Chapter 10
Exploring the Extras: Groups, Events, Watch, and Games
IN THIS CHAPTER
![]() Find Your Favorite Things on Facebook
Find Your Favorite Things on Facebook
![]() Join a Facebook Group
Join a Facebook Group
![]() Start a Facebook Group
Start a Facebook Group
![]() Communicate with Group Members
Communicate with Group Members
![]() Create an Event Invitation
Create an Event Invitation
![]() Review Upcoming Events and Birthdays
Review Upcoming Events and Birthdays
![]() Watch Facebook TV
Watch Facebook TV
If you thought your teen years were a busy time, just wait. Being a member of Facebook means that you’re about to have a whole new group of friends to combine with your old ones. Best of all? You’ll meet people who have interests just like yours. You’ll have the opportunity to attend chats and join groups — and you don’t even have to get out of your pajamas.
Is there something you really like? A series of books, films, or products? Look for a related page on Facebook; many businesses are joining up on Facebook. Even my local deli has a Facebook page. (I visit their page to check out the specials.)
And here are some other instances of Facebook member involvement:
- When Kashi products stopped manufacturing a popular (my favorite!) shake mix, unhappy customers started a Facebook group to protest!
- Someone came up with the idea that Betty White should host Saturday Night Live and started a Facebook group. They had a great idea. After spreading the word through wall posts and messages, over 500,000 people joined. The then eighty-eight-year-old Betty hosted the 2010 Mother’s Day show, and SNL had the highest ratings in over 18 months! All because of a Facebook group.
Other ways to enjoy community action are to join special interest groups. To many members, these are the best parts of Facebook. Be advised: Groups can burn a lot of time, but they are a lot of fun.
Find Your Favorite Things on Facebook
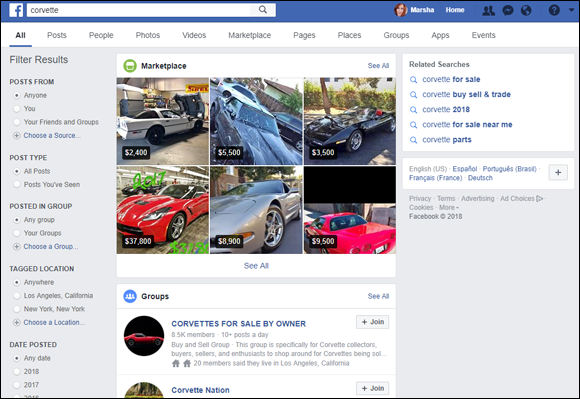
If you’re planning on navigating your way around Facebook, you’re going to be up close and personal with that little search box at the top of the page. To look at some of the magic it can perform, type a keyword (a word that best describes the topic you’re looking for) in that Search box. For this example, I’m looking for others who enjoy vintage cars (in this case, a Corvette); to find them, I typed Corvette.
Facebook finds all kinds of things with Corvette in the name and presents you with a busy page. The top bar and left column of the page (as Figure 10-1 shows) provides all kinds of options, and the top results are shown. If you want to check out any of the results at this point, just click the name, and you’re brought to that page.
- Facebook has many types of “pages,” and to confuse the issue even more, they all have different themes and are listed in the bar at the top of the search results. Here’s the short story:
- Pages: The most basic are pages set up for celebrities (or authors), organizations, or businesses to communicate with their fans or customers. This is different from a Facebook profile; you don’t make friends with a page, you use it to get information on the topic they’re related to. Mine is at
www.facebook.com/MarshaCollierFanPageif you’d like to visit or ask a question. Once you find a page you like, just click the Like button. - Groups: These are pages and communities that any Facebook user (even you) can set up and start. They’re put up to foster discussions about specific topics.
- Posts: Clicking to see Posts gives you recent Facebook posts that include your topic. These may be from friends or public posts from brands. It’s a good way to find new connections by clicking, reading, and liking the posts.
- Marketplace: This can be a dangerous link when you are searching for Corvette. Here you’ll find ads from people selling the object of your keyword.
Events: Facebook has become the default place to find fun get-togethers that are in your area or are of interest to you (more on events further on). I often use Facebook as a social calendar, to find places to go over the weekends.
 If you look at the Filter Results links on the left, there will be navigation links to further pare down your search.
- Pages: The most basic are pages set up for celebrities (or authors), organizations, or businesses to communicate with their fans or customers. This is different from a Facebook profile; you don’t make friends with a page, you use it to get information on the topic they’re related to. Mine is at
- Scroll down this page to also see a box that lists all pages that match your search (refer to Figure 10-1). Clicking there brings you to a list of Facebook pages related to your topic.
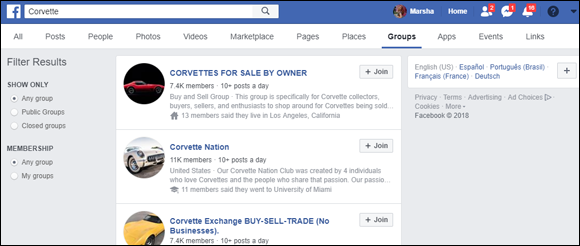
You’ll find also a link to Groups, as shown in Figure 10-2, where you can see the many groups and whether they are open to public viewing or closed.
Don’t jump willy-nilly into just any group or community that has a nice title and a cute picture. Click the title of a page and check it out before you choose to join; that way, you see what the page is really all about and who’s behind it and what their rules are, if any. (I clicked a couple in the example just given, and they weren’t my cup of tea at all.)My search for Corvette netted me way too many tantalizing pages to visit.
If you’d rather not confine your attention to the top results (but don’t want to trudge through thousands), add some more keywords in the search box. Typing another keyword can help you refine your search.
Join a Facebook Group
As a member of Facebook, you’ll no doubt want to connect with people who have common likes — and doing that through groups is quick and easy! Here’s how:
Find a group through search. To find a group you’re interested in, you can search for your keywords as I describe in the preceding section.
Click a group title that suits your fancy to check it out. If you think you’ve found one that you’d like to join, click the Join Group link on the group’s page. After looking at many pages, I could see one I liked enough that it was worth joining.
- Facebook groups come in three types:
- Public: Anyone who happens upon your group on Facebook or finds it in a search can join the group and read your posts.
Closed: The group name will appear in search results. When viewing the page, its members and people invited to join the group are visible, but only members can see posts in the group.
For Closed (private) groups, you must click the Join Group link on the Group page and await confirmation, which you’ll receive through Facebook messages. Some groups require an invitation to join. The only way you can join those groups is if a group administrator invites you and gives you access.Secret: A Secret Group won’t appear in search, and the only way people can join is if the administrator (or one of the members — if this option is set up) invites them. No one other than the members will even know that a Secret Group exists.
Your friends may add you to a group of which they are members (or have just started). You will receive a notification that shows up in the Notifications area (globe icon) in the top navigation bar, and the group may show up in a list after you click the word Groups in the link found on the left side of your home page. It’s up to you if you want to stay or go.
If you have a lot of friends who start groups, you will see a list of Pending Invites in the Groups area. You will have automatically become a member of these groups or pages just by your friends adding you. On that page, you do have the option to Join or Decline. (I just generally ignore them so that there are no hurt feelings.)
- Click the name of the group to get a better look at it. If, after you visit the page, you find the group isn’t something in which you’re interested in participating — no sweat. You can remove yourself quietly. So (say) you’re really not a morning person and don’t want to join your neighbor’s “Good Morning Coffee” group, you can always say you never saw the group. You can manually remove yourself, but there are other ways of ignoring it.
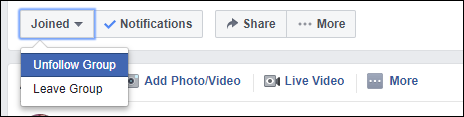
- Just click the word Joined to see the menu in Figure 10-3 and click Unfollow Group. You’ll still be a member but it won’t show up in your news feed or notifications.
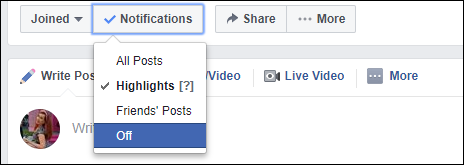
- Alternatively, click Notifications and from the drop-down menu, select Off as in Figure 10-4. This way, you can still see the page posts in your news feed, but won’t get notifications every time someone posts to the group or page.
- To really leave, click Leave Group (Figure 10-3) and a window pops up to confirm that you want to leave the group. The action of leaving a group prevents members from re-adding you. Should you wish to rejoin, you’ll have to visit the group page and click Join Group again. But, at this point, you’re sure you want to leave, click Leave Group.
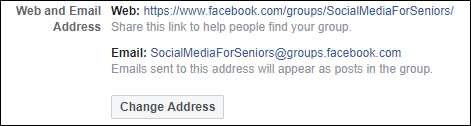
I started a group specifically for readers of this book. It’s a closed group so I will approve the members. Only members of this group can read or respond to the comments. The link to join is www.facebook.com/groups/SocialMediaForSeniors.
Start a Facebook Group
Groups can work as a substitute for mass emails you might otherwise send out to your family, friends, or any group you’re a member of in the real world.
Want to plan a family reunion? Perhaps you might be interested in starting a new group on Facebook based on your hobby? You can do it. Start by clicking the Groups link found in the navigation bar on the left side of your home page. (You may have to click the More link first.) You’ll be brought to your Groups page.
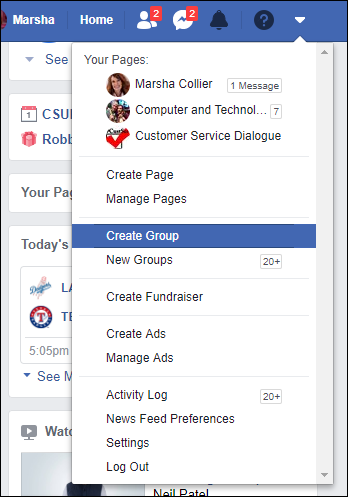
If you’d like, you can set up your Group so that you get an automatic email any time a member posts a comment or status update.- Click the Create Group after clicking on the grayed-out triangle (next to the question mark) in the navigation bar of your page (see Figure 10-5). The Create New Group pop-up window appears as shown in Figure 10-6.
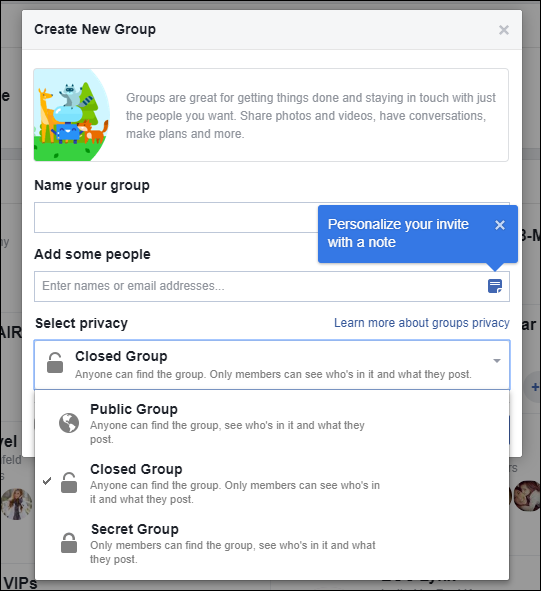
- Give your group a name by typing it in the Name Your Group text box.
- Add the initial members by typing their names in the Add Some People text box. A drop-down menu appears while you type, showing matching Facebook friends. After you see an entry with the correct person’s name and photo, click it, and that friend becomes part of your list in the People box. Continue to type in names until you’ve invited all the folks you want in the group. Facebook will suggest new members, based on your relationships with the members whose names you enter.
Click the drop-down menu and select the appropriate option (below the Select Privacy setting) you want for your group. There are three options, as described in the previous section.
You can change your privacy setting later on if you want — as long as the total membership of your group remains under 250.- Click the Create button at the bottom of the Create New Group pop-up window when you’re finished.
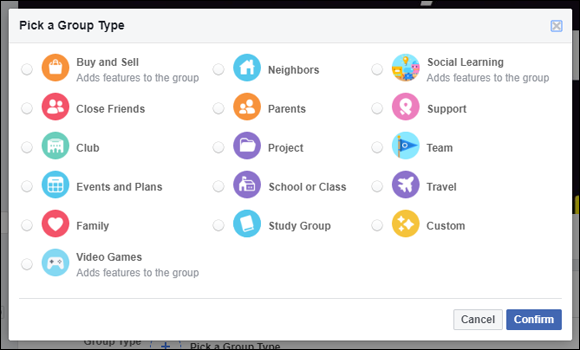
- A new window opens, asking you to select a Group Type from an assortment of fanciful icons, shown in Figure 10-7, to identify with your group (the default icon is boring, so pick something appropriate). This icon shows up next to the name of your group in search results. After you’ve selected your icon, click Confirm and your group will be live on Facebook.
You will be transported to your brand-spanking-new group home page on Facebook.
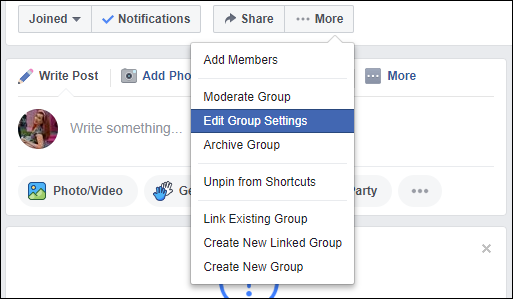
Be aware! Facebook has a very important rule about online group behavior: “Groups that attack a specific person or group of people (e.g. racist, sexist, or other hate groups) will not be tolerated. Creating such a group will result in the immediate termination of your Facebook account.”- You can edit your page and settings at any time by clicking the More box next to the word Share, shown in Figure 10-8, that appears (only to you) on the sections of your group page.
Communicate with Group Members
When you set up a group on Facebook, you’re usually the group administrator (admin, for short) by default. Everyone else in the group constitutes its members; they can post to the wall and share with the group as well. As the group administrator, you can adjust the privacy settings, edit information, and add a group profile photo. It’s just like setting up your own Facebook page. Think of your group page as much the same as your regular Profile page; it’s not any different, with the following exceptions:
- If you’re the admin of your group (the Big Kahuna, the person who created the group and runs it), you decide who can join the group, and can ban or remove any member who does not play well with others.
- A very handy feature of groups is that you can share files with other members of the group. You can upload files from your computer, or from those hosted on
Dropbox.com, the file storage and sharing site. If you make changes to a file, all group members get an update.
Below the group photo is an area of links where Facebook allows you unique controls. Only admins can see these options:
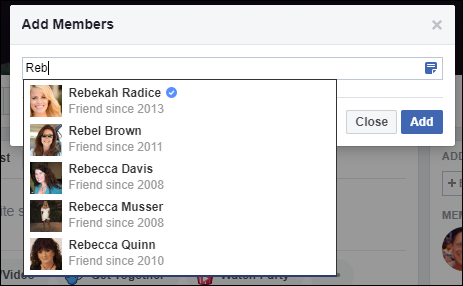
- Add Members. This opens a box where you can type in a Facebook member’s name and add the person to your group’s member roster, as shown in Figure 10-9.
- Create Event. Want to have a meeting? A party? Admins only can click here and go to the Create an Event page. Figure 10-10 shows you how this procedure differs from a regular Facebook event invitation. You have two options. You can invite all members of the group or just select ones.
- Email the group. A great feature of groups is that the group has its own email address to send communications to post on the page.
- Edit Group Settings. This takes you to an Administration page where you decide about privacy settings, page setup, and general information. In this area, you may also set up a group email address (as shown in Figure 10-11). Perhaps some group members rarely visit the Facebook site. By setting up a group exclusive email address, members can send posts via email to appear on the wall.

Create an Event Invitation
- Are you planning a party? Facebook is a good way to send out invitations. Any Facebook member can create an event and invite all their friends; you don’t need to have a group. Start by going to your Facebook home page and clicking the Events tab found in the toolbar on the left side of the screen. On the left side of your Events page (as shown in Figure 10-12), you’ll see the Create Event button.
- Clicking the Create Event button opens a pop-up window to create either a Private or Public Event. Click the appropriate box, fill out the when, what, and where of the event, and decide whether you want to allow guests to invite other guests or to make the guest list visible to all invitees. Check your work, and click the Create Event button.
- On the new Event page, click Invite Friends to prepare your guest list from your Facebook friends list by placing a check in the circle next to your friend’s name and photo. When you’re through selecting folks, click Send Invites.
- After clicking Create, you will be brought to the Event page where you can upload a cover photo to doll up the page. Your event, if Public, will appear on Facebook, and invitations will be sent to the friends you selected.

As the event administrator, you can adjust the event’s privacy settings, invite more people, edit the guest list, cancel the event, edit the event, and send messages to your guests.
Review Upcoming Events and Birthdays
To review your upcoming events, click the Events link in the links on the left side of your home page. You’re taken to your Events page, where you can view all your upcoming events.
You’ll also see events that are recommended to you either by friends or ones in which Facebook thinks you are interested in your neighborhood. You have the chance to respond to the event right there. I always recommend that you take a moment and click the title of the event so you can find out exactly what’s planned and where the event is. If you know all those details and are in a hurry, you can click the Interested button below the event and review it later. Under the word Events at the top of the page, you can select to view the upcoming events in a list or in a calendar format.
- Click to view in Calendar mode and everything will be in chronological order. You’ll also see your friend’s upcoming birthdays so you can post a “Happy Birthday” message to their pages.
- The best-laid plans often change, and you can also change your mind at any time (assuming it’s okay with the host). Change your RSVP on the Event page by clicking your RSVP and selecting Not Going from the drop-down menu.
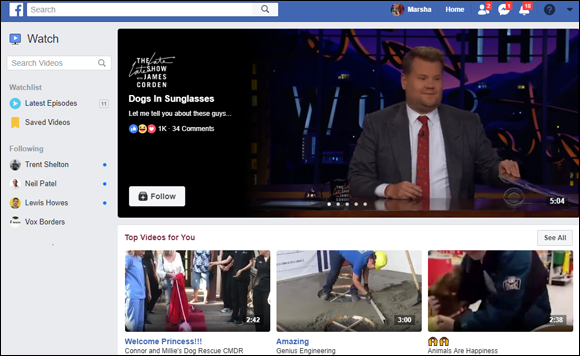
Watch Facebook TV
Facebook recently started encouraging people to upload home-produced videos. There are professional ones on the site too, ones from major studios and news outlets. To find them, from your home feed page, click Watch in the left-hand links and the page shown in Figure 10-13 appears. You can search for topics, or see the latest episodes. Fair warning, its addicting!