Chapter 9
Adding Photos and Videos to Facebook
IN THIS CHAPTER
![]() Upload a Photo to Your Account
Upload a Photo to Your Account
![]() Create a Photo Album
Create a Photo Album
![]() Tag Photos
Tag Photos
![]() Untag Yourself in a Photo
Untag Yourself in a Photo
![]() Delete a Photo
Delete a Photo
![]() Upload a Video to Facebook
Upload a Video to Facebook
![]() Broadcast Live Video on Facebook
Broadcast Live Video on Facebook
Since Facebook is all about sharing, it’s up to you to share! Putting up photos of you, your friends, and your family (that includes pets) is fun — and it gives your Facebook friends a chance to interact with you.
I figure you’ve uploaded a picture for your profile image already, but what I’m talking about in this chapter is setting up online photo albums.
So let’s get started!
Upload a Photo to Your Account
- As with most Facebook tasks, you have more than one way to post a photo. Start by signing in to your Facebook account if you’re not already signed in.
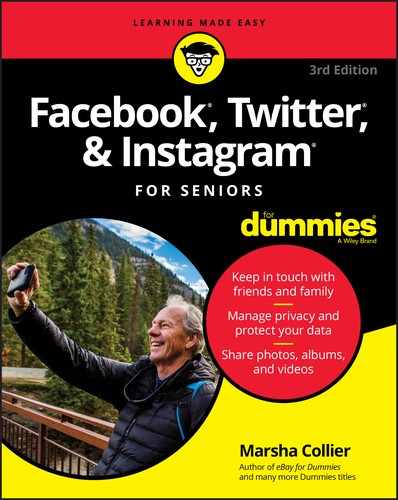
- If you took the photo with your phone or tablet, open the Facebook app and tap the What’s On Your Mind text box at the top of the page to create a post. Tap the words Photo/Video shown in Figure 9-1. (Your Photo gallery appears, from which you can select an image to post.) Once you select the photo, you will be brought back to a Status Update text box.
- If you’re at your computer, an easy choice is to post the image directly to your Home feed or Timeline page. Click your name in the upper right corner and you’ll arrive on your timeline.
- A status-update box appears on the top of your Home (News Feed) page where you can also upload pictures.
- Type a message about the photo in the Wall posting box that says What’s on your mind?
- Below your message, find the icon for uploading a photo (it looks like a little photo of a landscape) with the words Photo/Video, as I show from a computer in Figure 9-2. Clicking the text area changes the status box.
- The new view gives you lots of choices: Upload Photo/Video from your computer or create Photo/Video Album out of many photos (shown in Figure 9-3). Here’s how those choices work:
To use a single photo already on your computer, click the Photo/Video bar. Your window changes to enable you to select a photo from your computer’s hard drive. From the dialog box that opens, you can look for a photo on your computer’s hard drive. Find the photo you want to upload and double-click it to select it. Click Open. The photo opens and uploads while the dialog box closes, and you see a thumbnail version of your photo in the text box. To post the photo, type a description and click Post.
 Before clicking Post when you’re uploading photos to Facebook, you may want to change your default privacy settings. Figure 9-4 shows the options that appear when you click the arrow in the box next to the Post button. Click the appropriate privacy option, and then click Post.
- To upload multiple photos, click an image in the dialog box and hold down your Ctrl (Control) key on a Windows PC or the Command key (⌘ ) on an Apple machine. While holding down the key, click additional photos. You will see them line up in the File Name bar, as shown in Figure 9-5. When you are done, click Open to upload them to Facebook. After selecting your privacy setting (I allow everyone to see), click Share.
- If you’re ready to work with a batch of photos on Facebook, click Create an Album and the multiple photos you upload will all be placed in a single album.


Create a Photo Album
- You may have uploaded photos from your mobile device and later some from your computer and you’d like them all to appear in a single photo album. Facebook has many ways to get to the page where you can edit photo albums. Here are the two easiest:
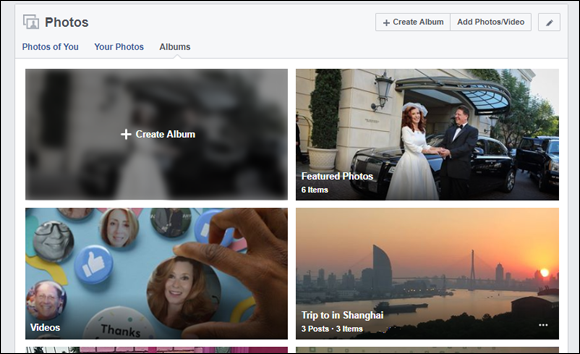
- Click the word Photos below your cover photo on your Timeline page. The resulting page, shown in Figure 9-6, brings you to all the photos of you that are posted on Facebook.
- Select the Albums link above the photos on your Timeline page. At the top right, click the + Create Album link.
- In either case, a window opens, showing you the contents of your computer. You can navigate around your computer by clicking the folders to find where your photos reside.
After you find the proper folder, you can begin selecting photos for your album. If you want to select just a few, click the check boxes for individual thumbnails, one at a time, to select them for upload.
You do not have to select all the photos just now; you can go back to the album and add them one by one by clicking Add More Photos.- After you’ve finished picking the images, click Open. This brings you back to the Untitled Album page (see Figure 9-7).
- On the Untitled Album page, give your album a title, add comments about the album, and type the location where the photos were taken in the Location box. Also, choose to Use date from photos or manually add the date.
- Below each photo, if you want, type a description in the text box and tag friends who appear in the photos (more on tagging later). You may also set an individual privacy setting for a photo which will override the default setting.
- Before clicking Post, you may select a general default privacy setting (for who can see the album) for the entire album.
- You can edit the album by going to your timeline and clicking the Photos box, then Albums. Scroll down the page and you’ll see your album (or albums), as in Figure 9-8.
- Click the album you want to edit and you’ll be brought to a page with thumbnail versions of your pictures. Click Edit in the upper right corner. Figure 9-9 shows you the Edit Album page. Go through the photos, tag the pictures, write captions, and delete any photos you’d rather not use. When you’re done, go to the top of the page and click Done.
- Your photos will now show up on your Timeline page; if you’ve tagged friends in the photos, those pictures appear on your friends’ Timeline pages.


Tag Photos
No matter where you find photos of you or one of your friends on Facebook, you can tag them. Tagging is the Facebook phrase for adding the names of friends to photo information. Tagging a friend makes his or her name appear when someone puts a mouse pointer over the tagged friend’s image. Tagging also links the photo to the appropriate profile. Whenever friends are tagged in a photo, that photo appears on their individual walls and becomes a permanent part of their Photos areas.
When you or anyone on Facebook is tagged, the tagee receives a notification letting him or her know of this newfound fame. Then the tagee can get online and look at the picture. If they have Privacy set up in their Timeline Settings (see Chapter 7), they can approve for the photo to appear on Facebook.- When you see a photo of you or one of your friends on Facebook, click it and you arrive at the photo’s page. If no one has been tagged in the picture, no linkable names will appear beside it.
- On the right, next to the photo, click the Tag Photo box, shown in Figure 9-10. After you’ve clicked this box, tag your friend and when you’re done, click the Done Tagging box on the right.
Move your cursor, and click it on the face of one of your friends. A box will appear for you to type in the person’s name.
Try not to freak out if, when you click someone’s face, Facebook says, “Would you like to tag” — and has already filled in the person’s name. According to a recent paper, Facebook’s DeepFace technology can accurately recognize faces 97.25 percent of the time. Google also uses a similar intelligence; Figure 9-11 shows you what this looks like. Unfortunately, this is part of the 2.75 percent or my husband has turned off Facial Recognition in his settings (more on Privacy settings in Chapter 7).- Start typing your friend’s name (or your name if the photo is of you), and a list of your friends pops up. Facebook narrows the selection as you type. I’ve found my friend’s name in Figure 9-12.
- When you’ve found the person in the photo, click his or her name; then — bingo! The name of the person you tagged becomes part of the photo — and the photo is posted to your tagged friend’s Timeline page.
If you have more than one friend in the picture, repeat Steps 1–6 given here until you’ve tagged everyone. When you’ve tagged all the friends in the picture, click the Done Tagging button to the right of the picture.
You must be friends with someone on Facebook to tag him or her in a photo. If you see a photo with a person you know — but aren’t Facebook friends with him or her (yet) — send that person a Friend invitation. After your friend accepts, you can add a tag to the photo.- As people view the photo, they’ll see the tagged names. If they move their mouse pointers over the picture, the person’s name pops up (as in Figure 9-13).


Untag Yourself in a Photo
- You may get a notification that one of your friends has tagged you in a photo on Facebook. Excited, you log on to your Timeline page … and groan. Have no fear. If you find a photo that a friend has taken of you that doesn’t quite meet your standards, you can do something about it. Click the photo, and Facebook takes you to the photo’s page. At the right corner above the photo, (as in Figure 9-14), is three dots. Click them to see a drop-down menu of options.
- You now have all sorts of options for this photo. The Remove Tag link appears. When you click it, Facebook will ask whether you want to Remove or Report the tag. Click Remove and the photo goes into the Facebook ether and will never be associated with your profile again. The photo does remain in your friend’s album, but someone would have to view the album to see that picture of you. Once you’ve untagged yourself in a photo, no one but you can tag you in that particular photo again.

Delete a Photo
If you upload a photo by mistake — or simply decide you’d rather remove that photo-taken-with-your-ex — you can remove it. You can delete only the photos that you, personally, have uploaded. Facebook has to have a reason to remove photos others have posted of you.
If you want to dissociate yourself from a photo that someone else uploaded, you’ll have to settle for untagging yourself (see the previous task in this chapter).- Mouse over the upper right corner of the photo and click the three dots. Click Delete as shown in Figure 9-15, and (poof) the photo is gone from your Facebook page.
- If the photo wasn’t posted by you, click the three dots. Then select Give Feedback on This Post. You will then see a box like the one in Figure 9-16. Use it to tell Facebook why you want the photo removed from the page. Personally, I find it easier just to remove my tag and move along.


Upload a Video to Facebook
- This isn’t rocket science. If you’ve uploaded a photo, you can upload a video. Go to your Timeline page and click the Photo/Video icon in the status-update box; you’re given the option to upload a video.
- You can also click Photos under your cover photo. Posted photos of you appear on the resulting page. When you’re through admiring them, look at the top right, and next to the + Create Album button, you should see an Add Video button.
- Click the button, and a window will pop up, offering a button you can use to choose a video file to upload from your computer. This link works similarly to Upload a Photo. When you click it, a standard search window opens on your computer.
- Browse your computer’s folders, find the video file you want to upload, and click to select it — be sure to select your Privacy Options. The upload begins immediately.
- After the upload finishes, the video will be on your Facebook page, ready for you to tag and caption.
Broadcast Live Video on Facebook
Lots of marketers post live video on Facebook with the goal of selling something. Regular folks like us would broadcast live on video if we wanted to share a special event or a news story. You can even give a tour of your garden to your friends or in a group. This can be accomplished in front of your webcam, but I feel this is much more of a mobile-device activity.
- Way back in Figure 9-1 I show you what your phone looks like when you start a post. Only this time, click on the words Go Live.
- Things start to happen quickly now, so I recommend not clicking Go Live until you’re ready to … go live. The first time you want to live broadcast, Facebook asks your permission to access your camera and microphone. Figure 9-17 shows you what it looks like. After that, Facebook asks your permission to record.
- Once you’ve given Facebook access (you can always remove this access in your smartphone’s app settings), the camera allows you to start filming.
- First, set the privacy of the video broadcast. Note that in Figure 9-18, I’ve set it to Only me (I’m not quite ready to broadcast a tour of my garden to everyone or even to just my Facebook friends; I do draw a line). You can click there for a drop-down menu that lists Facebook’s standard audiences.
- Type a short description for your video so that people will want to watch it.
- Tag friends who will be in the video with you, also a location if that’s important (like for a tour of your local botanical gardens).
Line up your camera and select the selfie mode if you’re going to be broadcasting yourself. If not, your regular camera takes over.
On Facebook, your video will appear square, so it doesn’t matter if you hold your phone vertically or horizontally. If you’re including images of written words, you might want to click the magic wand icon to mirror or flip your video.- When you’re all ready, click the Go Live box. You know when your video is live because a red icon appears at the top left corner next to the word LIVE.
- While you are broadcasting, you will see when your friends are watching. You can speak directly to them to engage your audience. They can comment or give you likes, hearts, and laughs.
- Click Finish when you’re done and you will be prompted to post it to your page for eternity (or until you delete it). You will see the broadcast on your page (and those you have selected in the Privacy settings can see it too). Also, tap the Download button so that you can save a copy of your broadcast on your phone.
- As with all posts, photos, and videos on Facebook, you can edit the description, change the audience, or delete it altogether at any time.


Just remember, some things can’t be unseen — even if you delete them. Someone could take a screenshot of an embarrassing photo before you have a chance to delete it.