Chapter 7
Preparing to Share Info
IN THIS CHAPTER
![]() Get Your Privacy Settings in Place
Get Your Privacy Settings in Place
![]() Meet Your Facebook Home Page
Meet Your Facebook Home Page
![]() Review Your Timeline Page
Review Your Timeline Page
![]() Update Your Status
Update Your Status
![]() Delete a Status Update or Other Post
Delete a Status Update or Other Post
![]() Add a Photo to Your Timeline
Add a Photo to Your Timeline
![]() Add Life Events to Your Timeline
Add Life Events to Your Timeline
![]() Share a YouTube Video on Facebook
Share a YouTube Video on Facebook
On Facebook, there are three basic levels of privacy: Friends, Friends of Friends, and Public (anyone who happens upon your page). You hold the key to how much, or how little, information about yourself you allow others to access on the site. The personal information you choose to share is apart from the publicly available information — such as your name, profile picture, current city, gender, networks, friend list, and pages — that helps friends find and connect with you.
On Facebook, your privacy and security settings work as locks that control access to what’s revealed about you, and to whom. In this chapter, I show you how to access and edit your privacy and security settings at any time. The idea behind these settings is to give you control of your Facebook experience.
Use these settings so you don’t have to worry about your personal information falling into the wrong hands — or having prying eyes access something about you that (for whatever reason) you don’t want just anybody to know. You are in charge — and can filter who views your information to increase your feelings of security and privacy online. The trick is finding all the controls. Then, with your information secure, you can move on to the fun stuff!
 You can set the privacy of your status updates, photos, and information as you post them, by using the privacy selector on the fly, I recommend you never share anything that you wouldn’t want published in your local newspaper. Even if you delete a post, some people may still have seen it. Use your good judgment to protect yourself online. Facebook sets the default for posts to be viewable by Friends only.
This chapter also shows you how to make the most of your Facebook pages by posting updates and photos, and by getting into the conversation. I’ll get the tough stuff out of the way first.
Get Your Privacy Settings in Place
To start the process of checking your privacy and security settings, look at the top right of the screen on any Facebook page and on the navigation bar (Chapter 8 tells you more about using this area), locate the word Home. Depending on your activity on Facebook, the area will be populated much as mine is in Figure 7-1, or you may just see some grayed-out (or blued-out) text. Bear with me here.
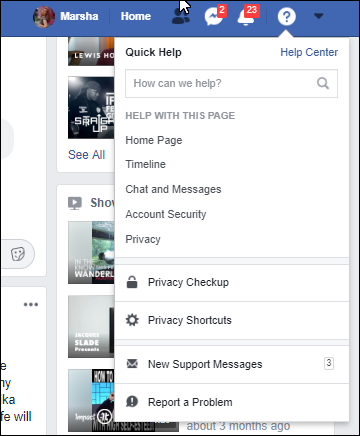
Should Facebook change their navigation, don’t fret. The advice that follows will still be valid. If you can’t find the “official” settings page (which links to settings mentioned in this chapter), type www.facebook.com/settingsin your browser and you’ll be all set! I recommend that you perform the tasks in this section in a web browser, preferably on a computer. The options in the mobile app are far less intuitive (to be kind). Things are laid out more clearly on the web platform. I know this all will be somewhat daunting. Facebook is a valuable resource, and I believe that going through all these settings will help you keep your information and data private.So, if you move your mouse to the far right, the cursor (arrow) will turn into a pointing finger. If you squint really hard you may (or may not) see a downward-pointing triangle on the far right, and a question mark to the left of it. When you click the question mark, a drop-down menu appears, providing access to your Account Security (questions on privacy), Privacy Checkup, and Privacy Shortcuts. The Privacy Shortcuts link (in Figure 7-1) is a list of Facebook’s suggestions that point to an area where you can adjust your settings.
Next to the question mark on the navigation menu, click the grayed-out triangle and you’ll see a menu with the word Settings, which work in concert with the Privacy Shortcuts on the other menu. This brings you to the main Settings page (shown in Figure 7-2), which gives you many more options.
The Privacy Settings enable you to control who can see your profile information, contact you, or look you up on Facebook. This page is set for Facebook’s default options; you have to take action and change them if you want to tighten up your privacy. There is nothing to be afraid of.
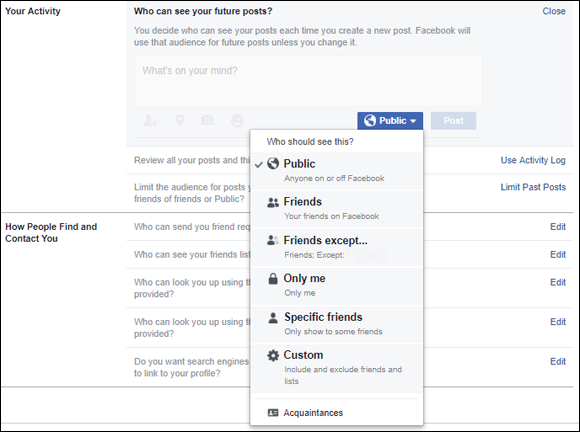
- Click the word Edit to make any changes throughout the Settings area. For example, under Privacy, Who can see your future posts? sets the default for everything you post on Facebook. If you want a specific post to reach a wider (or smaller) audience, you can use the individual controls on each post. When you click Edit in this section, a screen appears (as in Figure 7-3). In addition to Public, Friends (those with whom you’ve connected on Facebook), and Only Me (pretty self-explanatory) in the audience selector drop-down, you now see some additional options.
Friends except: When you’re currently in a feud with your next-door neighbor or a friend at work, you can select their names here and exclude them from seeing your post.
When you told your friends you were babysitting but you’re out to dinner with other friends, don’t post the picture of the group of you in a restaurant. Excluding people from seeing your post in their stream doesn’t mean it won’t exist. Anyone who sees the post can take a screenshot and innocently post it with a comment for all to see. Heed my words, things can backfire. Don’t overshare and you won’t need to monkey around with tons of settings.- Specific friends: Clicking this option (whether here or when you are posting updates, photos, videos, or Going Live) produces a searchable list of your friends. Click the dot next to each person’s name that you want to see the post and they will be able to view it. Again, if you really don’t want others to see it, think twice before posting.
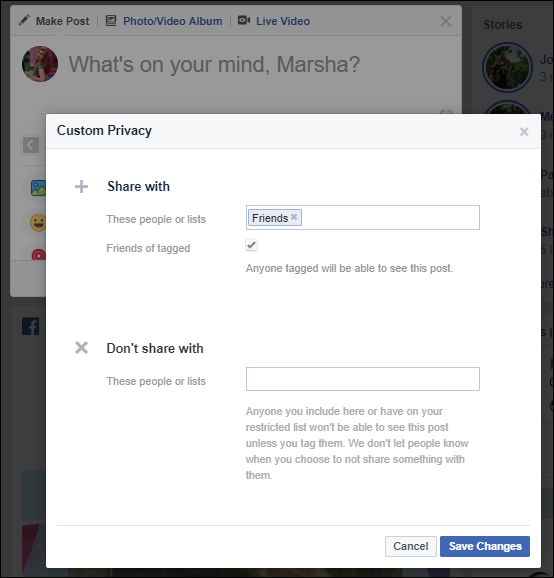
- Custom: This is an advanced privacy setting; Figure 7-4 shows an example of Custom Privacy options. You may select individual groups, lists, or, if your default is to be Friends, you can also include anyone who is mentioned (or whose photo is tagged) in the post — and their friends.
Acquaintances: Acquaintances is one of the lists you can put together on Facebook (which I cover in Chapter 8). Acquaintances are folks you don’t feel the need to be in close touch with; if you put them on this list, their posts will rarely show up in your news feed. If you select this option, your listed acquaintances will no longer see your posts. Also, they also won’t be notified that you’ve designated them as “acquaintances.”
Tightening up your Facebook feed by too much can suck the enjoyment out of Facebook. Consider customizing specific posts as you post them; it will make your time spent on Facebook a lot more enjoyable. This is all supposed to be fun.You can also edit who looks you up on Facebook (and how). This privacy setting controls who can see your name or profile information as search results on Facebook. This setting also indicates whether you allow search engines such as Google to access your publicly available information. Further on, I show you how to see a Public Preview of your timeline.
- Click the left-side onscreen navigation, shown in Figure 7-2, to visit the different areas of the settings. Here’s a little more about some of the sections you find here:
Security and Login: Facebook sets your Security options appropriately; go and take a look at them and edit, if necessary. This is where you can lock down your account with Two-Factor Authentication, which I describe in Chapter 3. Under Setting Up Extra Security, a couple of little-known — but very valuable — features appear.
One is Get alerts on unrecognized logins. Should someone log in to your account from a device or browser that isn’t identified with your account, Facebook will send you a notification.
The other is Trusted Contacts. If you ever forget your password, or can’t access your email account due to some sort of computer disaster, special one-time security codes can be sent to your trusted contacts. You can call those contacts to get this code so you can access Facebook again. You must select a minimum of three close (and trusted) friends.
Timeline and Tagging: Part of the fun of Facebook is that other members can post comments, pictures, and video. If another member tags you in a posted item, it will also appear on your wall. Here’s the area where you decide who can post (and comment) on your wall and who can view photos of you.
In the Review area, you can indicate that nothing should be posted to your page until you’ve seen it and approved it in your Timeline Review. This way, when your niece snaps an absolutely dreadful photo of you, it won’t be smack dab on your timeline for all to see (stay tuned; later on I show you how to work with your Timeline Reviews to prevent posts from appearing on your page (as well as removing the tag if you must).
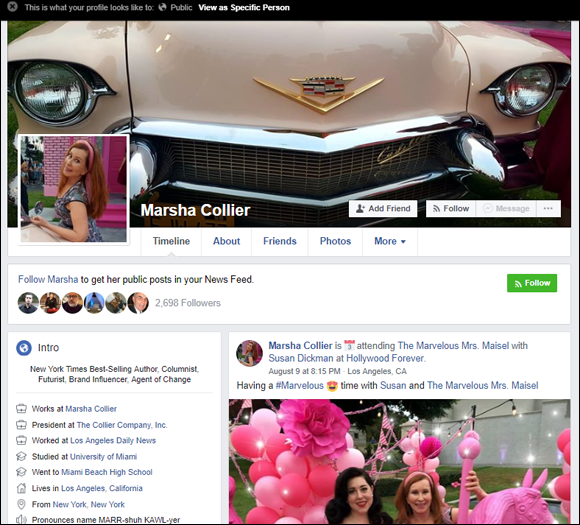
Also in Review, click the View As link next to Review what other people see on your timeline, and your public profile will appear as mine does in Figure 7-5. Use this link to view what your results might look like when someone finds you in the results from a search engine.
- Ads: An important place to visit. There are several sections on this page. Be sure to visit them all.
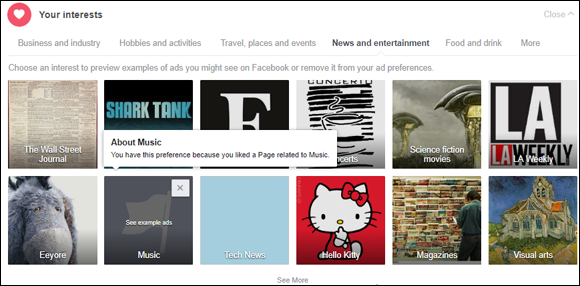
- Your Interests: If you’ve been on Facebook for a while, you might enjoy clicking here. This is what Facebook thinks you are interested in based on its observations of the stories you read, posts you comment on, and things you’ve liked on the site. You might find these uncannily accurate and a bit creepy. You are able to delete topics that you’re not interested in, and that should adjust Facebook’s algorithm. There are several categories here, so click each topic above the picture tiles as shown in Figure 7-6 and click the X in the upper right corner of any tile you want to remove.
- Advertisers you’ve interacted with: When you click on ads on Facebook, advertisers (further down on the page) add you to their target list. Feel free to remove any company you’re not interested in here in the same way you removed the Interest tiles in Figure 7-6. Again, click across and click on the other categories. If you follow my instructions further on, you will have nothing in the other categories, because I’m going to be showing you how to opt-out of this data collection.
- Your Information: Here is where you can opt-out for some personalized advertising. This means if you indicate you don’t want your marital status used as an advertising identifier, Facebook may show you ads that are meant for single or married people.
- Ad Settings: Here you will find three very important settings. These are the settings that protect your name from being used in advertising from advertisers off of the Facebook platform. By denying these permissions, you deny Facebook the right to use information they get from your actions on the site and elsewhere. I have set these all on my account to “Not Allowed” and “No One.” Click each heading to read the explanation of how the data is used or shared if you want, or just save time and deny permission.
Face Recognition: Here’s where you need to make your own decision. I am not a fan of facial recognition, but I am keenly aware that it occurs everywhere we go. I know I’ve been scanned at airports and in banks. There is current debate as to whether this practice is an invasion of privacy or a benefit to society.
I can tell you how it might be a benefit on Facebook. On the Internet there are bad actors who take other people’s photos (from Facebook posts, blogs, Google, or websites) and use them as their own. They may use them in profiles to put up a false persona or for other nefarious ends.
If you allow Facebook’s Face Recognition on your photos, you will be notified in your Timeline Review when you appear in photos or videos but haven’t been tagged. This gives you the opportunity to report any misuse of photos. No one is permitted to impersonate you on the platform. Also, when someone posts a photo of you, the Face Recognition option will suggest your name for tagging.
Many iPhone users I know are comfortable with unlocking their phones with their face, but some aren’t. Whether the benefits of this technology outweigh the perceived risk is up to you.
To turn Face Recognition on or off on a smartphone, open the Facebook App. Tap the hamburger menu (three parallel horizontal lines) on the screen and tap Settings and Privacy ⇒ Settings ⇒ Face Recognition.Apps and Websites: In this section, you put controls on what Facebook apps, advertisers, and the websites on which you’ve used Facebook login can share about you when you’re using these applications and websites. You can also block certain applications from accessing your information and contacting you; such applications include games, causes, and surveys. If you simply don’t want to be bothered, be careful which games and application invites you get from friends.
When you visit a website, you might think it easier to sign in with your Facebook account versus typing in your email address and a password. You’re right … but when you use Facebook login on another site, you may be opening access to your data and lists of Facebook friends to that website. Consider this next time you’re looking for a shortcut.Notifications: If you’d like Facebook to notify you when people mention you or when close friends post, you can edit these settings here. Be sure to click Edit so you can actually see which notifications Facebook wants to send you. Some are worthwhile and others, not so much. If you leave this control unchecked, your mobile device will buzz all day.
An important Notification setting lies in the On Facebook section. Once you go down the list of the many options, be sure to click Edit on the Tags line. This will enable you to be notified every time someone tags you in a picture or a post. I recommend changing this to Anyone because you never know when someone may mention your name or mistag you in a picture. This way you can swiftly handle these tags in your Timeline Review discussed further on.
Blocking: Click the Edit Your Lists link under Blocking. If there are some folks you’d really rather not interact with on Facebook, this setting allows you to block them from access. Simply type in each name and/or email address that you want to block, and then click the Block button. Once you’ve blocked someone, that person can no longer see any of your Facebook activity. You can also block apps that you may have used in the past that still have access to your Facebook data.
Using the Restricted List (in the same section) may be a more palatable way to handle your privacy. Rather than blocking a person, you might Restrict them. By restricting someone’s view, they will not see any Facebook post that you share only with friends.

Meet Your Facebook Home Page
- You have two main pages on Facebook: Home (also called your News Feed) and your Timeline. You can select the one you want to view by clicking either Home or your name (for your timeline) in the navigation bar atop any Facebook page. Clicking Home brings you to your news feed. Your home page has links for just about anything you want to do or see on Facebook. In the center of the page is a column for News Feeds, featuring your friends’ updates.
- The left side of this page has clickable navigation links that take you to important areas of Facebook that relate to your account. These areas include the Pages you create, Groups you join, and Lists you curate, as well as your Apps and Interests. Be sure to click the See More … link if it appears.
By default, the news feed in the center of the page shows the updates your friends have posted that are getting the most attention with replies. There is some mystery algorithm that decides which posts you see. So you may click the down arrow next to News Feed at the top left of your navigation links — Most Recent posts — if you’d like to see each post from each of your friends, in the order of posting. Figure 7-7 shows how it’s done.
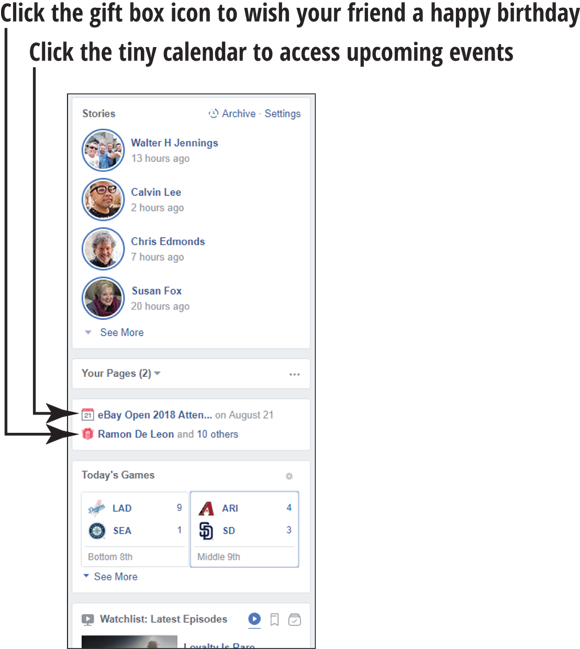
Aside from my family, whose posts I request to See First (more on that later), I visit my friends’ pages by typing their names into the search bar regularly. This way I can see what they’ve been up to, even if Facebook hasn’t deemed their posts necessary for me to see.- On the right side of this page, scroll down to watch a live ticker of your friends’ Stories on Facebook. There are also links to see sports scores and to Watch Latest Episodes and Facebook Watch. These videos are custom created content for Facebook members’ entertainment. Click on See All for the latest offerings. Just below this stream, you see some important sections to pay attention to (see Figure 7-8):
- Birthdays: Represented by a tiny gift box icon, the Birthdays link shows which of your friends has a birthday today. By clicking the link, you can see the names and be able to post a Happy Birthday wish that shows up directly on their pages. (Also note that you can access your friends’ birthdays by clicking the Events link on the left side of the Feed page.)
Events: Click the tiny calendar and you see links to upcoming events (in chronological order) that you’ve been invited to, that your friends may be interested in, or that are going on in your community. Just click the appropriate link on the left side of the page, shown in Figure 7-9.
You can check out the event by clicking on the page link. If you want, you can respond Interested, Going, Maybe, or Can’t Go.
- Chat: At the very bottom on the right side of the screen is a box marked Chat. Clicking here opens a box that enables you to text with your online Facebook friends or to place a video call. The side chat bar on the desktop can be a bit distracting, so if I want to make video calls, I use the Facebook Messenger app. (Chapter 8 explains how this works.)


Review Your Timeline Page
Click your name at the top navigation bar on any Facebook page, and you arrive on your Timeline (the page showing your public profile). Your Facebook timeline is designed to chronicle your travels and activities. It can show how you categorize your life and times and digitally document your entire life, should you wish. The page, as you see it, is your personal view. Click the View As bar at the bottom of your cover photo to see the way it looks to your friends when they visit your page. Notice that there are links just below your name. These are just the start; by clicking the word More, you make many other options appear that tie into your timeline.
Figure 7-10 shows you my page, populated with all the links (my view). This looks closer to what your page will look like after you’ve been on Facebook for a while.
In Figure 7-10, you see a large photo at the top. This is your cover image (think of it as a kind of album cover). Your cover photo is the first thing that people see when they come to your Facebook page. Your Profile photo appears in the lower left side, inset into the cover. You can use a personal photo that expresses your mood at the time. Click the small camera that appears grayed out until you mouse over it in the upper left-hand corner of your page.
After you have stored photos on Facebook (see Chapter 9), you can change your cover to any of these other photos as well as upload a new one at any time.You will be prompted to upload a photo, and a window on your computer pops up. Go to the folder that holds your pictures, select one, click Upload, and the photo appears on your page.
The photo appears as 851 pixels wide by 315 deep — but I wouldn’t be too concerned about the exact size; just stick to horizontal format pictures. Facebook enlarges your photo to fit the space if it’s too small. But the photo has to be at least 720 pixels wide, or Facebook asks you to select a different one. If your image is larger than 315 pixels in height, you have the option to reposition your image.- Once you upload an image, you’ll see the words Reposition. To center your photo vertically, mouse over (hover your mouse pointer in) that area; the cursor turns into a hand icon that you can use to drag the image up or down until you feel it’s centered just the way you want it.
- Click the Save Changes button, and your image appears at the top of your Facebook timeline.
- Small box links appear in the lower right side of your cover photo. These help you manage your page.
- View As: This switches your view from managing your page to Public viewing mode.
- Edit Profile: Here you can make additions and/or deletions to your profile information.
- Activity Log: Clicking here brings you to a page that has a link to your activity on Facebook and a link to your official Timeline Review. This is where you can see when you’ve been tagged in photos. You can decide whether tagged photos will appear on your page. Even if you don’t want these posts to appear on your page, you can Like or comment on the posts right here.
- Three horizontal dots: This box takes you to your Timeline Settings page.
- The tabs that appear below your cover photo are
- Timeline: Clicking here allows you to choose to view your page’s timeline photos in a grid or a list format.
- About: Clicking here brings you to the page that offers a bio and contact information. You can edit this at any time here, too.
- Photos: Here’s where you see photos of you that you’ve posted, and images of you that other people have posted. Photos magically appear here when a friend tags you in a picture. (Check out Chapter 9 for the how-to information on adding photos and tagging friends.) Click here to go to a page with all your photos and albums.
- Friends: As you accumulate friends on Facebook, small versions of their profile pictures appear here. When you click the box, a page with clickable links and pictures of all your friends will appear.
More: Clicking More produces a drop-down menu listing every section of your profile and connected apps. For example, Check-Ins represents places where you’ve checked in on Facebook and posted photos or events.
If you click Manage Sections at the bottom of the section list, you can indicate whether to show more or fewer sections — and change the order in which they appear.

Update Your Status
Here’s where the fun really begins. In the long, thin rectangle that appears at the top of either of your Facebook pages, type in your status — some words about what’s going on with you at the moment. Inside the status update box, you see the question What’s on your mind? To answer the question — called posting — click inside the box and type any message you want.
Most people use the update feature to let other people know what they’re doing at that given moment — often you see quick notes such as “Baking a cake for my in-laws” or “Going to work out on the treadmill.” If you’re on your smartphone, you also have the option to Check In to a special place you’re visiting (see a web example in Figure 7-11).- You can attach videos, photos, live video, or links to interesting pages on the web. If you’re posting your update from your Profile page, you can select color backgrounds, stickers, add animated GIFs, support non-profits, and more by moving the right slider shown in Figure 7-11 up and down. Click the icon representing the item, should you want to attach something to your comment. To attach a website link to a status update:
- Type your status update into the text box.
- Navigate in another browser tab to the website you want to share and select its URL by highlighting it in your browser’s address bar. Then copy it by pressing Ctrl+C on your keyboard.
- Paste the URL below your comments by clicking and then pressing Ctrl+V on your keyboard. A mini-version of your linked page will appear below the comment (see Figure 7-12).
- After the thumbnail of your link appears in the update box, you can delete the URL. The thumbnail contains the clickable link to the article or page.
- When you’re done typing the message (and attaching a photo, video, or link), check the Privacy selector at the bottom (click the small globe icon) to be sure you’ve chosen who gets to see the update. Now click the Post button at the bottom right of the status update section.


The words you typed in your status update (if you did not attach a link or photo) appear with your name at the top of your Facebook timeline.
Delete a Status Update or Other Post
- Removing the current status update from your Profile page is one of the simpler tasks to perform on Facebook. Move your cursor to the upper right-hand corner of the offending status update.
- Click the three horizontal dots, and the option to Delete appears, as shown in Figure 7-13. (If someone has shared something to your page that you’d rather not see, you have the option to Hide from Timeline, Edit Post, Change Date, and more.
- Click Delete and a confirmation window pops up. Confirm that you want to delete the post, and it’s gone.

Add a Photo to Your Timeline
- To post a photo to your timeline, locate the word Photo and the row of icons at the top of the status update text box where you see the question What’s on your mind?
- Click the Photo/Video icon on your desktop. Doing this opens a menu to upload a photo from your computer. On a mobile device, you will be asked whether you want to take a picture or use an existing one. The procedure is the same as loading a photo for your Profile page.
- Click Attach Photo, and you see a box that prompts you to browse for a photo or video on your computer. Click the Choose File button to look for a picture on your computer. After you find a photo, click that photo to select it. Then you can put it up on your Facebook wall by clicking the Post button at the bottom of the status update box.
Add Life Events to Your Timeline
- Life events happen to us all. And in your timeline status box, you have the opportunity to share your special events with the world (or just with your friends). To add a significant event, click the Life Event link above the status update box.
- Select one of the five main categories that identifies your event. Facebook produces an arrow menu on the right (as shown in Figure 7-14), offering a list of options in the main categories.
- Select the category you want to add, and then fill out the form that pops up; include the city and state in which the event occurred.
- Add a photo. (You can upload a fresh one or select from photos already uploaded.)
- Specify the Privacy setting by clicking the small down arrow to the left of the Save button.
- When you’re all done, click Save and the event will be part of your timeline and on your map.

Share a YouTube Video on Facebook
- So you just watched a video on YouTube and you can’t wait to show it to all your friends. Well, it turns out that Facebook is the perfect place to show a video to the maximum number of friends in the minimum amount of time. Start out by going to YouTube (
www.youtube.com) and clicking the video you want to share. Beneath the screen that’s showing the actual video, you should see a Share button. Click it, and you get several buttons you can click to share the video on various social networking sites, including Twitter, MySpace, StumbleUpon, and (you guessed it) Facebook. Click the Facebook button, and you’re prompted to add a message in a rectangular text box (similar to the status update space). Type in your message and click the Share button at bottom right. Voilà! You’ve posted a video to your Facebook wall.
You can also copy the URL of your video, and then paste it into a status update, as you would when posting any link. See this chapter’s earlier task “Update Your Status” for the steps. If you want to upload a video of your own that you have on your computer, you can post it the same way you upload a photo.- Facebook would much prefer that you upload original videos to the site. They don’t give YouTube videos a nice big image as the other posts on Facebook. Take a look at Figure 7-15. They look rather small on the bottom once they are posted.
