Now that Jenkinsfile is ready, let's set up CI/CD for our application. First, we need to upload our application to a Git server, such as GitHub, GitLab, or Bitbucket. Let's use GitHub (https://github.com/) for this. Make sure you have an account created in GitHub first:
- In GitHub, create a new repository (https://github.com/new); let's call it online-store. Do not check the Initialize this repository with a README option. Once created, you will see instructions to add code. Let's go with the option of push an existing repository from the command line by running the following commands inside our online-store application folder. Do not forget to replace <username> with your actual GitHub username:
> cd online-store
> git remote add origin https://github.com/<username>/online-store.git
> git push -u origin master
- Now, go to the Jenkins server web UI by visiting http://localhost:8989/ and create a new job using the create new jobs link.
- Enter a name, select Pipeline from the list, and click OK:

-
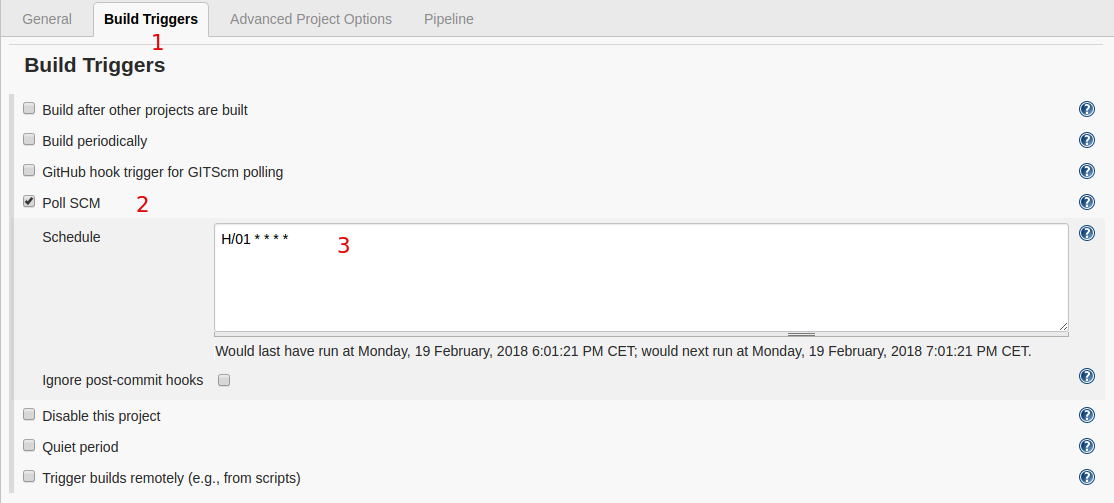
- Scroll down or click on the Build Triggers section.
- Select the Poll SCM checkbox.
- Enter H/01 * * * * as the cron schedule value so that Jenkins polls our repository every minute and builds the code if there are new commits:

- Next, do the following on the same page:
- Scroll down or click on the Pipeline section.
- Select Pipeline script from SCM for the Definition field from the drop-down menu.
- Select Git for the SCM field from the drop-down menu.
- Add the Repository URL that we created in GitHub for the application.
- Finally, click Save:

- Click on Build Now to trigger a new build to test our pipeline:

We should now see a build has started and its progress on the web UI, as shown in the following screenshot:

Congratulations! We have successfully set up CI/CD for our application. The builds will get triggered when you make new commits as well.
You can also view the pipeline status using the new UI from the Jenkins Blue Ocean plugin. Install the plugin from the Plugin Manager (click on Jenkins in the top menu and go to Manage Jenkins | Manage Plugins | Available and search for Blue Ocean and install it). The Open Blue Ocean link is available on the left-hand side menu. The builds will look as follows:

Click on a build to view the pipeline. You can click on each stage of the progress indicator to list the steps from that stage, and then expand the list items to view the logs from that step:

Congratulations. You have successfully set up a CI/CD pipeline using Jenkins.
