
CHAPTER 6
Unix/Linux
In this chapter, you will learn:
• Linux security: structure, permissions, and access
• Linux security: hardening and security
• Linux monitoring and attack detection
• Linux security utilities
If you want to be technical about its parentage, the story of Linux goes all the way back to the 1960s. Most people, though, trace it to 1991 when Linus Torvalds first released Linux, a kernel based on the MINIX operating system, written by Andrew Tanenbaum, as a way to teach operating system design. Linux is one of many Unix-like operating systems, taking its operational concepts from the Unix operating system. However, we’re getting a little ahead of ourselves here. We’ll get into Unix’s full history shortly, including the work of other groups that have contributed all of the bits that users primarily interact with, which is not generally considered Linux itself.
First, it’s useful to discuss what an operating system actually is. An OS is often thought of as all the bits you get when you install something like Windows and you boot it up. Everything you see when you boot it up is often considered the operating system. In point of fact, what you are actually looking at is the shell, which, in the case of Windows, macOS, and other similar systems is graphical in nature. When we talk about the operating system, we are really talking about the piece of software that interacts with the hardware and that is responsible for things like process and memory management. In the Linux world, this is often called the kernel. Sun Microsystems, which developed Solaris, made a distinction between their operating system, which was called SunOS, and their shell or interface, which they called Solaris. The reason for making this distinction is that the shell or interface can be switched out and you can have multiple ways of interacting with the hardware as well as different ways to launch applications, while underneath this the operating system still makes everything possible.
When you get a system in your hands like Linux, you need to have an understanding of how it runs and where all the pieces can be found to manage it. Since Linux descends from Unix, and Unix was designed as a command-line system, much of how Linux operates is still based in text files and manipulating them in a non-graphical way, in spite of the fact that we have become a predominantly graphical world when it comes to computing. There are a lot of aspects to managing a Linux system, including configuring, updating and installing software, managing processes, and working with all the utilities that make its functioning possible.
Unix History
Unix, the precursor to Linux and several other operating systems, has its roots in a multi-organization project called Multics. Multics is something of an acronym, meaning Multiplexed Information and Computing Service. The project to create the operating system began in 1964. Multics was designed to be multiuser at a time when very expensive computers were primarily used as single-user devices simply because there was no operating system that allowed for the running of multiple programs simultaneously. Today this is something we take for granted, and while you may perceive your system as only running one application at a time because it’s the one you are working on at any given moment (and you may not have any other applications open), in reality there are a large number of programs in some state of execution at any given time. These programs perform many functions, from ensuring you have a network address to sharing files or printers over the network, or perhaps they are waiting for you to plug a device into your system so they can perform some management functions on your device.

NOTE Security was one of the design goals of Multics and it was the first operating system to be given the designation of a B2 level secure operating system using the Trusted Computer System Evaluation criteria. Multics is still available in open source.
Multics was originally projected to be a commercial project for both GE and Honeywell, though Honeywell is the only company that actually released a commercial version of Multics. In addition to GE and Honeywell, MIT and AT&T Bell Labs were both involved in the Multics project. After a few years of working on Multics, Bell Labs pulled out of the project, though some of the developers involved were left feeling like they should implement something on a much smaller scale than Multics. In 1969, the developers began work on an operating system that was originally expected to be a programmer’s workbench and wasn’t expected to be targeted at normal users. Early on, the project was called Unics, being a play on the name Multics.
Throughout the 1970s, Unix was developed by Bell Labs and distributed to educational and governmental institutions. It was designed to be multiuser and multiprocess as well as portable since it was originally running on whatever hardware could be found for the purpose. The programming language C was created as part of the development of the Unix operating system and much of Unix is written in C. C was ported to a number of architectures, thus helping in the portability of Unix. Because of the distribution of Unix to educational institutions, including the source code, it became popular as a way to teach operating system design. Eventually, AT&T UNIX had a competitor when a small group at the University of California at Berkeley rewrote all of Unix and also introduced some additional components. This was called the Berkeley System Distribution and was also available freely to educational institutions without some of the paperwork and red tape required by AT&T.
Over time, Unix came to be reimplemented by a number of companies and institutions. Sun Microsystems, Silicon Graphics, IBM, and Hewlett-Packard all had different implementations of Unix, spawned out of the move to high-powered workstations in the 1980s. Additionally, NeXT implemented a Unix-like operating system based on the Mach kernel, designed to be lightweight and fast, which eventually became Mac OS X. Even Microsoft had a version of Unix for a time, called XENIX.
NOTE You’ll often see the term Unix-like. The reason for this is that Unix is a specific implementation of an operating system that was originally owned by AT&T, which was very good at looking out for its intellectual property. Currently, the trademark UNIX™ is owned by The Open Group, which is an industry standards consortium. Only systems that conform to a particular specification can be called Unix. All others are Unix-like.
It was really the use of Unix as a way to teach operating system design, though, that ultimately led to the creation of Linux. A number of books were written about the Unix design, with the rewritten code given a different name like XINU and MINIX. MINIX was a small implementation of Unix written by Andrew Tanenbaum for a book about operating system design. It was this implementation of a Unix-like operating system that Torvalds used as the genesis of his own implementation of a Unix-like operating system, Linux. What Torvalds wrote, though, is really just the operating system. He didn’t write any of the components of the environment that users typically deal with. Once you have a kernel, you have something that can interface with hardware and schedule programs and manage memory, but you don’t have any programs to load into memory. You still need an operating environment, complete with some form of user interface.
GNU
Unix was really designed as a programmer’s operating system. All of the system utilities were created to be small, lightweight, and modular so they could be chained in order to achieve larger tasks. There weren’t monolithic system administration tools. There wasn’t one tool to do all of the system administration. There were a lot of very small tools that would primarily be single-purpose. The idea was to create a portable system that would be fast and extensible. After Torvalds created the kernel, he still needed all the system utilities that later came to define Unix. Fortunately, he didn’t need to reinvent that wheel. It had been done for him a decade earlier.
In 1983, Richard Stallman was working in the Artificial Intelligence Lab at MIT. He had long been frustrated with the constraints of commercial software and the inability for programmers to take a piece of software and extend it in ways that made sense to them. Unix came with the constraints of the license that AT&T had, and while that license wasn’t necessarily a motivating factor in driving his actions, the license would have prevented him from doing what he wanted to do. He decided to create an operating system developed with completely open-source software. He announced the creation of the GNU Project in the fall of 1983.
NOTE Programmers can have a quirky sense of humor. GNU is actually a recursive acronym that stands for GNU’s Not Unix. My personal favorite of the little jokes like this is a replacement for the More paging program, designed to show a page at a time from a long file. The replacement is called Less. Because, of course, Less is More.
Stallman opted to make his operating system compatible with Unix because that was where the users were. If a user wanted to adopt GNU as their operating system, they were already familiar with how it worked. He also had a goal of portability and Unix was already portable. It seemed like a good fit. He started creating software for the GNU Project. Enormous volumes of software have since been generated under the GNU banner. Much of the software created was focused on developers, from the Emacs text editor (though text editor doesn’t begin to describe what Emacs is or does) to compilers and parsers, debuggers, and automation tools. In addition, GNU rewrote the userland system utilities commonly associated with Unix and made them open source.
Torvalds actually used the GNU development tools to create his Linux kernel. At that time, the GNU Project had yet to create a kernel that would allow them to have a fully functional system. It seemed like a good marriage, putting a new kernel together with a set of well-known and well-supported user tools. Torvalds bundled software from the GNU Project together with his kernel to create what he called Linux. It’s been a source of controversy that the various distributions that have followed have been called Linux. Supporters of GNU believe it should be called GNU/Linux because the kernel on its own is only a small part of what users get, and the kernel isn’t useful without the software that is provided by the GNU Project. No matter what you call the full suite of software that you use, the bulk of what we will be talking about in this chapter is primarily from the GNU suite of tools, which are run inside the Linux operating system.
NOTE To date, the GNU Project has yet to release a stable version of their own operating system, which they call GNU Hurd—even though Hurd has been in active development since 1990.
The Kernel
As mentioned previously, Linux really refers to the piece of software called the kernel. The kernel is responsible for interfacing with the hardware, and as a result, it operates with the highest level of privilege with respect to the processor. CPUs often are designed with a ring protection scheme, with ring 0 having the highest level of privileges and ring 3 having the lowest. Applications live in ring 3 and the kernel lives in ring 0 where it has the highest level of access to the system hardware and processor.
Linux uses a monolithic kernel, meaning that everything related to the kernel runs in kernel mode, and, in fact, all of the kernel functions reside in a single large binary image. However, some of the functionality can be swapped in and out using loadable kernel modules (LKMs). In Figure 6-1, you can see the high-level menu where the Linux kernel is configured. As of 3.8, the Linux kernel had over 6000 settings that could be configured to enable or disable specific functionality, including hardware drivers.

Figure 6-1 The Linux Kernel Configuration menu
Exercise 6-1: The Kernel Version
To find the kernel version of your Linux system, open a terminal window, type uname –a, and look for the version number in the output.
By comparison, a microkernel moves some of the functionality out of the kernel itself, leaving only those functions that need it to live in ring 0. Functions like memory management and process scheduling, as well as basic interprocess communication, remain in the kernel itself, while the device drivers function in higher-level rings where they have less access and can do less damage should there be a problem. A microkernel may adopt a hardware abstraction layer to provide an application programming interface (API) that drivers can access to control the hardware. This relieves the drivers from needing to implement architecture-specific functions, leaving that to the kernel to manage.
At runtime, the configuration of the Linux kernel can be managed by interacting with a virtual filesystem created by the kernel when it boots. This virtual filesystem is a set of files laid out in a hierarchy that exists in memory but appears to be accessible through the normal filesystem. You could get to the system configuration through the /sys directory, which will allow you to look at all of the various settings that are active in the kernel at any given time. You can take a lot of time digging your way through all of the different settings. As you can see from Figure 6-2, running sysctl –a, which provides all of the values for kernel configuration, yields over 1000 different variables. You can also see how the different variables are displayed. Many of the variables are managed using true-or-false, 1/0 settings, so you either turn something on or turn it off—although there are plenty of variables that do take numeric settings. You can also use the sysctl utility to configure kernel settings. As an example, you could use the following to disable replying to broadcasts that might later lead to a successful smurf attack, which is an amplification attack sending ICMP messages to a broadcast address:

Figure 6-2 A system configuration using sysctl
sysctl net.ipv4.icmp_echo_ignore_broadcasts = 1
NOTE While you can set the values using sysctl, they only remain at that setting until the system is rebooted. To keep the setting after the reboot, add an entry into /etc/sysctl.conf.
If you want to go to a particular setting in the virtual filesystem, use the dotted notation seen above as a guide. The setting to ignore ICMP broadcast messages would be located in /sys/net/ipv4/, and the “file” there would be named icmp_echo_ignore_broadcasts. If you were to look into that “file” after running the preceding sysctl command, you would only see the value 1. This is how the /sys tree works. The variables are stored in a manner that makes them look like files, and they are arranged in a typical hierarchical directory structure.
Filesystem Layout
Linux generally organizes its filesystem in the same way that most Unix-like operating systems do. The layout for Linux has been formalized into the Filesystem Hierarchy Standard (FHS), which more or less follows the standard BSD filesystem layout. Where Windows systems follow the convention of DOS and primarily use drive letters to indicate different physical devices or partitions, under Unix-like operating systems, everything appears within a single hierarchical filesystem, where / is the root and everything gets put somewhere underneath the root. This can avoid the problem of devices getting different drive letters on subsequent reboots since each device or partition is mounted into the Linux filesystem exactly where it is specified to be mounted.
One advantage to this approach is that it allows for upgrading storage in a more modular fashion. If you need more storage space in your home directories for your users, you can install a new hard drive and just mount it into the right place in the filesystem. Afterward, you will have more space for your users without impacting the rest of the system. The risk here is that if you don’t partition correctly, you could run out of space in one part of the filesystem while swimming in extra storage in another part of the filesystem. You could certainly install new hard drives and copy files to make it all work with enough space, but this does incur downtime on the system, so it’s best to try to get it as close to right as possible the first time around.
NOTE The file where all of the mount points are kept so the system knows which devices to mount to which mount point in the filesystem is /etc/fstab.
As you can see in Table 6-1, binaries can be stored in a number of places. The way to direct the system in how to find them is by using a variable called PATH, which indicates to the system all of the places you want the system to search for executable programs so you don’t have to specify the full path when you attempt to run the binary.

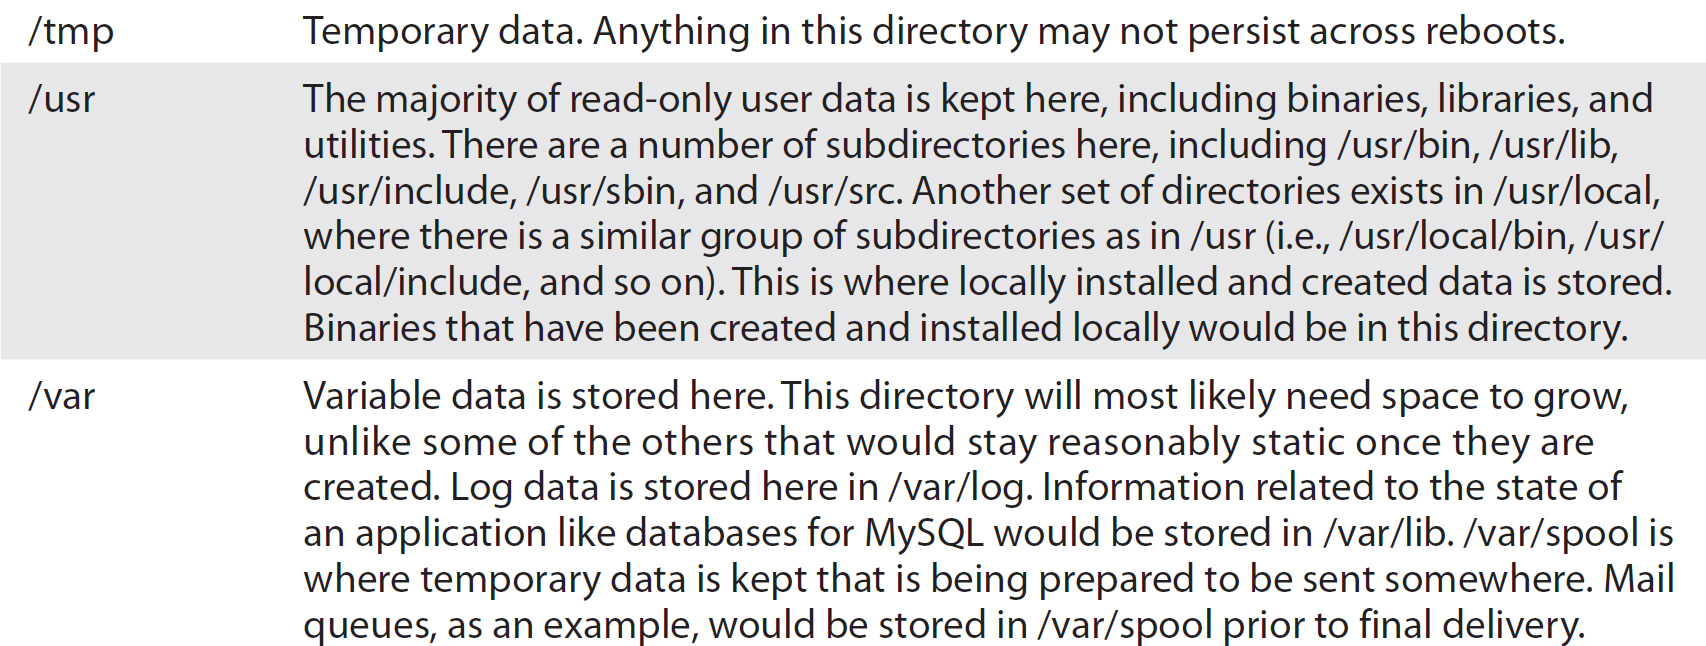
Table 6-1 Filesystem Hierarchy
NOTE Binary, in the context discussed here, is another word for program or application, but is a bit more specific than that. Binary indicates that the program in question is a compiled program and exists in the filesystem in binary form. Not all binary files are programs, though. Programs written in a scripting language like Python or Ruby would be stored in ASCII form.
Figure 6-3 displays a directory listing on a Linux system showing a representation (on a live system) of the directories described in Table 6-1. You’ll also see that while there are standard locations for things, a running system may have information in different places than where it is specified in the standard. As an example, you can see that the initial RAM disk and kernel image are in the root of the drive, whereas they would typically be in /boot instead.
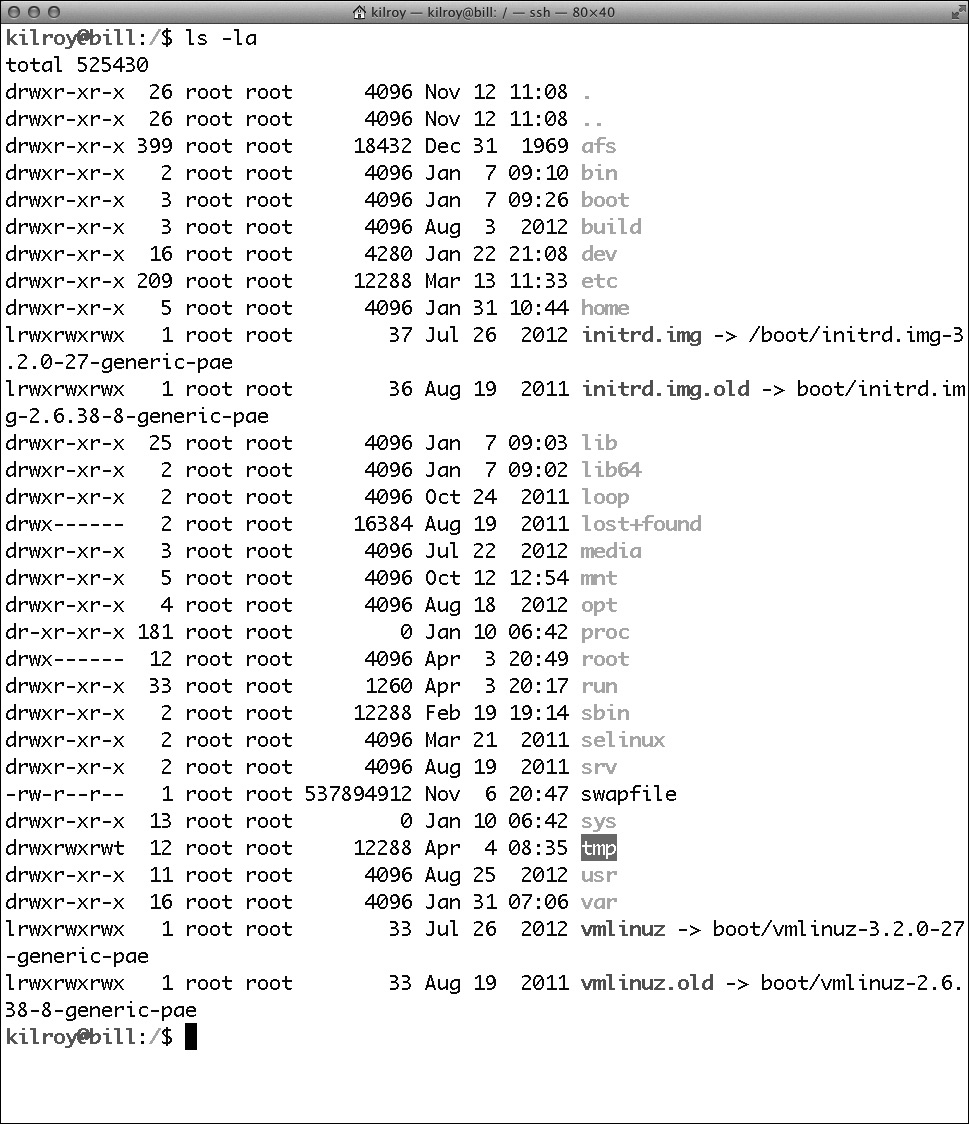
Figure 6-3 Directory listing of / on a Linux system
There are some virtual filesystems that are important to note. The first one is /proc, where information about running processes is stored. The kernel populates this directory as processes start and end. Devices on the system all have entries in the /dev directory, so you can directly access devices through simple file references. Finally, the /sys filesystem is where all of the running kernel configuration is stored.
NOTE The /dev filesystem includes character-generator devices like /dev/zero, which generates 0s, and /dev/random, which generates random characters. /dev/null is a sink where you can redirect any unwanted output and have it just disappear.
Using Linux
While all of the major Linux distributions include graphical desktops like Gnome, KDE, or Xfce, the underpinnings of Linux are still command-line oriented and there are a lot of useful things that can be done on the command line—and in many cases, better and faster than through a graphical interface. First, there are a couple of basic ideas worth mentioning here. Unix was meant to be modular with single-purpose utilities that were small and fast. In order to do this, there needed to be a way to chain the output of one command to the input of another command. You accomplish this through the use of a pipe, which is the | character. In order to send the output of one command into the input stream of another, you place the | character between them and thus the system knows you are piping the output of the first command into the input of the second command. This little tool is incredibly useful, and you will find yourself using it a lot once you have the hang of it. Beyond piping, you may want to simply redirect input or output. As an example, you may wish to send the output of a particular command into a file. You would do that by using the > character. So, you might type foo > file.txt, which would send the output of foo into the file file.txt. The > character overwrites the file. If you wanted to append to the file and start over, you would use >>.
There are three standard streams in Unix-like operating systems: stdin, stdout, and stderr. In the preceding example, we were making use of the stdout stream and redirecting it to a file. If you wanted to redirect stderr, which is where all of the error messages from any program are sent, you would use 2> because 2 is the numeric equivalent of the stderr stream, just as 1 is the equivalent of stdout and 0 is stdin. You may want to send output and errors to the same file, in which case you would use >&, which would send output and errors to wherever you specified.
Having gotten some of the basics out of the way, let’s talk about some specific commands you may use under Linux in the terminal to accomplish specific tasks. Where possible, we will talk about how you might chain commands together.
General Utilities
The following are general utilities that are useful across the system, specifically in conjunction with other commands and utilities.
• grep Short for global replace, it can be used to search for strings within a set of files or within the output from a chained command. grep –R will search recursively underneath the directory that grep is called from.
• cut This will cut a specific field out of the text that is handed to it. This can be used to extract specific information from a set of data, specifically data that is ordered in a particular way with a delimiter like a space, tab, or colon (:).
File Management
The following commands are useful for performing file management tasks.
• ls Lists files. There are a number of switches for ls that make the output more useful. As an example, ls –la shows the files in a list view with details about the file. It also shows all of the files in the directory, including the ones normally hidden because they start with a “.”, called dot files.
• mv Moves files from a source to a destination.
• cp Copies files from a source to a destination.
• rm Removes a file. Some distributions force this to be an alias for rm –i, which will prompt you for every file before actually deleting the file. Unlike graphical systems, when you use rm to delete a file, it is immediately deleted and not sent to a trash can or recycle bin where you can restore it at a later date.
• rmdir Removes a directory. This will not remove a directory that has files in it. In order to use rmdir, you need to have an empty directory. To remove a directory that has files in it, you could use rm –Rf. Adding the –Rf will recursively go through all directories underneath the specified directory and remove all files and directories as it goes, finally removing the specified directory.
• ln Creates a file link. This is similar to an alias or a shortcut used in other systems. A link will point back to a source file. In the case of a symbolic link, removing the link will not actually remove the file. Symbolic links are created using ln –s instead of simply ln, which creates a hard link.
• pwd Prints the working directory. In other words, it will show you the directory you are in.
• cd Changes the directory. This is used to move around the filesystem, changing directories you are working in.
• cat Concatenates files into a single output stream. This output stream can then be redirected ( > ) into another file. If a single file is provided, cat sends the contents of the file to stdout, effectively displaying the file to the terminal.
• less Presents a page of a particular file at a time, unlike cat, which sends the entire contents of the file to the terminal regardless of size. Less is a version of the file pager More (the joke is that Less is More).
Process Management
The following commands are useful for managing processes.
• ps Shows processes currently running. Depending on the switches provided, the list may include all of the processes on the system or just the processes belonging to the user you are logged in as. ps works well with grep, if you are looking for a specific process. If I were looking for the Apache Web server, for example, I might issue the command ps auxww | grep httpd since httpd is the name of the process for the Apache Web server. grep in this case is being handed the output from the ps command and is looking for lines in that output that have the word httpd in it.
• top Provides system information as well as a constantly updated list of all the processes running on the system, along with their usage information.
• kill Can either terminate a process or simply send the process a specific signal. This requires the process ID (PID) of the process you want to send the signal to.
• killall Is the same as kill in terms of functionality except it can take a process name instead of a process ID as an argument. If a process name is given, all processes with that name will get the signal that is being sent, if it’s the interrupt signal, which is the default.
Networking
The following commands are useful in performing networking tasks for configuration as well as troubleshooting.
• ifconfig Lists the configuration for all of the network interfaces on a particular system. It can also be used to configure a network interface.
• netstat Shows network information and statistics like routing tables as well as a list of connections and listening services.
• ping Issues ICMP echo requests to a specified host, expecting to get ICMP echo responses in return.
• traceroute Used to trace the path through the network to a specific host.
• route Can be used to add a network route to the routing table.
• arp Shows the stored table of ARP entries that map MAC addresses to IP addresses.
Software Management
There are, as you may know, a number of different distributions of Linux. While the programs that get installed are primarily the same, there may be subtle distinctions between many of the distributions. This may have to do with the way the binaries are compiled, using different flags and settings, or it may have to do with graphics for the user interfaces. It may use different sets of binaries installed by default or it may have different management utilities. One of the differences between different distributions is how software is managed. When it comes to software management, there are three primary distributions to consider: Debian, Red Hat Enterprise Linux(RHEL)/CentOS, and Slackware. Numerous other distributions are available, but the majority of them are descendants in one way or another from one of these three primary distributions.
Debian
The first distribution to consider is Debian, in part because it’s one of the oldest Linux distributions but also because a large number of Linux distributions follow the way Debian does things, from file layout to management utilities. Ubuntu and Linux Mint are two examples of Debian-based distributions. Debian uses apt (Advanced Packaging Tool) for package management. Various front-ends are available for the apt system, so you have a full range of options when it comes to interfacing with apt, depending on what you are most comfortable with. Using basic apt utilities like apt-get and apt-cache, you can install and update software packages. You could use aptitude, which is a utility that uses a user interface, though it’s cursor/keyboard-oriented and not a keyboard/mouse graphical interface. Synaptic is a full graphical interface.
NOTE The name Debian is a concatenation of the names Debra and Ian. Ian Murdock started the Debian distribution and Debra was his girlfriend in 1993 when Debian was first released.
Debian provides the ability to configure the location of where software packages come from, whether it’s new software or updates to existing software. If you are inclined to manage the files yourself, you would look at the file /etc/apt/sources.list, which lists all the locations that software can be installed from. Configuration files for changing the behavior of apt, including having apt use a proxy server to get content from the Web, are in /etc/apt/apt.conf.d. There are a number of files in this directory, all of which cover specific configurations for different functional aspects of apt. All the configuration files get read in the order in which they show up in the directory, so each filename begins with a number to make the order in which the files are read immediately clear. If you prefer a graphical way of managing your sources list, including selecting the server that is best for you based on your location, you can use the Software Sources configuration utility, shown in Figure 6-4. This utility allows you to select the server you obtain your software from in a number of ways, including simply using the main software repository site, choosing geographically, selecting the best server based on responsiveness, or simply selecting a server you happen to like for your own reasons.

Figure 6-4 Configuring Ubuntu sources
You can also manually install packages using the dpkg utility if you find Debian packages you’d like to install that either don’t come from one of the online repositories or come from a specific repository that you don’t want to add to your sources list. dpkg enables you to perform a number of actions, including install the package, unpack it, or get a status. With dpkg, you can manually work on the .deb files that the various apt utilities end up working with behind the scenes. Underneath the hood, .deb files are really a collection of compressed tape archives.
In addition to the other capabilities, the various package management utilities will resolve dependencies for packages and get them installed to ensure the package you are trying to install will function correctly.
Red Hat Enterprise Linux/CentOS
RedHat has also been around for a very long time as a Linux distribution, starting in 1993 just as Debian did. Red Hat currently has two distributions that behave the same way: Red Hat Enterprise Linux (RHEL) and Fedora Core. Fedora tends to be more of a leading-edge distribution where eventually packages and features end up getting rolled into RHEL. CentOS is a fully open-source distribution that’s completely binary-compatible with RHEL, but it uses different badging and graphics than RHEL because RHEL is commercial software. You can get all of the benefits and stability of RHEL without the RedHat support that goes with it by getting CentOS.
RedHat uses RedHat Package Manager (RPM) packages for software management. An RPM has four sections to it: the lead (identifies the file as an RPM); the signature (used to verify the file as complete and authentic); the header (contains the package name, the architecture, the version, and the file list); and the file archive (the meat of the package, which includes executables, libraries, configuration files, and documentation). The file archive is stored as a compressed cpio file. RPM is a very common package format and there are several front-ends available to manage these packages. One of those front-ends is the utility rpm, which can query an RPM file as well as install RPM packages. One thing rpm won’t do is resolve and install dependencies for an RPM file.
One of the tools commonly used because it’s available for RedHat, CentOS, and Fedora as well as other distributions is yum, which stands for Yellowdog Updater Modified. yum was created at Duke University as a full rewrite of Yellowdog Updater (YUP). Yellow Dog Linux was first released in 1999 for the PowerPC processor architecture and designed to run on Apple Macintosh PowerPC-based systems. yum is a command-line tool used to manage package installations under RedHat distributions. One of the advantages to yum is its ability to pull automatically from online repositories, which the tool rpm isn’t able to do. In order to install a package, you could type yum install packagename and yum would go find the package named packagename and install it. In order to update all of the outdated packages on your system, you would use yum update. You could update just one package by using yum update packagename. yum will also resolve dependencies and install them.

EXAM TIP While rpm can be used to install individual RPMs, yum uses a repository to check against for available updates and can be used to get all packages up to date automatically by running yum update.
One significant advantage to using yum is the ability to easily create a local repository of packages. This local repository may sync from a source online somewhere, but having the local repository allows you to keep multiple systems up to date using your local network without having to use bandwidth to the Internet. This provides you with better control, as well as faster updates, since you don’t have to download packages for every system.
Slackware
Slackware has also been around since 1993 and also includes package management like the others discussed so far. Slackware uses a utility called pkgtool to manage its packages. pkgtool allows you to do the same sorts of things that the other package managers allow, but unlike utilities like yum or apt-get, pkgtool doesn’t do dependency resolution. If a software package has dependencies, you have to install them manually. Slackware packages are also much simpler than the other packages. The structure of a Slackware package is simply a tape archive (tar) that has been compressed with gzip. The pkgtool utility keeps track of the package that has been installed, including its contents, so it can be upgraded or removed later. pkgtool is a menu-based system for managing packages. You can also use individual utilities to manage your packages like installpkg, removepkg, and upgradepkg.
Because of the popularity of the RPM package format, Slackware also offers utilities that will convert from an RPM format to a Slackware package. There are two utilities available to do the conversion: rpm2tgz and rpm2targz. The first creates a Slackware package with the .tgz extension and the second creates a Slackware package with the .tar.gz extension.
Boot Process
The beginnings of the boot process are the same as any other operating system since they start with powering the system on, where the BIOS takes initial control. Linux does have a well-defined boot process that includes some configuration settings and files that are worth going over. As expected, Linux takes the majority of the way it behaves from Unix. The issue with that is that there are, in effect, two different types of Unix: AT&T and BSD. Their boot processes are slightly different, but most Linux distributions seem to use the SysV (AT&T) style of managing their boot-time services, so that’s what we’ll be discussing here.
NOTE SysV is short for System V or System 5, which is the last official major version of Unix from AT&T. The minor versions were called releases, so you could have SysV Release 4 or SVR4. Novell owned the rights to Unix for a period of time, before they were acquired by Santa Cruz Operation (SCO), which has become Tarantella.
The very first step is powering the system on, which triggers the system BIOS, getting the time and date and all the configuration settings for the hardware, followed by a Power-On Self-Test (POST). Once the hardware is ready, control gets transferred to the boot sector of the boot disk. The boot sector, or master boot record (MBR), is 512 bytes and contains the partition table as well as the first stage of the boot loader. Linux typically uses either of two boot loaders, GRUB (Grand Unified Boot Loader) or LILO (LInux LOader). The boot loader is responsible for locating the kernel, based on its configuration, reading it, loading it in memory, and starting it up. Once the kernel is fully up and running, the init process starts. Init is the first program that is run after the kernel is started and it’s responsible for getting everything configured in order for the system to be ready for use.
NOTE The MBR was first introduced in 1983 and many operating systems are moving away from it to a GUID Partition Table in order to support larger hard drives.
Init uses runlevels to distinguish which processes need to be started when the system loads. Init uses the file /etc/inittab to determine which programs need to be started. Different runlevels have different purposes, and you can set a default runlevel depending on what your needs are for a particular system. Setting the runlevel will allow you to do things like boot to a console mode, boot to a graphical interface, or boot to a single-user mode. Single-user mode is often used for troubleshooting and repairing problems with the system since some processes don’t get started in single-user mode, so you end up reducing process clutter and interference. Table 6-2 shows the common runlevels for Linux, as well as their purpose.
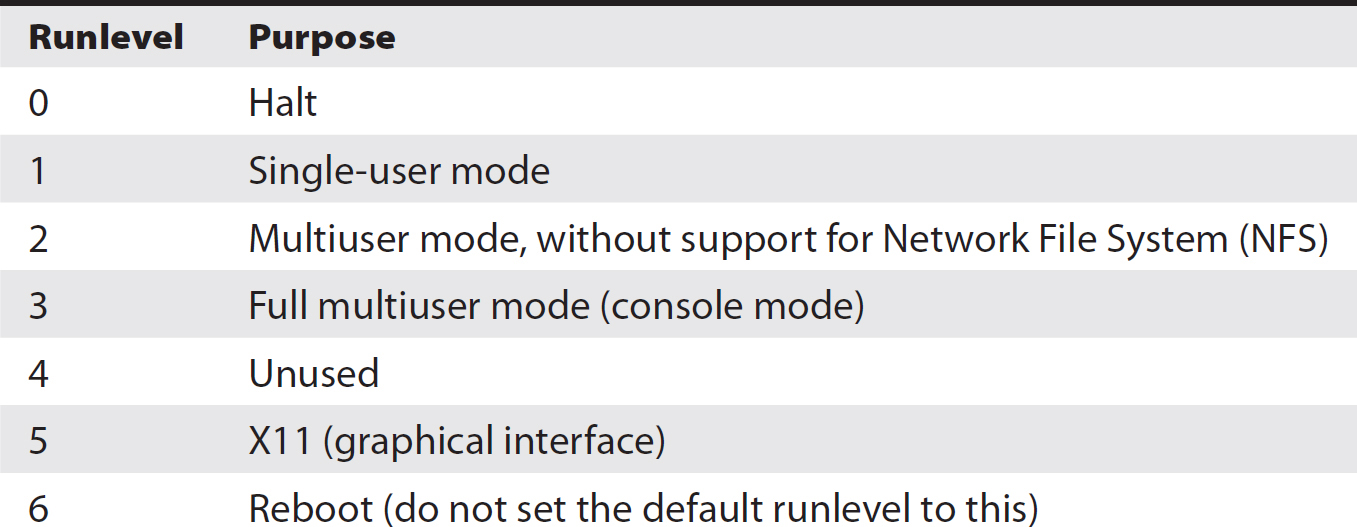
Table 6-2 Runlevels in Linux
EXAM TIP You should know the format for an entry in /etc/inittab.
The format for /etc/inittab is id:runlevels:action:process, where id is just a unique identifier for the entry, runlevels is a list of runlevels that the action will take place in, and process is the process that will be executed for that entry in the inittab. A sample inittab entry is 3:3:wait:/etc/rc.d/rc3, which says that in runlevel 3, execute the scripts in /etc/rc.d/rc3 and init should wait for its termination. Other actions are respawn, meaning that init will start the process over again should it fail, and once, meaning that the process will get executed once when the runlevel is entered.
The SysV style of init (AT&T) uses the /etc/rcx.d or /etc/rc.d/rcx directory structure to manage the different programs that run within different runlevels. The x in the preceding examples indicates the number of the runlevel. In each of these directories are scripts that start up the different services that need to be running for each runlevel. Typically, there would be a startup script and a script that stops the process. Startup scripts are prefaced with an S, while scripts intended to stop processes are prefaced with a K (for kill). They are run in order, so after the S, there is generally a number that indicates where they should be in the startup process. The lower the number, the higher priority a process it is.
Generally, the scripts to start up and kill a service that live in the individual runlevel directories are linked to the location where they are really stored, which is in /etc/init.d. Storing them in one location and linking to them in another location saves disk space and also ensures that when they need to be upgraded or changed, you don’t have to do it in multiple locations. When you make changes, you change the single file, and the linked locations automatically pick up the changes since they are really just pointers to the real file.
EXAM TIP Service management scripts are stored in the /etc/init.d/ directory, although there are links to those files stored in individual runlevel directories, allowing the services to be brought up by default in the appropriate runlevel.
Process Management
The very first process that starts is init, and as a result of being the first process, it receives process ID 1. All services that get started are started by init and become children of the init process. Each child may have children of its own, but all processes running on a Unix-like system such as Linux will trace their ancestry back to init. Init is responsible both for starting all of the services that are running and for starting the process that allows for login at the console. Typically, this process is called getty, which was once short for get teletype, since teletype machines were originally used for interactive access to computer systems. (Many long-since antiquated terms continue to exist in operating systems as old as Unix because descendants have simply picked up the terminology in order to preserve consistency and compatibility.)
If you were to diagram all of the processes running on a Linux system, you would start with init as the beginning. Everything would flow from that starting point. Figure 6-5 shows a diagram of the processes on a Linux system using a tool called pstree. The diagram might be called a process tree (thus the name pstree) because processes can be diagramed in a tree-like structure. The pstree utility shows the parentage for all the processes running, beginning with the super-parent, init, on the top-left side of the diagram. You’ll also see the login session that pstree was run from, beginning with lightdm toward the bottom of the output. Lightdm is the display manager that handles all graphical sessions run using X11. If you look toward the right side of the output at the bottom, you can see that my login session through lightdm includes Firefox and a terminal window. The terminal window is running bash, which is the user shell. bash is the parent for pstree, the beginning of which you can see at the very bottom; however, pstree truncates at 80 characters since terminal windows typically open at 80 characters.

Figure 6-5 A process tree
NOTE Terminal windows, while software now, are designed to emulate what it was like to use a physical CRT display, which commonly were 80×24 characters. Some of this size irregularity has to do with the rectangular-ness of characters that may take up more vertical space than horizontal.
Processes and Threads
Conceptualizing a process may be difficult because we’re used to dealing with applications and programs. Perhaps the best way to think about the concept is that a program is the collection of bits as they sit on the disk, and a process is how that program looks when it’s in memory. One reason for making the distinction is that you can have multiple instances of a particular program running at any given time, and while they are the same program, they are different processes with different execution paths and different memory segments.
Processes can also create processes, as you might have guessed from the previous discussion about parents and so forth. The process of creating a child process is called spawning, or sometimes forking. Note that if the parent dies, all the children die along with it. As an example, let’s say you have opened a terminal window and launched Firefox and Thunderbird, sending them to the background so you can get your terminal window back and they can continue to run. When you close your terminal window, Firefox and Thunderbird will also close. The terminal window, and specifically the bash shell running in it, is the parent of those graphical programs, even though they appear to be detached from it. When the parent dies or is killed, the children get killed.
Another thing to note is that processes are distinct from threads. A process can have multiple threads, but any threads created for multiprocessing purposes would belong to the context of the process. The threads would run in the same memory space as the parent process. They may follow different execution paths through the code, but the memory remains shared among all the threads within the process. The idea of multithreading is to get work done faster. The challenge is to break work up into tasks that can be performed simultaneously without impacting the other tasks or requiring that one task wait on another.
Under Linux, as with Unix, each process gets a process ID when it is created, which is how you would refer to the process if you needed to communicate with it. We’ll go into how to communicate with processes and the sorts of communications you can engage in with processes shortly. The other thing that happens when a program is executed and a process is created is that an entry gets created in the /proc filesystem. Figure 6-6 shows a listing of the /proc directory. The subdirectories under /proc are created for each individual process, and inside each directory are a number of files carrying information and statistics about the process, including memory segments in use, as well as the list of recent functions called.
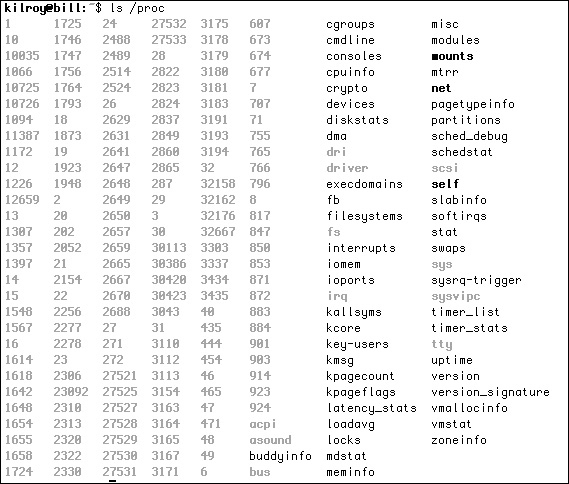
Figure 6-6 A /proc listing
Process Tools
Now that we can figure out who our parents are and the lineage of Linux processes, we can move on to what to do with these processes once they are created. Perhaps the very first thing you want to do is to figure out what processes are running on a particular system. A couple of tools are available to do that. The first one is ps, a static tool that gives you a process list based on what’s running at the moment the tool is executed. ps shows a process list and, depending on the arguments passed to ps, can provide that information in some different ways. ps can provide you with a list of processes that you own, and if you have root-level permissions, you can see all the processes running on the system. Additionally, with the right argument, you can see the process ID associated with each process. Figure 6-7 shows ps executed with different sets of arguments passed to it. The first run is without arguments and shows the processes owned by the user executing ps. The second run shows all processes with a terminal, which includes the bash process running in the terminal that ps is executing in, as well as ps itself. Finally, adding u shows the user who owns each process. ps reads the information displayed from the /proc filesystem.

Figure 6-7 Some ps variations
ps is similar to other tools in the toolset of common Unix utilities in that arguments have historically varied between the way BSD implemented them and the way AT&T implemented them. As a result, some tools, like ps, have had to support different options, and potentially in different ways, depending on the other arguments that are passed. If you are familiar with one flavor or another of Unix, it’s worth checking with the documentation under Linux to see which options do what.
Another way to look at processes is to use the top utility. Whereas ps shows a static list of processes, commonly just the ones belonging to the user issuing the command, top shows a dynamic list of all the processes running, updated every three seconds. top also provides additional details about the system, including the number of tasks currently running, CPU usage, memory usage, and the uptime of the system. Figure 6-8 shows an example of top with the list of processes currently running on the system. On the top of the screen, you can see the statistics for the system. While top updates every three seconds with new information, this is a point-in-time snapshot because it’s a screen capture. At the particular moment in time that the screen capture was taken, asterisk was consuming 0.2% of system memory. The kworker process was taking up the most CPU time, consuming 2%, which still isn’t much. The downside to running top is that it will take up processor time.

Figure 6-8 The top utility
NOTE The kworker process handles kernel work queues.
You can control the behavior of processes, including forcing them to terminate, through the utility kill. A related utility is killall. With the kill utility, you have to know the process ID in order to send a message to the process, and by default the message is to terminate the process. killall makes it easier to work with processes by allowing you to communicate with the process by name rather than the process ID.
Signals
The kill utility not only sends a termination signal to the process, which should cause it to terminate, but also is capable of sending any other signal to the process. Programs can implement handlers for each signal or let the default behavior remain in place, with the exception of the SIGKILL and SIGSTOP signals. A list of common signals is shown in Table 6-3. In order to send a particular signal to a process, you would send kill –SignalNumber process ID. As an example, you could send kill –HUP 55.

Table 6-3 Linux Signals Defined by POSIX Standard
Programs are free to implement handlers for nearly all of the signals, with the exception of the KILL and STOP signals. If a program were to receive the HUP signal, it could leave the signal alone, in which case the program would terminate. It might choose to catch the signal and ignore it, in which case the program would continue running as normal. It could also catch the signal and do something with it like go to a graceful shutdown. There have been programs that have restarted on receiving a HUP signal; basically, the program re-reads configuration files and starts over again. This may be helpful if you are making a lot of changes to configuration files, so that you don’t have to actually shut down the service and restart it, which may take a little bit longer.
If you have a process that is being stubborn and won’t close in spite of your best attempts to get it to, you can send a signal to the process. kill –9 or kill –KILL, which are the same thing since the KILL signal translates to number 9 in the definitions file where this information is kept, will send the KILL signal to the process. Since programs can’t ignore a KILL signal, the process will terminate. As noted earlier, you need to know the process ID to send a signal to it. If you were to use killall, you could achieve the same functionality by sending whatever signal you want, but you’d be able to refer to the process by name rather than by number. The catch there is that if you have multiple processes running the same program, you may end up killing a process that you didn’t mean to. As an example, if you have multiple bash (terminal) sessions open, as shown in Figure 6-9, and you issued a killall bash command, you may kill a login session you didn’t mean to. In fact, you will probably kill the session you are logged into. At that point, you have a race condition. The moment the bash session that issued the killall command is killed, killall will be killed with it because it’s a child process. Will it have killed the bash session you wanted to kill before it killed itself?
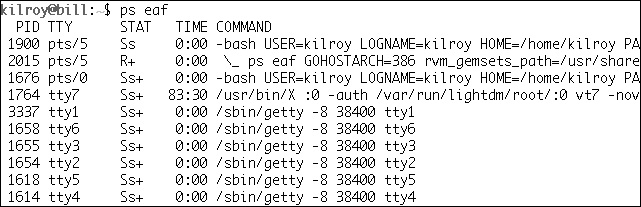
Figure 6-9 Duplicate process names
System Management
A number of tasks are necessary to maintain a well-run system, such as performing backups, patching systems, and applying updates. It’s also helpful to be able to provide a schedule for these tasks to get the system to run them automatically without the administrator needing to kick them off manually. Unix has long had facilities that allow for backups, and the various Linux distributions offer ways of doing updates and keeping packages up to date. Unix has also provided facilities for scheduling tasks, and the task scheduler is probably running on your Linux system currently, even if you aren’t aware of it.
Backups are a critical task for a system administrator, because at some point, either a user is going to lose a file they want back or, worse, you’ll have a hard drive failure and lose all of the files on the disk. Assuming there is data you’d just as soon have back, you’ll want a backup.
Backups
While there are certainly a large number of modern backup solutions, like Amanda and Bacula, there are also some tried-and-true standards that have been around for a while. The first utility you can use to perform backups is rsync. rsync allows you to copy files from one system to another, providing for a copy of the files on another system in case the original file is damaged or lost somehow. If you use rsync, you need a daemon (service) running on another system to run the rsync to. rsync is a fairly simple utility to run, as long as you have a system that’s prepared to listen to rsync requests. An example use of rsync is as follows:
rsync –avz /home backup:mybackup/
This command would archive (a) all of the files in the /home directory. Archiving preserves links to other locations in the filesystem, as well as modification and user information. It would also compress the data (z) so it would take up less space on the storage medium. All of the files would be sent to the system named backup and be stored in a directory called mybackup. If you needed to restore, you would reverse the source and destination, pulling the files back. Of course, a lot of other options are available with rsync, letting you do things like select specific files to back up rather than backing up everything.
If you have an attached backup drive, you may want to use the tar command. tar originally meant tape archive, but it works just as well creating disk archives. tar allows you to create a single file containing all the files you specify. Since it’s archiving the information, all the user and modification data is retained and not updated as it is stored out. tar historically didn’t allow for compression of data, but the GNU version of tar, which is the one that runs on most Linux systems, does support compression. In fact, it supports two different types of compression. If you wanted to store all the files in your /home directory, you might issue the following command:
tar cvfz homebackup.tar.gz /home
In that example, you are asking tar to create an archive (c), provide verbose feedback (v) about what it’s doing, store the result into a file (f), and compress it (z). The next argument is the file you are storing the archive in, and that’s followed by a list of all the files and directories you want to archive. In this case, we are simply archiving the /home directory so it’s the only thing listed. Once you have the compressed tar file, you could copy it to external storage or another system. In order to restore, you would issue the command tar xvfz homebackup.tar.gz and all of the home directory will extract into the directory you are in. You’ll notice the command looks very similar to the archive creation. The only thing different is the method. In the creation process, we use a c, and to extract, we use an x.
There are also different strategies for backing up files. You could always do a complete backup, but you may want to reduce the amount of information you are transferring and storing, in which case you may want to implement something like a full backup once a week and then incremental backups on subsequent days. The incremental backup would only back up files that had changed since the full backup. An alternative to the incremental approach is the differential backup. A differential backup will back up all data that has changed since the last full backup. This means that if you do a full backup on Sunday and do differential backups the rest of the week, by Thursday you are backing up data that changed on Monday, Tuesday, Wednesday, and Thursday, in spite of the fact that Monday night you backed up data that changed on Monday, and Tuesday night you backed up data that changed on Tuesday, and so forth.
The advantage to this approach is that all you would need to do if you had to do a restore is restore the full backup and then the last differential backup. In the case of an incremental backup, you would need to restore the full backup, then each incremental backup performed between the full backup and the need for a restore. This provides a trade-off. Differential backups take more storage space but less time and effort to restore, while incremental backups take less storage space but more time and effort to restore.
Patch Management
Keeping systems up to date with the latest versions of software is a critical task in protecting your systems and network from intrusion. Older versions of software often contain vulnerabilities that may be exploited to gain unauthorized access by a malicious user. There are different ways of handling system updates, depending on the distribution of Linux you are using. If you are using a RedHat-based system, you would issue the command yum update as an administrator or root user and yum will go out to see what packages need to be updated, then update them after checking with you to see if you really want to do the update or not. You can also update individual packages using yum update <packagename>, replacing <packagename> with the package you want to update.
In the case of Debian-based systems like Ubuntu, you can use the apt utilities to update your system. apt-get update will update the list of packages that are available, as well as update the current version. In order to see whether you have packages that need to be updated, you would issue the command apt-get upgrade. Upgrading will install the latest versions of all the packages on your system. You may also have the ability to do a version upgrade in a manner similar to this.
If you are running a production system, be wary of just applying updates since it might impact the usability of your system. While the packages are generally tested, there may be specific version requirements for applications you are running, and updating a dependency may cause an outage. As an example, you may have a web application using a particular version of JBoss or Tomcat. Doing a blanket update may update one of these packages to a version that is incompatible with the application you have that is using these packages.
EXAM TIP It’s generally worth applying updates to a test system before rolling them into production, to ensure that they don’t break things.
Job Scheduling
There are a number of system management tasks that are much easier when they are scheduled to occur on a predictable basis. One of these tasks is log rotation that compresses a log file and moves it to a backup location, including just renaming the file and leaving it in the same directory. This allows you to keep several days’ or weeks’ worth of log files without taking a lot of disk space, and it also keeps each log file to a manageable size, as well as a predictable set of dates.
You may also want to schedule your backups or even system updates, depending on the type of system you are using. One utility for doing that is cron. cron is a daemon that runs constantly on your system, waking up at set intervals to perform tasks. You can specify the tasks that occur in the /etc/crontab file, although if you want to run something hourly, daily, or weekly, your version of cron may already have jobs set up for those specific intervals. If that’s the case, all you need to do is add a script into one of the directories where the jobs are stored. Hourly scripts are stored in /etc/cron.hourly, daily scripts are stored in /etc/cron.daily, and weekly scripts are stored in /etc/cron.weekly. The script is simply a list of commands that you want to perform, though you could also use shell scripting to perform tasks like checking for the existence of a file before executing a particular command.
User Management
Linux supports different ways of managing users and allowing them to log in to a system. It does this by using Pluggable Authentication Modules (PAM), which allow for swapping in and out of different types of authentication. Linux systems can employ a variety of authentication mechanisms using these modules, including RADIUS, LDAP, TACACS+, and others. These modules also provide the ability to ensure that passwords are sufficiently strong. One module you might install, for example, is the cracklib module that helps ensure passwords are strong and that when passwords are changed, there is enough variation between the old password and the new one. The following configuration line implements a password policy that allows a user three attempts to choose a strong password before the passwd utility, used to set or change passwords, quits:
password required pam_cracklib.so retry=3 minlen=6 difok=3
The minimum password length allowed with this module in place is six, and at least three of the characters in the new password have to be different from the old password. As a result, if you were to start with the password Abcd4321 and then try Bcde6789, the new password would fail because there wouldn’t be enough letters different in the new one, compared with the old one.
EXAM TIP Understand how PAM functions, particularly with respect to password strength, and how the pam_cracklib module works. Some Linux systems, like Ubuntu, use /etc/pam.d/common-auth for this, while others like RedHat use /etc/pam.d/system-auth.
PAM has a series of files that dictate how it operates in different situations. In addition to the Linux login function, other applications can use PAM to handle authentication, like FTP servers, CUPS, Secure Shell (SSH), or e-mail servers. Figure 6-10 shows /etc/pam.d/common-auth, which has the common authentication settings, though this file is from an Ubuntu system. There are a few lines worth noting in Figure 6-10. The first is the first auth line. It is using the pam_unix module to perform a standard Unix authentication, checking the users and passwords in the shadow file. The nullok_secure option at the end of that line indicates that null passwords are okay, but only if the location they are logging in from is listed in the /etc/securetty file. The next auth line allows users to authenticate against a Windows domain, using Kerberos authentication and the Winbind daemon, if it’s available. Further down, you will see a line that allows authentication using the Samba user database. That line references the pam_smbpass.so module. While Debian-based systems use /etc/pam.d/common-auth, under RedHat the file is /etc/pam.d/system-auth.

Figure 6-10 The /etc/pam.d/common-auth file
Users are typically stored in the /etc/passwd file, while passwords are stored in /etc/shadow. Figure 6-11 shows a sample of an /etc/passwd file with all of the fields. The passwd file includes a username; a password, though in most cases this will be an x indicating that the password is stored in the shadow file; a user ID; a group ID; a comment field, which may have a phone number, a user’s full name, or some other extra information; the home directory; and the shell used. The shadow file stores the username along with the encrypted password. It also stores additional information about the password, including the last time it was changed, the minimum and maximum expiry age, and the warning period. If there is no password policy, these fields would be blank and the field delimiter would be a colon (:).

Figure 6-11 The /etc/passwd file
As an example, let’s take the first line from the passwd file shown in Figure 6-11. The username is root, as indicated in the first field. After that is an x in the second field, indicating that the password is stored in the shadow file. The next field is the user ID, which is 0 for the root user. The group ID follows this in the next column, which is also 0 for the root user. The next field is a comment field, and in this case it indicates the user is named root. Anything could be put into this field since it is a comment field that, by convention, often has the real name of the user. After the comment field is the home directory, and in this case the home directory is /root. Finally, the last column is the shell that the user uses, which is /bin/bash for this user.
Adding users is pretty simple, using the useradd utility. The useradd utility is a command-line utility. useradd takes a number of command-line parameters, allowing you to set the home directory, the shell, comments, and password expiration information. In order to make changes to any user, you can use the usermod utility to alter any of the parameters that go with user accounts. The shell is the command-line interface provided to the user in a terminal session. While Windows doesn’t always require individual services to have user accounts to operate under (it sometimes uses a system account, which has a high level of privileges), Linux services typically run under a user account created specifically for that service. In Figure 6-11, you can see accounts like postgres, which is used to run the postgresql database server, as well as www-data for the Apache Web server. These user accounts don’t have any advanced privileges and they would get access only to the portions of the filesystem that they need to access.
The challenge with any of these sorts of accounts is providing enough information to create the user, but not enough that the user could be used to exploit the system. Many service-based accounts don’t specify a shell for the account, but instead specify something like /bin/false. This is done to ensure that the account can’t be logged into directly. When a user logs in via a remote access service like SSH, the shell executable gets run and, presumably, then provides the user with an interactive experience. If the shell is specified to be /bin/false, /bin/false will get executed and not provide any way for the user to interact with the system at all. This provides another way to protect the system against attack.
If you prefer graphical user managers, you can get those as well. Figure 6-12 shows a graphical user manager where you can see the users that were added after the system was installed. There is a significant difference between the list shown by the User Manager utility and those listed in the /etc/passwd file. The list shown in the graphical user manager only includes actual users and doesn’t include all the service accounts. There are a couple of advantages to this, of course. First, it prevents an average user from making any changes to the service accounts. To make any changes to a service account, you’d have to know how to get to the files or use the utilities, as well as have administrative permissions.

Figure 6-12 Graphical user management
Configuration
Most of the configuration settings for Linux systems are in the /etc directory. You may be familiar with Windows systems where the configuration settings are stored in a system registry. macOS applications often use files that are called property lists to store data that needs to persist across executions of the application. This could be application settings. In Unix-like systems, all of the system configuration, as well as the configuration settings of applications that apply system-wide, are stored in the /etc directory. This might be something like the name of the system, stored in /etc/hostname. It might be the actions of network services managed by the inet daemon, stored in /etc/inetd.conf. Network configuration, DNS settings, configuration files for mail servers and FTP servers, and all of the startup scripts are stored in /etc.
Nearly all of the configuration files stored in the /etc directory are just plaintext files. They may be delimited in some way, either comma-delimited or tab-delimited. However, it’s really all just plaintext. To make changes to these configuration files, you would need to use a text editor like vi or emacs. Certainly, there are graphical editors as well, but if you are already working in a terminal window doing system administrative work, using a terminal-based editor like vi or emacs may simply be more convenient. Figure 6-13 shows a sample of a configuration file, /etc/login.defs, which provides all of the default settings for login sessions.

Figure 6-13 A sample configuration file, /etc/login.defs
NOTE If you are familiar with vi or emacs but would just as soon have a graphical editor, there are graphical implementations of each of these classic editors, providing you the command set you already know as well as a graphical implementation, allowing the use of a mouse and menus.
In addition to configuration, /etc hosts files may be used to look up information. One such file is the aliases database, which allows you to create aliases for common e-mail accounts so you don’t have to check another e-mail account for error logs or contact from external users. The postmaster account is one of these. It’s a well-known and common account and, in fact, one required by RFC 822. RFC 822 specifies the format for Internet messages and also suggests that all sites on the ARPA Internet have a commonly named account in case of problems. This means everyone would know what e-mail address to contact if you were running into problems with a particular e-mail server. Another commonly used file that stores information to be looked up by various utilities like netstat is the /etc/services file. The /etc/services file, as shown in Figure 6-14, provides the mapping between port numbers and services. These aren’t necessarily services that are running on the system but are instead a compilation of well-known ports and the services that run on them.

Figure 6-14 A services file
EXAM TIP The /etc/services file provides a mapping between services and ports. The file is based on information about well-known ports, which is managed by the Internet Assigned Numbers Authority (IANA).
Logging and Log Management
Logging is a critical component of system management. Without logs, it’s next to impossible to know what’s going on. Even when the logs are incomplete, or barely adequate because applications aren’t putting enough information into them, it’s far better to have something than nothing at all. Linux systems use the syslog standard for logging, although there are a number of programs that implement syslog like syslog, syslog-ng, or rsyslog. syslog not only has the ability to log information about what’s happening on the local system, but it also has the ability to log remotely to another system, sometimes called a syslog server or just a log server. Syslog communicates with systems it is sending log messages to over UDP port 514.
EXAM TIP Know the different facilities based on the short name used in the configuration files and what types of messages would get stored in logs for each facility.
Commonly, logs are stored in /var/log, although where each log is stored is entirely configurable, as seen in Figure 6-15. The configuration file specifies each facility, as well as the severity, and where the log file would go based on those parameters. Table 6-4 shows the facilities available in syslog, and the severities are ordered by highest severity to lowest: Emergency, Alert, Critical, Error, Warning, Notice, Informational, and Debug. An Emergency message is when the system is unusable. And while a Debug message isn’t typically used on a production system, it’s nice to have and make use of while you are debugging the initial deployment or development of an application. You may also note in Table 6-4 that it looks as though there are several facilities that may be used for authorization and security messages. In practice, facilities 4 and 10 are typically used, although 13 and 14 may also be used.

Figure 6-15 A syslog configuration file

Table 6-4 Syslog Facilities
Log messages can fill up disks on really busy systems, so it’s nice to have a log rotation tool that keeps the most recent log the way it is while compressing a handful of older logs. Each organization may have its own set of rules regarding how many days or weeks of logs to keep. Depending on how often the system is looked at may factor into decisions about how long to keep logs for. There may also be regulatory requirements for keeping logs for a certain period of time. Log messages may also be used for intrusion detection systems. At a minimum, you might set a log watcher utility that is configured to look for specific keywords and raise an alert or alarm when those keywords show up in the logs. This alone can provide a very rudimentary intrusion detection system, though having a system that is capable of correlating different log events is a far superior solution.
As noted earlier, syslog can be configured to send all logs to a central server. This provides several useful functions, including offloading disk space to a system that has a large amount of storage attached. Additionally, with logging from several systems all pulled together into one place, you can use a security information and event management (SIEM) solution to do the correlation of data, looking for trends and events that may be worth alerting on. Syslog servers are really designed to act in this way, making it easy to configure systems to log to a remote syslog server. Figure 6-16 shows the configuration for the rsyslog server with the UDP listener and a TCP listener turned on. $UdpServerRun is the UDP listener and $InputServerRun is the TCP listener. The other entries, starting with the @ sign, indicate logs to send off to a remote server. The *.* indicates that all facilities at all levels of severity would get sent to the remote server. You could get a finer level of granularity by sending different facilities to different servers if you wanted to do that. The server address starting with the single @ indicates that it’s a UDP connection, where the @@ indicates it’s a TCP connection to the server.

Figure 6-16 Syslog remote logging
Monitoring
Logging is only part of the story. Once you have logs in place, regardless of where they are, keeping an eye on them is essential. Logs can be useful after something bad has happened, but it’s even better to use them to identify something that is potentially bad so you can investigate and get it under control before the really bad stuff starts to happen. If you are shipping logs off to a log aggregation service, especially one that is a SIEM, it can do a lot of log watching for you, including setting off alerts if it sees something bad happen, such as a large number of authentication messages in your auth logs. If you don’t have a SIEM service and have just a few Linux systems, you can at least use something like logwatch, which is a utility that will pay attention to messages coming into your syslog files.
As with most Linux-based services, you are working with text-based files. When you have logwatch installed, you can look at the configuration in /etc/logwatch/ or, if your distribution doesn’t put default configurations into place for you automatically, you can go to /usr/share/logwatch/ and find a lot of configuration files there. You will find a directory there called services that will have configurations for monitoring different services. All of these configuration files are bundled up with the installation, regardless of whether you have the service installed or not. This means you can make use of just the configuration files you need. The configuration files for services will tell logwatch where to find the log files for that service. You may also need to tell logwatch where to find archived log files.
Once you have logwatch configured with the different services you have installed, as well as the different log files you want it to look at, it starts monitoring for you. Specifying an e-mail address and a means for logwatch to send e-mail will allow it to send messages to you with any findings as it runs.
Auditing
There is a source of log information that isn’t enabled by default, even if you have syslog installed. The kernel has facilities for logging events that take place on your system. You need the auditctl program and the auditd service that comes with it. Using auditd, you can catch kernel-level actions and log them. Essentially, you are looking for system calls and then generating log files for them when the call you have specified happens. What you end up with when you have a working audit system, though, is a set of logs that looks like this:
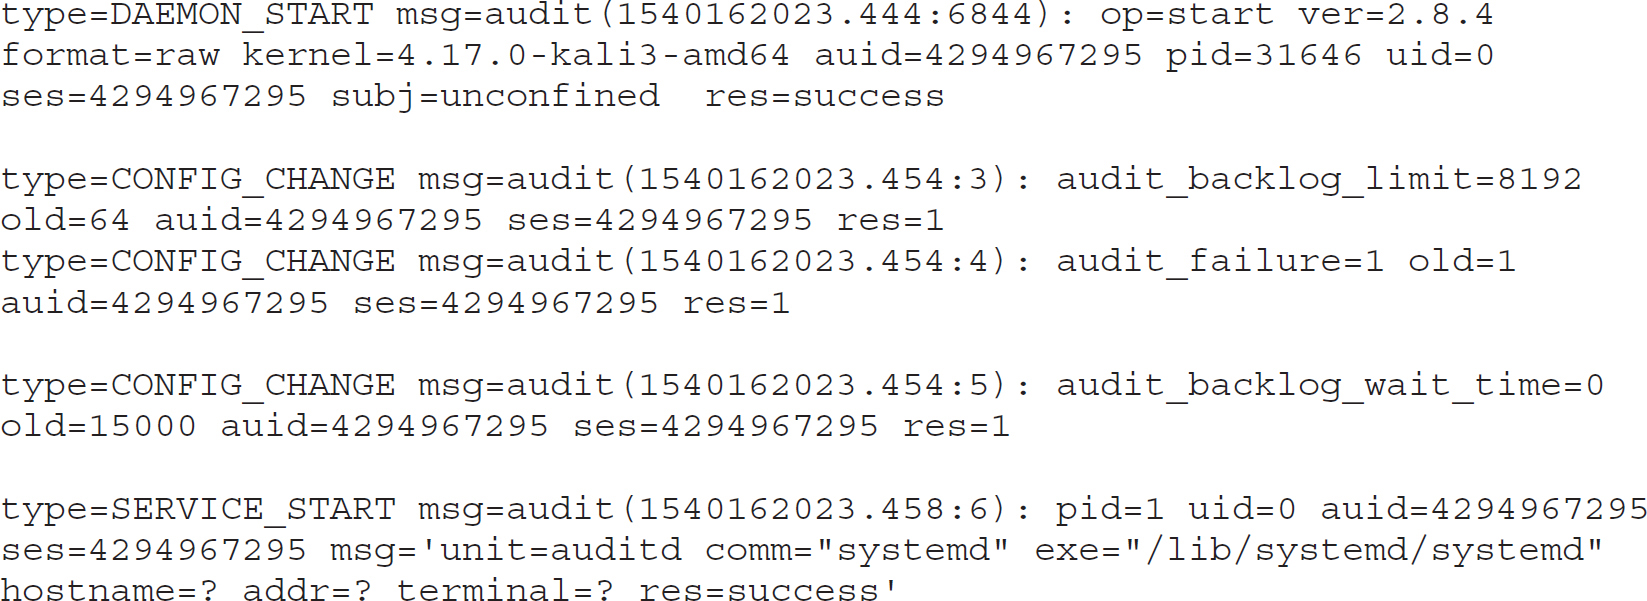
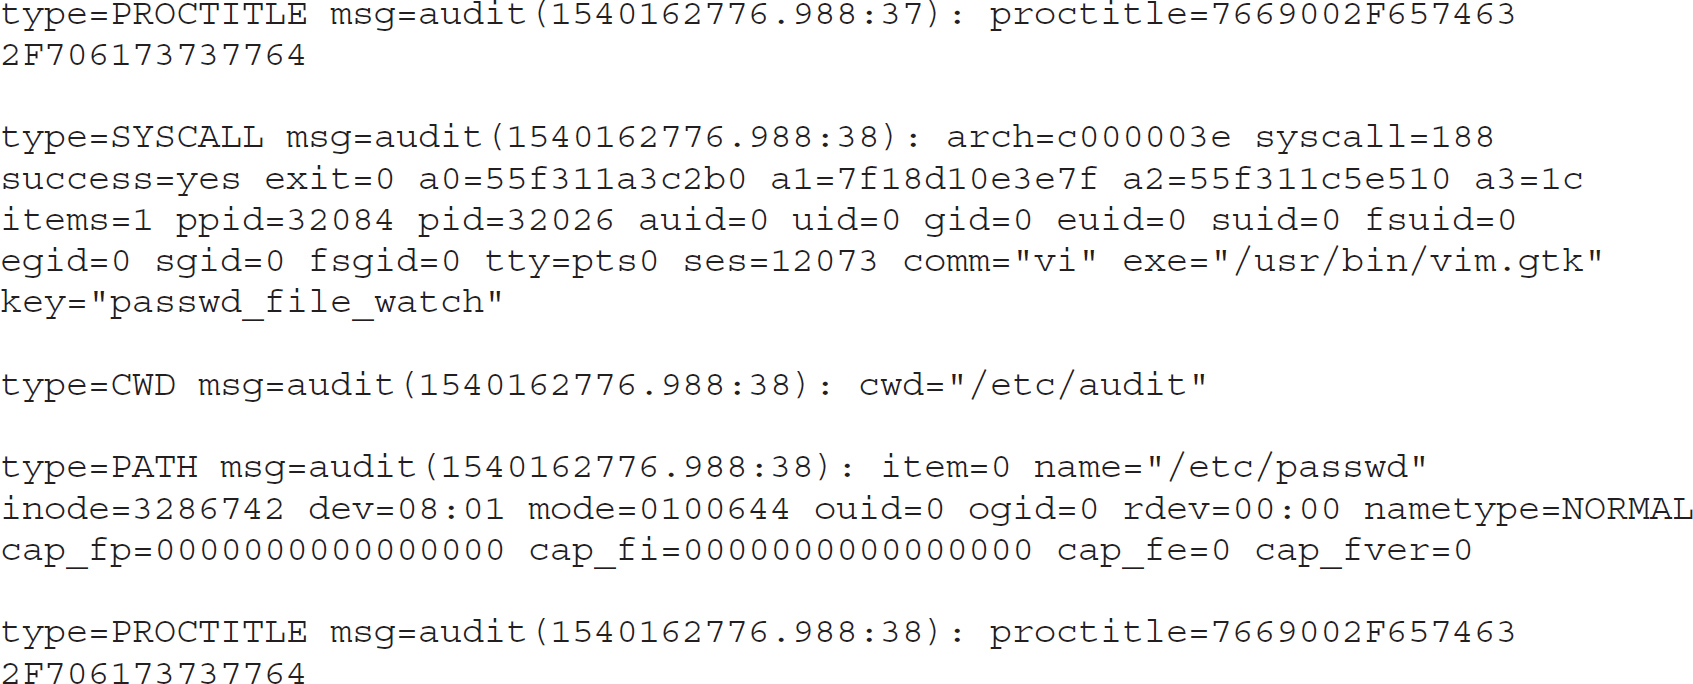
In order to get logs like this, you need to set up rules. Typically, you will find the auditd rules in /etc/audit/rules.d/. You will find a file there named audit.rules. If you look in /etc/audit/, you will also find a file named audit.rules, but that file is generated from the rules files that are found in rules.d/. When you edit audit.rules in the rules.d directory, auditd will automatically generate the file in /etc/audit/ for you. This will show you the rules that are in operation at any given moment, as long as it hasn’t been tampered with. The following output is from that file after I made some changes. In addition to setting parameters for auditd, there are two rules in place. The first rule looks for changes to the passwd file. A change will trigger a log message to appear with the message passwd_file_watch, as specified with the –k parameter. The –w sets a file watch, while the –p on that line indicates the permissions that have been used. The other entry looks for system calls where a process is exiting.

Once these entries have been added, the audit log looks different, as shown next, because you see any changes to the passwd file. You also see a number of messages with system calls, identified by SYSCALL. Each of these messages provides the process ID as well as the user ID and the group ID. Depending on the log entry, there will be other identifying information associated with the message.

Security Tools
Linux has inherited a number of the security-related issues that have long existed in Unix-like operating systems, some resulting from a number of common applications that run on those systems. Sendmail and BIND—used for e-mail delivery and DNS services, respectively—have a long history of vulnerabilities, though it’s not fair to single those two out since there have been several services that run under Unix or Linux with a lengthy history of vulnerabilities. Additionally, the Linux kernel itself has had a large number of vulnerabilities in the 25-plus years it’s been in existence. Because of this, there was a need for additional programs to enhance the security of the system. Some of these have been in existence for a long time, while others are more recent. Linux also comes with classes of vulnerabilities that result from the use of the C language, which was created as part of the genesis of Unix and was the language the OS was eventually written in. C programs don’t check the size of buffers (the memory allocated to store pieces of data) before writing the data into them. This has led to issues with buffer overflows and format string vulnerabilities, either of which may allow an attacker to take control of a system by executing code that was inserted into memory by the attacker.
Another issue that Linux inherited with Unix was the lack of ability to have granular access control over resources. Linux implements the User, Group, World (Everyone) model of permissions, and there are three permissions that can be set for each of those types or collections of users: read, write, and execute. There are additional bits that can be set on files that provide some additional capabilities, like the setuid bit, which is set on executables when you want the program to run with a certain set of privileges for the user that is set as the owner. In most cases, the setuid bit is used to have a program run with root privileges without actually having to be the root user to execute the program. You make root the owner, allow everyone else to have execute privileges, and then set the setuid bit.
One utility, chmod, offers you the ability to change the permissions settings on files and directories as well as utilities that allow you to change the user and group that owns the file or directory. It lets you set permissions as well as other bits on the file. chmod will allow you to set permissions for the user, group, or everyone individually, or it will allow you to set all the permissions all at once. To set all the permissions bits simultaneously, you must provide a numeric value. Permissions are set using a combination of bits of values 4, 2, and 1. The value 4 is read, 2 is write, and 1 is execute. Providing all permissions for the user, the group, and the world, you would set the value at 777. Providing all permissions for the user, read permission for the group, and no permissions for everyone (world), you would set the value at 740.
When you set permissions on a file or directory, you can assign to the owner any combination of read, write, or execute permissions that you want. Typically, you’d assign at least read and write since, as the owner, you probably want to be able to write and you can’t very well write without being able to read. Linux differs from Windows here by using a flag in the filesystem to indicate whether a file is executable or not. In Windows, the file extension indicates how the file is handled and the OS stores the mappings between file extensions and actions. A single group can also get a collection of read, write, and execute permissions. If you want to grant someone access to a file under Linux, you have to either put them into a group that has permissions to the file or give permissions to everyone. Figure 6-17 shows a file listing showing the file permissions. You can see the groups of permissions in the column on the left side.
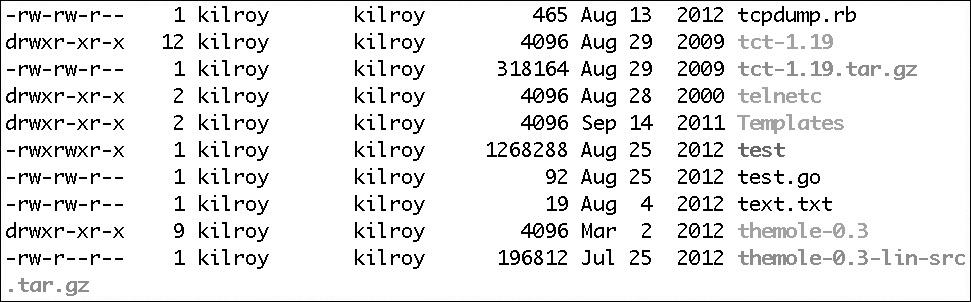
Figure 6-17 Sample permissions
Taking a look at the permissions for the first entry in Figure 6-17, tcpdump.rb, we see –rw-rw-r--. The first – would instead be a d if the entry were a directory (as in the second entry). Since there is no d, we know this is a regular file. The next cluster is the permissions for the user—in this case, rw-. This means that the user has read and write permissions, but because the execute bit hasn’t been turned on, the user can’t execute this script directly. The next cluster, rw-, is for the group that the user belongs to. In this case, the group is kilroy, the same as the user. The permissions are the same—read and write—for the group and the user. Finally, we have r--, indicating that everyone else on the system has read permissions. If you want to convert these permissions into decimal form, we have read and write, which have values of 4 and 2. Add those together and you have 6. World permissions are read only and read has a value of 4. All together, the user, group, and world permissions are 664 in decimal representation.
You’ll notice that there is only one group and one user that is given permissions to each file. Of course, there is always World (or everyone) but that doesn’t give us much flexibility to provide a lot of access to users on our system. The lack of ability to provide better access control on files and directories on Linux systems is part of what led to the development of SELinux.
SELinux
SELinux came out of the work of the National Security Agency (NSA), which released the first version in 2000 as a way of addressing the security shortcomings of Linux. SELinux set out to address some specific problems with the way Linux handled permissions, since it had inherited them from Unix. One issue is that users are allowed to set highly insecure permissions on files and directories that they have ownership of. Another is that processes are allowed to change permissions on files and directories that are owned by the user the process belongs to. One of the reasons for that problem (and a problem in and of itself) is that processes inherit the user’s rights and permissions. SELinux implements mandatory access control (MAC) into the operating system.
SELinux does take some configuration to establish all the roles and permissions, so there are three modes available. The first is disabled, which is simply off. The second is permissive, meaning that SELinux is in place but nothing is being enforced. This is useful for purposes of debugging and during policy development. SELinux does require planning and thought in order to implement it effectively. Users and roles have to be defined, as well as policies around permissions, including permissions for applications. Implementing SELinux is not something to be entered into lightly and can be daunting. As an example of the added complexity SELinux can bring, Figure 6-18 shows a file listing similar to that in Figure 6-17, except this time SELinux has been installed and the listing (using ls –Z) shows the mode, user, group, and security context of each file.

Figure 6-18 File listing with SELinux implemented
SELinux not only implements permissions on files, but can also be used to implement the same permissions on, for example, ports. You can ensure that only one particular process can open a given port by making sure that the process and the port have the same contexts within SELinux. You could also allow your web server to listen on ports other than the standard port 80. As an example, let’s say you wanted to allow your web server to listen on port 81 instead. You would need to allow that through SELinux. You could do this by adjusting policy using the policy management utility semanage. You would set the context type to http_port_t for port 81 using the command semanage port –a –t http_port_t –p 81. This means that the web server will be allowed to listen on that port because the port has the right context type for the web server.
Tripwire
Tripwire is an intrusion detection system originally developed in 1992 at Purdue University. In 1997, a company was formed to create a commercial version of the software, but there remains an open-source version as well. Tripwire is based around the idea that on most systems, there is a set of critical files that don’t change, and monitoring these files may result in detecting when an intrusion has happened. Tripwire maintains a database of cryptographic hashes of these critical files. Periodically, the filesystem is checked and current hashes get compared against the stored hash. If the hashes are different, the file has changed and an alert gets generated. This can run into complications when updates are applied since many of the critical files may get updated with current versions. These current versions would trip an alert unless the database was updated with the new information based on the update. Because of this, you probably want to install updates in a controlled fashion rather than just allowing your system to automatically update itself.
NOTE Gene Kim was a graduate student at Purdue at the time he created Tripwire with the help of his professor, Dr. Eugene Spafford (commonly called Spaf). Dr. Spafford was a leader in the response to the Morris worm in 1988 and helped create the Common Vulnerabilities and Exposures (CVE) service at MITRE. He also helped Dan Farmer create COPS, a simple security auditing program and the precursor to SATAN, which eventually led to tools like Nessus, Nexpose, and many others.
Tripwire has other functions outside of intrusion detection. Because of the way it works, it is a good program to have for configuration management, ensuring that a system configuration doesn’t change, and that if it does, an alert is issued since change may lead to breakage. Not all outages or bad behaviors on a system are caused by malicious behavior. Often, it’s inattentiveness or carelessness on the part of system administrators, or users attempting to administer the system. Tripwire can help ensure that critical files that were changed unexpectedly can be looked at to ensure the change hasn’t caused a problem. Ensuring the integrity of a system can be critical and a core security precept, so having a tool like Tripwire can be very beneficial.
It’s been determined to be so beneficial, in fact, that there have been several followers, both commercial and noncommercial. Linux packages like AIDE and Samhain are open-source intrusion detection systems that perform functions similar to Tripwire, with the goal of attempting to detect intrusions into your system where an intrusion is any unexpected or unwanted behavior, specifically around modification of critical system files.
iptables
Linux has long had a host-based operating system, in part because it has had to function as a server as well as a router and firewall, or at least there has been development that has allowed it to function as those types of devices. iptables is the latest version of a host-based firewall for Linux, which started with a set of kernel modules and utilities called ipfwadm that were then superseded by ipchains. ipchains was then superseded by iptables. iptables was implemented into the 2.4 kernel in 1998 and has been the Linux firewall ever since. iptables implements chains of rules, much like ipchains did, but extends the concept with tables that can be referenced to determine whether to filter a packet or perform Network Address Translation (NAT), for example. iptables is not only a set of kernel modules but also a utility that is used to install the rules. Rules can be appended or inserted into specific chains, based on the command-line parameters that are passed into the iptables utility.
iptables works as a set of commands, calling the iptables executable. You would pass different command-line parameters into iptables in order to get rules inserted or appended to a particular chain. As an example, let’s take a look at the following rules:

In the first line, we are appending (–A) to the INPUT chain. Any packet coming in on the first Ethernet interface on the system (–i eth0) will match this rule and be checked further. Any packet with a source address (–s) of 10.0.0.0–10.0.0.255 will continue to match here, so we will move on to checking the destination address. If the destination address (–d) falls into the range 192.168.1.0–192.168.1.24, it has matched the entire rule, and so we check the action (–j). The action in the first line says to log the packet. The second line says we should drop it. So, any packet coming into eth0 with a source address of 10.0.0.0/24 and destined to 192.168.1.0/24 will first be logged and then dropped.
Figure 6-19 is the output from iptables –L –v showing the list of rules that are currently in operation on the system. The –L flag shows the list of rules and the –v flag provides more verbosity. Without the –v flag, we wouldn’t have the detail about the interface being used. You can see rules where a specific interface was specified in the lines that have virbr0 under either the in or out columns. The additional verbosity gives the number of packets and bytes that have come through the firewall matching those particular rules.

Figure 6-19 iptables rules in place
Exercise 6-2: iptables Rules Exercise
What are the following rules doing?
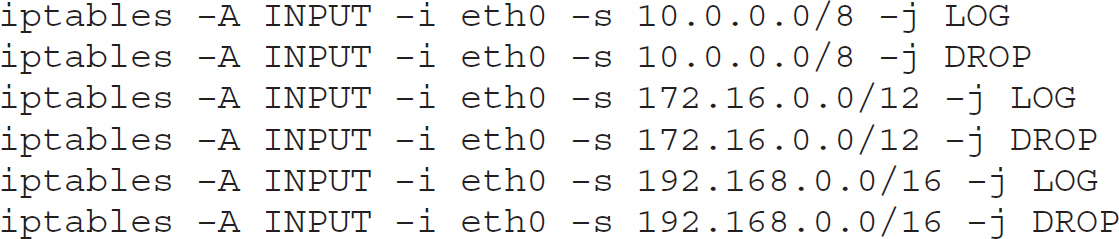
In addition to performing simple filtering, iptables also has the ability to perform masquerading functions such as NAT. If a Linux system has multiple interfaces, iptables can forward messages from one interface to another and manipulate the IP address as the packet passes through. This is often done to translate a private, RFC 1918 address on the inside to a public IP address on the outside. Performing NAT doesn’t preclude also performing filtering, of course.
firewalld
firewalld is the next generation of Linux firewall. Rather than the comparatively simple idea of iptables where you create stateful rules based around interfaces and IP addresses, firewalld adds additional functionality to accommodate a mobile system. If you have a laptop, you are constantly moving it from one network to another, and iptables likely can’t keep up with the regular changes of networks and the security requirements of those networks. This may mean you need to completely disable your firewall just to have a functional system if you are moving it around a lot. Instead, you can make use of firewalld, which introduces the idea of zones. You attach rules to zones rather than directly to the interface. The interface can then be placed into a zone with the right services and ports allowed. In order to manage firewalld, we use the command firewall-cmd. As an example, let’s say we wanted to allow the SSH service through our firewall. Here you can see the command that would be used to allow that:
sudo firewall-cmd --permanent --add-service=ssh
success
This doesn’t introduce the idea of zones, though. We haven’t indicated to firewalld which zone we want to allow this to happen on. In order to specify a zone, we can just add –zone=public, for instance, to this command. That allows us to say that any interface in the public zone is going to have SSH as a service that is allowed through. You may want to have different sets of services on private zones than you do on public zones. You may also have trusted and untrusted zones. When you move from home to work, for example, you will likely consider your device to be in different zones because the security expectations are different from one place to another.
AppArmor
AppArmor is similar to SELinux in that it implements mandatory access control (MAC) on a Linux system. Whereas SELinux uses labels in the filesystem itself, AppArmor doesn’t care about the filesystem in use, so AppArmor can provide the same functionality regardless of the type of filesystem mounted, whether it’s ext2 or NFS or FAT. AppArmor uses paths rather than identifying the specific inodes in the filesystem when it makes access determinations. Like SELinux, AppArmor is implemented using the Linux Security Modules kernel interface. While SELinux can be difficult to implement and administer, AppArmor is easier. An easier implementation can lead to a higher adoption rate, which may lead to systems less prone to exploitation and compromise.
Another advantage that AppArmor has is the ability to be set on a learning mode where nothing is prohibited but activities are logged. Those log files can then be used to create a policy. This may be beneficial if you don’t really understand the requirements of a particular application. Once you have determined what the application is doing by reviewing the logs generated by AppArmor, you can decide whether to proceed with the application, at which time you would create a policy for the application granting it the permissions it needs.
Hardening Linux
Hardening any operating system is an important activity. Often Linux is used in server systems that are more exposed to the Internet, meaning there are services that are listening that people on the Internet can connect to. This may be a web service, a mail service, or any of a number of other services users will commonly consume. This means that it’s particularly important that you harden the operating system. Hardening an operating system means performing administrative functions that will make it harder for any adversary to get unauthorized access. Among other activities, hardening the operating system can mean limiting the number of packages on a system, removing all unnecessary services, and ensuring permissions are set appropriately. It may also mean making use of a mandatory access control package like SELinux. While the tasks individually aren’t very complicated, it can be a lot of work to make sure you are doing the right thing—allowing all the right services to operate so users can get work done while at the same time making sure you haven’t left any exposures that an adversary can take advantage of.
Limiting the Number of Packages
First, we can look at reducing the number of packages on a system as a way of hardening it. The best way to do this is to start with as minimal an installation as your Linux distribution will accept. On a distribution like Ubuntu, you can select the server installation. This should keep you to the bare minimum of packages necessary to set up a server—whether it’s a web server, SSH server, DNS server, or some other type of server. If you have been handed a Linux installation and need to get a listing of all the packages installed, you can do something like the following code. On a Debian-based system, like Ubuntu is, you can just use the apt command to get a list of all installed packages.
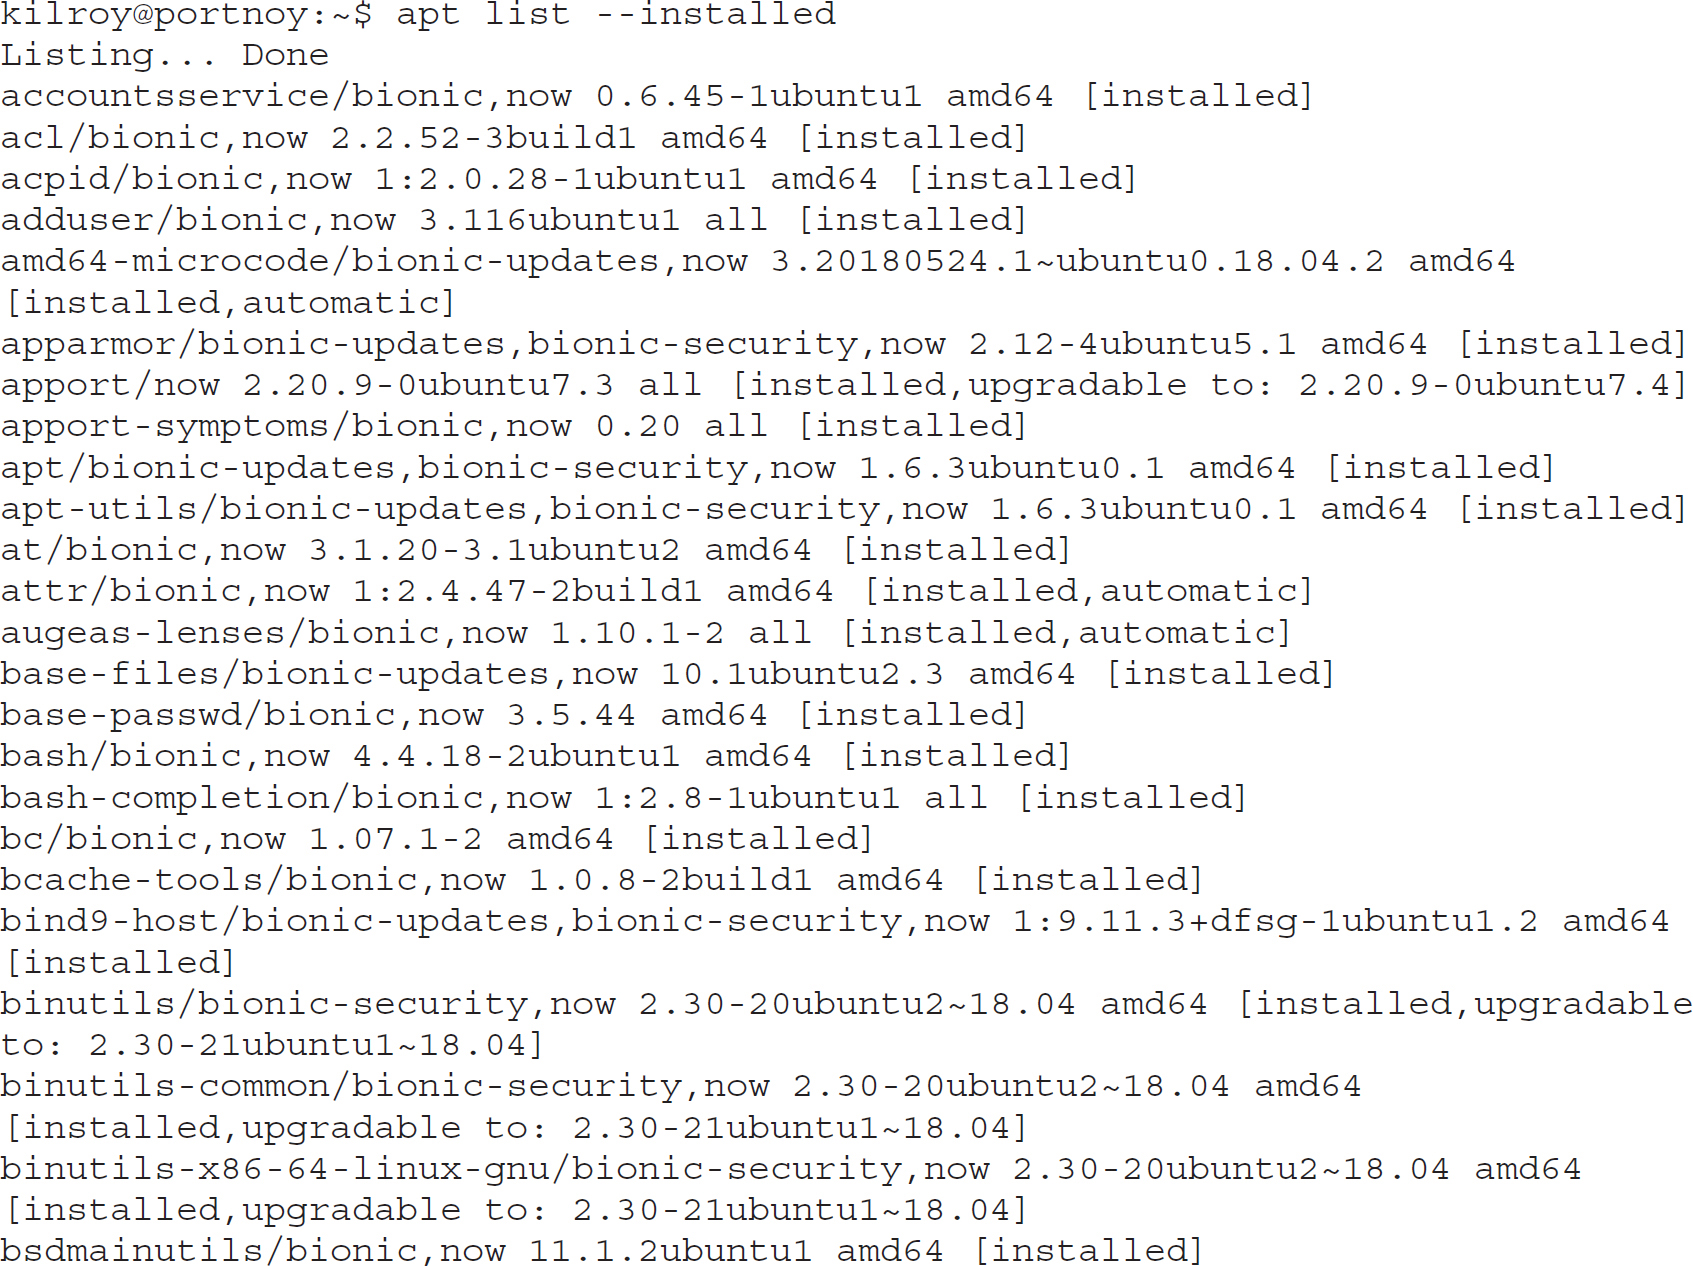
RHEL-based systems use a different command for package maintenance. Listing all the packages installed on a RHEL system, you could use rpm –qa, which would query the package database and return all the packages. These two systems and their respective commands should cover nearly all the Linux systems you are likely to run across, especially if you are looking at server-based systems. You may run across something like a Gentoo system or an Arch Linux system, but those would be highly unlikely. If you find a package you don’t want, you can use apt or rpm to remove them. The command apt remove will work, when used with the package name, to remove the package from the system. Similarly, using rpm –e will erase packages from a RHEL-based system.
Removing Unnecessary Services
Fortunately, system hardening is not as complicated when it comes to managing services. Most all systems have moved away from the old init-based system to the newer systemd. This allows for a lot of improvements over init, including faster boot-up times. If a system is using systemd, you would use the command systemctl to manage it. Removing packages will automatically remove a service, since the service is no longer installed to run. Should you need to, you can take away the ability for services to run automatically by using the systemctl command. If you just want to keep a service from running and, for whatever reason, you can’t just remove the package, perhaps because it’s a dependency of another required package, you can just use systemctl disable followed by the name of the service. This will keep the service from starting up at the next boot of the operating system. In order to shut it down right away, you would use systemctl stop, again followed by the name of the service. Service names can vary from distribution to distribution, however. In order to check the name of the service—the one that systemctl will recognize—you would use systemctl list-unit-files –type=service. You can see the output from that command:

One of the advantages of systemctl over init is the ability to have dependencies. Some services will rely on another service. When the service configuration file is created, the dependency would be identified. Any dependency would be started automatically when the service that relied on it was started. This is one way to pick up unexpected services. You may find that one of the services you have identified as not needing to run because it isn’t needed is actually required for a critical service to function correctly. You can also specify orders of operations using systemctl. In order for one service to start, for example, it may require another service to be running. As an example, services that start up the network, including obtaining an address and starting up the interfaces, would need to be running before any service that listens on the network.
Ensuring Permissions Are Set Appropriately
Permissions are a persistent problem. It’s not uncommon for permission creep to happen on a system. Permissions get changed in order to accomplish a task and then aren’t reset to where they should be. A user may get added to a group that owns certain files, but later that user may no longer need to belong to that group. There are many situations where permissions creep can happen. Periodic audits of users, groups, and file owners for important files on the system is important.
One of the biggest issues when it comes to file permissions, though, is executables that have the setuid or setgid bits set. When these bits are set, the executable takes on the permissions set of the owner of the file rather than the user who is running the executable. This is how normal users can perform what are technically administrative functions, such as looking at the network interface configuration or performing a traceroute. In many cases, the setuid files will be owned by root because they need to pick up some administrative permissions just for the time the program is running. If an attacker were to find a vulnerability in that program, though, they may be able to exploit it to perform tasks as root. For this reason, you will find that most distributions no longer have setuid or setgid executables. If you need to look for them, though, you can use the find command, as you can see here:

Another aspect of hardening is to ensure that any packages that an attacker could use to create additional attacks are not in place. This includes compilers. In truth, this rule was far more relevant in the days when attackers often didn’t have the same systems as the ones they were attacking. In order to create an executable for an AIX system on a PowerPC processor, the attacker would need to compile the attack program on the system. These days, it’s just as likely for the target to be using an Intel-based processor architecture and a common operating system, so it’s just as easy to compile programs elsewhere and push them to the target system. Still, making sure you haven’t left too much to help out the attacker is important.
Chapter Review
Linux inherits a long history from Unix, although there are certainly a few differences between them. It was really Linux that has generated a lot more users, in spite of the popularity of Unix with academics and engineers. With users come usability issues, as well as a tougher balancing act between security and usability. While you may be able to get an engineer to do their job in a particular way because it’s better for the system or more secure, it’s harder to tell an unsophisticated user that they need to jump through a lot of hoops to do the simple things they want to do.
Linux does have the weak file permissions it inherited from Unix, but that has been addressed with extensions like SELinux and AppArmor, implementing mandatory access control and thus providing stronger protection of the resources on the system. Unix has long had a history of providing logging facilities and providing a lot of flexibility and control over the way the system and applications log items, as well as what gets logged. This logging can help with troubleshooting as well as providing the ability to look for security issues. Logs can be combed to find specific keywords that may detect an intrusion. Unix has also generated host-based intrusion detection solutions like Tripwire, and since Linux is compatible with Unix, Tripwire has been ported to run under Linux.
Any system has vulnerabilities and ways for attackers to get unauthorized access. One important thing is to be able to detect anything bad that may be happening. Fortunately, there are multiple ways to do this on a Linux system without adding any third-party software, outside of the distribution. First, syslog is essential. Services and applications, not to mention various elements of the system as a whole, such as authentication, generate logs that are important not only for troubleshooting and debugging but also for providing a way to detect when something unexpected or unauthorized happens. Software like logwatch can help with that. In addition, you can use the auditing system to watch files and directories for access attempts, as well as watching system calls. Any output from the auditing subsystem can also be watched for unexpected activity that can be alerted on.
Linux has firewalling capabilities, including iptables, which provides a way to create a stateful firewall. It also can perform NAT, which can allow Linux to be used as a full-fledged network firewall. However, modern systems may move around a lot and host-based firewalls often use the idea of zones to create a set of rules that apply in some situations but not in others. Firewalld is the new firewall and it’s managed by firewall-cmd.
Linux does provide a lot of flexibility and a number of ways to interface with the system. That flexibility does provide risk in terms of the potential for abuse, possibly leaving the system open for exploitation. Fortunately, there are a number of tools that can assist you in ensuring that the system remains safe and free of exploitation and compromise.
Hardening any operating system is an essential task and one that requires skill and experience. It’s a misconception to think that Linux is hardened out of the box. It’s entirely about the distribution and the selections the user makes when it’s installed. This means removing any unnecessary packages and not selecting “Everything” when you install the system. If you are going to install everything, be aware that the more software that’s installed, the more exposure to compromise you have. Setting correct file permissions is important. This brings in the importance of making sure users and groups are set appropriately so the permissions don’t have to be wide open. System services are often an issue, since network services can be exploited. Reducing the number of services, meaning software running in the background, is important. You can use systemctl as a way to manage system services on a systemd-based system. On an init-based system, you would adjust scripts that are run based on the runlevel the system is set to.
Questions
1. PAM provides the ability to protect passwords in what way?
A. It encrypts them.
B. It stores them in the /etc/passwd file.
C. It checks that a password meets a specific policy.
D. It creates a backup copy of the password in the shadow file.
2. File permissions can be set using which utility?
A. chmod
B. chroot
C. chfile
D. chperm
3. Based on the following syslog configuration, where do login messages get stored?

A. /var/log/user.log
B. /var/log/daemon.log
C. /var/log/kern.log
D. /var/log/auth.log
4. If you wanted to find statistics on the inet process (process id 1) on your filesystem, where would you look for it?
A. /dev/proc/1
B. /proc/1
C. /home/1
D. /1
5. If you were to apply the permission 744 to a file, what permissions would user, group, and world get?
A. User: Read; Group: Read, Write; World: Read, Write
B. User: Read, Write; Group: Read, Write; World: none
C. User: Read, Write, Execute; Group: Read; World: Read
D. User: Read, Write; Group: none; World: none
6. Tripwire provides which of the following security functions?
A. Firewall
B. Password cracker
C. Vulnerability scanner
D. Intrusion detection system
7. Which key press generates a SIGINT signal?
A. CTRL-V
B. CTRL-C
C. CTRL-I
D. CTRL-S
8. Which file stores mappings between ports and the names of applications associated with them?
A. /etc/proc
B. /etc/system
C. /etc/services
D. /etc/protocols
9. You need a utility that will show you CPU usage of individual processes, updated every three seconds. Which utility would you use?
A. top
B. ps
C. kill
D. killall
10. What does the following iptables rule do?
iptables –A INPUT –j DROP
A. Appends input
B. Allows everything out
C. Drops all inbound traffic
D. Logs all inbound traffic
11. If you wanted to implement zones in your firewall—which may be useful for a mobile system or a multi-interface system—what software would you use?
A. firewalld
B. iptables
C. logwatch
D. auditd
12. Monitoring changes to directories and files can be achieved with which software?
A. firewalld
B. logwatch
C. auditd
D. SELinux
13. What essential actions would you perform to harden a system?
A. Implement a stateless firewall, monitor logs, and audit files
B. Audit files, tighten file permissions, and limit services
C. Limit services, reduce packages, and audit files
D. Restrict permissions, reduce packages installed, and limit services
14. How would you get a list of services installed on a system that was using systemd rather than init?
A. logwatch
B. ps aux
C. systemctl
D. firewall-cmd
15. Monitoring a Linux system could be done using what software?
A. logmon and a SIEM solution
B. logmon and syswatch
C. logwatch and syswatch
D. logwatch and a SIEM solution
Answers
1. C. PAM can check that a password meets a specific policy. While passwords run through the crypt() utility, it is crypt that handles encryption. Passwords are not stored in the passwd file, and a backup isn’t stored in the shadow file. The primary copy may be stored in the shadow file if another storage mechanism isn’t used.
2. A. chmod changes the file mode bits. chroot changes the root of the system, and chfile and chperm don’t exist.
3. D. The auth.log is where authentication messages are logged. While it may be tempting to go for the user.log, that’s where user processes log. kern.log is for kernel messages, and daemon.log is for services.
4. B. The /proc filesystem is where process information is stored. This is a virtual or pseudo-filesystem that’s populated by the kernel and based on the processes that are running.
5. C. Read has a bit value of 4, Write has a bit value of 2, and Execute has a value of 1. 7 is 4 + 2 + 1 so User gets Read, Write, and Execute. 4 is Read, so Group and World both have Read permissions.
6. D. Tripwire is an intrusion detection system that was developed at Purdue University. It introduced a number of innovative techniques and primarily works by ensuring that critical system files haven’t changed.
7. B. CTRL-C generates a SIGINT to interrupt and stop a process/application.
8. C. The /etc/services file stores the mapping between port numbers and the services or daemons that they belong to.
9. A. While ps will provide information about processes, top will provide information about CPU usage as well as the processes that are running.
10. C. The iptables command appends to the INPUT chain and, without anything to match, just jumps to the DROP target, meaning that all input is dropped.
11. A. The firewalld software is the next-generation Linux firewall. It implements zones, in addition to providing the same functionality as iptables. logwatch is used for monitoring logs and auditd is the auditing system.
12. C. auditd is the software used to audit kernel-level events, including system calls and file access. firewalld is the Linux firewall. logwatch is used to monitor log files for events to alert on them. SELinux implements mandatory access control.
13. D. Hardening a system would definitely include tightening file permissions where possible, reducing the number of packages installed on a system, and limiting or reducing the number of services running on a system. Firewalls are a good idea but they are not essential on an endpoint. While auditing files may be useful, it’s not considered an element of system hardening. The same is true of monitoring logs.
14. C. The systemctl command is used to interface with systemd. You can get a list of all the services that are installed on a system, whether they are running, enabled, or disabled. The ps command is used to get a process listing, which is different from a service listing, even if services would be included in the process listing. logwatch is a log monitoring program, and firewall-cmd is used to manage the firewalld firewall.
15. D. logwatch is a software package that will monitor logs on a Linux system. A SIEM solution can be used to monitor logs that are sent to it, which could be done using syslog from a Linux system. logmon and syswatch are not Linux programs.
Exercise Answers
Exercise 6-1
You will get output similar to Linux bill 3.2.0-27-generic-pae #43-Ubuntu SMP Fri Jul 6 15:06:05 UTC 2018 i686 i686 i386 GNU/Linux from uname –a. The kernel version from that is 3.2.0. You can get just the release of the kernel by typing uname –r, which would provide you, in the case presented here, with 3.2.0-27-generic-pae.
Exercise 6-2
The rules log and then drop all inbound connections from RFC 1918 addresses. –A appends the rule to the INPUT chain. All packets coming in on interface (–i) eth0 are affected by this rule. The –s flag indicates a source address where the packets are originating from. All of the source addresses in the list of rules are RFC 1918 addresses. Since these are, by convention, not routable on the Internet, they are dropped because any reply can’t get back. Prior to dropping, however, we are asking that the packet get logged. Since packets originating from these addresses may be part of an attack, it’s worth logging in case we need the data to follow up with later on.