
Chapter 13. Facial Animation Setup
CD Files
Kila_Combined.mb
Kila_FaceBind.mb
Kila_FaceRig_BS.mb
Kila_FaceRig_Jnt.mb
Kila_FaceWeight.mb
Kila_MainRig.mb
Grae_Combined.mb
Grae_FaceBind.mb
Grae_FaceRig_BS.mb
Grae_FaceRig_Jnt.mb
Grae_FaceWeight.mb
Grae_MainRig.mb
KilaBody.tga
KilaHair.tga
KilaHead.tga
GraeBody.tga
GraeMisc.tga
GraeWing.tga
GraeBody_Bump.tga
GraeMisc_Bump.tga
GraeBody_Spec.tga
GraeMisc_Spec.tga
With each generation of hardware comes more scope for graphical detail. Facial animation is fast becoming a major element of video games; characters can not only speak but also express emotions. It used to be that a simple joint acting as a jaw was enough. This allowed the character’s mouth to open and close, but the illusion failed to bring the character to life; instead, it looked more like a puppet.
Two of the most popular methods today of real-time facial animation use either joints or blend shapes. Joint-based animation simply uses a series of joints placed around the face that, when moved, serve to animate the character’s face. Blend shapes, or morph targets, use duplicates of the face as a reference. The main face then morphs into the vertex-modified reference shapes.
This chapter demonstrates how to set up your characters using joints and using blend shapes, so that you can make up your own mind about which one to use in a particular situation.
Your choice will depend heavily on the game engine, so consult with the lead programmer first before embarking on a particular method. In addition, discuss the matter with your manager before you start work. Find out exactly what the character will need to do. If all it will ever do is blink, then there is no need to spend time creating multiple face shapes.
Joint-Based Facial Animation Setup (Kila)
The most obvious way to animate a character’s face is to use joints, because we are already employing them to animate the body. We simply place joints at certain places around the character’s face, which will then act like muscles, moving the vertices around and animating the face.
Where do we put facial joints to get the best facial expressions on Kila?
![]() We need one to operate the mouth, opening and closing the jaw.
We need one to operate the mouth, opening and closing the jaw.
![]() For the eyes, we’ll add joints that operate the eyelids.
For the eyes, we’ll add joints that operate the eyelids.
![]() Joints at several locations around the mouth will give movement to the lips, enabling the character to form words.
Joints at several locations around the mouth will give movement to the lips, enabling the character to form words.
![]() The eyebrows contribute a lot to facial expression, so we can add joints to move these as well.
The eyebrows contribute a lot to facial expression, so we can add joints to move these as well.
![]() If our budget allows, we can add the ability to animate the tongue.
If our budget allows, we can add the ability to animate the tongue.
![]() Two more joints will add movement to the cheeks.
Two more joints will add movement to the cheeks.
This list includes quite a few extra joints, so for your own project, make sure you have room in your budget. In this chapter, we will implement them all.
Joint Placement
As we did with Kila’s breasts, we will rely mostly on the translations of joints to animate the face. We only need to add joints to the left side of her face, and then mirror these to create the right side.
1. Open up the file Kila_MainRig.mb and, using the visibility controller we added in Chapter 12, turn off all the icons.
2. Switch to the side view, and hide her hair and the main skeleton so you can concentrate on her face. Turn the geometry layer visibility to Template.
3. Using the Joint tool found in the Skeleton menu, place Kila’s jawbone as shown in Figure 13.1a. Call the first joint Jaw, and the second Jaw_Tip.

4. Place three joints that will control her tongue, using the actual tongue geometry to guide you. Call these TongueBase, TongueMiddle, and Tongue_Tip, before parenting TongueBase to the Jaw joint (Figure 13.1b).
5. Following Figure 13.1c, place two single joints in exactly the same place as the eye joint. (You will need to make the base skeleton visible again for this step. Set it to Reference, so that you will be able to snap the new joints to the ones on the base skeleton.)
We need the eyelids to follow the same rotations as the eyes, so these joints need to be in the same position as the eye joint. Use the Point Snap tool to position them correctly, and call them L_UpperLid and L_LowerLid.
6. Add three separate joints around her lips, placing one at the top, one at the corner of her mouth, and a final one on the lower lip (Figure 13.1d). Call these L_UpperLip, L_OuterLip, and L_LowerLip.

7. Place two joints along the eyebrow, calling these L_InnerBrow and L_OuterBrow (Figure 13.1e).
8. Create a joint that will animate her cheek, calling it L_Cheek (Figure 13.1f).
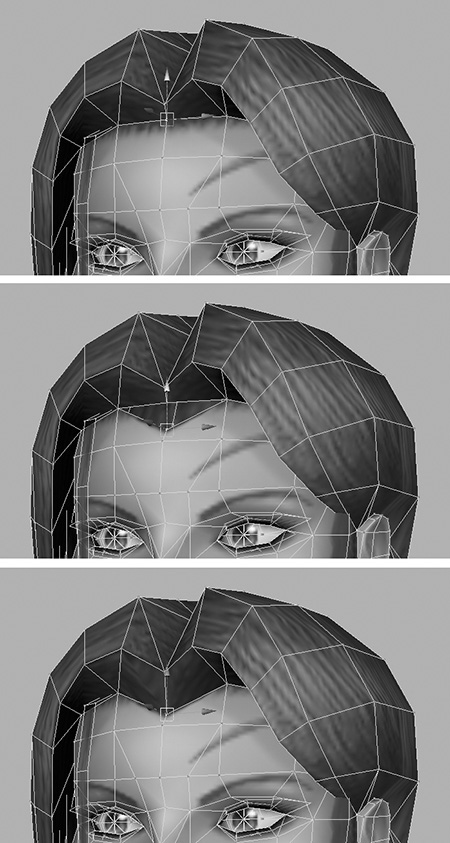
9. Switch to the perspective view now and move all except the jaw and tongue joints away from the center, placing them in the areas for which they were intended (Figure 13.2, middle).

FIGURE 13.2 Move the new eye, eyebrow, and cheek joints away from the center and into their correct places.
Note
As illustrated in Figure 13.2, right, make sure the joints lie half in and half out of the actual geometry. This way, they will give an accurate movement when animated.
10. The joints are now in position, so make the main skeleton visible again. Then parent all the joints except TongueBase, TongueMiddle, Tongue_Tip, Jaw_Tip, and LowerLip to the main head joint. Parent the LowerLip joint to the jaw joint because it will move with the bottom jaw.
Tip
You may find it easier to select the joints in the Outliner. A quick way to navigate through the hierarchy is to select any of the joints belonging to the face in the main view; then right-click in the Outliner and select Reveal Selected. You will be taken to the selected joint in the Outliner, which in turn will reveal the rest since they all lie in the same place.
Next, simply use the Mirror Joint tool to copy each joint across, creating the right side joints. Do all except for the jaw joints.
1. Select one of the new face joints and go to Skeleton > Mirror Joint.
2. In the tool options, set Mirror Across to YZ. Under the heading “Replacement names for duplicated joints,” put L_ in Search For, and R_ in Replace With.
This will automatically rename the joints for you so that they represent the right side.
3. Click on Apply to mirror the joint and keep the window open. Now repeat this for each of the remaining face joints.
Note
Remember to reset each joint’s rotational axes, especially after you have mirrored them. Select all the new joints and use the rsJnt button on the GCDM shelf. Use the orJnt button on the jaw and tongue joints.
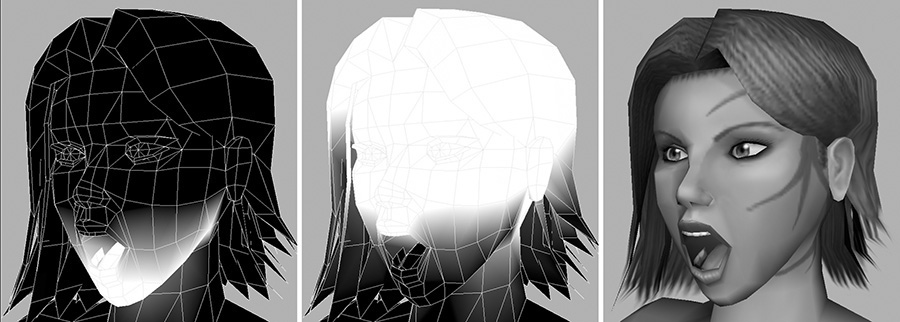
You can see in Figure 13.3 that the face is looking pretty complicated right now, and to an animator this would be a nightmare to pose. But we can rig the face just as we did the body, making it easier to get basic poses and mouth shapes. In order to do this, the joints must first be bound to the mesh and their positions tested.

Preparation and Binding
Although binding isn’t covered until Chapter 14, “Final Character Deformation,” we want to make a start now on this process so that we can fully rig the face.
To successfully bind Kila, we need her to be a single object. Your game engine may not handle multiple objects, so in this case it’s safest to combine Kila’s polygons.
1. Select each element that makes up the highest level of detail and go to Polygons > Combine. This will create a single object; rename it to Kila_LOD01.
2. Because she started out as separate objects, combining Kila won’t have welded the vertices between each element. Look at Figure 13.4, middle. At the line where her head meets her hair, there are two vertices lying on top of each other. You can easily select one and move it down, which creates an undesirable hole.
To fix this, select all the vertices of her head and hair and go to Edit Polygons > Merge Vertices, setting the value to a small number such as 0.0001. This way, only vertices that lie on top of each other will be welded (Figure 13.4, right).
3. Double-check each area that this welding should have affected, including the hairline, eyelashes, and inner mouth. Make sure that the lips, though, have not been merged.
4. Combining Kila into a single object will have placed the geometry out of the LOD group, so quickly make sure she is again parented to the Kila4096 group. This will ensure the LODs still work.
5. Delete the history on the mesh.
Note
There may be a stray node still in the Kila4096 group; this may have been missed when we deleted her history. She is a single model now, though, so it’s safe to delete this node. Use Hypergraph or Outliner to check for this issue.
The first LOD for Kila is now a single mesh, which will make her easier to work with. Now let’s connect her to the base skeleton.
1. In the Outliner, navigate to the first joint of the base skeleton; this should be called Root. Select it and open up the hierarchy by Shift+clicking on the plus sign (+) next to Root.
2. Go to Edit > Select Hierarchy to select all the objects beneath Root.
3. Although the skeleton hierarchy is selected, you don’t want to bind all the joints. Scroll down the Outliner and, holding Ctrl, deselect all the joints ending with _Tip. These are only here as visual aids and don’t deform the character.
Also make sure you only have joints selected. Unselect any icons, constraint nodes, or effectors (which are part of the IK system and usually named “effector”) that may also be selected.
4. With just the correct joints selected, hold Shift and add the Kila mesh to the selection.
5. Go to Skin > Bind Skin > Smooth Bind and open the options. For Bind To, choose Selected Joints, and for Bind Method, choose Closest Joint. Set Max Influences to 3, and Dropoff Rate to 4.
6. Click on Bind Skin, and the skin is now attached to the base skeleton. You can test this by moving some of the control icons (Figure 13.5, right).

On the GCDM shelf, you’ll find a button labeled Bind. This will automatically select the joints needed and bind the selected skin to them, while making sure no unwanted objects are included.
Save the scene as Kila_FaceBind.mb.
We will leave binding the rest of the body until Chapter 14. For now, let’s concentrate on the job at hand and edit the weighting information on the face.
Joint Weights
Since we covered the various weighting tools and options in Chapter 6, we can now get right to it and work on the facial joints.
Note
Unless specified, we will mainly be using the paint operation Replace, from the Paint Weights pane in the Paint Skin Weights options.
We will be moving the joints around, so it would be prudent for us to first store their current translations. Since the joints’ translations cannot be frozen, we will set a keyframe on them, thus storing their default pose.
Figure 13.6 shows the Time Slider at the bottom of the Maya window (the main bar with numbers in it). This controls time in Maya; simply clicking in the slider will alter the frame you’re on. We will discuss the Time Slider in more detail in Chapter 16, “Animating for Games.”

On the Time Slider, make sure you have frame 0 selected; then select all the joints associated with the face. Right-click in the Channel Box and select Key All from the menu. The attributes will turn orange to indicate they are keyframed. We have thus stored the joints’ positions at frame 0; you will be able to see a thin red line indicating that the selected object has a key set on it. We can still move the joints around, but to return them to their default pose we need only click on frame 0 in the Time Slider. The only way to store a new pose would be to set another key.
With the joints, positions safely stored, let’s look at adjusting the weights on her jaw and lips.
Jaw and Mouth Weights
The jaw joints are first; they’ll allow us to open and close her mouth.
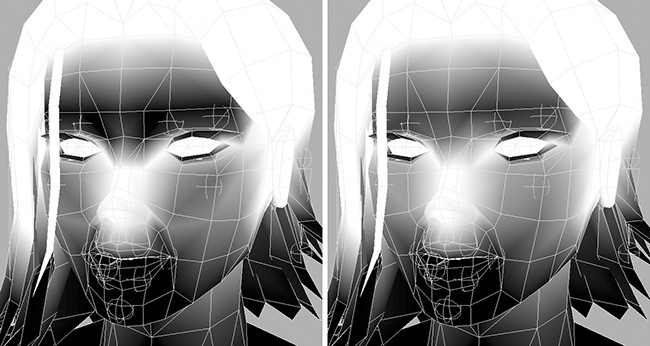
1. Make all the icons invisible. Focus in on the face and make sure you can see the base skeleton (Figure 13.7, left).

2. Following Figure 13.7, right, rotate the main jawbone down to where the mouth would be open. As you can see, the weights are not distributed properly, so you need to go in and tweak them.
3. Select the main character model, and go to Skin > Edit Smooth Skin > Paint Skin Weights Tool and open the tool’s options.
4. Set both Brush Opacity and the Paint Weights Value to 1, and select the Jaw joint so that you can edit its weights (Figure 13.8).

5. Using the solid brush, fully weight the bottom of the jaw (including her bottom teeth and tongue) to the Jaw joint.
6. Reset the Paint Weights Value to 0.5, and paint over the middle of the mouth at the corners and cheeks (this is the area halfway between the upper and lower lips), as seen in Figure 13.9, left.
7. Select the head joint, and set Paint Weights Value back to 1. Fully weight the top of her head (including her upper teeth and lip) to this joint (Figure 13.9, middle).
As you can see in Figure 13.9, right, the mouth now looks better when it is open. But the problem now is that it’s too round when open, so we need to bring the sides of the mouth in.
We will now adjust the weighting for the lip joints we created. This will help to adjust the shape of her mouth when it is open.
1. Reset the joints back to their default positions by moving the Time Slider to a different frame, and then back to frame 0.
2. Move outward all six joints that will operate the lips (Figure 13.10, right). When they’re weighted, these joints will open the lips but keep the teeth together.

Because we fully weighted them to the jaw and head joints, the vertices around the mouth are being told to ignore the lip joints. Let’s attend to this next.
3. With a softer brush and a smaller Opacity value (say, 0.10), start to add weighting information for just the left three lip joints. Make the vertices on the inside of her lips almost fully affected by the joints, with the influence gradually fading as you get farther from the mouth. This will cause the lips to flatten slightly as they part, just as they would do naturally.
As you are adding the weights, you will see the lips begin to open up, with the vertices moving gradually toward the joint you are working on (Figure 13.11b).

4. When you are happy with the weights, you can mirror them across to the joints on the right side of her mouth. First, though, you have to reset the joints back to their default position; if they are not reset, the weights will not mirror properly. In this case, it’s as simple as returning to frame 0.
5. Select the geometry and go to Skin > Edit Smooth Skin > Mirror Skin Weights, setting Mirror Across to YZ and enabling Positive to Negative as the Direction. The weights will now be copied across, as shown in Figure 13.11c.
Work more on the shape of the lips; they should look like those in Figure 13.11d. To add additional realism to the face make the upper lips influence her nose slightly. Keep opening the mouth up (Figure 13.11e) to get a better idea of how the mouth looks with the new weights. Remember, though, that you will now have to position the outer lip joints, too, since these will control the corners of the mouth.
When you’ve finished this phase of weighting and adjusting, Kila’s jaw and lips will be fully controlled by the joints.
Now we will complete the mouth by adding control to her tongue. Again, it’s quite difficult to get to the tongue in order to weight it properly, so first open Kila’s mouth some to expose the tongue more. We will now isolate it so that we can work on it more easily.
1. Right-click on the Kila model and select Face, switching to face editing mode.
2. Go to Edit Polygons > Selection > Selection Constraints, which opens the dialog box seen in Figure 13.12. This tool allows you to alter the way you select things.

3. Near the bottom of the dialog box are the Propagation radio button selections. Selecting Shell will automatically expand our next selection to contain all the connected faces.
4. Navigate inside Kila’s head to the tongue and select any face on it; with the new selection setting, this now selects the entire tongue.
5. Click on the Close and Reset button in the Polygon Selection Constraints dialog box.
6. With the tongue selected, go to Show > Isolate Select > View Selected in order to work on just the tongue (Figure 13.13a).

7. You want the joints to be visible, too, so use the Outliner to select the TongueBase and TongueMiddle joints. Then go to Show > Isolate Select > Add Selected Objects to make these visible (Figure 13.13b).
8. As seen in Figures 13.13c and 13.13d, rotate the tongue joints down along the X axis. Then select the tongue geometry and open the Paint Skin Weights options.
9. Fully weight the whole tongue to the TongueBase joint (Figure 13.13e).
Although you can’t see the rest of the geometry, the paintbrush will still be able to select it, so make sure you are actually on the tongue before you apply any weights. Once you know you’re on the right spot, try to keep the mouse button held down because the brush will then move over the adjoining faces.
10. Finally, weight the lower half of the tongue to the TongueMiddle joint (Figure 13.13f).
11. When you’re finished, reset all tongue joint rotations back to 0.
The mouth area is now complete; so let’s continue on to the eyes.
Eye and Eyelid Weights
We need to add control to the eyes and eyelids so the character can look at things as well as blink.
Getting to the geometry for the eyes might be tricky, so we’ll isolate just the general area we need to work on. To do this, simply select the faces around the area of the eyes and, on the current view, go to Show > Isolate Select > View Selected. As you can see in Figure 13.14, only the faces you selected are visible, allowing you to work more easily and quickly.

Go to Skin > Edit Smooth Skin > Paint Skin Weights, open the options, and set both Brush Opacity and Paint Weights Value to 1. Fully weight the left eye’s geometry to the L_Eye joint (Figure 13.15, top) and then the right eye’s geometry to the R_Eye joint (Figure 13.15, bottom).

Now, as you can see in Figure 13.16, when you move the EyeControl controller around, the eyeballs will follow.

Next let’s look at the eyelids. For this task we will work on the left side and then mirror the weights.
1. Select the joint named L_UpperLid and rotate it around the X axis about 15 units. Rotating the joint allows you to see what effect the weights will have on the mesh. Figure 13.17, top, shows you the current influence this joint has, which is none.
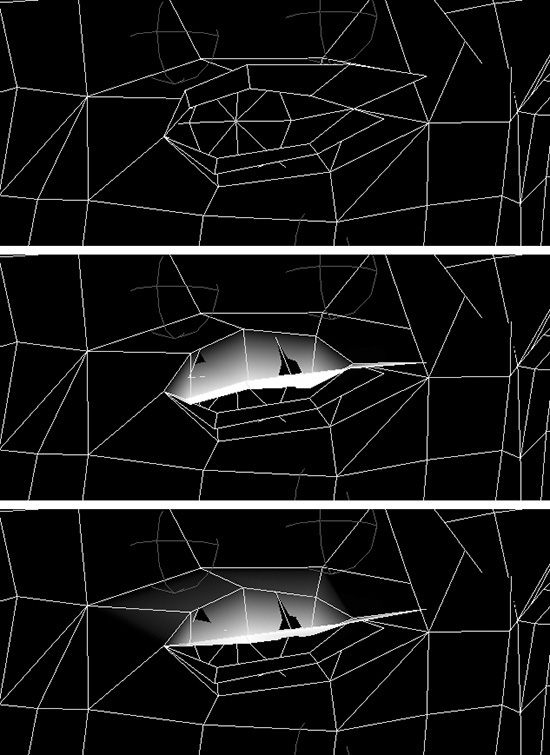
2. Open up the Paint Skin Weights options. In the Influence pane, select L_UpperLid. Set Brush Opacity and Paint Weight Value to 1.
3. Paint on the lower vertices of the left upper eyelid and eyelash, leaving the very corners of the eye alone (Figure 13.17, middle).
4. The eyelid now has quite a harsh, angular look to it; let’s fix that. Turn Value to 0 and Opacity to around 0.1; then reduce the amount the eyelid affects the outer vertices, rounding the eyelid as it closes (Figure 13.17, bottom).
The upper eyelid is complete; now to repeat the procedure for the lower lid.
1. Set the L_LowerLid joint’s X rotation to –7.
2. With Value and Opacity set to 1, fully weight the upper vertices of the lower eyelid to the joint (Figure 13.18, middle).

3. With Value reset to 0 and Opacity reset to 0.1, go in and smooth out the lower lid, giving it a better curve (Figure 13.18, bottom).
Tip
Don’t worry about the eye geometry popping through the eyelids at this stage. Later, when we rig them, we can make the eyelids move forward slightly, which will hide this problem.
Mirroring the weights of the eyes isn’t as straightforward as it was for the lips. Currently we have three joints residing in the same place on either side. This will confuse Maya when we ask it to mirror the weights because it won’t know which joint to copy the weights to. To prevent this, simply move both UpperLid joints up slightly and the LowerLid joints down. Giving them their own individual locations will help Maya choose which joint to mirror across to. As long as the rest of the body is in the default position, the weighting should mirror successfully.
Select the mesh and go to Skin > Edit Smooth Skin > Mirror Skin Weights. There is no need to set the options; Maya will have retained the previous settings. When you’re done, snap the eyelid joints back to the eye joints.
We will be mirroring the weights in the eye area quite often, so I suggest moving the eyelid joints and setting a key while on frame 1. This way, you will merely need to switch to frame 1 when mirroring weights, rather than having to move the eyelids each time.
1. To set this key, first move along to frame 1 in the Time Slider.
2. Move each of the joints into position.
3. Select all four joints and set a key in the Channel Box, by right-clicking it and selecting Key All from the menu.
As shown in Figure 13.19, the eyelids now follow their joints and can be made to open and close.
We are almost done with adjusting the weights on the face; all we need to do now is work on the eyebrows and cheeks.
1. Start by moving each of the left eyebrow joints up slightly so they are away from their default positions.
2. Select the mesh and open the Paint Skin Weights tool. Set Paint Weights Value to 1, Brush Opacity to 0.5, and select the joint named L_InnerBrow.
3. Using a softer brush, paint in the area of the eyebrow. Make the vertices closest to the eyebrow almost fully affected by the joint; allow the influence to fade out as it moves away (Figure 13.20, middle).

4. Select the joint named L_OuterBrow. Apply weighting similar to the inner section of the eyebrow (Figure 13.20 bottom).
5. Mirror the weights by first going to frame 1 and then selecting Skin > Edit Smooth Skin > Mirror Skin Weights. Although the eyebrow joints exist in their own space, the mirror weights tool works globally; so even though we are mirroring the new eyebrow weights, the eyelids will be mirrored, too.
Try the eyebrows in different poses before you decide they are complete (Figure 13.21). It may be that they look fine in one pose but do not work in another and so will need some minor tweaking.

Tip
When mirroring weights, always check the vertices down the center of the model. These tend to end up with incorrect weighting information, so make sure to check them after mirroring.
The last area to edit is the left cheek. You want to add more subtle movement to the face as she talks, giving her a more organic feel. The cheeks need a soft influence on the geometry, so use a soft brush and apply a higher influence close to the joint, then gradually fade this out (Figure 13.22).

We have one final tweak to perform before our weighting tasks are complete. Select the head joint in the Influences pane of the Paint Skin Weights settings, and make sure the main sections of hair are weighted fully to it (Figure 13.23, left). Switch the Paint Operation to Smooth, and set both Value and Opacity to 1; then give the edges of the cheeks and eyebrows a general smoothing (Figure 13.23, right). This will be a subtle change, but it will smooth out the overall movement of her skin.
The facial joints are now bound and weighted to the character’s skin and ready to be rigged. Save the file as Kila_FaceWeight.mb.
Facial Rig (Kila)
Now that each joint manipulates the mesh, we can animate them to create various facial expressions. In the model’s present state, this would be a long and tedious job, so we will add a rig to the joints much like the one we created for the hands.
We will first add the ability to create quick poses for common facial expressions, and then we will create a small library of mouth shapes to help speed up any lip-synching. Finally, we will create individual controls for the eyes and eyebrows.
Rig Preparation
Before we implement the rig controls, we will need something to manipulate them, so let’s first create a series of dynamic attributes that will drive the joints.
1. The most obvious place to put attributes is the HeadControls icon, so select this first.
Note
The HeadControls icon already has quite a few attributes on it, but we’ll hide some of these later in Chapter 15, “Finalize and Clean Up.”
2. Go to Modify > Add Attribute to open the Add Attribute window.
3. Start with a basic Boolean called _ (a single underscore). This may seem to be a strange name, but this is going to be a dummy attribute, acting as a divider to help us quickly navigate the Channel Box and get to the attributes we need.
4. Right-click on the new attribute’s name in the Channel Box, and select Lock Selected from the menu. This turns the attribute gray, which will also help us visually.
5. Now we will create the first section of actual attributes. Create four Float attributes called Happy, Shock, Angry, and Injured, giving them a minimum value of 0 and a maximum of 10. These will form the main facial poses.
6. Create a second divider attribute, this time called __ (two underscores); you can’t repeat attribute names on the same object. Remember to lock this, too, using the same method as in step 4.
Now we will add the attributes that will drive the mouth and form the various mouth shapes we need for lip-synching.
7. Create 10 attributes this time, all with a Data Type of Float and having a minimum value of 0 and a maximum of 10. Call these O, CDENSZ, AKI, L, MPB, FV, Ooo, Ahh, Smile, and Frown. These names represent the sounds the mouth will form.
8. Create and lock a third and final divider named ___ (three underscores). You will now add attributes to control the eyelids and eyebrows.
9. Create six new float-type attributes named LeftInnerBrow, LeftOuterBrow, RightInnerBrow, RightOuterBrow, LeftEyeLids, and RightEyeLids. Give these a minimum value of –10 and a maximum value of 10.
Your Channel Box should now resemble that shown in Figure 13.24.

We have all the attributes we need for now, but feel free to add more if you want them. In the next section, we’ll wire them up.
Rig Creation, Main Poses
With the main controls for the facial rig created, we will now use Set Driven Key to connect the controls to the joints. First we will define the main facial poses.
1. Open the Set Driven Key dialog box (Animate > Set Driven Key > Set), and load HeadControls in the Driver section. (Select HeadControls and click on Load Driver.)
2. Next select all the joints associated with the face, and click on Load Driven.
3. Select the Happy attribute next to HeadControls, and select all the translation and rotation attributes next to the joints. Your Set Driven Key dialog box should look like that in Figure 13.25.

4. Click on Key to store the base pose for the Happy attribute.
5. Repeat steps 3 and 4 for the Shock, Angry, and Injured attributes, storing their base poses.
Now we can start building individual poses for Kila.
1. Select the HeadControls icon, and set Happy to 10 in the Channel Box.
2. Position each face joint, using rotations and translations so that Kila looks happy (Figure 13.26a). Make sure you use a facial expression reference at this stage, or even grab a mirror and copy your own smile.

3. Click on Key in the Set Driven Key dialog box, and then test the Happy attribute.
4. Set Happy back to 0. Set Shock up to 10 in the Channel Box, and select Shock in Set Driven Key. Remember that moving the timeline back to 0 will pop the joints back to their default position.
5. Adjust the face joints so that Kila appears shocked (Figure 13.26b), and set a key to store this pose.
6. In Set Driven Key, select Angry next. Then set the Shock attribute back to 0, and Angry to 10.
7. Give Kila an angry-looking face like the one in Figure 13.26c. Press Key in Set Driven Key to store it in the Angry attribute.
8. Finally, set Angry back to 0 and Injured to 10, and then select Injured in Set Driven Key.
9. Give Kila a face expressing that she has just been hurt and is about to cry (Figure 13.26d). Set a key to store it.
Setting these poses means we can quickly give her face movement and the ability to express emotion.
Rig Creation, Mouth Shapes
Using Set Driven Key again, let’s connect up a set of attributes that will make Kila talk.
You should still have the Set Driven Key dialog box open; if it’s not, reopen it. Reload HeadControls into the Driver section.
1. You will only be controlling the mouth area, so reload just the jaw, lips, and tongue joints into the Driven section. Select the rotation as well as the translation attributes in the list on the right.
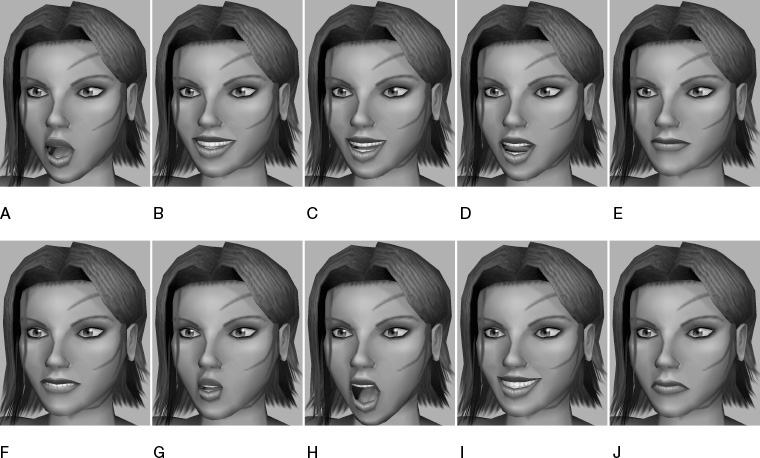
Work your way down this section of attributes, starting with O and ending with Frown, setting a key on each one to store the default pose.
2. Select O again in Set Driven Key, and set the same attribute to 10.
Now adjust the joints of the mouth to make her look like she is saying the letter O (Figure 13.27a).
Tip
Try to exaggerate the mouth shapes slightly when you create them. This will give the animators a bit more flexibility when they are doing lip-synching.
3. Set O back to 0, and set the attribute named CDENSZ up to its maximum of 10.
Our mouth shape is similar when we say any of the letters C, D, E, N, S or Z, so we can combine them into a single attribute for Kila. Adjust the mouth as seen in Figure 13.27b. Make sure CDENSZ is selected in Set Driven Key, and then set a key.
4. Next up is AKI. Set this to 10, remembering to reset the CDENSZ attribute to 0.
As you did for CDENSZ, pose the mouth so she is saying the letter A, K, or I (Figure 13.27c). This is quite similar to the CDENSZ mouth shape, but the mouth is open slightly more. Then select the AKI attribute and set a key.
5. The L pose is next (Figure 13.27d). Set the L attribute to 10 and the AKI attribute to 0. Pose the mouth, this time remembering to pose the tongue under the upper teeth. Then store the pose by setting a key on the L attribute in Set Driven Key.
6. Set MPB to 10 and reset L back to 0.
You could just use the default pose to get the look of M, P, or B, but as you can see in Figure 13.27e, creating a pose where the lips are closed tighter will emphasize the shape. When you’re done, set a key on the MPB attribute in Set Driven Key.
7. Next is FV. For this shape we want to tuck the lower lip under the upper teeth (Figure 13.27f). First set up the attributes by setting FV to 10 and MPB back to 0. Pose the mouth and, with FV selected in Set Driven Key, set a key.
8. Next set Ooo to 10 and FV to 0. Pushing the lips forward and together slightly will give us the Ooo shape seen in Figure 13.27g. Set the key for Ooo in Set Driven Key.
9. For Ahh, you want just a general open-mouth shape. Manipulate the jaw joint and then position the outer lip joints so you end up with a mouth like the one in Figure 13.27h. When you’re done, set the key.
10. Kila won’t be miserable all the time, so you need to make her smile. Set the Smile attribute to 10 and reset the Ahh attribute to 0. Give her a lovely big smile as in Figure 13.27i, and set a key on the attribute.
11. Finally, implement the Frown. Set Frown to 10 and Smile back to 0. Then adjust the joints to make her look sad (Figure 13.27j), and set a key on the Frown attribute.
The principal shapes for the mouth are now set up and ready to be animated. Because we’re using joints, we’re not restricted in the number of poses we create for this element, so feel free to make more if your character needs them. You might want to assign more options to the tongue, allowing her to stick it out or something similar, but only add what will actually be used. It’s a good idea to consult with your manager to make sure vital expressions are covered, but a conversation with the animator is also important at this point. There may be some mouth shapes needed for quick lip-synching.
Rig Creation, Eyebrows and Eyelids
The final facial areas we will rig are Kila’s eyelids and eyebrows. These are key areas in expressing emotions, so it’s crucial that we add the ability to animate them quickly and easily.
You should be getting the hang of setting driven keys by now, so in the procedures from this point on we can safely leave out some of the details.
1. With the Set Driven Key dialog box open, make sure HeadControls is loaded into the Driver section, and that the four main eyebrow joints are loaded into the Driven section.
We first need to store each joint’s default position, but each eyebrow attribute should only affect one joint, so we will need to work on the joints individually.
2. As demonstrated in Figure 13.28, select LeftInnerBrow next to HeadControls, and then all the translations and rotations next to L_InnerBrow. Set a key.

Do the same for the other three Brow attributes, making sure you have only the corresponding joint selected in the Driven section.
With the base pose keyed, we can now define the extremes these joints can move to.
3. First set the four eyebrow attributes to 10; then adjust each eyebrow joint so they are raised as far as they can go (Figure 13.29, middle).

4. When you are satisfied with the pose, store it in the Set Driven Key dialog box. Do this by going through each individual attribute on the HeadControls icon and setting a key on the joint it will control. Don’t select all four joints at the same time.
5. Now set the attributes to –10 so that we can define the lowest point to which the eyebrows will go. Move the joints so that the eyebrows are like those in Figure 13.29, right, and set a key on each—one attribute to one joint—in Set Driven Key.
1. With Set Driven Key open and Head Controls loaded in the Driver section, load all four eyelid joints into the Driven section.
2. Select the LeftEyeLids attribute in the Driver section, and then all the rotations and translations for L_UpperLid and L_LowerLid in the Driven section (Figure 13.30). Set a key to store the default pose.

3. Store the default pose for the right eyelids, selecting RightEyeLids and then the R_UpperLid and R_LowerLid joints.
4. Now work on closing her eyes, as shown in Figure 13.31, left. Start by setting the LeftEyeLids and RightEyeLids attribute to –10.

5. Close the eyes by rotating both the upper lid joints around the X axis so that they cover most of the eyeball. Then rotate the lower lids up to meet them.
6. Before you set a key to store the pose, translate all four joints out along the Z axis so that the eyeballs don’t pop through the lids.
7. Follow the same procedure for storing the default pose (steps 2 and 3) to store this one.
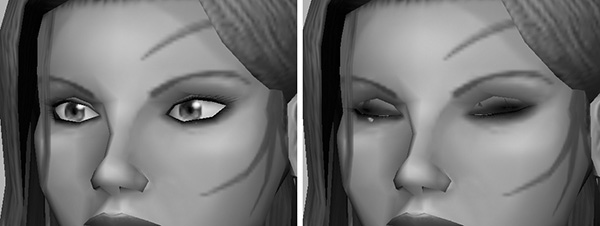
8. Now we will widen her eyes. This time set the LeftEyeLids and RightEyeLids attribute to 10, which will reset the eyelids for us. Then, rotating around the X axis, open her eyes wider (Figure 13.31, middle). Store the pose in Set Driven Key.
Kila’s facial rig is complete now. Not only can she open and close her eyes, but she can also open each eye independently (Figure 13.31, right). Save the scene as Kila_FaceRig_Jnt.mb.
This completes the tasks of this section. With the facial rig you’ve constructed, Kila can communicate with the player. If you’d like to, you can add further controls to the joints to allow extra manipulation of her lips and jaw (as I have in the Kila_FaceRig_Jnt.mb file on the CD).
Let’s now explore the other method for creating facial movement: blend shapes.
Blend Shapes Facial Animation Setup (Kila)
Blend shapes work by referencing the vertices from a duplicate of the main mesh. The duplicated vertices are edited to create a facial expression into which the main head will morph on command. Suppose the duplicate face is edited to represent an open mouth. Using the Blend Shape window, you can then tell the main face to gradually morph into the duplicate, making the character’s mouth open and close.
Depending on the system for which you are developing, the number of available blend shapes might be restricted, so always check with your manager first. Work with as few blend shapes as possible. In this section, we will work with just a few basic shapes, and you can add more if you have the budget to do so.
Our first step is to prepare the geometry.
Preparation for Blend Shapes
Open up the file called Kila_MainRig.mb and turn off visibility for all the icons. We can’t use the geometry in its current state for our work with blend shapes, so (as we did with the joint rig) we need to combine all the separate elements of Kila into one object.
With the first LOD combined into a single element, we could duplicate the whole figure and use that as our morph target, but that would be a huge waste of memory and processing power because we only need to alter her face. So we will separate her face from the rest of the body, and then combine the rest. In effect, there will be two separate mesh objects.
1. Switch to the side view and hide her hair, as seen in Figure 13.32, left.

2. Following Figure 13.32, middle, select the faces that make up her principal face area, as well as the ones under her jaw (these will move as she opens her mouth).
3. With these faces selected, go to Edit Polygons > Extract. This separates the face from the body (Figure 13.32, right).
4. Because the eyelashes, inner mouth, teeth, and tongue will move as the face moves, you need to combine them with the face’s geometry. (This can be done much more easily in perspective view.) Select all these elements, and go to Polygons > Combine to combine them.
Note
When blend shapes morph from one shape to another, the vertices follow a linear path. This won’t work for elements that rotate, so we’ll leave the eyeballs with the main body, controlling them with joints instead.
5. Now you need to weld all the duplicate vertices that lie in the same place; this stops the mesh from tearing as it moves. Select all the vertices of the combined face, and go to Edit Polygons > Merge Vertices and set the value to a small number (say, 0.0001).
Double-check that coincident vertices are indeed merged and that areas with deliberately small gaps (like the mouth) were not inadvertently merged.
6. Center the pivot for the face (Modify > Center Pivot). This will make it easier to manipulate later.
7. The face is now its own object and perfect for creating Kila’s blend shapes. Delete the history on both the separated face and body geometry.
8. Unhide the hair; then combine all the other pieces that make up her body, including the eyes and belt. You could at this stage hide the face to make this step easier.
9. Weld the vertices around the ear and hairline with a small value like 0.0001.
10. Finally, delete the history on the body.
The mesh is now ready for generating face shapes. Move the geometry for both the face and the body back inside the Kila4095 folder in the Outliner. Then rename the body to KilaBody and the face to KilaFace. Save the file as Kila_Combined.mb.
With the face detached and the rest of the body combined, we can start to build up our library of face shapes.
Generating Face Shapes
Creating blend shapes is a simple task involving nothing more than editing vertices. The faces we create will essentially be the same as the poses we generated for the joint-based facial rig.
To start, we will generate the Ahh shape so that we can test the mouth before continuing on to create shapes that will animate the eyelids and eyebrows. We will then create the O, L, MPB, FV, Ooo, Smile, and Frown shapes. You will notice that, unlike the joint-based facial setup, we don’t create face shapes for CDENSZ and AKI. Since we are limited in the overall number of blend shapes we can use, we will use the Ahh and Smile shapes together to create CDENSZ and AKI. Efficiency is also called for in the creation of some base facial poses, including Shock, Angry, or Happy. These can all be done via the other basic shapes.
Note
It’s important that the geometry is fully tested and complete before you create the blend shapes. If the topology is altered in any way afterward, they will have to be redone. Each vertex is assigned a number in Maya, and blend shapes work with these numbers. Altering the topology means altering the vertex numbers, so the face shapes will no longer work. You can still flip and edit edges, as that doesn’t affect vertex numbers.
Tip
Do not freeze the transforms on any of the face shapes. The vertices work on a relative basis, so all transforms should remain intact. If not, when you blend the main face to one of the others, the whole face will move to its target.
1. Duplicate the face and move it over to the left of the main model. Name this copy Ahh.
2. Hide the main model. Then, following Figure 13.33, left, select all the vertices that make up the bottom jaw, teeth, and tongue, but not the vertices that lie on the edges of the model.

3. Press E to switch to the Rotate manipulator; then press Insert and move the pivot point to the spot from which the jaw will rotate. You can see this in Figure 13.33, middle.
4. Rotate the jaw around the X axis so that the mouth is open (Figure 13.33, right).
5. As you can see in Figure 13.34, left, the mouth doesn’t look right yet. Spend some time editing the vertices on the head to sculpt the shape of the mouth (Figure 13.34, right).

The first mouth shape is complete and we haven’t noticed any problems. One good feature of blend shapes is that, even after they have been applied to the main model, you can still tweak the vertices to get the shape just right.
We’ll do the eyebrows next, and learn a technique of creating two face shapes from one.
1. Duplicate the main face again, and this time call it LeftBrowUp. Position it to the left of the Ahh face shape.
2. Edit the vertices, this time to raise both eyebrows as shown in Figure 13.35.
Tip
To save time, select the same vertices on each side of the face. This way, when you move them, both sides will be exactly the same.
This shape is acceptable for moving both eyebrows at the same time, but we want Kila to be able to move them individually, as well.
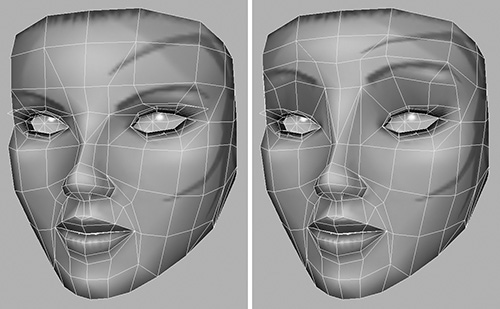
3. Duplicate this face, calling it RightBrowUp, and move the copy over to the left (Figure 13.36a).

4. On LeftBrowUp, select all the vertices you edited on Kila’s right side (Figure 13.36b).
5. Look in the Channel Box, and you’ll see a new heading labeled “CVs (click to show),” as seen in Figure 13.37, left. Click on this heading to reveal all the selected vertices, plus their current positions relative to the face’s default pose (Figure 13.37, right).
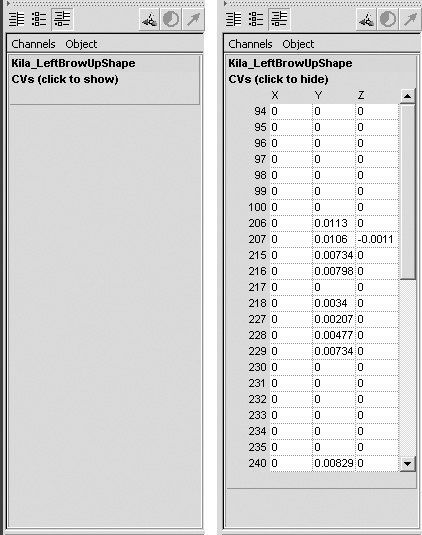
6. Select all the coordinates and set them to 0. This resets the selected vertices back to their default positions (Figure 13.36c).
7. Select the central vertices (Figure 13.36d), and in the Channel Box set them to be half of their current values.
Why are we setting the central vertices to half? Each blend shape works relatively; that is, the vertex positions are added to any that are already applied. So if the left eyebrow and right eyebrow shapes fully affected the central vertices on the head, when both shapes were applied these vertices would move double the distance.
So when we set vertices that may need to share their values to move half the amount for each eyebrow, it means that when both are applied at the same time, the central vertices won’t move too far up. They’ll wind up where you actually want them to be.
8. On the RightBrowUp model, reset the vertices on its left and center (Figure 13.36e), just as you did for LeftBrowUp.
The technique you’ve just used is a quick and easy way to get two shapes out of one; plus, you will know that each side will be the same. It may be that you don’t want the face to be symmetrical, which is fine, but this way you get a good starting point from which you can tweak later.
Go ahead and create the rest of the face shapes needed, by simply duplicating the main head and editing the vertices. You should have the following:
![]() Both the left and right eyebrows, lowered.
Both the left and right eyebrows, lowered.
![]() Both individual eyelids opening wider and closing.
Both individual eyelids opening wider and closing.
![]() The remaining facial shapes L, MPB, FV, Ooo, Smile, and Frown.
The remaining facial shapes L, MPB, FV, Ooo, Smile, and Frown.
For the eyelids, you will need to use the shape of the eyes as a guide, so keep the duplicated head in its default position until you are happy with the eyelid shape.
You can see all of these shapes in Figure 13.38. These represent a good initial group of face shapes for a character. If your budget allows, you can add more to get more refined manipulation of the face.

With the entire library of face shapes complete, we can now apply them to our main model.
Blend Shape Application
The geometry shapes are ready, so now we can connect them to the main face model, allowing us to morph the face into any of the new shapes.
1. Select all the face shapes, adding Kila’s main face to the selection last.
2. Go to Deform > Create Blend Shape, and set the options seen in Figure 13.39.

3. We will use the default options, so just set BlendShape Node to Kila_FaceShapes; this defines the name for the actual blend shape controller.
4. Click on Create to create the blend shape controller.
To animate the blend shapes, go to Window > Animation Editors > Blend Shape, which opens up the window shown in Figure 13.40, left. Moving the sliders will animate the main face, morphing it into its target shape. Pressing Select will select the node, enabling you to animate it via the Channel Box (Figure 13.40, right).

Note
You can change the orientation of the sliders by going to Options > Orientation and selecting either Horizontal or Vertical. Vertical is the default view.
Now that the blend shapes are set up, take some time to edit each face, tweaking the vertices until you are satisfied with the final shapes.
Place all the face shapes in a new group called Bshapes; then move this node so it is under the Kila4095 group.
Create a new display layer called BlendShapes, add the BShapes group to it, and save your scene as Kila_FaceRig_BS.mb.
Once the face shapes have been applied to the main face, you can delete them. However, I recommend keeping them in the scene for as long as you can. This allows you to easily edit them if you need to.
The animator will quite happily use the Blend Shape window to animate the character. If you like, though, you could use Set Driven Key to tie the blend shapes into the main head controller, as you did with the joint setup.
Facial Animation and LODs
You have now worked through two approaches to facial animation on Kila, but what about the LODs? Giving a character the ability to be seen talking might be unnecessary at a distance, but you may need it for the next level of detail.
For the joint-based face, all the hard work has already been done. Because all the animation is applied via the joints, we can simply bind the lower LODs and then copy the weighting information across. We will be covering this process in Chapter 14.
The blend shapes, however, will need further work in terms of LODs. These shapes reference a copy of the face’s geometry, so we will need to create the required blend shapes for all the LODs. This might seem a daunting task, but getting organized ahead of time will help. Before you start, consider what will actually be seen at that distance and what the geometry will allow. Dolly out until Kila is just about to switch to her next LOD; then use the Blend Shape window to see what face shapes are visible and actually distinguishable.
Certainly at this distance you can see that her mouth is open or closed, her eyebrows are raised or lowered, and her eyes are open or closed. The smile is clearly visible, but the rest of the mouth shapes can hardly be seen, so it wouldn’t be advisable to re-create these for the lower LOD.
With the blend shapes created and applied, you can use the Connection Editor to connect the lower-LOD blend shape nodes’ attributes to the higher ones. When you animate the highest LOD, the lower ones will follow; that means you and the animator don’t need to animate each individual LOD.
Grae’s Facial Animation
Now that we have some experience working with the two main styles of facial animation, it’s time to take a brief look at Grae.
Whichever animation method you choose, rigging Grae’s face will be simpler than doing Kila’s, mainly because he does not speak. Nevertheless, his jaw will need some slight movement, as will his upper lips. So we’ll do some rigging for these, in addition to his eyes and eyebrows.
When it comes to rigging the joint-based face, you can skip most of the attributes we included for Kila. Just use JawOpen to control how the mouth opens, and add JawSlide to enable the jaw to move left and right as he grinds his teeth. Add some poses for his tongue, too; you should be able to see it moving because his mouth can open quite wide.
For the lips, create a LeftUpperLip and RightUpperLip attribute, and connect them to the upper lip joints. These will enable the animator to make him snarl.
In addition, you can copy Kila’s final six attributes: LeftInnerBrow, LeftOuterBrow, RightInnerBrow, RightOuterBrow, LeftEyeLids, and RightEyeLids.
For Grae’s blend-shape animation version, stick to more or less the same face shapes as Kila’s, which can be seen in Figure 13.41.

Which Is Best?
Now that we have explored both ways of generating facial animation in game characters, let’s have a look at the issues, pros, and cons for both methods.
![]() The big question concerns which version the game engine, or indeed the target platform, can handle. Chances are any one of them could use joints, since they will already be doing so to move the character around. You may even find that blend shapes are not eligible and need not be considered.
The big question concerns which version the game engine, or indeed the target platform, can handle. Chances are any one of them could use joints, since they will already be doing so to move the character around. You may even find that blend shapes are not eligible and need not be considered.
![]() The way each type of animation works and looks can be drastically affected by your budget. Having too few joints, or too few blend shapes, will make the face look stiff. The freedom to include all the joints needed would allow you room to create an almost limitless number of facial poses and movements. With blend shapes, each new face would add to the overall size of the character in memory, so eventually you could reach your limit. Even so, this can be overcome through clever use of your shapes; you can mix existing ones to create new ones.
The way each type of animation works and looks can be drastically affected by your budget. Having too few joints, or too few blend shapes, will make the face look stiff. The freedom to include all the joints needed would allow you room to create an almost limitless number of facial poses and movements. With blend shapes, each new face would add to the overall size of the character in memory, so eventually you could reach your limit. Even so, this can be overcome through clever use of your shapes; you can mix existing ones to create new ones.
![]() The initial setup of the joint-based face rig can be quite cumbersome and tricky, since you’re having to use Set Driven Key to store each pose and area of movement. However, once they are complete, redoing them shouldn’t be necessary, even if the character’s topology is changed.
The initial setup of the joint-based face rig can be quite cumbersome and tricky, since you’re having to use Set Driven Key to store each pose and area of movement. However, once they are complete, redoing them shouldn’t be necessary, even if the character’s topology is changed.
The blend shapes setup is simpler but does rely heavily on the main face’s geometry being locked. Any alteration in the facial topology could result in your having to redo all the existing blend shapes.
![]() With the joint setup, you can’t get the facial expressions vertex-perfect, because each vertex’s position is merely influenced by the joints. With blend shapes, on the other hand, you are physically sculpting each face, allowing you to get each pose perfect.
With the joint setup, you can’t get the facial expressions vertex-perfect, because each vertex’s position is merely influenced by the joints. With blend shapes, on the other hand, you are physically sculpting each face, allowing you to get each pose perfect.
If you are lucky enough to be able to choose either method, it will come down to your own preference or style of working.
Summary
This chapter’s discussion of the use of joints and morph targets to achieve facial animation will help you decide which one you prefer and which is appropriate for your project. Next, we will move to the chapter on the final binding—attaching our characters’ geometry to their skeletons and then adjusting the weighting information to enable correct deformation.