
Chapter 5. Model Optimization
CD Files
Kila_Complete.mb
Kila_Optimized.mb
Until now, we have spent our time developing a good, clean model without worrying too much about the polygon count. That’s about to change—in this chapter, we will be removing a lot of the details you have sculpted into Kila so far. Try not to think of this step as destroying all your hard work, however. What you’ve accomplished so far is to create a character that is complete and has all the embellishment it needs to have. With all these details in place, we can now make informed decisions about the places from which we can remove those details. That’s what optimization is all about.
You will find as you gain more experience in modeling game characters that the optimization stage will gradually become less important, because you will learn to analyze the topology automatically, from the moment you begin building. For the novice artist, this chapter tells you exactly what you need to be looking for as you optimize your character.
With every model, you will find areas where polygons have been placed but are not needed. Essentially, we want the model to have as few polygons as possible. Our polygon limit for this project, established in Chapter 1, is 4500, and we don’t want to use more than that number. Indeed, after optimization we may very well end up well under our budget, which is good. If not, we will start to look at areas that we can sacrifice in order to bring the polygon count down.
Deciding What to Remove
It’s important to decide carefully about where to remove polygons from the geometry. Remove the wrong ones, and the shape of our character will change dramatically. It could also result in bad deformation in the game.
The first two sorts of polygons you should consider for removal are unnecessary polygons and polygons that form shallow angles.
Your model is currently made up of hundreds of polygons, and almost all of them are needed. You may think that a polygon’s actual presence means it is necessary to a model, but this is not the case.
So how do you determine which polygons will be unused? An unnecessary polygon is one that does not add to the shape of the mesh, nor does it aid in its deformation.
Look at the two cubes in Figure 5.1. They look exactly the same; the only way they differ is in construction.

Now look at their wireframes in Figure 5.2. You can see that the one on the right contains more polygons than the one on the left. Since the edges are straight, the cube does not need the extra polygons to create that straight edge. If we removed these polygons, the cube would look exactly the same.
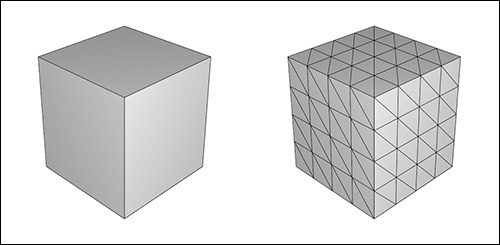
FIGURE 5.2 In the wireframe, you can see that the cube on the right unnecessarily uses far more polygons than the one on the left.
Removing areas that contain shallow angles is also a good way to reduce the polygon count, although this will slightly affect the way the geometry looks.
Take a look at the cylinders in Figure 5.3. Do you see a difference? The one on the right has a very slight bump in it. This is a shallow angle, and it adds so insignificantly to the shape of the geometry that no one would miss it if it were gone.

We now know what to look for—unnecessary polygons and shallow angles—so let’s move on and begin optimizing our character model.
Finding the Polygon Count
Before we begin optimizing, let’s first look at how many polygons our model currently has.
Load in the last file you saved, Kila_Complete.mb. You first need to convert the geometry to triangles in order to get an accurate reading.
1. Select everything by dragging over the entire character in the view panel; then go to Polygons > Triangulate. The model will now be built from triangular polygons only.
2. To show the polygon count, go to Display > Heads Up Display > Poly Count. The polygon statistics (Figure 5.4) will be displayed in the upper-left corner of your view, although depending on your resolution setting these could even take up more space.

In the Faces line, the far-left number is the current scene’s polygon count. This includes only the polygons of objects onscreen, so make sure your entire mesh is visible. Our current polygon count is 5856. This is 1356 over our budget, which is what we expected.
Remember that we added the higher-resolution hands and ear in Chapter 4, to see if we could use them. Each hand alone is around 1010 polygons. If we replaced those with the lower version, which was 406 polygons each, we would save 1208. But we don’t want to do that just yet as we first need to remove the unnecessary polygons. We will begin by looking at Kila’s upper body, concentrating first on her arms before moving on to her torso, considering various places where we can cut back. Next we will look at the lower body, including waist, legs, and feet, before working on her hair, neck, and face.
After we’ve made some changes, we can recheck the polygon count and decide whether we need to make any additional sacrifices, such as swapping the hands for lower versions.
Optimization Methods
![]() Simply select the edge and go to Edit Polygons > Collapse. This will collapse the edge, bringing together the two vertices it shared in.
Simply select the edge and go to Edit Polygons > Collapse. This will collapse the edge, bringing together the two vertices it shared in.
![]() You can weld vertices by going to Edit Polygons > Merge Vertices. This method gives results similar to collapsing the edges, bringing together the selected vertices. In some cases you will want to retain one of the vertices’ positions; to do this, snap the others to it by holding down V while moving the vertex, remembering to weld them afterwards.
You can weld vertices by going to Edit Polygons > Merge Vertices. This method gives results similar to collapsing the edges, bringing together the selected vertices. In some cases you will want to retain one of the vertices’ positions; to do this, snap the others to it by holding down V while moving the vertex, remembering to weld them afterwards.
![]() In some instances you can simply select the edges and press Delete; this will remove the edges but the vertices will remain in the geometry. You will then have to select and delete those, too.
In some instances you can simply select the edges and press Delete; this will remove the edges but the vertices will remain in the geometry. You will then have to select and delete those, too.
Arm Optimization
Let’s begin by looking at Kila’s arms. (We’ll leave the hands for now, just concentrating on the arm itself.)
Before you start, make sure to press Z/Cmd+Z to undo the triangulation you used to get a polygon count. Or you can reload the file called Kila_Complete.mb.
With the model now back in quads, the polygon count will be lower, around 3342. Don’t let this fool you—Maya’s quads can be made from a number of triangles, not just two, so this number is not an accurate reflection of the number of triangles in the scene. We want this amount to be around 2600. When in doubt, it’s always best to do a quick triangulation to check the actual count.
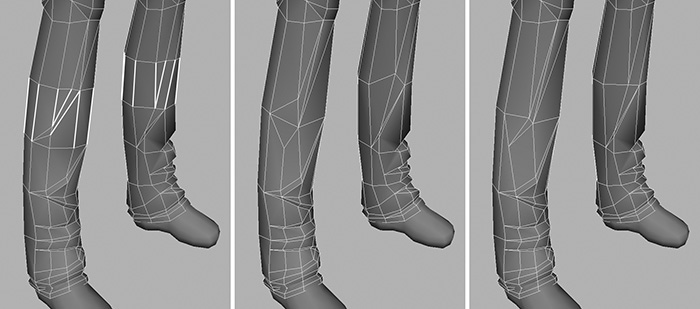
1. Looking from the front, you can see three sections of polygons that can be removed because they affect the shape of the arm only slightly. These areas are highlighted in Figure 5.5. The best way to remove these polygons is to collapse the edges, so go ahead and do that now.

2. Move the row that is closest to the wrist down the arm (Figure 5.5, bottom). This will help when the wrist deforms.
3. On the top of the arm, you can remove some of the small polygons that exist here. Collapse the edges highlighted in Figure 5.6, left.

4. You will have to do a bit of repair work to the areas from which you have removed the polygons and edges. The shape of the biceps and the shoulder area will need some extra work (Figure 5.7).

Tip
If you end up with two adjoining triangles, try converting them into quads. Select them and go to Polygons > Quadrangulate. This helps to keep the mesh clean and tidy.
Note
When converting to quads, Maya will guess at the way the triangles should lie. This could result in concave areas like we saw on her hips in Chapter 2. In such instances, it will be necessary to keep the area triangulated.
5. Optimize the back of the arm by welding the vertex in the center of the X (Figure 5.8, top) to a vertex above it.

That’s about all we should do on the arm for now; if we need to, we can reduce it further later.
Torso Optimization
Next, let’s look at the torso area. At the very front, there are some edges we created when doing our muscle mapping, as you can see on the left of Figure 5.9. Since this area is cloth and not skin, we can remove these edges, giving us a nice, flat front (Figure 5.9, right).

Flipping around to her back, you can see the same situation as in the front: a few unnecessary edges because the area is cloth. In addition, there are a few unused polygons.
First remove the edges highlighted in Figure 5.10, left. Then remove any stray vertices that remain, giving us a cleaner back (Figure 5.10, right).

Finally, on Kila’s side there are a few unused polygons just under her arm, as well as two edges we can collapse at the front of her shoulder. These are all illustrated in Figure 5.11.

Looking farther down the model, you will notice a few areas that are currently triangulated. Convert these to quads to clean up the area.
The topology in the breasts is sound; reducing this area would mean we’d lose the curve, making them more angular. So, with the torso optimized, let’s move on.
Waist and Leg Optimization
We next come to Kila’s waist area. We will not optimize the belt at this time; it is currently quite low in resolution anyway, so reducing it more would make the overall shape suffer.
1. Hide her belt so we can concentrate on her waist.
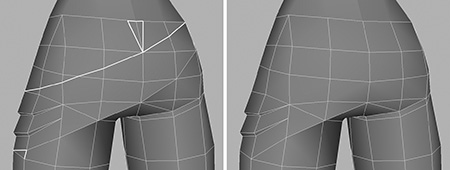
Although we modeled all of the sash in Chapter 4, we only need certain parts of it built into the geometry. The rest will be visible via the texture. Take a look at Figure 5.12; there are a few areas here we can optimize. For example, highlighted on the left, along the hip, is a shallow angle comprising numerous divisions; this was created when we split the polygons for the sash.

2. Follow the line highlighted in Figure 5.13 (left) around the mesh, removing most of the sash’s polygons (Figure 5.13, middle).

3. When you’re done, combine some of the triangular faces into quads to clean up the area (Figure 5.13, right).
4. Rotating around to her backside, continue removing the extra polygons of the sash. There are a couple at the top of her jeans that can go, too. These are all highlighted in Figure 5.14, left.
We are finished with her waist for now, so let’s concentrate on her thighs before moving down the legs. There are a few shallow angles here but we will not remove all of them.
1. Select just the edges across the center of the thigh (Figure 5.15, left) and collapse them, giving us the results seen in Figure 5.15, right.

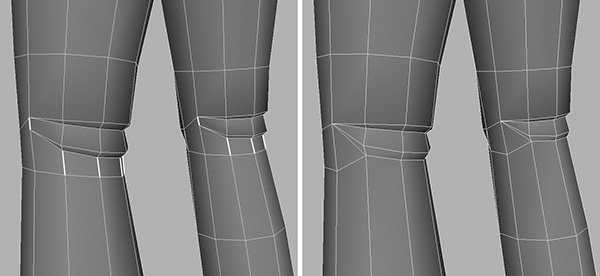
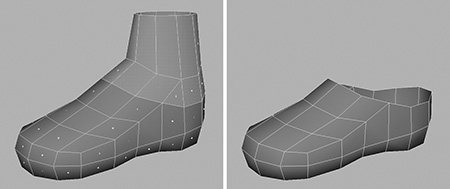
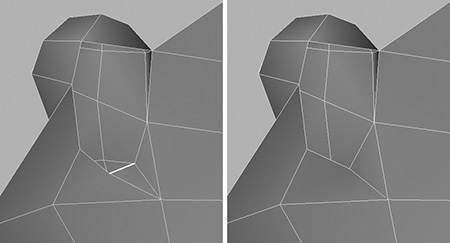
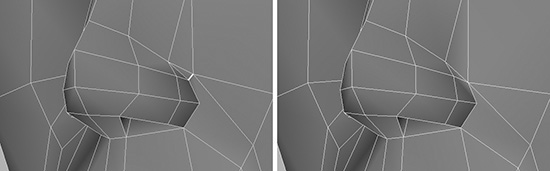
2. At the very front of both knee areas, under the ridges of her knees, there is a small quad (Figure 5.16, top). It does not help either the shape or the deformation, so we can remove it, leaving the knees as shown in Figure 5.16, bottom.
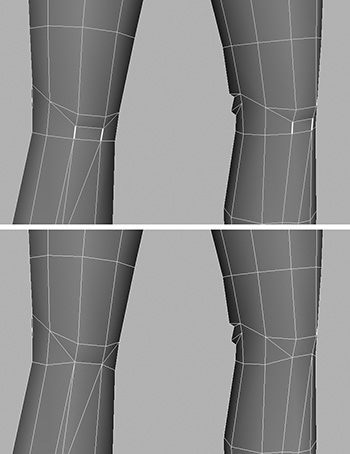
3. Working on the back of the knees, there are more edges we can collapse, shown in Figure 5.17, left. Again, they create both shallow edges and smaller polygons, so these edges won’t be missed.
4. Moving on to the calves, start by collapsing the central section of edges, shown in Figure 5.18, left. This extra division of polygons is not essential. Notice on your model and in Figure 5.18 (middle) that collapsing these edges leaves some of the creases in front a bit messy. Take five minutes to fix them (Figure 5.18, right).
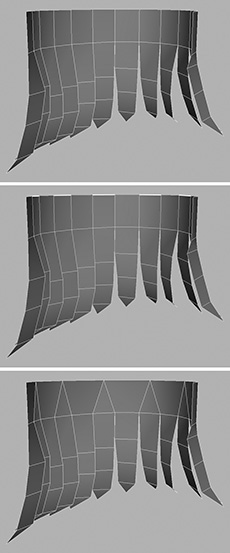
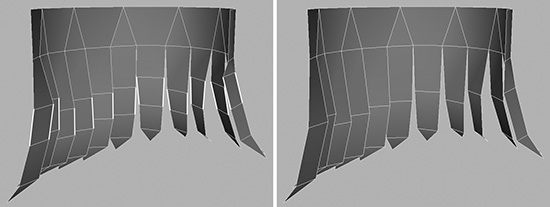
5. Concentrating on just the left leg now, optimize the folds in the cloth at the bottom of her jeans. Try to maintain their shape—following the example in Figure 5.19, collapse the middle of each fold, leaving the peaks intact. Move over to the right leg and do the same (Figure 5.20).


6. At the back of her lower legs, we can remove a section of polygons completely and not harm the overall shape. Select the edges shown in Figure 5.21 (left) and collapse them. Next, optimize the area a little more by removing any small polygons or edges that are left.

For now, Kila’s jeans are optimized, so let’s see what we can do with her feet.
Foot Optimization
The optimization you can do on Kila’s feet is fairly straightforward.
1. To start, delete any polygons that are hidden by her jeans (Figure 5.22), these will never be seen in the game so they don’t need to exist.
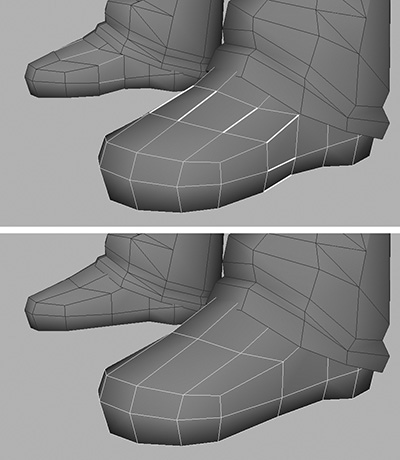
2. Because the tops of her shoes are relatively flat, we can remove the middle section of polygons. As illustrated in Figure 5.23, select the edges that span the middle and collapse them. Make sure you collapse them all the way around the foot.
3. Before we finish with the feet, notice that three quads at her heel, also hidden by the jeans, could be removed; see the top of Figure 5.24. After removing these three quads, weld down the point on the remaining quad to create a triangle, and smooth the area.

If you want to be able to see through the jeans but keep the shoes solid, as I have in Figure 5.24, right-click the geometry you want to see through and select Actions > Template. To return it to normal, right-click again and select Actions > Untemplate.
Before we continue to her hair and face, take one final look around Kila’s main body. You should now have a good idea of what to look for, so chances are you can find a few more polygons to remove. A few areas I found were in her collarbone and the backs of her shoulders. You can see these areas highlighted in Figures 5.25 and 5.26.


Note
It is very important to have the right amount and placement of geometry around the shoulder for good deformation. We will examine this in Chapter 6.
We are not at the stage where we need to sacrifice any major details yet. Our current polygon count is 2992 (remember, this is in quads)—we are only 392 away from reaching the target of about 2600.
We can leave the main body behind now, and get busy with the head area.
Hair, Face, and Neck Optimization
The geometry that makes up Kila’s head and hair is a goldmine of opportunities where we can remove lots of polygons. Let’s begin with the hair.
The Hair
Hide everything apart from her hair and face. Template the face (using the method explained earlier for working with the jeans), so we can work on just the top part of her hair.
To start, there are quite a few areas where we can collapse edges because there are so many shallow angles.
1. Select the edges shown in Figure 5.27, selecting them all around her hair, and collapse them.

Leave the very bottom of the hair intact, however. This area is divided into separate strips, so collapsing the edges constructing the strips will remove them. Kila’s hair should now look like that in Figure 5.28.

Take another look; there are still a couple of shallow angles that can be removed without affecting the overall shape of her hair.
2. As shown in Figure 5.29, select the middle row of edges and collapse them, leaving the hair as seen in Figure 5.30.


3. Moving around now to the front of her hair, we can have a look and see if we can get away with removing a polygon or two from here. Try selecting and collapsing the edges shown in Figure 5.31 (left); does it still look okay?

Although it does looks fine (Figure 5.31, right), altering the hairline like this will reduce the number of vertices along that edge, thereby changing how the face mesh lines up with the hair. This will become obvious when the face is untemplated in subsequent steps.
4. Continue looking around the geometry for polygons to be removed. Another one lies right on the top; you can see it in Figure 5.32 (left). It’s a small polygon and so should not cause any major problems when it’s removed.

We are finished now with the top portion of the hair; let’s optimize the inner layers next.
1. Isolate the first layer so we can work on it alone (Figure 5.33, top).
2. As shown in the middle image of Figure 5.33, select every other edge around the very top and collapse them. We can do this because the top layer of hair will hide most of these polygons. We still need them to exist, though, so that you don’t see through her head.
3. Since this is an inner layer, the curves in the geometry need not be perfectly smooth. That means we can reduce this layer some more by removing an entire row of polygons. This is shown in Figure 5.34.
Now follow the same procedure for the other inner layers of hair. When you’re done, the geometry will look like that in Figure 5.35.

The Face and Neck
The hair’s done; now let’s work on her face. One quick look will show many areas where you can reduce the mesh.
Start with the forehead. I chose to begin here because we’ve already reduced her hairline, and the vertices in her hair no longer line up with her head.
1. Follow the edges down the brow, starting with the same edges we removed from her hair, until you get to the eye area. If you’re not sure which edges to choose, they’re shown in Figure 5.36 (left). Judging by the results in Figure 5.36 (right), removing these edges doesn’t cause a problem.

Time to make our first sacrifice; we need to reduce her ear. This is not a major loss, however, because the texture will hold all the detail we need.
2. Flatten the outer face of the ear, but try to retain the ear’s general shape (Figure 5.37).

3. It looks like we can reduce the ear a little more by collapsing the edges highlighted in Figure 5.38 (left). This will ultimately affect the ear’s overall shape, but not too much.

4. Looking around, you’ll spot a small polygon nearly out of sight on the inside (Figure 5.39, left); remove this. Then go ahead and work a little more on the ear’s general shape, and see if you can remove any more polygons.
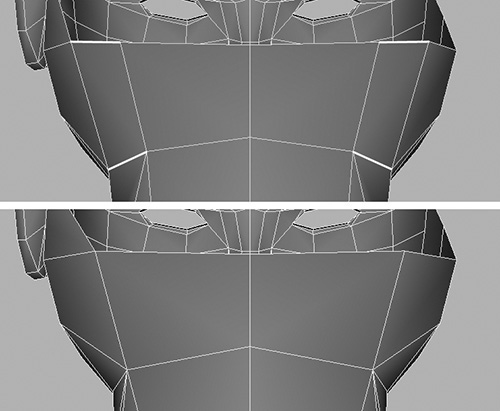
After the ear is done, the next major area to examine is under her chin. You can see in Figure 5.40 (left) that there are lots of unused polygons here.
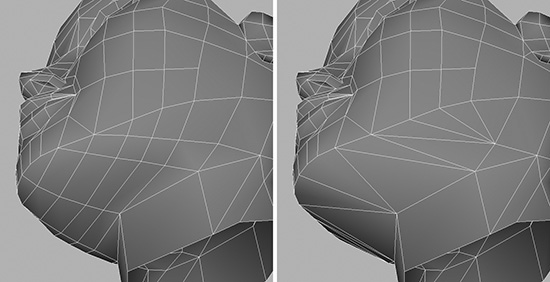
1. We can probably get away with flattening the area as demonstrated in Figure 5.40 (right), although I admit I’m not entirely comfortable with removing this many polygons in one go because it does affect the shape. After we’re finished, if we’re under our budget, we can always add a bit back into this area to fill out the shape.
2. Removing so much from the chin will make other potential trim areas stand out. The edges in Figure 5.41 (left), for example, lead up from a now-unused edge around her jaw.
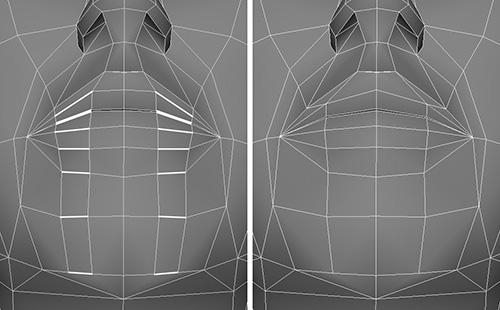
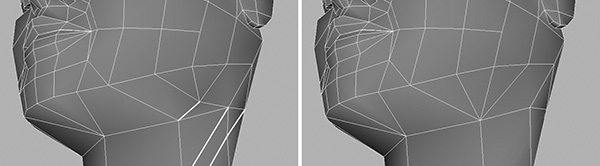
3. Again, optimizing the underside of her chin has made other reduction possibilities leap right out at us. Look at the chin itself: We definitely don’t need all six of those subdivisions. Removing the bottom edge alone, however, may cause some odd-looking results. So work your way up as I have done in Figure 5.42 (left), optimizing the lips, too.
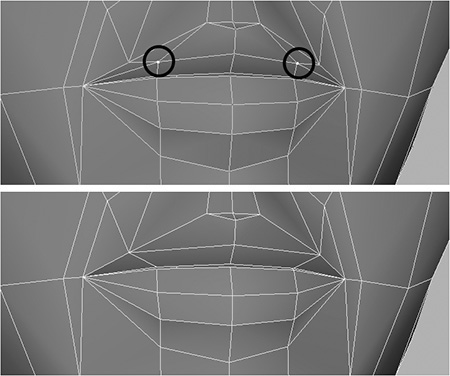
4. Removing the edges from the lips has left us with two stray vertices, shown in Figure 5.43 at the top. Weld these vertices to the ones closest to them, smoothing out the upper lip (Figure 5.43, bottom).
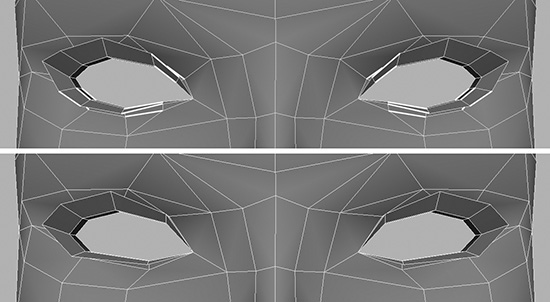
Next, we will examine Kila’s eyes before moving on to the rest of her head. They are quite round, but we don’t actually need this amount of detail.
1. We can get away with collapsing the edges highlighted in Figure 5.44 (left), before moving the remaining vertices to reshape the eye as shown in Figure 5.44 (right). By doing this, we’ll regain 18 quads, or 36 polygons.
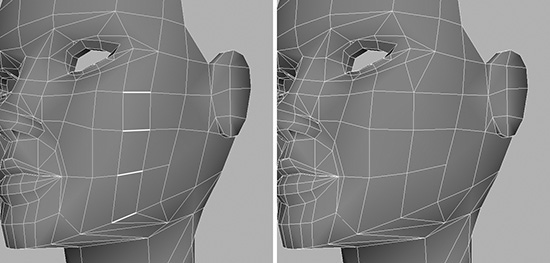
Now look at the bridge of the nose from the side. You’ll spot an area that is quite flat. There are three vertical subdivisions making up this area, but we can live with just two.
2. Select the edges that make up the central division of the nose. Optimizing the bridge of the nose means we can also reduce her cheeks, so work your way around them and see what you can do (Figure 5.45).

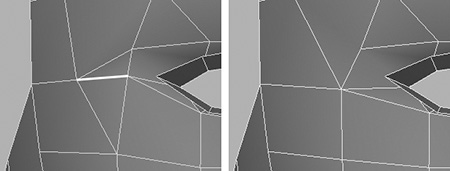
3. Here’s something less obvious: Notice the small polygon next to the corner of her eye, shown in Figure 5.46. Select and collapse this, as it is not needed.
Note
It’s important to keep your eyes peeled, looking for potential areas of optimization that are less easily seen, like this one.
Tip
When you are unsure about removing a particular polygon, go ahead and try it—if the geometry looks wrong, you can always press Z/Cmd+Z to undo the operation. And Shift+Z/Shift+Cmd+Z will redo the last undo.
4. The back of Kila’s head would be another good place to look for optimization opportunities, because her hair will cover it. In Figure 5.47 (left), you can see an edge that might potentially be collapsed.

5. Now move around the head, scanning the surface for anything you might remove. Above the nostril we built in the crease, but this is such a small polygon we just can’t justify keeping it, so collapse this edge (Figure 5.48).
Returning to the back of her neck, it looks like we can do some additional reduction. Shown in the top image of Figure 5.49, there are two quads on the sides of the neck that do not offer much in the way of shape or deformation. These edges can be removed, but make sure to fine-tune the new geometry so that the form correctly resembles the back of a neck.
Taking one last look around the head, we notice an edge under the jaw that we can remove (Figure 5.50). This cleans up the area nicely.
Another spot we can remove in this area is the muscle definition in the side of the neck, also shown in Figure 5.50. Ultimately this does not add to the character; besides, the muscle tone here can be drawn into the texture if we need it.
The face is now complete and can be seen in Figure 5.51. As mentioned earlier, we may have removed too much from a few areas, but we will wait and see how things shape up. If we come in well below our limit, we can go back in and rework some areas.

Now bring back the rest of the geometry so it is visible. Because we removed the detail from the upper part of the neck, we must now remove it from the lower portion as well, so they match up (Figure 5.52).

Current Count
The main optimization is now complete. Before we find out how we are doing as far as the polygon count is concerned, let’s look at the appearance of our character. Figure 5.53 shows our model of Kila before and after optimization—can you tell which is which?

If you look closely, there are subtle differences now. The main difference, however, is that one version has 1054 more polygons. You can see from this example that removing polygons does not mean you have to sacrifice the detail or even the shape of a character. What it does mean is that you have a well-constructed and efficient model that doesn’t eat up lots of processing power because it has 1000 polygons in an ear that the player never sees. It pays to be ruthless!
So where are we now with Kila? Remembering that our limit is 4500, let’s see how many polygons she currently holds. Select all the geometry, and go to Polygons > Triangulate and read the onscreen display. Our current polygon count is 4802. Hmmm, not bad—but we’re still 302 over our limit. There’s one remaining area where we can reduce to pare down these faces a little more: the hands.
Note
Remember to undo (Z/Cmd+Z) the triangulation before you proceed.
Hand Optimization
Kila’s hands at this point do house a lot of detail, so reducing them by 151 polygons each should not significantly reduce their quality. We should be able to have all five fingers articulated, without having to resort to a mitten hand or one with frozen fingers.
So what’s available for optimization? We can start by removing the fingernails. Here we have to remember that when working on the fingers, if we alter one we must do the same on the other four. They all have to match or they will look odd.
1. On all the fingernails and the thumbnail, snap the inner vertices of the nails to the outer ones and weld them, as demonstrated in the before-and-after shots in Figure 5.54.

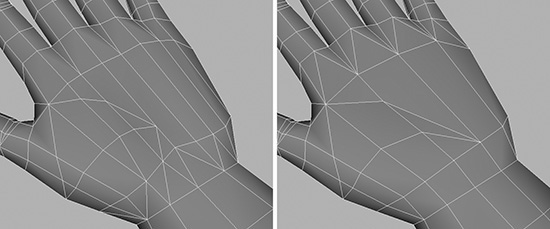
Currently we have fewer divisions of faces on the wrist than we have across the back and palm of the hand. So we should next optimize the back of the hand. Figure 5.55 (left) shows the back of the hand currently.

2. Following the center of the X created for the knuckles, trace back to the two vertices behind it and weld them to the ones on their left (Figure 5.55, right).
3. Next, flip the hand over and do the same for the palm, reducing it to match the divisions on the wrist. Figure 5.56 shows the palm before and after the optimization.
4. You might be left with the two edges I have highlighted in Figure 5.57 (left). If so, you can simply collapse these because they don’t add anything to the model.

The main hand area is now done, but we can reduce it even further by optimizing the fingers.
1. Flatten the top of each finger as shown in Figure 5.58. Do this by snapping each of the vertices that run down the center to the ones directly to their right. Remember to weld them afterward, or the polygons will still exist.

2. Right at the tip of each finger there is a single vertex that we no longer need. It doesn’t add much to the shape, so snap it to the vertex at the tip of the nail, and weld (Figure 5.59).

3. Still looking at the fingertip, there are two edges at either side of the nail; you can see these in Figure 5.60, left. Collapsing these on each finger will recoup another 20 polygons.

That completes the first stage of reducing the hand; you can see the results in Figure 5.61. We could leave it as-is, but there’s more we can do. I don’t think we will see a major difference in quality if we move forward one more step, which will reduce the polygon count by another 160.

4. As we did on the top of the hand, we can optimize the sides of the fingers and thumb. Select the vertices that run down both sides of each digit, and snap and then weld them to the vertices below. Figure 5.62 shows you how this looks on just the index finger.

This operation not only removes the side-finger divisions but also reduces the number of mesh divisions on the underside of each knuckle from 3 to 1.
We will leave the bottom curve of the fingers intact. This will provide a little more shape than they would have if we reduced them to cubes.
Once all the digits have been done, the hand is finished (Figure 5.63).

Final Check
So the model optimization is done! We have been through each section of Kila’s body and optimized them all in an attempt to get the polygon count under 4500. Before we look at the final total, spend some time looking at the model to try and reduce it further. See if you can spot any areas we missed.
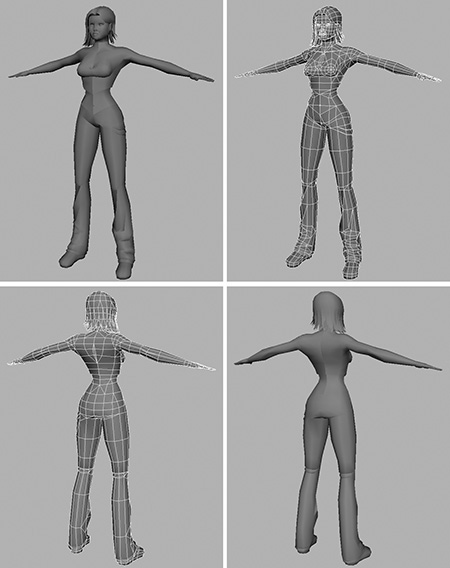
Figure 5.64 shows the final model, top to bottom, after all the optimizations described in this chapter. So what’s the polygon count? Triangulating the model gives it to us: 3998. We are well under our budget—which is great. But we can’t afford to put any detail back in just yet, as we may need the polygons during the next chapter, “Deformation Testing.” Once the model is finalized we can then go back through it, if we feel we need to, and add detail back in.

Before we go to the deformation stage, I recommend saving the model and leaving it alone for a day. Clean up the model and the scene then save your file as Kila_Optimized.mb. If you can, do something else before you come back to it for a final look. Taking a break from it will enable you to see it from a fresh perspective when you return. You may be able to spot some additional extra polygons that can be removed, or an area that needs reshaping. Indeed, optimizing the geometry will mean that some areas do in fact need reshaping. Usually, they will be thinner than before and so will need filling out.
Take some time to look around the entire model. Double-check the proportions and make sure the shape is perfect. Check it against your concept images; you must be positive it is correct before you proceed to the next stage.
Tip
Here’s a good way to determine how smooth your model is: Go to the Lighting menu in your current panel and select Use No Lights. Just the silhouette of the character will remain. Now you can rotate around the model and assess her.
Following are some of the alterations I made to Kila during my final, postoptimization examination:
![]() Adjusted the bottom of her crop top so the point was smoother
Adjusted the bottom of her crop top so the point was smoother
![]() Generally reworked the shape of her hips, widening them slightly
Generally reworked the shape of her hips, widening them slightly
![]() Moved up her navel
Moved up her navel
![]() Brought the upper body down, shortening her slightly (the distance between her chest and the bottom of her t-shirt was too great)
Brought the upper body down, shortening her slightly (the distance between her chest and the bottom of her t-shirt was too great)
![]() Added more of a curve to the small of her back, making her chest and backside a bit more pronounced
Added more of a curve to the small of her back, making her chest and backside a bit more pronounced
![]() Shortened the legs and widened the bottom of her jeans
Shortened the legs and widened the bottom of her jeans
![]() Reduced the length of her neck
Reduced the length of her neck
![]() Added an extra division across her waist to smooth it out
Added an extra division across her waist to smooth it out
You can see the final model in Figure 5.65.
When you’re sure Kila is ready, clean up the model and the scene, and save your file again as Kila_Optimized.mb.
Summary
We now have a model that is not only clean and good looking, but efficient as well. The various techniques explored in this chapter will serve you well when you need to optimize your geometry. You’ll know what to look out for on future projects.
With Kila now the best she can be, we can proceed to see how she deforms.