
Chapter 16. Animating for Games
CD Files
Kila_Walk.mb
Kila_Final.mb
Grae_Walk.mb
Grae_Final.mb
Cube_Example.mb
KilaBody.tga
KilaHair.tga
KilaHead.tga
GraeBody.tga
GraeMisc.tga
GraeWing.tga
GraeBody_Bump.tga
GraeMisc_Bump.tga
GraeBody_Spec.tga
GraeMisc_Spec.tga
in Movies directory:
KilaWalk_GameCam.mov
GraeWalk_GameCam.mov
KilaWalk_Persp.mov
GraeWalk_Persp.mov
Animation is truly magical: Being able to make an inanimate object move and show emotion is a powerful skill. There are many aspects of animation, enough to fill a book in itself; in this chapter we will focus on real-time animation and the various aspects of its creation, with the goal of bringing our Kila and Grae characters to life. Once we have established a few ground rules, I will demonstrate how to generate a basic walk cycle.
If you would like to learn more about the basic principles of animation, many helpful books are recommended in Appendix B, “Reference and Further Reading.”
To prepare for animation, you must know everything your character will do and how they should do it. Your lead animator will work closely with the designer on the project to compile an animation list that will then be passed to you.
In Chapter 1, we introduced some of the design elements associated with our characters. You read a brief background story that helped to portray the characters’ personalities, and basic information in the form of bios offered more insight into who they are and why. All this character information will now help us decide how Kila and Grae will walk. We know Kila is a dancer, so we can enhance her feminine walk, adding a bit more sway to her hips and giving her a sexier look. Grae, on the other hand, is a colossal beast; we want to feel the power behind each purposeful step as he lumbers around.
With these ideas of how the characters will move and interact with the game world, you can then go on to gather some reference material. More than likely this will be in the form of movies (DVDs, videos downloaded from the Internet, or something you have filmed yourself). Once you have a solid idea of the movements required, you and your team can discuss how they will be implemented into the game engine and what techniques will be used to save memory.
Animation Optimization
As you are now well aware, in every aspect of real-time artwork you have to keep within specified boundaries, and the same applies to animation. If your character can perform a hundred moves, all these will have to be stored in memory. Add to this the animations for all of the nonplayer characters, plus scenic animation, and your allotted chunk of the memory is soon gone.
Restricting the number of animations used isn’t the best approach for today’s games; in-game animation is a huge draw these days, and variety is the key to making your characters interesting and believable. Instead, you can explore the following options for saving processing power.
Mirroring Animations
Normally, if you wanted your character to be able to step left as well as right, you would have to create two separate animations, both of which would be stored in memory. Such doubling-up on so much of the animation data can soon reach the limits of your resources. One way to remove the need for mirrored versions is to see if the programmers on your team can do the mirroring in the game engine. (By this I mean mirroring only the joints’ rotation and translation values; mirroring the whole skeleton would also flip the character mesh.)
Having this aspect of animation handled in the game engine can cut almost in half the amount of data being stored, leaving you room for more animations.
Dividing Animations
Another way to reduce the memory consumed by animations, without losing any of the animation, is to divide them up. Say your character is running, which is one animation. Then she needs to hold a variety of weapons, say five. In all, you have six separate running animations.
What you can do is divide them into upper- and lower-body movements. The hips and legs from the primary run animation could also be used with the upper body animation from each of the six variations.
Storing upper and lower body data will itself save a lot of memory. If you can, you could even divide the animations further, into individual limbs—but this can lead to a reduction in the quality of the animation.
As always, talk these options over with your manager; implementing this technique into the game engine can be a big job.
Skeleton and Animation Sharing
For games in which you have many characters that potentially will do the same things, you can create one set of generic animations that can be applied to all. In this case, it’s wise to use the same skeleton structure in order to maintain the correct motion, but slight variations in size and proportions can also work.
This sharing technique is particularly useful on more generic, nonplayer character animations—civilians, for example—where the repeated use of the same animation is not obvious.
Animation Categories
Real-time animation is handled differently from big-screen animation. To make the game truly interactive, each animation has to be handled separately, so that the correct one can run when the player requests it.
In all, real-time animation can be separated into the five principal categories discussed in this section. Each animation you create will fit into one of these categories.
Idle and Fidget Animations
When the player stops controlling the character, it will begin to cycle randomly through various animations. If, for example, the character is standing still, a default breathing animation will play, in which the shoulders and chest rise and fall and the arms swing slightly—this is the idle animation. Once this has played for a while, another animation will randomly kick in; this could involve the character’s looking around aimlessly, tapping a toe, or picking their nose; the intent is to give them variety and some feeling of life. These variants are know as fidget animations. Both idle and fidget animations need to be looped or cycled and so could also come under the next category, cycle animations.
Cycle Animations
Almost all the animations involving the character’s physical movement (except idle or fidget animations, where the character is standing still) will be based on a single sequence, looping. A walk cycle is a good example of a cycle animation; this begins at the crossover point of the animation (the stage when the legs cross over from the side view) and ends in the same place. The animation can be looped seamlessly, giving the impression that the character can walk continuously.
Four-Stage Animations
The four-stage animation can also be described as a Move In, Hold, Cycle, and Move Out sequence. This sequence can be used when the character needs to change states temporarily; say climbing a ladder, for instance.
For the Move In, you need a starting animation where the character grabs hold of the ladder and moves into a pose where they can ascend or descend it easily. The Hold is this pose held while the player decides what they want to do; this Hold can be classed as an idle animation and so could possibly have other idle or fidget animations branching from it.
Next you have the Cycle. In the ladder-climbing example, the Cycle would be a short sequence involving the character climbing up or down the ladder. This would then be looped for the duration of the movement.
Finally, we have the Move Out, which is simply the character leaving the ladder and returning to the default idle animation or rest pose.
Blending Animations
Blending animations are used to transition the character smoothly from one animation state to another—for example, from walking to running. Switching from one animation directly to another can cause the character to stutter or to jump obviously—blending animations are intermediate animations that take the character smoothly and seamlessly from the walk to the run. These animations can even be taken a step further so that you have different animations based on which foot the character is currently on when triggered to change to a different animation.
With the exception of major change-of-venue actions such as the ladder climbing example, blending animations are rarely used in games. Blending is usually handled by the game engine, which tweens the position of the character in a frame of his current animation to the newly called animation. Obviously, tweening isn’t the most visually appealing or accurate solution, but it is fast; and if the programmer is willing to tweak the parameters a bit, it can have a quite passable result.
Custom Animations
These are simple animations that are specific to a character or to the game itself. Custom animations can include things such as operating a computer or transforming into a beast, but they are not the normal set of animations used by the majority of in-game characters.
Cinematic Animations
More and more games are relying on cinematic animations—real-time cut scenes—to help the story progress. These are scenes played using the actual game engine rather than showing a prerendered movie. This method is beneficial because it can help keep the flow of the game intact. These “scripted” events usually involve an animated scene being played when triggered in the game.
The Animation List
Most of the animations you create will rely heavily on animations you’ve created previously. Therefore, it’s important to follow the structure of the animation list, which your lead animator and project designer will have compiled in advance.
You would think a list containing the animations a character performs in a game would be pretty straightforward. They walk, run, jump, maybe have some fight moves or shoot a gun. In actual fact, however, a lot more animations than these explicit ones are involved in getting your characters to move, most of which you may not even realize are separate animations.
The animation list will tell you what movements are required, but not how the character will perform them. A walk cycle, for example, can be one of the most difficult animations to create because it can be interpreted in any number of ways—each person has their own way of walking. So creating a unique animation that also has to loop is tricky. Since most animations are based upon it, the very first pose that needs to be defined is the rest pose.
Defining the Rest Pose
With any third-person-perspective game, the main character has to be interesting even when the player is not controlling him. Look at any game you play, and when you’re not controlling the character, he will first adopt the idle animation before looping through any fidget animations he has. Before these animations can be created, a rest pose needs to be defined.
It’s important to lock the rest pose early on, since changing it later will involve altering many of the animations based on it. For example, consider a crouching position. The animation would start with the character in the rest pose and end in the crouch position, which can be classed as another rest pose. Then when the character stands again, the rest pose is where the animation would end. So altering the rest pose would also mean editing all these other animations.
Initially, the rest pose need only be a single frame, just one pose. At this stage you don’t need any animation, because this is the pose used as the starting point for many others.
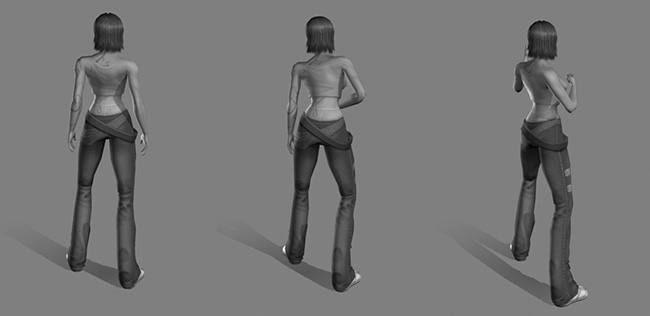
You may find that you will need a number of rest poses, each depending on the character’s state of health or current mood. For Kila, we might have the following (the first three are illustrated in Figure 16.1):
![]() The default posture used in game: relaxed yet dynamic, and—most important of all—in keeping with her personality. Also, don’t have the feet too far apart, or it will be difficult to get other animations back into this pose.
The default posture used in game: relaxed yet dynamic, and—most important of all—in keeping with her personality. Also, don’t have the feet too far apart, or it will be difficult to get other animations back into this pose.
![]() A posture to indicate when she is low on health.
A posture to indicate when she is low on health.
![]() A fight stance; Kila will use hand-to-hand combat to defend herself.
A fight stance; Kila will use hand-to-hand combat to defend herself.
![]() Various weapons, ranging from a metal post to a machine gun, will be available to Kila. To avoid having a different rest pose for every weapon, you could create the same rest pose for weapons that are held with one hand, like a pistol or Uzi. Even the default pose could be used for these stances.
Various weapons, ranging from a metal post to a machine gun, will be available to Kila. To avoid having a different rest pose for every weapon, you could create the same rest pose for weapons that are held with one hand, like a pistol or Uzi. Even the default pose could be used for these stances.
Tip
Try viewing your character from an in-game view. This will help you to see if certain poses or animations, including the rest pose, read well at that distance. It may be that you have been too subtle, in which case you will need to exaggerate the pose more.
With the rest pose(s) defined and signed off by your manager, you can then proceed to generate all the animations that begin or end in this pose. The idle animations, for example, all need to start and end in the same place so that they can flow into each other smoothly.
Take a good look at your complete animations list and make sure you know which ones need to be done first. Before we look at creating an animation in Maya, let’s examine some of the program’s animation tools.
Animation Tools
There are many ways to produce and control animation in Maya (in fact, whole books are written about them), so we’ll just look at the main animation controls.
Animation Controls
At the bottom of the Maya user interface are various animation controls; these can be seen in Figure 16.2.

Let’s first look at the Time Slider. This bar shows the range of frames you are currently working on. Clicking anywhere in here with the left mouse button will highlight the selected frame with a black box and update the view to show that frame of the animation.
Clicking with the middle mouse button in the Time Slider will select that frame but not update the time in the views. This is handy if you want to quickly copy the pose from one frame to another. You simply select the object whose keys you want to copy, select the frame you wish to copy to with the middle mouse button, and then set a key on the object at this new frame.
Right-clicking on the Time Slider will open up a new contextual menu (Figure 16.3). These options allow you to cut, copy, and paste selected keys, snap them to specific times, and adjust the playback and range of the animation. We’ll look at other contextual menu items (such as Tangents and Playblast, which play a valuable role in animation) later in the chapter.

The Range Slider sets the current visible range in the Time Slider. This is useful if you need to work on a specific section of the animation, while also maintaining the full animation timeline.
Setting values for the Animation Start Time and Animation End Time will set the overall animation’s timeline.
You can use the Playback Start Time and Playback End Time to manually set the Range Slider. To interactively edit the Range Slider, use the Range Slider bar. At either end of this bar are two small squares; click and drag these to specify the Time Slider range in which you want to work.
The Playback Controls are very much like a remote control, allowing you to play the animation, step along a frame at a time, or even move along to the next keyframe.
Now that we know how to control time in Maya, let’s now look at how to set keyframes.
Setting Keyframes
When you set a keyframe, you are actively storing that object’s attribute values at that specific time. Storing particular values at specific spots in the Time Slider instructs Maya to create the in-between positions of those values that ultimately provides the illusion of movement.
Note
Although they are related, setting a key is not the same as setting a driven key. As you may remember from Chapter 12, driven keys link one attribute to another, but are set at specific attribute values, not specific frames in the Time Slider. Ordinary keys are set at a specific frame, storing the currently selected attributes at that time.
When keys are set on an object, they show up in the Time Slider as red lines (Figure 16.4, top). You can then interactively edit these keys, moving and scaling them in the Time Slider itself. To do this, hold down Shift and drag over a selection in the Time Slider. Your selection will be marked with a red box, with arrows at either end and in the center (Figure 16.4, bottom). Selecting the center arrow lets you drag the selection, in effect moving the entire set of selected keys as a group. Selecting and moving one of the end arrows lets you scale the selected keys in that direction.

So how do we create a keyframe? There are a number of ways to do this in Maya; here are the most common ones:
![]() In the Animation menu set, go to Animate > Set Key (you can also access this tool by pressing S). By default this will set a key on all the selected object’s keyable attributes, but it can be configured to work however you like, using the options seen in Figure 16.5. The best thing to do is play around with this tool until you find a setup that works best for you.
In the Animation menu set, go to Animate > Set Key (you can also access this tool by pressing S). By default this will set a key on all the selected object’s keyable attributes, but it can be configured to work however you like, using the options seen in Figure 16.5. The best thing to do is play around with this tool until you find a setup that works best for you.

![]() In the Channel Box, simply right-click on a single attribute and choose Key Selected to set a single key. Key All will set a key on all the keyable attributes of the object.
In the Channel Box, simply right-click on a single attribute and choose Key Selected to set a single key. Key All will set a key on all the keyable attributes of the object.
![]() Moving away from the main Maya UI, you can also set keys in several other windows. For example, in the Attribute Editor you can right-click on an attribute and select Set Key.
Moving away from the main Maya UI, you can also set keys in several other windows. For example, in the Attribute Editor you can right-click on an attribute and select Set Key.
![]() You can also add keys to objects in the Graph Editor and Dope Sheet, both of which are discussed next.
You can also add keys to objects in the Graph Editor and Dope Sheet, both of which are discussed next.
The Graph Editor
Setting keys to move an object is only half the job; the other half is working with animation curves.
To get from one keyframe to another, a curve is drawn between them, sort of like a path to be followed by the object’s attributes. This is called interpolation, and it’s Maya’s way of predicting how the object should move from one keyframe to another. The Graph Editor allows you to edit not only the keys themselves, but also these curves. The tangents of a curve dictate the way the curve enters and exits a keyframe. Editing these tangents can have dramatic results on how the animation flows from one keyframe to the next.
Open up the file Cube_Example.mb. All of these cubes are identical and have exactly the same keys set on them at the same times; but when you play the animation, each one moves differently. This is because each cube’s tangents are different.
Open the Graph Editor by going to Window > Animation Editors > Graph Editor. You’ll see the window in Figure 16.6. (Your Graph Editor window may differ slightly, depending on the version of Maya you are using. All the basic tools will still be present, however.)

Let’s have a quick look at some of the tools on the Graph Editor’s toolbar.
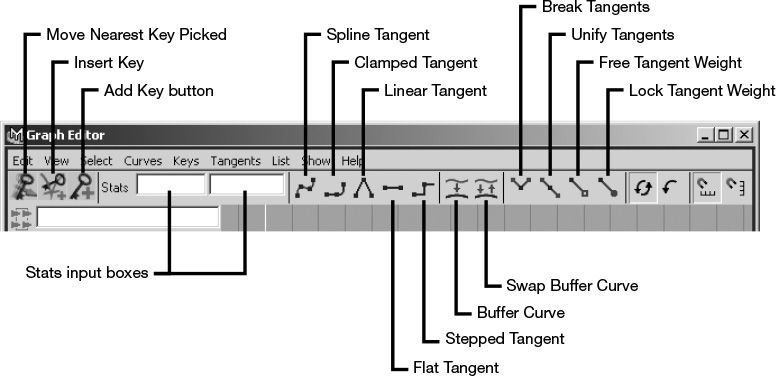
The first few buttons at the left end of the toolbar are the key manipulation tools:
![]() Move Nearest Picked Key. When this tool is active, only the key nearest to the cursor will move regardless of how many keys you select in the Graph Editor.
Move Nearest Picked Key. When this tool is active, only the key nearest to the cursor will move regardless of how many keys you select in the Graph Editor.
![]() Insert Keys. With this tool active, simply select the curve with the left mouse button, then click and drag with the middle mouse button until you reach the place where you want to insert a key.
Insert Keys. With this tool active, simply select the curve with the left mouse button, then click and drag with the middle mouse button until you reach the place where you want to insert a key.
![]() Add Keys. This tool works similarly to Insert Keys, except that clicking with the middle mouse button will dictate where the new key is placed. Holding the middle button allows you to move the key around; it will not be committed to the curve until you release the button.
Add Keys. This tool works similarly to Insert Keys, except that clicking with the middle mouse button will dictate where the new key is placed. Holding the middle button allows you to move the key around; it will not be committed to the curve until you release the button.
Note
There is an important difference between the Insert Keys and Add Keys tools: Insert Keys will add keys at the position in time that you designate, but only on the existing value curve. Add Keys will add a key wherever you designate, but will not preserve the value curve.
Next on the toolbar are the two Stats input boxes. The first box shows you the frame number of the selected key, and the other box shows the key’s attribute value. With a key selected, you can type absolute values into these input boxes to place the key in an exact place or time.
The five Tangent buttons are (left to right) Spline, Clamped, Linear, Flat, and Stepped. Clicking on these will apply a particular tangent to the whole curve or to the selected keys. Tangents are discussed in a later section.
After the tangent buttons are two Buffer Curve buttons. The first one allows you to store the current curve in a buffer. You can then make changes, enable View > Show Buffer Curves to display the buffered curve in gray, and compare the new curve with the buffered curve. If you want to revert back to the stored curve, click on the second button, Swap Buffer Curve.
Next on the toolbar are two tangent-editing tools. The first, Break Tangents, lets you edit the in and out tangents for each key individually. The Unify Tangents button will fix this break, so if you manipulate the in tangent of a curve, the out tangent will also be affected. All tangents are unified by default.
Next to the two tangent-editing buttons are the Free Tangent Weight and Lock Tangent Weight buttons. By default, all curves are created nonweighted; this means you can only edit the tangents vertically—the handles will only move up and down, pivoted around the key. When the tangents are weighted, you have complete freedom over where the handles can be placed; that means you can move them horizontally as well as vertically, adding more weight to each key. To convert a nonweighted curve to a weighted one, select the attribute in the list on the left in the Graph Editor and go to Curves > Weighted Tangents.
Note
If you prefer, you can change your general animation preferences to make weighted tangents the default rather than nonweighted.
Now that we have an understanding of some of the Graph Editor’s tools, let’s get some exposure to working with animation curves and tangents. You should still have Cube_Example.mb open, along with the Graph Editor.
1. In Maya’s main view, select the first cube, named Cube_Spline.
Figure 16.7a shows the Graph Editor with the selected cube listed on the left. Below this is a list of all the cube’s attributes that have animation applied to them. Currently only the Translate Z attribute has animation applied.

2. Press F in the Graph Editor’s main window to frame the animation curve. As you can see, this first cube has a Spline Tangent applied to it. This makes the curve flow smoothly between all the keys.
3. Select the next cube, Cube_Clamped. This tangent is a hybrid of two others, the Linear and Spline tangents. Unless two keys are similar in value, all the tangents will be set to splines. As you can see in Figure 16.7b, the first two keys have the same value, so their tangents are set to Linear; the third key has a higher value, so the tangents leading out of the previous key and into this are set to Spline.
4. Next, look at the cube called Cube_Linear. This type of tangent creates a simple linear path between keys (Figure 16.7c).
5. Now select Cube_Flat. As you can see in Figure 16.7d, instead of the cube following a straight linear path from key to key, it now moves along to the second key and then eases out of it before easing into the final key. This creates a gradual smooth motion when the object starts to move or comes to a stop.
6. Finally, look at the Stepped tangent shown in Figure 16.7e; this is applied to Cube_Stepped. Unlike the others, this one does not flow along a path as such; rather, it will snap from key to key without being interpolated.
Each of these tangents discussed here can be applied to any curve, by either clicking on the tangent’s button found on the Graph Editor toolbar, or from the Tangents menu in either the Graph Editor or the Time Slider contextual menu.
As well as altering the tangents on a whole curve, you can also select each key and apply them individually. With a key selected in the Graph Editor, you can also edit the curves manually using the two handles that appear. These can be moved around until you achieve the motion you require (Figure 16.8).

Dope Sheet
The Dope Sheet is used primarily to edit the timing of your animation because it gives you access to the keys for the whole scene. This can be very useful when you need to quickly speed up or slow down areas of your work.
To open the Dope Sheet, go to Window > Animation Editors > Dope Sheet. In Figure 16.9, top, we have the window displaying the basic scene summary, which shows us all the keys that exist in the scene.

This display option is not available by default. To make the scene summary visible, go to the Dope Sheet’s View menu and enable Scene Summary.
As you can see, the toolbar is a cut-down version of the Graph Editor’s, allowing you to add/insert new keys and input absolute values for existing keys. Next to the Stats boxes is a new button for turning hierarchy on and off. When this is enabled, the keys are displayed on objects that exist below the active object, meaning you can work on an entire hierarchy at once.
You can also display each separate attribute in the scene by clicking on the plus icon next to Scene Summary, which will open up its contents (Figure 16.9, bottom). You can then select the keys, represented by black blocks; the blocks turn yellow when selected. You are then free to move or even scale them using the middle mouse button to achieve the animation you require.
Playblast
Depending on the specifications of the computer you are working on and the complexity of your scene, it can be difficult to get a realistic idea of how your animation is going to flow when put into the game. Producing a playblast allows you to quickly output your animation as a movie, play it back, and see how the animation will look when run at an exact frame rate.
To produce a playblast, right-click on the Time Slider and select Playblast from the contextual menu. Maya will then run through the animation, taking screen grabs of the selected view, and storing them either as a movie file or separate images.
If you open the Playblast options (Figure 16.10), you can configure what Maya will capture and how it is stored. Most of the options are fairly self-explanatory, so let’s just have a brief look at the less obvious ones.

![]() View automatically opens the movie for you after Maya has finished capturing it.
View automatically opens the movie for you after Maya has finished capturing it.
![]() Having Show Ornaments enabled keeps the camera name, axis, and other onscreen displays visible in the playblast.
Having Show Ornaments enabled keeps the camera name, axis, and other onscreen displays visible in the playblast.
![]() The Viewer options let you specify how you would like the playblast to be output. The Movieplayer viewer will use your operating system’s default movie-viewing software, and will more than likely output the playblast as a single movie file. Fcheck is Maya’s own viewer and can only handle images. Thus, the playblast is output as individual frames—but this can produce a better, cleaner playback of your animation.
The Viewer options let you specify how you would like the playblast to be output. The Movieplayer viewer will use your operating system’s default movie-viewing software, and will more than likely output the playblast as a single movie file. Fcheck is Maya’s own viewer and can only handle images. Thus, the playblast is output as individual frames—but this can produce a better, cleaner playback of your animation.
As you begin to animate later in the chapter, don’t be afraid to generate any number of playblasts; they are an invaluable means of making sure your animation is headed in the right direction.
Creating a Walk Cycle
In this section we will produce a walk cycle for Kila. First we will block in the basic motion; once this is in place, the animation can be easily tweaked and refined.
Since this is an in-game animation, it’s best to exaggerate the movements slightly at the beginning. If they look “over the top” from the game camera, you can easily reduce the exaggeration using the Graph Editor.
Scene Preparation
We will start by preparing the scene, getting it ready for animation.
1. Open the Kila_Final.mb file. (You don’t need to use the Rest Pose file here because the walk cycle will not begin or end in it.)
Make sure you have a key set on frame –1, storing the file’s base pose. Do this by selecting each character set (Character > Select Character Set Node), then right-clicking in the Channel Box and selecting Key All.
Depending on how your game engine handles animation data, you may or may not need to store this base pose. When the character animation is exported, you may need the skeleton to be keyed in this bind pose at the beginning of each animation. It’s best to discuss this with your team’s technical artist or lead programmer to be sure.
2. Go to Window > Settings/Preferences > Preferences and, as shown in Figure 16.11, select Keys in the Categories list.

3. Set both Default In Tangent and Default Out Tangent to Linear. Every new key you create will now have Linear tangents, which will initially be easier to work with. You can alter these tangents again later.
While you work on these steps, you will animate Kila physically moving forward; this will help you visualize how the walk is shaping up. You also need to see how the animation loops, as if she were walking in place. This is because, once the walk is complete, you will have to remove any forward motion, as the game engine will implement that for you.
Some animators prefer to go straight in and create the animation on the spot, without the forward motion. I find it useful to have both versions at hand just in case I need to generate an animated sequence in which the character must physically walk a distance. With the forward motion included, I don’t have to try and put it back in, which can make the feet appear to slide if not done correctly.
To help us see both versions, we can parent a camera to a point at the character’s feet. This means the camera will move with the character, giving the illusion of Kila walking in place. We can look through a different camera to see her actually moving along.
1. Make sure you are still on frame –1, and create a new Locator (Create > Locator).
2. Set the Kila_BaseSkel display layer so you can see the joints. Select them, and then select the main Root joint.
3. Holding Shift+Ctrl/Cmd, select the locator and apply a point constraint just on the Y axis, making sure Maintain Offset is enabled. (If for some reason you can’t see the locator, check the visibility in the panel’s View menu. Or simply make the selections in the Outliner or Hypergraph.)
Now as Kila moves, the locator will follow but will stay locked to the floor.
4. In the side view, position Kila so you can see her legs and waist in the center of the window.
5. go to View > Select Camera. Holding Shift+Ctrl/Cmd, select the locator and parent the camera to it by pressing P.
6. Now you need to set up the Time Slider to cover the time it will take Kila to perform a single cycle of her walk. Set the start frame back to 0, and the end frame at 32.
Note
When creating the walk, the first and last frames must be the same so that the animation loops. This will cause the animation to pause slightly when played, so remember this when you play it back, or create a playblast that only runs up to frame 31.
We use a power-of-two range (0 to 32) because it’s then easier to divide the animation into stages. For example, the first and last poses of the walk are on frames 0 and 32; these key poses are known as “extremes.” Halfway, we would place a new pose (when the legs cross over the opposite way) on frame 16; this is known as a “breakdown” or “passing position.” We can then place additional poses called “in-betweens” on frames 8 and 24, before breaking down the animation further if we need to. With all the main keys evenly spaced, the animation will play at a steady pace throughout.
Now that we have a locator acting as a basepoint for the character, you can parent other cameras to it in order to see the character cycling from other angles. With the scene ready now, we can begin to animate.
Legs and Waist: Blocking Out Poses
The first step in creating any animation is to block out the main poses. These are the extremes, breakdowns, and any in-between poses needed. This not only gives you a good idea of how the timing feels as the character moves, but also how each pose looks.
Before you do anything else in Maya at this point, get out of your seat and walk around the room. Observe where your waist and feet are at certain stages in your walk. See how they rotate, what speed they move. When do your hips dip? If you are a male animating Kila, try to imitate a feminine walk. It’s one thing to watch someone else walking—but to physically do it yourself will give you insight for applying it to your character. Try to do this for all your animation work; don’t be afraid of looking silly—in the long run, your animation will be better for it.
1. Let’s create our first extreme. With your own walk fresh in your mind, move along to frame 0, switch to the side view, and position Kila’s feet to match the crossover point in the walk (Figure 16.12b).

Move the right foot up slightly and rotate it so it is tilted forward. Move the hips down and forward, too.
Set a key on the translate and rotate attributes for the icons of both feet and Root_Control.
Normally we would now place the second extreme on frame 32, then the breakdown at frame 16, and so on. However, since our character is moving forward, it makes sense to place each pose as we come to it in the timeline.
This will allow us to see where the hips and feet should be placed on the subsequent poses.
2. Move along to frame 8 and create the second pose. Move the right foot forward until it is just about to plant itself, pose the left foot so it’s just about to leave the floor, and move the hips forward, keeping them in between both feet at all times (Figure 16.12c).
Set a key to store this pose.
3. Now we come to what would be the breakdown and the next crossover. Move along to frame 16 and try your best to replicate the pose on frame 0 (Figure 16.12d), but on the opposite feet. Set a key to store it.
4. Now add the second in-between. The left foot needs to plant, so move to frame 24 and do your best to replicate the pose on frame 8, again on the opposite feet (Figure 16.12e).
An easy way to do this is to use the middle mouse button to go to frame 24. Line up one of the feet on top of the opposite one in the view, and set a key just on the one you moved. Left-click to move back to the reference frame, then repeat on the other foot and the root. The poses will be nearly identically mirrored in just a few seconds, with no guesswork.
5. The pose in frame 32 (our second extreme) needs to be the same as frame 0 so that it can successfully cycle (Figure 16.12f). To quickly accomplish this, simply copy the keys from frame 0 to frame 32 and then adjust the Z translation.
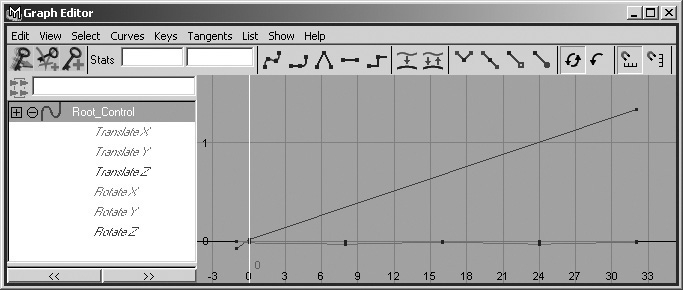
Now we will clean up the Root_Controls keys a little—it’s important to keep your animation clean, removing any unused keyframes.
1. Select the Root_Control and open the Graph Editor.
2. Delete all the keys, except the first and last ones on the Translate Z curve. You want its Z translation to be a continuous straight line, as it is in Figure 16.13. This will allow the character to move forward smoothly; any extra keys might cause her to pause as she steps.
3. Removing these keys may mean you have to go back and tweak some of your poses, so go back and do that now before we continue.
From the side, the walk is shaping up nicely; but what about the front? As shown in Figure 16.14a, by switching to the front view we can see that her legs are too far apart. In a more feminine walk, the feet tend to cross in front of each other, almost as if she is walking on a tightrope.

1. Select the LeftFoot icon and, in the Graph Editor, highlight just its Translate X attribute (Figure 16.15, top).
2. Now select all the keys except the one that lies on frame –1, and move them down (Figure 16.15, bottom). This should also bring the foot in toward the center in the view panel, as seen in Figure 16.14b.
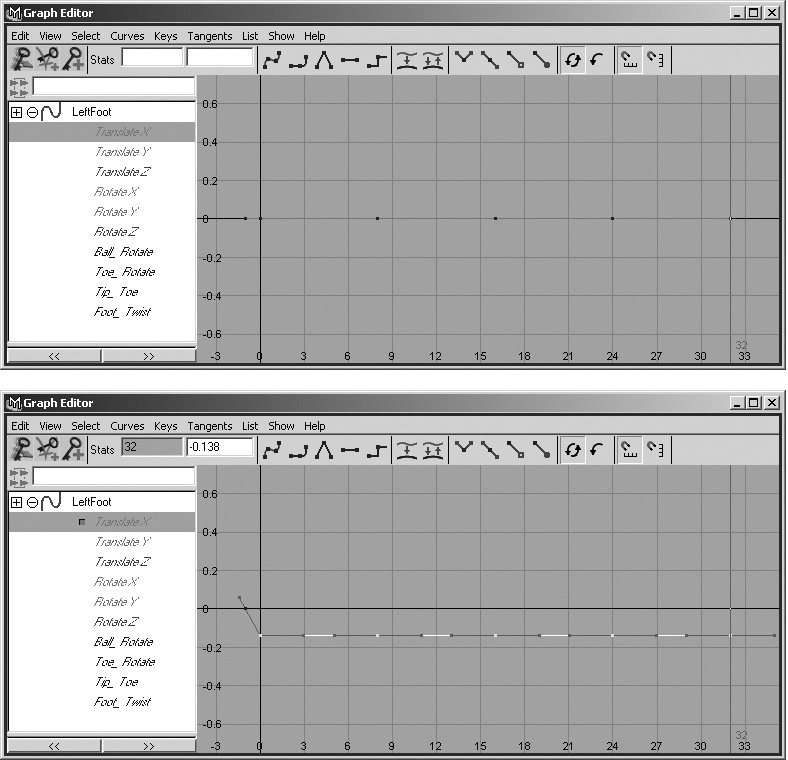
Move the keys down to about –0.138 and make a note of the value.
3. Now apply this same technique to the RightFoot icon. Edit its Translate X attribute by moving the keys to a value of 0.138 (Figure 16.16, bottom). This brings the foot in the opposite way (refer back to Figure 16.14c).

The problem we have now is that the feet will go through the legs as they pass by. We can fix this easily in the Graph Editor. We know that frames 0 and 32 are the same; these are the crossover frames for the right foot, so we need to edit both.
4. Select frames 0 and 32 in the Graph Editor and move them both down, to a value of around 0.075. This should move the foot back out in the main view panel (Figure 16.14d).
5. Select the LeftFoot icon and move its key to where the crossover exists (frame 16) out to around –0.075.
We have now blocked in the animation for the waist and legs. You may need to play the animation through, or create a playblast, to check how she looks from the side again before we proceed:
![]() Altering the feet positions probably means the hips are now too low; if this is the case, select the Root_Control’s Translate Y keys and move them up slightly.
Altering the feet positions probably means the hips are now too low; if this is the case, select the Root_Control’s Translate Y keys and move them up slightly.
![]() Make other final adjustments to the basic poses and timing as needed, but keep the keys at the times already specified: frames 0, 8, 16, 24, and 32.
Make other final adjustments to the basic poses and timing as needed, but keep the keys at the times already specified: frames 0, 8, 16, 24, and 32.
Legs and Waist: Refinement
With the poses established, we can now refine the basic animation, giving Kila a smooth and realistic walk cycle by adding extra keys and poses.
Moving along the timeline, the first thing we can work on is the way the feet plant after each step. At the moment, they don’t spend enough time on the ground, giving the impression that she is floating along and has no weight.
1. Working on the left foot first, move the keys set at frame 8 to frame 10. This will keep the foot grounded for longer.
You can use any method you like to move the keys: in the Graph Editor, in the Dope Sheet, or by simply highlighting them and moving them in the Time Slider.
2. Move along to frame 32. Then select frame 28 with your middle mouse button and set a key at this frame. You’ve just copied the pose from frame 32, essentially moving the keys back. We need to keep the keys at frame 32 because it is the very end of the animation.
3. To achieve the same results for the right foot, move the keys set at 16 back to 12 and move the keys at 24 up to 26.
Now that the feet have changed, you will also need to alter the hips. You want them to drop just as each foot plants on the floor and takes the weight.
1. Select the Root_Control icon, and select just the Translate Y attribute in the Graph Editor. You will see the curve for the Y translation, as demonstrated in Figure 16.17a.

2. We now want to offset the hips’ dip so it happens when the foot plants. Select all the keys except for the one at frame –1, and move them along the timeline until the two lower keys, which currently lie on frames 8 and 24, lie on frames 15 and 31 (Figure 16.17b).
3. You will now need to set new start and end keys, or the animation will not loop. Move along to frame 32 and set a key on just the Y translation. This will store its current value and maintain the curve’s current shape.
4. To create the seamless loop, you will copy this exact key to frame 0. Select frame 0 using the middle mouse button, and set another key on the Y translation.
5. Clean up the curve by deleting any keys after frame 32 (Figure 16.17c).
6. Flatten the tangents on the middle three keys only, by selecting them and clicking on the Flat Tangent button.
Your new curve should resemble that in Figure 16.17d.
We have now smoothed out the waist’s animation, so let’s do the same on the feet.
1. Select the right foot. In the Graph Editor, flatten all the tangents by clicking on the Flat Tangent button (Figure 16.18, bottom). This will initially soften all the animation on the foot.

2. Now select only Translate Y. As you can see in Figure 16.19, top, on frame 8 there is a key that breaks up the nice arc between frames 0 and 12. If you play the animation, you’ll probably notice that this causes the foot to pause just before it is planted on the floor. We want to remove this so the foot can flow freely.

Select the key at frame 8 and delete it, which will give you the cleaned-up curve in Figure 16.19, bottom.
3. The same correction can be done on the Z translation, except that the key you want to remove lies on the very first and last frames. Instead of deleting this one, we simply select the keys and click on the Linear Tangent button, straightening out the curves so that they run in a more linear fashion (Figure 16.20).

4. Now select the left foot and follow the same procedure. You want to remove the extra key from the Y translation. For the Z translation, this time the key we require is in the middle of the curve, meaning we can simply select it and delete it (Figure 16.21).

We still have work to do on the feet, but that should wait until after we work on the hips. We’ll do these now because their positions could affect the feet’s animation later on.
We are now going to add a bit of weight to Kila as she moves. To do this, we will shift her hips over the foot that is currently on the floor and taking all her weight.
1. Switch to the front view first. While on frame 0, move the Root_Control over her left foot using just the X translation. Use a small value of around 0.015, this will also give her hips a subtle sway as she moves (Figure 16.22).
When you’re done, set a key on just the Translate X attribute.
2. Now move to frame 16 and set the same value, but this time make it negative: –0.015. Then set another key.
3. Set a key on frame 32; set this one to be the same as the original value, which was 0.015.
4. Now look in the Graph Editor and make sure you have keys only on frames 0, 16, and 32 of the X translation. Remove any keys that lie in between.
5. Finally, flatten all the tangents on the curve, to smooth out the sway of the hips.
Now we will give her a little wiggle as she walks, by animating the waist controller. The first thing we will alter is the amount of tilt on her hips. When one of her feet is placed on the floor, it’s taking all the weight of her body, so her hips will tilt away from that leg.
1. Starting on frame 0, rotate the Waist_Control around the Z axis until you reach a value of around 7. The hips should tilt like those in Figure 16.23, middle.

2. Set a key on just the Rotate Z attribute on both frames 0 and 32.
3. Move along to frame 16 and set the Z rotation to –7, tilting her hips in the opposite direction (Figure 16.23, right). Set another key.
4. Go to the Graph Editor and make all of the Rotate Z curve’s tangents Flat to soften their movement.
When women walk, their hips’ movement is in relation to the placement of their feet. The hip doesn’t begin to tilt in the opposite direction until the foot has been placed, because it’s the shift in weight that straightens the leg out; this then forces the hip to tilt away from it. We need to insert a few more keys to implement this detail.
5. Move along to frame 11 in the Time Slider and set a key on the Rotate Z attribute. Follow that with another key placed at frame 27. You are adding keys here because these are the frames just before each foot plants.
6. Now, using the Graph Editor, edit the keys so that the hips don’t tilt immediately. Set the key at frame 11 to 1.7, and the key at frame 27 to –1.7.
As demonstrated in Figure 16.24, the hips will begin to gradually tilt until they reach frame 12, the point where the foot connects with the floor. Then they’ll tilt more quickly before moving gradually again over toward the other foot.
Now that we have the hips’ tilt, we can implement a slight rotation to make the hips move forward with each leg.
1. Move along to the first frame where the right leg is about to plant; this should be around frame 10. Set the Waist_Control’s Rotate Y attribute to 10, and set a key on it.
2. Move along until the left leg is in the same position; this should be at frame 26. Set the Y rotation to –10 and set another key.
3. Move along to frame 32, and set the Y rotation to 0 so that it’s the same as on frame 0. Set another key.

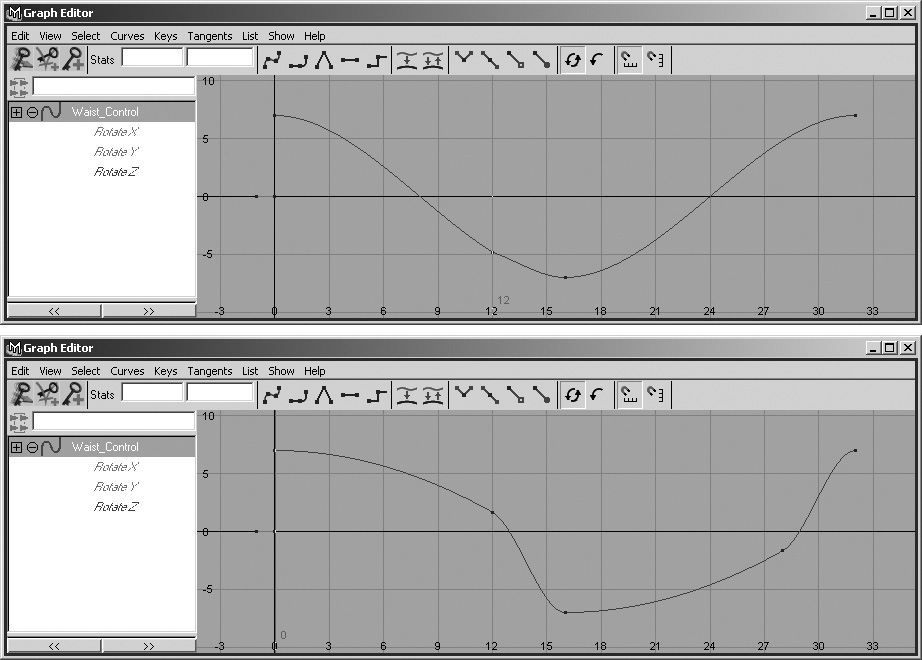
4. Now open the Graph Editor so we can see the curve (Figure 16.26, top). You want the two middle keys to run smoothly, but because this animation loops you want to keep the first and last keys as they are. If their tangents were set to Smooth, it would cause the animation on the hips to pause as it reaches the end of the cycle.

So select the middle two keys and make their tangents Flat, producing a smoother curve like that in Figure 16.26, middle.
Finally, you need to make sure this curve loops correctly. Looking at its current path, the tangents are shallower at the beginning than they are at the end—the start and end keys need to be updated so the animation will run smoothly. Our animation’s midpoint is at frame 16, but we offset the animation by two frames; so the new midpoint is 18.
5. Move along to frame 18. With your middle mouse button, select frames 0 and 32 and set a key on the Rotate Y attribute. The curve is now correctly balanced, making for a better loop (Figure 16.26, bottom).
The majority of the hip work is complete. So we can now return to the feet and finish them. We’ll use the Ball_Rotate control we added to the rig, so as each foot moves back, Kila will eventually end up on just the ball of her foot.
1. Use the gridline as a floor marker, and move along the timeline until the left foot starts to prematurely leave the floor. This should be around frame 4.
2. This marks where the ball of the foot should start to rotate, so move back to frame 3. Set a key on the Ball_Rotate attribute, storing the value of 0 on this frame.
3. Now move along to where the foot does leave the floor; this should be at frame 10 (Figure 16.27, left). Set the Ball_Rotate attribute to –45, which will plant the ball of the foot back on the ground (Figure 16.27, right). Set a key.

4. Set the Ball_Rotate attribute back to 0 where the foot has fully left the floor, which should be around frame 16. Set a key here, too, effectively removing the rotation around the ball of the foot.
5. Now repeat the procedure on the right foot. Set the Ball_Rotate attribute to 0 on frames 19 and 32, and then plant the ball of the foot on frame 26 with a value of -45.
6. All that remains is to flatten the tangents on both Ball_Rotate attributes, to smooth out the animation.
Now you have all the basic keys in place for Kila’s lower body. Go through the animation again, adjusting it in the Graph Editor until you are happy with the walking movement of her legs. Here are a few things to look out for:
![]() It may be that the feet raise too high off the ground, making her look like she is walking in water. If need be, simply move the highest Y translation keys for the feet down slightly.
It may be that the feet raise too high off the ground, making her look like she is walking in water. If need be, simply move the highest Y translation keys for the feet down slightly.
![]() You may want to add a slight twist to the feet as they come forward. Do this by placing keys on the Z rotation of the feet.
You may want to add a slight twist to the feet as they come forward. Do this by placing keys on the Z rotation of the feet.
![]() You can also adjust the knee positions, pointing her knees inward as she walks.
You can also adjust the knee positions, pointing her knees inward as she walks.
Play through the lower body animation a few times, and maybe even generate a playblast to see how it runs in real time. Once you are completely happy with it, we will continue on to the torso.
Torso Animation
The animation in Kila’s legs and hips will guide the movement of the rest of her body. To add movement to her torso, we only need to animate the main spine controls.
To make sure we have complete control over the animation, we will animate one attribute at a time, but to speed things up we can animate all three spine joints together, giving her back a smooth, gradual arc as it moves.
We will begin with the Rotate Y attribute, making her torso twist slightly with each step. As you walk, your upper body tends to mirror the lower body’s actions. That is, when your right leg is out in front, it’s the left arm that is in front. As the arm moves to the front, the torso twists, bringing the related shoulder out with the arm. This is the movement we will now add into Kila.
1. Select all three spine controls. At frame 0, neither leg is out in front, so we will keep the torso’s rotations at 0. This is the crossover point in the animation.
Set a key on the Y rotation on frames 0 and 32 on all spine controls. These frames need to hold the same pose.
2. Move along the Time Slider until the right leg is as far forward as it can go; this should happen on frame 8.
Using just the Y rotation, twist the torso so that the left shoulder moves forward. Inputting a value of –2 directly into the Channel Box will affect all three spine controls and should be sufficient; we don’t want the torso movement to be too dramatic. Set a key when you’re finished with the rotation.
3. Move along until the left leg is all the way forward; this should be on frame 24. Set a value of 2 in the Rotate Y attribute, and set another key.
Note
We use the same values on both sides so that Kila’s walk is even. If one side moved more than the other, she might have a limp or some other unnatural movement. In some parts of the game this will be what you want; for instance, when she is injured.
4. With all the main keys applied, go into the Graph Editor. Flatten the tangents on the new keys, but leave the first and last ones Linear. As you can see in Figure 16.28, you can work on all three attributes at once.

Kila’s torso will now twist slightly as she walks.
To help show the weight behind each step, we can use both the Z and X rotations to dip and tilt the upper body. As each foot plants on the ground, the hip tilts away from it; this also causes the body to tilt. Gravity and momentum then make the weight of her upper body dip slightly before catching up with the rest of the body.
Note
When you’re creating a walk cycle, as a general rule the shoulders should tilt opposite to the hips. So when the left hip is raised, the left shoulder is dipped.
Let’s implement the Z rotation first.
1. You should still have all three spine controls selected; if not, select them all again and switch to the front view.
Unlike the Y rotation, the shoulders need to be tilted when the legs are at their crossover point, which is at frames 0, 16, and 32. On frame 0, set the Rotate Z attributes to –1.5, tilting the shoulders to her left, as seen in Figure 16.29b. Set a key to store this at frames 0 and 32.

2. You now want the shoulders to tilt to her right (Figure 16.29d), so move along to frame 16 and set a value of 1.5. Set a key.
3. Finally, smooth the keys out in the Graph Editor by making all the tangents Flat (Figure 16.30).

The final torso attribute to animate is the X rotation. Although this will give a forward dip to her walk, placement of these keys is different from the Z rotation. This is because the dip needs to start just after the foot has planted and then rise at the crossover point, before dipping again when the next foot goes down.
1. Switch to the side view and, with all the spine controls selected once again, move to frame 0. As seen in Figure 16.31b, set the X rotation to 2, which should give a subtle dip. Set a key on frames 0, 16, and 32.

2. Move along to frame 8 and set the Rotate X attribute to –0.7 (Figure 16.31d). In this instance we don’t mirror the first value because that would cause her to bend too far backward. Set a key on frames 8 and 24.
3. Flatten the tangents in the Graph Editor. Your curves should now resemble those in Figure 16.32.

The torso area is complete. Looking at Kila’s walk from the front, she sways quite a lot. This could work well for a character with real “attitude,” but for Kila we want to calm this down a bit. We want her head to be almost stationary as her hips sway from side to side. We can fix this easily by animating the Rotate Z attribute on the main Root_Control. (If you like the attitude and want to keep the exaggerated sway, you can skip this step; or you could reduce the amount that we’re going to edit the animation, to give her even less of a sway.)
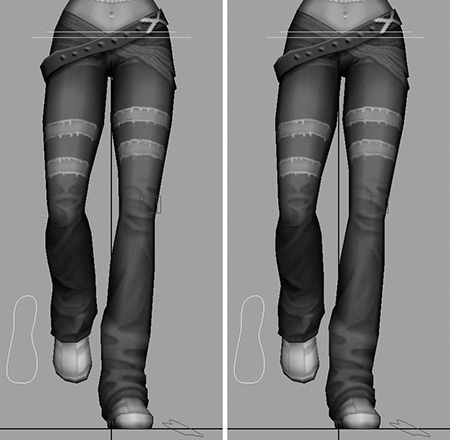
1. Switch to the front view and make sure you have the grid visible. As you can see in Figure 16.33a, on frame 0 Kila’s head is over to the left of the main gridline. We want her head to stay more central to that line.

2. Select the Root_Control, and rotate around the Z axis until her head lines up with the gridline (Figure 16.33b). Use the part in her hair as a guide.
3. Now set keys on the Rotate Z attribute on frame 0 and frame 32.
4. Move along to frame 16 (Figure 16.33c), and again rotate the Root_Control, this time backward so her head stays fixed to the line (Figure 16.33d). Set a key.
5. Flatten all the tangents in the Graph Editor.
You could, if you want a more precise movement, apply the same value to Root_Control’s Rotate Z attribute in frames 0 and 16; just remember to make the one in frame 16 a negative number.
The torso movement is now complete. After the rest of the animation is applied, you can look at the character’s walk as a whole, seeing how everything works together. At that stage you can play around with the keys for the torso until you get the animation just right.
Arm and Clavicle Animation
Animating the torso helped show us where the shoulders will be at specific times in the walk cycle. With those keys in place, we can begin work on her arms.
At present, Kila looks like she is shrugging her shoulders a little, so let’s begin by animating the clavicle controls and reducing this shrug. Select both clavicle controls and move them down slightly, as shown in Figure 16.34 on the right. Then set a key on just the Y axis, on frames 0 and 32.

That could be all that’s needed for the clavicles, but feel free to add some slight animation to the Z and Y translations to give the shoulders some movement—a slight bounce with each step.
Now let’s turn our attention to the arms. First prepare the scene by using the visibility controller to hide all the icons except for those on the left side. You will be working in both the side and perspective views, so in each one’s View menu make only polygons and handles active. This will hide all the other icons we don’t need at present.
In a basic walk cycle, the arms tend to mirror the legs’ movement, so when the left leg is forward, the right arm is also. We’re going to concentrate on creating a full swing of her left arm, using the FK controls. Employing forward kinematics will give a better simulation of a swinging arm because it’s a rotational-based movement. If we used IK, the wrist would follow a linear path between each key set, which would be difficult to animate and would look unnatural in the end.
Because the animation starts at a crossover point, we will start this swing at frame 8, where Kila’s right foot is forward, and end it at frame 24 where her right foot is behind her.
1. Move along to frame 8. As demonstrated in Figures 16.35b and 16.35e, rotate just the left shoulder, moving it forward slightly. Then set a key on all the rotation attributes.

2. Move on to frame 24. Here, rotate the shoulder again, moving it backward this time (Figures 16.35c and 16.35f). Set a key on the rotations.
The main swing is in place, so we can use the arm’s pose in between these two keys, which is a crossover point, to define the first and last keys for the animation.
3. Move to frame 16, which is the point of the second crossover. Click on frame 0 with your middle mouse button, and set a key on all the rotation attributes of the shoulder.
4. Click on frame 32 with the middle mouse button and set another key here.
5. Finally, go to the Graph Editor and flatten all the tangents on just the middle keys.
With the basic movement for the arm in place, next up are the elbow and wrist joints. If we key the elbow’s rotation at frames 8 and 24, the elbow will appear rigid because it will move at exactly the same times as the shoulder. We want to offset the elbow animation, making the arm appear to move freely.
1. Move along to frame 11, which is just after the shoulder has reached its first key. Rotate the elbow, just around the Y axis. This is demonstrated in Figure 16.36, left. Set a key on the Rotate Y attribute.

2. Move to frame 27, and rotate the elbow back so that the arm is almost straight, as in Figure 16.36, right. Set another key on the Y rotation.
The basic swing is in, but we can no longer use frame 16 as our middle point of reference to help us on frames 0 and 32. Instead, we need to work out where the new middle pose will be.
3. Count the number of frames between the last key created (at frame 27) and the final frame (frame 32). There are five.
4. Now select frame 27 and move back five frames to frame 22. This is the frame where the elbow should be as it’s rotating back.
5. Use the middle mouse button to select frame 32, and set a key on the Y axis. Do the same on frame 0.
6. Flatten the tangents on the two middle keys to smooth out the animation.
For the wrist, follow the same procedure as for the elbow, to give it a bit of swing.
1. Start by moving along to frame 11; then pose and set a key on the hand (Figure 16.37, left).

2. Move on to frame 27, and pose and key the hand (Figure 16.37, right).
3. Using the method we employed for the elbow, work out the frame for the middle pose that the hand should be in for frames 0 and 32. You should land on frame 22.
4. With the middle mouse button, select frame 32, and set a key on all the hand’s rotations. Do the same at frame 0.
5. Flatten the tangents on both the middle keys.
The entire arm now swings nicely, but it moves a bit too freely. When our arms swing forward and backward, they pause slightly just before they change direction. We will now implement this into the shoulder; you can then apply the same procedure on the rest of the arm.
1. Select the shoulder and open up the Graph Editor. As you can see in Figure 16.38a, the curves are nice and smooth.
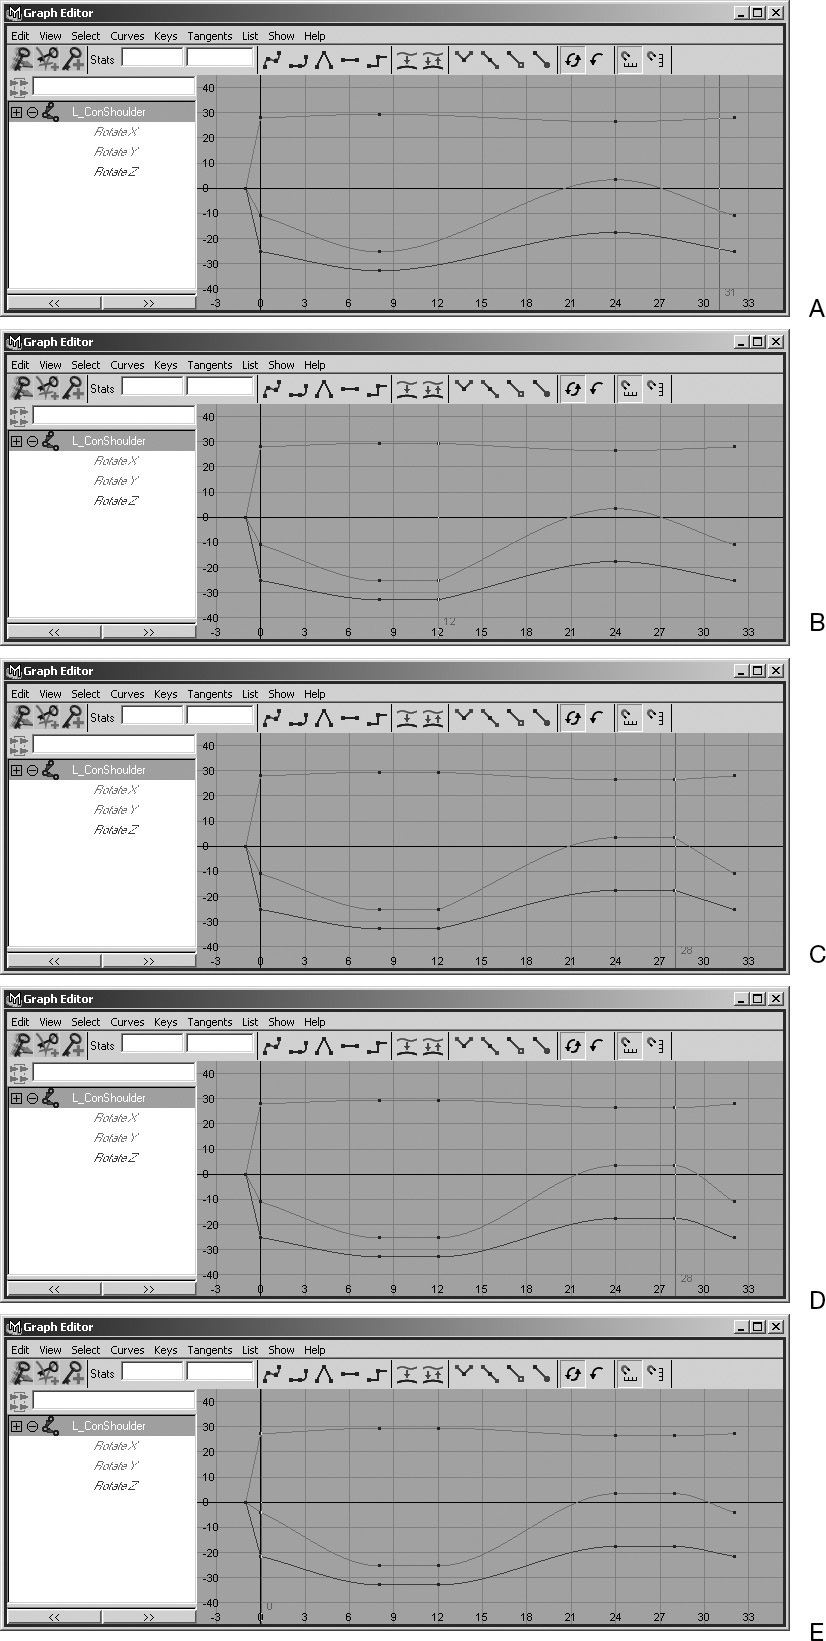
FIGURE 16.38 Add extra keys to make the arm pause slightly before it changes direction in its swing.
2. Move along to the first set of keys, which in this instance lie on frame 8. Hold down the middle mouse button, and move along the timeline to frame 12. Set a key on the shoulder; this will give us a pause of 4 frames (Figure 16.38b).
3. Move along to the next set of keys at frame 24. Again holding the middle mouse button, move ahead another four frames and set a key (Figure 16.38c).
4. The new keys’ tangents are quite angular, so select them keys and flatten the tangents (Figure 16.38d).
The final things to alter are the start and end frames, which need to be updated to take into account the change in the curve. Our new last key was placed at frame 28, so that means there are four frames between that and the end frame 32.
5. Move four frames back from frame 24; this is now where the arm ends its cycle. With the middle mouse button, click on frames 0 and 32 and set a key on both. This gives you the final curves seen in Figure 16.38e.
The shoulder will now pause slightly before it changes direction. Apply this arrangement to the elbow and hand animations.
The left arm now has motion, so follow the steps in this section again for the right arm.
When both arms are at this same stage, it will give you a better idea of how the animation feels as a whole, so create a playblast and spend some time tweaking things until you are happy with the results.
![]() Try playing around with the timing of both arms so that they are not exactly symmetrical; this can add interest to the animation.
Try playing around with the timing of both arms so that they are not exactly symmetrical; this can add interest to the animation.
![]() Try moving the keys back a frame or two, so the arms’ animation happens slightly sooner.
Try moving the keys back a frame or two, so the arms’ animation happens slightly sooner.
That’s it for the primary animation included in Kila. If you want, go ahead and add movement to her head, breasts, and even her hair. Stick to just simple animation for these parts; all they really need to have are slight bounces. Tweak the overall walk cycle, refining her movements until the walk is perfect.
Save the finished file as Kila_Walk.mb.
Creating a walk cycle for Grae is a little more difficult, because of his unusual leg conformation. The basic principles remain the same, but you may want to give him more vertical movement as his knees unbend. Also, his wings would move in the same pattern as his arms, but you may wish to give them even more sway to indicate their less-solid construction. Save the file as Grae_Walk.mb when you’re happy with it.
Running in Place
When the animation for Kila is played in-game, it’s the game code that will actually cause her to move. So we now need to alter our animation, removing her forward movement. (If you animated the character without this forward movement, you can skip this section.)
Normally, removing the forward movement would involve editing the Root_Control and both foot controls’ Translate Z attributes, working out where they should be at specific times—as you can imagine, this can be a very difficult and time-consuming task. To make this much easier, I have supplied a script on the GCDM shelf called Spot. As long as you have followed the same naming conventions I have used during the creation of the rig, this script will pull the animation back for you.
If you are using a different rig or if your names are different, you can simply rename the main controls to Root_Control, LeftFoot, and RightFoot, and the script will work. When you’re done with this task, you can change the names back to the ones you prefer.
All the Spot script does is work out the distance of each foot from the hips on each keyframe. The keys are then pulled back while maintaining this offset. You can do this just as easily using the Graph Editor, but it will take a while longer to complete.
Once you’ve run the script, all you need to do is make sure the first and last keys (0 and 32) are exactly the same, to ensure that the loop is seamless.
You can see both Kila and Grae’s walk cycles by loading the files Kila_Walk.mb and Grae_Walk.mb from the CD. You will also find a selection of QuickTime movies in this chapter’s Movies directory, showing both characters walking from different views.
Animation Archive
Keeping all your previous animation works in an archive will add efficiency to all your animation projects. These archives can then be called upon when needed, potentially saving you days of work.
Because we have built character sets into our characters (see Chapter 15), we can use these to export the animation data and import other animations onto the Kila and Grae characters. We do this using the Trax Editor.
The Trax Editor is a fantastic tool for manipulating existing animations. Each animation is stored as a clip, which can then be imported onto a character to create whole sequences of animation. You can even manipulate the timing, blend animations, and work on top of each clip to add improvements to the existing animation.
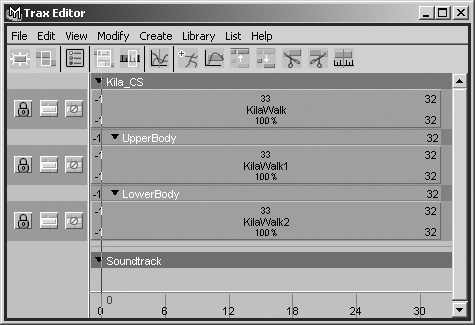
As you can see in Figure 16.39, the Trax Editor has been dramatically improved in the transition from Maya 5 to Maya 6. In this section we will focus more on the Maya 6 version because it is the most current, but most of the basic principles remain the same for both versions.

Now that we have the walk cycle completed, we can create a clip. This takes all the animation data associated with the selected character set(s) and places it into a single node. This node can then be worked on or even exported as a separate file to be used on a separate character. Note, however, that you must be using the full version of Maya to export a clip; the Personal Learning Edition does not support this feature.
Let’s first look at creating and exporting a clip.
1. Open the Trax Editor by going to Window > Animation Editors > Trax Editor.
2. First select the character set by going to Character > Select Character Set Node > Kila_CS. (If you are using Maya 5, the character sets in the scene will already be loaded into the Trax Editor.)
3. Load the character set into the Trax Editor by clicking on the Load Selected Character button (this is the seventh button from the left on the Trax Editor toolbar).
The Trax Editor will now have the current character active; it should look like Figure 16.39. Notice that the subsets are also brought into the Editor.
4. There are two ways to create a clip. The first and quickest way is to click on the Create Clip button, which is the first one on the toolbar. This will create a clip for each character set (the main set and both subsets) using the current settings.
If you want to configure the settings before you create the clip, however, go to the Create > Clip and open the options (Figure 16.40).
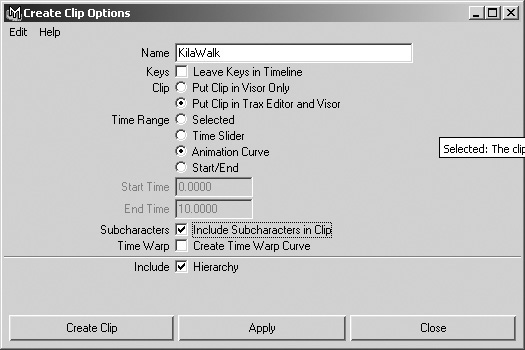
5. In the options, call the clip KilaWalk, specify that the Time Range will be dictated by the Animation Curve, and make sure to enable Include Subcharacters in Clip. Click on Apply, and three new clips will be created (Figure 16.41).
6. It’s a good idea to rename each of these clips to match the animation it stores—simply double-click the clip’s name in the Trax Editor. For example, rename KilaWalk1 to KilaWalk_LB for the lower body animation. If this clip is exported later, people will be able to tell what it is.
7. To now export all the clips together, select the main KilaWalk clip by clicking directly on it in the Trax Editor; then select File > Export Clip in the Trax Editor. Because you selected the main character set to export from, all three clips will be exported and stored.
With the animation safely stored, you can now import it back onto your character. To do this, simply select the character onto which you want to import the clips, and go to File > Import Clip to Characters.
We have barely scratched the surface of what is a very powerful tool in Maya, but by delving deeper into the Trax Editor we might find ourselves in a whole different book. If you intend to do a lot of animation work, I recommend you spend some time with the Trax Editor to see what it has to offer.
Summary
For the final chapter in this book we have discussed some of the fundamentals of real-time animation. We have also explored Maya’s animation environment and its tools; we learned how to create a simple walk cycle.
You now have the basic knowledge needed to tackle almost any animation sent your way, as well as the breadth of knowledge to take on nearly any task in game character creation.