
Chapter 1. Designing Your Character
CD Files
FaceScan.tif
MainScan.tif
GraeColorRender.tif
KilaColorRender.tif
Playing a computer game is in some ways very similar to reading a book or watching a film: It is pure escapism. For the duration of the game, the player becomes the hero. During these few hours they step into another world, leaving worries and troubles behind. The overall design of the hero plays a key part in the player’s distraction; a good design, combined with a good story, can encapsulate the player, immersing them fully in the game. A bad design will only serve to shatter the illusion, which could single-handedly cause your game to fail in the marketplace.
So where do you start when designing a character? This depends on the project. If you are working on a licensed project, a cartoon for example, or a comic book or movie license, you will be supplied with all the relevant materials to help you create your characters. These materials might include various models and color sheets, or even photographic references.
In theory, not having to worry about character design for your game could save time and work, but in reality you will find that the licensor will want the 3D version of their creation to stay true to its original style and design. Accomplishing this will involve a great many submissions of your artwork to get feedback from several people. First, you must be happy with the piece, and then your immediate manager—the lead artist on the project—must approve it. The work will then be passed to your art director before it is finally presented to the client. And it’s not done yet: The client may have to pass it around among a few colleagues before you receive any feedback. All this can turn out to be a lengthy process and will ultimately mean your having to make plenty of minor alterations before the characters are “signed off” as complete.
If, on the other hand, you are developing a product independently, all the character designs will be developed in house. Passing through fewer people means approval times will be shorter. This also means you will have more creative freedom, as long as your project managers are happy with the result.
In this first chapter I will share my own thoughts about the character design process, and in particular my ideas about designing the two main characters that we will develop as we work through this book.
What Makes a Successful Character?
Designing a character can be difficult; not only have you got to be fresh and original, but you must also be able to communicate your ideas to others through your artwork. You don’t have to be an excellent traditional artist; all you need at this point is the ability to roughly sketch your ideas and put them onto paper for others to see. Once the sketches are approved, you can spend more time creating better renderings of the concepts to flesh out your basic ideas.
So what are key points to keep in mind when designing a successful character?
![]() Target Audience—One of the first things to consider is for whom you are designing this character. Who is the game aimed at? The design and style for the character should fit the target audience’s age group. If you are designing for a younger, pre-teen player, the character could be more of a caricature or could have a cartoon style with exaggerated proportions and bright colors. An adult audience will connect better with a more realistic hero.
Target Audience—One of the first things to consider is for whom you are designing this character. Who is the game aimed at? The design and style for the character should fit the target audience’s age group. If you are designing for a younger, pre-teen player, the character could be more of a caricature or could have a cartoon style with exaggerated proportions and bright colors. An adult audience will connect better with a more realistic hero.
![]() Player Identification—As with the characters in a film, the more players can identify with the game hero, the more deeply they will be drawn into the game. Players must want to be the character, to step into those shoes for the duration of the game.
Player Identification—As with the characters in a film, the more players can identify with the game hero, the more deeply they will be drawn into the game. Players must want to be the character, to step into those shoes for the duration of the game.
![]() Character Depth—Your characters’ personalities will contribute tremendously not only to their visual design but also to the way they act. Their “background” is what shapes their personality, so it’s essential that you have good knowledge of the characters’ past and present.
Character Depth—Your characters’ personalities will contribute tremendously not only to their visual design but also to the way they act. Their “background” is what shapes their personality, so it’s essential that you have good knowledge of the characters’ past and present.
![]() Branding—If you are designing the main character for the game, it could be that all advertisements will be based upon that character. With this in mind, the character must be original and memorable as well as marketable.
Branding—If you are designing the main character for the game, it could be that all advertisements will be based upon that character. With this in mind, the character must be original and memorable as well as marketable.
![]() Technical Considerations—We talk more about technical matters later in the chapter. Knowing the technical limitations that affect your character will have an impact on your design of that character.
Technical Considerations—We talk more about technical matters later in the chapter. Knowing the technical limitations that affect your character will have an impact on your design of that character.
![]() The Game World—Finally, look at what the level/world builders in your game are doing. Work together with them, so that your characters and their world fit together. If the styles compete, the character may look out of place, and you lose the player’s connection with the game hero.
The Game World—Finally, look at what the level/world builders in your game are doing. Work together with them, so that your characters and their world fit together. If the styles compete, the character may look out of place, and you lose the player’s connection with the game hero.
We now have a good idea of what qualities make up a good character, but what else can help us conceptualize that character? Inspiration certainly can, and it’s all around us.
Comics are a good source of inspiration; they give us many of today’s cool characters. Superman, for example, is one of the most popular heroes of our time. His “S” shield is recognized worldwide. The striking red, blue, and yellow colors of his costume, his swirling cape, and the underwear worn on the outside of his outfit are all part of his trademark. Yet his uniform is relatively simple in design. Batman is another good example derived from comics; his design demonstrates good use of color and a strong silhouette—both important factors in a character’s design.
It’s safe to say that comics have long been a source of inspiration for game characters. Visit any game development studio and you will be hard pressed to find an artist’s desk that doesn’t display some comic memorabilia.
We can also learn substantially from studying other successful game character designs. The hugely popular Final Fantasy series gives us colorful characters that hold a lot of personality and visual style. With each new Final Fantasy game come new styles and fresh new characters, each unique in its appearance. Lavish swords and weaponry, highly imaginative outfits, and well-conceived characters add to the gaming experience.
Metal Gear Solid is another example of strong character design, in this case taking a more hyper-realistic style. The chosen colors fit the character perfectly—he is a moody tactical character who uses stealth effectively, and his outfit has to represent this by being practical as well as stylish.
Finally, we have games such as the Jak and Daxter or Ratchet and Clank series, which are complete departures from the previously mentioned titles. These PlayStation games offer well-designed characters using a more abstract and cartoony style, because this sort of game needs to appeal to a wider audience, particularly the younger gamer.
The Three Stages of Concepting
So where do we start with our concept? Do we sit down and begin to sketch? Just pour out our ideas onto paper? Nope. Not yet. If you go to this step too early, you might end up with a good design, but it will not be what your manager wants.
Concepting usually happens in the pre-production phase of a game, and sometimes earlier. During this time the designer, along with the concept artists, will work on the game’s design and overall style. You will be approached by either your lead artist or the art director and asked to provide some concept artwork for the design. They will provide some basic information to start you off (for example, the general style and overall look of each character). You can then begin plans to flesh out this information; this is covered in more depth in the “Preparation” section.
The aim is to have a clear idea of what direction you’re taking, having a vision in your mind of what the character will look like and why. Concepting a character has three stages:
![]() Research
Research
![]() Preparation
Preparation
![]() Design
Design
As you gain more experience in concepting, you may find that you need to do less during the first two stages and can more or less move straight into the design (sketching) phase. For the novice, however, it is important to begin at the beginning: researching the character.
Research
Our primary job when doing character research is to gain as much information as possible about the character. You can get the basic details from the lead designer, as well as information on game mechanics. All of this will tell you what the character needs to do in the game, which will have an impact on the design. Consult your lead artist and art director about the general style and look of the game. Ideally, you should have the basics—age, height, sex, and hair/eye/skin color—but if possible you should get a more in-depth description. Just being told that the main character is a “guy with a gun” will not do.
Having a brief history or biography of the character can be invaluable. Folding this insight into the character’s personality will help you decide not only what they would wear but why they would wear it. Will the character have a distinguishing feature or some sort of visual scarring? What about the hair style and color? Your design should fit the brief; for example, a conservative character would not sport a bright-pink mohawk—well, not unless the game guidelines ask for it.
A Sample Character History
To help demonstrate the importance of character history or biography, I have come up with a basic game idea and two main characters, Kila and Grae. The following introduction gives you a rough idea of the overall game and introduces you to these key characters.
This story sets the scene for the game. A young woman’s life is turned upside-down when she finds herself part of a symbiotic relationship with Grae, the organism living inside her. Grae can manipulate Kila’s DNA in numerous ways, the main one being to show his true form. Throughout the game, Kila struggles to find answers as to why this has happened, while struggling with the overpowering evil that has invaded her body.
From a design point of view, Kila should be quite average looking, nothing too fancy or flashy. There are two reasons for this:
![]() Keeping her appearance average will allow the player to relate to the character.
Keeping her appearance average will allow the player to relate to the character.
![]() A plain and not-too-fancy Kila will provide more of a contrast between her and the monstrous Grae.
A plain and not-too-fancy Kila will provide more of a contrast between her and the monstrous Grae.
This first, unremarkable design for Kila will work well as an introductory character for this book, allowing me to discuss the basic principles associated with creating a real-time character.
Grae’s design should be completely different from Kila’s. To start, he will be larger and his parts will have more outrageous proportions. He should include some of the more advanced elements associated with modeling creatures for games, such as wings and double-jointed legs (dog legs).
Note
The Grae character will comprise advanced areas of character design for the reader’s instruction.
At this point, you probably have a few ideas of your own about how Kila and Grae should look, but before we move on we need to gather some more information on the two characters. The following tables are a kind of “bio,” presenting basic details and some set pieces of information about the characters.


Technical Limitations
With all this information at hand, we have a pretty good starting point. From the introductory story, we know a little of how the game begins and we have insight into the main character’s personality. Next we have the set details listed in the foregoing tables. These are explicit guidelines about the character that we must follow when we begin to design.
Normally this is all you need for character design, but for the project outlined in this book we are creating a real-time character; that means there are other considerations that could affect your design. As with any game artwork, you are expected to work within certain technical limitations. Examples are polygon count, texture page size, animation data, and even joint limits (all of which are covered in later chapters). The lead artist, having worked closely with the lead programmer to come up with the numbers, will impose these restrictions.
So how does this affect your character design? Let’s look at two examples.
![]() Example A: John Doe—In this case you are creating a generic character who will be onscreen with a hundred others, plus vehicles and the game world. The polygon count limit is between 500 and 1000, but you are urged to go as low as possible, as is always the case when creating real-time artwork. The less overall memory your character takes up the better, as the entire game will have to fit inside a tight budget. In addition, let’s say you are informed that John Doe will have to use a basic skeleton, which will probably mean a limit of about 15 joints. You are not going to see him up close, so there is no need for significant detail.
Example A: John Doe—In this case you are creating a generic character who will be onscreen with a hundred others, plus vehicles and the game world. The polygon count limit is between 500 and 1000, but you are urged to go as low as possible, as is always the case when creating real-time artwork. The less overall memory your character takes up the better, as the entire game will have to fit inside a tight budget. In addition, let’s say you are informed that John Doe will have to use a basic skeleton, which will probably mean a limit of about 15 joints. You are not going to see him up close, so there is no need for significant detail.
With such small polygon and joint limits, you won’t be able to build long flowing hair, or that complex rocket pack you had in mind. Instead, you will be better off sticking with a basic model: arms, legs, head, and probably hands that are fixed in a certain pose because you will not have enough polygons or joints for separate fingers. In addition, you won’t have sufficient polygons to have nice, rounded muscle tone, so you will have to rely on the textures to show any needed detail. Since the character will always be positioned away from the camera, however, any detail in the texture will be lost.
Tip
When compiling your research, try to get a good idea of how big the character will be onscreen, this will allow you to get a good idea of just how much detail you will need.
![]() Example B: Hercules—This is the game’s main character; he will be seen both close up and from a distance, but the game is predominantly viewed in the third-person perspective (from behind the character). As the game’s cut scenes are rendered real-time, Hercules will also need fully posable fingers, as well as facial animation. Your polygon limit is 3000, and the character needs to look good at all resolutions.
Example B: Hercules—This is the game’s main character; he will be seen both close up and from a distance, but the game is predominantly viewed in the third-person perspective (from behind the character). As the game’s cut scenes are rendered real-time, Hercules will also need fully posable fingers, as well as facial animation. Your polygon limit is 3000, and the character needs to look good at all resolutions.
This should give you scope to create a decent design for Hercules. You have sufficient polygons to get the detail you need. Plus, his being the main character means you can go to town on making him look great. Sufficient levels of detail can be adopted to make sure he looks good at any distance while ensuring he only uses the needed polygons. (We talk more about levels of detail in Chapter 10.)
Tip
Here’s one thing to remember when creating a character who is viewed from the third-person perspective: Chances are that 99% of the time the character will be viewed from behind, so you will want to make the character’s back interesting for the player.
Tip
An RTS (real-time strategy) game—a top-down, isometric, Diablo- or Warcraft-type game—often requires some extreme proportional distortions for its characters to read well onscreen: Head and shoulder areas often need exaggeration, and limbs might require thickening to make sure they don’t “wink out” at distances (become too negligible in width to merit a pixel onscreen).
Animation Considerations
You can see how a game’s technical restrictions can affect the look of your designs. Another important question you should ask is, “Will it animate okay?”
Implementing a cape, ribbons, or hair into your character concept may look cool—but when it comes down to it, do you have the resources to animate the feature successfully? Take the cape, for instance. Essentially, if it’s hand animated, you can consider it an additional character. So do you or the other animators on the project have time in the schedule to animate it? Your programmers may have a nice dynamics engine which will drive the cape cloth for you while obeying real-world physics, such as wind, drag, and gravity. This will save time, but will it give a good enough simulation? Will it move convincingly? There are dangers in employing a dynamics simulation to animate cloth or hair, and if done wrong it can destroy the player’s connection with the main character and the game. If the simulation moves unpredictably or pops through the character or surrounding area, it will distract the player from the game and ultimately become annoying.
Some other animation issues to consider: When designing clothing at or near joints, think about how these areas will behave when the joint bends. Loincloths, skirts, shoulder pads, long sleeves, cuffs, and overlapping armor can cause some of the most frustrating problems when skinning your character (covered in Chapter 11), and often require additional control bones not allowed in your joint budget.
Tip
Consult your technical director or lead animator about any design element that looks troublesome or that might need substantial secondary animation or many control bones. And do it before embarking on the modeling stage; you may be saving yourself a lot of rework later on.
Summing Up the Limitations
So let’s summarize the basic technical limits for our two characters.
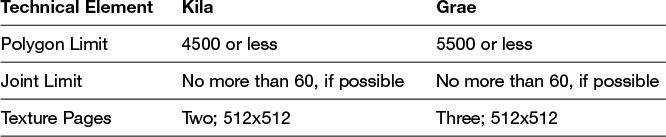
This is quite a short list, and on a real project there will be other areas to consider. How will facial animation be handled in the game—will it be joint driven or will you use blend shapes (we will discuss this in Chapter 13)? What about extra texture effects like alpha, specular, bump, or normal mapping? Will Grae’s wings be joint or dynamics driven? These questions may look scary to the uninitiated, so for now we will concentrate on the basics. Other technical considerations and concerns will be covered as we work through the book, building, texturing, and rigging our characters.
Luckily, Kila and Grae are the main characters, so we have been given generous polygon, joint, and texture limits. Grae is quite large and also has wings, so he will need more joints, polygons, and (possibly) texture space than Kila.
Preparation
Having done the research, we now have all the information we could possibly handle, right? Now do we start to draw? Nope, we move on to the next stage: preparation. We need to gather reference material and compile a style sheet.
At this point, we know what the character will look like and we have a pretty good idea of where to start. What I like to do next is compile a style sheet to hold all the relevant images I find while collecting my reference material. The Internet, with its unlimited image resources, is an excellent source for the gathering of material. Other great sources are magazines and even DVDs—you can get references from anywhere, really.
Looking at the information on our characters so far, we can see that Kila is a casual, average-looking girl in ripped jeans and a T-shirt. So to start, we can go to one of the many Internet search engines that have the option to search for images, and do a search for “ripped jeans” or simply “jeans.” After quickly scanning the results for anything relevant and grabbing it, we move on to the next item of clothing we want to design, and so on and so forth. Maybe we even add a belt of some sort. After we have enough references for her clothing, we can move on to her hairstyle, makeup, and other elements. The earlier bio table specifies a large, gothic tattoo, so we look for references on tattoos. The main idea of a style sheet is to gather every image you will need into one location, and you then only need to refer to this when you begin to sketch. The style sheet is also useful for showing to others, to give them a feel for the style of the character.
Tip
Good Web sites for clothing images are online catalogs and shopping sites. These contain images of people in various poses wearing entire outfits; these pictures can also be useful references for your concept drawings.
Once you have all the images you need, you can simply load them all into Photoshop and compile them into one large image, usually an 8.5” by 11” sheet at a resolution of 300 dpi. Then print it, and it’s ready for you to use. Don’t be afraid to compile a number of style sheets if you feel you need them. Or, if you are lucky and have access to a larger-format printer, produce one to that size.
Figure 1.1 shows an example of a style sheet layout. (Unfortunately, due to copyright restrictions, I cannot show the actual images I compiled for Kila and Grae but this should give you a general idea.)

Design
We are now at the final stage, design—you are now ready to begin drawing. Although the first two stages of research and preparation may seem like a lot of work, believe me—it is worth it. Without the proper preparation, you could end up stumbling ahead blindly, but having help at hand early on will keep you from falling later. It’s trite, but true: “If you fail to prepare, you prepare to fail!”
Let’s have a look at some of the key points to consider when fleshing out the design of your character.
![]() A Good, Fresh Style—A strong visual style is important and must remain consistent throughout the whole design. Coming up with an original style can be difficult; don’t be surprised if, whatever your character looks like, someone in the approval list will comment on how “it looks like such-and-such.” Try not to directly copy an existing style, and instead use a mixture of different influences to come up with something original.
A Good, Fresh Style—A strong visual style is important and must remain consistent throughout the whole design. Coming up with an original style can be difficult; don’t be surprised if, whatever your character looks like, someone in the approval list will comment on how “it looks like such-and-such.” Try not to directly copy an existing style, and instead use a mixture of different influences to come up with something original.
![]() Contrast Among Characters—When designing a series of characters, it is important to have contrast among them. Try not to make any two characters too much alike. A good way to check the success of your concept in terms of contrast is to line up your characters and switch off the lights so the characters are only visible in silhouette. Can you tell who is who?
Contrast Among Characters—When designing a series of characters, it is important to have contrast among them. Try not to make any two characters too much alike. A good way to check the success of your concept in terms of contrast is to line up your characters and switch off the lights so the characters are only visible in silhouette. Can you tell who is who?
![]() Asymmetry—To make your design more interesting, make sure the character is not completely symmetrical. Variation is the key, just as it is in the real people all around you. No one’s features are completely symmetrical.
Asymmetry—To make your design more interesting, make sure the character is not completely symmetrical. Variation is the key, just as it is in the real people all around you. No one’s features are completely symmetrical.
![]() Appeal—Your character has to be appealing to its target audience. If the game is aimed at young children, reflect this in your design by including bright colors and outrageous proportions. Make the characters fun to look at as well as play with.
Appeal—Your character has to be appealing to its target audience. If the game is aimed at young children, reflect this in your design by including bright colors and outrageous proportions. Make the characters fun to look at as well as play with.
![]() Color—The colors of your character can say a lot about them. Darker colors tend to represent evil or a rebellious nature; brighter colors are usually associated with a good, pure person.
Color—The colors of your character can say a lot about them. Darker colors tend to represent evil or a rebellious nature; brighter colors are usually associated with a good, pure person.
![]() Proportions—The size and scale of your character can add greatly to the desired style. As a rule of thumb, a realistic humanoid character tends to be around eight heads high. Looking at the comparison in Figure 1.2, you can see the proportions of a more heroic, stylized male character. He would have a slightly smaller head but much larger shoulders than the average figure. The legs would be longer, but in contrast his torso would be shortened and his waist smaller.
Proportions—The size and scale of your character can add greatly to the desired style. As a rule of thumb, a realistic humanoid character tends to be around eight heads high. Looking at the comparison in Figure 1.2, you can see the proportions of a more heroic, stylized male character. He would have a slightly smaller head but much larger shoulders than the average figure. The legs would be longer, but in contrast his torso would be shortened and his waist smaller.

Figure 1.3 illustrates the difference between a realistic and stylized female. The more stylized version has longer legs, a smaller waist, and—yep, you guessed it, a larger chest. In the face she has more pronounced cheekbones, larger eyes and eyelashes, plus more voluptuous lips than the realistic version.

With cartoon characters, you can play around with the numbers, changing them drastically to achieve exaggerated proportions. But a good starting point is to have the overall size of your character around three heads high. This will give them a larger head in proportion to the body, so add to this contrast by increasing the size of the hands and feet (Figure 1.4). If they are meant to be cute, you can give them large eyes, too.
![]() Anatomy—A good knowledge of anatomy is essential when creating characters. Understanding the basics of muscle and bone structure will help you shape your figures, making them more realistic and correctly proportioned. Having a good selection of anatomy books to refer to is always a good idea.
Anatomy—A good knowledge of anatomy is essential when creating characters. Understanding the basics of muscle and bone structure will help you shape your figures, making them more realistic and correctly proportioned. Having a good selection of anatomy books to refer to is always a good idea.
Your Early Sketches
Using your style sheets, you can now begin to roughly sketch out some ideas. Take your time if you have it, and spend a few days playing around with ideas. Figure 1.5 shows a few early sketches I produced for Kila; you can probably see the progression of her design and the deep contrast between the first idea and her eventual look.

While designing Kila, I tried to make her look normal but with subtle differences. Early on, I gave her wild hair and extravagant clothing, but this all looked over the top. I also tried to tone down the amount of symmetry she originally had. Notice that her hair is now longer on one side, and across her waist the belt and sash cross from opposite directions.
Figure 1.6 shows the sketches I produced while creating the concept for Grae. My initial idea was to have Kila visible inside his chest, with all the tendrils wrapped around her. I eventually dropped this idea, first because of polygon restrictions, and secondly because it could have caused problems when animating.

Once you feel confident and comfortable with an idea, you can create a cleaner piece, which you then show to your lead artist and game designer. Again, this should be a quick image to give an idea of the design. It’s likely your collaborators will want it revised; you can pretty much be sure your first idea will not be the one they like.
If you have the time and are given the freedom to do so, why not render some nice color pieces like the ones in Figures 1.7 and 1.8. Some companies encourage this step. They also like you to present the characters in a well-arranged sheet showing the final render along with a few sketches. These summary sheets look professional and impressive, and at the end of the day you will end up with a nice piece of artwork to go in your portfolio.


Creating the Model Sheets
Great! They love your idea and give you the go ahead! But before you or someone else starts to model, you need to create a few model sheets to work from. These sheets show the character in many different ways; they are the blueprints for building the character.
Imagine someone else is going to be building Kila, and plan out everything for that person.
First of all, you should produce a turnaround view (Figure 1.9). The basic images included in this are a front view, side view, and rear view. You can also include a three-quarter view if you have time. If there are any design areas about which you can already be specific, or if you feel something needs more explanation, include these specifics in this turnaround sheet.

Notice that the silhouettes for the front and back views are the same. You may be able to make out faint lines across the image; these are important because you need the proportions to be the same for each angle.
To help the person who is going to model your character, you can produce a head sheet like the one in Figure 1.10. This is like the turnaround view sheet but focuses on the head’s front and side views along with any additional information needed.

Whew! With concepting complete, you should have a well thought out and great looking character to work with. So put your crayons away and boot up your computer—it’s time to build your creation in glorious 3D.
Summary
In this chapter, we covered the main phases of creating your own concepts for real-time characters. In addition, we examined the artwork that should be prepared before you move on to modeling a character.
What you should have at this point are some nice character concepts that have been approved by your manager. From these, you will have created the model sheets needed to move to the next stage. In the next chapter, we will start to build your characters, at the same time introducing you to Maya’s environment and basic modeling tools.