
Many large applications have a considerable waiting period that occurs when the application first launches. One reason can be the loading of numerous dependencies on external components, such as a plugin that must be interrogated and assimilated into the runtime of the application. Another reason can be a substantial amount of preprocessing that occurs before the application is handed to the user. Preprocessing is generally used to generate and cache commonly used data when the application first starts so that this data is not calculated when the user expects responsiveness.
Some applications also use the concept of a splash screen, which is basically a loading screen that is only used for aesthetic purposes. These screens typically display a title image and some supporting text, like copyright messages or development credits. Splash screens are usually dismissed when a certain amount of time has elapsed or the user clicks the mouse or presses a key.
As discussed in Chapter 7, “Fundamentals of User Interface Design,” the Principle of Feedback describes how the application should notify the user of long-running processes so the user does not suspect that the application has stalled. Almost every application that has a significant waiting period during startup uses a loading screen to display the status of long-running processes. Typically, these loading screens run as modal dialogs that appear centered on top of the underlying application windows and do not allow the user to interact with anything in the application until the processing is finished and the loading screen closes.
This chapter will describe some fundamental aspects of loading screens, and then will focus on implementing a reusable component that will display process status to the user when an application first starts. The component will also support the concept of splash screens.
The general idea is to build a reusable form that has a variety of customization options depending on the needs of the project. Splash dialogs can be designed in virtually any way, so this chapter will cover the features found in the example on the Companion Web site. The main feature is the ability to specify a background image that defines the width and height of the form.
There are a couple of properties that must be customized on the default form. The starting position of the form should be set to center screen, the form should be displayed without a title box, and the border style should be set to none. Another good flag to enable is top most, which causes the splash dialog to be shown on top of all other windows. Lastly, specify the splash dialog to not show up in the task bar. Splash dialogs should not create additional window entries in the task bar because they should be considered part of the main window.
The framework presented in this chapter makes use of a class that contains all the settings and handles the launching of the splash screen dialog. The settings class passes itself as a reference to the dialog constructor so that the splash screen can configure the appropriate settings as it launches. The splash dialog is an internal class within the library, so consumers of the library cannot access the dialog directly, and must do so through the settings and launcher class.
The following code describes the settings and launcher class in its entirety. I will not yet explain what each property does, but they will be discussed when needed as you read on in the chapter. You will need to make sure that you reference the System.Drawing and System.Collections.Generic namespaces as well.
public class SplashScreen
{
    private List<ILoadingJob> _loadingJobs = new List<ILoadingJob>();
    private bool _interruptible = true;
    private bool _fading = true;
    private bool _displayVersion = true;
    private bool _displayStatus = false;
    private int _splashInterval = 3000;
    private Image _splashImage = null;
    private string _windowTitle = string.Empty;
    private bool _blackBorder = true;
    private string _versionText = string.Empty;

    public List<ILoadingJob> LoadingJobs
    {
        get { return _loadingJobs; }
        set { _loadingJobs = value; }
    }

    public bool Interruptible
    {
        get { return _interruptible; }
        set { _interruptible = value; }
    }

    public bool Fading
    {
        get { return _fading; }
        set { _fading = value; }
    }

    public bool DisplayVersion
    {
        get { return _displayVersion; }
        set { _displayVersion = value; }
    }

    public bool DisplayStatus
    {
        get { return _displayStatus; }
        set { _displayStatus = value; }
    }

    public int SplashInterval
    {
        get { return _splashInterval; }
        set { _splashInterval = value; }
    }

    public Image SplashImage
    {
        get { return _splashImage; }
        set { _splashImage = value; }
    }

    public string WindowTitle
    {
        get { return _windowTitle; }
        set { _windowTitle = value; }
    }

    public bool BlackBorder
    {
        get { return _blackBorder; }
        set { _blackBorder = value; }
    }

    public string VersionText
    {
        get { return _versionText; }
        set { _versionText = value; }
    }

    public void Launch()
    {
        (new SplashDialog(this)).ShowDialog();
    }
}
It is now time to jump into the meat of our framework, the splash dialog form itself.
The VersionText property enables the user to set the version of the application to display in the top-right corner of the splash dialog, and the dimensions of the text box are dynamically calculated based on the width of the version string specified.
The dialog constructor takes an instance of the settings and launcher class and configures the appropriate settings for the splash screen.
When the dialog first loads, it checks to see if it should function as a splash screen or as a loading screen. Basically, the dialog checks to see if any jobs have been designated for loading; if there are no jobs, it will function as a splash screen. In splash screen mode, the dialog will start the display timer that will run for the specified interval and then close. In loading screen mode, the dialog will remain open until all jobs have been processed.
The key down and mouse click events call the interrupt method that attempts to close the splash screen dialog early. The ability to do this is determined by the Interruptible property in the settings and launcher class.
Note
A loading screen cannot be interrupted in our framework because all jobs must complete before the application can be considered ready for use. Canceling the loading process has the potential to make the application unstable.
The following code implements the functionality of the splash screen and loading dialog form.
public partial class SplashDialog : Form
{
    private ILoadingJob _currentJob = null;
    private SplashScreen _splashScreen = null;
    public string VersionText
    {
        set
        {
            VersionLabel.Text = String.Format("Version: {0}", value);
            int offset = this.Width - VersionLabel.Bounds.Right;
            Graphics graphics = VersionLabel.CreateGraphics();

            Size size = (graphics.MeasureString(VersionLabel.Text,
                                                VersionLabel.Font)).ToSize();

            int newX = this.Width - offset - size.Width;

            VersionLabel.Bounds = new Rectangle(newX,
                                                VersionLabel.Bounds.Y,
                                                size.Width,
                                                size.Height + 4);
        }
    }
    public string StatusText
    {
        set
        {
            StatusLabel.Text = String.Format("Status: {0}", value);
        }
    }

    public SplashDialog(SplashScreen splashScreen)
    {
        InitializeComponent();

        _splashScreen = splashScreen;

        if (_splashScreen != null)
        {
            if (_splashScreen.SplashImage != null)
            {
                this.Width = _splashScreen.SplashImage.Width;
                this.Height = _splashScreen.SplashImage.Height;

                this.SplashPanel.BackgroundImage = _splashScreen.SplashImage;
            }

            VersionLabel.Visible = _splashScreen.DisplayVersion;
            StatusLabel.Visible = _splashScreen.DisplayStatus;

            DisplayTimer.Interval = _splashScreen.SplashInterval;

            if (_splashScreen.BlackBorder)
            {
                SplashPanel.BorderStyle = BorderStyle.FixedSingle;
            }
            else
            {
                SplashPanel.BorderStyle = BorderStyle.None;
            }

            if (_splashScreen.WindowTitle != null &&
                _splashScreen.WindowTitle.Length > 0)
            {
                this.FormBorderStyle = FormBorderStyle.FixedDialog;
                this.Text = _splashScreen.WindowTitle;
            }
            else
            {
                this.FormBorderStyle = FormBorderStyle.None;
            }

            this.VersionText = _splashScreen.VersionText;
        }
    }

    private void SplashDialog_Load(object sender, EventArgs e)
    {
        this.Opacity = 1.0;

        if (_splashScreen.LoadingJobs == null ||
            _splashScreen.LoadingJobs.Count <= 0)
            DisplayTimer.Start();
        else
            ProcessJobs();
    }

    private void DisplayTimer_Tick(object sender, System.EventArgs e)
    {
        DisplayTimer.Stop();
        this.Close();
    }

    private void SplashDialog_KeyDown(object sender,
                                      System.Windows.Forms.KeyEventArgs e)
    {
        InterruptSplash();
    }

    private void SplashPanel_MouseClick(object sender, MouseEventArgs e)
    {
        InterruptSplash();
    }

    private void InterruptSplash()
    {
        if (_splashScreen.Interruptable)
        {
            if (_splashScreen.LoadingJobs == null ||
                _splashScreen.LoadingJobs.Count <= 0)
            {
                DisplayTimer.Stop();
               this.Close();
            }
        }
    }

    public void RefreshStatus()
    {
        if (_currentJob != null)
        {
            this.StatusText = _currentJob.StatusText;
            Application.DoEvents();
        }
    }

    public void ProcessJobs()
    {
        Application.DoEvents();

        if (_splashScreen.LoadingJobs != null &&
            _splashScreen.LoadingJobs.Count > 0)
        {

            MethodInvoker refreshInvoker = new MethodInvoker(RefreshStatus);

            foreach (ILoadingJob jobObject in _splashScreen.LoadingJobs)
            {
                _currentJob = jobObject;

                if (_currentJob != null)
                {
                    LoadingResult result = _currentJob.Load(refreshInvoker);

                    switch (result)
                    {

                        case LoadingResult.Success:
                        {
                                // Generally ignore this return value
                                break;
                        }
                        case LoadingResult.Warning:
                        {
                                // Could log this somewhere or notify the user
                                break;
                        }

                        case LoadingResult.Failure:
                        {
                                // Could cancel all remaining jobs
                                // and perform a rollback
                                break;
                        }
                    }
                }
            }

            this.StatusText = "Finished";
            this.Close();
        }
    }
}
The splash dialog looks something like Figure 40.1 at this point in time.

As we continue on in this chapter, some more features and functionality will be added to make the component more robust.
We now have the dialog component built for our splash screen launcher, but we can take it one step further and enhance the visual effects if we want. A nice touch that is common among many splash screens is the fade-in and fade-out transition effect. You may skip this step if you do not want this extra functionality, or if you feel that doing so would not be an effective use of your time.
Thankfully, .NET WinForms support an Opacity property that lets you modify the transparency factor of a window and all the contained child controls. We can utilize this property in conjunction with a couple of timer objects to create a fading effect that will make our splash dialogs look really slick!
The fading effect will be orchestrated by two timers in addition to the first one used to time the duration of the splash dialog.
private void FadeInTimer_Tick(object sender, System.EventArgs e)
{
    if (this.Opacity < 0.9)
        this.Opacity += 0.1;
    else
    {
        FadeInTimer.Stop();
        if (_splashScreen.LoadingJobs == null ||
            _splashScreen.LoadingJobs.Count <= 0)
        {
            DisplayTimer.Start();
        }
        else
        {
            ProcessJobs();
        }
    }
}
The fade-in timer will be started in the form load event instead of the display timer. When the form is fully visible and if the dialog is timed, the display timer will fire and begin counting towards closing the dialog. The event code for the display timer presented earlier will require a small modification to support the new fading feature. The change is shown in the following code.
private void DisplayTimer_Tick(object sender, System.EventArgs e)
{
    DisplayTimer.Stop();
    if (_splashScreen.Fading)
        FadeOutTimer.Start();
    else
        this.Close();
}
Lastly, another timer is used to fade out the window visibility and then close the window when it becomes hidden. The following code implements the fade out timer event.
private void FadeOutTimer_Tick(object sender, System.EventArgs e)
{
    if (this.Opacity > 0.01)
        this.Opacity -= 0.1;
    else
    {
        FadeOutTimer.Stop();
        this.Close();
    }
}
The load event for the dialog must also be updated to support the new fading effect. The following code implements the updated dialog load event.
private void SplashDialog_Load(object sender, EventArgs e)
{
    if (_splashScreen.Fading)
        FadeInTimer.Start();
    else
    {
        this.Opacity = 1.0;
        if (_splashScreen.LoadingJobs == null ||
            _splashScreen.LoadingJobs.Count <= 0)
            DisplayTimer.Start();
        else
            ProcessJobs();
    }
}
The splash interrupt method must also be updated to cancel the active timers and start the fade out timer, if appropriate. The following code implements the updated splash interrupt method.
private void InterruptSplash()
{
    if (_splashScreen.Interruptable)
    {
        if (_splashScreen.LoadingJobs == null ||
            _splashScreen.LoadingJobs.Count <= 0)
        {
            if (_splashScreen.Fading)
                FadeInTimer.Stop();

            DisplayTimer.Stop();

            if (_splashScreen.Fading)
                 FadeOutTimer.Start();
            else
                this.Close();
        }
    }
}
The last modification that must be performed is near the end of the job processing method. The following code shows where the change must be done.
public void ProcessJobs()
{
    Application.DoEvents();

if (_splashScreen.LoadingJobs != null &&
         _splashScreen.LoadingJobs.Count > 0)
    {
        ...

        this.StatusText = "Finished";

        if (_splashScreen.Fading)
            FadeOutTimer.Start();
        else
            this.Close();
     }
}At this point, we have an attractive splash dialog that does not provide much in terms of processing functionality. The next thing on the agenda is to create a mechanism where jobs can be designed and plugged into the job manager for execution. If you have not figured it out yet, we need an interface to do this!
The interface ILoadingJob is described in the following code and should be fairly simple to understand. The StatusText property will be called by the job manager to update progress messages. The load method takes a MethodInvoker that is used to relay update requests back to the job manager during loading (more on this later).
The following code implements the ILoadingJob interface.
public interface ILoadingJob
{
    string StatusText
    {
        get;
    }

    LoadingResult Load(MethodInvoker refreshInvoker);
}
The load method also returns a result code that indicates the success or failure of the job. The result codes are described in the following. The values are self-explanatory, and the job manager can handle each code in a certain way, depending on the implementation.
public enum LoadingResult
{
    Success,
    Warning,
    Failure
}
The success code is fairly trivial; generally, this result will be ignored and processing will continue. The warning code can be used to alert the user if a potential problem or risk is identified and leave it up to her to react to it. The error code can be used to halt further processing and perform a rollback if desired.
Launching the splash screen is simple enough, but the complexity of the solution increases when the component must facilitate the processing of jobs. Single-threaded applications typically hang when a long-running process executes, and the application must wait to dispatch its usual messages. It is important that the user interface remain responsive while jobs are being processed.
The MethodInvoker mechanism provides a generic delegate that is used to invoke a method with a void parameter list. This mechanism can be used when you need a simple delegate but do not want to create one yourself. MethodInvoker is used by jobs to notify the application when processing status has changed. The application defines a method that updates the status text label and calls Application.DoEvents() to allow the application to update the user interface with the changes. This method is bound to a MethodInvoker object and is passed to all jobs by the controlling logic. The ProcessJobs() method has the code that creates a MethodInvoker bound to the refresh method and then passes it to all jobs being processed.
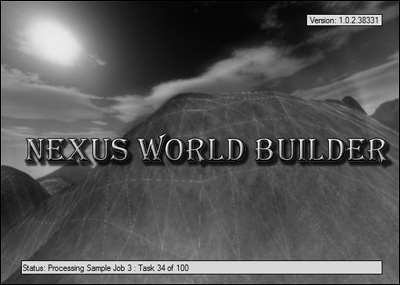
With the addition of responsive job processing, the loading job component is now complete and should resemble that shown in Figure 42.2. Notice the addition of the status text label at the bottom of the form. The visibility of this label is controlled by the DisplayStatus property in the settings and launcher class.
Now that development of the component is complete, we can finally start using it! The example presented in this chapter has a form with two buttons where one launches a splash screen and the other launches a loading dialog. The user interface code will not be discussed because it is redundant and rudimentary, but the full source code can be found on the Companion Web site.
We will start off by building three sample jobs that can be used to test the loading dialog and show how to properly implement the ILoadingJob interface. Finally, the code will be shown that properly configures the component to function as a splash screen or a loading dialog.
The first sample job merely waits for two seconds before completing. This wait time is to simulate actual processing that would occur if the job did something remotely useful. The StatusText property will be used by the job manager to update the processing status, so it is important that this property always return the most up-to-date description of the operation.
public class SampleLoadingJob1 : SplashScreenLibrary.ILoadingJob
{
    public SplashScreenLibrary.LoadingResult Load(MethodInvoker refreshInvoker)
    {
        refreshInvoker.Method.Invoke(refreshInvoker.Target, new object[0]);
        System.Threading.Thread.Sleep(2000);
        return SplashScreenLibrary.LoadingResult.Success;
    }

    public string StatusText
    {
        get
        {
            return "Processing Sample Job 1 : Waiting for 2 Seconds";
        }
    }
}
You should notice the following line that invokes the method that refreshes the status description.
refreshInvoker.Method.Invoke(refreshInvoker.Target, new object[0]);
The preceding code should never be altered, but it is important that this line appear either before a job begins processing or before each task within a job begins processing.
The second sample job shows how to execute multiple tasks within a job and correctly handle the StatusText property. The job executes 10 tasks, each one taking 0.6 seconds to complete.
public class SampleLoadingJob2 : SplashScreenLibrary.ILoadingJob
{
    private int _currentTask = 1;

    public SplashScreenLibrary.LoadingResult Load(MethodInvoker refreshInvoker)
    {
        for (_currentTask = 1; _currentTask <= 10; _currentTask++)
        {
            refreshInvoker.Method.Invoke(refreshInvoker.Target, new object[0]);
            System.Threading.Thread.Sleep(600);
        }

        return SplashScreenLibrary.LoadingResult.Success;
    }

    public string StatusText
    {
        get
        {
            return String.Format("Processing Sample Job 2 : Task {0} of 10",
                                 _currentTask);
        }
    }
}
This sample job works in a very similar way to the second sample job, except that there are a greater number of tasks to complete and a much shorter waiting period between tasks.
public class SampleLoadingJob3 : SplashScreenLibrary.ILoadingJob
{
    private int _currentTask = 1;

    public SplashScreenLibrary.LoadingResult Load(MethodInvoker refreshInvoker)
    {
        for (_currentTask = 1; _currentTask <= 100; _currentTask++)
        {
            refreshInvoker.Method.Invoke(refreshInvoker.Target, new object[0]);
            System.Threading.Thread.Sleep(50);
        }
        return SplashScreenLibrary.LoadingResult.Success;
    }

    public string StatusText
    {
        get
        {
            return String.Format("Processing Sample Job 3 : Task {0} of 100",
                                 _currentTask);
        }
    }
}
The component is ready, and we now have some sample jobs at our disposal to work with. The last step is to instantiate the settings and launcher class, configure it appropriately (splash screen or loading dialog), and finally activate it. The following code shows how to configure and launch a splash screen.
SplashScreen splash = new SplashScreen();
splash.BackgroundImage = new System.Drawing.Bitmap(@"PathToSplash.bmp");
splash.DisplayStatus = false;
splash.DisplayVersion = true;
splash.VersionText = Application.ProductVersion;
splash.DisplayTime = 3000;
splash.Launch();
The code to launch the loading dialog is quite similar to the splash screen, except the display time is not set, and the job objects are bound to the job manager for processing. The following code shows how to configure and launch a loading dialog.
SplashScreen splash = new SplashScreen();
splash.BackgroundImage = new System.Drawing.Bitmap(@"PathToSplash.bmp");
splash.DisplayStatus = true;
splash.DisplayVersion = true;
splash.VersionText = Application.ProductVersion;
splash.LoadingJobs.Add(new SampleLoadingJob1());
splash.LoadingJobs.Add(new SampleLoadingJob2());
splash.LoadingJobs.Add(new SampleLoadingJob3());
splash.Launch();
The background image can also be loaded from the assembly if it has been compiled as an embedded resource. Simply add the appropriate bitmap image to the project, right-click on it, select Properties, and set the Build Action to Embedded Resource. If the assembly is called SplashTest, and the image is called Splash.bmp, the following code will return a bitmap from the data embedded in the assembly.
using System.Reflection;
Assembly mainAssembly = Assembly.GetExecutingAssembly();
splash.SplashImage = new Bitmap(mainAssembly.GetManifestResourceStream
("SplashTest.Splash.bmp"));
This approach is generally superior to loading the bitmap from the file system because the user cannot easily modify or remove the image, and there is one less file that you have to worry about deploying with your tool.
This chapter provided a reusable and customizable component, suitable for displaying splash screens or loading screens that prohibit users from accessing the application until processing has finished.
One area that could be improved is where a method is passed into each job to handle refreshing of the status text. This approach was used to decouple the interface from a lot of the implementation specifics, but it would be an improvement to refactor the framework where this method invocation is unnecessary.
The full source code to this component can be found on the Companion Web site in the Chapter 40 folder.