
“Every minute spent on infrastructure programming is a wasted minute.” | ||
| --Juval Lowy, .NET Software Legend, April 2003 | ||
Users of an application or tool vary in their levels of knowledge and technical competence. Some users can alter configuration files to optimize the application for their environment, or access public APIs to extend the software, while others barely get by with the self-help guides and manuals. Catering to this diversity of simple users and power users can be quite challenging, and doing so in a clean and maintainable way is even harder. How can you provide enough advanced functionality to power users, without cluttering up the interface and confusing simple users? Welcome to the wonderful concept of extensibility.
There are a number of ways to develop an extensible application, such as plugin support, but one concept that is repeatedly ignored or abused is having a rich object model that is decoupled from the presentation layer, with support for script interaction and automation. Almost every Microsoft application, especially those included in the Office suite, is built on top of a rich object model that has support for automation. This level of extensibility allows any developer to create and manipulate content or to automate functionality and actions within the application. Scripts can be written to extend these applications to suit the needs of the power users.
Sadly, the majority of applications available do not offer the level of extensibility that the Microsoft products provide, and this is generally because of budget and time constraints. The ideal solution to this problem would be a solid and proven design from the ground up that would pave the way for flexible extensibility support. Typically, rich object models that support extensibility are developed with respect to the Model-View-Controller design pattern, but this chapter will present a slight deviation from this common approach, using .NET delegates to provide a truly decoupled architecture. This chapter will also show how to embed a command window, such as the one found in Visual Studio .NET, to write and execute script macros at runtime within the application.
Many benefits are derived from developing an object model that supports automation, but I will list only a handful of them since that should be enough to convince you. One of the biggest benefits is that a rich object model decouples the user interface from the business logic. Quite often, the user interface is entangled with business logic and becomes hard to maintain. The user interface code can be so dependent on the business logic that a single change to the business logic can break the entire application, and vice versa for changes to the user interface code. This occurrence is generally a result of developers focusing first on the user interface when they are assigned a task. Building the user interface, even a rough prototype, before the business logic is a bad idea because the design of your business logic will reflect the constraints and design ideas behind the way your user interface is designed. Business logic should be user interface-agnostic.
A rich object model causes developers to focus on the design behind small units of work instead of the entire application, or “the big picture.” Focusing on a small unit of work usually results in cleaner and more reliable code. For example, imagine a part of the application that shows the user a file listing in a tree view. Normally, a developer would design the system with the tree view control in mind. A developer thinking about the object model, however, would ignore the fact that there is a user interface. He would focus strictly on file and directory entities, processing functionality such as determining a hierarchical list of files and folders from a parent folder, and how these entities fit into the rest of the model. The new functionality in the object model can then be consumed by whatever component is using it, in this case the user interface of the application. The developer could now display this relationship of entities in multiple tree view controls, or other controls altogether, without altering the model. If the user interface had been considered, he might have been stuck with file loading code mixed in with the code of the tree view control, forcing him to copy and paste code or refactor.
On the other side of the fence, developers working on the user interface only have to know that any files added to a collection in the object model are to be displayed in the appropriate controls. They do not care where these files come from, just so long as they are notified accordingly when files are made available for display.
Another nice feature of a decoupled object model is the ability to distribute responsibility for the implementation of certain aspects to different developers without their having to worry about how the other components work. Again, as long as the appropriate notifications are fired, the villagers are content. If you have a developer who shows the file listing in a tree view, she will not care about another developer who shows the same listing in an HTML page that is generated with XSL transforms. Both developers only care that the object model contains model objects that will fire the appropriate notifications when certain situations arise.
Lastly, having an object model that supports automation is a godsend to functional and defect testing. It is very easy to write scripts to test user interface and business logic behaviors when the underlying architecture supports this automation natively.
To start, it is important to cover the Model-View-Controller (MVC) pattern before doing a comparison because this chapter discusses a slightly enhanced version of MVC. The MVC pattern, or paradigm, encompasses breaking a section or all of an application into three parts: the model, the view, and the controller.
The model manages information and handles the notification of observers when the related information changes. The model only contains information and functionality that match a common purpose. If you need to model multiple groups of unrelated information and functionality, you create multiple models. This is important so that your business logic remains modular and decoupled. The model serves as an abstraction of a real world system or process. As an example, a model could be a relationship between file and directory entries, and could contain functionality to load them from the file system or network. There is no user interface code for displaying the entities within the model; the user interface code is handled by the views.
The view handles transforming the models to be displayed in an appropriate display context. A view is usually attached to a single display surface and renders to that surface using transformed information from the models attached to it. The view automatically renders the information again when the information in the model changes. It is quite common to have multiple views attached to the same model but rendering information to many unique display surfaces. A view can be composite, containing sub-views that can each themselves contain sub-views. As an example, a view could be a tree view that will display hard drive files in a hierarchical fashion.
The controller is the interface point between the user and the application. The controller reads input sent by the user and instructs the model and view to act according to the type of input received. As an example, when the user clicks a button, the controller is responsible for determining how the application will respond.
The model, view, and controller form a triumvirate, so they must reference each other as shown in Figure 43.1.
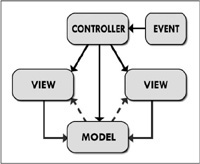
To explain, an event occurs that propagates to the controller. The controller then changes the model, the view, or both accordingly. If the model changes, events can be sent to the views; an example could be a request for a redisplay of information. If need be, the views can go fetch data from the model to display. This pattern requires that each view must understand the relationship and schema of the model.
It is for this reason that I present a slightly different spin on this paradigm, using the native event mechanisms of the .NET platform in an attempt to further decouple this excellent pattern from being directly tied between views and model. The pattern used in this chapter is basically the Model-View-Controller paradigm, except .NET delegates, and events are used to pass data between model and views. Such a variation can resemble Figure 43.2.
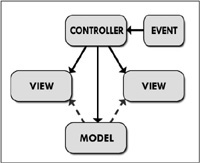
The variation will still require that the controller know the type of views and model used, but we should be able to build a system where a view does not need to know the type of model being observed. You may be wondering why a view does not know about the controller sending commands to it. This is so there are as few dependencies as possible, making it easy to swap controllers in and out of the system without breaking any references.
Microsoft Word is an excellent case study when studying object models, but covering the entire design would be a complete book in itself. Instead, I will give you a very small overview of a small subset of the object model so that hopefully you will understand the way the object model in Word is designed. After that I will discuss the small object model that the example in this chapter employs, along with some of the more important code snippets.
The root of the Microsoft Word object model starts with the Application class, which is basically a singleton that provides access to all the toolbars, documents, windows, menus, status bars, alerts, dialogs, and so forth. The entire application can be accessed by this singleton, which can do things like manipulate content in documents, change menu labels, update a status bar, click user interface elements such as buttons, add command bars, and so forth. As an example, you can display an open file dialog by calling Application.Documents.Open(). If you need to change a value such as the title of the document, you do not have to worry about executing the code that Word invokes to change a document title. You can instead find the Document instance in the Application.Documents collection and modify the Name property. The user interface will automatically reflect the new change, thanks to the power of an object model that supports automation.
Prior to learning the Model-View-Controller paradigm, I used to think that large applications like Word or Visual Studio just had a massive amount of code that performed a whole slew of tasks when an event, such as a file being deleted, occurred. The complexity and unmaintainability of such a solution gave me shivers. When I discovered this wonderful pattern, I began to relax and understand that these applications are actually not that complicated. But experience and learning from past mistakes is the way to constantly improve and write better code.
The object model for the example in this chapter is far from a real world system. Instead, it exists solely to show how all the pieces fit together into an architecture that has decoupled views from the model, and automation script support using the CodeDom compiler. Showing a full-featured object model in this chapter would make it even more difficult to understand the underlying principles behind what this chapter really covers.
The actual implementation details behind the example on the Companion Web site are covered near the end of this chapter.
I will not talk much about plugin architectures, since this topic is addressed in Chapter 38, “Designing an Extensible Plugin-Based Architecture.” I will, however, discuss how a robust object model can make your life much easier when building a system that supports plugin extensibility.
When it comes to extensibility, having a rich object model that supports automation is ideal for plugin-based architectures. Theoretically, if your object model is robust enough that you can perform all tasks programmatically, any plugins that are exposed to this object model can extend all aspects of the application.
Supporting extensibility with a rich object model and plugins reduces the amount of code that exists in the core assemblies, resulting in a number of advantages. The first advantage is that your working set is greatly reduced, only loading plugins when needed (provided you are unloading the assemblies from a second application domain when they are no longer in use). A reduced working set results in less memory being required to run your application, and overall loading and execution times are reduced.
In addition to a reduced working set, the core application will be lightweight and contain very little business logic. Such a design would make patching and repairing the application really easy because you would just have to patch or repair a subset of the logic that exists within an external plugin assembly.
As an example, say, for instance, that you have a model viewer application, which renders 3D models that are structured in your proprietary format. You could have plugins that add import options for different third-party formats to the file menu. These import plugins could extend the application to be able to handle different formats and convert the end result into the proprietary format. If you deploy the application on a machine where importing is unnecessary, you could simply remove the external assemblies from the plugins directory.
Perhaps the most powerful extensibility feature of an application is the ability to write scripts to automate processes and use case flows. Automation can lead to a number of benefits, including a substantial increase in productivity for tedious and repetitive tasks. Imagine that you have hundreds of source code files, to which you must prepend a new copyright comment block. You could do this manually, but it could take you an hour or more, depending on the project. To save a significant amount of time, you could write a script in Visual Studio .NET that iterates through the documents in the solution tree and modifies the text within them automatically.
Another excellent application for integrated script support is in the realm of testing: functional, performance, and defects. A script could be written to verify that a particular process or flow works, or a script that determines the elapsed running time for an intensive calculation, or a script that unit tests the user interface and business logic looking for errors.
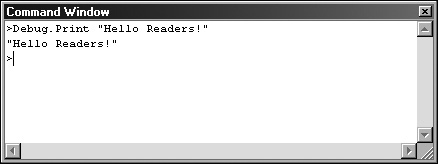
As an example, let’s look at the Visual Studio .NET 2005 IDE. One mechanism for script support is the Command Window, which lets you write a line of code and instantly execute it. This feature is shown in Figure 43.3.
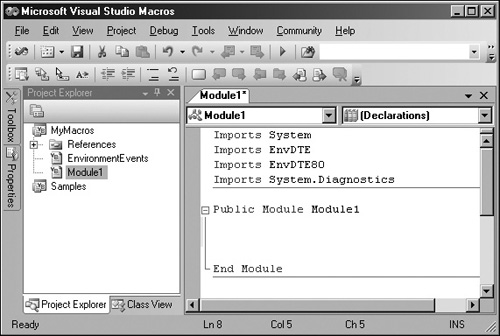
The Command Window is great for simple evaluations and expressions, but the functionality of this feature pales in comparison to the power of the macro support in Visual Studio .NET. As mentioned earlier, almost all Microsoft products use the same object model, which is probably the most robust object model available for any application on the market. There are a variety of ways to access this object model, such as extensions and plugins, but one approach is to script macros within the IDE. These macros can be saved and reused across projects. Figure 43.4 shows the macro editor in Visual Studio .NET 2005.
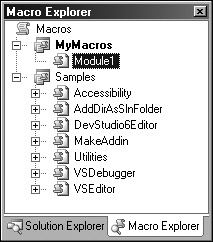
The interface is very similar to the regular code editor that you are used to, just with fewer options. After a macro has been written to perform a particular task, you can map the macro to a key-binding or a toolbar button, or you can access it directly from the macro explorer pane, as shown in Figure 43.5.
The Microsoft object model takes automation even further and allows you to record scripts based on actions you perform in the application, which can later be played back to repeat. This level of extensibility is very powerful, but it’s tricky to get right. You must build your architecture from the ground up with this level of extensibility in mind, or you will fail. If you manage to pull it off though, your power users will kiss the ground you walk on for making their productive lives that much more enjoyable.
Before moving on to the implementation details behind the object model and the Model-View-Controller pattern, let’s focus on code generation with CodeDom. We will use this powerful .NET feature to compile C# code at runtime with which we can automate our application (through the object model).
We can start by referencing the namespaces that we will be using.
using System;
using System.Text; // For StringBuilder
using System.Reflection; // For the Assembly type
using System.CodeDom.Compiler; // For CSharpCodeProvider support
using System.Collections.Specialized; // For StringCollection
using Microsoft.CSharp; // For CSharpCodeProvider support
Basically, what we are building is a class that can take a string of C# source code and compile it to an in-memory assembly. This assembly will contain a method that can be invoked to run whatever script we have written.
namespace SampleApp.Scripting
{
    using ObjectModel;
    public class ScriptEngine
    {
Regardless of the script logic, there will always be identical stub code that must be compiled in order to generate correct source code that will support runtime automation. Rather than having the user write the same stub code every time, we will provide a simple method that takes in a string containing C# code and wraps it within a default layer of stub code. The following code shows the method to generate the stub wrapper code. Take note of the namespace, class, and method names.
private string StubWrapper(string innerCode)
{}
The next method is the meat of our scripting engine; it is in charge of building complete source code, including the stub code, setting up the CodeDom compiler instance, and building the in-memory assembly for execution. A notable area is the list of references where you specify the dependencies to include. Keep this reference list as small as possible for security. The user should only have access to the functionality you provide.
Caution
Do not add every class library in the .NET framework for the heck of it. Many problems will arise from this, including a number of security vulnerabilities, even with code access security configured. The rule of thumb is to list only the references you need after carefully considering what your users need access to.
The next important area is where compilation errors are handed. Do not worry about the code lines that reference ObjectHost; we will cover that shortly. You can, however, notice the information that is available for each error. We can use this information to display compilation errors to the user when we build the user interface for our command window.
Finally, the most important area is near the end, where reflection is used to find the Run() method within our in-memory assembly after compilation. This method is then executed to run the script logic sent to this class.
The following method describes the compilation logic for the script engine.
        public bool Execute(string innerCode)
{ }
}
}The harness code that uses the scripting engine is not overly complex, but is large enough that it would be a waste of space and reading time to place it all in this chapter. Rather, I will just show you a couple of screenshots of the command window, error listing, and script output window.
Figure 43.6 shows our new command window. Clicking Run passes the code within the textbox into the scripting engine and executes it. If no errors are encountered, the tab control switches to the Output page, otherwise the tab control switches to the Errors and Warnings page.
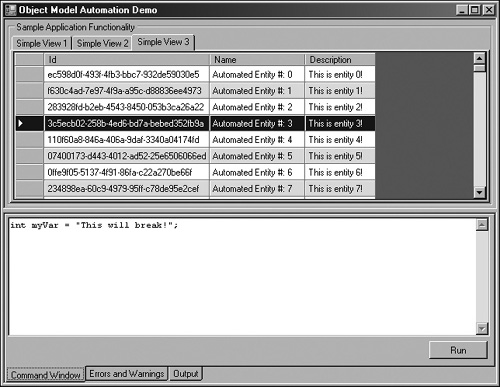
As you can see from the code in Figure 43.6, we are trying to initialize an integer value to a string. Obviously, this will generate a compilation error and inform us that we are too tired to write any worthwhile code. When attempting to run this code, you will end up with an error like the one shown in Figure 43.7.
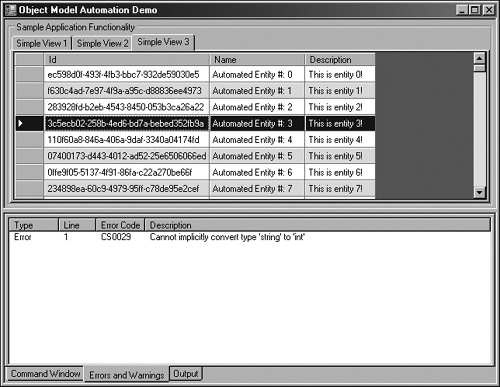
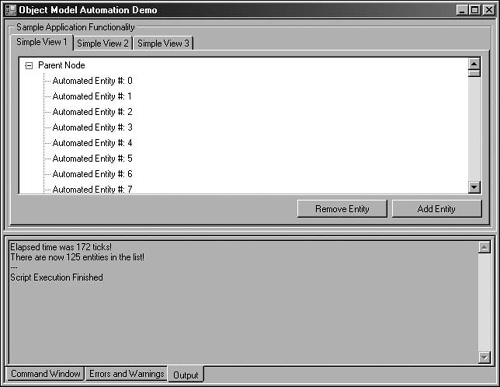
If a script executes successfully, you will be redirected to the Output page of the tab control, which displays any script output that was printed during execution. Figure 43.8 shows some output that is printed when executing the example provided with this chapter.
By referencing the object model assembly in the CodeDom instance, we can now execute any code in the command window that can be expressed in the compiled code for the application that uses the object model.
The previous section gave a quick inside look at the example for this chapter, and now we are going to dive right into the heart of everything. We are going to make an application that serves no real world applicability, but it demonstrates all of the concepts discussed in this chapter. To start, we are going to need some sort of data object to exist in our model, so let’s declare the following entity class.
namespace SampleApp.Entities
{
    public class SimpleEntity
{} }
Note
The full source code for the example will not be presented, so it may be difficult to see how the assemblies are composed and where each class belongs. It is safe to assume that whatever namespace a class is declared in is also the name of the assembly in which it resides.
Before covering the event system for our object model, we will need a custom EventArgs class that can store a SimpleEntity object. This class will be used to transport entity data between views and the controller inside the events.
The following code defines the EventArgs class for SimpleEntity events.
namespace SampleApp.Entities
{
    public class SimpleEntityEventArgs : EventArgs
{} }
Note
The entity object and EventArgs class exist in a separate assembly from the rest of the application, so that the assembly containing the views does not have to reference the object model assembly.
The example has three sample views, each of which displays the SimpleEntity data in a different way. The beauty of the Model-View-Controller paradigm is that the object model does not care about the views, so the user interface code is decoupled from the business logic. We can also add or remove views without breaking the object model.
Earlier in this chapter, I gave a very brief overview of how the root level of the Microsoft Word object model is designed. The accompanying example has a similar approach to the Application object, except it is called ObjectHost so that I do not have to override the type name used by the System.Windows.Forms.Application class.
namespace SampleApp.ObjectModel
{
    using Entities;
    public class ObjectHost
{} }
You probably noticed the EnhancedBindingList class. This class is an inherited version of the BindingList collection that exists in System.ComponentModel. This class is a generic collection template just like List<T>, except it supports event notifications for when the data in the list changes. These events are used to notify the views of changes to the data. Unfortunately, the delete event for BindingList does not store a reference to the object being deleted; it only references the index where the object used to be stored.
I did not want to have an associated list of references to return the deleted object, so I added an override for the RemoveItem method so I could store a reference to the object being deleted. The following code describes the EnhancedBindingList collection.
namespace SampleApp.ObjectModel
{
    public class EnhancedBindingList<T> : BindingList<T>
{} }
Our object model is now built (I did not lie when I said it was too simple to be real-world applicable!) so we can start linking events. The first events we will link are related to the script engine. Specifically, we want to handle the event for errors that occur, the event for displaying script output, and the event for code execution that uses our scripting engine. Additionally, we will tie into the event the handles application exceptions.
The following code shows how these events are linked and implemented in the example on the Companion Web site.
namespace SampleApp
{
    using ObjectModel;
    using Scripting;
    using Entities;
    public partial class MainForm : Form
{} }
We now want to link up some views to display the information contained in the object model. The first view we will implement is a TreeView that just lists SimpleEntity nodes under a parent node. The following code shows the event handling for this type of view.
namespace SampleApp
{
    using ObjectModel;
    using Entities;
    public partial class SimpleView1 : UserControl
{} }
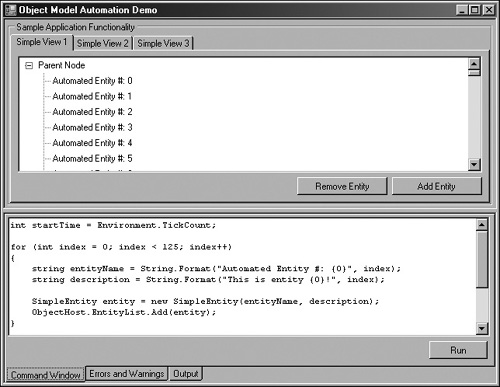
This first view resembles the one shown in Figure 43.9 when shown in the running application.
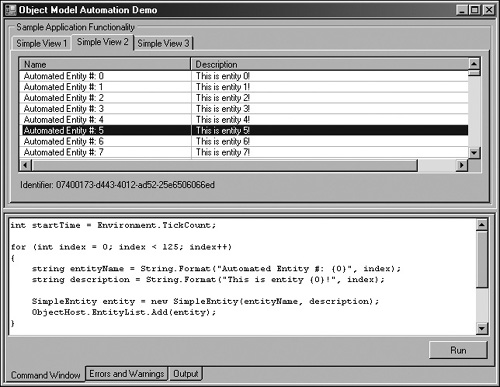
The second view we will implement is a ListView in detail mode that displays more information about the entity data than was shown in the first view. The following code shows the event handling for this type of view.
namespace SampleApp
{
    using ObjectModel;
    using Entities;
    public partial class SimpleView2 : UserControl
{} }
This second view resembles Figure 43.10 when shown in the running application.
Finally, the third view we will implement is to show the power of .NET databinding. This view is a DataGrid control that is bound to the EnhancedBindingList class that holds our SimpleEntity objects. We do not need to implement any logic behind adding and removing objects because this is all handled beautifully by the built-in features of databound controls.
namespace SampleApp
{
    using ObjectModel;
    using Entities;
    public partial class SimpleView3 : UserControl
{} }
This third view resembles the one shown in Figure 43.11 when shown in the running application.

The DataGrid view is great because we do not have to put in much code to get it up and running. The downside is a little bit of a performance hit compared to the other views because of an insane number of reflection calls when the row count gets fairly high. It’s all about the right tool for the job!
A number of problems arise when an application contains a variety of presentation layer code, business logic, and data access code. These applications are often difficult to maintain and extend because of all the dependencies between different components. Usually any change, even the smallest one, breaks compilation and calls for a bit of refactoring to get the application back together. Tightly coupled architectures make it difficult to reuse components, often resulting in copy-paste solutions or other ungodly hacks. The Model-View-Controller design pattern is widely used for desktop application development, and I guarantee that you will see a significant improvement in the overall maintainability and extensibility of your application if you consider this wonderful paradigm. It will make your application and components much more reusable, provide you with a decoupling of your business logic and presentation layer, and cleanly support extensibility mechanisms such as plugins and integrated scripting.
Integrated scripting is not necessary for many applications, especially small throw-away tools, but for large applications where you anticipate a fair amount of content to be created, you should definitely consider implementing some form of automation support to reduce the time spent on performing tedious and repetitive tasks. Doing so can save a significant amount of time, money, and patience.