
The most likely way for the world to be destroyed, most experts agree, is by accident. That’s where we come in; we’re computer professionals. We cause accidents. | ||
| --Nathaniel S. Borenstein | ||
In order to help define what a tool is, and how the interface should be designed, this chapter will introduce and discuss a couple of popular toolsets that are used in the creation of game content and shipped with commercial products.
Although external tools that ship with the final product require a higher level of quality when the fans themselves will be using the tools to build expansive content, internal tools still follow proper development standards in terms of documentation, maintainability, and quality of design.
The two case studies selected for discussion were both developed for external use and clearly show a high level of quality in terms of user interface design, logical functionality, and ease of use.
Many different types of tools are used in the creation and modification of game content, but the following two were chosen because of the success of the companies and the products the tools are associated with.
BioWare is perhaps one of the most widely known and respected developers, especially in the role-playing game (RPG) world. BioWare’s mission is to produce the best story-driven games worldwide, and it is succeeding based on all the awards and recognition the company has received for its games. Although an exasperating amount of work is contributed by everyone at the company to produce their exceptional games, many fans just see the finished product. This is unfortunate because the tools and the people who build them play a critical role in the production of a successful AAA title, but with the exception of mod builders, they often are unnoticed by the fan community.
A couple of years ago, BioWare released the critically acclaimed RPG NeverWinter Nights, which has won numerous writing and technology awards. The game was based on the Dungeons & Dragons rule set placed in the Forgotten Realms world, and it took players on a compelling story-driven fantasy adventure. The game had hours and hours of game time, but that didn’t stop the fan community from building custom campaigns and adventures. The game shipped with the NeverWinter Nights Aurora Toolset, which gave players the power to build custom adventures using the same tools that BioWare utilized in the production of the original game.
The Aurora Toolset produces campaigns and adventures in the form of modules, which are composed of various components, such as areas, creatures, doors, conversations, scripts, and triggers, to name a few. The toolset offers functionality to build either an indoor or outdoor world, and then populate that environment with entities and triggers.
Figure 3.1 shows the main user interface for the Aurora Toolset, where other child dialogs are launched and where entity instantiation and placement occurs. On the left is a tree view that shows all areas in the module and all the instantiated entities that are associated with each area. Additionally, there is also a listing for conversation dialog as well as module scripts. Module developers do not have access to a core low-level API, but instead interface with the game engine using a scripting language developed for the game and toolset.
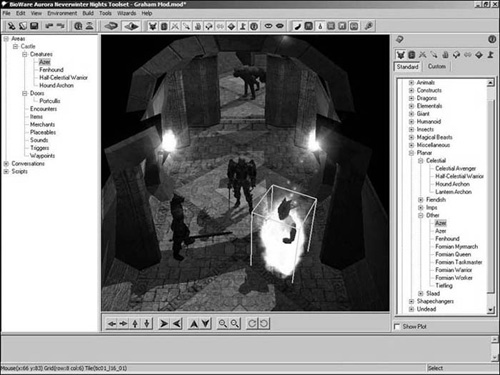
A multitude of assets and source art that can be reused across custom modules is included, with the ability to add your own custom work if so desired. All the monsters and items from NeverWinter Nights are available to module developers, and can even be customized from their original properties and attributes. The tree view on the right lists all the assets that can be instantiated and placed in an area.
At the top of the main window is a toolbar that offers tool selection and the ability to toggle certain display and functionality settings. Another toolbar at the bottom of the main viewport controls the scene camera. The camera can be panned, translated, rotated, and zoomed.
Figure 3.2 shows the properties of the Azer monster, and all the attributes that can be customized or extended for it. Creatures in role-playing games are often composed of a vast number of properties and scripts that define its behavior and abilities. As such, this complexity can clutter the user interface of tools that are designed to modify those properties and scripts. The way the Aurora Toolset addresses this design issue is through the use of tab pages that each contain properties associated to a certain group. Users should never feel overwhelmed by large numbers of data fields, so breaking the properties into groups represented on different tab pages was a good design move.

Another nice touch to the dialog shown in Figure 3.2 is the real-time 3D preview of the edited creature in question. Although it doesn’t propose much in regards to functionality, the preview pane spices up the user interface and makes it much more interesting to work with, as opposed to a normal data entry tool.
The goal of the Aurora Toolset was to cater to novice users, not necessarily people who have experience with other world editing tools such as Hammer, Q3Radiant, or any other complex brush- and constructive solid geometry-based editors. The toolset had to allow users to build rooms and outdoor environments quite easily. The toolset does not support polygonal or brush-based editing; instead it has a collection of rooms, each with several variations in appearance from which to choose. This functionality makes the tool easier to understand and use, but it also supports enough customization to keep advanced users happy.
The Aurora Toolset harnesses an embedded viewport that renders the current area as you would see it in-game. This functionality is great in the sense that you can preview roughly how the area would appear in the game itself without the need to launch NeverWinter Nights.
Figure 3.3 shows an area that was created in the editor and is now shown in the actual game.
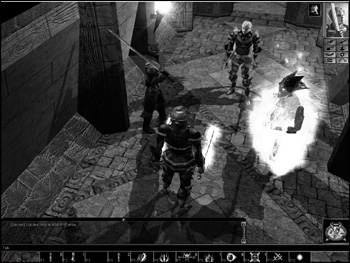
It is important to note that the embedded viewport does not manage any physics, networking, or gameplay functionality while running the editor. The scene is merely displayed using a visual representation only, and the game won’t actually execute until the module is run from within the game engine.
The Aurora Toolset is a great piece of software, but it is only one, albeit big, tool amongst numerous others that produce the content for a game. The NeverWinter Nights module developer community appreciates the work put into the Aurora Toolset, but only because the toolset shipped with the game. Had the toolset been created for internal use only, the community would not have appreciated its value as much or even known about it.
BioWare keeps putting out AAA titles and recognizes that great tools produce great games. In addition to their own titles, the technology behind those games is also reusable enough that third-party companies have licensed it to produce some other exceptional games. BioWare is leading the way in role-playing games and has one of the most respected dedicated tools teams.
Note
For more information, please visit http://www.bioware.com.
As a game studio that also markets its own middleware products, Artificial Studios is dedicated to advancing the state of professional game development solutions. They have a flagship product titled Reality Engine, which is a total solution for games using next-generation graphics, dynamic physics, and high-performance graphics.
The Reality Engine SDK also provides a next-generation toolset titled Reality Builder and is powered by C#.NET technology. The engine itself is developed in unmanaged C++, but Reality Builder has a harness that displays its scenes using the Reality Engine within the editor as a WYSIWYG display.
Shown in Figure 3.4 is the main interface for Reality Builder, where entities can be selected and transformed, as well as a property grid control on the right side that allows easy access to the properties of the currently selected entity. You can also see another dialog being displayed that shows the assets available to the world designer.
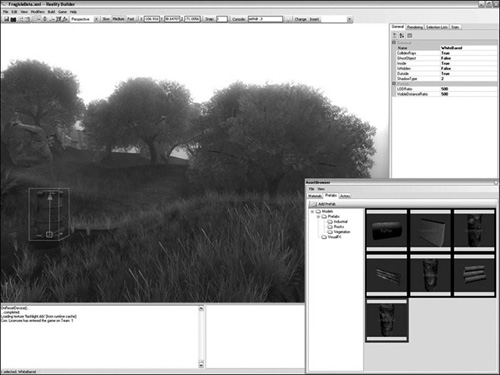
Another nice accessibility feature is a menu at the top which contains some quick launch buttons and edit fields for commonly used operations or properties. This is a very handy feature for designers, and can often improve workflow to some extent by reducing the number of clicks required to perform common operations.
Visual cues are another feature of graphical tools that make them easier to use. Notice the barrel in Figure 3.4; there is a selection bounding box around the entity, and there are widgets to adjust the X, Y, and Z position of the selected entity. The same functionality could have been implemented using a numeric input field, but doing so would make the interface less intuitive to the designers.
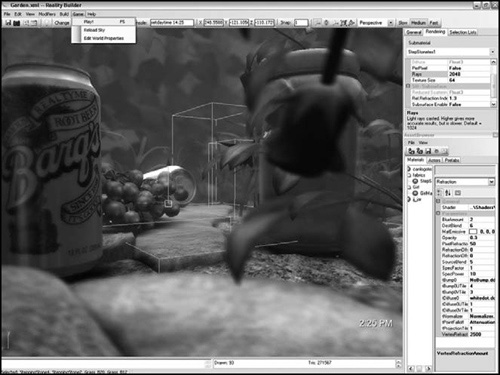
An excellent feature that is seen in most cutting-edge graphical tools is in-game rendering, where the tool displays the world as it would look in-game. This doesn’t necessarily mean that the game itself is running within the tool but merely that the rendering subsystem is attached to the tool’s viewport to render the world appropriately.
Reality Builder supports in-game rendering, and you can see this in Figure 3.5. The concepts behind software architecture design are extremely important to implement this feature, and require a graphics engine that is modular in nature. Bonus Chapter 2, “Building a Managed Wrapper with C++/CLI,” shows how to create a Direct3D context in unmanaged code, and then build a managed harness around it.

Reality Builder also provides script support to designers using the C# language and the CodeDom compiler. By using C# as their scripting language, the tools and engine can take advantage of compiled code that also has the ability to interface with the robust .NET class framework.
All .NET applications have access to the Windows Forms class framework, which offers a number of feature-rich and intuitive controls. Additionally, if a specific control is not available, it is very easy to build a custom one that functions the way you desire. Figure 3.6 shows another screenshot of Reality Builder displaying its rich user interface.
Artificial Studios is a relatively new company, but their custom technology is cutting-edge, and their embracement of C# and the .NET platform is admirable. They were recently purchased by Epic Games, and it will be interesting to see what comes of the acquisition, and whether Epic Games will maintain a strong stand for the .NET platform. Trends in the industry are pointing toward a larger percentage of companies migrating legacy technology or tools to managed code. The old saying “Time is money” is quite applicable to this issue, and if .NET can save a project a significant amount of money, then its usage is justified.
Note
For more information, please check out http://www.artificialstudios.com.
In this chapter, I discussed a few commercial-grade tools that have been used in the development of some best-selling games. I hope the case studies presented have given you some extra insight into building high quality tools and some useful interface features to improve workflow. See each product’s user manual for more information on the specifics of each application.
Remember that the .NET class framework offers rich user interface controls and should be used to improve the accessibility and workflow of your tools. An intelligent user interface can save countless hours when it takes very few navigation actions to perform a particular task.
As an example, imagine you have a tool that takes 7 seconds to perform a particular task. With this task being performed four times a day in a 22-workday month, 12 months of the year, you end up with a total time of two hours. Now imagine that you have 20 designers performing this task. The total time spent on this task would be 40 hours. If you introduce an accessibility feature that causes that same task to take 2 seconds, with one designer, the total time spent is 35.2 minutes, roughly a 342 percent improvement in efficiency. With 20 designers, the total time spent would be 12 hours, saving you 29 hours that could be directed elsewhere.