
Chapter 13
Creating Controls for Mobile Devices
In This Chapter
![]() Playing games on mobile devices
Playing games on mobile devices
![]() Creating virtual keys on the screen
Creating virtual keys on the screen
![]() Adding swipe controls
Adding swipe controls
![]() Creating pinch and zoom controls
Creating pinch and zoom controls
![]() Playing mobile games with virtual analog sticks
Playing mobile games with virtual analog sticks
If you want to make a game these days, there’s a very good chance you want your audience to play it on a mobile device. That’s where this chapter, and Chapter 10 on scaling and resolution, come into play. In this chapter, I show you how to add controls to your game so that it’s playable on a mobile device such as a tablet or phone. This includes virtual keys such as analog sticks, swiping, and pinching and zooming. You can add all these features to your game through GameMaker: Studio functions.
Putting Your Game on a Mobile Device
During the game creation process, be sure to test your game as you go. Think about how you’re going to test your game on a mobile device before you create it. After all, it would be awful to spend hours creating virtual joysticks only to learn you have no way to test your work.
Using an emulator
To test the procedures in this chapter, you need to get your game onto a mobile device. You can do this through an emulator if you don’t have a mobile device available. I’m not going to discuss the details behind using emulators, but if you look online, you can find plenty of information.
Putting your game online
If you have a website, you can upload your GameMaker files through FTP to appear on your site. Then you can access the game through your mobile device’s browser, whether an iPhone, iPad, Kindle Fire, or any kind of Android tablet or phone.
 If you decide to make an HTML5 game geared towards mobile devices, keep those games small and simple.
If you want to test your mobile game online, change the target of your game to HTML5. That way, when you save the game, GameMaker creates the appropriate files.
You can change the target (the platform you want to play the game on) of your game from the icon menu, as shown in Figure 13-1. From the Target drop-down list, choose HTML5. (For more information, see Chapter 1.)
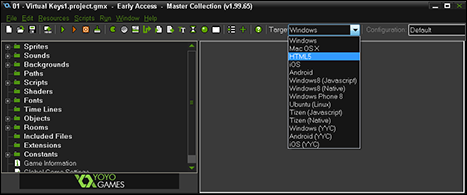
Figure 13-1: Select the target of the game.
Now, when you save your game, GameMaker will create an index.html file along with a folder named html5game; within that folder, you’ll find the files that you need to upload (along with the index.html file) through FTP. After that’s done, simply point your mobile device’s browser to the URL, which ends in index.html.
When you change the target to HTML5, when you test the game, the game will open in your default browser.
The reason I suggest using HTML5 as the target is because it’ll work on Android, iOS, and Windows devices. You’ll be able to test your touch controls on any of those devices using HTML5.
Adding Simple Touch Controls
In this section, I show you how to add touch controls for the game Breakout, which is discussed in Chapter 11. In that chapter, the directions were to add in keyboard commands so that the player could play from a PC. However, the game is unplayable on a mobile device, because mobile devices don’t have a traditional hardware keyboard. To remedy this, I show you how to add touch controls to move the bat in the Breakout game.
The Left Mouse Button Event is considered the same as a tap on mobile devices. So, if you use a Left Mouse Button Event in your game (say, for a button), then when you play on a mobile device, tapping that button works just as well as using a mouse.
Understanding virtual keys
Virtual keys (also known as touch controls) respond to a player’s touch while on a mobile device. You can map virtual keys to keyboard keys so that any Keyboard Events you set up in GameMaker will have the same effect as a virtual key. For example, in the game Breakout, the player uses the left-and-right arrow keys to move the bat back and forth. You can map those arrow keys to work as virtual keys so that the player can tap a button to move the bat back and forth instead of using the arrows on the keyboard.
Virtual keys are simple rectangular areas and cannot be any other shape (such as ellipses). Virtual keys are mapped to the graphical user interface (GUI) layer; this means that they don’t move with the View. Virtual keys are automatically removed when a Room ends. It doesn’t matter in which Object you create the virtual keys — they’ll trigger a key Event for all Instances equally, like any normal keyboard press.
Creating virtual keys
The following procedure is based on the Virtual Keys tutorial found within GameMaker. To create a virtual key, follow these steps:
- Start the GameMaker: Studio software.
- From the New Project window, click the Tutorials tab.
An outline of tutorials appears in the left column.
- From the Beginner section on the left, click to open Touch Controls and then click to open the Virtual Keys tutorial.
If this is the first time you’ve opened this tutorial, you’ll be prompted to install it.
The Virtual Keys project window appears.
- From the Target drop-down list, choose HTML5 (refer to Figure 13-1).
Now when you save and test your game, GameMaker will compile the files specifically for HTML5, or whichever Target you chose.
- From the Resource tree, in the Objects section, double-click obj_Control.
The Object Properties window appears.
- From the Events section, click the Create Event.
The Actions for the Create Event appear in the Actions section.
- From the Actions section, double-click the Execute Code Action.
The code window appears.
- In the code window, type the following code (as shown in Figure 13-2):
display_set_gui_size(view_wview[0], view_hview[0]);
key_left = virtual_key_add(32, display_get_gui_height() - 96, 64, 64, vk_left);
key_right = virtual_key_add(display_get_gui_width() - 96, display_get_gui_height() - 96, 64, 64, vk_right);
key_space = virtual_key_add((display_get_gui_width() / 2) - 32, display_get_gui_height() - 96, 64, 64, vk_space);
virtual_key_show(key_left);
virtual_key_show(key_right);
virtual_key_show(key_space);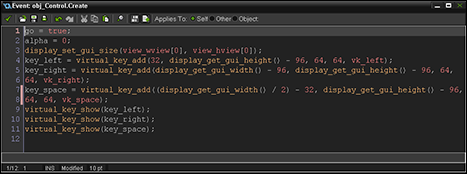
Figure 13-2: The code to create virtual keys.
- Click the green check mark.
The code window is saved and closed.
This code sets the GUI size to match the View. The code also creates three virtual keys: left, right, and spacebar, which are drawn on the GUI layer as white squares. Each key is assigned a unique ID (key_left, key_right, and key_space), which is stored as a variable, so that you can then change it later.
At this point, you can test the game — from the main menu, choose Run⇒Run Normally. If you updated the Target to HTML5, the game should open in your default browser. After you click Play, you should see the outline of three squares, as shown in Figure 13-3. If you’re on a desktop, you can click these squares and they’ll work. If you’re on a mobile device, you can tap these squares for them to work.
If you see three solid white squares and they don’t work with the mouse, check your Target. Most likely, it’s still set to Windows.
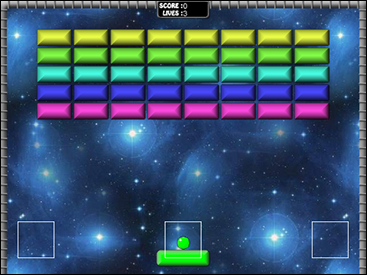
Figure 13-3: Virtual keys as depicted in the Google Chrome browser.
Adding Sprites to virtual keys
In all likelihood, you don’t want your virtual keys looking like empty boxes. To remedy this, this section describes how to assign a Sprite to your virtual keys. If you’re following along with the tutorial, GameMaker has Sprites ready and waiting for you.
To assign a Sprite to your virtual keys, follow these steps:
- From the Resource tree, double-click obj_Control from the Objects section.
The Object Properties window appears.
- With the Create Event selected in the Events section, double-click the Execute Code Action from the Actions section.
The code window appears.
- Delete the last three lines of code:
virtual_key_show(key_left);
virtual_key_show(key_right);
virtual_key_show(key_space); - Type the following code:
s_left = 0;
s_right = 0;
s_space = 0;You just set up variables to draw the correct Sprite for each of the buttons, which you’ll set up next in the Step Event.
- Click the green check mark.
The code window is saved and closed.
- From the Events section, select the Step Event.
The Actions for the Step Event appear in the Actions section.
- Double-click the Execute Code Action from the Actions section.
The code window appears.
- Scroll down to line 32 and find the code room_restart();. Type in the following code between the last two brackets so that it looks like Figure 13-4:
{
room_restart();
}
s_left = keyboard_check(vk_left);
s_right = keyboard_check(vk_right);
if keyboard_check_pressed(vk_space)
{
s_space = -1;
}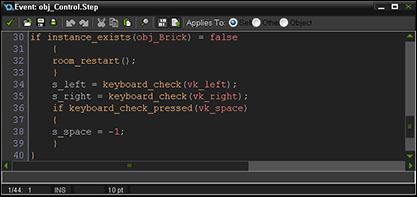
Figure 13-4: New code for the virtual keys.
- Click the green check mark.
The code window is saved and closed.
- Select the Draw Event from the Events section.
The Actions for the Draw Event appear in the Actions section.
- Double-click the Execute Code Action from the Actions section.
The code window appears.
- In the code window, type the following code at line 15 (after the existing code) to make the Sprites actually appear in the game:
if go
{
draw_sprite(spr_Left, s_left, 32, display_get_gui_height() - 96);
draw_sprite(spr_Right, s_right, display_get_gui_width() - 96, display_get_gui_height() - 96);
if s_space != -1
{
draw_sprite(spr_Space, 0, display_get_gui_width() / 2, display_get_gui_height() - 64);
}
}This code checks the game state (if go) and then draws the buttons if there are bricks left. The launch Sprite is also drawn, but only up until the player taps that button. You need this button to reappear when the player loses the ball, which you set up next.
- Click the green check mark.
The code window is saved and closed.
- Click OK from the Object Properties window for obj_Control.
The Object Properties window is saved and closed.
- From the Resource tree, in the Objects section, double-click obj_Ball.
The Object Properties window appears.
- From the Events section, click the Step Event.
The Actions for the Step Event appear in the Actions section.
- Double-click the Execute Code Action from the Actions section.
The code window appears.
- At line 14, insert the cursor, and type in the following code at line 15, as shown in Figure 13-5.
s_space = 0;
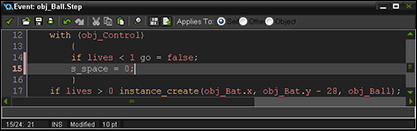
Figure 13-5: New code for the ball.
You can test your game again and you should see the button Sprites, shown in Figure 13-6, that you added for virtual keys. The game should play well on all mobile and touchscreen devices.
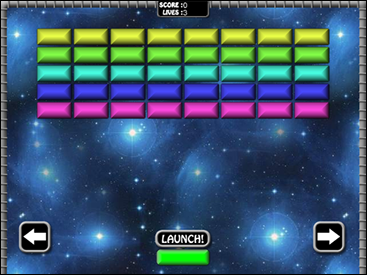
Figure 13-6: The Breakout game with Sprites for the virtual keys.
Adding Swipe Controls
Many games for mobile devices use swipes to control aspects of their game like skipping through menus or different screens. This same effect can easily be achieved using the normal mouse functions in GameMaker: Studio.
In the first part of this chapter, I show you how to set up virtual keys to detect taps on mobile devices, but that’s only the beginning. For most mobile games, people expect to use swipe gestures to make certain things happen, such as navigating menus. In the following procedures, I show you how to add swipe controls to the Breakout game. These procedures are based on the in-software tutorial, Swipes.
Single-direction swipes
For the following procedures, you can follow along with the in-software tutorial, Swipes. In this procedure, you will add a swipe check to the high-score menu to switch between local and online high scores.
To add a swipe check, follow these steps:
- Open the GameMaker: Studio software and from the New Project window, choose Tutorials⇒Intermediate⇒Touch Controls⇒Swipes.
The Swipes Project window appears.
- From the Resource tree, in the Objects section, double-click obj_HighScores.
You’ll add a swipe check to this Object.
The Object Properties window appears.
- Select the Create Event from the Events section.
The Actions for the Create Event appear in the Actions section.
- Double-click the Execute Code Action from the Actions window.
The code window appears.
- Insert the cursor at line 20 and type the following code:
page = 0;
mx = 0;
score_x = 0;
swipe_min = 100;This code sets up variables for the Object. These variables are defined as:
- page: The score page the player is on
- mx: The X position of the mouse at the start of the swipe
- score_x: The current base position GameMaker uses for drawing
- swipe_min: The minimum distance to travel (in pixels) before a swipe is detected (how much a person has to swipe before it’s detected as a swipe)
- Click the green check mark.
The code window is saved and closed.
- Choose Add Event⇒Mouse⇒Global Mouse⇒Global Left Button.
The Global Left Button Event appears in the Events section. You want to use the Global Mouse Event because this detects a touch anywhere on the screen. A Local Mouse Event only detects touches with the Instance collision Mask (which is how the button works).
- Drag and drop the Execute Code Action from the Control tab to the Actions section.
A code window appears.
- Type in the following code:
if mouse_check_button_pressed(mb_left)
{
mx = mouse_x;
}
score_x = clamp((page * room_width) + (mouse_x - mx), 0, room_width); - Click the green check mark.
The code window is saved and closed.
This code detects the touch and then stores the position of the touch on the X axis. The position of the X axis is used to set the position of where the scores are drawn.
The code uses the clamp() function so that the player can’t drag the scores too far to the left or too far to the right. When the player swipes, she’s moving the high-score list. If she swipes far enough, she’ll switch to another page, say, from local high scores to global high scores.
 You can modify the value of the page variable so that you can add more pages for the player to swipe through by changing the value in the Create Event.
The page itself will be set when the player releases her finger from the screen, which I show you how to set up in the next procedure.
To detect when the player stops swiping, follow these steps:
- Choose Add Event⇒Global Mouse⇒Global Left Released.
The Global Left Released Event appears in the Events section.
- Drag and drop an Execute Code Action from the Control tab to the Actions section.
A code window appears.
- In the code window, type the following code:
var tx = mouse_x - mx;
if abs(tx) > swipe_min
{
if sign(tx) == -1
{
page = 0;
}
else
{
page = 1;
}
}Here, the abs() function gets the absolute value of the distance between the start and the finish of the swipe. If that value is greater than the minimum swipe value, that triggers the sign() of the swipe value. The sign will be –1 for a swipe to the left; if the swipe is not to the left, then the value of 1 is assigned to the page variable.
- Click the green check mark.
The code window is saved and closed.
To get a smooth transition so that it looks like the player is sliding the pages across the screen when swiping, follow these steps:
- With obj_HighScores still open from the last procedure, choose Add Event⇒Step⇒Step.
The Step Event appears in the Events section.
- Drag and drop an Execute Code Action from the Control tab to the Actions window.
The code window appears.
- In the code window, type the following code:
var xgo = (page * room_width);
if score_x != xgo //(page * room_width)
{
score_x += (xgo - score_x) / 5;
} - Click the green check mark.
The code window is saved and closed.
This code moves the drawing position of the high-score tables based on the length of the player’s swipe.
Run the game now — from the main menu, choose Run⇒Run Normally. Click the Scores button and you’ll see the Local Scores. If you’re on a mobile device, you can swipe the screen to see the Online Scores. When you swipe, the Local Scores move with the swipe. If you’re on PC, a click-and-drag is the equivalent of a swipe, and you’ll see the Local Scores transition to the Online Scores.
This code works the same for vertical swipes, too. You just need to adjust the code to reflect the Y axis instead of the X axis and use the Room height instead of the Room width.
Directional swipes
In the game Breakout, to start the game, the player needs to launch the ball from the bat up toward the bricks. Currently, the player can launch the ball by either pressing the spacebar (from Chapter 11) or by using virtual keys (earlier in this chapter). These two options launch the ball in a random direction. In this section, I show you how you can launch the ball in a specific direction, based on which direction you swipe. This type of swipe is considered a directional swipe.
The following procedure picks up from the last section on using swipes.
To add a directional swipe to the breakout game, follow these steps:
- Open the GameMaker: Studio software and from the New Project window, choose Tutorials⇒Intermediate⇒Touch Controls⇒Swipes.
The Swipes Project window appears.
- From the Resource tree, in the Objects section, double-click obj_Bat.
The Object Properties window appears.
- From the Events section, right-click the Keyboard Pressed Space Event and choose Delete.
You no longer want the player to launch the ball using the spacebar, so this Event is no longer necessary.
- Choose Add Event⇒Create.
The Create Event appears in the Events section.
- Drag and drop an Execute Code Action from the Control tab to the Actions section.
A code window appears.
- In the code window, type the following code:
mx = 0;
my = 0;This sets two variables, mx and my, to 0. This represents an initial mouse (in this case, the player’s finger) position at the start of the swipe.
- Click the green check mark.
The code window is saved and closed.
- Choose Add Event⇒Mouse⇒Global Mouse⇒Global Left Pressed.
The Global Left Pressed Event appears in the Events section.
- Drag and drop an Execute Code Action from the Control tab to the Actions section.
A code window appears.
- In the code window, type the following code:
mx = mouse_x;
my = mouse_y;Now, when the player presses his finger against the screen, the mx and my variables are updated to match the X and Y coordinates of the touch.
- Click the green check mark.
The code window is saved and closed.
- Choose Add Event⇒Mouse⇒Global Mouse⇒Global Left Released.
The Global Left Released Event appears in the Events section.
- Drag and drop the Execute Code Action from the Control tab to the Actions section.
A code window appears.
- In the code window, type the following code:
if point_distance(mx, my, mouse_x, mouse_y) > 50
{
with (obj_Ball)
{
if go = false
{
audio_play_sound(snd_Play, 0, false);
go = true;
direction = clamp(point_direction(other.mx, other.my, mouse_x, mouse_y), 10, 170);
speed = clamp(point_distance(other.mx, other.my, mouse_x, mouse_y) / 50, 2, 10);
}
}
with (obj_Control)
{
s_space = -1;
}
} - Click the green check mark.
The code window is saved and closed.
This code determines the direction of the swipe and how far, and how fast, the player pressed her finger against the screen. These values are what GameMaker uses to set the speed and direction for the launch of the ball.
Note the use of the clamp() function in this code. The clamp() function limits the possible angle of the ball during the launch so that the ball can’t start at an angle that would cause the player to lose a life. The clamp() function also ensures that the ball doesn’t launch too fast or two slow.
The last line of code stops the launch Sprite from showing while the game is in play.
Now is a great time to save and test your game — from the main menu, choose Run⇒Run Normally. If you’re testing on a PC, you can click and drag with the mouse to represent a directional swipe of a finger on a mobile device.
Pinching and Zooming
The act of pinching and zooming has become commonplace when interacting with content on a mobile device. Pinching and zooming are when a player touches his thumb and index finger to the screen and then simultaneously pinches them together to zoom in on the content, or spreads the fingers wider apart to zoom out of the content (or vice versa depending on your device). This type of player interaction requires code that enables the player to use multiple touches during a game. This is where the device_mouse_*() function comes into play.
The device_mouse_*() function is designed to take an argument from 0 to 4. Each of those values (0, 1, 2, 3, 4) represents a finger. This makes it possible for you to tell GameMaker to check up to five simultaneous touches on a screen (remember that in coding, numbering always starts at 0).
In the following procedures, I show you how to detect when two fingers are touching the screen simultaneously. You then tell GameMaker to use the X and Y coordinates of where the player is touching the screen to create a pinch-and-zoom feature to a game.
The pinch function is represented through the device_mouse_check_button(). Remember that mobile devices treat fingers as mouse actions, so there are many opportunities to translate mouse functions for use on mobile devices. You use this function to check for the initial position of each finger and then to test if the distance between them changes.
To set up the zoom function, you use device_mouse_raw_x/y(). In this function, you use the raw coordinates as opposed to the Room coordinates (see Chapter 2 for more on Rooms). The raw coordinates are the X and Y position of the mouse within the screen, and not the Room. This is important to understand, because these coordinates change relative to the new coordinates as the player pinches.
For the Windows Target, the raw position is calculated from a specific window resolution, with the top-left corner being (0,0). However, on mobile devices, the raw position is calculated from the display resolution.
To add zoom functionality to your game, follow these steps:
- From the New Project window, choose Tutorials⇒Intermediate⇒Touch Controls⇒Pinch and Zoom.
- From the Resource tree, in the Objects section, double-click obj_Controller.
The Object Properties window appears.
- Click the Create Event in the Events section.
The Actions for the Create Event appear in the Actions section.
- Double-click the Execute Code Action in the Actions section.
The code window appears.
- In the code window, type the following code at line 6 (as shown in Figure 13-7):
initial_w = view_wview[0];
initial_h = view_hview[0];
v_scale = 1;
v_dist = 0;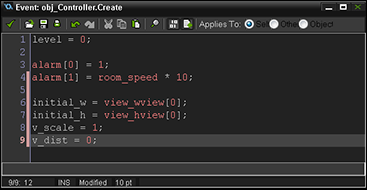
Figure 13-7: Code for the Create Event.
These variables will hold the starting width/height of the view, the current scaling modifier, and the distance between the two touches on the screen.
- Click the green check mark.
The code window is saved and closed.
- Choose Add Event⇒Step⇒Step.
The Step Event appears in the Events section.
- Drag and drop an Execute Code Action from the Control tab to the Actions section.
A code window appears.
- In the code window, type the following code:
var mx0raw, my0raw, mx1raw, my1raw;
mx0raw = device_mouse_raw_x(0);
my0raw = device_mouse_raw_y(0);
mx1raw = device_mouse_raw_x(1);
my1raw = device_mouse_raw_y(1);This code checks for the raw position (as described right before this procedure) of the first two touches on the screen and stores them in the variables you set up earlier.
- In the code window, type the following code (shown in Figure 13-8):
if device_mouse_check_button(1, mb_left)
{
if device_mouse_check_button_pressed(1, mb_left)
{
v_dist = point_distance(mx0raw, my0raw, mx1raw ,my1raw) * v_scale;
}
v_scale = v_dist / max(1, point_distance(mx0raw, my0raw, mx1raw, my1raw));
if v_scale < 0.5 v_scale = 0.5 else if v_scale > 1.5 v_scale = 1.5;
view_wview[0] = initial_w * v_scale;
view_hview[0] = initial_h * v_scale;
view_xview[0] = global.Player_x - (view_wview[0] / 2);
view_yview[0] = global.Player_y - (view_hview[0] / 2);
}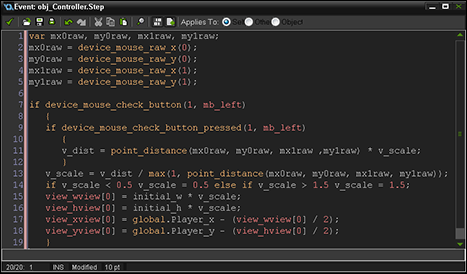
Figure 13-8: Code for the Step Event.
- Click the green check mark.
The code window is saved and closed.
This code checks to see if a second touch has been detected, and if it has, GameMaker stores in the variable v_dist the initial starting distance between the two touch points. GameMaker then uses these values to detect further movement. The resulting change between the initial distance and the new distance is stored in the variable v_scale.
Note the use of the max() function in the code at line 13 in Figure 13-8. This function prevents any possible divide by zero errors that may occur should the distance be zero.
 A divide by zero error is when the divisor is 0, which causes an error in your game. Use the max() function to prevent the error.
At line 14 of the code, you’re telling GameMaker to limit the zoom to half the natural view as a minimum, and 1.5 as maximum (the player can’t zoom the view so small that you can’t see it and the player can’t zoom in so far as to make the pixels blurry). This concept is good to keep in mind when designing your games — different zoom factors will drastically change the end-user experience, especially with the visuals of your game.
The final part of this code — lines 15 through 18 — sets the actual view by multiplying the initial width and height by the scaling value, and then sets the new X and Y position for the view appropriately.
You can test the game now on any mobile device and see that pinching and zooming will cause the screen view to enlarge or shrink. To test the game, from the main menu, choose Run⇒Run Normally. If you’re testing the game on a laptop with a multitouch-capable trackpad enabled, the pinch and zoom functionality should work.
Creating Analog Sticks for Mobile Devices
This section shows you how to create analog sticks (virtual joysticks) for mobile devices. You can use analog sticks in your game to greatly improve moving characters around in the game. A benefit to using analog sticks over virtual keys is the enhanced freedom of movement that these virtual joysticks provide.
The procedures in this section are based off the in-software tutorial, Analogue Sticks, found on the Tutorials tab of the New Project window. In this section, you see how to add analog sticks to make movement and game play more natural. You’ll make two sticks: one to control the player movement and the other to control the player’s shooting direction. The player uses her left thumb to control the movement and her right thumb to control the direction.
Drawing the sticks onto the GUI script
You need two Scripts for the analog sticks to work. The Scripts are used to draw the stick onto the GUI layer of the screen. To do so, GameMaker needs to convert the raw mouse positions (as discussed earlier in this chapter) into GUI positions. That’s why one Script is for the X position, and the other Script is for the Y position.
To create the X position Script, follow these steps:
- From the New Project window, choose Tutorials⇒Advanced Touch Controls⇒Analogue Sticks.
The Analogue Sticks project window appears.
- From the Resource tree, right-click Scripts⇒Create Script.
A Script code window appears.
- In the Name field, type scr_mouse_gui_x, as shown in Figure 13-9.
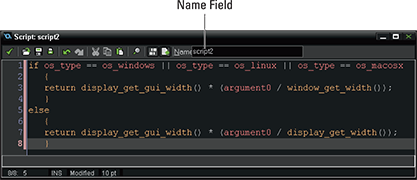
Figure 13-9: Code for the X position Script.
- In the Script code window, type the following code (refer to Figure 13-9):
if os_type == os_windows || os_type == os_linux || os_type == os_macosx
{
return display_get_gui_width() * (argument0 / window_get_width());
}
else
{
return display_get_gui_width() * (argument0 / display_get_width());
} - Click the green check mark from the icon menu.
The Script code window is saved and closed.
- From the Resource tree, right-click Scripts and select Create Script.
A Script code window appears.
- In the Name field, type scr_mouse_gui_y.
- In the code window, type the following code:
if os_type == os_windows || os_type == os_linux || os_type == os_macosx
{
return display_get_gui_height() * (argument0 / window_get_height());
}
else
{
return display_get_gui_height() * (argument0 / display_get_height());
} - Click the green check mark.
The Script code window is saved and closed.
Later, you call these two Scripts to determine the GUI layer X and Y coordinates from the raw mouse position in the game.
You may have noticed in the first line of code that there are checks to determine the operating system the player is playing on. This is because for Windows and other desktop targets, you need to use the window resolution, whereas on mobile devices, you want the display resolution. These checks help fix any potential errors with placing the sticks on the screen.
Making the player move
Now it’s time to enable the player to move. This section picks up where the previous section left off and is a continuation of the Analogue Sticks tutorial.
In the following procedure, you create several new variables for the player Object. These variables are used to translate the mouse position (the player’s finger) into movement. The variables are also used to draw the controls on the screen, which is also done in obj_Player.
To create arrays to store values for the two sticks, follow these steps:
- With the Analogue Sticks tutorial open, from the Resource tree, click to open the Objects folder, and then double-click obj_Player from the Player folder.
The Object Properties window appears.
- From the Events section, click the Create Event.
The Actions for the Create Event appear in the Actions section.
- Double-click the Execute Code Action from the Actions section.
The code window appears.
- At line 12, update spd=3;to b_spd=3.
You need to use the correct variable to get the player to move.
- In the code window, at line 31, type the following code (as shown in Figure 13-10):
gui_x[0] = 64;
gui_y[0] = (display_get_gui_height() - 64);
gui_x[1] = (display_get_gui_width() - 64);
gui_y[1] = (display_get_gui_height() - 64);
stick_x[0] = gui_x[0];
stick_y[0] = gui_y[0];
stick_x[1] = gui_x[1];
stick_y[1] = gui_y[1];
st_pressed[0] = -1;
st_pressed[1] = -1;
st_radius = 40;
vdir = 0;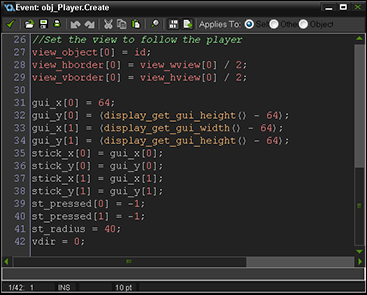
Figure 13-10: Code for the arrays.
- Click the green check mark.
The code window is saved and closed.
This code creates arrays to hold the X and Y coordinates. Arrays make it easier to group multiple values under the same variable. In this code, you use the array [0] for the left stick, and array [1] for the right stick.
You may need to fix some of the code that came with the tutorial. In line 27, you may see, /*view_object[0] = id;. You need to delete the slash and the asterisk to get your code to look like Figure 13-10.Here’s what the different variables do:
- gui_x/y: These arrays hold the position on the GUI layer that GameMaker will consider as the center position. They’re used to calculate movement. You’ll use them to draw the base images of the analog stick on the screen.
- stick_x/y: These arrays hold the position of the analog stick while it’s being moved by the player, as well as for drawing the stick on the screen.
- st_pressed: Use this variable to check for a touch on the screen.
- st_radius: This is the radius (in pixels) of the analog stick base. It’s used to control the maximum movement of the stick from the base position.
- vdir: This variable controls the stick movement for the direction that the player is facing. This is used to set the image angle only when the player is using the stick.
Now you need to update the Step Event. To update the Step Event to support analog sticks, follow these steps:
- With the obj_Player Object Properties window open, click the Step Event from the Events section.
The Actions for the Step Event appear in the Actions section.
- Double-click the Execute Code Action from the Actions section.
The code window appears.
- Delete lines 8 through 12, highlighted in Figure 13-11.
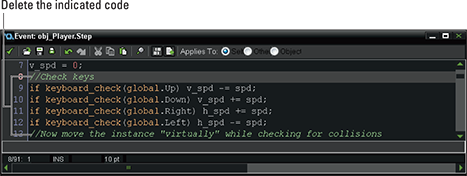
Figure 13-11: Delete this code to remove the keyboard controls.
You just removed the keyboard controls by deleting that code. Now you can add the code for the analog sticks where the code for the keyboard controls used to be. You do this in two parts. The first part of the code detects which finger is over the controller and then stores that value in the array st_pressed. If the screen is not being touched (at the stick position), this array will hold the value of –1. The second part of the code is used to get the position of any detected touch relative to the base GUI position (as defined in the array gui_x/y) and that sets the player’s horizontal and vertical speed values.
- At line 8, type in the following code (see Figure 13-12 for the full code block):
stick_x[0] = gui_x[0];
stick_y[0] = gui_y[0];
if st_pressed[0] = -1
{
for (i = 0; i < 5; i++;)
{
if device_mouse_check_button(i, mb_left)
{
var tx, ty;
tx = scr_mouse_gui_x(device_mouse_raw_x(i));
ty = scr_mouse_gui_y(device_mouse_raw_y(i));
if point_distance(tx, ty, gui_x[0], gui_y[0]) < st_radius
{
if st_pressed[1] != i
{
st_pressed[0] = i;
break;
}
}
}
}
}This code block checks to see if there is no current touch on the left stick, and if not, the code loops through the five possible touch points and checks to see if there is a finger there (making sure that it is not the same finger as the one using the shoot controller). If there is a touch within the given radius from the base GUI X/Y point, that touch is detected and the finger number is stored.
Note that this code calls the Scripts you wrote earlier in this chapter to convert the raw mouse position on the screen into the correct GUI layer position.
- Type in the following code block directly below the code you typed in Step 4 (this code should start at line 30):
if device_mouse_check_button(st_pressed[0], mb_left)
{
var spd, vdist, mx, my;
mx = scr_mouse_gui_x(device_mouse_raw_x(st_pressed[0]));
my = scr_mouse_gui_y(device_mouse_raw_y(st_pressed[0]));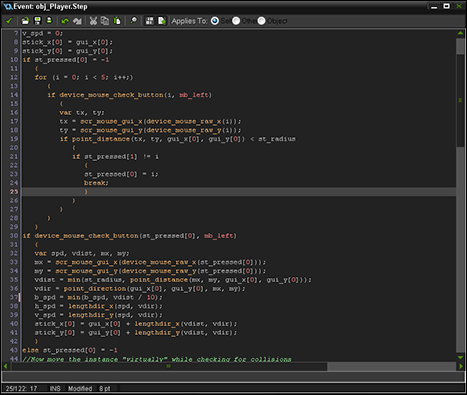
Figure 13-12: The code block for Steps 4 through 8.
This code checks to see if the previously stored finger is still touching the screen. If it is, the local variables defined here get the mouse position on the GUI layer.
- Next, type in this code at line 35:
vdist = min(st_radius, point_distance(mx, my, gui_x[0], gui_y[0]));
vdir = point_direction(gui_x[0], gui_y[0], mx, my);This code captures the distance that the stick has been moved, limiting it to the radius value that you set earlier in the Create Event, and also gets the direction that the stick has been moved in. Both of these values will now be used to calculate the movement speed, which you write the code for next.
- Type in this code directly below the previous code (at line 37).
spd = min(b_spd, vdist / 10);
h_spd = lengthdir_x(spd, vdir);
v_spd = lengthdir_y(spd, vdir);This code sets the local spd variable to a value that is limited to a maximum speed set by the base speed (b_spd), and then GameMaker uses this value to get the component horizontal and vertical speed from the speed/direction vector. These two values are then used in the movement code of this object.
- Type in this code directly below the previous code (at line 40):
stick_x[0] = gui_x[0] + lengthdir_x(vdist, vdir);
stick_y[0] = gui_y[0] + lengthdir_y(vdist, vdir);
}
else st_pressed[0] = -1This code sets the stick array to hold the current position for drawing the stick head in the Draw GUI Event, and it also resets the st_pressed variable to –1 if the player lifts his finger from the screen.
- At line 111, you should see the point_direction function; update that code to reflect vdir instead, as shown in Figure 13-13.
This code change will make the player point in the correct direction when the stick is being moved.
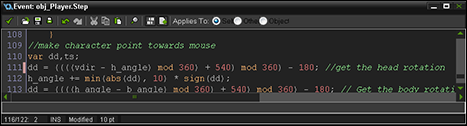
Figure 13-13: Updated code to get the head direction.
- Click the green check mark.
The code window is saved and closed.
- Choose Add Event⇒Draw⇒Draw GUI.
The Draw GUI Event appears in the Events section.
- Drag and drop an Execute Code Action from the Control tab to the Actions section.
A code window appears.
- In the code window, type the following code:
draw_set_alpha(0.75);
draw_circle_color(gui_x[0], gui_y[0], st_radius, c_lime, c_lime, true);
draw_circle_color(stick_x[0], stick_y[0], 20, c_lime, c_lime, true);
draw_circle_color(gui_x[1], gui_y[1], st_radius, c_lime, c_lime, true);
draw_circle_color(stick_x[1], stick_y[1], 20, c_lime, c_lime, true);
draw_set_alpha(0.25);
draw_circle_color(gui_x[0], gui_y[0], st_radius, c_lime, c_lime, false);
draw_circle_color(stick_x[0], stick_y[0], 20, c_lime, c_lime, false);
draw_circle_color(gui_x[1], gui_y[1], st_radius, c_lime, c_lime, false);
draw_circle_color(stick_x[1], stick_y[1], 20, c_lime, c_lime, false);
draw_set_alpha(1);This code draws a representation of the stick on the screen. This allows the player to know where to place his fingers and thumbs.
- Click the green check mark.
The code window is saved and closed.
You can draw the stick in any way you choose, but in this example, you drew green circles, as shown in Figure 13-14. Note that you also draw the second stick on the right (for shooting) although it’s useless at this point. You can test the game now, and you’ll see the analog sticks, even if they aren’t fully functional yet.
If you run and test your game now, you should see the green circles at the left-and right-bottom corners, as shown in Figure 13-14. If you see the virtual keys (the hollow white squares), then you need to open obj_Controller, and in the Create Event, open the Execute Code Action and delete the following code:
key_left = virtual_key_add(32, display_get_gui_height() - 160, 64, 64, vk_left);
key_up = virtual_key_add(96, display_get_gui_height() - 224, 64, 64, vk_up);
key_down = virtual_key_add(96, display_get_gui_height() - 96, 64, 64, vk_down);
key_right = virtual_key_add(160, display_get_gui_height() - 160, 64, 64, vk_right);
virtual_key_show(key_left);
virtual_key_show(key_up);
virtual_key_show(key_down);
virtual_key_show(key_right);
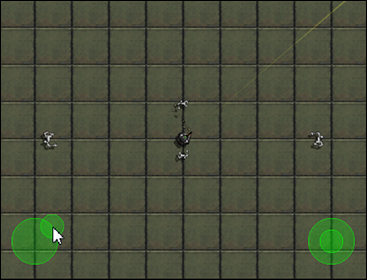
Figure 13-14: The analog sticks.
Shooting with the analog stick
In the previous section, you created analog sticks for moving and shooting. Currently, you can turn with the left stick, but the right stick doesn’t do anything. You update this so that the player can move in one direction and shoot in another. The procedures in this section pick up from the Analogue Stick tutorial.
To shoot with the analog stick, follow these steps:
- With the Analogue Stick tutorial open, from the Resource tree, double-click obj_Player.
The Object Properties window appears.
- Click the Step Event from the Events section.
The Actions for the Step Event appear in the Actions section.
- Double-click the Execute Code Action.
The code window appears.
- At line 82 in the code window, type in the following code, as shown in Figure 13-15.
stick_x[1] = gui_x[1];
stick_y[1] = gui_y[1];
if st_pressed[1] = -1
{
for (i = 0; i < 5; i++;)
{
if device_mouse_check_button(i, mb_left)
{
var tx, ty;
tx = scr_mouse_gui_x(device_mouse_raw_x(i));
ty = scr_mouse_gui_y(device_mouse_raw_y(i));
if point_distance(tx, ty, gui_x[1], gui_y[1]) < st_radius
{
if st_pressed[0] != i
{
st_pressed[1] = i;
break;
}
}
}
}
}
Figure 13-15: Code for the shooting analog stick.
- Now you need to change the shooting code to accept the touch on the stick and set the correct angles for shooting and drawing; replace the initial mouse_check_button function with a device-specific one and set the stick array values like this (see Figure 13-16):
if device_mouse_check_button(st_pressed[1], mb_left)
{
var mx, my;
mx = scr_mouse_gui_x(device_mouse_raw_x(st_pressed[1]));
my = scr_mouse_gui_y(device_mouse_raw_y(st_pressed[1]));
vdist = min(st_radius, point_distance(mx, my, gui_x[1], gui_y[1]));
vdir = point_direction(gui_x[1], gui_y[1], mx, my);
stick_x[1] = gui_x[1] + lengthdir_x(vdist, vdir);
stick_y[1] = gui_y[1] + lengthdir_y(vdist, vdir);
//check for the shooting variable
if c_shoot
{
//the rest of the code as it is here
}
}
else st_pressed[1] = -1; - Click the green check mark.
The code window is saved and closed.
Test the game now and you should see that the left control turns and moves the player and the right control makes him shoot and turn. You may notice that you can’t shoot and move at the same time, but perhaps that’s a challenge you can take on!
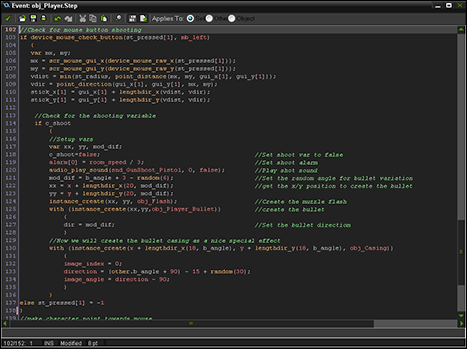
Figure 13-16: Code for the Step Event.