
Chapter 11
Coding with GameMaker Language
In This Chapter
![]() Looking at coding examples from the breakout tutorial
Looking at coding examples from the breakout tutorial
![]() Using GameMaker Language code
Using GameMaker Language code
![]() Coding keyboard controls
Coding keyboard controls
![]() Looking at example code for collisions
Looking at example code for collisions
![]() Coding score displays
Coding score displays
![]() Creating an introductory Room and a closing Room
Creating an introductory Room and a closing Room
An extremely powerful feature of GameMaker: Studio is the ability to code using GameMaker Language (GML). GameMaker makes it easy for you to add custom code to your game through the Execute Code Action found on the Control tab of the Object Properties window.
To get you acquainted with GML, this chapter uses coding examples from the in-software tutorial, Coding Tutorial, which shows how to create a breakout-style game using GML. Through the example code, you work with Objects that represent a player-controlled bat, a bouncing ball, and a number of other Objects that you can use in your own games.
 This chapter isn’t a one-stop shop for learning GML or coding a breakout-style game. Instead, it’s an introduction with examples on using GML and coding examples.
This chapter also describes how to create introductory and closing screens by setting up more than one Room. I introduce the concept of saving and displaying the current high score. These features are one that you can then add to your own games.
For additional information on coding, turn to Chapter 14. Chapter 7 has a good coding example on how to create a button. And Chapter 12 has coding examples based on physics.
 While using GameMaker, at any time, you can press F1 on your keyboard to open the in-software manual. From there, you can read additional information on the functions used in this chapter.
Displaying Sub-Images with Code
The following two procedures describe how to write code to tell GameMaker to
- Randomly display sub-images within Sprites
- Display Sprites based on the sub-image index, which is the number assigned to the sub-image
The following two examples are based on the in-software tutorial on coding a breakout game. Within that tutorial, you create a Sprite that looks like a brick, and it has several sub-images, each sub-image being a different-colored brick. In the first procedure, you tell GameMaker to randomly display the sub-images. In the second procedure, you tell GameMaker to sort the sub-images by index number.
Randomly displaying sub-images
I get started with coding in a very simple way — by using only two lines of code that can really change how your game looks.
To randomly display a sub-image, follow these steps:
- Create a Sprite with several sub-images (for example, each sub-image could be a different colored brick).
See Chapter 2 for more on creating Sprites.
The Sprite should appear in the Resource tree.
- Choose Resources⇒Create Object.
The Object Properties window appears.
- In the Name field, type something like obj_brick (see Figure 11-1).
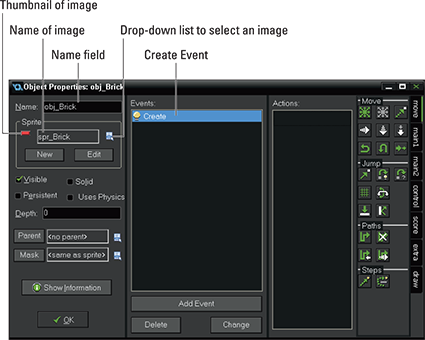
Figure 11-1: The Object Properties window for the brick Object.
- From the Sprite drop-down list, select the Sprite with the sub-images that you just created (see Chapter 2).
A thumbnail of the image appears in the Sprite section, and the name of the image appears in the field (refer to Figure 11-1).
- Choose Add Event⇒Create.
A Create Event appears in the Events section of the Object Properties window (refer to Figure 11-1).
- Drag and drop the Execute Code Action from the Control tab into the Actions section.
An empty code window appears with its own menu.
- In the code window (shown in Figure 11-2), type the following code:
image_speed = 0;
image_index = floor(random(image_number));
Figure 11-2: The code window.
- Click the green check mark in the icon menu.
The code window is saved and closed.
- Click OK in the Object Properties window.
The Object Properties are saved and closed.
- Place an Instance of the Object in the Room.
See Chapter 2 on creating Rooms and placing Instances of Objects in the Room.
- From the main menu, choose Run⇒Run Normally, to test the game.
The compile window displays the compilation of the game. When the game starts, you should see randomly sorted bricks, as shown in Figure 11-3.

Figure 11-3: Randomly sorted bricks.
This code sets the speed of the image to 0. This is the speed GameMaker uses to show the individual sub-images of the Sprite. The default is 1, which means that normally GameMaker displays a single frame (one of the sub-images) in each step of the game. By using 0 as the image speed, you’re telling GameMaker not to animate the Sprite and to show only a single sub-image. The second line of the code randomly selects one of the sub-images that will be displayed during the game.
 If you were to use 0.5 as the speed, then the sub-images would appear in slow motion or at half the speed. If you want the sub-images to appear very quickly, you could enter a value of 2.
You may have noticed that the code window is color-coded — that is, certain text appears in different colors than others. That is a useful feature of GameMaker, in that comments, functions, variables, and so on are highlighted in different colors. If you don’t like the color coding, or you want to use your own custom colors, you can update the Preferences — from the main menu choose, File⇒Preferences, and then select the Scripts and Code tab as shown in Figure 11-4.
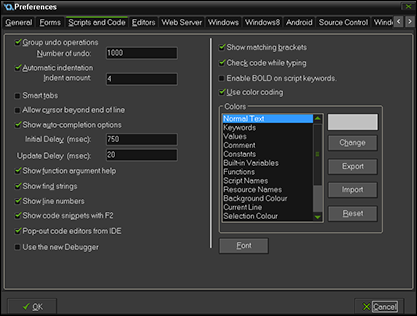
Figure 11-4: The Scripts and Code tab of the Preferences window.
Sorting sub-images by index
If you want to use a single Object to display multiple Instances within a Room, you can assign a Sprite to that Object that has multiple sub-images. Then you can write the following code so that GameMaker displays the sub-images in a sorted manner. The following code example is from the in-software coding tutorial, which shows you how to make a breakout-style game.
To sort sub-images by position (as based on the Room coordinates), follow these steps:
- Create a Sprite with at least four sub-images (for example, each sub-image could be a different colored brick).
See Chapter 2 for more on creating Sprites.
The Sprite should appear in the Resource tree.
- Choose Resources⇒Create Object.
The Object Properties window appears.
- In the Name field, type something like obj_brick.
- From the Sprite drop-down list, select the Sprite with the sub-images (see Chapter 2).
A thumbnail of the image appears in the Sprite section, and the name of the image appears in the field.
- Choose Add Event⇒Create.
A Create Event appears in the Events section of the Object Properties window (refer to Figure 11-1).
- Drag and drop the Execute Code Action from the Control tab into the Actions section.
An empty code window appears.
- In the code window, type the following code:
image_speed = 0;
if y <= 32 image_index = 0;
else
if y <= 64 image_index = 1;
else
if y <= 96 image_index = 2;
else
if y <= 128 image_index = 3;
else
if y <= 160 image_index = 4;The code checks for the Y position of the Instance (as determined by the coordinates of the Room) and then assigns the index number of the Sprite to determine which sub-image to display.
- Click the green check mark to save and close.
Figure 11-5 shows an example of sorting sub-images by index using this code. This game uses a single Sprite with five sub-images, which are displayed based on their index.
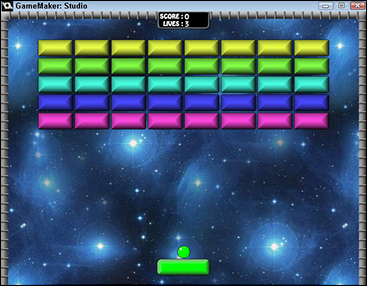
Figure 11-5: An example of sorted bricks using the index of sub-images.
Adding Code to Objects
You add code to Objects through an Execute Code Action from the Control tab. There is an infinite number of ways to use code in games — these examples are just the tip of the iceberg. In the next few sections, I provide sample code for
- Keyboard controls for moving an Object left or right
- Launching an Object into the Room through the spacebar
- Using Collision and Step Events with code
- A Script that prevents an Object from getting stuck in other Objects
For information on how to create controls for mobile devices that don’t have a keyboard, check out Chapter 13.
Coding keyboard controls
You can use the drag-and-drop Actions (see Chapter 4) to create keyboard controls, but you can also write your own code for keyboard controls. The following procedures show you how to write code to make an Object move left and right.
To code left and right keyboard controls, follow these steps:
- Create a Sprite that will represent what the player controls, such as the bat Sprite from the breakout tutorial.
See Chapter 2 for more information on creating Sprites.
The Sprite should appear in the Resource tree.
- Choose Resources⇒Create Object.
The Object Properties window appears.
- In the Name field, type something like obj_bat.
- From the Sprite drop-down list, select the Sprite, such as spr_bat (see Chapter 2).
A thumbnail of the image appears in the Sprite section, and the name of the image appears in the field.
- Choose Add Event⇒Keyboard⇒Left.
A Left Keyboard Event appears in the Events section of the Object Properties.
- Drag and drop the Execute Code Action from the Control tab into the Actions section.
An empty code window appears.
- In the code window, type the following code:
if place_meeting(x - 5, y, obj_wall) = false
{
x -=5;
}The code first checks for a collision between the Object (an Instance of the Object during gameplay) and obj_wall (if there are fewer than 5 pixels separating the Object from the wall). If there is less than 5 pixels of space between the Object and the wall, GameMaker sets the X position of the Object to move 5 pixels over. In that way, the player can’t move the Object into the wall.
- Click the green check mark.
The code window is saved and closed.
- Choose Add Event⇒Keyboard⇒Right.
The Right Keyboard Event appears in the Events section.
- From the Control tab, drag and drop an Execute Code Action into the Actions section.
An empty code window appears.
- In the code window, type the following code:
if place_meeting(x + 5, y, obj_wall) = false
{
x +=5;
}The code for the Right arrow key is the same as for the Left arrow key, except you’re checking for the right boundary (in this case, obj_wall). A good thing to remember is that +x is to the right and –x is to the left. In the same way, +y is down and –y is up.
- Click the green check mark.
The code window is saved and closed.
You could test this code now by placing an Instance of the bat Object in the Room. Of course, you would need the wall Object created as well. To find out how to the create the wall Object, you can follow along with GameMaker’s coding tutorial.
To code the spacebar to trigger an Action, follow these steps:
- With your Object open, such as the Object from the last procedure, choose Add Event⇒Keyboard⇒Space.
The Space Keyboard Event appears in the Events section.
- Drag and drop an Execute Code Action from the Control tab to the Actions section.
An empty code window appears.
- Type the following code:
with (obj_ball)
{
if go = false
{
go = true;
direction = 45 + random(90);
speed = 5;
}
}This code does a few things. Basically, when the player presses the spacebar (you set this code in a Keyboard Event), the game starts with a ball Object shooting out into the Room. The ball Object has a speed of 5 pixels per step, and it will travel at a random direction between 45 and 135 degrees (135 is derived from adding 90 to 45).
This code also introduces the go variable, which you define in the next procedure. The go variable is an example of a controller variable. A controller variable, much like a controller Object, controls how and when different events and actions are triggered. Here, the code says that if go is set to false, and if the spacebar is pressed, set go to true and give the ball Object speed and direction. In the next procedure, I show you how to define the go variable, set it to false, and tell it what to do until it’s triggered to true.
Coding an Object with collisions and Step Events
The following code examples show how to create a ball Object that behaves differently, depending on what it collides with. The Object should react differently if it collides with a wall Object, a brick Object, or a bat Object. Also, if the ball happens to leave the Room, then the game restarts. Figure 11-6 shows the Events in the Events section of the Object Properties window for the ball Object. Each of these Events will have a single Execute Code Action. The Execute Code Action opens a code window into which you enter your code.
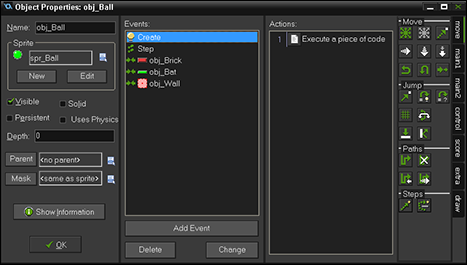
Figure 11-6: The Object Properties window for the ball.
In this procedure, you set the go variable to false. This go variable is linked, so to speak, with the Object from the previous procedure — the line of code with (obj_ball). In the following procedure, you create obj_ball. To create the ball Object, follow these steps:
- Create a Sprite that will represent the ball, such as the ball Sprite from the breakout tutorial.
See Chapter 2 for more information on creating Sprites.
The Sprite should appear in the Resource tree.
- Choose Resources⇒Create Object.
The Object Properties window appears.
- In the Name field, type something like obj_ball.
- From the Sprite drop-down list, select spr_ball (see Chapter 2).
A thumbnail of the image appears in the Sprite section, and the name of the image appears in the field.
- Choose Add Event⇒Create.
A Create Event appears in the Events section of the Object Properties window.
- Drag and drop the Execute Code Action from the Control tab into the Actions section.
An empty code window appears.
- In the code window, type the following code:
go = false;
You just defined the go variable as false (see the last procedure).
- Click the green check mark.
The code window is saved and closed.
- Choose Add Event⇒Step⇒Step.
A Step Event appears in the Events section.
- Drag and drop an Execute Code Action from the Control tab to the Actions section.
An empty code window appears.
- In the code box, type the following code:
if go = false
{
x = obj_bat.x;
}
else
{
if y > room_height room_restart();
}The first line of code references the control variable go, which you used in the previous code example for the spacebar. Here, in the Step Event, for every step of the game, GameMaker will test to see if go is false; if it is, the X position of the ball Object will equal the X position of the bat Object (meaning, if the player moves the bat back and forth before starting the game, the ball will follow the bat back and forth).
The X position refers to the coordinates of the Room. When the player presses the spacebar, the code from the previous example changes the go variable to true, which means the else statement in this code is triggered (because go no longer equals false). When the else statement is triggered, GameMaker now checks for the Y position of the ball, and if the ball leaves the Room, the game restarts. - Click the green check mark.
The code window is saved and closed.
- Choose Add Event⇒Collision⇒obj_wall.
A Collision Event for the wall Object appears in the Events section.
- Drag and drop an Execute Code Action from the Control tab to the Actions section.
An empty code window appears.
- In the code window, type the following code:
move_bounce_all(true);
This code tells the ball to bounce off the wall when the two collide. By using true, this creates precise bouncing, which provides some realism to the bounce effect.
- Click the green check mark.
The code window is saved and closed.
- Choose Add Event⇒Collision⇒obj_brick.
A Collision Event for the brick Object appears in the Events section.
- Drag and drop an Execute Code Action in the Actions section.
An empty code window appears.
- In the code window, type the following code:
move_bounce_all(true);
with (other) instance_destroy();This is the same line of code as for the wall, but this time you want the ball to destroy other Instances in the Room, such as the bricks from the breakout tutorial, and not just bounce off.
The snippet of code with (other) is very useful, in that it tells GameMaker that if the Object collides with another Object, that other Object (the Object that collided with this Object) should be destroyed. I provide an example of this in Chapter 6, in the section on creating a boss battle. In that example, if a player’s bullet collides with the boss Object, the Instance of the player’s bullet that collided with the boss Object is destroyed; however, any other Instances of the player’s bullet will remain in the Room.
- Click the green check mark.
The code window is saved and closed.
- Choose Add Event⇒Collision⇒obj_bat.
A Collision Event with the bat appears in the Event section.
- Drag and drop an Execute Code Action from the Control tab to the Actions section.
An empty code window appears.
- In the code window, type the following code to determine how the ball bounces off the bat (or the Object of your choosing).
move_bounce_all(true);
var dir;
dir = point_direction(other.x, other.y, x, y);
motion_add(dir, 5);
speed = 5;This code provides the ball a direction to travel in, based on the other Instance it collides with, whether that be the bat, the wall, or a brick.
- Click the green check mark.
The code window is saved and closed.
That concludes this procedure. Now, you should have a ball Object with several Events, as shown in Figure 11-6, found at the beginning of the ball procedures.
Coding a Score Display and Lives
By writing code to create the score display, you can customize it to your liking, without necessarily having to use images. With that said, the following example uses the ScoreBox image, which you can find in the Graphics folder of the assets for the in-software coding tutorial.
To load the Sprite for the score display, follow these steps:
- Choose Resources⇒Create Sprite.
The Sprite Properties window appears.
- In the name field, type something like spr_scorebox.
- Choose Load Sprite.
A navigation window opens.
- Navigate to the scorebox.png on your PC, or whichever image you want to use.
- Select the image file and choose Open from the navigation window.
A thumbnail of the image appears in the Sprite Properties window.
- For the Origin, click Center (see Figure 11-7).
GameMaker determines the center of the image — in this case, X becomes 48 and Y becomes 16 (refer to Figure 11-7). This will help you align the text for the score and lives later on.
- Click OK.
The Sprite Properties window is saved and closed.
You just created a Sprite that you can use as part of your score display. Next, I show you how to create an Object for the score display by using code.
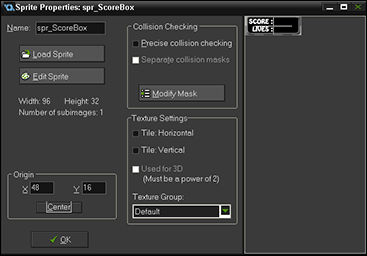
Figure 11-7: The Sprite Properties window.
To create the score display Object, follow these steps:
- Choose Resources⇒Create Object.
The Object Properties window appears.
- In the Name field, type something like obj_score_display.
- From the Sprite drop-down list, select the Sprite, such as spr_ScoreBox (see Chapter 2).
A thumbnail of the image appears in the Sprite section, and the name of the image appears in the field.
- Choose Add Event⇒Create.
A Create Event appears in the Events section of the Object Properties window.
- Drag and drop the Execute Code Action from the Control tab into the Actions section.
An empty code window appears.
- In the code window, type the following code:
draw_set_halign(fa_left);
draw_set_color(c_white);
go = true;
alpha = 0;You just set up the text alignment for the score display to start on the left and the color to be white. However, when you created the Sprite, you set the Origin to Center, which means the text will be drawn starting from the center of the Sprite, so the left text alignment actually starts in the middle of the Sprite, which is right where you want it.
- Click the green check mark.
The code window is saved and closed.
- Choose Add Event⇒Step⇒Step.
A Step Event appears in the Events section.
- Drag and drop an Execute Code Action from the Control tab into the Actions section.
An empty code window appears.
- In the code window, type the following code:
if go = false
{
if alpha < 1
{
alpha += 0.05;
}
else
{
ini_open("Score.ini");
+- if score > ini_read_real("Score","0",0)
{
ini_write_real("Score","0",score);
}
ini_close();
room_goto(room_intro_close);
}
}
else
{
if instance_exists(obj_brick) = false
{
room_restart();
}
}This code creates the transition effect for when the game ends or if the player clears all the bricks. If the game is over, the player is returned to the introduction Room, which you need to create (see Chapter 2). If the bricks are cleared, then the Room resets, but the score remains. It also reads and writes the high score to an INI file; if the player’s current score is higher than the saved high score, then the old high score is updated with the player’s current score. You can learn more about reading and writing INI files and more in Chapter 14.
- Click the green check mark.
The code window is saved and closed.
- Choose Add Event⇒Draw⇒Draw.
A Draw Event appears in the Events section.
- Drag and drop an Execute Code Action from the Control tab to the Actions section.
An empty code window appears.
- In the code window, type the following code:
draw_self();
draw_text(x, 2, score);
draw_text(x, 15, lives);
draw_rectangle(0, 0, room_width, room_height, false);
draw_set_alpha(1);You just told GameMaker to draw the score display Sprite (draw_self) and the text. The X coordinate was defined in the Create Event, so you don’t have to assign a value here. The 2 and the 15 are the values for the Y coordinate, which determines the height at which to draw the text.
- Click the green check mark.
The code window is saved and closed.
- Click OK in the Object Properties window.
The Object Properties window is saved and closed.
Now you should turn your attention back to the ball Object. You need to change the Step Event so that it reduces a life when the ball leaves the screen and the game only restarts after the player loses his last life.
To update the ball Object, follow these steps:
- Select the ball Object from the Resource tree (see “Coding an Object with collisions and Step Events,” earlier in this chapter).
- Select the Step Event.
The Step Event Actions appear in the Actions section.
- Double-click the Execute Code Action.
The code window appears.
- Update the code to the following:
if go = false
{
x = obj_bat.x;
}
else
{
if y > room_height
{
lives -= 1;
if lives < 1
{
room_restart();
}
else
{
instance_create(obj_bat.x, obj_bat.y - 28, obj_ball);
instance_destroy();
}
}
}This code tells GameMaker to reduce the player’s lives by 1 when the ball leaves the Room. If the player has additional lives, a new ball Instance is created over the bat. If the player does not have any remaining lives, then GameMaker restarts the game.
- Click the green check mark.
The code window is saved and closed.
- Select the Collision Event for the bricks.
The Actions for the Collision Event appear in the Actions section.
- Double-click the Execute Code Action.
The code window appears.
- Add the following code at the end of the existing code:
score += 10;
This code adds 10 points to the player’s score each time a brick is destroyed.
- Click the green check mark.
The code window is saved and closed.
- Click OK.
The Object Properties window is saved and closed.
Your score display Object and Sprite should now be ready for use. Remember to place the score display Object in the Room for you to see it in action (see Chapter 2 for more information).
Coding to Start and End Games
In this section, I show you how to code Rooms for introducing and closing your games. These introduction screens are useful to display many different types of game features, including:
- Showing a title graphic
- Displaying high scores
- Displaying a Play button
The following procedures do cover these features, but there are other game options you may want to add to your game, such as allowing the player to toggle the sound off and on or allowing the player to configure her own keyboard controls (see Chapter 14).
Introducing the game
In the introduction screen, you show the player several pieces of information. This includes a title graphic, a Play button, and the current high score, as shown Figure 11-8. You create a new Room for this intro screen, which you also use when the game restarts.
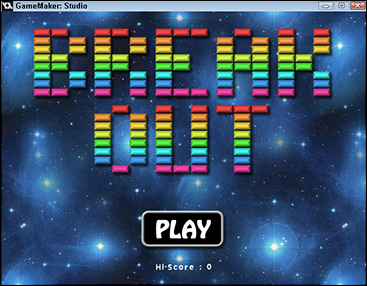
Figure 11-8: An example intro screen showing a Play button and high score.
To save the high score, you create an INI file (see Chapter 14). I walk you through the details in this chapter as well. The following procedures are based on the in-software coding tutorial, but you can adapt them for your own games.
To create two Sprites for the introduction screen, follow these steps:
- Right-click Sprites from the Resource tree, and then choose Create Sprite.
The Sprite Properties window appears.
- In the Name field, type something like spr_play.
- Choose Load Sprite.
A navigation window appears.
- Navigate to where you have your image saved on your PC and choose, say,Play.png.
- Choose Open from the navigation window.
A thumbnail of the Sprite appears in the Sprite Properties window.
- Click OK.
The Sprite Properties window is saved and closed.
- Create a second Sprite by right-clicking Sprites from the Resource tree and then choosing Create Sprite.
The Sprite Properties window appears.
- In the Name field, type spr_title or spr_intro or something appropriate for the title graphic.
- Choose Load Sprite, navigate to your image, such as Titles.png, and choose Open from the navigation window.
A thumbnail of the image appears in the Sprite Properties window.
- Click OK.
The Sprite Properties window is saved and closed.
You’ve now created two different Sprites that you can use for the introduction screen of your game.
To create the Control Object for the introduction screen, follow these steps:
- From the Resource tree, right-click Object and choose Create Object.
The Object Properties window appears.
- In the name field, type something like obj_intro_end.
- From the Sprite drop-down list, select spr_play.
A thumbnail of the image appears in the Sprite section, and the name of the image appears in the field.
- Choose Add Event⇒Create.
A Create Event appears in the Events window.
- Drag and drop an Execute Code Action from the Control tab to the Actions section
An empty code window appears.
- In the code window, type the following code:
alpha = 0;
ini_open("score.ini");
hiscore = ini_read_real("Score","0",0);
ini_close();
draw_set_color(c_white);The draw code defines the text color. This code also records and saves the high score in an INI file. If you didn’t set up your own INI file, GameMaker creates one for you.
- Click the green check mark.
The code window is saved and closed.
- Choose Add Event⇒Draw⇒Draw.
A Draw Event appears in the Events section.
- Drag and drop an Execute Code Action from the Control tab to the Actions section.
An empty code window appears.
- In the code window, type the following code:
draw_self();
draw_sprite(spr_intro, 0, 64, 160);
draw_text(240, 440, “Hi-Score : “ + string(hiscore));
draw_set_alpha(alpha);
draw_rectangle(0, 0, room_width, room_height, false);
draw_set_alpha(1);You may recognize this code to draw the Play button (draw_self), the intro graphic (spr_intro), and the high score. The alpha variable is used to create a transition effect from the intro screen to actually playing the game. I show you how to do this next.
- Choose Add Event⇒Mouse⇒Left Pressed.
The Left Pressed Mouse Event appears in the Events section.
- Drag and drop an Execute Code Action from the Control tab to the Actions section.
An empty code window appears.
- In the code window, type the following code:
if alpha = 0
{
alarm[0] = 1;
score = 0;
lives = 3;
}With this code, GameMaker checks the value of alpha, and if it is 0, it runs the Alarm, sets the score to 0, and gives the player three lives. GameMaker performs this check to make sure the Event runs a single time, even if the player repeatedly presses the mouse button.
The preceding code also sets the global variables for score and lives. Global variables are built into GameMaker, and they don’t belong to Objects, but rather to everything within the game.
- Choose Add Event⇒Alarm⇒Alarm [0].
The Alarm Event appears in the Events section.
- Drag and drop an Execute Code Action from the Control tab to the Actions section.
An empty code window appears.
- In the code window, type the following code:
alpha += 0.05;
if alpha >= 1
{
room_goto(room_breakout);
}
else alarm[0] = 1;
You’ve now created the introduction screen for the game. Before I show you how to add it to the game, I’m going to walk you through creating the conclusion to the game.
Ending the game
In this section, I show you how to create a transition effect for when the player runs out of lives and the game ends. This includes saving the high score and restarting the Room.
- From the Resource tree, in the Object section, double-click the obj_intro_end Object.
The Object Properties window appears.
- Select the Create Event.
The Create Event Actions appear in the Actions section.
- Double-click the Execute Code Action from the Actions section.
The code window appears.
- Update the code to the following:
alpha = 0;
ini_open("score.ini");
hiscore = ini_read_real("Score","0",0);
ini_close();
draw_set_halign(fa_center);
draw_set_color(c_white); You placed these draw functions in the Create Event, and not a Draw Event, because they don’t actually draw anything. The draw functions here simply set the values for alignment and color. Because these functions are only needed once, you can place them in the Create Event. If you placed these functions in a Draw Event, GameMaker would be checking them once every step of the game, which isn’t necessary. - Click the green check mark.
The code window is saved and closed.
- Click OK from the Object Properties window.
The Object Properties window is saved and closed.
- From the Resource tree, open obj_control.
The Object Properties window appears.
- Select the Draw Event.
The Draw Event Actions appear in the Actions section.
- Double-click the Execute Code Action.
The code window appears.
- Update the code to the following:
draw_self();
draw_text(x, 2, score);
draw_text(x, 15, lives);
draw_rectangle(0, 0, room_width, room_height, false);
draw_set_alpha(1);This code creates the transition effect for closing the game.
- Click the green check mark.
The code window is saved and closed.
- In the Object Properties window, in the Depth field, type –1000.
This makes sure that the introduction screen is drawn over everything else.
- Click OK in the Object Properties window.
The Object Properties window is saved and closed.
- From the Resource tree, open obj_ball.
The Object Properties window appears.
- Select the Step Event.
The Step Event Actions appear in the Actions section.
- Double-click the Execute Code Action.
The code window appears.
- Update the code to look like the following:
if go = false
{
x = obj_bat.x;
}
else
{
if y > room_height
{
lives -= 1;
if lives < 1
{
with (obj_control) go = false;
}
else
{
instance_create(obj_bat.x, obj_bat.y - 28, obj_ball);
instance_destroy();
}
}
} - Click the green check mark.
The code window is saved and closed.
- Click OK.
The Object Properties are saved and closed.
Now when you run the game, when the game is over, there should be a flash of white as the game transitions back to the introduction screen.
Hopefully, these coding examples will give you an excellent starting point for you to code your own games. They should also give you some ideas on how to work with Rooms to create introduction and closing screens.
If you find yourself having trouble getting the code to work, don’t worry — you’re not alone. When I did some of the GameMaker tutorials for the first time, I spent an entire day debugging my typos and mistakes, placing Actions in the wrong Events, using the wrong Events, and so on.