
Chapter 10
Applying Scaling
In This Chapter
![]() Working with the Global Game Settings
Working with the Global Game Settings
![]() Scaling to Windows
Scaling to Windows
![]() Drawing GUI Elements
Drawing GUI Elements
![]() Scaling for HTML5
Scaling for HTML5
In this chapter, I cover resolution and scaling. Resolution is all about pixels per inch — a resolution of 1,920 x 1,200 means that a screen has 1,920 pixels horizontally and 1,200 lines vertically. Scaling is all about matching your game’s graphics to the actual size of the player’s screen. This chapter gets you started writing code to make your games fit the screen, whether you’re playing on a large monitor, a mobile phone, or a tablet.
This chapter explains how to code for proper resolution and scaling for different screen sizes for the Windows 7 platform, which works great on all desktops, including Mac and Linux. This provides a foundation to learn about additional platforms such as HTML5, iOS, Android, and others.
The procedures in this chapter work together with the in-software tutorial “The_Application_Surface_Scaling.” When creating the proper resolution and scaling for your games, you’re manipulating the application surface. I cover working with the application surface in Chapter 9, and I recommend that you familiarize yourself with how the application surface works before continuing with this chapter. You can also review the tutorial “The_Application_Surface_Overview,” which you can find from the New Project window, under the Tutorials tab, in the Beginner section.
Note: You can scale your games for Windows 8 (JavaScript) and Tizen (JavaScript) to maintain the appropriate aspect ratio, but those platforms require a different set of functions that are not covered in this chapter.
Configuring the Global Game Settings
To get started, you should become familiar with the Global Game Settings window, shown in Figure 10-1. You can find the Global Game Settings window under the Resources menu.
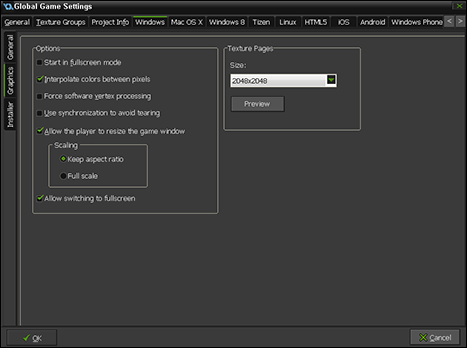
Figure 10-1: The Global Game Settings window.
To open the Global Game Settings window, follow these steps:
- Open the Application_Surface_Scaling tutorial from the New Project window.
The project window appears.
- From the main menu, choose Resources⇒Change Global Game Settings.
The Global Game Settings appear.
- Click the Windows tab.
The Windows properties appear.
- Along the left side of the window, click the Graphics tab.
- From the Scaling section, select the Full Scale radio button.
 In the Options section of the Windows Graphics tab, you see a Scaling section with two radio buttons. The default is Keep Aspect Ratio, which is what you’ll eventually want for this chapter, but for now choose Full Scale so you can see the differences between the two settings.
GameMaker does its best to fit the game in the full window, without maintaining aspect ratio.
- Click OK to save and close the Global Game Settings window.
Now is a good time to run the tutorial game to see what it initially looks like. To run the tutorial game, from the main menu, choose Run⇒Run Normally. At first, the game should have a proper aspect ratio — the game doesn’t look stretched to fill the screen. However, if you resize the window, you’ll find that the game loses the aspect ratio and appears stretched, as shown in Figure 10-2. To fix this, go back to the Global Game Settings and choose Keep Aspect Ratio (refer to Step 5 in the preceding list).
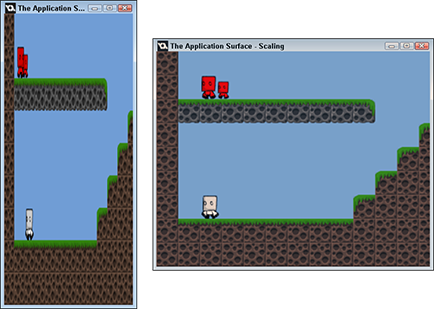
Figure 10-2: Improper aspect ratio makes the game look stretched.
The Full Scale option tells GameMaker to always scale the game to fit the current window size, which can lead to the stretching effect. When you select the Keep Aspect Ratio radio button, the aspect ratio remains correct but you get the letterbox effect (the black bars), as shown in Figure 10-3.
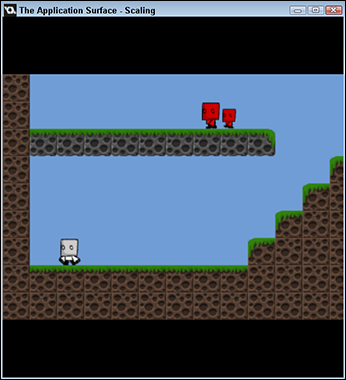
Figure 10-3: The letterbox effect with Keep Aspect Ratio selected.
The Keep Aspect Ratio setting works for all target platforms except HTML5 and is the simplest way to ensure that all your games will display correctly regardless of the device display or window size. The problem right now is those pesky black bars. In the next section, I show you how to cover up the black bars and maintain a proper aspect ratio.
Scaling to the Window
In the following procedures, I show you how to maintain a proper aspect ratio for your games without the letterbox effect appearing. You do this by manipulating the application surface. The initial size of the application surface is based on the size of the Room (if Views are not active) or the View port (if Views are active).
Scaling to best fit
By scaling the application surface to fit the player’s window or display size as best as possible, GameMaker adjusts the aspect ratio accordingly as the player resizes the window or triggers full-screen mode. The following procedures show how to scale your game for the best fit for desktop games. Later sections show how to update the code for mobile devices.
The following procedure picks up from the last section with the Application_Surface_Scaling tutorial.
To update the controller Object for scaling to best fit, follow these steps:
- With the tutorial open, from the Resource tree, click to open the Objects folder, then double-click obj_Control.
The Object Properties appear.
- Choose Add Event⇒Create.
The Create Event appears in the Events section.
- From the Control tab, drag and drop an Execute Code Action.
The code window appears.
- In the code window type the following code:
application_surface_draw_enable(false);
min_width = view_wview[0];
min_height= view_hview[0];
scr_Resize();This code tells GameMaker that the controller Object will take over the drawing of the application surface. The code also sets variables for the base width and height when the player resizes the window. The last line of the code calls a Script, which you write next. Because you haven’t written the Script yet, the last line of code will appear as an error in the code window, but that will fix itself after you write the Script.
- Click the green check mark to save and close the code window.
Next, you need to write the Script that you called in the last procedure.
- From the Resource tree, right-click Scripts and choose Create Script.
The Script code window appears.
- In the Name field, type scr_Resize.
- In the Script code window, type the following:
cur_width = max(1, window_get_width());
cur_height = max(1, window_get_height());
var ratio = cur_width / cur_height;
if cur_width < cur_height
{
view_wview[0] = min_height * ratio;
view_hview[0] = min_height;
}
else
{
view_wview[0] = min_width;
view_hview[0] = min_width / ratio;
}
view_wport[0] = cur_width;
view_hport[0] = cur_height;
surface_resize(application_surface, view_wview[0], view_hview[0]); - Click the green check mark to save and close the Script code window.
This code gets the current window size and stores those values in the variables. Because windows can be minimized, which would result in values of 0 (and you can’t divide by 0), you’re using the max function to ensure that the variables always have a value of 1 or greater. The variables are then used to get the aspect ratio of the game window. After the aspect ratio is determined, GameMaker can use that to scale the game correctly, which is what the remainder of the code entails.
Now you need to tell the controller Object to detect any changes in the window size for each step of the game.
- With the obj_Control still open from the previous procedure, choose Add Event⇒Step⇒Step.
The Step Event appears in the Events section.
- From the Control tab, drag and drop an Execute Code Action.
The code window appears.
- In the code window type the following:
if cur_width != window_get_width() || cur_height != window_get_height()
{
scr_Resize();
}This code detects any changes in the window size for each step of the game and adjusts the aspect ratio as necessary.
- Click the green check mark to save and close.
Now you need to draw the application surface so that you don’t wind up with a black screen:
- Choose Add Event⇒Draw⇒PostDraw.
The Post Draw Event appears in the Events section.
- From the Control tab, drag and drop an Execute Code Action.
The code window appears.
- In the code window, type the following:
draw_surface_stretched(application_surface, 0, 0, cur_width, cur_height);
- Click the green check mark to save and close the code window.
You can now run the game to test how the game looks in full-screen mode and by adjusting the width and height of the window. The game should now scale correctly with no black bars. To put the game in full-screen mode, press Alt+Enter. Press Alt+Enter a second time to leave full-screen mode.
Scaling the View
In the preceding section, I explain how to scale your game to fit the size of the window, no matter the dimensions of the window. In this section, I show you how to scale the View. When working with Views (see Chapter 5), you tell GameMaker to show only a certain portion of the Room at a time, which is how this tutorial is set up. However, if the player’s window is big enough to show more of the View than what you set in the Room, you can update the Script from the last procedure.
- With the tutorial open from the last section, in the Resource tree, from the Scripts folder, double-click scr_Resize.
The Script code window appears.
- In the code window, update the code to reflect the following (the code in bold indicates the differences):
cur_width = max(1, window_get_width());
cur_height = max(1, window_get_height());
var ratio = cur_width / cur_height;
if cur_width < cur_height
{
view_wview[0] = median(min_height, cur_height, room_height);
view_hview[0] = view_hview[0] * ratio;
}
else
{
view_wview[0] = median(min_width, cur_width, room_height);
view_hview[0] = view_wview[0] / ratio;
}
view_wport[0] = cur_width;
view_hport[0] = cur_height;
surface_resize(application_surface, view_wview[0], view_hview[0]); - Click the green check mark to save and close the Script code window.
GameMaker displays as much of the Room as it can within the window while maintaining the appropriate aspect ratio. You can press the spacebar to change Rooms to see how the window and view adapts to different Room sizes. You may have noticed in the Resource tree that there are two Rooms set up for this tutorial, room0 and room1. When you press the spacebar and switch to room1, you should see much more of the View than you did before.
Scaling on mobile devices
For mobile devices, such as tablets and phones, you’re configuring the full display size instead of a window (see the preceding section). Because of this, you only have to deal with a single aspect ratio, unless you allow for landscape and portrait settings from the Global Game Settings window.
The following procedure picks up from the last section and has you update the Script and controller Object:
- From the Resource tree, in the Objects folder, double-click obj_Control (if it’s not open from earlier).
The Object Properties appear.
- Click the Step Event from the Events section.
The Actions for the Step Event appear in the Actions section.
- Double-click the Execute Code Action from the Actions section.
The code window appears.
- In the code window, type the following (the code in bold indicates the original code):
switch(os_type)
{
case os_macosx:
case os_windows:
case os_linux:
case os_win8native:
if cur_width != window_get_width() || cur_height != window_get_height()
{
scr_Resize();
}
break;
case os_ios:
case os_android:
case os_winphone:
case os_tizen:
if cur_width != display_get_width() || cur_height != display_get_height()
{
scr_Resize();
}
break;
}This code checks the operating system of the device running the game.
- Click the green check mark to save and close the code window.
Now you need to update the Script.
- From the Resource tree, in the Scripts folder, double-click scr_Resize.
The Script code window appears.
- Replace the first two lines of code with the following:
switch(os_type)
{
case os_macosx:
case os_windows:
case os_linux:
case os_win8native:
cur_width = max(1, display_get_width());
cur_height = max(1, display_get_height());
break;
case os_ios:
case os_android:
case os_winphone:
case os_tizen:
cur_width = max(1, display_get_width());
cur_height = max(1, window_get_height());
break;
} - Click the green check mark to save and close the code window.
Now when you run the game on any mobile device, you should see that the game scales correctly no matter the resolution of the device or if you change the orientation from landscape to portrait. You should also notice that more of the Room is displayed in landscape mode rather than portrait.
Scaling with Draw GUI Events
An important thing to note when configuring your game for a fixed aspect ratio (or if you’re positioning the application layer manually) is that the graphical user interface (GUI) layer is normally letterboxed along with the application surface. This makes things very easy to position, as the top-left corner of the GUI layer is the (0,0) position of the application surface and the width and height are scaled by default to fit the application surface, too.
However, this may not be what you want. Fortunately, GameMaker enables you to set the GUI layer to cover the whole window or display, regardless of where the application surface is being drawn, permitting you to override the letterbox effect and draw over the whole area.
Maximizing the GUI
Basically, the GUI layer is dealt with apart from the general Draw Events and has its own resolution and positioning, based on the relative position (0,0) of the application surface. If you choose not to resize the GUI layer, it will be 1:1 with the application surface, but in many games you may want to resize this to better fit heads-up display (HUD) elements, such as virtual keys, ammo count, health status, and so on.
In the following procedures, I show you how to maximize the GUI layer and set it to 1.5 times the size of the View. Then, in the next section, I show you how to hide the letterbox effect. I also show you how to position GUI elements so that they appear over the application surface and not over the letterbox areas. This method can be more complex than leaving the default positioning, but it permits more dynamic GUI elements that change position based on the size of the window or display.
This procedure continues with “The_Application_Surface_Scaling” tutorial. Because of this, you do need to backtrack and remove all the Events from the control Object except for the Keyboard Event as described in the following procedure:
- With obj_Control open from the previous sections, right-click each Event one at a time and choose Delete Event.
Only the Press <Space> Event and Create Event should appear in the Events section.
- Click to select the Create Event.
The Create Event Actions appear in the Actions section.
- Double-click the Execute Code Action.
The code window appears.
- Update the code to only show the following:
display_set_gui_maximise();
This code tells GameMaker to start drawing the GUI layer from the (0,0) position of the display (or game window) rather than the position at which it draws the application surface.
- Click the green check mark to save and close the code window.
Now you need to update the Global Game Settings:
- From the main menu, choose Resources⇒Change Global Game Settings.
The Global Game Settings appear.
- Click the Windows tab.
- From the left side of the window, click the Graphics tab.
- In the Options section, select the Start in Fullscreen Mode check box.
- Make sure that Allow the Player to Resize the Game Window is selected.
- In the Scaling section, make sure Keep Aspect Ratio is selected.
- Directly below the Scaling section, make sure Allow Switching to Fullscreen is selected.
- Click OK to save and close the Global Game Settings.
Go ahead and run the game now. The game should start in full-screen mode. To exit full-screen mode, press Alt+Enter. If you resize the window, the game should maintain its aspect ratio. You may also notice that the letterbox effect is back. To remove the letterbox effect, move on to the next section.
Hiding the letterbox
The Keep Aspect Ratio option in the Global Game Settings window is a fantastic quick fix for mobile devices or full-screen desktop games. However, if you have the letterbox effect, the GUI elements will be drawn over them because they take all their coordinate positions from the (0,0) screen position.
This is where the application_get_position() function comes into play. This function returns an array of values indicating where on the screen the application surface is being drawn by default. You can use these values to define a relative position on the GUI layer, no matter the size of the GUI.
The following procedure picks up from The_Application_Surface_Scaling tutorial.
- Open obj_Control from the Resource tree.
- Choose Add Event⇒Draw⇒Draw GUI.
The Draw GUI Event appears in the Events section.
- From the Control tab, drag and drop an Execute Code Action into the Actions section.
The code window appears.
- In the code window, type the following:
draw_set_color(c_white);
var pos = application_get_position();
if pos[0] > 0
{
var ratio = window_get_width() / window_get_height();
display_set_gui_size((view_hview[0] * 1.5) * ratio, (view_hview[0] * 1.5));
}
else
{
var ratio = window_get_height() / window_get_width()
display_set_gui_size((view_wview * 1.5), (view_wview[0] * 1.5) * ratio);
}
var gui_w = display_get_gui_width();
var gui_h = display_get_gui_height();
switch(os_type)
{
case os_windows:
case os_macosx:
case os_linux:
case os_win8native:
var win_w = window_get_width();
var win_h = window_get_height();
break;
case os_android:
case os_ios:
case os_winphone:
case os_tizen:
var win_w = display_get_width();
var win_h = display_get_height();
break;
}This code sets up the appropriate variables based on device type, and also sets the GUI layer to always be 1.5 times the size of the view. (Note that normally you would have a check in here to see if the screen has changed and only set the GUI layer if it has, but for this tutorial that isn’t necessary.)
var x1 = (pos[0] / win_w) * gui_w;
var x2 = (pos[2] / win_w) * gui_w;
var y1 = (pos[1] / win_h) * gui_h;
var y2 = (pos[3] / win_h) * gui_h;
if pos[0] > 0
{
draw_rectangle(0, 0, x1, gui_h, false);
draw_rectangle(x2, 0, gui_w, gui_h, false);
}
else
{
draw_rectangle(0, 0, gui_w, y1, false);
draw_rectangle(0, y2, gui_w, gui_h, false);
}This code draws white rectangles to cover the letterbox.
- Click the green check mark to save and close the code window.
If you test the game now, you should see white rectangles either on the top and bottom, or on the left and right, depending on how you size the window (see Figure 10-4). You can also change the Global Game Settings to landscape and portrait to see how that affects your game.
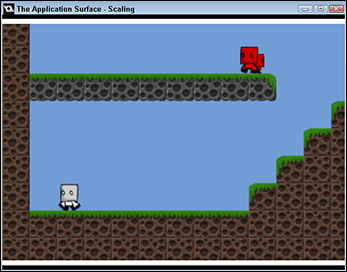
Figure 10-4: The white rectangles appear over the letterbox effect.
You’ll most likely still see some of the black bars from the letterbox effect. This shows that the white rectangles didn’t replace the letterbox effect; they just attempted to cover them up. Now, it’s up to you to go back and fine-tune the code to cover, say, 2 times the area instead of 1.5 times the area, to see what a difference that makes.
You don’t have to use white rectangles; you could use any color or even a Sprite. In the next section, I show you how to add Sprites to the GUI layer to create a HUD.
Placing GUI elements to create a heads-up display
This section shows you how to draw GUI elements directly over the application surface. These types of GUI elements typically include such things as the score, number of lives, virtual keys (see Chapter 13), and so on.
To do this, you need to continue from the preceding procedure. Basically, you’ll be using the interface values to place different items (score, lives, keys) around the GUI layer to create a heads-up display. A HUD is great for games in which the player needs to know certain information, such as how much health she has left, how much ammo she has, where she is on a map, how strong her shields are, and so on.
To get started, you have to create a new Sprite of your choosing, as described in Chapter 2. Name this Sprite, spr_Button. For the purposes of the tutorial, I created a green circle for the Sprite as indicated in the tutorial. The following procedure shows how to draw this Sprite in each corner of the application surface. In this way, you can create your own HUD. This same procedure could also work for drawing text or backgrounds.
The following procedure picks up from The_Application_Surface_Scaling tutorial.
- Double-click obj_Control from the Resource tree.
The Object Properties appear.
- Select the Draw GUI Event from the Events section.
The Actions for the Draw GUI Event appear in the Actions section.
- Double-click the Execute Code Action from the Actions section.
The code window appears.
- Add the following code after the existing code:
draw_sprite(spr_Button, 0, x1 + 32, y1 + 32);
draw_sprite(spr_Button, 0, x2 - 32, y1 + 32);
draw_sprite(spr_Button, 0, x1 + 32, y2 - 32);
draw_sprite(spr_Button, 0, x2 - 32, y2 - 32); - Click the green check mark to save and close the code window.
If you run the game now, you should see something similar to Figure 10-5.
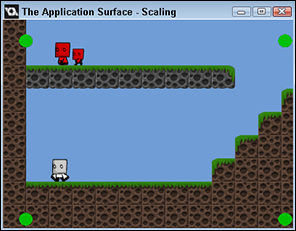
Figure 10-5: The Sprite appears in the four corners.
HTML5 Scaling
The beginning of this chapter covers resolution and scaling for desktop targets, which also works for the most part in the HTML5 target. However, you can fine-tune your code specifically for browser windows instead of desktops. The main differences are that the window is now referred to as a canvas element of the web page and the display becomes the width and height of the browser.
This section works in tandem with the in-software tutorial, HTML5_Scaling. You can find this tutorial from the New Project window on the Tutorials tab. From the tree on the left, open Intermediate and then select HTML5_Scaling. Over the next few procedures, you create your variables, write a Script, and then create a call to the Script that will scale the full Room to fit the browser window.
To create the variables, follow these steps:
- With the HTML5_Scaling tutorial open, from the Resource tree, in the Objects folder, double-click obj_HTML5_Scaling.
The Object Properties appear.
- Choose Add Event⇒Create.
The Create Event appears in the Events section.
- Drag and drop an Execute Code Action from the Control tab to the Actions section.
A code window appears.
- In the code window, type the following:
base_width = room_width;
base_height = room_height;
width = base_width;
height = base_height; - Click the green check mark.
The code window is saved and closed.
This code sets variables for the base width and height of the Room. The second set of variables will account for when the browser height and width change. The beginning value for the width and height variables equal the base width and height (this will change later with a Script you write next). You can leave the Object Properties open — you’ll come back to it later after you write the following Script.
To write a Script to scale for HTML5, follow these steps:
- From the Resource tree, right-click Scripts, and choose Create Script.
The Script code window appears.
- In the Name field, type scr_HTML5_Scale_Canvas.
- In the code window, type the following:
aspect = argument0 / argument1;
if argument2 / aspect > argument3
{
window_set_size(argument3 * aspect, argument3);
}
else
{
window_set_size(argument2, argument2 / aspect);
}
if argument4
{
window_center();
} - Click the green check mark.
The code window is saved and closed.
This code checks the size of the browser window and makes the necessary calculations to maintain aspect ratio (as discussed earlier in this chapter) and scaling if the player changes the size of the window. The last line of code centers the game within the browser, which is optional, and it doesn’t currently work with the Windows 8 (JS) target.
To call the Script, follow these steps:
- From the Object Properties for obj_HTML5_Scaling (which is probably still open from earlier), choose Add Event⇒Step⇒Step.
The Step Event appears in the Events section.
- Drag and drop an Execute Code Action from the Control tab to the Actions section.
A code window appears.
- In the code window, type the following:
if browser_width != width || browser_height != height
{
width = browser_width;
height = browser_height;
scr_HTML5_Scale_Canvas(base_width, base_height, width, height, true);
} - Click the green check mark.
The code window is saved and closed.
This code checks to see if the browser has changed size, and if so, runs the Script you wrote earlier to scale the canvas.
- Click OK from the Object Properties.
The Object Properties are saved and closed.
- From the icon menu, click the Target drop-down and select HTML5.
Now, when you test the game, GameMaker will generate code specifically for HTML5.
- From the main menu, choose Run⇒Run Normally.
The game should appear in a browser window. The game will scale and maintain the aspect ratio if you resize the window.
If you don’t want the canvas to scale to the full size of the browser, and you’d rather have it scale only to the maximum size of the game Room, you can make a small change to the code (as denoted in the bold text) you wrote for the Step Event as shown here:
if browser_width != width || browser_height != height
{
width = min(base_width, browser_width);
height = min(base_height, browser_height);
scr_HTML5_Scale_Canvas(base_width, base_height, width, height, true);
}
Now when you test the game, the player can size the browser window smaller than the game Room and the game will maintain aspect ratio and scaling. But the game won’t scale bigger than the dimensions set in the Room properties. If you make the browser window bigger than the Room size, the game will appear both horizontally and vertically centered in the window.