
Chapter 14
Saving and Loading
In This Chapter
![]() Making sense of the file system
Making sense of the file system
![]() Looking at the ins and outs of INI files and text files
Looking at the ins and outs of INI files and text files
![]() Enabling the player to save a game
Enabling the player to save a game
![]() Loading a saved game
Loading a saved game
![]() Mapping the gameplay keys and resetting the default
Mapping the gameplay keys and resetting the default
This chapter provides some basic information on how to add some functionality to your games that the player may find useful. This includes game options, such as turning the background music off or on. This type of functionality is performed using file functions within GameMaker and does require that you have some coding skills with the GameMaker Language (GML). With that said, I provide all the code that you need so that you can set up your game with some useful features for the player.
 This chapter is geared toward creating a game for the Windows target module. However, everything I discuss in this chapter works for all other platforms (with slight changes).
 This chapter is written in tandem with the Loading and Saving tutorial found within GameMaker. If you start with that tutorial, all the Objects, Sprites, Sounds, and so on come preloaded, which means you can focus on learning GML. I recommend that you play the game first to get an idea of what this tutorial comes preloaded with. Finally, don’t be surprised if some of the functionality doesn’t work — you’re going to fix that as you read through this chapter.
Understanding the File System
Saving and loading functionality — for everything from the player mapping keys to saving games to creating a saved leaderboard — relates to writing to and reading from external files. This chapter focuses on saving and loading game configurations.
The first term that you should learn is the sandbox. The sandbox is where GameMaker saves and loads files. These files are found within the game bundle (the files GameMaker makes) and the local storage (your hard drive). The player has to provide input for data to be saved or loaded.
The inputs discussed here relate only to the Windows target platform.
The sandbox is divided into the game bundle and the save area:
- The game bundle: All the files that are part of the executable game, including any files you added to the Included Files in the Resource tree. The Included Files are external files that you might package with the game. The player can’t write to the game bundle.
- The save area: Located on the player’s computer. The save area is where game data is written and saved, and can be loaded from later. The save area consists of reading and writing operations within the working_directory.
- Reading operations is used when the game wants to save data. GameMaker first checks to see if the file being accessed exists in the save area. If the file doesn’t exist, GameMaker searches the game bundle for the Included File.
- Writing operations can only happen in the save area.
 The sandbox is available on each target platform, but it behaves differently on each one. Don’t worry, though — GameMaker makes it easy to target your games to many different platforms. You can export the games you make with GameMaker to several different platforms:
- Windows: Windows saves all files in the %localappdata%Game Name directory (on Windows 7 this is the /Users/<User Name>/AppData/Local/Game Name directory).
- Mac OS: Storage depends on whether the application is sandboxed or not (following Apple’s rules).
- HTML5/Windows 8 (JS): Everything is done through the local storage.
- iOS: Storage is the standard location, as viewed through iTunes.
- Android: Files are in the standard location (which is invisible unless the device is rooted), /data/data/package name.
- Windows Phone: Files are in the same location as the app.
For Android, iOS, and Windows Phone, you must use the working_directory prefix to access stored files. Using just the relative path doesn’t work. In addition, the HTML5 and Windows 8 platforms have a limit on how much local storage (between 1 MB and 5 MB) you can use for your games. This means that you need to be cognizant of how large your Sprites and so forth are.
Understanding INI Files
You set up save game options through INI files, which are used by all Windows programs to store data (and are perfectly acceptable to use for all platforms). You can create an INI file by using a plain text editor such as Notepad, which comes standard with Windows. You then bundle that INI file into your game. I show you how to do that in this section.
You don’t have to include the INI files in your game bundle, but it’s considered best practice to do so. If you don’t bundle an INI file, then when the player tries to save a game option, an INI file is created automatically. However, the auto-generated INI file does not create any reset mechanisms. A reset mechanism enables the player to revert to the game defaults. For example, say that the player mapped B as the jump key, but then later realized that the default use of the spacebar served better for jumping. By providing a reset mechanism to the player (generally in the form of a button), she can revert back to the default game setting. Another important reason for creating your own INI files is that you take control of the format, and this enables players to save information from different localizations.
An example of an INI file for game options could look like this:
[Options]
music = 1
sound = 1
diff = 2
name = Anon
All INI files are broken up into sections. In this code block, you see the section for Options. Within this section are the keys (such as music, sound, diff, and name); each key has its own value (such as 1, 2, and Anon), which can either be a real (say, a number) or a string (a sequence of characters) data type.
If you open the Loading and Saving tutorial within GameMaker, and then look in the Resource tree under Included Files, you see Save.ini. You can open this file by double-clicking on it, which opens Notepad and you should see Figure 14-1.
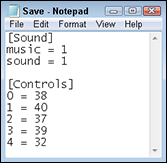
Figure 14-1: The INI file from the Saving and Loading tutorial.
When you’re creating your own INI file in Notepad, be sure to save it as *.ini and not *.txt.
To save a TXT file as an INI file with Notepad, follow these steps:
- From within Notepad, choose File⇒Save As.
The Save As dialog box appears.
- In the File Name field, change the suffix from.txt to.ini.
- Click the Save As Type drop-down and choose All Files.
- From the Encoding drop-down list, choose UTF-8 (as shown in Figure 14-2).
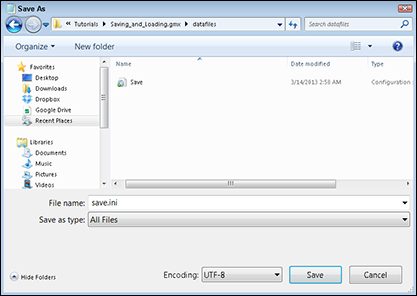
Figure 14-2: The Save As dialog box.
Make sure to save your INI file as UTF-8 from the Encoding drop-down. This will save your game from errors when players from places other than the United States or the United Kingdom try to save data.
 During the game, when the player chooses the different options, it’s the INI file that’s copied over to the player’s local storage (the save area as discussed earlier in this chapter). The base file — the INI file that you saved in the Included Files and is part of the game bundle — won’t be overwritten; instead, the player’s choices are saved on the local computer. This follows the sandboxing rules mentioned earlier.
Using Real Values to Save Game Options
In this section, I show you how to create a couple buttons that the player can use to toggle the background music or the sound effects off or on. To do this, you update code blocks in three different files. Two of these code blocks are found within the Objects that were made for the background music and the sound effects. The third block of code is found in the Scripts section of the Resource tree (assuming you’re working from the in-software Saving and Loading tutorial).
The following procedures show you how to create code using real values (numbers) that GameMaker uses to determine if the player has selected the sound effects and background music to be off or on (to play or not to play, that is the toggle). In the next section, I show you how to use strings (characters or numbers) so that the player can save his name.
Making a button for the background music
If you haven’t done so already, go ahead and open the Saving and Loading tutorial that comes with GameMaker. Run the game and take note of the buttons for toggling the sound effects, as shown in Figure 14-3.
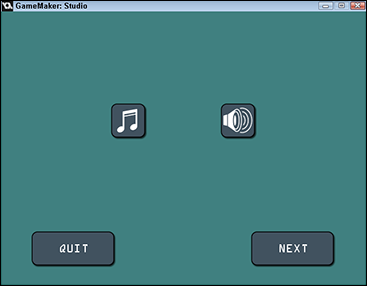
Figure 14-3: The sound options buttons in the Saving and Loading tutorial.
If you click those buttons now, you see them push in, so to speak, but they don’t actually do anything. To get them to work, follow the next procedure.
To make the musical note button work, follow these steps:
- From the New Project window, select the Tutorials tab.
- Select the Saving and Loading Tutorial under Intermediate in the left-side column.
The Saving and Loading Project window appears.
- From the Resource tree, in the Objects section, click to open the Start Room folder.
The contents of the Start Room folder appear.
- Double-click obj_Music_Button.
The Object Properties window appears.
- Select the Step Event from the Events section, as shown in Figure 14-4.
The Actions for the Step Event appear in the Actions section.
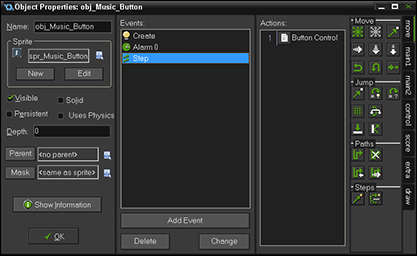
Figure 14-4: Select the Step Event.
- From the Actions section, double-click Button Control (refer to Figure 14-4).
Button Control is an Execute Code Action that was named by using a comment with three backslashes (see Figure 14-5).
The code window appears. You can use the code window as a code editor to edit, write, and delete code.
The code shown in Figure 14-5 checks for when the player presses the mouse button over the music button in the game. (See Chapter 11 for information on the color coding in the code window.)
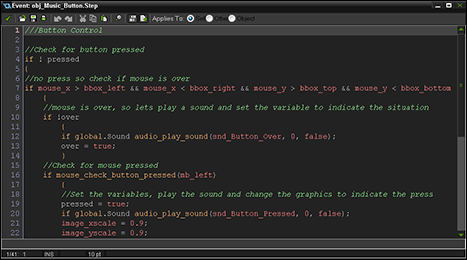
Figure 14-5: The code window for the Button Control Execute Code Action.
- Place the cursor after the alarm[0] = room_speed / 4; (line 24), press Enter, and type the following code (see Figure 14-6):
//Check the ini file and write the changes
ini_open("Save.ini");
global.Music = !global.Music
ini_write_real("Sound", "music", global.Music);
if global.Music audio_play_music(snd_Music, true) else audio_stop_music();
ini_close();
}
}The code window should now look like Figure 14-6.
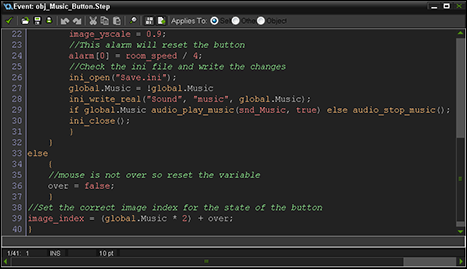
Figure 14-6: The code window for obj_Music_Button in the Step Event.
- Click the green check mark from the icon menu.
The code window is saved and closed.
This code does a few things. When the player presses the button, the global controller variable is toggled between true or false (on or off). The next line checks the value and then either starts or stops the music. From there, the Save.ini file is opened, then the new value is written, and then the INI file is closed. If you’ve been following this chapter from the beginning, you should already be familiar with the Save.ini file that came preloaded with this tutorial.
You should always make sure that any ini_open() function is followed by ini_close(). Failure to close the INI file will cause errors during gameplay when the player tries to make changes to the game settings later on.
Now you need for the game to check the saved values to see whether the music should play. I’m also going to show you how to check the saved values for the sound effects button (this will save you the trouble of coming back later and updating the code a second time).
To check the saved value, follow these steps:
- From the Resource tree, under Scripts, double-click scr_Init_Globals.
The script window appears.
- Update the code to reflect Figure 14-7.
You won’t have to type in all this, but check it line-for-line to see the differences. Don’t forget to add in lines 19 and 20 to close the INI file.
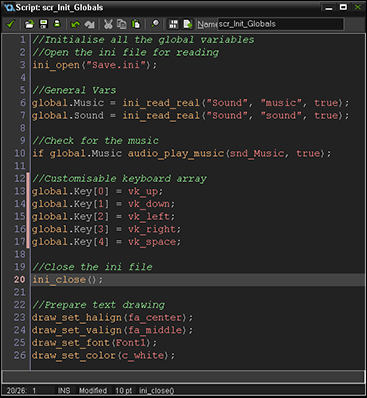
Figure 14-7: The script window for scr_Init_Globals.
- Click the green check mark from the icon menu.
The script window is saved and closed.
Now you can save and run the tutorial to see if you wrote the code correctly. If you did, when you click the musical note button, the background music should stop playing and the icon on the button should change. If you click the button again, the music should start playing, and you see the musical note icon again. If you click Quit to close the game, and then run the game again, your last option should have been saved. (If you Quit the game with the music playing, it should be playing when you restart; if you Quit the game with the music turned off, then it should still be off when you start the game again).
Making a button for the sound effects
Now, it’s time to take what you just learned and apply it to the second button, which toggles the sound effects in the game. In the following procedure, you update the obj_Sound_button Object from the Saving and Loading tutorial.
To make the sound effects button work, follow these steps:
- With the Saving and Loading tutorial open, from the Resource tree, in the Objects section, click to open the Start Room folder and then click obj_Sound_Button.
The Object Properties window appears.
- Select the Step Event from the Events section.
The Actions for the Step Event appear in the Actions section.
- Double-click Button Control from the Actions section.
This opens the code window for the Execute Code Action.
- Find the section of code that checks for when the mouse button is pressed.
That code starts at line 15 with the comment, //Check for mouse pressed.
- Type in the following code so that it reflects Figure 14-8.
//Check the ini file and write the changes
ini_open("Save.ini");
global.Sound = !global.Sound
ini_write_real("Sound", "sound", global.Sound);
ini_close();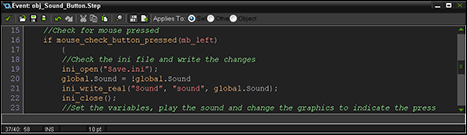
Figure 14-8: The code window for the Sound Button Step Event.
- Click the green check mark.
The code window is saved and closed.
If you were following along from the last section, you’ve already updated the Init_Globals script. If not, go back and follow the procedure before this one.
If you run the game now, both the music and sound effect buttons should work. When you click the background music or the sound effect button off or on, the icon on the button changes, indicating that the sound is either off or on. When you close the game and reopen it, your last options should be saved.
Using String Values to Save Game Options
In the previous section, I show you how to save game options using real values, which works well if you want to toggle options off or on. In this section, I show you how to write code so that the player can save his name within the game. This is useful if you want to create a saved leaderboard so that different players can compare scores. This can lead to competition and people wanting to play your game more and more to get better and better and to score higher and higher!
To create code that enables the player to save his name, follow these steps:
- With the Saving and Loading tutorial open, from the Resource tree, in the Objects section, click to open the Name Room folder and then click obj_Name_Control.
The Object Properties window appears.
- Select the Create Event from the Events section.
The Actions for the Create Event appear in the Actions section.
- Double-click the Execute Code Action from the Actions section.
The code window appears.
- Type in the following code at line 12, as shown in Figure 14-9.
//Get any stored name
ini_open("Save.ini");
keyboard_string = ini_read_string("Player", "Name", "Anon");
ini_close();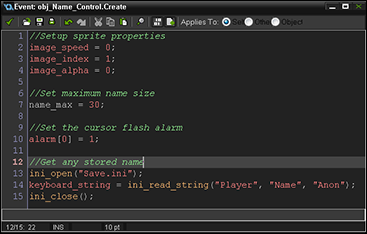
Figure 14-9: The code window for the Create Event.
- Click the green check mark.
The code window is saved and closed.
This code opens the Save.ini file, checks for a name, and if there is none, returns the value of Anon. After you complete the procedure, when you run the game and click Next, you should now see Anon in the name (see Figure 14-10). To test this, go back and edit the code, but replace Anon with, say, Mike. Now when you run the game, the default name is Mike.
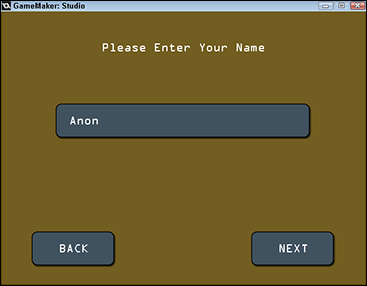
Figure 14-10: Update the code to show Anon as the default name.
Now you need to add some code to save the name the player types in.
To save the player’s name, follow these steps:
- With obj_Name_Control still open, click Add Event⇒Other⇒Room End.
The Room End Event appears in the Events section.
- Drag and drop an Execute Code Action from the Control tab to the Actions section.
A code window appears.
- Type in the following code so that the player’s name is saved when she leaves that room (for example, clicks Back or Next), as shown in Figure 14-11.
//Save the name data
ini_open("Save.ini");
if keyboard_string !=""
{
//Write the name
ini_write_string("Player", "Name", keyboard_string);
}
else
{
//No name has been given, so write “Anon”
ini_write_string("Player", "Name", "Anon");
}
ini_close();If the player does not type in a name, GameMaker uses “Anon” as the player’s name.

Figure 14-11: The Room End Event code.
- Click the green check mark.
The code window is saved and closed.
Test the game now and type in your name. Try clicking Back and Next and see if your name stays. If you close the game and reopen it, your name should still appear.
You must pair your read and write code correctly, or else you’ll get an error during gameplay. If you mix and match your string values with real values (say, you use ini_read_real() with ini_write_string()), you’ll create an error).
Mapping the Gameplay Keys
In this section, I show you how to update existing code that enables the player to remap keys that are used in the game. Some players may prefer to use W, A, and D to move the character on the screen and some players may prefer the arrow keys. With this code, the player can assign whichever keys they want for the gameplay. This input is also saved to the INI file that you used earlier.
The Saving and Loading tutorial uses a parent button that controls everything. The following procedure shows you how to update the obj_Key_Parent to save the player’s choices.
To update the Alarm Event to save mapped keys, follow these steps:
- With the Saving and Loading tutorial open, from the Resource tree, click to open the Objects folder, click to open the Options Room folder, and then click obj_Key_Parent.
The Object Properties window appears.
- Select the Alarm 0 Event from the Events section.
The Actions for the Alarm 0 Event appear in the Actions section.
- Double-click the Execute Code Action in the Actions section.
The code window appears.
- Scroll down to line 33, click to insert your cursor at the beginning of the line and press Enter to start a new line, and type the following code (as shown in Figure 14-12):
ini_open("Save.ini");
ini_write_real("Controls", string(keynum), global.Key[keynum]);
ini_close();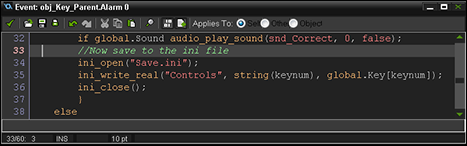
Figure 14-12: The code window for the Alarm 0 Event.
- Click the green check mark.
The code window is saved and closed.
In this code, you’re assigning a number (hence, the real value and not a string value) to the key the player chooses. The key can be a letter, a symbol, or a function key, because a number is assigned to each key on the keyboard.
Now, I’ll show you how to load the keys that the player assigns. You do this by updating the scr_Init_Globals script. To update the script for loading mapped keys, follow these steps:
- With the Saving and Loading tutorial open, from the Resource tree, in Scripts, double-click scr_Init_Globals.
The script window appears.
- Scroll down to line 19 (or so) and type in the following code (see Figure 14-13):
ini_open("Save.ini")
global.Key[0] = ini_read_real("Controls", "0", vk_up);
global.Key[1] = ini_read_real("Controls", "1", vk_down);
global.Key[2] = ini_read_real("Controls", "2", vk_left);
global.Key[3] = ini_read_real("Controls", "3", vk_right);
global.Key[4] = ini_read_real("Controls", "4", vk_space);
ini_close()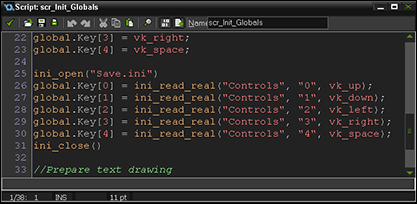
Figure 14-13: The script window for scr_Init_Globals.
- Click the green check mark.
The script window is saved and closed.
With this procedure complete, the player can now remap the game controls and they’ll be saved for later use.
Now it’s a good idea to fix the functionality of the Reset Keys button. I show you how to do that in the next section.
Resetting the Default Keys
At this point in the tutorial, the player has the ability to remap the game keys, but the Reset Keys button doesn’t do anything. In the next procedure, I show you how to make the Reset Keys button work.
While working in this section, keep in mind the difference between the game bundle files and the saved area files. The game bundle files are never written to; instead, they’re copied to the player’s local machine and that copy of the file is written to. That creates a player-specific file in the local storage (saved area), and that’s the file GameMaker reads and writes to. At that point, there are two versions of the file: one with the default values in the game bundle and one with player-specific values in the saved area.
When the saved area file is removed, GameMaker can no longer find it to use the saved values. In that case, GameMaker reverts back to using the game bundle file. In that way, the player can revert to the default values.
To make the Reset Keys button work, follow these steps:
- With the Saving and Loading tutorial open, from the Resource tree, click to open the Objects folder, click to open the Options Room folder, and then click obj_Key_Reset.
The Object Properties window appears.
- Select the Step Event from the Events section.
The Actions for the Step Event appear in the Actions section.
- Double-click the Execute Code Action from the Actions section.
The code window appears.
- Insert the cursor at line 25 and type in the following code directly after alarm[0] = room_speed /4, as shown in Figure 14-14:
file_delete("Save.ini");
ini_open("Save.ini");
var i;
for (i = 0; i < 5; i += 1)
{
global.Key[i] = ini_read_real("Controls", string(i), -1);
}
with (obj_Key_Parent)
{
keyname = scr_Key_Remap(global.Key[keynum]);
}
ini_write_real("Sounds", "sound", global.Sound);
ini_write_real("Sounds", "music", global.Music);
ini_close(); - Click the green check mark.
The code window is saved and closed.
Now, when the player clicks the Reset Keys button, the default keys should reappear. Figure 14-15 shows a before and after of the mapped keys. Also, if you click the Back button, you should notice the name reset to Anon. Finally, the music options won’t change, but if you close and reopen the game, the music options will default back to being on.
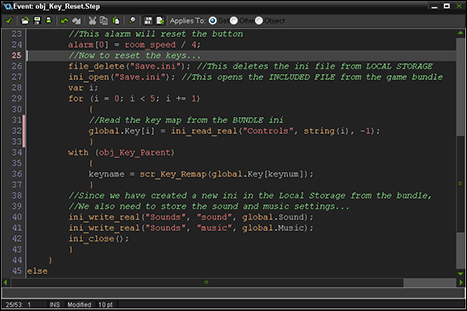
Figure 14-14: The code for the Step Event.
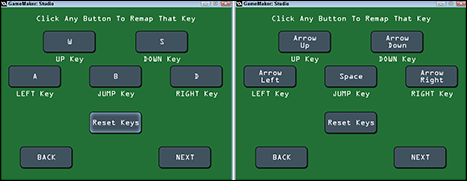
Figure 14-15: Remapped keys (left) and the default values after clicking Reset Keys (right).
If you’re not a developer by profession, you may be wondering what this code does. The first part, and probably the most obvious, is that you tell GameMaker to delete the saved INI file on the local storage. From there, GameMaker opens the INI file from the game bundle, and it uses the global key array for the default values. Next, the script is run to show the default values for the keys. Finally, GameMaker writes the current values for the sound as the INI file is rewritten and placed in the saved area (local storage) once again.