
Chapter 3
Creating Events
In This Chapter
![]() Creating and destroying Objects
Creating and destroying Objects
![]() Setting Alarms
Setting Alarms
![]() Using Steps
Using Steps
![]() Making Instances collide
Making Instances collide
![]() Using keyboard and mouse controls
Using keyboard and mouse controls
![]() Drawing to the screen
Drawing to the screen
![]() Enhancing your game with other Events
Enhancing your game with other Events
In this chapter, I cover each of the Events you can use within GameMaker: Studio. If you think of Objects, Events, and Actions in terms of English grammar, then the Objects are the subjects, the Events are the object (so to speak, just work with me here), and the Actions are the verbs. In that sense, the Objects are the things in the game (such as the player’s plane), the Events are what is acted upon (such as creating the plane), and the Actions make the magic happen (such as making the plane fly).
How to Add an Event to an Object
There are 12 different Events that you can use in GameMaker, as shown in Figure 3-1.
To add an Event to a new Object, follow these steps:
- From the main menu, choose Resources⇒Create Object.
The Object Properties window appears.
- Click the Add Event button, shown in Figure 3-2.
The Events menu appears.
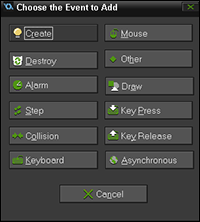
Figure 3-1: GameMaker Events.
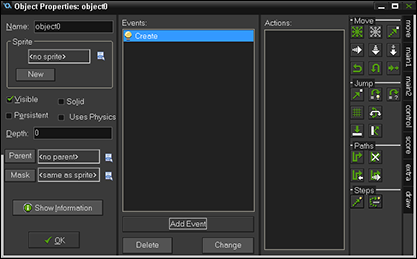
Figure 3-2: To open the Events menu, click Add Event.
- Select the Event that you want to use (that’s what the remainder of this chapter is about).
The name of the Event you chose appears in the Events section of the Object Properties window.
By the way, after you add an Event to the Object, you need to assign Actions to that Event. Chapter 4 is all about Actions.
The Create Event
The Create Event triggers an assigned Action that you want to happen at the start of the game or when the player enters a new Room. The Create Event is best used for initializing variables, starting Time Lines, setting paths, and so on. These are the types of Actions that you want to happen at the start of the game, or when an Instance first appears in the game, and you only need them done once.
You can also use the Create Event to provide an Object with an initial speed for when the Instance appears in the Room. This is useful if you make a game in which a plane flies continuously upward.
Another use for the Create Event is for when a bullet is fired. In that case, when the player presses the spacebar to shoot, that triggers a Create Instance Action (this is an Action, not an Event), which triggers the creation of the bullet Object, then within that bullet Object, is a Create Event. That Create Event is triggered when an Instance of that Object appears in the Room (when the player shoots a bullet) and the speed, sound, and movement Actions are triggered. Figure 3-3 shows the Create Event with the Actions for the bullet Object. Remember, all of these Actions happen when the Instance first appears in the Room.
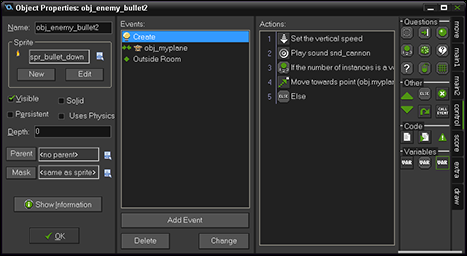
Figure 3-3: Use the Create Event to cause Actions to happen when the Object appears in the Room.
The Destroy Event
Use the Destroy Event when you no longer want an Instance in the Room — say, when an enemy gets blown up. You can use the Destroy Event to trigger an explosion, increase the player’s score, or re-create a new Instance of the Object (or all three). Figure 3-4 shows an Object with a Destroy Event with a Set Score Action. This obviously isn’t a fully configured enemy Object — you would want the Destroy Event to be the last, and certainly not the only, Event.
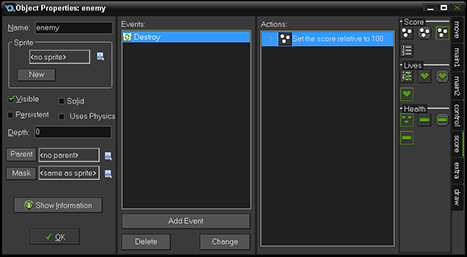
Figure 3-4: Use the Destroy Event to increase the player’s score.
The Alarm Event
You can add up to 12 Alarms for each Instance in the Room. Alarms are excellent for when you want to time Actions. For example, if you want the player to only shoot bullets once every two seconds, you can set an Alarm for that. If you want to time when new enemy planes appear, you can set an Alarm for that as well.
To get an Alarm to work, you must first set an Alarm Action to trigger the Alarm Event after a countdown that you set. In that way, Alarms enable you to time when events happen in your game.
 Timelines are another great way to time events in your game. To see how to use Timelines, see Chapter 6.
When you choose the Alarm Event from the Event menu, a new submenu opens. From that submenu, you can choose the Alarm you want to configure and add Actions to (see Figure 3-5).
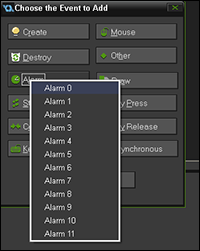
Figure 3-5: You can have up to 12 Alarms for each Instance.
 An Instance is an Object that you’ve placed in the Room. You can place more than one Instance of an Object in a Room, so you can have multiple Instances of the same Object in your game.
The Step Event
Step Events are great for when you want something to continuously happen, or you want something continuously checked for each step of the game. GameMaker tells time by steps, which is defined by the Room Speed (see Chapter 2), which sets how many steps are performed each second.
An example of using a Step Event is to determine if certain Instances have left the Room, and if so, to reappear at the top of the Room. As GameMaker needs to continuously check to see if the Instance left the Room, a Step Event comes in very handy to use.
When you click Step from the Event menu, a submenu appears giving you three options, as shown in Figure 3-6:
- Step: This will probably work best for you 90 percent of the time.
- Begin Step: This option is useful when you absolutely need the Step Event to be the first Event checked, no matter what, every time.
 GameMaker updates all built-in variables between the Step and End Step. So, if you want something to happen after the variables have been updated, then choose End Step. If you want something to happen before the variables are updated, then choose Begin Step.
 - End Step: This option is just like Begin Step, except it’s for when you absolutely need this Step Event to be checked last, every single time.
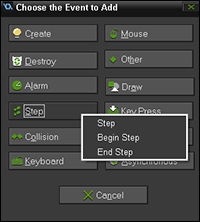
Figure 3-6: Your Step Event options.
The Collision Event
If your game has Instances flying every which way and collisions are inevitable, then you may be using a lot of Collision Events. These Events are great for when you want something to happen when two Instances collide — such as when a bullet Instance hits a plane Instance or, more simply, when a player Instance hits a wall Instance and you want the player to bounce off the wall (see Chapter 2).
Masks are important to Collision Events because this is how GameMaker determines where the actual collision takes place. (See Chapter 2.)
The Mouse Event
Mouse Events can be as simple as assigning the left button to fire, but there is a large submenu of Events that you can choose from (see Figure 3-7). Figure 3-7 also shows the tertiary menu for Global mouse. In this way, GameMaker provides you great control over how you want the mouse to behave in your game. After you choose which Mouse Event you want to use, you can add Actions to that event or even your own code.
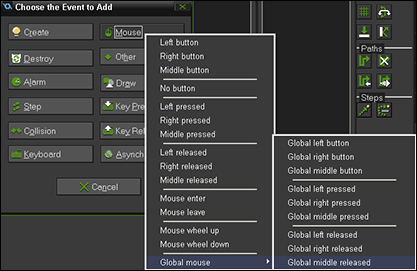
Figure 3-7: The many options for the Mouse Event.
The Other Event
Ah, the Others. Those not deemed worthy of their own place on the Event menu. I kid. These Other Events can be kinda awesome. The menu items (shown in Figure 3-8) are pretty much self-explanatory, so I won’t go into detail on them. For full descriptions of each of these items, you can always press F1 within the GameMaker and search for Events.
The Other Events are
- Outside Room: The Event is triggered when the Instance leaves the Room.
- Intersect Boundary: The Event is triggered when the Instance touches the inside edge of the Room.
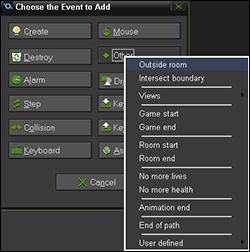
Figure 3-8: The Other Events you can use.
- Views: This option has a submenu from which you can choose Outside View or Intersect Boundary. The Views here correlate with the Views in the Room. (For more on Views, see Chapter 5.)
- Game Start: This Event is triggered only once during the game. The Game Start Event is triggered after the Create Event of all other Instances. You can use this Event in controller Objects to start music and initialize global variables and other Actions that you want to happen at the start of the game.
- Game End: This Event is also triggered only once during the game. It really works only with Windows, Ubuntu (Linux), and Mac OS — it doesn’t work well on all mobile devices.
- Room Start and Room End: These Events are triggered when a Room starts or ends.
- No More Lives: GameMaker uses global variables, and Lives is one of them. This Event is triggered when the player runs out of lives and is typically set up to restart a Room or end the game.
- No More Health: Health is another global variable. You can use this Event to decrease the number of player’s lives when the player’s health is depleted.
- Animation End: This Event works with Sprites and sub-images (see Chapter 2). Basically, this Event is triggered when all the sub-images of a Sprite are finished playing. A good example for an Action for an Animation End Event would be for an explosion Sprite to destroy itself when it’s done playing.
- End of Path: If you use Paths in your game, this Event could be useful for when an Instance reaches the end of the Path.
- User Defined Event: This Event is triggered by code that you write through an Execute Code Action. This Event also works with all the Actions.
The Draw Event
Use the Draw Event when you want to display something during the game. The Draw Event does have its own submenu, as shown in Figure 3-9.
If you use a Draw Event, GameMaker no longer defaults to the assigned Sprite, and instead you have to tell GameMaker what to draw.

Figure 3-9: The Draw Event submenu.
The different options from the submenu include
- Draw: The standard Draw Event should be sufficient for most of your needs. The Draw Event enables you to place code or Actions for an Object, and those Actions and code override the default draw, which would be the assigned Sprite. This is useful, for example, if you want to replace the assigned Sprite with text to display a message. This Event is called once per View, while the other Draw Events are drawn each step of the game.
All Objects with an assigned Sprite with Visible toggled on (from the Object Properties window, as shown in Figure 3-10) automatically trigger a default Draw Event every step of the game. GameMaker does this for you, which is nice, because you don’t have to assign a Draw Event for each Object with an assigned Sprite to have it appear in the game.
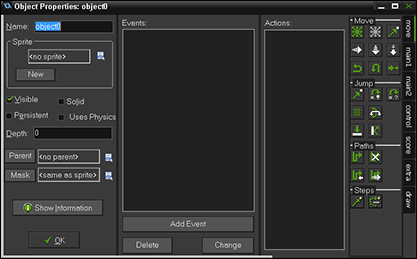
Figure 3-10: Select the Visible check box to automatically trigger a default Draw Event.
- Draw GUI, Draw GUI Begin, and Draw GUI End: GUI is an acronym for graphical user interface. The GUI is not affected by the View scale or rotation. Instead, the GUI is drawn on a separate layer than, say, the background. A Draw GUI Event is great for creating a heads-up display (HUD), which can show a player’s health, ammo, weapon type, a mini map, and so on. As with the other Begin and End Events, the Draw GUI Begin and Draw GUI End Events determine the order of what’s drawn.
- Draw Begin and Draw End: These two Events do exactly as they say: They make sure that something is drawn in the game either before or after the standard Draw Event. Using these Events is a great way to make sure items are drawn in the order you want them to appear.
The Draw Begin, Draw, and Draw End Events all run before the Draw GUI Events and between the PreDraw and PostDraw Events. This has significant meaning in that all these Events are drawn beneath the Draw GUI Event, no matter what the Depth (see Chapter 2) is set at.
- PreDraw and PostDraw: The PreDraw and PostDraw Events are drawn directly to the screen buffer, which is the combined screen space for all Views currently visible, or the window size if you don’t use Views. The PreDraw Event is triggered before any other Draw Events, which means you can use it to set values, set draw properties, and, of course, draw things. The PostDraw Event runs after the other Draw Events but before the Draw GUI Event.
You need to deselect the Clear Background with Window Colour check box in the Room editor for PreDraw and PostDraw Events to work. Figure 3-11 shows where to deselect this feature (the default setting has it selected). You also need to make sure that a background color is not drawn; you do this on the Background tab (see Chapter 2 for additional information).
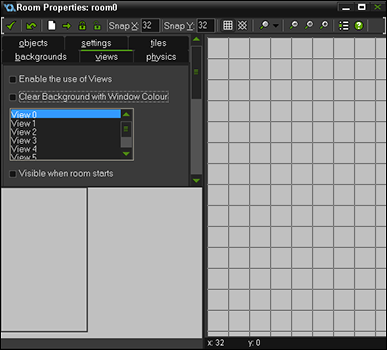
Figure 3-11: Do not select Clear Background with Window Colour for PreDraw and PostDraw Events.
If you turn off the View Clearing and disable drawing a background color, you might experience trails (leftover traces of images) during gameplay. These trails happen because now you’re drawing directly over the previous frame without it being cleared. You can use code to help solve this potential problem, which is draw_clear_alpha. You can place this code in an Execute Code Action within the PreDraw or PostDraw Event. - Resize: The Resize Event is used specifically for Windows 8 games and doesn’t actually draw anything in the game. Instead, the Resize Event is to help snap the game window when the player moves that window to the side of the screen. If you’re familiar with working in a Microsoft Windows environment, you’re aware that if you’re working in a window and you drag the top of the window to the top of your screen, Windows will snap the bottom of the window to the bottom of the screen. This Event is triggered every time the player resizes or moves the game window.
The Key Events
When you click Add Event, you may notice there are three different options for the keyboard: Keyboard, Key Press, and Key Release. Use the Key Press and Key Release Events to trigger an Action once each time an assigned key is pressed or released. The Keyboard Event is good for when the player needs to press the key continuously, such as for moving an Instance across the Room.
Each of the Key Events has a submenu, as shown in Figure 3-12, from which you can assign a key for the Action. Use <Left>, <Right>, and so on for the arrow keys on the keyboard.
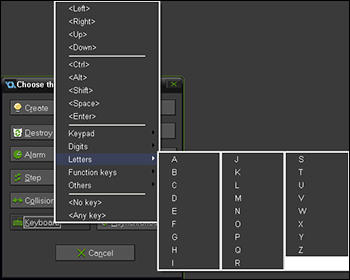
Figure 3-12: The Keyboard has many options to fit your many needs.
The Keypad, Digits, Letters, Function keys, and Others have a tertiary menu. Figure 3-12 shows the third-level submenu for Letters — say, if you want to assign W for moving up, A for moving left, D for moving right, and so on (as opposed to using the arrow keys).
Most of the keys are pretty obvious, except for No Key and Any Key. These Events check for when the player doesn’t press a key at all or presses any key on the keyboard.
Also note that the keys for the numeric keypad only work if the player has NumLock toggled.
The Asynchronous Event
The Asynchronous Event is triggered at the end of another Action, such as the loading of a file or a reply from a web server. This Event also has a submenu, as shown in Figure 3-13.
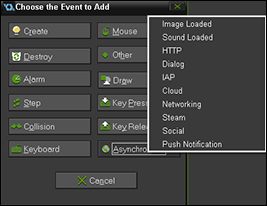
Figure 3-13: The Asynchronous Event triggers after another Action finishes.
Asynchronous Events are triggered by functions that need to receive data from a source at an unknown time in the future. This Event is best used for seasoned game developers who are creating complex online games.
In the following chapter, I go into detail on all the Actions that you can assign to Events.