Chapter 1
Introducing GameMaker: Studio
In This Chapter
![]() Coding without coding using Actions
Coding without coding using Actions
![]() Coding by coding with GameMaker Language
Coding by coding with GameMaker Language
![]() Getting your game into players’ hands
Getting your game into players’ hands
![]() Identifying the major features of GameMaker: Studio
Identifying the major features of GameMaker: Studio
![]() Looking at the main steps of creating a game
Looking at the main steps of creating a game
GameMaker: Studio software, from YoYo Games, is a game development tool that enables you to make video games. At the Game Developers Conference (GDC), I had an opportunity to meet with key players from YoYo Games. I saw firsthand the level of excitement this team from Dundee, Scotland has. It’s as if each of them embodied the spirit of a magical dragon, circling high overhead a misty mountaintop, ready to breathe down green flames of magical energy to level up all game developers with enhanced game-making attributes.
All game developers can benefit from GameMaker: Studio. Whether you’re a professional developer looking to enter the videogame community, or a university student interested in breaking into the videogame field, or a 10-year-old with no coding experience at all, GameMaker: Studio has the tools you need to make your vision a reality.
Dragging and Dropping Your Way to Making a Game
You can make games with GameMaker: Studio without knowing code! That’s because GameMaker uses the drag-and-drop Actions (see Chapter 4). You use Actions to tell GameMaker how, what, when, and where you want something to happen during your game. When you create an Action, GameMaker creates the code for you in the background. For example, say you create an Action so that when the player presses the spacebar, she shoots bullets from her plane. When you make that Action, GameMaker creates the code that causes the plane to shoot a bullet when the player presses the spacebar. In that way, using the drag-and-drop Actions enables the non-developer to develop code.
The drag-and-drop Actions are also good for developers who do know how to code but want a quick and efficient way to write large blocks of code. For example, a developer could sit down and write out the code by hand, which can be timely and can lead to typos and errors. Or, she can use the drag-and-drop Actions to create those same blocks of code, which can take seconds instead of hours.
Understanding the GameMaker Language
The drag-and-drop Actions provide a quick and easy way to create code. But you should start your game-making adventure with an open mind for learning how to code because, ultimately, it will benefit you and your games. Plus, by learning code, you gain a better appreciation for how the Actions work.
I’m not a developer, but I’m familiar enough with code that I can tweak existing code. Having this level of familiarity with how code works give you some background knowledge on what you’re doing when you drag and drop an Action.
Publishing Games to Different Platforms
As of this writing, you can install GameMaker: Studio on a PC or on a Mac with a Windows emulator, but that doesn’t mean you’re stuck making only games for Windows. Oh no, my friends, that’s far from the truth. When you’re ready to invest in the Professional or Master Collection version of GameMaker: Studio, you open yourself up to a world of platforms on which you can publish your game.
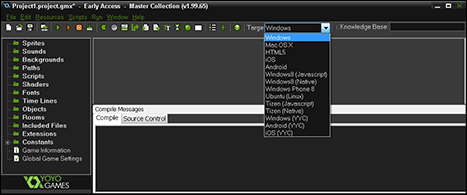
Figure 1-1 shows the drop-down list showing the different platforms to which you can target your game.

Figure 1-1: You have lots of options for where to publish your game.
If you don’t see your favorite platform on this list, it’s probably just a matter of time before it appears.
To publish a game to a specific platform, follow these steps:
- From the icon menu, click the Target drop-down list (refer to Figure 1-1).
The Target options appear.
- Choose the platform you want to play your game on (for example, HTML5, if you want to be able to play it in a browser, such as Chrome or Firefox).
The chosen platform appears in the Target field.
- Choose File⇒Create Application.
A navigation window opens, allowing you to choose where to save the files. GameMaker names the file for you.
- Navigate to where you want to save the files, and then click Save.
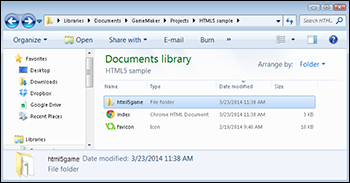
GameMaker saves the appropriate files for the platform you chose, as shown in Figure 1-2.

Figure 1-2: The saved game folder structure and files for HTML5 games.
Now you can take these saved games files and folders and use them to upload to a website, which is great for HTML5 games. I use FTP software such as FileZilla (https://filezilla-project.org) to do that.
Highlighting the Key Features of GameMaker: Studio
GameMaker: Studio is so feature-rich, with such a multitude of tools, that I could write ten books on the subject! This book is excellent for those who want to learn what an Object is, and how Objects relate to Instances, and how you can assign Events and Actions to Objects to make them do things, like create a flower blossoming into a beautiful display of color, and then have the player blow it all up. You know, fun stuff like that. Objects and Actions are covered in detail in Chapters 3 and 4, respectively.
The interface for GameMaker: Studio is based on a series of windows. When you first open the software, you see a New Project window, from which you can do several things, such as open a tutorial, a demo, or a saved project, or start an entirely new project. When you start working on a project, the main window appears with a Resource tree, main menu, icon menu, and compile window. (I go into detail on each of these in Chapter 2.)
Another critical feature of GameMaker: Studio is the robust coding window, complete with color coding to highlight text. I discuss this in detail in Chapter 11. YoYo Games is planning an upgrade to this code window so that it supports tabs. This feature is not available as of this writing, but it should be out by the time you’re reading this book.
Creating a Game, Step by Step
The steps I take to create a game are the same approach I use for most any creative project. First, you have to plan. Then you have to plan some more.
Here’s a quick list of action items I take before creating a game:
- Create an outline of the game, complete with objectives, characters, and game type.
- Think about how each level of the game will play.
Too often, developers create an awesome first and second level, only to run out of ideas for consecutive levels.
- Gather your assets, including images for Sprites, text, and any other resources you need for your game, such as music and sound effects.
- As you create your game based on your outline, start testing each new aspect.
- Test the game some more.
- Finally, test your game.
Seriously. You can’t test enough.

 If you’re a professional developer, and you want to write specific code for your own specific means, then GameMaker: Studio features a code-editing tool that most professional game developers should appreciate. Part
  If you’re wondering why you don’t see PS4 or Vita in Figure