
Chapter 4
Adding Actions to Events
In This Chapter
![]() Assigning an Action to an Object
Assigning an Action to an Object
![]() Giving an Object something to do
Giving an Object something to do
![]() Making your Object move
Making your Object move
![]() Keeping score and more
Keeping score and more
In this chapter, I discuss each of the Actions that you can assign to Objects. You can think of Actions as the verb in a sentence: They tell the Objects what to do, when to do it, and how to do it. Actions are what causes a clown to bounce off the wall, or a plane to shoot a bullet, or an asteroid to split into pieces. By using Actions, you save yourself from having to write the code yourself. I love Actions because I’m not great with writing my own code, and Actions provide an easier and quicker way for me (and you) to create a game.
 If you want to write the code yourself, you can do that, but you still need to assign an Execute Code Action to an Event (see Chapter 3) within the Object. Then you add your code to the Execute Code Action.
How to Assign an Action to an Object
Here’s a quick, top-level procedure on how to assign an Action to an Object:
- From the main menu, choose Resources⇒Create Object.
The Object Properties window appears.
- Choose Add an Event from near the bottom-middle of the Object Properties window (see Chapter 3).
The Events menu appears.
- Choose an Event, such as Create.
The Create Event appears in the Create section of the Object Properties window.
- From the right side of the Object Properties window, drag and drop an Action icon — say, the Move Fixed Action — from the Move tab into the Actions section (see Figure 4-1).
The properties for the Action that you dragged and dropped appear.
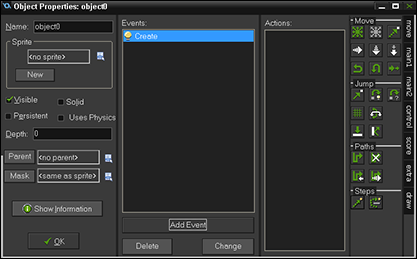
Figure 4-1: Drag and drop Actions from the Move tab to the Actions section.
The remainder of this chapter focuses on the different tabs that contain the Actions and tells you what you can do with each Action.
Move Actions
The Move tab is the first tab in the Object Properties window. It consists of four different sections: Move, Jump, Paths, and Steps (as shown in Figure 4-2).
Move Directional Actions
 In the following definitions, I use the term Instance to refer to what the Action is affecting. However, you configure the Action in the Object Properties window. Remember that an Instance is simply an Object that you’ve placed in the Room.
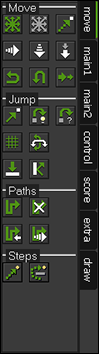
Figure 4-2: The Move tab.
The Move directional arrows apply to the movement, direction, and position of an Instance. They include the following Actions (see Figure 4-3):
- Move Fixed: This action starts an Instance moving in a specified or random direction. Also, it includes the speed you want the Instance to move, which is based on pixels per step.
- Move Free: Use this Action to have the Instance move at a specific angle between 0 and 360 degrees. If you use 0, the Instance moves to the right, a 90-degree angle moves the Instance up, and so on. You can also use random (360) to specify a random movement.
If you select Relative for this Action, any new motion is added to the current motion. Say the Instance is moving up, and then something happens during the game to cause the Instance to move left. If you select Relative, the Instance will start moving up and to the left.
- Move Towards: This action enables you to send an Instance toward another Instance. You can set the speed of the Instance and then use the coordinates of another Instance as the direction for it to move in. An example could be player.x, player.y (where player is the Instance you want your Instance moving toward). I have a great example of this in Chapter 5, in the section on shooting guided bullets in a Room with a View (but this will work even if you’re not using Views).
- Speed Horizontal and Speed Vertical: Use this Action to set the Speed of an Instance.
- Set Gravity: For gravity, you can set the direction you want the gravity to pull the Instance by using the degree of an angle. When you start to experiment, begin with a slow speed of say, 0.01. Gravity is cumulative, in that an Object will pick up speed, such as a boulder would do as it rolled down a mountainside.
- Reverse Horizontal and Vertical: This Action is great for when an Instance collides with another Instance and you want the Instance to reverse direction.
- Set Friction: This Action slows down the Instance. For each step of the game, friction slows the Instance by the amount that you set. You may want to start with a small amount of friction, such as 0.01.
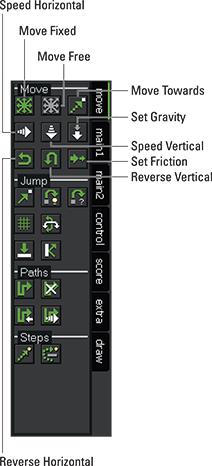
Figure 4-3: The Move Actions from the Move tab.
Jump Actions
The Jump Actions, shown in Figure 4-4, enable you to move Instances around the Room — at one moment, the Instance may be at the bottom of the Room, but in the next moment it’s at the top of the Room. Here are your options:
- Jump to Position: GameMaker checks the position of the Instances, such as checking to see if the Object left the Room. If the Object does leave the Room, you could have it reappear at the top of the Room by jumping. Another example is if a player dies, and you want the player to restart in a specific position. You specify the X and Y coordinates to determine where the Instance jumps to.
- Jump to Start: Use this Action to move an Instance back to where it was created.
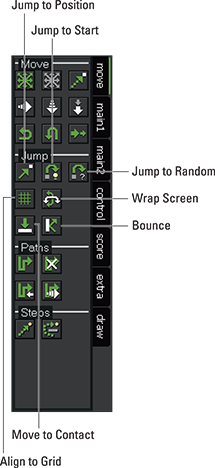
Figure 4-4: The Jump Actions from the Move tab.
- Jump to Random: Use this Action to randomly move the Instance about the Room. Instances won’t appear where any other solid Instances are located.
- Align to Grid: This Action enables you to snap an Instance to a position for accurate placement within the game.
- Wrap Screen: Wrapping is when an Instance can leave one side of the screen and reappear on the other. There is an example on how to achieve this with code in Chapter 12, where the player’s ship can leave one side of the screen during the game and reappear on the other. This Action is typically used together with the Outside Room Event; when the Instance is outside the Room, wrap it around to the other side. You can choose only horizontal, only vertical, or both.
- Move to Contact: Use this Action when you want an Instance to stop moving when it encounters another Instance or when it moves the maximum amount of distance that you set. You can enter a value of –1 for the Instance to travel for an infinite distance (no maximum). This Action also enables you to set the direction of the Instance. This Action is typically used with a Collision Event.
- Bounce: Use this Action when you want an Instance to naturally bounce off other Instances. If you set Precise to false, you get the natural bounce effect only on straight walls; if you set Precise to true, you get the natural bounce even on slanted walls.
Path Actions
Paths are great when you want to send an Instance to travel in a specific way about the Room. Figure 4-5 shows the Path Properties window and what a Path looks like.
You can start a new Path by clicking the Path icon from the menu (see Figure 4-5) or by right-clicking on Paths from the Resource tree. Paths are represented as a yellow line. The way points along the path are represented by colored squares and dots:
- The green square represents the starting and end point of the path.
- The red dot represents the selected way point.
- The blue dots represent way points.
You can create a Path by clicking and dragging in the grid section of the Path Properties.
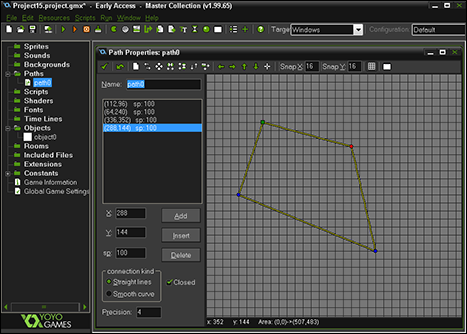
Figure 4-5: Use the Path Properties window to send an Instance on a specific Path.
The Path Actions, as shown in Figure 4-6, are configured directly to a Path that you create and then assign to an Action and, thus, an Object:
- Set Path: This Action enables you to choose a Path, set the speed, determine what to do at the end of the Path, and choose whether the Path is relative or absolute. Choose Relative when you want the start point to begin where the Instance is in the Room; choose Absolute when you’ve designed the Path location in relation to the Room.
- End Path: Use this Action to stop the Path for the Instance.
- Path Position: Use this Action to change the current position of the Instance in the Path. You must use a value between 0 and 1, with 0 being the beginning and 1 being the end.
- Path Speed: Use this Action to change the speed of the Instance on the Path. Negative speeds move the Instance backward. If you use 0, that will temporarily stop the motion along the path.

Figure 4-6: The Path Actions from the Move tab.
Step Actions
There are two Step Actions — Step Towards and Step Avoid — as shown in Figure 4-7:
- Step Towards: Use this Action to have an Instance move in a specific direction or toward another Instance. The difference between Step Towards and Move Towards is that in Step Towards, you can set a parameter for stopping the Instance when it encounters either solid Instances or all Instances.
- Step Avoid: This Action is similar to Step Towards, except you can tell the Instance to avoid solid Instances or all Instances.
These Step Actions are a great way to introduce artificial intelligence (AI) to your games, such as having a zombie horde moving toward the player.
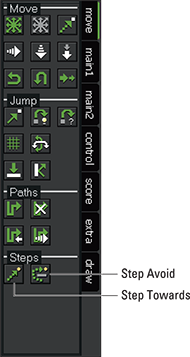
Figure 4-7: The Step Actions from the Move tab.
Main1 Actions
The Main1 Actions include the Objects, Sprite, Sounds, and Room Actions. Figure 4-8 shows all the main1 Actions, which I cover in detail in this section.
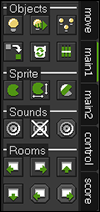
Figure 4-8: The Main1 tab.
Objects Actions
The Objects Actions, as shown in Figure 4-9, are all about creating, changing, and destroying Objects:
- Create Instance: This Action is used to create Instances during the game when they aren’t already placed in the Room.
- Create Moving: This Action enables you to set the speed and direction of a newly created Instance.
- Create Random: GameMaker will randomly create one of four different Objects. If you have fewer than four Objects, you can use No Object.
- Change Instance: Use this Action to change one Instance, such as a plane, into another Instance, such as an explosion.
- Destroy Instance: Boom goes the Instance and — poof! — there it’s gone. The name of the Action says it all: Use this Action to destroy an Instance and remove it from the Room.
- Destroy at Position: This Action is used in conjunction with a bounding box. When you select the Relative check box, the position is determined in relation to the position of the current Instance.
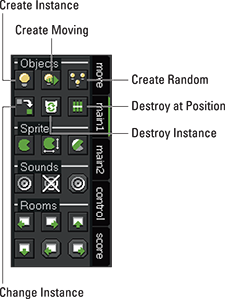
Figure 4-9: The Objects Actions from the Main1 tab.
Sprite Actions
The Sprite Actions, as shown in Figure 4-10, are all about — yep, you guessed it — Sprites. There are three Sprite Actions on the Main1 tab:
- Change Sprite: Use this Action to change the Sprite of an Instance. You can even configure which sub-image to use. (I discuss sub-images in Chapter 2.) This Action is useful if you want to change the appearance of a character when it changes direction.
- Transform Sprite: This Action changes the size and orientation of the Sprite for the Instance. You can make it smaller, larger, or even rotate it.
- Colour Sprite: Yes, the good folks at YoYo Games are from Scotland, and they spell color with a u. This Action blends in color of the current Sprite, so, if you want your Sprite to change colors, a good bit of advice is to create the Sprite in black and white, and then apply the color through this Action. You can also use transparency through this Action.
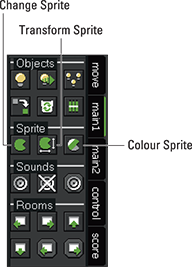
Figure 4-10: The Sprite Actions from the Main1 tab.
Sound Actions
Here are the three Sound Actions, shown in Figure 4-11:
- Play Sound: Use this Action to play a selected audio file.
- Stop Sound: Use this Action to stop the audio file from playing.
- Check Sound: Use this Action when you want GameMaker to test if a particular sound is playing and, if it is, to trigger the next Action.
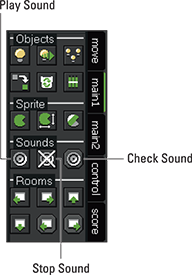
Figure 4-11: The Sound Actions from the Main1 tab.
Room Actions
The Room Actions are highlighted in Figure 4-12 and are best used when you want the player to move from one Room to the next. There are six different Room Actions:
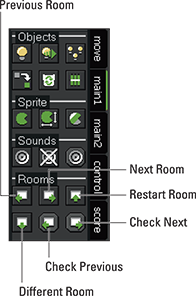
Figure 4-12: The Room Actions from the Main1 tab.
- Previous Room: This Action moves the player to the previous Room.
- Next Room: This Action moves the player to the next Room.
- Restart Room: This Action restarts the Room.
- Different Room: With this Action, you can select a different Room that you want the player to move to from a drop-down list.
- Check Previous: This Action checks to see if the previous Room exists; if it does, the next Action in the Action section is triggered.
- Check Next: This Action checks to see if the next Room exists; if it does, the next Action in the Action section is triggered.
You can change the order of Rooms through the Resource tree by clicking and dragging them up and down.
Main2 Actions
The Main2 tab has four different sections: Timing, Info, Game, and Resources (see Figure 4-13).
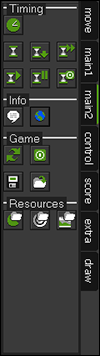
Figure 4-13: The Main2 tab.
Timing Actions
Timing Actions, as shown in Figure 4-14, are an important part of the game:
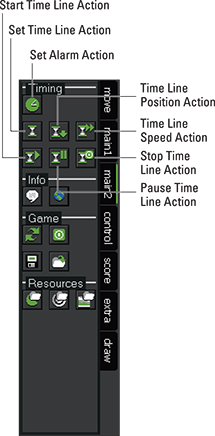
Figure 4-14: Timing Actions from the Main2 tab.
- Set Alarm Action: This Action enables you to set 1 of 12 different alarm clocks for any single Instance. You simply select the number of steps you want to occur before the alarm is triggered; then you set which Alarm to trigger.
- Set Time Line Action: This Action enables you to set which Time Line should run for that Object. You can also set the starting position from within the Time Line, with 0 marking the beginning.
- Time Line Position Action: You can change the position of the current Time Line. You can use this Action to skip or repeat sections of the Time Line.
- Time Line Speed Action: This Action enables you to change the speed of the Time Line.
- Start, Pause, and Stop Time Line Actions: These Actions enable you to set the chosen Action, as well as start, pause, or stop the Time Line.
Info Actions
There are two Info Actions, as shown in Figure 4-15:
- Display Message: Use this Action to make text appear on the screen.
- URL Open: Use this Action to have the game open a web page of your liking.
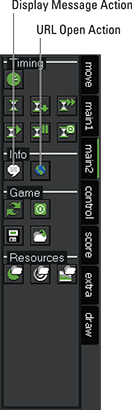
Figure 4-15: Info Actions from the Main2 tab.
To start a new line within a Display Message Action, use the # symbol. To get the # symbol to appear, use #.
Game Actions
Here are the four different Game Actions, as shown in Figure 4-16:
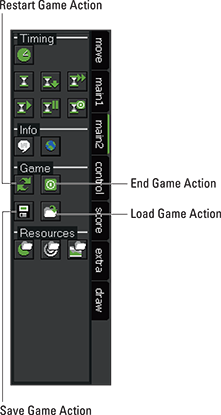
Figure 4-16: Game Actions from the Main2 tab.
- Restart Game: Use this Action to restart the game — say, if the player loses all his lives.
- End Game: Use this Action to end the game. The End Game Action does not close out tabs or windows for the HTML5 target. But it does end the game.
 If you use the iOS or Windows Phone target, the End Game Action may block the device. It’s strongly recommended that you do not use this Action for these modules. Your final game will be rejected from the corresponding app store if this Action is used.
 - Save Game: Use this Action to enable the player to save her game so that she can load it later. In the Save Game Properties window, there is a field for you to enter the name of the save file. So, if you save the game as AllBasesGone, you’ll want to load the file, AllBasesGone.
Not all aspects of the game will be saved. For example, if the game is saved while a Particles event is running, the particles will not be saved (see Chapters 7 and 8 for information on working with particles). Sounds are also not saved. Chapter 14 is all about writing code for saving and loading player-specified configurations.
- Load Game: Use this Action to enable the player to load a previously saved game. In the field within the Load Game Properties window, type in the name of the file you want to load, such as AllBasesGone, which is the same filename you used to save a game.
Resources Actions
The Resource Actions, as shown in Figure 4-17, are all about replacing things like Sprites, Sounds, and Backgrounds:
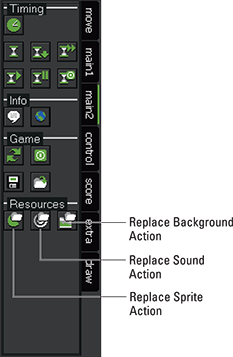
Figure 4-17: Resources Actions from the Main2 tab.
- Replace Sprite: This Action enables you to replace Sprites from the contents of a file. That way, you don’t have to load all the Sprites into the game code. Instead, you can call that Sprite during the game. But don’t call a Sprite that’s currently in view, or you could get some odd effects.
- Replace Sound and Replace Background: These Actions work in a similar way to the Replace Sprite Action, in that you can store the files to be called during the game, so they aren’t part of the game program. This helps speed up the loading of your game.
As of this writing, the Resource Actions are still available for use. However, a known bug exists and they should not be used, because they may not work. Please check for updates to see if these Actions are fixed or if they’ve been removed from the software.
Control Actions
The Control tab (shown in Figure 4-18) includes Actions for Questions, Other, Code, and Variables. These Actions can perform complex tasks.
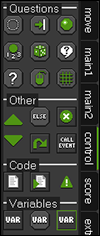
Figure 4-18: The Control tab.
Questions Actions
There are nine Questions Actions, as shown in Figure 4-19. They ask questions such as, does something exist, is there a collision, are two values the same, and so on. And if so, the next Action in the Actions section is triggered.

Figure 4-19: Questions Actions from the Main2 tab.
- Check Empty: This Action asks to see if the Instance, if placed at an indicated position, would cause a collision. This Action does require that the Instance doing the checking has a Mask index or a Sprite with a valid collision Mask.
- Check Collision: This Action simply checks to see if the Instance collided with another Instance.
- Check Object: This Action checks to see if there is an Instance of a specified Object at the indicated position.
- Test Instance Count: This Action is useful if you want to test if there is a certain number of Instances in the Room, and if so, to perform the next Action.
- Test Chance: This Action takes the result of a one-in-X chance, where you set the X (the input to test). For example, if you use 10, then there will be a 1 in 10 chance (based on a simulated dice roll) that the next Action will be triggered.
- Check Question: This Action enables you to ask the player a yes-or-no question, which triggers a respective Action. The question appears in a pop-up window during the game.
- Test Expression: As described in the in-software manual, this Action is the most general question action whereby you can enter an arbitrary expression and evaluate it. If the expression evaluates to true (that is, a number larger or equal to 0.5) then the next Action (or block of Actions) is performed.
- Check Mouse: This Action returns true if the indicated mouse button is pressed and the next Action is performed; this Action is usually placed within a Step Event.
- Check Grid: This Action returns true if the Instance is within a grid.
Other Actions
The Other Actions section of the Main2 tab, shown in Figure 4-20, include a wide assortment of Actions associated with using code:
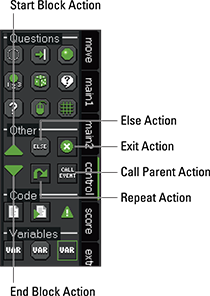
Figure 4-20: Other Actions from the Main2 tab.
- Start Block and End Block: Use these Actions to group a block of Actions, as shown in Figure 4-21. In this way, all the Actions within the block are performed if triggered. Normally, only the first Action that follows the question Action is triggered. Place the Start Block Action after the question being asked (in this case, a Test Variable Action). Place the End Block after the last Action you want triggered.
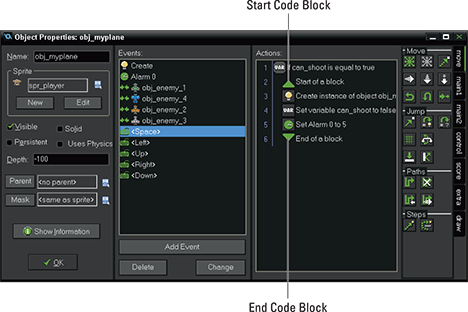
Figure 4-21: Use the Start and End Block Actions to group Actions.
- Else: Use this Action if you want something else to happen if the test question returns false instead of true. Set up your Actions so that you have the question, then a block of code to trigger if true, then an Else Action, and then another block of code to trigger if false.
- Exit Event: Use this Action if you want no further Actions to trigger within this Event.
- Repeat: Use this Action if you want an Action, or a block of Actions, to repeat a set number of times. This feature provides you the luxury of not having to simply paste in the same Actions over and over.
- Call Parent Event: Use this Action with child Objects with a Parent (discussed in Chapter 2). This is useful if you want to trigger the corresponding Event from the parent Object.
Code Actions
There are only three Code Actions, as indicated in Figure 4-22, but don’t let the limited number of options fool you — the Code Actions can be very powerful.
- Execute Code: This Action opens up an entire world of custom code that you can write for GameMaker to execute. You can add anything from a simple, single line of code to something as complex as coding artificial intelligence.
- Execute Script: This Action enables you to call a Script. If you intend to reuse the same block of code many times for multiple Objects, then you can write a Script, which you can then call from within an Execute Code Action.
- Comment: This Action enables you to add a comment line to the Action list. These comments can remind you what the surrounding Actions are meant to do.
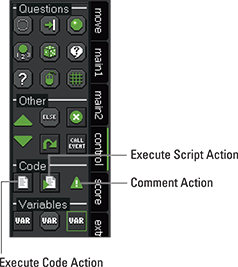
Figure 4-22: Code Actions from the Control tab.
Even though the Comment Action doesn’t necessarily do anything, besides provide you a very helpful reminder, if you place a Comment Action within, say, a Collision Event, GameMaker will still trigger the collision. That is, Collision Events are only triggered when they have an Action, which can include a Comment Action.
Variables Actions
The three Variables Actions, as shown in Figure 4-23, are
- Set Variable: Use this Action to enter a value to a variable. If the variable does not exist, using this Action creates the variable. You can also use the Set Variable Action to configure one of GameMaker’s many global variables, as well as the built-in Instance variables.
- Test Variable: This Action checks the value of a given variable, whether that be true, false, greater than, or lesser than, and then performs, or does not perform, the next Action based on the results.
- Draw Variable: This Action enables you to draw the value of a variable at a position that you choose. You can only use the Draw Variable Action within a Draw Event.
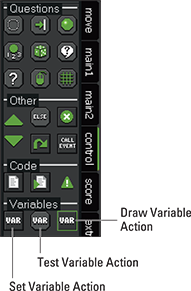
Figure 4-23: Variables Actions from the Control tab.
Score Actions
Scoreboard! Yep, that’s right, this section is all about keeping score and seeing who’s the winner and who’s the loser. Figure 4-24 shows the score tab and its associated Actions, which includes score, lives, and health.
Score Actions
Score is considered a global variable within GameMaker and can be used with any Object. The Score Actions, shown in Figure 4-25, are the following:
- Set Score: This Action is used to determine the player’s score. It’s important to toggle Relative within the Set Score Action Properties window — you want the player to keep increasing his score, and not to maintain it (as in, you want the player to earn 10 points for every enemy killed and not just have a consistent score of 10).
- Test Score: This Action tests to see what the player’s score is, and if it matches a certain value, to trigger the next Action.
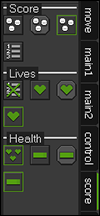
Figure 4-24: The Score tab.
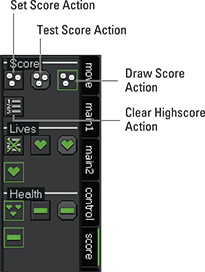
Figure 4-25: Score Actions from the Score tab.
- Draw Score: This Action enables you to draw the player’s score in the game as simple text. All you have to do is configure the correct location within the Room.
- Clear Highscore: This Action does exactly as its name implies: clears the high score table, if you have one set up. You should be warned though, that the Clear Highscore Action cannot be undone.
Lives Actions
Here are the Lives Actions (see Figure 4-26):
- Set Lives: This Action determines how many lives the player has before it’s game over. Lives is considered a GameMaker global variable.
- Test Lives: This Action enables you to, for example, set a maximum number of lives that the player can have, or a minimum number, if that’s what you need for your game.
- Draw Lives: This Action draws the score based on the coordinates that you input. You must place this Action within a Draw Event for it to work.
- Draw Life Images: This Action is awesome for those times when you want to represent the number of player’s lives through an image instead of text or a number.
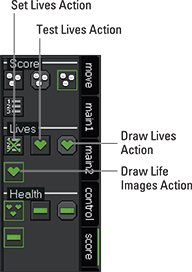
Figure 4-26: Lives Actions from the Score tab.
Health Actions
The Health Actions, shown in Figure 4-27, are similar to the Lives Actions — you have Set Health, Test Health, Draw Health, plus the additional Score Caption Action. Health is a global variable within GameMaker with a range of 0% to 100%. When a player’s health reaches 0, an out-of-health Event is triggered.
- Set Health: This Action is used to set the amount of health a player has.
- Test Health: This Action can be fun to use — for example, if you want to warn the player that his health has fallen below a certain threshold, then the following Action is triggered.
- Draw Health: This Action is used to create a bar of health to indicate the strength of the player. You can set the position, size, and color of the health bar.
- Score Caption: This Action enables you to configure whether to display the score, lives, and health, including the caption for each. The Score Caption Action only works with Windows, Ubuntu (Linux), and MacOS targets.
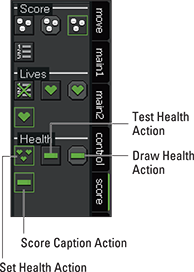
Figure 4-27: Health Actions from the Score tab.
Extra Actions
The Extra tab is all about, well, it’s mostly about Particles, and then there’s an Action for setting the mouse cursor thrown in for good measure. In the interest of page count, I refer you to Chapter 7, where you can see how to use the different Particles Actions to create some very special effects.
You can use the Set Mouse Cursor Action to set a Sprite to represent the cursor (choose the Sprite drop-down menu, shown in Figure 4-28), or show no cursor at all (choose the Cursor drop-down menu, also in Figure 4-28). Easy-peasey, lemon-squeezey, right?
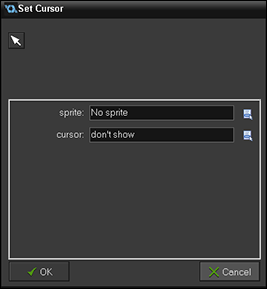
Figure 4-28: Set the Mouse Cursor Action.
Draw Actions
The Draw Actions include Drawing Actions, Settings Actions, and Other Actions, as shown in Figure 4-29.
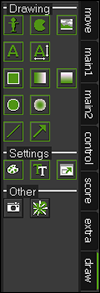
Figure 4-29: The Draw tab.
Drawing Actions
The Drawing Actions, shown in Figure 4-30, are exactly that: They provide a means for you to draw.
- Draw Self: This is the same Action as the default draw that GameMaker uses. If you were to write the code instead of using a drag-and-drop Action, it would look like this:
draw_sprite_ext(sprite_index, image_index, x, y, image_xscale, image_yscale, image_angle, image_blend, image_alpha);
- Draw Sprite, Draw Background, Draw Text, and so on: Use these Actions to draw scaled text, rectangles, horizontal and vertical gradients, ellipses, and gradient ellipses. You can also draw lines and arrows with these Actions.
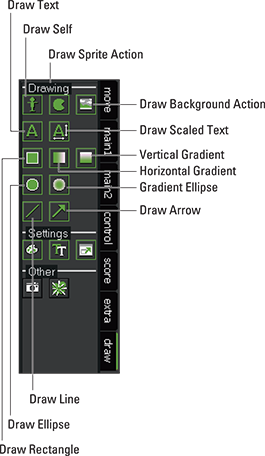
Figure 4-30: Drawing Actions from the Draw tab.
Settings Actions
GameMaker includes Actions for setting color (or, colour, if you prefer), fonts, and going full-screen, as shown in Figure 4-31.
- Set Color: This Action enables you to choose a color for every Instance drawn after this Action is triggered.
- Set Font: The default font for GameMaker games is Arial, 12 point, but if you add a new font to the Resource tree, you can specify for GameMaker to use that font using this Action.
- Set Full Screen: With this Action, you can enable the player to toggle going full-screen and back, which you can use as a player-configured option in a game.
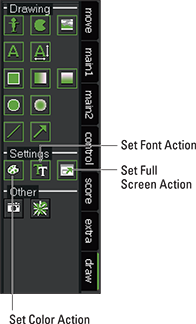
Figure 4-31: Settings Actions from the Draw tab.
Other Actions
The Other Actions on the Draw tab, shown in Figure 4-32, are
- Take Snapshot: This Action takes a screen capture of the game and stores it in a PNG file with a filename of your choosing. By default, GameMaker saves the screen capture in the %localappdata% folder of the game.
- Create Effect: Use this Action to create many effects in a simple and efficient manner, as I detail in Chapter 7.
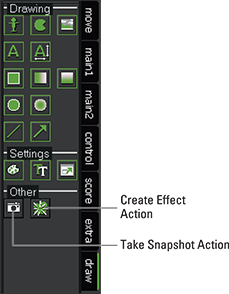
Figure 4-32: Other Actions from the Draw tab.