The first thing that microcontroller programmers often do is blink an LED on their new electronics board. This verifies that the board is booting up properly and that they can successfully create and run a simple app on the board.
While this can often take hours or days in the traditional microcontroller world, you’ll do it in a few minutes. Go ahead and write this Blinky app now:
Now that Visual Studio is open, look for Solution Explorer on the right side of the screen. Solution Explorer shows the source and data files, which make up your Netduino project. Of particular note, the file Program.cs holds the startup code for your project. You’re going to open it and write about a half dozen lines of code. Double-click on Program.cs now (or right-click on its name and select Open).
In the main section of the Visual Studio editor, you are now editing Program.cs. Click on the line underneath the text
// write your code here. This is where you’ll write your code.Now, type the following:
OutputPort led = new OutputPort(Pins.ONBOARD_LED, false);
This first line of code creates an
OutputPort. AnOutputPortis a software object that lets you control the voltage level of a pin on the Netduino. The first parameter tells the Netduino which pin of the microcontroller you want to control, and the second parameter tells the Netduino which state to put it in.Pins.ONBOARD_LEDis shorthand that specifies the Netduino’s built-in blue LED. The second parameter (false) puts the LED in an initial state of OFF (false).Note
For digital inputs and outputs, higher voltage (1) is represented as
trueand lower voltage (0) is represented asfalse.Now, you’re going to blink the LED on and off repeatedly. A straightforward way to create an action that repeats forever is to put it inside a loop that never ends. Add the following code to your project:
while (true)
{
}
The keyword while tells the microcontroller to do something in a loop while a certain condition is met. This condition is placed in parentheses. In our case, we use a condition of
true. Since conditions are met when they are true, puttingtruehere means that the loop will repeat forever.Next, create the blinking LED code. Between the two sets of curly braces, insert the following four lines of code:
led.Write(true); // turn on the LED
Thread.Sleep(250); // sleep for 250ms
led.Write(false); // turn off the LED
Thread.Sleep(250); // sleep for 250ms
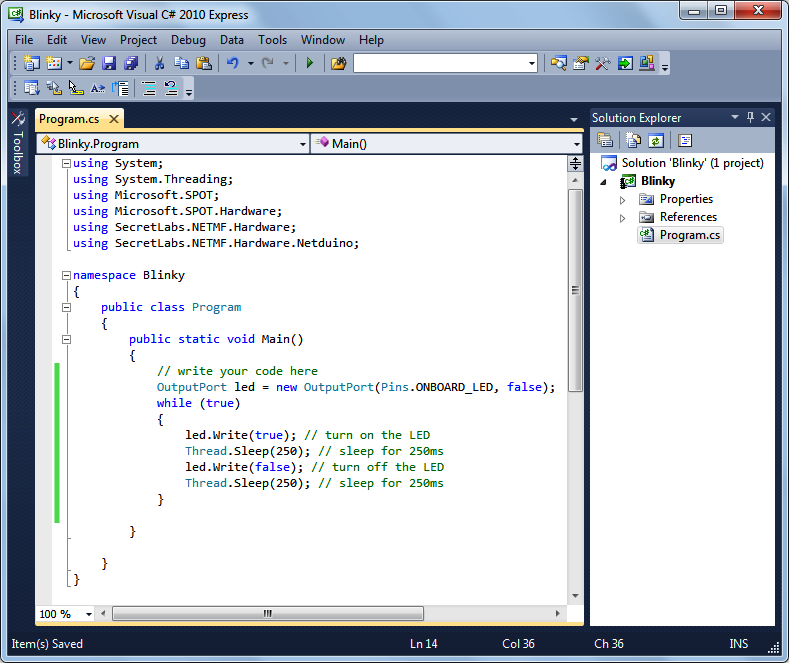
Your final program’s Main()
method should now look like the following listing. Figure 3-2 shows Visual Studio Express with the
Solution Explorer to the right and the complete Program.cs open in the editor:
public static void Main()
{
    // write your code here
    OutputPort led = new OutputPort(Pins.ONBOARD_LED, false);

    while (true)
    {
        led.Write(true); // turn on the LED
        Thread.Sleep(250); // sleep for 250ms
        led.Write(false); // turn off the LED
        Thread.Sleep(250); // sleep for 250ms
    }
}