
One of the founding principles of Netduino is that Netduino’s hardware and software are open source. Because of this it’s possible to compile the latest Netduino firmware from scratch and reflash your Netduino, to create custom features and incorporate them into the firmware, and to share those custom features with others. Netduino is designed to be fully “hackable.”
The Netduino firmware is made up of two pieces of software: the bootloader (TinyBooter) and the .NET Micro Framework runtime (TinyCLR).
Each variant of Netduino (Netduino, Netduino Plus, and Netduino Mini) has separate versions of the firmware. Make sure you have the right firmware for the board you want to flash. New firmware releases are posted to http://forums.netduino.com under the Hardware section. Go into the subsection (Netduino, Netduino Plus, or Netduino Mini) for the board you want to flash, and look for the posts at the top of the list (they’ll have a title like “Netduino Firmware” followed by a version and update number).
The bootloader runs when the board is first powered on. Its jobs are to load the .NET MF (Micro Framework) runtime and to enable you to update the .NET MF runtime. The .NET MF runtime then runs your Netduino app.
Due to the bonded nature of these two pieces of software, both should be updated whenever a new release of the .NET Micro Framework is released. For minor updates and patches, only the .NET MF runtime needs to be re-flashed. Updates are optional and only take a minute or two.
For minor updates, use the MFDeploy tool, which ships with the .NET Micro Framework SDK to update the .NET MF runtime on the Netduino.
To begin, run the MFDeploy application. You can find this in Start→All Programs→.NET Micro Framework SDK→Tools→MFDeploy.exe.
Note
If you have file extensions hidden in Windows Explorer, several files may appear to be named MFDeploy or MFDeploy.exe. Make sure you open the one that’s an application.
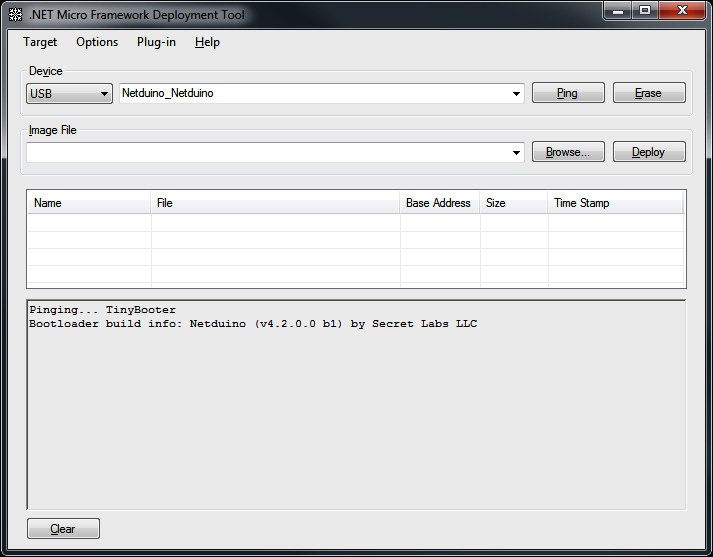
In MFDeploy, change the deployment method from Serial to USB and ensure that your Netduino appears in the drop-down box. Now, press Ping (see Figure A-1) to ensure that your device is available and responding.
Note
If your Netduino doesn’t respond, press the Netduino’s SW1 pushbutton. Then unplug and reconnect your Netduino to your PC. Press Ping on your PC to see “Pinging... TinyBooter” and then release the pushbutton on your Netduino. This failsafe mode will put your Netduino into a special bootloader mode for 20 seconds so you can erase your app or update the firmware.
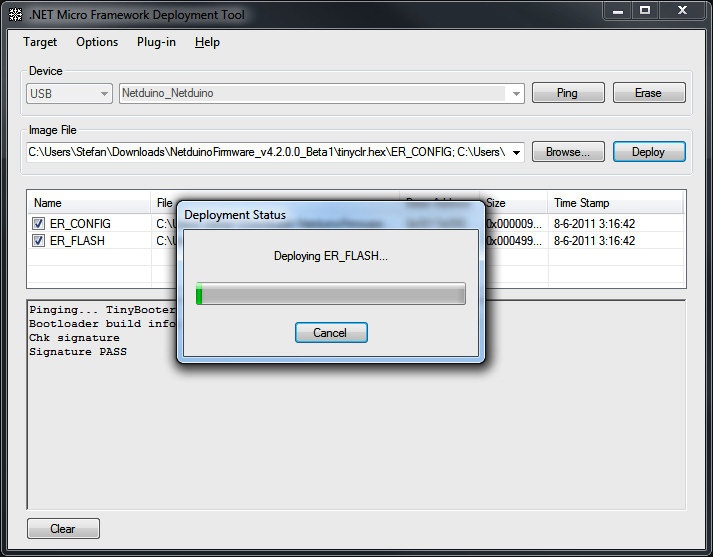
In the Image File section, press the Browse button to select the updated Netduino firmware. The two files will be named ER_CONFIG and ER_FLASH. Browse for these and press OK once you have selected them.
Now, press Deploy. This will reflash your Netduino’s .NET MF firmware and may take a minute (see Figure A-2).
Once deployment has completed, verify that your firmware has been updated to the newest version. You can do this by selecting Device Capabilities in the Target menu (or pressing Ctrl+Shift+C).
The output will contain a
SolutionReleaseInfo.solutionVersion and
SolutionReleaseInfo.solutionVendorInfo. They should
look something like this:
SolutionReleaseInfo.solutionVersion:    4.1.0.0
SolutionReleaseInfo.solutionVendorInfo: Netduino (v4.1.0.0) by Secret Labs LLC