This chapter covers the toolbar in Paint.NET and its functions. We will go over each tool in detail and how to use them.
The topics covered in this chapter are as follows:
- Selection tools
- Move tools
- View tools
- Fill tools
- Drawing tools
- Photo tools
- Text and Shape tools
- The Colors window
- Retouching a photo
The Tools window is where you will choose the different tools to work on your images. The Tools window is broken up into different categories. Each category is grouped together in a way that makes your workflow much easier. These are broken up into selection tools, move tools, view tools, fill tools, drawing tools, photo tools, and text and shape tools.
Selection tools are designed to allow you to select specific areas within your document so that you can perform activities like the color correction of effects. The following screenshot shows the selection tools available in the toolbar:
For example, let's say you took a photo and want to increase the contrast on somebody's face without affecting the entire photo. You can use one of the selection tools to isolate the area and increase the brightness of the face without changing the rest of the photo. The selection tools consist of the Rectangle Select, Lasso Select, Ellipse Select, and the Magic Wand. When these selection areas are active, they appear as light blue areas surrounded by small dashes.
As its name suggests, the Rectangle Select tool ![]() allows you to select a rectangle shape in your document.
allows you to select a rectangle shape in your document.
This is perfect for areas containing sharp edges that you wish to isolate and change. When you select the Rectangle Select tool, your cursor will appear as a small cross symbol within the canvas window. Left-click on it and drag, tracing your desired area. As you do, you will see a blue-tinted square stretch across your selected area. Once you are satisfied with your selected area, release the mouse. If you are unhappy with your selected area, just start over. Your original selected area will disappear.
The Lasso Select tool ![]() will give you the ability to draw a freeform shape using your mouse.
will give you the ability to draw a freeform shape using your mouse.
This tool is perfect for areas you wish to isolate that have no hard edges. Like the Rectangle Select tool, you use it by placing your cursor over the spot where you would like your shape to start; left-click on your mouse and drag, tracing your desired area. Once you are happy with the shape you have created, let go of the mouse button. If you are unhappy with that shape, start again.
Similar to the Lasso Select and Rectangle Select tools, the Ellipse Select tool ![]() is perfect for creating uniform circles or ovals.
is perfect for creating uniform circles or ovals.
As stated previously, selection tools allow you to select a particular area of your image; but what if you want to make more than one selection? What if the shape that you want cannot be achieved using just one of the tools? This is where selection modes come in handy. For example, you can use the Rectangle Select and Ellipse Select tools together using the Add (union) selection mode and create a completely different shape:
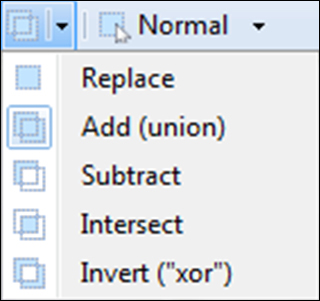
Replace is the default selection mode. This mode will replace any selection with a new one. For example, if you use the Rectangle Select tool and then use the Ellipse Select tool to select another area of the image, the area previously selected using Rectangle Select will be cleared and will no longer be available for processing.
The Add (union) selection mode will allow you to extend or add to an area you have already selected. For example, let's say you have selected a square area but you want to extend a small section of the area. You would use the Add (union) mode to do this. It will extend any area without changing the area you first selected.
The following screenshot shows a sample selection made using the Rectangle Select and Ellipse Select tools combined with the Add (union) selection mode:
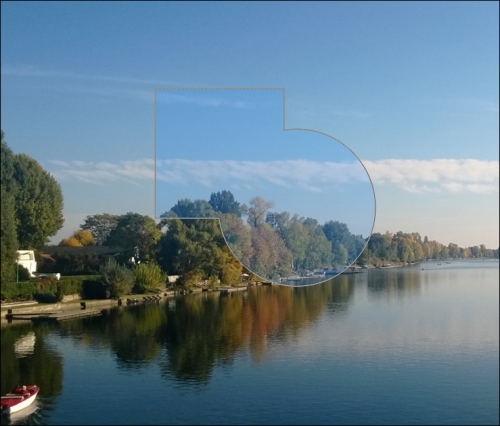
Subtract will remove the selected area that overlaps with the area selected with the first select tool. The following is an example of the Subtract selection mode being used with the Rectangle Select and Ellipse Select tools:
Unlike with the Add (union) selection mode, the area selected using the Ellipse Select tool removes the overlapping area that was selected using Rectangle Select.
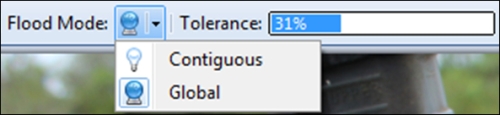
The Magic Wand tool ![]() is used to select areas of uniform color. Once you select the Magic Wand tool, place it on the area you would like to adjust. Simply left-click and an entire area will be selected. The Magic Wand tool works by selecting areas of similar color. How much area is selected can be determined by adjusting the Flood Mode and Tolerance level settings of the Magic Wand tool. The area selected will be highlighted in blue.
is used to select areas of uniform color. Once you select the Magic Wand tool, place it on the area you would like to adjust. Simply left-click and an entire area will be selected. The Magic Wand tool works by selecting areas of similar color. How much area is selected can be determined by adjusting the Flood Mode and Tolerance level settings of the Magic Wand tool. The area selected will be highlighted in blue.
Flood Mode has two different settings: Contiguous and Global. Contiguous will select all the nearby pixels that are similar in color, whereas Global will look for a particular color range across your entire photograph. How much of the selection is done will be determined based on the Tolerance level. The lower the value of Tolerance, the less sensitive the Magic Wand tool will be to the color of the pixel that was clicked:
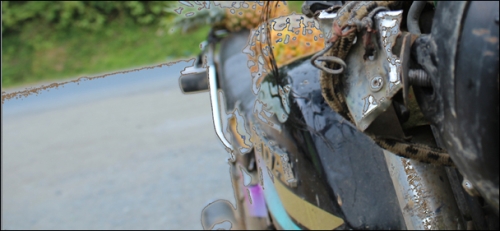
Let us use the Magic Wand tool with the Global mode on the following image and see what happens:
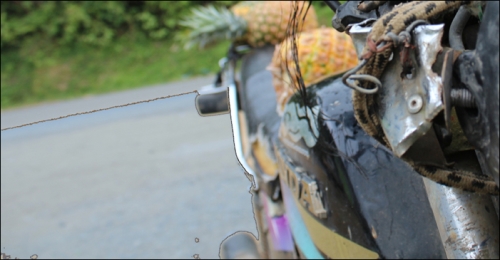
If you notice, only the left-hand side of the image is selected even though there are other areas in the image that are similar in color.
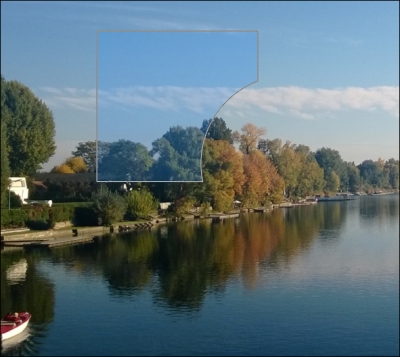
In the following image, a larger portion with a similar color range is selected: