
You may have noticed in the previous recipe that the data we used was global and not user-specific. In this recipe, we will see how we can create session data and take a deeper look into the templates as well as the data associated with them. In order to demonstrate this, we will create a small image-voting application, where the user will be prompted for the name, and after that they are given 50 points that they can spend for votes on the images.
To make the recipe simpler, we will serve the images statically from our public directory so you can download the sample images that are part of the example code or use your own ones.
- We start as any other normal Meteor application:
>meteor create gallery - Because we will use a little bit more code in this recipe, it makes sense to create a structure with a
publicfolder for the static files, and theserverandclientfolders for the server and client code respectively. After that, we can move the generated gallery files to theclientfolder and add the images to thepublicfolder. The images, for simplicity, will be named1.jpg,2.jpg,3.jpg, and guess what,4.jpg. Then we proceed with creating abootstrap.jsfile in theserverfolder:// if the database is empty fill it with data Meteor.startup(function () { //has some images if (Images.find().count() < 4) { var images =[ { name: "Awesome Cat", url: "img/1.jpg", votes: "0" },{ name:"Cool Cat", url: "img/2.jpg", votes: "0" },{ name:"Mjauuu", url: "img/3.jpg", votes: "0" },{ name:"The Cat", url: "img/4.jpg", votes: "0" } ]; for (var i = 0; i < images.length; i++) { Images.insert(images[i]); } Users.insert({ name: "awesome user", pointsLeft: "30" }); } }); - This will initialize the database with a simple user and add some data about the images, as well as add a condition that this should happen only when there are less than four images in the database.
Note
You may notice that we are using a
forloop to insert the data, but since Version 2.2 of MongoDB, thedb.collection.insert()function can accept an array of elements and do a bulk insert of them into the collection, but we are not using the method like that, as it will result in a slightly more complex structure, and we want to go with the simplest case. You can read more about thedb.collecton.insert()on http://docs.mongodb.org/manual/reference/method/db.collection.insert/. - After this, we can proceed with the definition and the publishing of the collections, making the collections available to the client side:
// DB collection of movies Images = new Meteor.Collection("images"); // DB collection of users Users = new Meteor.Collection("users"); // Publish complete set of lists to all clients. Meteor.publish('images', function () { return Images.find(); }); // Publish for users Meteor.publish('users', function () { return Users.find(); }); - Now we can continue with the template code in
gallery.html:<body> <div class="box"> {{> main}} </div> {{> footer}} </body> <template name="footer"> <footer> {{footerText}} </footer> </template> - The
maintemplate will check whether there is a user currently present. If present, it will display the voting, otherwise, it will display a simple form to enter a name:<template name="main"> {{#if hasUserEnteredName}} {{> votes}} {{> gallery}} {{else}} <label>Please insert your name <input name="name"> </input> <button class="name">start</button> </label> {{/if}} </template> - The
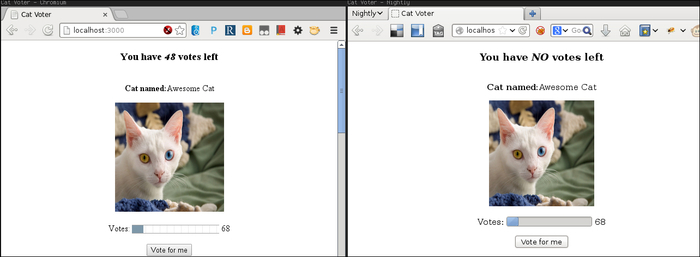
votestemplate will show how many votes are there left for the user, and the gallery will display the images together with the info about current number of votes, as well as add a button that will be used for voting:<template name="votes"> <h3>You have <i>{{numberOfVotes}}</i> votes left</h3> </template> <template name="gallery"> <div> {{#each images}} <div class="item"> <p> <b>Cat named:</b>{{name}} </p> <img src="{{url}}" /> <p> Votes: <progress value="{{votes}}" max="500" /> <output>{{votes}}</output> </p> <button class="vote">Vote for me</button> </div> {{/each}} </div> </template> - We can start up the application and see if everything turned up as expected. If you open up the application on two browser sessions side by side, and enter two different names, you can notice that when we vote on the images, the number of votes gets updated instantly on the other browser session.
The first thing you might want to see is what is the state in the database. While having the server up, you can start the meteor mongo console and list the collections with db.getCollectionNames(), where you should have the following result:
[ "images", "system.indexes", "users" ]
The collection names are the ones we defined in our publish.js file. As for the data contained in the database, we decided on having URL to the images in the public folder for the image collection, because that is simpler for this case.
Note
If you need to store or manipulate binary data such as images, you can do that in MongoDB, and it plays very well with Meteor. There we can use EJSON, where the E stands for extended. Basically, it supports all JSON types while adding additional Data via the JavaScript Date() object and Binary data via Uint8Array. You can also define your own custom datatypes and use the EJSON object similarly to the regulator JSON. There are a few other methods such as EJSON.newBinary(size) and EJSON.addType(name,factory), and you can read more about them on http://docs.meteor.com/#ejson. There is also the option to configure your own already existing MongoDB instance. This is done by defining an environment variable before starting meteor:
MONGO_URL=mongodb://localhost:3317 meteor
This makes it convenient to have a same MongoDB server that is used by non-Meteor applications.
In the gallery.js file, in order to have some data in the client side, we used Session variables. This is actuality a global object that can be used on the client side to store any key-value pairs. Just like you are used to in other frameworks and languages, we have Session.set("theKey", someValue) that stores someValue for theKey and Session.get("theKey") is used to retrieve the data. As for initialization, there is the Session.setDefault("theKey", initalValue), making it handy to avoid reinitialization of the variable every time a new version of your application is loaded.
Note
You can read more about the Session object in the Meteor specification at http://docs.meteor.com/#session.
As you have probably noticed so far, we can nest templates. This is a standard handlebar behavior, and in our case, we use it to simplify the view logic. In the real-life scenario, it not only makes more sense to separate only the parts that can be reused in some other sections of the application, but also at the same time, you don't want to have huge templates that make your code hard to read. In order to have events, we can use standard CSS selectors to add them to our template, so if we want to attach a callback on the click event of an element using the .name CSS class in the main template, we can use the following code:
Template.main.events({
    'click .name' : function () { ... }
});
In the event callback, we can access several objects that are of use to us. We used some of them in Template.gallery.events, where onclick callback accepts two arguments; we can see that in this object, and we have access to the related document. Having the data context of where the element was triggered allows easy manipulation of that section:
Template.gallery.events({
  'click .vote' : function(e,t) {
    //this object can be used to access elements
      }
});
The two arguments that are passed in the callback allow access to the event type as well as the DOMElement of the current target.
Note
More about how event maps and selectors are used as well as what else is accessible in the event callback can be found at http://docs.meteor.com/#eventmaps. You can also attach callbacks that would be called after the template is rendered, http://docs.meteor.com/#template_rendered. There is also an option to use other template engines instead of handlebars, such as Jade, for example, http://docs.meteor.com/#templates. This can be done as the reactive context for the templates is not dependent on the engine; you can even construct the HTML manually by appending string and it will still work.
In the main template besides Users.insert, we used the db.collection.findOne function that returns the first object that is found. This is done by matching the query that we specify with the database and retrieving the first result in natural order if found.
Note
More detailed explanation of findOne is available in the MongoDB documentation at http://docs.mongodb.org/manual/reference/method/db.collection.findOne/.
As for the update of the elements, the collection accepts two arguments, first being the selection query where, for example in voteForImage, we used the MongoDB-generated _id for matching the element, and the second is the new update using the $set modifier to update the pointsLeft property of the selected documents:
    Users.update(
        {_id:currentUser._id},
        {$set:{pointsLeft:currentUser.pointsLeft}}
      );
Note
There are several different update modifiers that can be used, and you can read about them in great detail in the documentation, but to get you up to speed with the basics,, you can use some of the reference cards provided by 10gen, the company behind MongoDB. More details can be found at http://www.10gen.com/reference.
In our case, we could have used the $inc modifier that increments the value we want for a given amount, but for simplicity, we picked the more general $set modifier. Also, one other additional improvement that can be done is to move the collection declarations, such as Images = new Meteor.Collection('images'), into a common file for the server and the client that is not in the respective folders so that we can reduce the code duplication.
At some point of time, you may want to have some kind of timer based on the standard JavaScript setTimeout or setInterval functions. You will get an error if you try to do so, but the same functionality is provided by Meteor.setTimeout and Meteor.setInterval functions (http://docs.meteor.com/#timers).
When it comes to the view, you may have seen so far that it is entirely handled with JavaScript. This is one of the problems with Meteor, because the content generated like this is hard to get indexed by search engines such as Google. In order to help you out with this problem, there is a package called spiderable (http://docs.meteor.com/#spiderable) that can be used as a temporary fix.