You can create almost any texture imaginable with a pencil and paper. You won’t need a lot of supplies to follow the exercises in this book, but it’s important to get acquainted with the basics. As you work, you can experiment with different tools to discover which ones suit you best.
Pencils are labeled with numbers and letters. The letter indicates hard lead (H) or soft lead (B), and the number describes the grade—the higher the number, the more intense the hardness or softness of the lead. So a 9B is the softest of the B leads; a 2B is mildly soft. HB is in between hard and soft. Soft leads create thicker, darker lines; hard leads produce thinner, lighter lines.
There are several types of pencils: Woodless pencils feature larger leads that can form fine points; mechanical pencils create uniform strokes; carpenter’s pencils create very wide strokes; water-soluble pencils produce washes that are similar to watercolor paint when manipulated with water; and lead holders are “sleeves” that can hold any grade of lead.

Choosing Your Pencil Pictured from left to right are a carpenter’s pencil, a woodless graphite pencil, and large and small lead holders.
Erasers are great for creating highlights and for shading. I prefer kneaded erasers because they can be molded into different shapes and sizes to suit my needs. They’re softer and more flexible than vinyl erasers, the type you usually see in schools. They are great for cleaning up a finished drawing because they don’t leave crumbs.
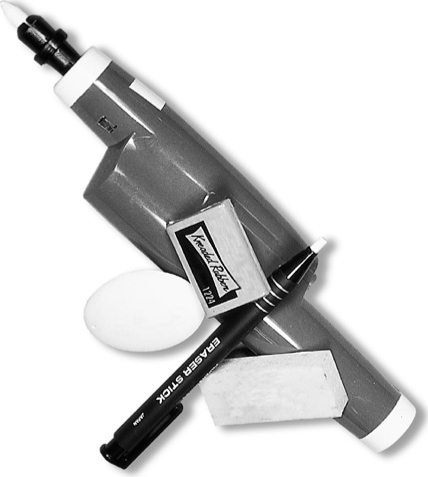
Cleaning Up Pictured here are a battery-powered eraser, a kneaded eraser, vinyl erasers, and a pen eraser.
Your choice of paper is as important as your choice of pencil. I mainly use Bristol board, a heavy paper available in vellum (rough) or plate (smooth) finish. Rough, cold-pressed papers create a deeper tone and break up the stroke, which is great for drawing stone and landscape textures. Smooth, hot-pressed papers provide the ideal surface for delicacy and detail. The rougher the surface, the more “tooth” (or texture) the paper has. Use acid-free papers whenever possible to avoid yellowing and deterioration.
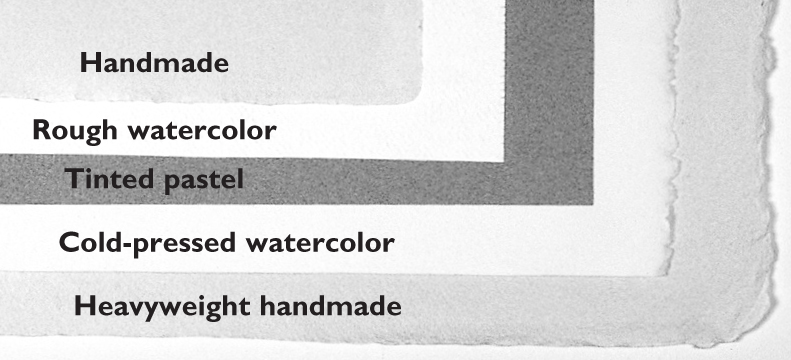
Experimenting with Papers There is a great variety of papers you can choose from. Pictured from top to bottom are a small handmade paper, which has a deckle edge and is ideal for smaller drawings; a rough watercolor paper, which has a very rugged, but regular, pattern; a tinted pastel paper, which has a nice tooth; a cold-pressed watercolor paper, which is great for laying washes with water-soluble pencil; and finally a heavyweight handmade paper, which has a very rough, irregular tooth.
Carpenter’s pencils and other specialty pencils can be sharpened manually with a single-edge blade and/or a sandpaper block. Mechanical pencils have special sharpeners for the leads, called “pointers.” For my wood pencils, I usually use an electric sharpener. Most artists use a combination of all these sharpeners, depending on the type of point they want. A mechanical sharpener will give you a very fine point, but you have little control over it. Sandpaper can make some nice blunt points that are difficult to create with other types of sharpeners. Some artists even use a utility knife to whittle their pencils into hard, sharp shapes.

Sharpening Your Tools Each type of pencil has a specific sharpener. If you’re using a carpenter’s pencil, you can find a blade and sandpaper at the hardware store. When you’re done sharpening, the shavings can be used as graphite powder, also called “carbon dust.”
There are several tools that can be used to smudge and blend graphite. A blending stump is a rolled piece of paper that can be used for blending so you don’t get your fingers dirty. A tortillon is similar, but shaped differently. When you’re working with a larger area, you can use a chamois cloth for blending. These are important to have on hand for creating certain textures.

Blending Tools Made of tightly wrapped paper, tortillons are pointed on one end (right), whereas blending stumps are pointed on both ends (left).
A sturdy drawing surface is invaluable. Portable drawing boards are very convenient and can be used at most tables. I currently do most of my fine art at an easel because it enables me to look at the piece from a distance to see how the work is progressing. I also use a large drawing table when I need more space.

Setting Up a “Studio” For many years, my “studio” was a drawing board leaned against my kitchen table. Your workspace doesn’t need to be fancy, but there are essentials, such as a comfortable chair, supplies within reach (I keep mine in a taboret), and plenty of natural light—plus artificial lights for gray days and evenings!
Rulers and triangles are indispensable for highly realistic buildings and other hard-edged subjects. Artist’s drafting tape is a necessity for keeping your art in position, but do not tape within the drawing area, as this can leave residue.

Eraser Shields and Stencils Another great tool is the eraser shield (above), which acts as a stencil when erasing parts of your drawing. You also can use a ruler to help you create perfect corners and angles.