Once you’ve purchased your camera, it’s important to understand some photography fundamentals before shooting your reference photos—even if the camera you decided on is a point-and-shoot.
ISO refers to how sensitive film is to light. With digital cameras, it refers to the sensitivity of the camera’s image sensors. Point-and-shoot cameras have an automated ISO: The camera will lower the ISO in bright light and increase it in dim light. Both my cameras allow me to adjust the ISO setting, affording me more control. I always use the lowest ISO possible, because as the number goes up, the picture quality goes down.

ISO 50

ISO 1600
In the first photo, the lower ISO results in a sharper photo. In the second, the higher ISO has a grainy result. In certain low-light situations, you’ll need a higher ISO regardless of clarity loss—the fuzzy result will work for reference.
Point-and-shoot cameras auto-focus, but they do so based on where you’re pointing the camera, so you can still take multiple shots of a subject, focusing in on different parts to capture every detail. On the SLR, auto-focus is sometimes an option, but adjusting the lens gives you more control.

Foreground Focus When I focus my camera on these leaves, the venation of the main leaf is very sharp, and the highlights and shadows are clearly defined. But the background is very blurry.
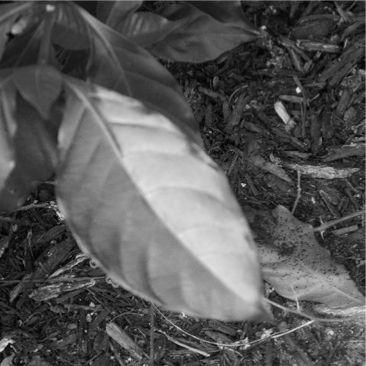
Background Focus I switch my focus to the background. This won’t be the central focus of the drawing, but it’s an important detail I may need later. Here the sticks and the dirt are very clear.
More advanced point-and-shoot cameras will allow you to manipulate the exposure—how much light the camera lets in when you press the shutter release. Too much light can overexpose a photo, leaving it “blown out.” Too little light can underexpose an image, making it appear dark. I frequently take three shots of the same subject to make sure I have one with the right exposure when I get back to the studio.

Auto Exposure When I let the camera decide the “correct” exposure, the detail of the clouds and snow-capped mountain are evident, but the foreground and trees are too dark.

Higher Exposure I manually increased the exposure to capture a lighter foreground and trees, and now I can see much more detail. The sky, however, is washed out.

Lower Exposure With this setting, I managed crisper clouds and snow-capped mountain. But the foreground and middle ground are way too dark to make out details.