

Backup and recovery
This chapter describes enhancements to the IBM i backup and recovery functions. This chapter describes the base operating system save and restore functions that are included in the IBM i operating system in 3.1, “New and enhanced system save and restore functions” on page 46.
After it describes the basics, this chapter describes the more advanced Backup Recovery and Media Services (BRMS) product in 3.2, “New and improved BRMS for IBM i functions” on page 50. This chapter then addresses the new BRMS functions and capabilities added to the IBM Navigator for i and the System Director products in 3.3, “BRMS enhancements to GUI and web interfaces” on page 84.
A list of references to more information about these topics is included at the end of the chapter.
This chapter includes the following sections:
3.1 New and enhanced system save and restore functions
This section describes new and enhanced functions for the system save and restore functions in the IBM i 7.1 operating system. Topics include:
3.1.1 Fast restore using tape position
Fast restore using tape position is a new function that enables object restore to move to the location of a stored object on tape, thus saving time by minimizing searching for the object. You can use this function to restore a single object from a backup much more quickly. There are other scenarios where restoring multiple objects might benefit from this function.
Although restore time savings vary depending on the device, media format, and position of the object on tape, tests restoring the last object from a tape that contains 1.1 million IFS objects reduced object restore time from 22 minutes to less than 3 minutes.
Save operations now track the physical media position of each saved object. This media position is a 32 hex character field in the various save commands output files.
Restores commands have a new POSITION parameter, which is used to specify the hexadecimal position value that appeared in the output files that were previously mentioned. The following restore interfaces support the POSITION parameter:
•Restore Library (RSTLIB), Restore Object (RSTOBJ) and Restore IFS Object (RST) commands.
•QsrRestore and QSRRSTO application programming interfaces.
•QsrCreateMediaDefinition application programming interface to create a media definition for use by parallel restores.
•BRMS supports the POSITION parameter.
The default value for the POSITION parameter is special value named *FIRST, which restores using the current search from the beginning mode. When you use the POSITION (object location) parameter and value, you must also specify the SEQNBR parameter with the correct sequence number of the saved object.
In Example 3-1, the Restore Object (RSTOBJ) command restores the SYSTEMS file to the HARDWARE library. The saved object is sequence number 547 on the tape, the position of the file on tape is 0000000000190490000000AB430009CA, and the tape device name is TAP01.
Example 3-1 RSTOBJ command that specifies the POSITION parameter
RSTOBJ OBJ(SYSTEMS)
SAVLIB(HARDWARE)
DEV(TAP01)
OBJTYPE(*FILE)
SEQNBR(547)
POSITION(0000000000190490000000AB430009CA)
3.1.2 New ALWOBJDIF (*COMPATIBLE) restore option
A new value, *COMPATIBLE, is added to the Allow Object Differences (ALWOBJDIF) parameter to make restores less confusing and less error-prone for database files.
Using ALWOBJDIF(*ALL) for database files is undesirable for the following reasons:
•When a file-level difference occurs, the original file is renamed and the saved file
is restored.
is restored.
•When a member level difference occurs, the existing member is renamed and the saved member is restored.
Because of the duplicated files and members, system resources are wasted and applications might produce unpredictable results. This situation leaves you with a perplexing choice between the renamed data or the restored data and leaves clean-up activities to perform.
For database objects, ALWOBJDIF(*COMPATIBLE) is equivalent to specifying ALWOBJDIF(*AUTL *OWNER *PGP *FILELVL), which allows the following differences:
•All authorization list differences.
•All ownership differences.
•All primary group differences.
•File level differences where file level and member levels are restored only when the format level identifiers of the file on media match format level identifiers of the file on the system. In brief, the file formats must match.
For non-database objects, ALWOBJDIF(*COMPATIBLE) performs like ALWOBJDIF(*ALL), which allows all object differences to be restored.
The *COMPATIBLE value for the ALWOBJDIF parameter is supported as follows:
•Restore Library (RSTLIB) and Restore Object (RSTOBJ) commands.
•Restore Object (QSRRSTO) API.
•Restore menu options that use RSTLIB and RSTOBJ commands.
•Restore Library using BRM (RSTLIBBRM), Restore Object using BRM (RSTOBJBRM), and Start Recovery using BRM (STRRCYBRM) commands.
•Save Restore Library (SAVRSTLIB), Save Restore Object (SAVRSTOBJ), and Save Restore Changed Objects (SAVRSTCHG) commands.
The following restore menu options now default to ALWOBJDIF(*COMPATIBLE) when you restore to another system:
•21: Restore entire system
•22: Restore system data only
•23: Restore all user data
The Restore Licensed Program (RSTLICPGM) command now internally uses ALWOBJDIF(*COMPATIBLE), but does not include it on the command interface.
3.1.3 Enhanced save and restore limits
Before IBM i 7.1, database files that contained more than 16 MB of descriptive information could not be saved. This limitation was removed, and is the last known limitation for database file save and restore.
3.1.4 Save While Active support for integrated VMware ESX servers
IBM i Integrated Server Support is enhanced to provide Save While Active (SWA) support for integrated VMware ESX servers. Storage spaces for VMware ESX servers can now be saved from IBM i while the ESX server is active. This feature allows a concurrent save of ESX data without requiring the ESX server to be shut down or applications ended.
This function is available in SF99369 - IBM i integration with BladeCenter and System x Group PTF Level 6. For more information, see the IBM i integration with BladeCenter and System x website at:
3.1.5 Support for journal and journal receiver restore independence
Restore processing has been enhanced to allow the start of journaling to be deferred for database files, data areas, data queues, and libraries when the object or library is restored before the journal. After the journal is restored, the object that deferred start of journaling is reestablished and resumes journaling.
To use this feature, specify the Defer ID (DFRID) parameter on the restore operation. DFRID is an optional parameter on the Restore Library (RSTLIB), Restore Object (RSTOBJ), and Restore Object List API (QSRRSTO) commands.
In previous releases, the Defer ID parameter was used to defer the restore of views (logical files) and Materialized Query Tables (MQTs) that were restored before their based-on files.
There are two ways to use this function:
•To explicitly use this enhancement, the Restore Deferred Objects (RSTDFROBJ) command can be called directly using the same DFRID value that was used on the RSTOBJ or RSTLIB commands.
•Some restore operations are already configured to use Defer ID automatically. These operations use this improved journal processing with no change required by the user:
– Base operating system: GO RESTORE option 21 or the RSTLIB command specifying *NONSYS or *ALLUSR for the Saved library (SAVLIB) parameter.
– Backup, Recovery, and Media Services: STRRCYBRM and all other BRMS restore operations.
|
Note for BRMS users: If you were using the Recovery Order List to self-manage the order of a BRMS restore to compensate for journal dependencies, that control is no longer needed. Consider changing OVERRIDE(*YES) and RCYORDLST(<user-specified-restore-order>) to RCYORDLST(*NONE).
|
The following are journal restore considerations:
•This enhancement applies to database file, data area, data queue, library objects, or access paths that were explicitly journaled.
•If system-managed access-path protection (SMAPP) is being used, the access paths being protected by the system are implicitly journaled and not relevant to this topic.
•Journaling for an object resumes when the missing journal is restored or explicitly re-created followed by a call to RSTDFROBJ using the appropriate DFRID.
•A new system file, QADBRSDFRJ, is used to track objects that defer start journaling. The file is created in the QRECOVERY library for SYSBAS and the QRCYnnnnn library for independent ASPs (IASP). One record is inserted into the file for each object that defers starting journaling.
•The objects that defer start journaling are created. Because the objects are restored before resumption of journaling for the object, the restore and create journal entries for these objects are generated.
•If a Defer ID is specified when restoring an object into a journaled library that has a *RESTORE inherit rule defined, the object was journaled at save time, and that journal does not exist on the system, the start of journaling is deferred for the object to the journal that the object was journaled to when it was saved.
•If a Defer ID is specified when restoring an object into a library that contains a data area called QDFTJRN that has a *RSTOVRJRN rule defined, the object attempts to automatically start journaling to the journal specified in the QDFTJRN data area. This occurs regardless of whether or not the object was journaled when it was saved or the journal target at save time. If the journal specified in the QDFTJRN data area does not exist, the start of journaling is deferred.
•If a Defer ID is specified when restoring an object into a journaled library that has a *RSTOVRJRN inherit rule defined, the object attempts to automatically start journaling to the journal being used by the library, regardless of whether or not the object was journaled when it was saved or the object's journal target at save time. For this scenario, the journal for the library exists and therefore deferred journaling does not apply.
3.1.6 Miscellaneous enhancements
There are numerous miscellaneous enhancements:
•Supported Save Target (TGTRLS) releases are V7R1M0, V6R1M0, and V5R4M0.
•SAVLIB and SAVCHGOBJ of the QUSRSYS library now perform RTVSYSINF and save the results.
If the correct procedures are followed, this information is already saved. Often, this data is inadvertently not saved and cannot be recovered. This change ensures that the system information is saved for later recovery if needed.
This enhancement is available through PTF SI34094 for V5R4 i5/OS and PTF SI34095 for IBM i 6.1.
•The system name is now included in the headers of the various output files and spool files.
•Save and restore menu options that place the system in a restricted state are enhanced to gracefully end TCP/IP servers, host servers, and TCP/IP before ending in a restricted state.
Save menu options 21 (Save entire system), 22 (Save system data only), 23 (Save all user data), and 40 (Save all libraries other than the system library), and Restore menu options 21 (Restore entire system), 22 (Restore system data only), 23 (Restore all user data) and 40 (Restore all libraries other than the system library) now run the following commands before the ENDSBS SBS(*ALL) OPTION(*IMMED) command is issued:
– ENDTCPSVR
– ENDHOSTSVR
– DLYJOB JOB(300)
– ENDTCP
– DLYJOB JOB(300)
This enhancement is available through PTF SI35204 for IBM i 6.1.
•Improved serviceability
Collection Services data is now collected for specific save/restore events.
Save/restore flight recorder enhancements include a larger default size of 5 MB, more entries to be logged, and the ability to adjust the size of the data.
To change the flight recorder size to 10 MB, run the following command:
CRTDTAARA DTAARA(QGPL/QSRFRSIZE) TYPE(*CHAR) LEN(4) VALUE('10')
In this example, the size is being changed to 10 MB. The QSRFRSIZE data area can be created in either the QTEMP or QGPL library.
•Libraries QPTFOBJ1 and QPTFOBJ2 have been restricted from save operations, much in the same fashion as QRPLOBJ and other system-type libraries. This applies to native OS commands as well as BRMS commands and control groups.
3.2 New and improved BRMS for IBM i functions
This section reviews new and improved functions that are part of the BRMS product:
3.2.1 Support for Domino 8.5 Domino Attachment and Object Service (DAOS)
Domino Release 8.5 contains a new enhancement that is called the Domino Attachment and Object Service (DAOS). DAOS enables more efficient use of storage by reducing the number of redundant attachments by using a separate repository for a Domino server attachment.
Before DAOS, attachments were part of each Domino database (.nsf) file. If a large attachment is sent to 40 mail users, there are 40 occurrences, one in each mail file.
With DAOS, attachments that exceed a configured size are pulled out of the.nsf files and are placed as objects. In the example that is described in the previous paragraph, rather than one occurrence of the attachment being stored in each mail file, there is one NLO stored per Domino server, thus saving storage space.
BRMS is enhanced to handle the NLO objects as follows:
•During Online Domino backups, the presence of NLO objects is determined and are automatically saved at the end of the SAVDOMBRM backups. No BRMS changes are necessary.
•A full save includes the NLO objects.
•An incremental save includes the new and changed NLO objects since the last full save.
BRMS DAOS support was made available through PTFs for V6R1 (SI34918) and
V5R4 (SI31916).
V5R4 (SI31916).
When you configure DAOS on Domino servers, be careful with the configuration of attachment sizes that are externalized into NLOs. If you select a small size, many NLO objects can be created, each of which is an IFS object that can significantly lengthen the IFS backup time. The default is 4096, but consider using 1,000,000 or larger.
DAOS references
The following references provide more information about DAOS:
•DAOS Quick Start Guide:
•DAOS Best Practices:
•DAOS Estimator:
•BRMS Online Lotus Server Backup Reference:
3.2.2 Link list enhancements
BRMS has enhanced link lists for ease of use and to ensure complete backups.
The QIBMLINK link list for IBM IFS directories is now automatically added to the supplied system backup control group *SYSGRP for new installations only. In V5R4 i5/OS and IBM i 6.1, QIBMLINK existed, but was not automatically added to *SYSGRP. Add QIBMLINK manually to *SYSGRP in existing installations. QIBMLINK is used to save system IFS files and directories.
List QIBMLINK includes the following directories:
•/QIBM/ProdData
•/QOpenSys/QIBM/ProdData
The QALLUSRLNK link list was added in IBM i 7.1. QALLUSRLNK is used to save user IFS directories and files. QALLUSRLNK is used with the QIBMLINK link list. QALLUSRLNK omits the following directories:
•/QSYS.LIB
•/QDLS
•/TMP/BRMS
•/QIBM/ProdData
•/QOpenSys/QIBM/ProdData
Usage of QIBMLINK followed by QALLUSRLNK enables more granularity than the *LINK control group entry and ensures that IBM directories are restored before user directories if a system restore is necessary. The usage of the QALLUSRLNK link list with the QIBMLINK link list also avoids the duplication of saved data that occurs with the combination of using QIBMLINK and *LINK.
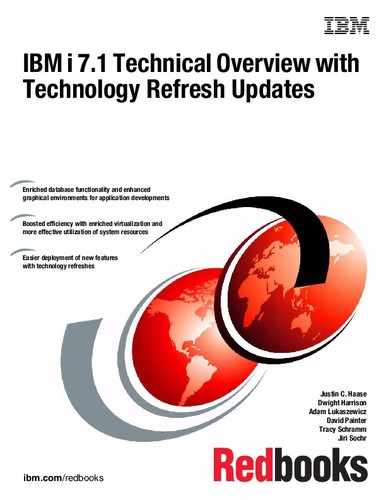
3.2.3 Support of more than 999,999 objects
To support more than 999,999 objects, BRMS has an enhanced WRKMEDIBRM panel and QP1ARCY recovery report.
The WRKMEDIBRM command previously could not show more than 999,999 objects in the saved objects field. In IBM i 7.1, if more than 999,999 objects or files are saved in a single library or save command, BRMS lists the actual number rather than 999,999 objects on the WRKMEDIBRM Object Detail panel.
Figure 3-1 shows a WRKMEDIBRM Object Detail panel. The circled field shows a saved item with more than 999,999 objects.
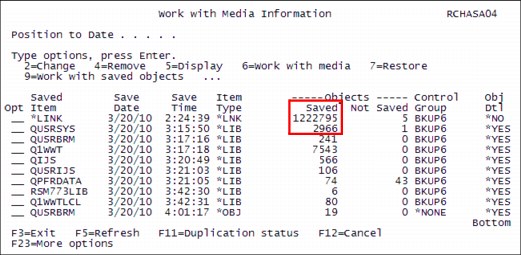
Figure 3-1 WRKMEDIBRM Object Detail panel with more than 999,999 objects
The BRMS recovery report QP1ARCY previously could not show more than 999,999 in the saved objects column. In IBM i 7.1, if more than 999,999 objects or files are saved in a single library or save command, BRMS lists the actual number, rather than 999,999 objects on the BRMS recovery report QP1ARCY.
Figure 3-2 shows an excerpt of the BRMS recovery report. The circled data shows greater than 999,999 objects were saved for the *LINK item.
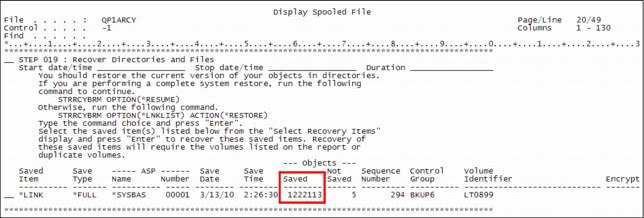
Figure 3-2 BRMS recovery report showing more than 999,999 objects saved
3.2.4 Start recovery using BRM (STRRCYBRM) command enhancements
The STRRCYBRM command was enhanced to use the Defer ID function available for out-of-order restore of specific types of objects and their associated journals. For more information about the Defer ID function, see 3.1.5, “Support for journal and journal receiver restore independence” on page 48.
Additionally, the STRRCYBRM command was enhanced to override specific recovery elements so that they use another time period. This process requires that the override recovery element (OVERRIDE) parameter is set to *YES. This action affects the ACTION parameter values of *REPORT and *RESTORE.
The following recovery elements can be selected for override:
•*ALLSYS: This element specifies that you want to recover all the system data, which includes *SAVSYS, *SECDTA, and *SAVCFG.
•*SAVSYS: This element specifies that you want to recover the operating system that is based on the BRMS media content information.
•*SECDTA: This element specifies that you want to recover the security data.
•*SAVCFG: This element specifies that you want to recover the configuration data.
The STRRCYBRM command keywords that enable overriding recovery elements are as follows:
•OVERRIDE: This keyword specifies whether you want to use another time period for a specific recovery element.
– *NO: This keyword indicates that you do not want to specify another date and time range for a specific recovery element. Recovery elements and overrides are ignored if specified.
– *YES: This keyword indicates that you want to specify another date and time range for a specific recovery element.
•RCYELEM: This keyword specifies a recovery element and its override time period. You can specify as many as three sets of them. Each set has the following parameters:
– Recovery element:
• *ALLSYS: This element specifies that you want to recover the entire system using an override. If this element is selected, you cannot specify other recovery elements.
• *SAVSYS: This element specifies that you want to recover the operating system using an override.
• *SECDTA: This element specifies that you want to recover the security data using an override.
• *SAVCFG: This element specifies that you want to recover the configuration data using an override.
– Beginning time: This parameter specifies the beginning time at which or after recovery items are included. Any items that are created before the specified time and date are not included in the items that are selected for recovery.
This parameter uses the BRMS standard methods for specifying times.
– Beginning date: This parameter specifies the beginning date on or after which the recovery items must be saved. Any entries that are saved before the specified date are not included in the recovery.
This parameter uses the BRMS standard methods for specifying dates.
– Ending time: This parameter specifies the ending time before which recovery items are included. Any items that are created after the specified time and date are not included in the recovery items that are selected for recovery.
This parameter uses the BRMS standard methods for specifying times.
– Ending date: This parameter specifies the ending date on which or before which the recovery items must be saved. Any recovery items that are created after the specified date are not included in the recovery operation.
This parameter uses the BRMS standard methods for specifying dates.
In Example 3-2, the STRRCYBRM command selects all restore items that are found regardless of time, except for the operating system restore items, which select nothing newer than 6 p.m. on 03/01/2010 because of the *SAVSYS override.
Example 3-2 STRRCYBRM command using recovery element override of *SAVSYS
STRRCYBRM PERIOD((*AVAIL *BEGIN) (*AVAIL *END))
OVERRIDE(*YES)
RCYELEM((*SAVSYS ((*AVAIL *BEGIN) ('18:00:00' '03/01/10'))))
In Example 3-3, the STRRCYBRM command selects all restore items found up to and including 03/01/2010, except for security data and configuration data, which is restored through the current date.
Example 3-3 STRRCYBRM command using recovery element override of *SECDTA and *SYSCFG
STRRCYBRM PERIOD((*AVAIL *BEGIN) (*AVAIL '03/01/10'))
RCYELEM((*SECDTA ((*AVAIL *BEGIN) (*AVAIL *END)))
(*SYSCFG ((*AVAIL *BEGIN) (*AVAIL *END))))
When overrides are specified, the recovery report QP1ARCY has an attention block that notes the override, which is an indicator to you that the latest saved data is not being used, as shown in Figure 3-3.
Figure 3-3 BRMS recovery report with override attention block
3.2.5 Recovery report enhancements
The “Verify System Information” step in the recovery report is updated to include new instructions to include the Update System Information (UPDSYSINF) command now that the system information is now saved with the QUSRBRM library. The new instructions are in the red circled area of the recovery report excerpt that is shown in Figure 3-4.
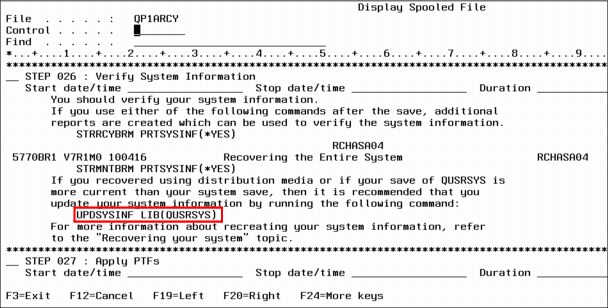
Figure 3-4 BRMS recovery report with new UPDSYSINF instructions
The “Restoring User Profiles” step is updated to include the new Allow Object Differences *COMPATIBLE value, replacing the *ALL value of previous releases, as shown in the red circle in Figure 3-5.
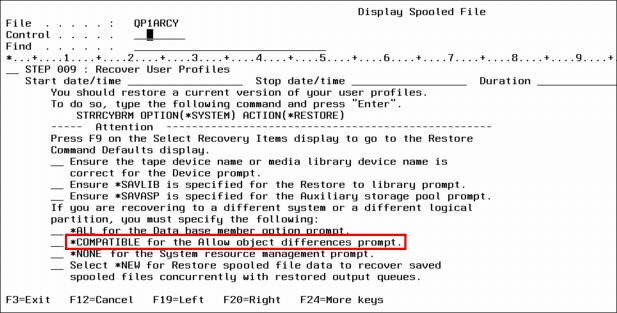
Figure 3-5 BRMS recovery report updates for support of ALWOBJDIF(*COMPATIBLE) special value
3.2.6 Output file support for BRMS restores
IBM i 7.1 BRMS supports the option to specify an output file when restoring data is saved through BRMS. The *OUTFILE value can be specified with the OUTPUT parameter in these functions:
•BRMS recovery policy
Figure 3-6 shows the third panel of the Change Recovery Policy function.
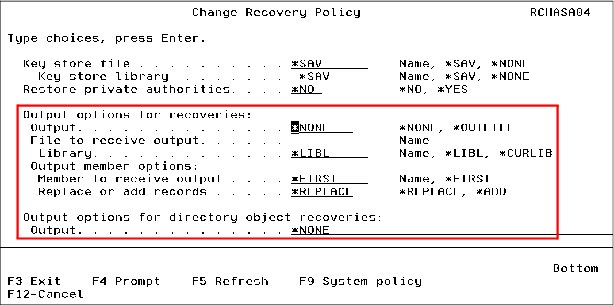
Figure 3-6 OUTPUT support parameters in the BRMS Change Recovery Policy function
Note the following information in the red box in Figure 3-6 on page 56:
The new “Output options for recoveries” section:
– The new “Output” parameter
– The new “File to receive output” and “Library” fields
– The new “Output member options” fields
The new “Output options for directory object recoveries” section:
– The new “Output” parameter
This parameter uses IFS directory syntax for the output field.
•BRMS Restore commands
– Restore Library using the BRM (RSTLIBBRM) command
– Restore Object using the BRM (RSTOBJBRM) command
– Restore (IFS) Object using the BRM (RSTBRM) command
Figure 3-7 shows the new output keywords of the RSTLIBBRM command. The RSTOBJBRM command is not shown because the keywords are identical. Note the following items in the red box:
– The new OUTPUT keyword
– The new OUTFILE keyword
– The new OUTMBR keyword
The example in Figure 3-7 places the restore output in member RS03012010 of the LIBS file in the RESTORE library.
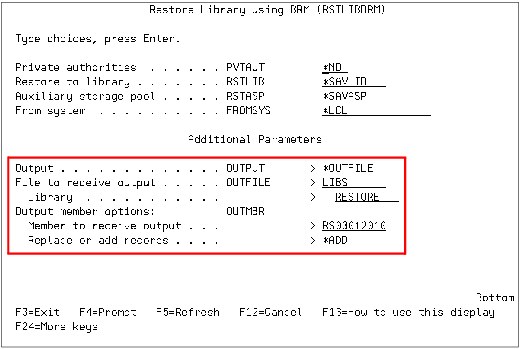
Figure 3-7 RSTLIBBRM command panel with new output keywords
•In the recovery defaults of the Work with Media Information (WRKMEDIBRM) command.
The WRKMEDIBRM recovery defaults apply only to the current session and are not permanent.
The following sequence of WRKMEDIBRM panels opens the Recovery Defaults panel, which contains the new output parameters. From the Work with Media Information (WRKMEDIBRM) panel, select option 7 (Restore) for the library to be restored, as shown in Figure 3-8.

Figure 3-8 WRKMEDIBRM navigation to Recovery Defaults panel - step 1
This option causes the Select Recovery Items panel to be displayed, as shown in Figure 3-9. On the Select Recovery Items panel, F9 (circled) displays the Recovery Defaults panel.
Figure 3-9 WRKMEDIBRM navigation to Recovery Defaults panel - Step 2
Figure 3-10 is the Recovery Defaults panel. The various output selection fields are in the box. The output fields are nearly identical to the output keywords of the RSTLIBBRM command.

Figure 3-10 WRKMEDIBRM Recovery Defaults panel
•Start Recovery using the BRM (STRRCYBRM) command when the *RESTORE action is also specified.
The WRKMEDIBRM recovery defaults apply only to the current session and are not permanent.
A sequence of STRRCYBRM display panels shows how to access the output parameters and the output parameters themselves.
Figure 3-11 shows the Select Recovery Items panel, which is generated by the STRRCYBRM command. Pressing F9 on this panel (circled) displays the Restore Command Defaults panel.
Figure 3-11 STRRCYBRM Select Recovery Items panel
On the Restore Command Defaults panel, scroll to the third window, which is shown in Figure 3-12. This panel shows the new output parameters. The output parameters on this panel look and act like the fields in the Change Recovery Policy panel that is shown in Figure 3-6 on page 56, except that they apply only to the current session.
Figure 3-12 STRRCYBRM Recovery Defaults panel - Restore options
3.2.7 Ability to select Saved ASP on RSTLIBBRM and RSTOBJBRM commands
You can use this new function to specify the auxiliary storage pool (ASP) from which a library is saved when you perform a restore using the Restore Library using BRM (RSTLIBBRM) command and the Restore Object using BRM (RSTOBJBRM) command.
Suppose that a system has a system ASP and three independent ASPs. Each of the ASPs has library TOOLS and the entire system, including the IASPs, was saved. There are three saves of library TOOLS. You can use this function to select which of the saves to restore.
The new keyword is SAVASP. Values for the parameters for the RSTLIBBRM command are as follows:
•*ANY
The library and objects that are saved is restored from any ASPs save. This value is the default value, which works as it did before IBM i 7.1.
•*SYSTEM
The saved library and objects are restored from the system ASP save.
•ASP number 1 - 32
The library and objects are restored from the specified user ASP, or the system ASP if 1 is specified.
•ASP name
The library and objects are restored from the specified ASP save.
The keyword and values for the RSTOBJBRM command are identical. The function is identical except that only objects are restored.
There are limitations about which objects can be restored to non-system ASPs. These objects are not allowed to be in user or independent ASPs.

Figure 3-13 Save ASP (SAVASP) keyword of the BRMS RSTLIBBRM command
3.2.8 Distributed backup support
New options were created for BRMS networking support to control distribution of backup history. In IBM i 6.1, all systems in a BRMS network received all history from other systems in the network.
In IBM i 7.1, there are now options to configure which systems receive information about backups and which do not. Distributed backup support reduces the data on systems that have no need to know about the saved history from other systems. The distributed backup function is available through the Change Network Group menu option of the BRMS System Policy (BRMSSYSPCY) menu.
For IBM i 6.1, the Change Network Group panel (see Figure 3-14) could not be used to receive media information. If the system was in the network group, it received the media information.

Figure 3-14 Change Network Group panel from IBM i 6.1
In IBM i 7.1, the Change Network Group panel now has a function key (F11) that displays a new BRMS Media Information panel. The Change Network Group panel in Figure 3-15 no longer shows the Receive Media Information column.
Figure 3-15 Change Network Group panel from IBM i 7.1
The new BRMS Media Information panel replaced the single column Receive Media Information value with a three column set of fields, as shown in Figure 3-16.
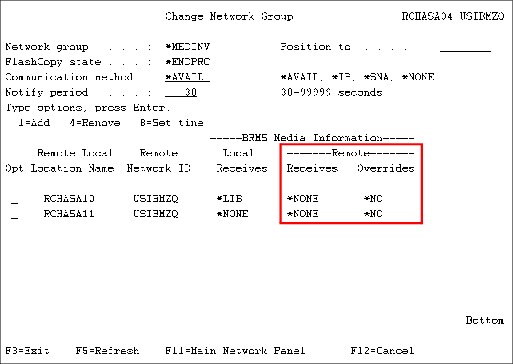
Figure 3-16 Change Network Group BRMS Information panel
Some of the fields in this panel are:
•Local Receives field
This field specifies whether media content information, and at what level, is received by the current system from the specified remote system. Media content information represents files that are on a media volume. You can specify whether media content information is shared with the current system or specify that the current system is not to receive any media content information from the specified remote system in the network group. Media inventory information is always shared between systems that are members of the network group. Possible values are as follows:
– *NONE
Media content information is not received from the specified remote system on the current system.
– *LIB
Media content information is received from the specified remote system on the current system. The information includes library level information only.
•Remote Receives field:
This value displays whether the remote system is to receive media content information, and at what level, from the current system displayed.
To change this value, you must go to that remote system and change the value on that system.
Possible values are as follows:
– *NONE
Media content information is not sent to the specified remote system.
– *LIB
Media content information is sent to the specified remote system. The information includes library level information only.
•Remote overrides field
This field represents media information overrides that are in place for the remote system for IASP high availability support that is described in 3.3.10, “High availability support for independent ASPs in a BRMS network” on page 116.
This field cannot be updated from the character-based interface, and must be set through IBM Systems Director, IBM Systems Director Navigator for i, or System i Navigator.
3.2.9 Maintenance enhancements
BRMS added enhancements to enable more concurrent maintenance than was allowed in previous releases. When you perform media moves through the Start Maintenance for BRM (STRMNTBRM) command, you now receive a BRM6717 Volume (volume-ID) was not moved to location warning message when volumes are in use and cannot be moved. The volume move report also lists an alert that the volume was in use.
Suppose that maintenance is running and a second job issues a BRMS command that attempts to use files in the QUSRBRM library that is used by the maintenance job. In this case, a BRM6714 Job (job-name) is being held by job (maintenance-job-name) message is issued to that second job’s message queue and is displayed (Figure 3-17).
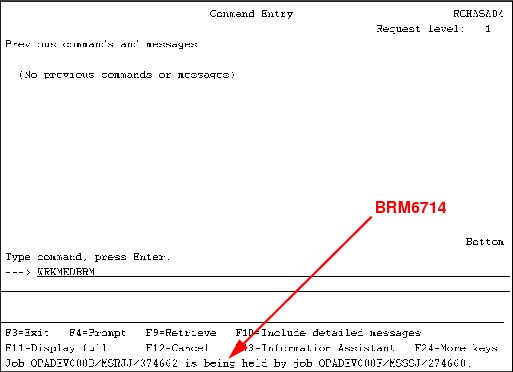
Figure 3-17 BRMS6714 message that is displayed
When maintenance uses the BRMS files, the held job is sent a BRM6716 BRM restricted procedure ended message. This message is logged in the held job’s message queue but is not displayed. The BRM6714 message is no longer displayed, indicating that the job
is continuing.
is continuing.
The job that is running the STRMNTBRM command during the period where maintenance requires exclusive use of the BRMS files lists, but does not display, message BRM6715 BRM restricted procedure started and message BRM6716 BRM restricted procedure ended, as shown in Figure 3-18.

Figure 3-18 BRM restricted procedure messages in the STRMNTBRM job message queue
In a typical maintenance run, you might see several pairs of these messages.
3.2.10 Planning Media Movement report
You can now print a report that can help you plan future moves of BRMS media.
The Print Media Movement (PRTMOVBRM) command has a new *NEXT value on its TYPE parameter. TYPE(*NEXT), combined with a future date specified in the select date (SLTDATE) parameter, generates a report of future media moves.
In Figure 3-19, the Select dates parameters are set to generate the media movement report with moves starting on the current date for seven days. The TYPE parameter is set to *NEXT. This command invocation generates a report that lists all media moves to the next location that are to occur between today and the next seven days.
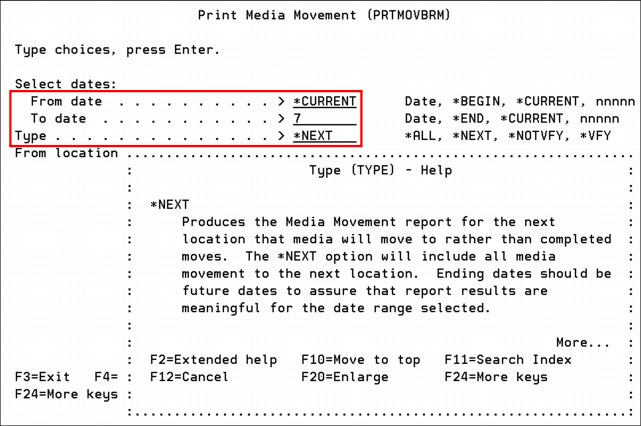
Figure 3-19 Print Media Movement panel using the TYPE parameter value of *NEXT
|
Tip: The PRTMOVBRM command has multiple functions for date entry and calculations in the “Select dates” section. Be sure to review the details of these options in the help text by pressing F1 with the cursor in the field.
|
3.2.11 Improved clearing of volumes in *ERR status
Improvements were made to simplify and speed the clearing of tape volumes in error status (*ERR). Prior releases required you to remove the media volume from inventory, add the media volume back in inventory, and then initialize the media.
In IBM i 7.1, instead of the removing and adding the media volume, you can clear the error status using new option 9 (Remove volume error status) of the Work with Media using the BRM (WRKMEDBRM) command. This action changes the media volume status to Requires Initialization (*INZ). See Figure 3-20.
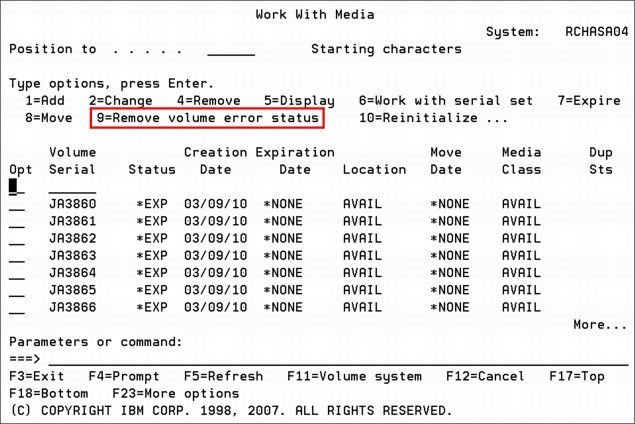
Figure 3-20 WRKMEDBRM Work with Media Panel with Remove volume error status option
When in the *INZ status, the media volume can be reinitialized by running one of the following commands
•Work with Media using BRM (WRKMEDBRM) command option 10
•Work with Media Library Media (WRKMLMBRM) command option 5
•Initialize Media using BRM (INZMEDBRM) command
You must verify that the media volume is still usable.
This new function is also available through the IBM System Director Navigator for i web interface and IBM i Access graphical user access (GUI) client.
3.2.12 Protection of volumes that are marked for duplication
BRMS no longer expires media volumes marked for duplication.
When media is marked for duplication, BRMS no longer expires the media when the Start Maintenance for BRM (STRMNTBRM) command, the Start Expiration for BRM (STREXPBRM) command, or the Work with Media using BRM (WRKMEDBRM) command option 7 (expire) is run.
The BRM expiration (QP1AEP) report lists warning messages for each volume that did not expire, as shown in Figure 3-21.
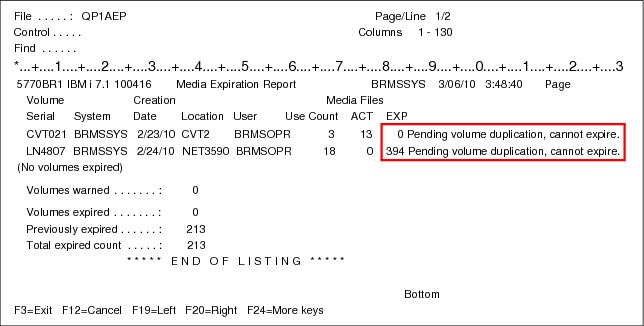
Figure 3-21 Warning messages in the BRMS expiration report
When you try to expire a volume marked for duplication through WRKMEDBRM option 7, a BRM0010 message (Volume vol-ID cannot be expired.) with reason 2 (The volume has been marked for duplication.) is displayed, as shown in Figure 3-22.
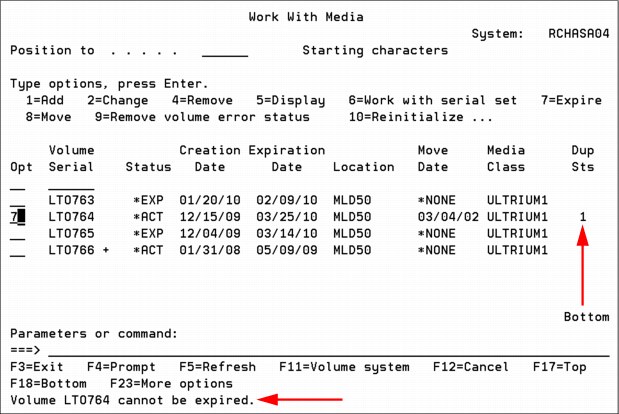
Figure 3-22 Error message when you attempt to expire a volume marked for duplication
3.2.13 Improved recovery times with new media position function
BRMS supports the new media position function that is described in 3.1.1, “Fast restore using tape position” on page 46.
The media position function is automatically and invisibly used by BRMS, but requires object level detail (*YES, *OBJ, *MBR) specified for the saved items in the control group, or on the Save Library using BRM (SAVLIBBRM) command. BRMS saves retain the media positions in the BRMS database files and BRMS restores retrieve the media positions from the BRMS database files.
The media position function is not supported on the following options:
•WRKMEDIBRM option 7 (restore) or 7 (specify object)
•WRKMEDIBRM option 9 (Work with Saved Objects) or option 9 (Work with Saved Members), 7 (Restore), or 7 (Specify object)
3.2.14 BRMS support for the special value *COMPATIBLE for ALWOBJDIF
BRMS restore functions support the *COMPATIBLE special value for the ALWOBJDIF parameter described in 3.1.2, “New ALWOBJDIF (*COMPATIBLE) restore option” on page 47.
3.2.15 Improved control with running non-BRMS saves
When you run non-BRMS saves using non-BRMS volumes on a system with BRMS, the save job no longer ends if a BRMS volume is loaded. BRMS posts a BRM1730 BRMS enrolled volume rejected message, giving you the option to load another non-BRMS volume.
3.2.16 RDX and BRMS
RDX drives, a disk-based technology, are positioned for the lower end of performance and capacity requirements. They are faster than a DAT tape, but slower than LTO. The available capacities range from 160 GB to 1.5 TB per removable cartridge.
RDX is available natively attached to an IBM i partition, by using either USB or SATA connectivity, or they also can be virtualized through VIOS or iVirtualization. The SATA support was implemented back to IBM i 6.1 through a PTF. The RDX dock is available in either a 5.25 inch internal (SATA or USB) or external USB version. The dock supports all RDX cartridges. The cartridges are reliable, rugged, and they can be shipped through courier transport. Because the media is not tape-based, there is no requirement to clean the drive.
For more information about the RDX standard, see the RDX consortium website at:
RDX devices show up as RMSxx devices, but are classified as optical (random access spinning media) devices and can be used by optical, not tape, commands.
BRMS supports these devices as optical devices as well. The following limitations apply:
•The Media Policy option ‘Mark history for duplication’ is restricted to *NO. BRMS does not allow the duplication of optical history items.
•BRMS does not track opposite side volume identifiers or double-sided volumes. Each piece of media is viewed as a single volume.
•There is no optical support for the following BRMS functions: Dump BRMS (DMPBRM), add media information to BRMS (ADDMEDIBRM), extract media information (EXTMEDIBRM), and print media exceptions (PRTMEDBRM). There is no reclaim support for optical / RDX devices.
•You can specify only one device parameter per BRMS operation; optical does not support cascading or parallel devices.
•Optical media also cannot be shared on a BRMS network. Remote duplication is not supported.
•DUPMEDBRM duplicates only entire optical volumes. The output volume must have the exact same physical characteristics as the input volume.
•Optical devices do not support software encryption.
3.2.17 Allowing volumes that are marked for duplication to be moved
In releases IBM i 7.1 and earlier, media movement is not allowed for volumes that are marked for duplication. Use the following interfaces to override this behavior and allow movement for volumes that are marked for duplication. This method is useful for virtual tape libraries, which often require virtual volumes to be moved during the duplication process.
You can perform the following actions:
•To override a move policy to allow movement when a volume is marked for duplication, run the following command:
CALL QBRM/Q1AOLD PARM('MOVMRKDUP ' '*SET' 'move policy' 'Y')
•To remove the override for a move policy that allows movement when a volume is marked for duplication, run the following command:
CALL QBRM/Q1AOLD PARM('MOVMRKDUP ' '*SET' 'move policy' 'N')
•To display all overrides for move policies that allow movement when a volume is marked for duplication, run the following command, as shown in Figure 3-23:
CALL QBRM/Q1AOLD PARM('MOVMRKDUP ' '*DISPLAY')
|
Command Entry ITSOP1
Request level: 4
Previous commands and messages:
> CALL QBRM/Q1AOLD PARM('MOVMRKDUP ' '*DISPLAY')
MOVE1
MOVE2
Bottom
Type command, press Enter.
===>
F3=Exit F4=Prompt F9=Retrieve F10=Include detailed messages
F11=Display full F12=Cancel F13=Information Assistant F24=More keys
|
Figure 3-23 Move policy exceptions display
•To remove all overrides for move policies that allow movement when a volume is marked for duplication, run the following command:
CALL QBRM/Q1AOLD PARM('MOVMRKDUP ' '*CLEAR')
|
Consideration: In releases IBM i 7.1 and earlier, there is no synchronization of this behavior to other systems in a BRMS network. For each system for which you want to use this new function, you must run the commands individually.
Statement of direction: In releases that follow IBM i 7.1, this limitation will be removed. The function will be integrated into any relevant CL commands and the GUI.
All statements about the future direction and intent of IBM are subject to change or withdrawal without notice, and represent goals only.
|
3.2.18 Support for expiration dates greater than year 2038
For versioning and media expiration, BRMS currently does not support dates beyond the year 2038. If you need an expiration date beyond 2038, you must set the date to *PERM.
|
Statement of direction: In releases that follow IBM i 7.1, this limitation will be removed. All statements about the future direction and intent of IBM are subject to change or withdrawal without notice, and represent goals only.
|
3.2.19 Setting maximum size for BRMS flight recorders
The BRMS flight recorder size for storage can now be changed. To change the maximum flight recorder size, run the following command:
CALL PGM(QBRM/Q1AOLD) PARM('FRSIZE ' '*SET ' 'XXX')
XXX is equal to 001 - 999 MB.
|
Leading zeros: XXX must always be three digits, so leading zeros must be added to the front of the numbers.
|
|
Statement of direction: In releases that follow IBM i 7.1, interfaces will be provided on the WRKPCYBRM TYPE(*SYS) work panel.
All statements about the future direction and intent of IBM are subject to change or withdrawal without notice, and represent goals only.
|
The following command can be used to display the maximum flight recorder size:
CALL PGM(QBRM/Q1AOLD) PARM('FRSIZE ' '*DISPLAY').
3.2.20 Using compression for BRMS save files
BRMS in IBM i 7.1 now supports override for the DTACPR parameter for save file saves within BRMS. The parameters of *HIGH, *MEDIUM, *LOW, *DEV, *NO, and *YES are all valid values. The override is then active for all save file operations in BRMS.
You can perform the following actions:
•To set the new save file DTACPR parameter to *HIGH, run the following command:
CALL PGM(QBRM/Q1AOLD) PARM('PARMOVR' '*ADD' 'SAVFDTACPR' '*HIGH')
•To set the new save file DTACPR parameter to *MEDIUM, run the following command:
CALL PGM(QBRM/Q1AOLD) PARM('PARMOVR' '*ADD' 'SAVFDTACPR' '*MEDIUM ')
•To set the new save file DTACPR parameter to *LOW, run the following command:
CALL PGM(QBRM/Q1AOLD) PARM('PARMOVR' '*ADD' 'SAVFDTACPR' '*LOW')
•To set the new save file DTACPR parameter to *YES, run the following command:
CALL PGM(QBRM/Q1AOLD) PARM('PARMOVR' '*ADD' 'SAVFDTACPR' '*YES')
•To set the new save file DTACPR parameter to *NO, run the following command:
CALL PGM(QBRM/Q1AOLD) PARM('PARMOVR' '*ADD' 'SAVFDTACPR' '*NO')
•To set the new save file DTACPR parameter to *DEV, run the following command:
CALL PGM(QBRM/Q1AOLD) PARM('PARMOVR' '*ADD' 'SAVFDTACPR' '*DEV')
•To remove the override, run the following command:
CALL PGM(QBRM/Q1AOLD) PARM('PARMOVR' '*REMOVE ' 'SAVFDTACPR')
Significant compression can be reached with the *HIGH setting, but at the cost of a longer save time.
To show the current override that is being used, run the following command:
CALL PGM(QBRM/Q1AOLD) PARM('PARMOVR' '*DISPLAY' 'SAVFDTACPR')
The command output is shown in Figure 3-24.
|
Command Entry ITSOP2
Request level: 4
Previous commands and messages:
> CALL PGM(QBRM/Q1AOLD) PARM('PARMOVR' '*DISPLAY' 'SAVFDTACPR')
SAVFDTACPR: *HIGH.
Bottom
Type command, press Enter.
===>
F3=Exit F4=Prompt F9=Retrieve F10=Include detailed messages
F11=Display full F12=Cancel F13=Information Assistant F24=More keys
|
Figure 3-24 SAVFDTACPR command
3.2.21 Improving IFS save performance with the ASYNCBRING parameter
|
Statement of direction: In releases that follow IBM i 7.1, the function will be integrated into any relevant CL commands and the GUI.
All statements about the future direction and intent of IBM are subject to change or withdrawal without notice, and represent goals only.
|
In releases V6R1M0 and later, the ASYNCBRING parameter can be overridden to help improve IFS save performance. To use the ASYNCBRING parameter, run the following commands:
•To override the new ASYNCBRING parameter, run the following command:
CALL PGM(QBRM/Q1AOLD) PARM('PARMOVR' '*ADD' 'ASYNCBRING' '*YES')
•To disable the ASYNCBRING parameter, run the following command:
CALL PGM(QBRM/Q1AOLD) PARM('PARMOVR' '*ADD' 'ASYNCBRING' '*NO ')
•To remove the override for the ASYNCBRING parameter, run the following command:
CALL PGM(QBRM/Q1AOLD) PARM('PARMOVR' '*REMOVE ' 'ASYNCBRING')
•To show the current override for the ASYNCBRING parameter, as shown in Figure 3-25, run the following command:
CALL PGM(QBRM/Q1AOLD) PARM('PARMOVR' '*DISPLAY' 'ASYNCBRING')
|
Command Entry ITSOP2
Request level: 4
Previous commands and messages:
> CALL PGM(QBRM/Q1AOLD) PARM('PARMOVR' '*DISPLAY' 'ASYNCBRING')
ASYNCBRING: *YES.
Bottom
Type command, press Enter.
===>
F3=Exit F4=Prompt F9=Retrieve F10=Include detailed messages
F11=Display full F12=Cancel F13=Information Assistant F24=More keys
|
Figure 3-25 Displaying the ASYNCBRING parameter
|
Statement of direction: In releases that follow IBM i 7.1, interfaces will be provided on BRMS commands and on the control groups to use the new Asynchronous Bring parameters and these calls will not work. If *YES was set in the call statement, then the backup policy reflects that action on a new field after the upgrade finishes.
All statements about the future direction and intent of IBM are subject to change or withdrawal without notice, and represent goals only.
|
3.2.22 Using STRMNTBRM to initialize media when it is expired
A new option was added to the Start Maintenance for BRM (STRMNTBRM) command to initialize enrolled BRMS media when it is expired. When the option is enabled, it requires media that is expired to be mounted on a device. The function is intended for use in environments that contain virtualized tape. The feature to initialize expired media allows disk storage consumed by virtual volumes that contain expired data to be freed.
You can perform the following actions:
•To enable this option, run the following command:
CALL QBRM/Q1AOLD PARM('INZONEXP ' '*SET ' 'xxxxxxxxxx' 'Y')
xxxxxxxxxx is a media class name.
•To disable this option, run the following command:
CALL QBRM/Q1AOLD PARM('INZONEXP ' '*SET ' 'xxxxxxxxxx' 'N')
xxxxxxxxxx is a media class name.
•To display all media classes that have this option turned on, as shown in Figure 3-26, run the following command:
CALL QBRM/Q1AOLD PARM('INZONEXP ' '*DISPLAY ')
|
Command Entry ITSOP2
Request level: 4
Previous commands and messages:
> CALL QBRM/Q1AOLD PARM('INZONEXP ' '*DISPLAY ')
MEDCLS1
MEDCLS2
MEDCLS3
Bottom
Type command, press Enter.
===>
F3=Exit F4=Prompt F9=Retrieve F10=Include detailed messages
F11=Display full F12=Cancel F13=Information Assistant F24=More keys
|
Figure 3-26 Displaying media classes with initialize on expiration
•To disable this option for all media classes that have this option enabled, run the following command:
CALL QBRM/Q1AOLD PARM('INZONEXP ' '*CLEAR ')
|
Consideration: In releases IBM i 7.1 and earlier, there is no synchronization of this behavior to other systems in the BRMS network. If you want each system to use this new function, you must run the commands that are shown above.
Initializing volumes: For IBM ProtecTIER® or other virtual tape library technologies, if volumes are initialized when they expire, performance for operations using the library might be temporarily degraded as the device frees the storage that was being used by the volume.
For native IBM i virtual tape, if volumes are initialized when they expire, system performance might be temporarily degraded as the system frees the storage that was being used by the volume.
For native IBM i virtual tape, if multiple virtual tape devices are registered with BRMS, the STRMNTBRM job log might contain CPF41B0 (‘Incorrect image catalog name specified.’) messages. These messages can be safely ignored.
|
3.2.23 Print Report using BRM (PRTRPTBRM) enhancements
The Print Report using BRM (PRTRPTBRM) command is enhanced to support the *CTLGRPSTAT value on the Report type (TYPE) parameter. The *CTLGRPSTAT report gives you information about backup control groups, which are specified on the Control group (CTLGRP) parameter, that is processed by BRMS, and meet the other selection criteria that are specified with the
PRTRPTBRM command.
PRTRPTBRM command.
The following values can be specified for the CTLGRP parameter:
•*ALL: All backups that are produced by running STRBKUBRM are included in this report. The output that is generated by CTLGRP(*NONE) is not included in this report.
•*SYSTEM: Backups that are produced by running STRBKUBRM for the *SYSTEM control group are included in the report.
•*BKUGRP: Backups that are produced by running STRBKUBRM for the *BKUGRP control group are included in the report.
•*SYSGRP: Backups that are produced by running STRBKUBRM for the *SYSGRP control group are included in the report.
•*NONE: Backups that are produced by running SAVxxxBRM commands are summarized in the report.
•Generic name: Specify the generic name of the control group to be included in the report. A generic name is a character string that contains one or more characters followed by an asterisk (*). If an * is not specified with the name, the name is assumed to be a complete control group name.
•Name: Specify the name of a control group. All backups that are produced by running STRBKUBRM for the named control group are included in the report.
The following values can be specified for the FROMSYS parameter:
•*LCL: Data returned are from the local system.
•Remote System Name: Data returned are from the specified remote system.
|
Considerations: To run PRTRPTBRM TYPE(*CTLGRPSTAT) in release IBM i 7.1, the following PTF or its superseding PTFs are required: SI46340.
To run PRTRPTBRM TYPE(*CTLGRPSTAT) with a FROMSYS parameter other than *LCL, the following PTFs are required: IBM i 7.1: SI50292, IBM i 6.1: SI50291.
Additionally, for systems other than *LCL, the BRMS Network Feature licensed program is required.
PRTRPTBRM TYPE(*CTLGRPSTAT) CTLGRP(<name>) summarizes only information about control groups that are run after the PTFs are applied.
PRTRPTBRM TYPE(*CTLGRPSTAT) CTLGRP(*NONE) summarizes information about backups that are run before or after the PTFs are applied.
The CTLGRP parameter is ignored if the TYPE parameter is not *CTLGRPSTAT.
|
Additionally, the PRTRPTBRM TYPE(*CTLGRPSTAT) includes a retention section if a value other than *NONE is specified for the CTLGRP parameter and an optional data area is created before running the command.
The retention section starts on a new page with a heading of *RETENTION. Each control group has an entry with full and incremental media retention information.
To have the retention section included by PRTRPTBRM, data area QTEMP/Q1ARPTRETN must exist for the job that is generating the report. Use the following command to create the data area:
CRTDTAARA DTAARA(QTEMP/Q1ARPTRETN) TYPE(*CHAR)
See Figure 3-27 for an example of the output.
|
Selection Criteria
Start date and time . . . . . . : 10/15/13 *AVAIL
Ending date and time . . . . . . : *END 23:59:59
Auxiliary storage pool . . . . . : *ALL
Library . . . . . . . . . . . . : *CTLGRP
From System . . . . . . . . . . : SPEED
Number of Number of Save
Control Start Start End End Objects Objects Size Save Media Save
Group Date Time Date Time Duration Saved Not saved (MB) GB/HR Class Volume Status
BIGRETAIN 10/16/13 11:11:34 10/16/13 11:12:37 0:01:03 30 0 2055 115 VRTTAP GEN008 *NOERR
LOWRETAIN 10/16/13 11:08:59 10/16/13 11:10:00 0:01:01 30 0 2055 118 VRTTAP GEN006 *NOERR
MEDRETAIN 10/16/13 11:10:13 10/16/13 11:11:20 0:01:07 30 0 2055 108 VRTTAP GEN007 *NOERR
5770BR1 V7R1M0 100416 Backup Statistic Report 10/10/13 12:00:00 Page 2
Number of Number of Save
Control Start Start End End Objects Objects Size Save Media Save
Group Date Time Date Time Duration Saved Not saved (MB) GB/HR Class Volume Status
*RETENTION *FULL 0:00:00 *INCR 0:00:00 0:00:00 0 0 0 0
BIGRETAIN 2100 D 0:00:00 2100 D 0:00:00 0:00:00 0 0 0 0
LOWRETAIN 0007 D 0:00:00 0007 D 0:00:00 0:00:00 0 0 0 0
MEDRETAIN 0090 D 0:00:00 0090 D 0:00:00 0:00:00 0 0 0 0
* * * * * E N D O F L I S T I N G * * * * *
|
Figure 3-27 Example output when selecting to view retention information
3.2.24 Support of relational database entries and fully-qualified domain names
BRMS has supported using relational database (RDB) entries for some of its communications in the past. It now supports usage of RDB entries for all communications between systems. In addition, it also allows for usage of fully-qualified domain names (FQDN) within the RDB. This applies to BRMS networking in general, and communication for BRMS Enterprise.
To use this new function, run the command WRKPCYBRM TYPE(*SYS) and select option 4 for Change Network Group. On the Change Network Group panel displayed, set the Communications Method field to *RDB as shown in Figure 3-28.
|
Tip: Be aware that *RDB does not appear as an option and is not listed in the online help text, but it is a valid entry and functions as described here.
|
|
Change Network Group
Network group . . . . : *MEDINV Position to . . . . :
FlashCopy state . . . : *ENDPRC
Communication method : *RDB *AVAIL, *IP, *SNA, *NONE
Notify period . . . . : 30 30-99999 seconds
|
Figure 3-28 Configuring system to use RDB for BRMS communications
Use the WRKRDBDIRE command to add or modify existing remote database entries as needed.
3.2.25 Duplicate Media using BRM (DUPMEDBRM) enhancements
BRMS can be configured to allow multiple parallel input volumes to be appended to the same target volume when running a DUPMEDBRM command. If the TOSEQNBR parameter is 1, then the first volume starts on a scratch volume and all other volumes in the parallel set are appended to that volume until it is full.
This function can be useful in an environment where the initial save is performed in a multi-stream method to a virtual tape library with multiple virtual tape drives. In many cases, saving to multiple virtual tape drives within a VTL can provide better performance. However, duplicating those virtual tapes to the same quantity of physical media might not be wanted, cost-effective, or a good use of high-capacity media.
To enable this function, create a data area using the following command:
CRTDTAARA QUSRBRM/Q1AALWMFDP TYPE(*CHAR) LEN(1)
Note these considerations when using this command:
•When doing restores from the duplicated single volume, the parallel resources parameter needs to be set to a minimum and maximum of 1, PRLRSC(1 1).
•Ensure that only expired media is available in the media class specified in the MEDPCY parameter on the DUPMEDBRM command. If there are any active volumes in that media class, they will have data appended to them.
•Restores from the duplicate media can potentially take longer than using the original media.
|
Tip: To revert BRMS back to the prior method of duplication (a one-to-one volume relationship), delete the QUSRBRM/Q1AALWMFDP data area.
|
3.2.26 Support for simultaneous batch-mode DUPMEDBRM
The Duplicate Media using BRMS (DUPMEDBRM) command supports using multiple batch jobs to asynchronously duplicate media sets. The batch jobs used for duplication are submitted using the Job description and Job queue fields in the BRMS submitted jobs section of the BRMS system policy.
The job log from the DUPMEDBRM command contains messages that indicate which batch jobs are running the duplication. Each of these duplication jobs sends completion or error messages to the BRMS log, so monitor the BRMS log to verify that each of the duplication jobs has completed successfully.
To enable DUPMEDBRM batch job options for the current job, run the following command:
CALL PGM(QBRM/Q1AOLD) PARM('DUPBATCH' '*SET' 'nn')
Where nn is the number of batch jobs to use. This value must be greater than or equal to '00', and less than or equal to the number of device resources available to be used during the duplication. The value of '00' indicates to use the default behavior.
To display the current job's DUPMEDBRM batch job options, run the following command:
CALL PGM(QBRM/Q1AOLD) PARM('DUPBATCH' '*DISPLAY')
To remove the current job's DUPMEDBRM batch job options, run the following command:
CALL PGM(QBRM/Q1AOLD) PARM('DUPBATCH' '*REMOVE')
The command has these restrictions:
•This call to DUPBATCH applies only to the current job.
•The number of values that are specified for the Input volume list (FROMVOL) parameter on the DUPMEDBRM command must include more that one volume identifier to be duplicated.
•If needing to submit the DUPMEDBRM to batch, a program must be created that has the call to the DUPBATCH and the DUPMEDBRM command in it. This program can then be submitted to batch.
•Batch jobs can be used only when a volume name, *LIST, or *SEARCH is specified for the From volume identifier (VOL) parameter. Batch jobs are not used when *SCHHST or *RESUME is specified for the From volume identifier (VOL) parameter.
•If the media being duplicated was created during a parallel save, restores from the duplicated media require the same or fewer number of resources used during the DUPMEDBRM command.
•The Output volume list (TOVOL) parameter must be *MOUNTED. Specifying output volumes is not supported.
•This feature is not supported when using the AUTODUP function within media policies.
3.2.27 Ability to use save files in independent ASPs as targets for save operations
Media policies that have the “Save to save file” field set to *YES allows independent auxiliary storage pools (IASP) names to be specified for the ASP for save files field.
The IASP that is specified for the ASP for save files field must have an ASP number in the range 33 - 99.
When running a backup or recovery using a save file on an IASP, the IASP must be in the job’s name space. The IASP can be added to the name space by using the SETASPGRP command or adding a *SETASPGRP entry to a control group. See Figure 3-29.
|
Change Media Policy
Media policy . . . . . . . . . . : SAVFIASP
Type choices, press Enter.
Retention type . . . . . . . . . . 2 1=Date, 2=Days,
3=Versions, 4=Permanent
Retain media . . . . . . . . . . 7 Date, Number
Deleted library retention. . . . *NONE Number, *NONE
Move policy . . . . . . . . . . . *NONE Name, *NONE, *ADSM, F4
Media class . . . . . . . . . . . *NONE Name, *SYSPCY, *ADSM, F4
Storage location . . . . . . . . . *ANY Name, *ANY, F4 for list
Save to save file . . . . . . . . *YES *YES, *NO
ASP for save files . . . . . . . SMALLIASP Name, *SYSTEM, 1-32
Save file retention type . . . . 4 1=Date, 2=Days,
3=Permanent, 4=None
Retain save files . . . . . . *NONE Date, Number, *NONE
ASP storage limit . . . . . . . *SYS *SYS, 1-99
Secure media . . . . . . . . . . . *NO *YES, *NO, *ADSM
|
Figure 3-29 Setting a media policy to use an IASP as a destination for BRMS save files
|
Note: If the IASP did not exist before installation and configuration of BRMS, running either the DSPASPBRM or WRKASPBRM command is necessary to make the IASP known to BRMS. After it is known to BRMS, the IASP name can be specified in the “ASP for save files” parameter.
|
3.2.28 Move media using BRM (MOVMEDBRM) allows for multiple locations
The From location (LOC) parameter on the MOVMEDBRM command allows multiple values (up to 10) to be specified.
Using multiple From location values allows one MOVMEDBRM command to be run from a central system even if the central system is not connected to the devices that are used by the other systems in the BRMS network. See Figure 3-30.
|
Move Media using BRM (MOVMEDBRM)
Type choices, press Enter.
Move policy . . . . . . . . . . *ALL *ALL, OFFSITE
From location . . . . . . . . . > LOCATION1 *ALL, *HOME, TAPMLB01, TAPM...
> LOCATION2
> LOCATION3
> LOCATION4
> LOCATION5
> LOCATION6
> LOCATION7
> LOCATION8
> LOCATION9
> LOCATION10
Container . . . . . . . . . . . *ALL Name, *ALL
Media class . . . . . . . . . . *ALL *ALL, FMTOPTUDF, SAVSYS, UL...
System name . . . . . . . . . . *ALL
File group . . . . . . . . . . . *ALL *ALL, *NONE, *SYSTEM, *BKUG...
File group type . . . . . . . . *ALL *ALL, *NONE, *BKU, *ARC
Output . . . . . . . . . . . . . *PRINT *PRINT, *OUTFILE
|
Figure 3-30 Up to 10 locations can be specified on the MOVMEDBRM command
3.2.29 Monitor Save While Active (MONSWABRM) functionality enhancement
The Monitor Save While Active (MONSWABRM) command now monitors all checkpoint messages from more than one save. Before this enhancement, the MONSWABRM command only monitored for a save-while-active message from one save even if there was more than one save associated with the backup.
|
Tip: To revert to the previous MONSWABRM behavior, run the following commands:
CRTDTAARA DTAARA(QUSRBRM/Q1ASYNCMSG) TYPE(*CHAR)
CHGOBJOWN OBJ(QUSRBRM/Q1ASYNCMSG) OBJTYPE(*DTAARA) NEWOWN(QBRMS)
|
3.2.30 Improvements in online Domino save performance
Support to use the IFS API pattern key instead of traversing for online Lotus Domino directories has been added to improve Domino online save performance.
3.2.31 Restores of incrementally-saved objects allowed
Support has been added to allow incremental saves to be restored, without restoring a full save, when *SAVDATE is specified for the Save level (SAVLVL) parameter on the Restore Library using the BRM (RSTLIBBRM) command.
To enable this function in the current job, run the following command:
CRTDTAARA DTAARA(QTEMP/Q1ADMEDPCY) TYPE(*CHAR) LEN(1)
To enable this function in all jobs, run the following command:
CRTDTAARA DTAARA(QUSRBRM/Q1ADMEDPCY) TYPE(*CHAR) LEN(1)
3.2.32 Miscellaneous BRMS enhancements
Following are miscellaneous BRMS enhancements:
•Support of *ULTRIUM6 tape format.
•Additional diagnostic information is provided for media with mount issues.
•Inquiry messages that have been responded to now remain in BRMS job logs.
•Automatic duplication to media setting within a media policy can be overridden on a per-job basis.
•Duplicate Media using BRM (DUPMEDBRM) parameter VOL(*SCHHST) handles more volume sequences.
•BRMS has enhanced processing of inquiry messages related to media issues, and now allows all volumes to be revalidated for use. That way, if a volume was previously rejected for an operation due to incorrect location, media class, or some other value that has since been changed, that media now has an opportunity to be used.
3.3 BRMS enhancements to GUI and web interfaces
As an alternative to the BRMS character-based interface, BRMS provides a full function graphical user interface (GUI). System i Navigator is a client-based GUI system management console that uses a BRMS plug-in to offer full-featured BRMS capabilities.
IBM Navigator for i and IBM Systems Director are web-based interfaces that had limited BRMS function in IBM i 6.1. The capabilities of these interfaces were greatly expanded into a full-featured BRMS interface, bringing these web interfaces into parity with the client-based System i Navigator product.
|
Note: IBM Navigator for i is the current name for the product that was previously known as IBM Systems Director Navigator for i.
|
This section describes the new capabilities and changes in the System DIrector web interfaces and points out which ones are also new to the System i Navigator product. This section describes the following enhanced functions:
|
Required features: To use the IBM i 7.1 enhancements, you must install the BRMS 7.1 plug-ins. There are instructions at the following link for installing the plug-ins for the client-based System i Navigator:
|
Also in IBM i 7.1, management of tape devices and libraries were added to IBM Systems Director and IBM Navigator for i. For more information, see 17.7, “New journal management enhancements” on page 704.
3.3.1 Added support for the IBM Systems Director web browser environment
Functions previously available and new IBM i 7.1 functions accessible through IBM Navigator for i are now also available through IBM Systems Director.
Both products’ BRMS functions are almost functionally and visually identical. The major differences are the navigation steps to get to the BRMS functions and the main BRMS window.
IBM Systems Director is intended for multiple systems and multiple system platforms. IBM Navigator for i is intended for managing environments that are running IBM i.
3.3.2 IBM Systems Director navigation to BRMS functions
IBM Systems Director, being a multiplatform and multiple system environment, requires navigation steps to select an IBM i system and to navigate to the BRMS functions. This section describes how this task is done. This section also describes the main BRMS window functions.
To access the BRMS functions for a particular IBM eServer iSeries or IBM i, complete the following steps:
1. Log on to IBM Systems Director.
2. Select a system resource that is an IBM i system or partition.
3. Access the IBM i resource.
4. Navigate to the BRMS function.
5. After logging in to the IBM Systems Director, you see the Systems Director Welcome window. In the view pane, at the upper left corner, is the Navigate Resources link, as shown in Figure 3-31. Click Navigate Resources.
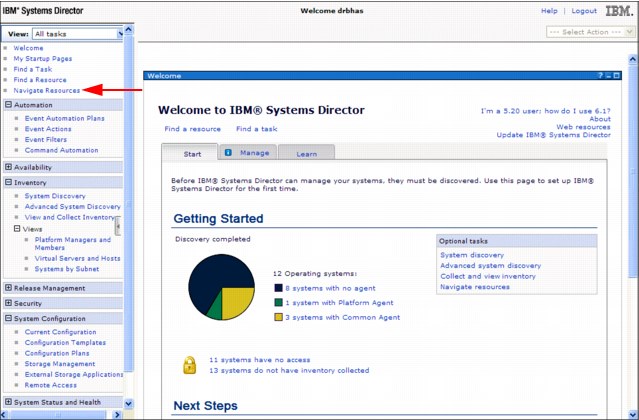
Figure 3-31 IBM Systems Director Welcome window
6. The Navigate Resources pane lists the various resource groups (Figure 3-32). Although you can select several of the groups to select an IBM i system, for this example click All Operating Systems.

Figure 3-32 IBM Systems Director Navigate Resources group list window
7. As shown in Figure 3-33, a list of member systems in the group is displayed. Note the OS Type column at the right of the display. Identify an IBM i system, and click its link.

Figure 3-33 IBM Systems Director Navigate Resources Operating System group list
8. After selecting a particular system, the resource window that is shown in Figure 3-34 is displayed. When you select the Actions menu, the first drop-down menu is displayed. When you move your cursor to IBM i Management, another menu of management functions is displayed. Backup Recovery and Media Services is at the top of the list of management functions, as shown in Figure 3-34. Select the Backup Recovery and Media Services link.
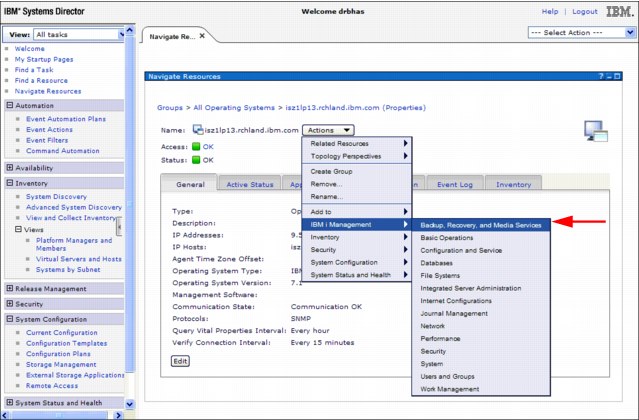
Figure 3-34 Navigation from selected system to the BRMS function
9. The BRMS initial window opens, as shown in Figure 3-35. The initial window is described in 3.3.4, “Enhancements to the BRMS initial window” on page 93.
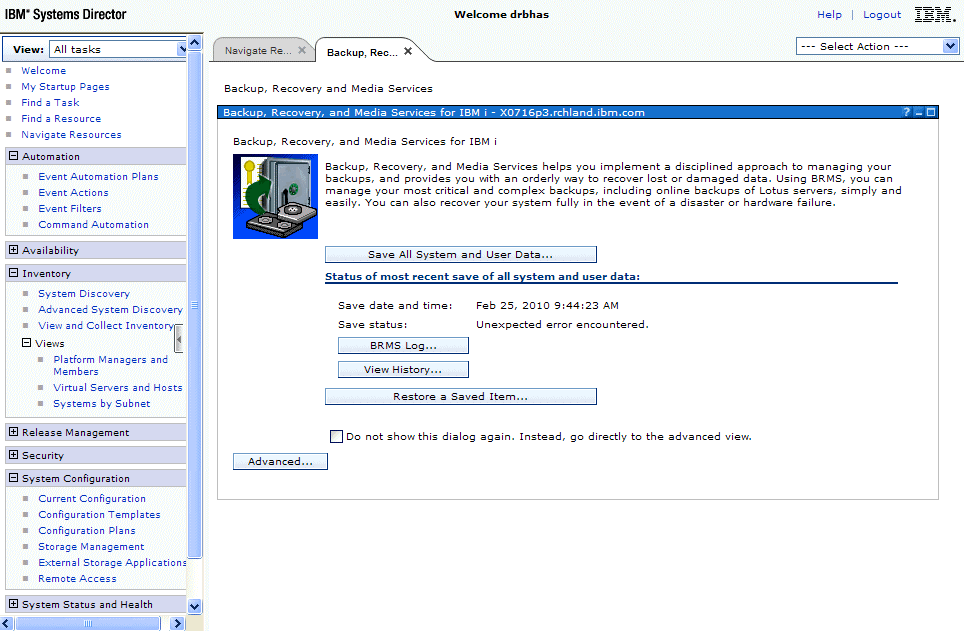
Figure 3-35 IBM Systems Director BRMS initial window
3.3.3 IBM Navigator for i navigation to BRMS functions
IBM Navigator for i, being a single IBM i environment, has much simpler navigation for accessing the BRMS function than the IBM Systems Director product. Although this function is not a new function, it is included here for reference. This section reviews how this navigation is done and describes changes to the main window of the BRMS functions.
To access the IBM Navigator for i Welcome window (Figure 3-37 on page 91), you must meet the following conditions:
•The *ADMIN HTTP server must be started on the IBM i system.
•Open a web browser to http://system-name:2001 (where system-name is the host name of the IBM i system).
•Log on with an IBM i user profile with sufficient privileges.
Run the following steps:
1. When accessing the IBM Navigator for i Welcome page, you see a window similar to that in shown in Figure 3-36. Enter your user name and password and click Log In.
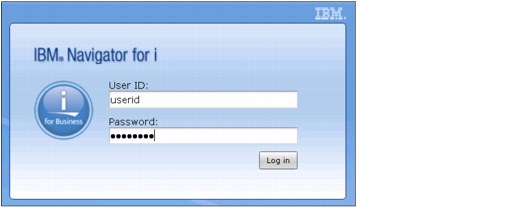
Figure 3-36 IBM Navigator for i logon
2. After successfully logging in, the Welcome window opens, as shown in Figure 3-37. If the section for “IBM i Management” is collapsed, click the plus to the left of the text to expand the list.
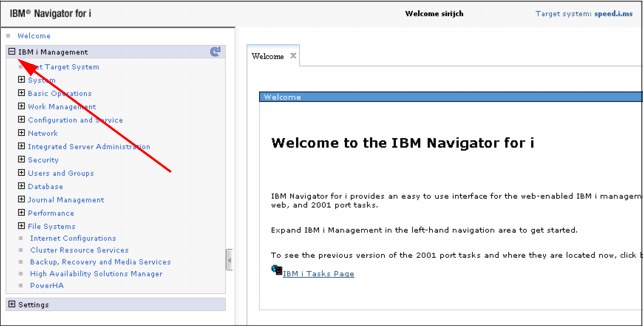
Figure 3-37 IBM Navigator for i Welcome window
3. After you expand the IBM i Management item, you see a list of links to IBM i management functions (Figure 3-38). At the bottom of the list is the Backup, Recovery and Media Services option. Click this link and a tab opens that shows the BRMS initial window.

Figure 3-38 IBM Navigator for i - BRMS initial window
3.3.4 Enhancements to the BRMS initial window
This section describes changes to the initial window of the BRMS functions when it is accessed through IBM Systems Director and IBM Navigator for i. The BRMS tab with the initial window is nearly identical for both.
Here is what is new on the window, as shown in Figure 3-39:
•The date, time, and status of the most recent save of all system and user data. The date, time, and status reported here are for the last run of the *SYSTEM control group. If your total system saves are run under your own backup group, they are not shown here.
•Buttons to view the BRMS log and to view BRMS history. If the system has never run the *SYSTEM backup control group, the preceding items are not shown.
•The check box to enable skipping of the initial window and to go directly to the advanced functions window.

Figure 3-39 Enhancements to BRMS web initial window as shown in IBM Systems Director
3.3.5 BRMS advanced functions window
To access the BRMS advanced functions from the initial window, click Advanced. The BRMS advanced functions window opens, as shown in Figure 3-40.
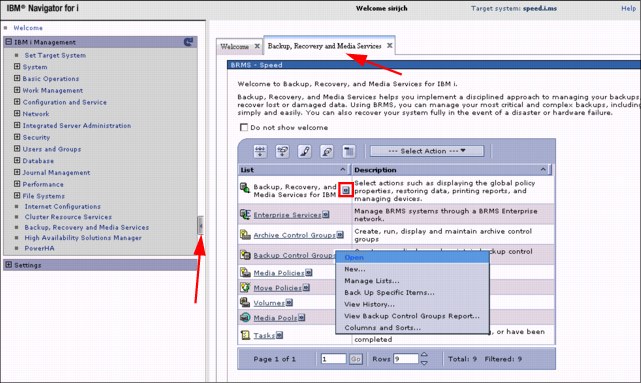
Figure 3-40 BRMS advanced functions window
The format of the window is a page with a tab. Selecting the tab (top arrow) brings that page to the foreground and places the others in the background.
The arrow at the left points to an object that, when clicked, can hide the left navigation pane. The remaining figures in this chapter do not show the navigation pane.
The small circled icon, when selected, opens a menu of actions. In Figure 3-40, the menu is shown for the BRMS Backup Control Groups field.
3.3.6 Scheduling support for BRMS
Scheduling support was added to IBM Systems Director and IBM Navigator for i. The following actions can be scheduled:
•Back up and archive control groups
•Maintenance activities, including:
– Media maintenance, such as expiration and moves
– Reporting, such as expired media, media audit, media information, system information, and recovery reports
– BRMS file management, such as journal receiver changes, data cleanup, and BRMS file reorganization
To schedule a backup control group to run, open the menu for Backup Control Groups from the BRMS advanced menu, as shown in Figure 3-41.
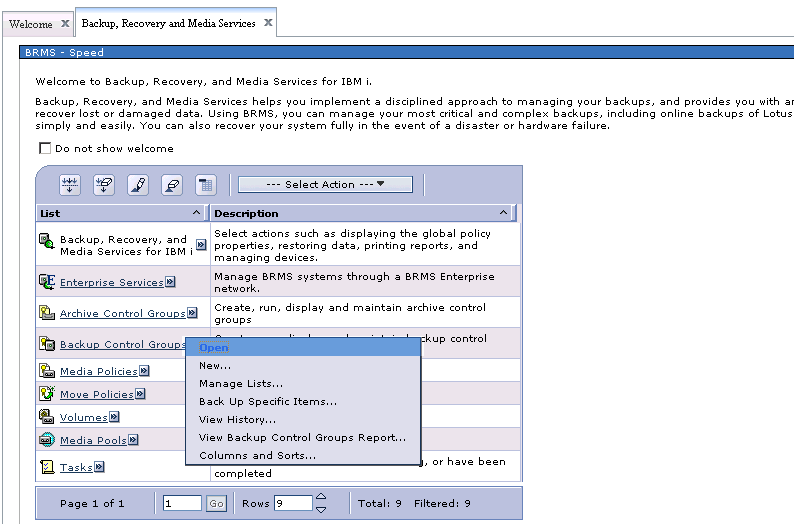
Figure 3-41 Open action of Backup Control Groups menu
Open Backup Control Groups
To open backup control groups, complete the following steps:
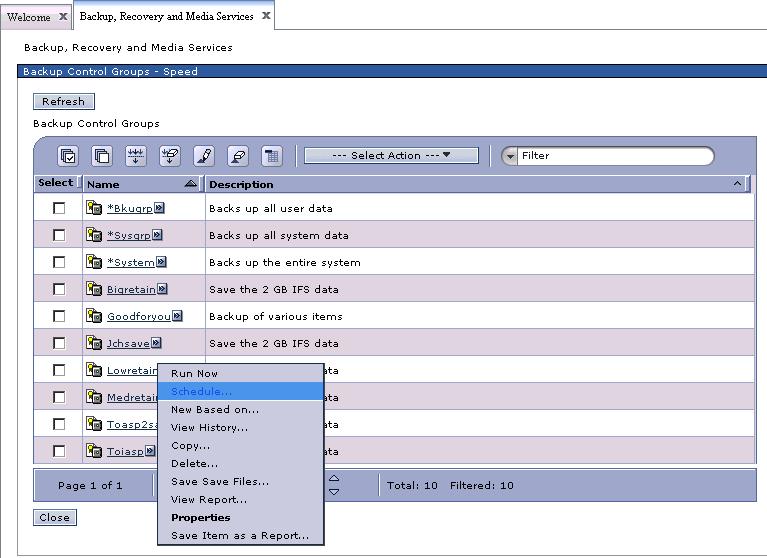
Figure 3-42 Selecting schedule on a backup control group
2. Open the menu for the control group that is to be scheduled. Select Schedule from the menu. You are presented with a window offering overrides as shown in Figure 3-43. Modify any overrides as needed and click OK.

Figure 3-43 Override options available prior to scheduling a control group
3. The Schedule Information window opens, as shown in Figure 3-44. Schedule the backup control group to run once and click OK.
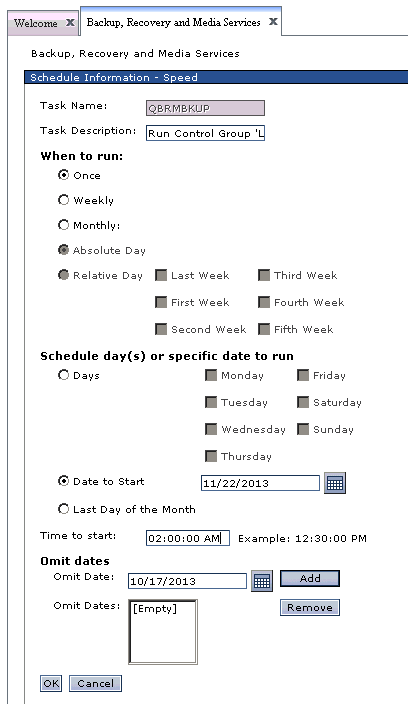
Figure 3-44 Scheduling Information window
Scheduling BRMS maintenance
The following procedure describes one way of scheduling BRMS maintenance:
1. From the BRMS advanced menu, click Select Action to display a menu, as shown in Figure 3-45. From the menu, select Run Maintenance and click Go.

Figure 3-45 Selecting Run Maintenance from the Select Action drop-down menu
The Run Maintenance window (Figure 3-46) opens.

Figure 3-46 Run Maintenance window
2. Clicks Options. The Run Maintenance Options window (Figure 3-47) opens. The Run Maintenance Options window has three options to choose from:
– Media (as shown in Figure 3-47)
– Print (shown in Figure 3-48)
– File Management (shown in Figure 3-49 on page 101)
Select maintenance options as required.
Click OK and the Run Maintenance window shown previously (Figure 3-46 on page 99) is displayed.

Figure 3-47 Run Maintenance Options - Media options window
Figure 3-48 shows the Print options.
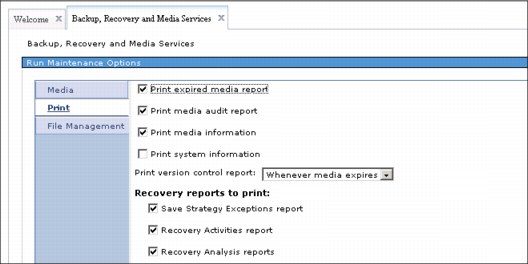
Figure 3-48 Run Maintenance Options - Print options window
Figure 3-49 shows the File Management options.

Figure 3-49 Run Maintenance Options - File Management options window

Figure 3-50 Schedule Information window
This Schedule Information window looks identical and operates identically to the Schedule Information window that is used when you schedule a backup control group. The differences are with the Task name and Task Description field contents at the upper left of the window.
If the task is already scheduled, the current values are shown. If you make no changes and click OK, the maintenance is not scheduled because it is already scheduled. An error window opens.
If you change the schedule, then click OK, a Run Maintenance confirmation window (Figure 3-51) opens, giving you a chance to change any options, cancel the request, or accept the Run Maintenance as configured.
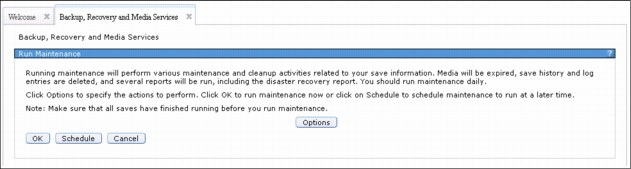
Figure 3-51 Run Maintenance Confirmation window
4. Click OK to complete scheduling maintenance.
Viewing scheduled tasks
To view scheduled tasks, complete the following steps:
1. Expand the menu for Tasks from the list column of the BRMS advanced menu.

Figure 3-52 Task List menu with Open selected
Figure 3-53 shows the window that opens, which is a list of scheduled BRMS maintenance tasks.

Figure 3-53 List of BRMS maintenance tasks
In IBM i 6.1, only active or completed tasks can be viewed or monitored. In IBM i 7.1, scheduled tasks can be viewed, including those tasks that are scheduled by System i Navigator.
BRMS 5250 support lists System i Navigator, IBM Systems Director, and IBM Navigator for i BRMS tasks and jobs.
|
Note: Enhancements in IBM i 7.1 allows for the following items to be scheduled using the IBM Navigator for i web interface:
•Backups using control groups
•Media movement
•Save of all save files
|
3.3.7 Added option to the BRMS Log to filter messages by control groups
In IBM i 7.1, the BRMS Log can now be filtered by control group. You can filter by one control group at a time. Similar functionality is now available in the System i Navigator client.
To use this option, you can select BRMS Log from the BRMS initial menu that is shown in Figure 3-38 on page 92. You can also navigate to the Task list menu shown in Figure 3-52 on page 103, except that instead of clicking Open, click BRMS Log.
Another way that you can accomplish the same objective is by choosing BRMS Log from the Select Action menu of the BRMS advanced function menu page, as shown in Figure 3-54.
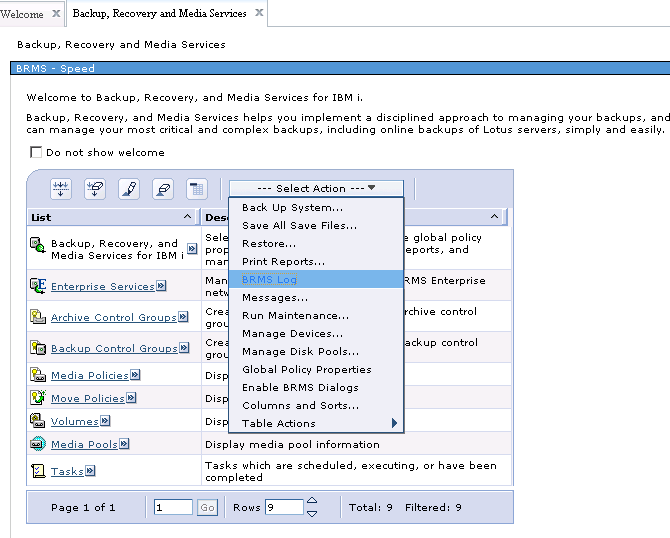
Figure 3-54 Selecting BRMS Log from the Select Action drop-down menu
Regardless of the method that is used to access the BRMS log, the BRMS Log - Include window opens, as shown in Figure 3-55.

Figure 3-55 New Control group selection of BRMS Log - Include window
The new control group selection parameters are shown. The Browse button displays a list of controls groups from which you can make selections.
A partial view of the resulting control group for BRMS log listing is shown in Figure 3-56.
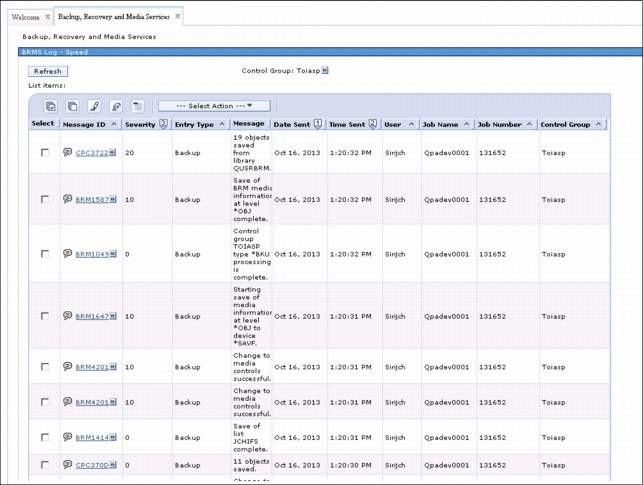
Figure 3-56 BRMS Log list - Filtered by control group TOIASP
3.3.8 Ability to mark and unmark volumes for duplication
IBM Navigator for i has the same mark and unmark for duplication functions as WRKMEDBRM options 18 and 19. In this section, the navigation is described.
In Figure 3-57, the Volume list menu is displayed with the Open option specified.
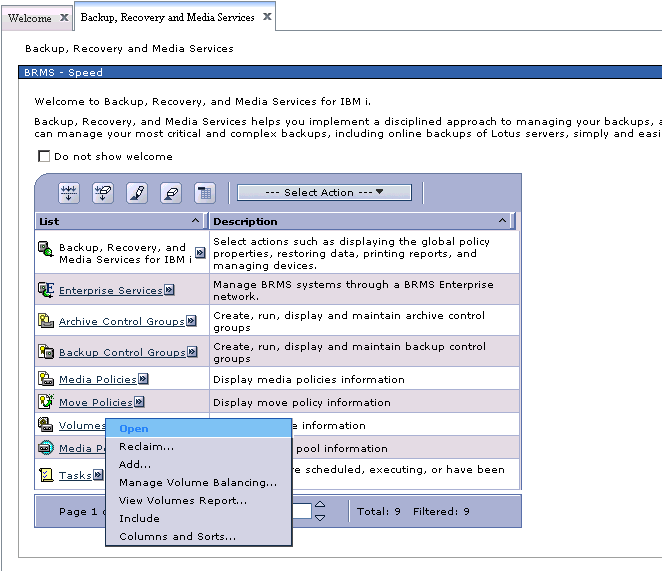
Figure 3-57 Opening the volume list
When you click Open, the volumes table is displayed. From the volume table, open the menu for a specific volume, as shown in Figure 3-58.
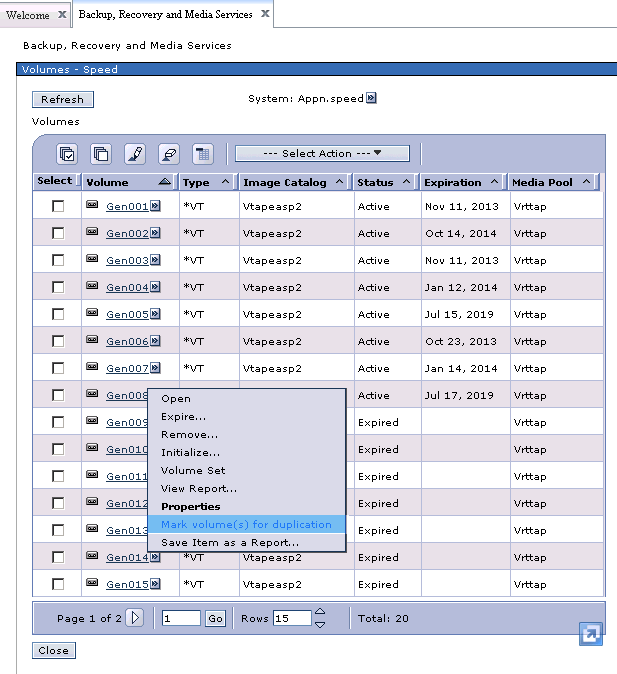
Figure 3-58 Volumes table with the menu displayed for volume GEN008
You can tell that the volume is not marked for duplication because the Mark volume(s) for duplication option exists in the menu. Select the mark option, and the Confirm Volume Action window (Figure 3-59) opens.
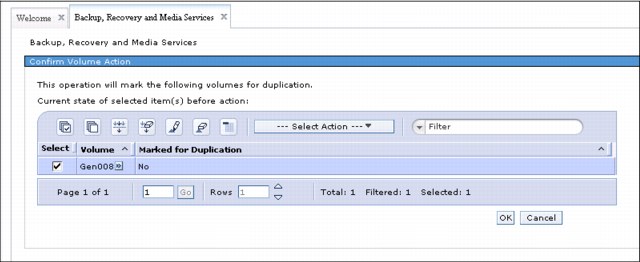
Figure 3-59 Confirm Volume Action window
Click OK and the volume is marked duplication. The Volumes window opens again.
You cannot tell from the Volumes table window whether the volume is marked. One way to verify that the volume is marked is to select the volume, open its menu, and look at its contents, as shown in Figure 3-60.

Figure 3-60 Volume menu that shows Unmark volume(s) for duplication
Because the Unmark volume(s) for duplication option is shown, you know that the volume is marked for duplication.
If you want to unmark the volume, click the Unmark option.
Suppose that you do a significant amount of marking and unmarking for duplication. You can modify the volume table and add the “Marked for Duplication” column to the table view. In the following scenario, you remove the “Image Catalog” column to keep the table narrow enough to fit on the window. To accomplish this task, open the Select Action menu, as shown in Figure 3-61, and select Columns and Sorts.
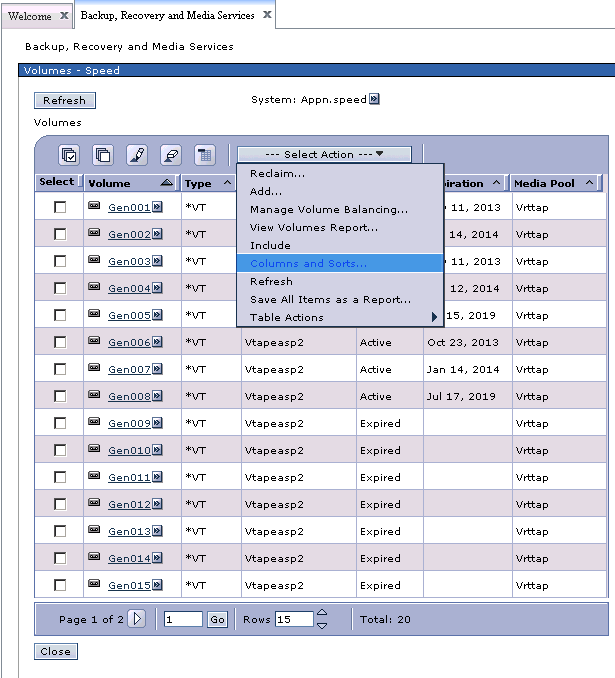
Figure 3-61 Select Action menu - Columns and Sorts action
When Columns and Sorts is selected, the Set Columns to Display and Sort window opens. Figure 3-62 shows a “Show Column” column in which the columns are selected for display.

Figure 3-62 Set Columns to Display and Sort window
You do not want the Image Catalog column to be displayed, so you click to clear that check box. You want the Marked for Duplication column to display, so you select the check box to include that column for display. When you click OK, the listing displayed in Figure 3-63 is shown.
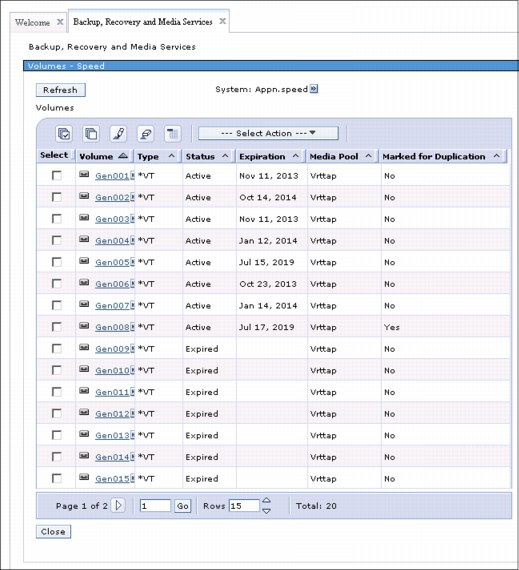
Figure 3-63 Volume table with column changes
The Image Catalog column is removed and the Marked for Duplication column is shown. You can now see the Marked for Duplication status of each volume without selecting each one.
3.3.9 Multiple email address support
Multiple email addresses can now be specified for sending BRMS alerts. This function is not available under 5250 emulation, but is supported by System i Navigator, IBM Systems Director and IBM Navigator for i interfaces.
To configure this support, access the Global Policy Properties menu from the BRMS advanced menu, as shown in Figure 3-64.

Figure 3-64 Selecting Global Policy Properties
The Global Policy Properties window opens, as shown in Figure 3-65.

Figure 3-65 Global Policy Properties window
Click Network. In the email address field, multiple email addresses can now be entered (separated by commas), as shown in Figure 3-66.

Figure 3-66 Email address field with multiple entries on the Network policy properties window
3.3.10 High availability support for independent ASPs in a BRMS network
This function runs an incremental save from any system in the BRMS network for IASPs using the IBM i Clustering technology. Suppose that System A has run a full backup of an IASP and the save information that is stored in BRMS databases is synchronized to System B in the BRMS network. Because System B has System A's save information, System B can do an incremental save using reference dates from that save information.
This feature is only available through the BRMS graphical user interfaces of IBM Systems Director web environment, IBM i Navigator web environment, or System i Navigator running on a PC.
To configure this function, complete the following steps:
1. Click Backup, Recovery, and Media Services → Global Policy Properties. The window that is shown in Figure 3-65 on page 115 opens.
2. On the Global Policy Properties window, select the Network tab.
3. Click Manage Disk Pool History as shown in Figure 3-67. The BRMS graphical interface refers to IASPs as disk pools.
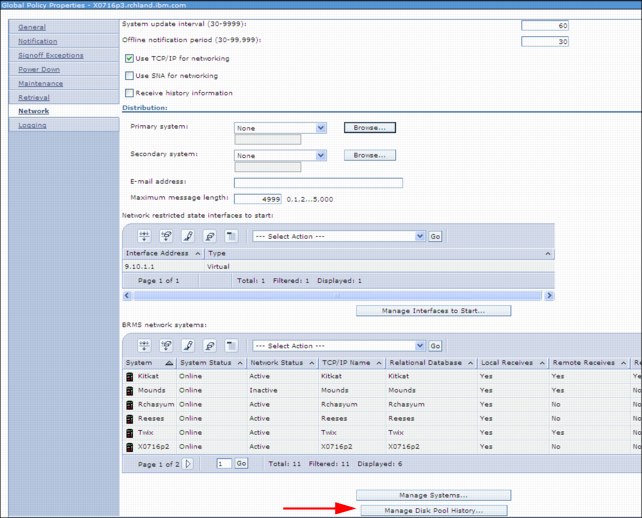
Figure 3-67 Global Policy Properties - Network Properties
4. On the Manage Disk Pool History to Send window, click List actions from the menu bar and select New, as shown in Figure 3-68.
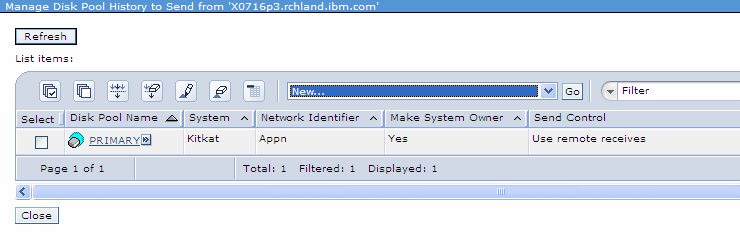
Figure 3-68 Send New Disk Pool History
5. Enter the disk pool name, the system name, and network identifier of the system to which you want the history information to be sent (Figure 3-69).
Decide whether to use the BRMS media information remote receives value that is defined by “Send to system”. You can override that systems value by selecting the Always send option.

Figure 3-69 Send Disk Pool History Properties
To determine what the Remote Receives value is for the remote system, view it by going back to the Global Policy Properties window, clicking Network properties, and clicking Manage Systems. The value is listed under the Remote Receives column for that remote system, as shown in Figure 3-70.

Figure 3-70 Checking a System’s Remote Receives value
6. Return to the Send Disk Pool History addition of a new disk pool window and click OK to complete the addition.
3.3.11 Enhanced maintenance features in the backup control group
You can now use the BRMS maintenance features in the backup control group to run movement, expire partial volume sets, and reorganize BRMS database files.
Figure 3-71 shows the Global Policy Properties - Backup Maintenance Options window. The new Run move policies and Expire partial volume sets are circled.
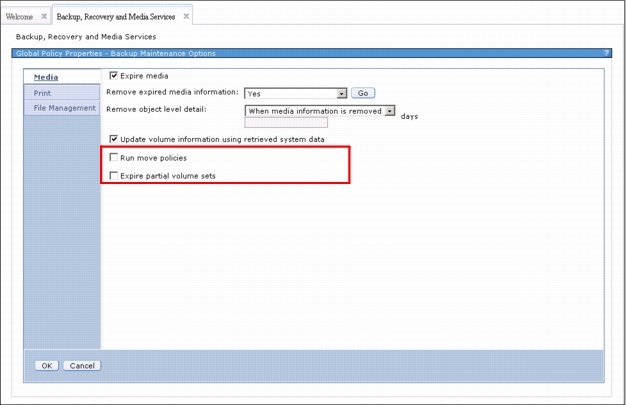
Figure 3-71 Global Policy Properties - Backup Maintenance Options
Click File Management and the new Reorganize BRMS database option becomes available, as shown in Figure 3-72.

Figure 3-72 Global Policy Properties - Backup Maintenance Options, Reorganize BRMS database option
3.3.12 BRMS Enterprise function
BRMS now includes the new BRMS enterprise function that you can use to centralize your daily BRMS chores that you have on multiple systems on one central system. You can do this task with either individual BRMS systems, one BRMS network, multiple BRMS networks, or any combination thereof, as shown in Figure 3-73.
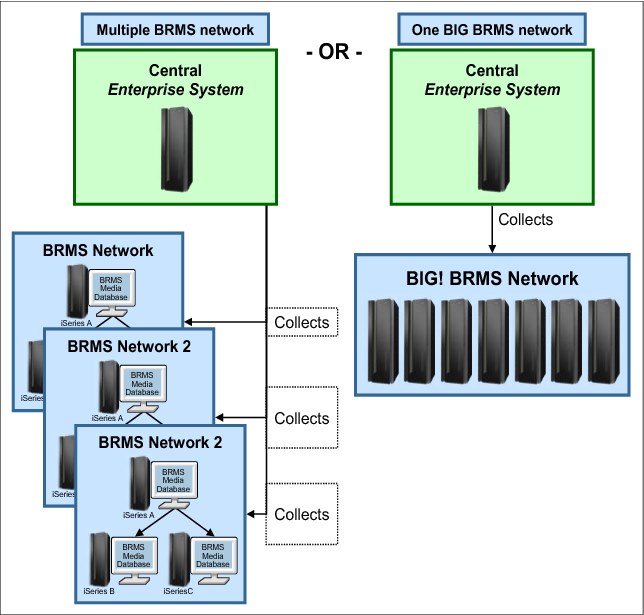
Figure 3-73 BRMS Enterprise network
The central “Enterprise System’ (HUB) pulls important information from systems (NODES) defined in its “Enterprise” network. From this information, specific notifications, verifications, and various other functions can be made and help an administrator manage the health of their BRMS backups/recoveries from one central server. This situation is beneficial for customers with multiple BRMS systems or BRMS networks.
This feature is available in the IBM Navigator for i and System i Navigator. To use it, you need a valid license for 5770 BR1 features *BASE (BRMS), 1 (BRMS-Network Feature), and 3 (BRMS-Advanced Functions Feature). Your HTTP *ADMIN server also must be up and running.
To access this feature, point your web browser to http://<systemname>:2001. Sign on with your IBM i user profile and password, then click IBM i Management → Backup, Recovery and Media Services → Advanced → Enterprise Services. You can see the initial Enterprise Network window in Figure 3-74.
For more information about what you can do with BRMS Enterprise, see BRMS Enterprise Enhancements, REDP-4926.
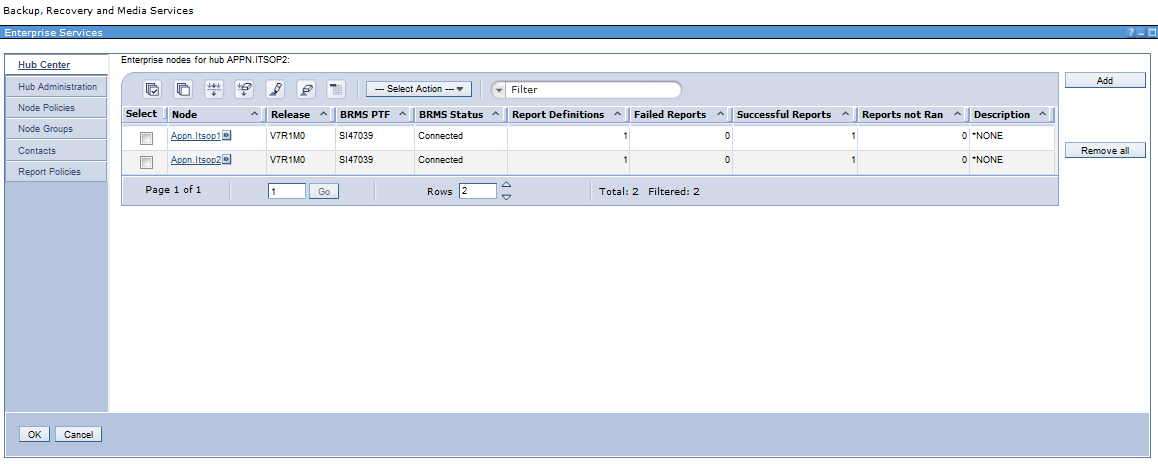
Figure 3-74 BRMS Enterprise initial window
3.4 More resources
For more information about the topics in this chapter, see the following resources:
•IBM i 7.1 Knowledge Center:
•IBM i Backup, Recovery, and Media Services for IBM i 7.1, SC41-5345-07
•BRMS for IBM i website on developerWorks:
•BRMS GUI documentation:
•BRMS Enterprise:
•DAOS Quick Start Guide:
•DAOS Best Practices:
•DAOS Estimator:
•BRMS Online Lotus Server Backup Reference:
..................Content has been hidden....................
You can't read the all page of ebook, please click here login for view all page.