

Web enablers
This chapter describes the following topics:
14.1 IBM Integrated Web Services for i
Integrated Web Services for i enables IBM integrated Language Environment® (ILE) applications to work in the web services and service-oriented architecture (SOA) arena with little effort, knowledge, and resources on your part. The convergence of web service and IBM i technologies can help you liberate these core business assets by making it easier to enrich, modernize, extend, and reuse them well beyond their original scope of design.
The IBM i operating system integrates software technologies that support the externalization of an ILE program object as a web service and the consumption of a web service by an ILE program object. These technologies are the integrated web services server and the integrated web services client for ILE.
The following sections describe enhancements that were made to the integrated web services support on IBM i.
For the latest news about Integrated Web Services for i support, go to:
14.1.1 Integrated Web Services Client for ILE
The Integrated Web Services Client for ILE provides a set of libraries and Java tools that enable you to build web service client applications from existing Web Service Description Language (WSDL) files. You use the tools to generate code that can be called from ILE applications to use a web service.
In the past, the tools supported only the generation of C and C++ code, and you had to manually generate the program or service program that contained the generated code. The tools were enhanced to generate RPG code in addition to automatically creating the service program that contains the generated code.
To use this support, ensure that you have the latest PTFs or the latest replacement PTFs. At the time of publication, the latest PTFs are SI44364 and SI44363.
More information can be found in the Web Services Client for ILE Programming Guide at:
14.1.2 Accessing Web Services using DB2 for i UDFs and UDTFs
It is now possible to access Web Services using user-defined functions (UDF) and user-defined table functions (UDTF) from DB2 for i. See the Accessing web services: Using IBM DB2 for i HTTP UDFs and UDTFs article at the following website:
14.2 Changes in IBM WebSphere Application Server
The following sections describe enhancements that were made to WebSphere Application Server.
14.2.1 Packaging for WebSphere Application Server
In IBM i 7.1, IBM Web Enablement for IBM i (5722-WE2) includes the following products:
•IBM WebSphere Application Server - Express V6.1
•IBM WebSphere Application Server - Express V7.0
•IBM WebSphere Application Server - Express V8.0
•IBM WebSphere Application Server - Express V8.5
•IBM WebSphere Application Server - Express V8.5.5
|
Note: IBM WebSphere Application Server Express V6.0 is not included because it is not supported and is not operational on IBM i 7.1.
|
14.2.2 IBM WebSphere Liberty Profile
IBM WebSphere Liberty Profile is a lightweight low-cost Liberty profile based offering (not a full-profile WebSphere Application Server) that provides the ability to rapidly build and deliver web applications that do not require the full Java EE stack.
Figure 14-1 shows the WebShpere Liberty profile 8.5.5 functions.

Figure 14-1 IBM WebSphere Liberty profile 8.5.5 functions diagram
14.2.3 IBM WebSphere Application Server family
Figure 14-2 shows an overview of the latest version of IBM WebSphere V8.5.5 family. Notice that there are several editions of WebSphere Application Server:
•WebSphere Liberty Profile - LightWeight
•WebSphere Application Server - Express, delivered with IBM i as part of the Web Enablement product (5722-WE2)
•WebSphere Application Server - Base
•WebSphere Application Server - Network Deployment
•WebSphere Application Server for Developers
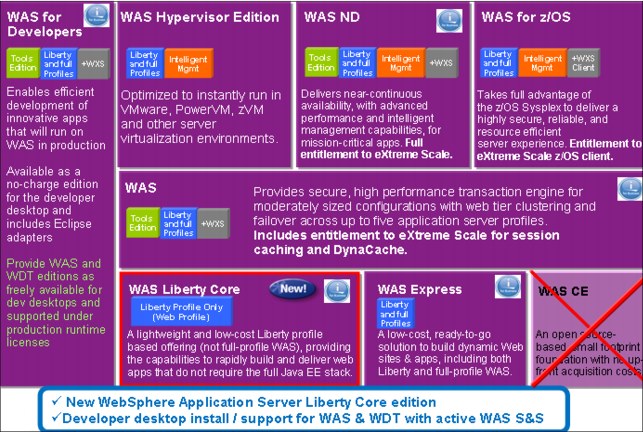
Figure 14-2 The WebSphere v8.5.5 family
Figure 14-3 shows the development path of IBM WebSphere Application Server, which is interesting especially to see how and when WebSphere Liberty Profile was introduced to the family after several versions of WebSphere Integrated.
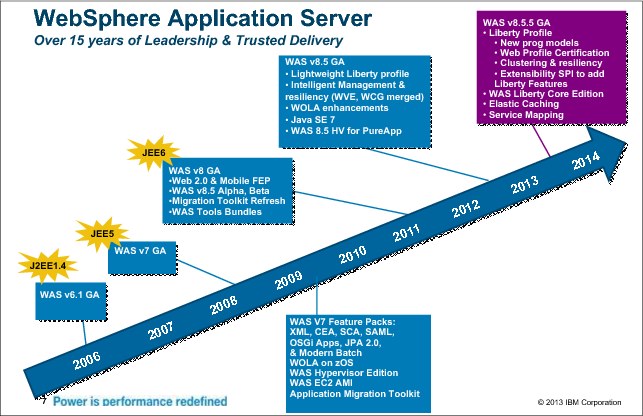
Figure 14-3 History of the development of WebSphere Application Server for i with added functionality
14.2.4 Installation
Installing IBM WebSphere Application Server V6.1 on IBM i 7.1 requires a refreshed installation version of the product. The refreshed installation version of IBM WebSphere Application Server V6.1 is based on fix level 6.1.0.29. For ordering information, go to:
For IBM WebSphere Application Server V7.0, apply Fix Pack 7 (7.0.0.7) or later after you complete the installation.
14.2.5 Installation support on IBM Web Administration for i
WebSphere Application Server V8.0 and later is installed and managed by the IBM Installation Manager tool. Although this tool is available for IBM i, there is no GUI support on the platform. Therefore, WebSphere Application Server V8.0 and later can be installed only through the command line.
To address this problem, IBM Web Administration for i now provides a GUI interface for WebSphere Application Server to provide the following actions:
•Install product.
•Uninstall product.
•Update the installation with interim fixes or fix packs.
•View interim fixes on the installation.
•Delete interim fixes.
To use the installation management support, your IBM HTTP Server for i DG1 must be at the following minimum Group PTF levels:
•For IBM i 7.1: SF99368 level 16
Ensure that your user profile has at least the *ALLOBJ, *IOSYSCFG, and *SECADM special authorities.
14.2.6 Alternative and easier installation of WebSphere Application Server
Because IBM Installation Manager is available only in command-line mode for IBM i, IBM Web Administration for i provides a GUI interface for Installation Manager to support the following functions:
•Install a new WebSphere Application Server installation.
•Update an existing installation with interim fixes or fix packs.
•Uninstall a WebSphere Application Server installation.
•View the installed interim fixes.
•Delete the interim fixes from the installation.
Verify that your HTTP Admin server is active by running WRKACTJOB SBS(QHTTPSVR). The displayed jobs should look as shown in Figure 14-4.
|
Work with Active Jobs ITSOP2
10/02/12 11:51:02
CPU %: .1 Elapsed time: 00:00:04 Active jobs: 229
Type options, press Enter.
2=Change 3=Hold 4=End 5=Work with 6=Release 7=Display message
8=Work with spooled files 13=Disconnect ...
Current
Opt Subsystem/Job User Type CPU % Function Status
QHTTPSVR QSYS SBS .0 DEQW
ADMIN QTMHHTTP BCH .0 PGM-QZHBMAIN SIGW
ADMIN QTMHHTTP BCI .0 PGM-QZSRLOG SIGW
ADMIN QTMHHTTP BCI .0 PGM-QZSRHTTP SIGW
ADMIN1 QLWISVR BCI .0 JVM-com.ibm.lw THDW
ADMIN2 QLWISVR BCI .0 JVM-com.ibm.lw THDW
ADMIN3 QLWISVR BCI .0 JVM-com.ibm.lw THDW
ADMIN4 QWEBADMIN BCI .0 JVM-com.ibm.lw THDW
Bottom
Parameters or command
===>
F3=Exit F5=Refresh F7=Find F10=Restart statistics
F11=Display elapsed data F12=Cancel F23=More options F24=More keys
|
Figure 14-4 QHTTPSVR subsystem
To access your web admin GUI, enter http://<your_system>:2001/HTTPAdmin in your browser, and then click Manage → Installations to open the Manage Installations functions window that is shown in Figure 14-5.
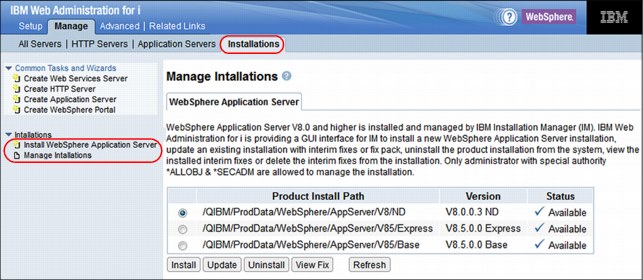
Figure 14-5 Manage installations
In this window, you can install, update, uninstall, and review the fix level of WebSphere Application Server V8.0 and later.
You can use the Install button to install a new WebSphere Application Server product on your system. If the Installation Manager tool is not on your system, the wizard helps you install or update it to the required level.
Complete the following steps:
1. Start the wizard by clicking Install WebSphere Application Server in the left navigation pane or by clicking Install as shown in Figure 14-6.

Figure 14-6 Start the installation
2. After the welcome window opens, specify the Installation Manager installation packages location, as shown in Figure 14-7.
The installation package location can either be in your IFS or on a Network File System (NFS) share. You can obtain the Installation Manager packages from the physical installation media or download them from the Installation Manager website found at:
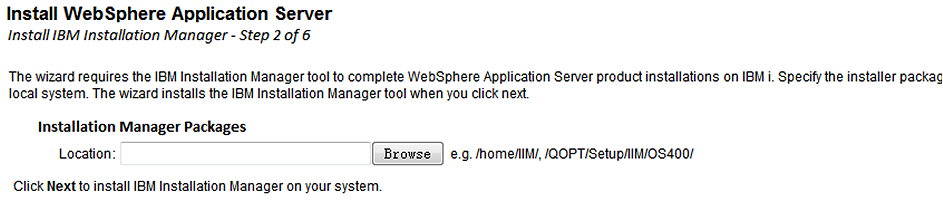
Figure 14-7 Installation Manager location
3. Specify the location of your WebSphere installation files, as shown in Figure 14-8. The product packages can be on your local system or a remote server. To access the packages on the local system, enter the location of the packages into the Location field or click Browse to find the location. If accessing the packages’ location requires authentication, select Specify authentication to access the install location and complete the User and Password fields. Click Next.
Figure 14-8 Product install packages
4. Figure 14-9 shows the Liberty profile. The Liberty profile is a new feature in WebSphere Application Server V8.5. You can select to install it or not.
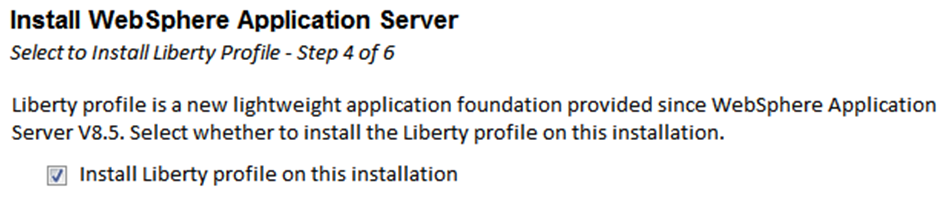
Figure 14-9 Liberty Profile
5. The next two steps (5 and 6) are just verification steps that are not described here. In the final window, click Finish to start the installation, as shown in Figure 14-10.
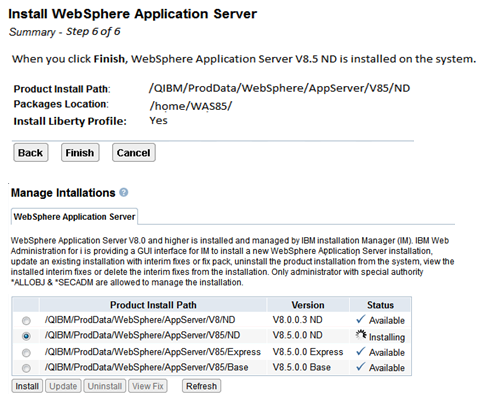
Figure 14-10 Finish installation
To uninstall a WebSphere product, select the version that you want to uninstall and click Uninstall, as shown in Figure 14-11.

Figure 14-11 Uninstall
The product and all profiles that are based on it are deleted from the system.
To update a WebSphere Application Server installation with interim fixes or fix packs, click Update in Figure 14-11 on page 560 instead. You must specify a location for your fixes, as shown in Figure 14-12.
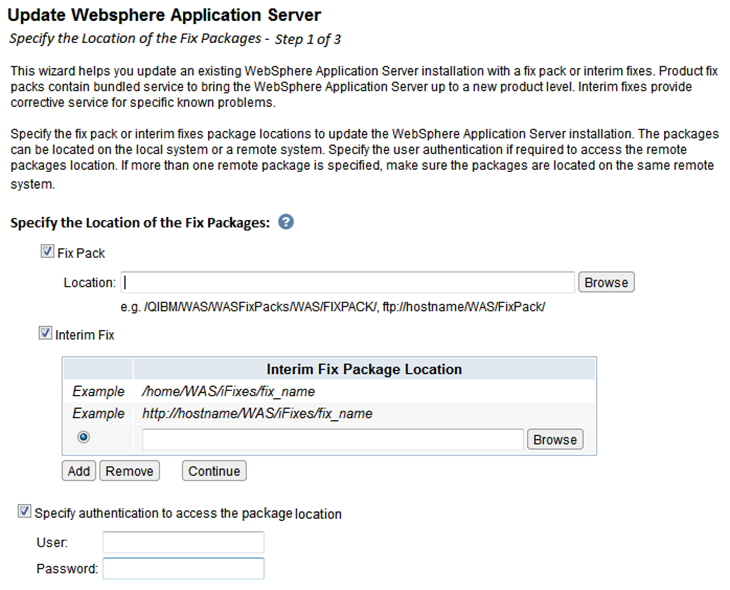
Figure 14-12 Specifying a fix location
Click Finish to complete the installation, as shown in Figure 14-13.
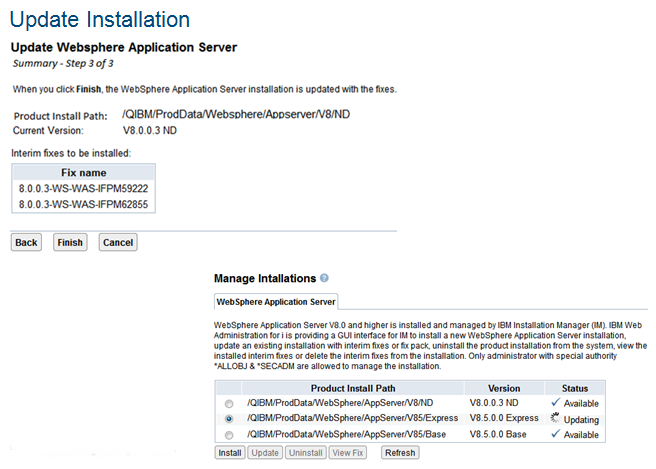
Figure 14-13 Finish updating
To see the installed fix levels, select the installation and click View Fix, as shown in Figure 14-14.

Figure 14-14 View fixes
You can also delete fixes through the View Fix function. This topic is not described in this book.
For more information about the topics in this section, see the following resources:
•IBM Web Administration for IBM i:
•WebSphere Application Server V8.5 Knowledge Center:
•IBM Installation Manager Knowledge Center:
14.2.7 Upgrading to IBM i 7.1
If you are using IBM WebSphere Application Server V6.0 and upgrading to IBM i 7.1, you must upgrade to the WebSphere Application Server V6.1.0.29 or V7.0.0.7 products. Migration can occur before or after you upgrade to IBM i 7.1.
Before you upgrade to IBM i 7.1, ensure that all WebSphere Application Server installations meet the minimum required fix levels. The version identifier is contained in the <app_server_root>/properties/version/WAS.product file, where <app_server_root> is the root directory of the IBM WebSphere Application Server installation. The version is also displayed on the IBM Web Administration GUI. It is listed on the introduction page under the Properties link. For WebSphere Application Server V6.1, apply Fix Pack 29 (6.1.0.29) or later if needed. For WebSphere Application Server V7.0, apply Fix Pack 7 (7.0.0.7) or later if needed.
|
Tip: Switch any WebSphere servers that are running classic to J9 before the OS upgrade. You can accomplish this task by running the following command:
/qibm/proddata/websphere/appserver/<version>/<edition>/bin/enablejvm -jvm std32'
|
When you upgrade to IBM i 7.1, enable WebSphere Application Server to use IBM Technology for Java virtual machine. The classic Java virtual machine is not available for IBM i 7.1. It is not operational until it is enabled to use IBM Technology for Java virtual machine.
After you upgrade to IBM i 7.1, if you upgraded from V5R4 or earlier, update the WebSphere Application Server service programs for IBM i 7.1. To update the programs, complete the following steps:
1. Start the Qshell interpreter.
2. Change the directory to <app_server_root>/bin.
3. Run export OSVER=V7R1M0 to export the OSVER environment variable to the
Qshell environment.
Qshell environment.
4. Run the _postfpexit script as follows:
_postfpexit<app_server_root><product_library>.
<product_library> is the product library for the WebSphere Application Server installation that is listed in <app_server_root>/properties/product.properties.
5. Upload the LoadModule directives. LoadModule directives are used by external HTTP servers that are associated with WebSphere Application Server V6.1 and WebSphere Application Server V7. For more information about updating the LoadModule directives, see 13.3, “Plug-ins and LoadModule directives” on page 542.
14.2.8 IBM Installation Manager for WebSphere Application Server V8
WebSphere Application Server V8 is the first full version to be installed by Installation Manager rather than by the programs that are used to install, update, and uninstall previous versions. Installation Manager is a single installation program that can use remote or local software repositories to install, modify, or update new WebSphere Application Server products. It determines available packages (including products, fix packs, interim fixes, and so on), checks prerequisites and interdependencies, and installs the selected packages. You can also use Installation Manager to uninstall the packages that it installed.
Considerations
Note the following items:
•Do not use the same response files that are used with WebSphere Application Server V7 or earlier to install or uninstall Version 8 and later. Use response files that are based on Installation Manager to install, update, or uninstall Version 8 and later.
•The Installation Manager GUI is not available on IBM i; all interaction with Installation Manager on IBM i is done through the command line or response files.
Overview of Installation Manager
Installation Manager is a general-purpose software installation and update tool that runs on a range of computer systems. Installation Manager can be started through a command-line interface. You can also create response files in XML and use them to direct the performance of Installation Manager tasks in silent mode.
For more information about Installation Manager, go to the IBM Installation Manager Version 1.4 Knowledge Center at:
Packages and package groups
Each software product that can be installed with Installation Manager is referred to as a package. An installed package has a product level and an installation location. A package group consists of all of the products that are installed at a single location.
How many Installation Managers do you need
You must run Installation Manager only on those systems on which you install or update product code. You normally need only one Installation Manager on a system because one Installation Manager can track any number of product installations.
Installing an Installation Manager
When the installation kit is available on your system, you can install an Installation Manager. An Installation Manager consists of a set of binary files that are copied from the installation kit and a set of runtime data that describes the products that are installed by this particular Installation Manager. Before you install an Installation Manager, you must decide in which mode the Installation Manager runs and where the binary files and runtime data, called “agent data” or “appdata” are located. Then, issue the Installation Manager installation command from the appropriate user ID to install the Installation Manager.
Accessing product repositories
All software materials that are installed with Installation Manager are stored in repositories. Each repository contains program objects and metadata for one or more packages, that is, software products at a particular level. Repositories can also contain product maintenance, such as fix packs and interim fixes. Whenever you install a new product, you can choose from any of the available product levels in any accessible repository.
Installing the product
After you install an Installation Manager and have access to all necessary product repositories, you can use Installation Manager command-line commands or response files to run the actual product installations. When you install a product, you provide the package name, optionally the product level to be installed, the product location, and any other optional properties. For example, some products have optional features that you can select at installation time or a list of optional supported language packs from which you can select.
Working with installed products
You can use Installation Manager commands to list installed products and product levels. You can also obtain this information for installed copies of WebSphere Application Server V8 products by issuing versionInfo from the product file system. You can use Installation Manager commands or response files to install a new product level, roll back to a previous level, or modify the product by adding or removing optional features or language packs.
14.3 IBM Web Administration for i
IBM Web Administration for i is an integrated management interface for creating many types of servers, including web servers and application servers. These include WebSphere Application Server for i, WebSphere Portal Server, IBM Integrated Web Application Server for i, and IBM Integrated Web Services Server for i.
IBM Web Administration for i has several wizards that guide you through a series of advanced steps to accomplish a task. With a few clicks, you can have a web server or web application server running in no time.
Enhancements were made to IBM Web Administration for i to include a web log monitor and permissions.
14.3.1 Web Log Monitor
In today’s web application environment, notices and error messages that appear in the web servers logging files can be easily lost or missed. This situation leads to you to missing important information. This support is included as part of the IBM Web Administration for i interface.
You can use Web Log Monitor to monitor the contents of log files for any web-related server, such as Integrated Web Application Server, Integrated Web Services Server, WebSphere Application Server, WebSphere Portal, and IBM HTTP Server.
Users can set rules that Web Log Monitor inspects. If a match is found, a notification is sent to one of the following sources:
•The *QSYSOPR system message queue
•One or more email addresses
•Both the *QSYSOPR system message queue and email addresses
Web Log Monitor ensures that important messages are not lost or missed.
|
Remember: Web Log Monitor inspects the log files if Web Administration for i is started. The minimum OS supported is IBM i 6.1 PTF SF99115 level 12 or later.
|
Configuring Web Log Monitor
To activate Web Log Monitor, complete the following steps:
1. Start the IBM Systems Director Navigator for i by accessing the following URL from a web browser, where your_system is your IBM i server host name:
http://your_system:2001
2. From the IBM Systems Director Navigator for i welcome window (Figure 14-15), click the IBM i Tasks Page link.

Figure 14-15 IBM Systems Director Navigator for i
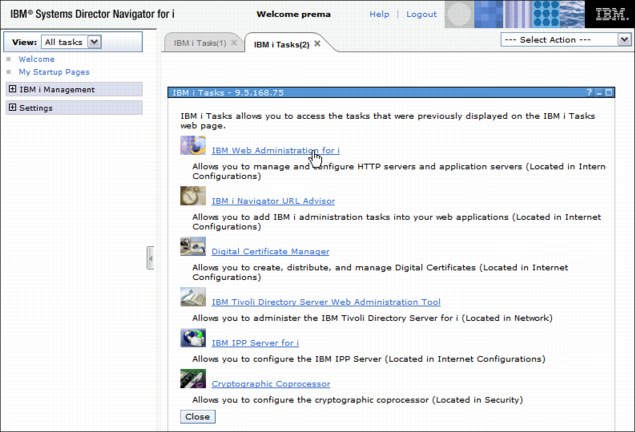
Figure 14-16 IBM Web Administration for i
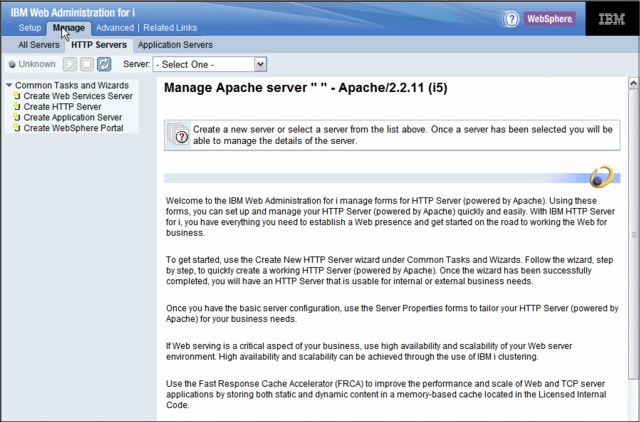
Figure 14-17 Manage tab

Figure 14-18 Application Servers
6. Click Web Log Monitor under the Problem Determination link in the left navigation window (Figure 14-19).
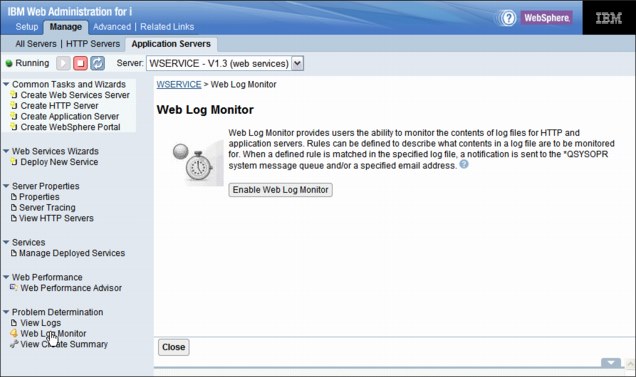
Figure 14-19 Web Log Monitor
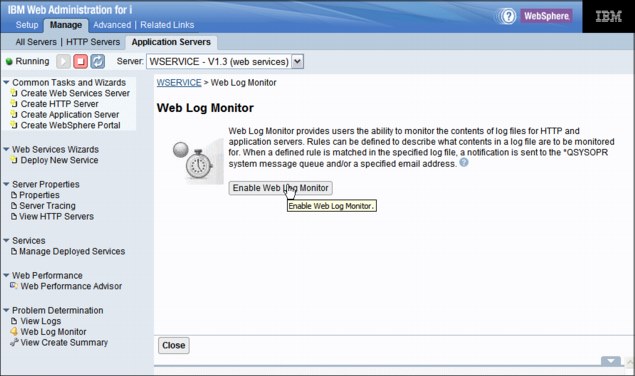
Figure 14-20 Enable Web Log Monitor
8. Specify the log file to monitor. Click Browse to select the log file (Figure 14-21). Only log files that you are authorized to use are shown in the browser window. Select the log file and click Next.

Figure 14-21 Specify the log file to monitor
When the log file is selected, you can use the Basic tab (Figure 14-22) or the Advanced tab to configure the rule.

Figure 14-22 Basic tab
You can use keywords to filter the content of specified log file. To specify more than one keyword, use a comma or semicolon to separate each key word. Three modes are provided:
– Match any keyword
For example, if the monitored file contains a line such as “JVMDUMP0061 Processing Dump Event gpf.detail- Please wait” and the keywords that are specified here are Dump, Failed, and Error, then the line is considered a match.
– Match all keywords
For example, if the monitored file contains a line such as “JVMDUMP0061 Processing Dump Event gpf.detail- Please wait” and if the keywords specified here are Dump, Event, and Wait, then this line is not considered a match. The white space or blank character in front of Wait is also treated as part of the keyword. If the specified keywords are Dump, Event, and Wait, then this line is considered a match, as all three specified keys are in the line.
– Keyword A+any string+Keyword B
For example, if the monitored file contains a line such as “JVMDUMP0061 Processing Dump Event gpf.detail- Please wait” and the keywords that are specified here are Dump and detail, then this line is considered a match.
The Advanced Tab (Figure 14-23) specifies the complex patterns that are used in the rule:
– Exclude the following keywords
This option specifies whether to ignore a line that contains any of the keywords that follow.
– Configure regular expressions
You can use this option to customize the rule by using a regular expression.
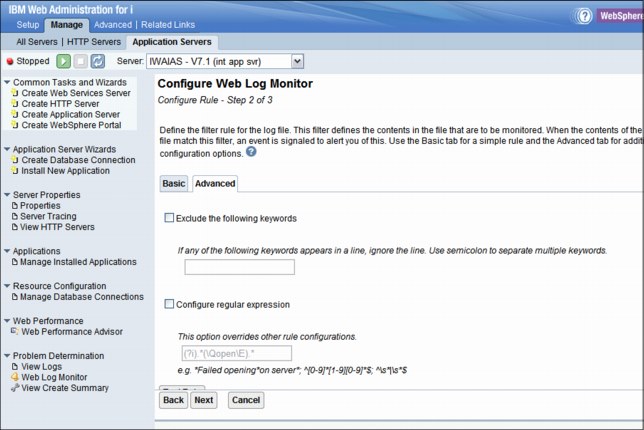
Figure 14-23 Advanced tab
9. If you have multiple log files to monitor, click Add in the File and Rule Tab, as shown
in Figure 14-24.
in Figure 14-24.

Figure 14-24 Add multiple log files
10. When the rules are set, define where the notification text is sent when a match is found by clicking the Notification tab (Figure 14-25). Here are the choices that you can use:
– Send message to QSYSOPR message queue
When selected, the notification text is sent to the “QSYSOPR system message queue when a match is found for a specified log file.
– Send email to
A notification is sent to the specified email address. More than one email address can be specified. Use a comma to separate multiple email addresses.
– Sender’s email address
Specifies the email address that is used to send the notification.
– SMTP server
Specifies the Simple Mail Transfer Protocol (SMTP) server that is used to send the mail notification.
– Account
Specifies the account that is used to log on to the SMTP server.
– Password
Specifies the password of the account that is used to log on to the SMTP server.
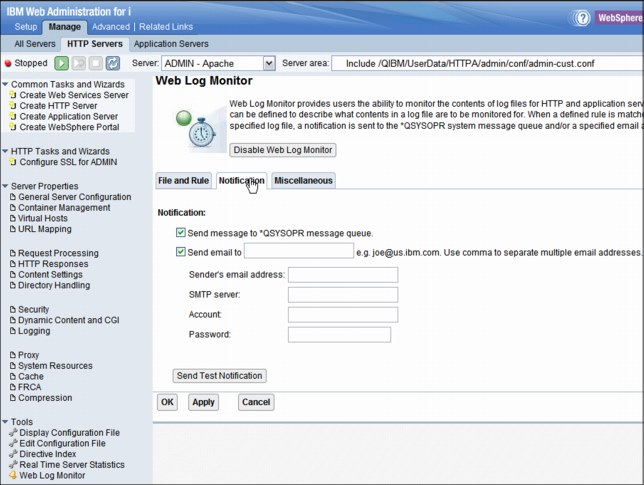
Figure 14-25 Notification tab
11. On the Miscellaneous tab, specify the interval in minutes and the maximum number of notifications to be sent per hour to prevent notification flood (Figure 14-26):
– Monitor interval
This option specifies the frequency of checking the log file. Set the interval to a small value when log files are updated frequently and a large value when the specified log files are updated infrequently.
– Notification flood prevention
This option specifies the maximum permitted number of notifications to be sent per hour to prevent notification flood. If the specified maximum number is exceeded, no notification is sent even when a match is found.

Figure 14-26 Miscellaneous tab
To disable Web Log Monitor, click Disable Web Log Monitor on the Web Log Monitor introduction window.
|
Requirement: Only users who have Developer or higher authority can configure Web Log Monitor.
|
14.3.2 Permissions
By default, only users with *IOSYSCFG and *ALLOBJ special authority can manage and create web-related servers on the system through IBM Web Administration for i. To get to the Permission tab, go to the IBM i Task window and click IBM Web Administration for i → Advanced → Permissions.
The Manage Permissions form allows administrators to give permissions to users without *IOSYSCFG and *ALLOBJ. There are two roles that can be granted:
•Operators
•Developers
A permission is the ability to perform an operation on a server. The ability for a user to perform operations on a server is determined by the role they are assigned for the server. The Web Administration for i roles are defined with the permissions listed in Table 14-1.
Table 14-1 Permissions corresponding to each role
|
Permissions
|
Administrator
|
Developer
|
Operator
|
|
Start/Stop server
|
x
|
x
|
x
|
|
Delete server
|
x
|
x
|
|
|
Install/Remove applications1
|
x
|
x
|
|
|
Install/Remove web servicesa
|
x
|
x
|
|
|
Start/Stop applications
|
x
|
x
|
x
|
|
Start/Stop web servicesa
|
x
|
x
|
x
|
|
Modify server attributes
|
x
|
x
|
|
|
Modify application attributes
|
x
|
x
|
|
|
Create database connections
|
x
|
x
|
|
|
Delete database connections
|
x
|
x
|
|
|
Modify server tracing
|
x
|
x
|
x
|
|
Use Web Performance Advisor
|
x
|
x
|
|
|
Use Web Performance Monitor
|
x
|
x
|
|
|
Use Web Log Monitor
|
x
|
x
|
|
|
Create Server2
|
x
|
|
|
1 Web services that are deployed with integrated web services servers.
2 An administrator that grants permissions to a user profile must explicitly grant the create-server permission.
A new feature, group profile support, adds the ability to grant or revoke permissions to a group of all users all at the same time. Otherwise, these users must be granted or revoked permissions separately, which is time consuming and error prone. When you use this feature, when a user has one or more supplemental groups, you combine the permissions that the individual has and the ones from its groups. The cumulative and highest permissions are granted when the user needs appropriate permissions to perform an operation through the Web Administration Interface.
The group profile support applies only to IBM i 6.1 and later.
Adding permissions
The Add Permissions wizard considers all aspects of a selected server. If a selected application server is associated with an HTTP Server, the Add Permissions wizard takes this situation into account and recommends that permissions are specified correctly for that web environment. This specification ensures that the specified user can successfully manage the server that is based on granted permissions.
Users who are granted permission to servers can be given a different role for each server. When a user is granted permission to create new servers, any server that they do create is automatically updated to give them developer permission to that newly created server.
To add permissions for a user ID, complete the following steps:
1. Click Add Permissions (Figure 14-27). Select the user ID to which you want to give permission. Click >> and click Next.
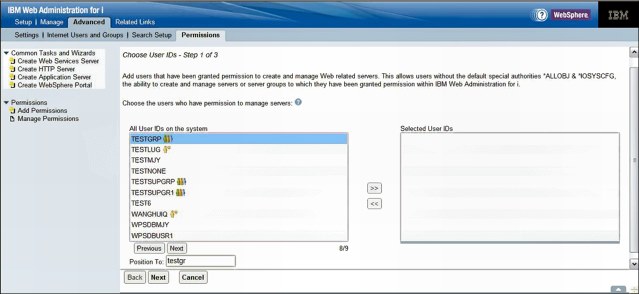
Figure 14-27 Add Permissions - step 1
2. Click Server and select the permissions that you want to grant to the user. Select the role and select the Create server check box if you want to grant the user the ability to create servers (see Figure 14-28). The options are explained as follows:
– Server: Specifies how the server’s category is to be handled. There are three values:
• *ALL: The users that are specified in step 1 on page 578 are granted permission to all the servers for this category, including all existing servers and any other server that is created in the future.
• *NONE: The users that are specified in step 1 on page 578 have no permission to the servers for this category.
• Specify: When this option is selected, an additional interface is displayed when Next is clicked. The Specify Specific Servers interface allows the Administrator to specify a list of existing servers that the specified users can work with.
– Role: Lists the permissions that are granted to a user for a server. There are three values:
• Operator: Basic permission to the server. See Table 14-1 on page 577 for details.
• Developer: All permissions to the server. See Table 14-1 on page 577 for details.
– Create Server: The specified users can be granted permission to create servers for this category.
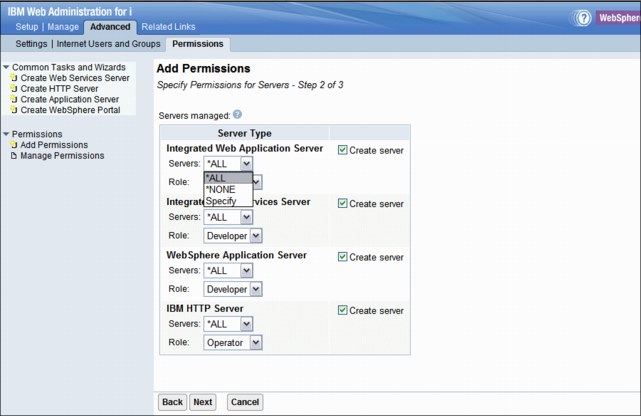
Figure 14-28 Add Permissions - step 2
3. When you have defined the correct authority and role, click Next. Check what is displayed (Figure 14-29). If you must change anything, click Back; otherwise, click Finish.

Figure 14-29 Add Permissions - step 3
Modifying permissions
The Modify Permissions wizard allows an administrator to modify permissions for a specified server or user. The Modify Permissions wizard guides the administrator through this process.
The Modify Permissions wizard considers all aspects of a selected server. If a selected application server is associated with an HTTP Server, the Modify Permissions wizard considers this situation and recommends that permissions are specified correctly for that entire web environment. Either add or remove the permissions for all servers within that specified web environment. This action ensures that the specified user can either successfully manage the server based on the granted permissions or no longer successfully manage the server.
There are two ways to modify the permissions:
•Modify the permissions for a specific server (Figure 14-30). This action is started from the By Server view on the Manage Permissions window when you choose a specific server.
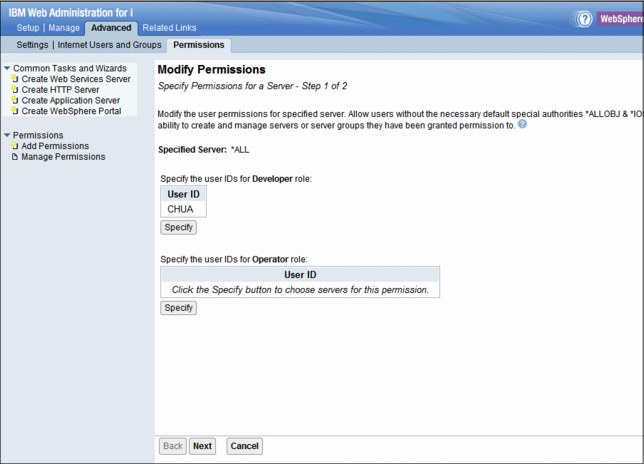
Figure 14-30 Modify permissions by Server view
•Modify the permissions for a specific user (Figure 14-31). This action is started from the By User view on the Manage Permissions window when you select a specific user.
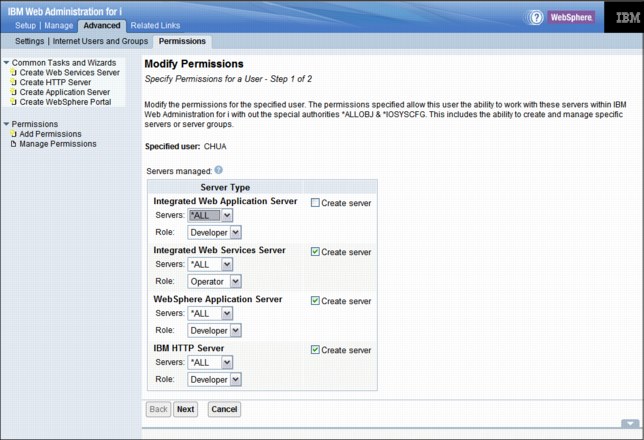
Figure 14-31 Modify permissions by User view
Removing permissions
The Remove Permissions wizard provides an administrator with the ability to remove the permissions for a specified server or user. The removing of permissions removes the ability of the specified user to work with and manage a server within the IBM Web Administration for i interface.
The Remove Permissions wizard considers all aspects of a selected server. If a selected application server is associated with an HTTP Server, the Remove Permissions wizard takes this situation into account and also removes the permissions for all servers within that specified web environment. This action ensures that the specified user no longer successfully manages the server.
There are two ways to remove the permissions:
•Remove all permissions for a specific server and the other servers from the same web environment (Figure 14-32). This action is run from the By Server view on the Manage Permissions window when you select a specific server.
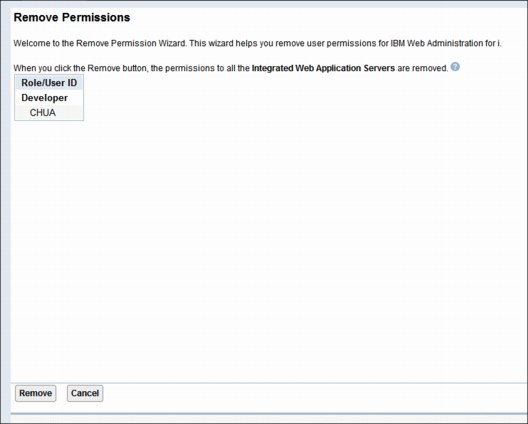
Figure 14-32 Remove permissions by Server view
•Remove all the permissions for a specific user (Figure 14-33). This action is performed from the By User view on Manage Permissions window when you choose a specific user.

Figure 14-33 Remove Permissions by User view
Click Remove to remove the permissions. This operation cannot be undone.
14.3.3 Web Performance Advisor
Web Performance Advisor (Figure 14-34) provides a consolidated place to review, evaluate, and modify the performance attributes for your web environments on IBM i. This tool is a great first stop to ensure that you are running at a reasonable set of performance-related settings. It is updated to include the latest performance settings for IBM i 7.1 as it relates to each of the supported web-based servers. WebSphere Portal Server V6.1.5 is now supported on Web Performance Advisor.
If you are using WebSphere Application Server V6 and upgrading to IBM i 7.1, you must update the web performance profile. The classic Java virtual machine is not available for IBM i 7.1. If your WebSphere Application Server installation is enabled to use classic Java, it is not operational until it is enabled to use IBM Technology for Java virtual machine. For more information, see 15.7.1, “Enabling IBM Technology for Java virtual machine” on page 603.

Figure 14-34 Web Performance Advisor
..................Content has been hidden....................
You can't read the all page of ebook, please click here login for view all page.