
Chapter 6. Fills, Strokes, and Effects
Here’s where you get a chance to express your creativity. Styling refers to applying fills, strokes, gradients, and effects to frames, lines, and text. If you’re bored with plain black text on a white background, InDesign lets you change the text and background colors to almost anything you can imagine.
Most other graphics programs let you style objects and text with fills, strokes, and gradients. InDesign certainly does that also.
However, InDesign has broken new ground in offering sophisticated effects such as transparency, drop shadows, and glows. These are the effects that art directors and designers could only dream about creating with other page-layout programs.
With InDesign, they can make those dreams a reality.
Applying Fills
Fills are the effects applied to objects, which can be the interior of frames or text within a frame. So you can apply one color fill to the text inside a frame and another color fill to the frame itself. A fill can be a solid color or a gradient.
- Select an object.
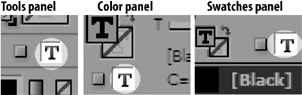
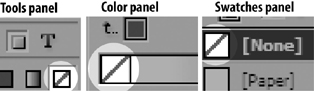
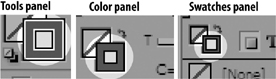
- Make sure the Container icon is chosen in the Tools panel or the Swatches or Color panel
 . This indicates that the object will be modified.
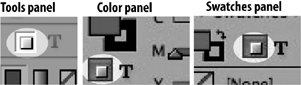 The Container icons (circled) indicate an effect will be applied to an object, not text.
 - Click the Fill icon in the Tools panel or in the Swatches or Color panel
 .
.
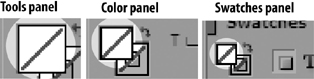
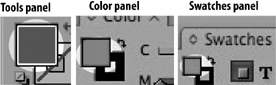 The Fill icons (circled) indicate an effect will be applied inside an object.
 - Choose a color or gradient in the Color, Gradient, or Swatches panel.
You don’t have to select an object to apply a fill. You can just drag a swatch onto any object to apply a color or a gradient.
To drag fill effects onto objects:
- Drag a gradient or color swatch from the Tools panel or the Color, Gradient, or Swatches panel onto the object
 .
.
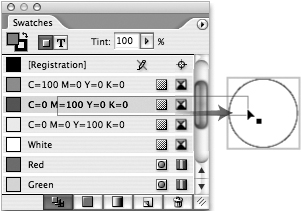 You can drag a swatch inside an object to apply a fill.
 - Release the mouse button when the swatch is inside the object. A square dot appears to indicate you are inside the object.
You can also apply fill colors to selected text in a text frame.
To apply a fill to selected text:
- Use the Text tool to highlight the text.
- Click the Fill icon in the Tools panel or the Swatches or Color panel.
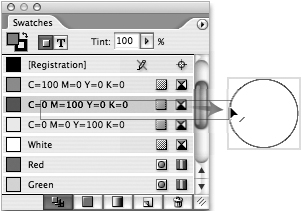
- Choose a swatch in the Color, Gradient, or Swatches panel
 .
.
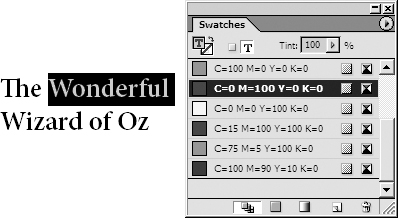 Choose a swatch to apply the color or gradient to selected text.
You can also apply a fill to all the text in a frame with just the frame selected.
To apply a fill to all the text in a frame:
- Select the text frame that contains the text to which you want to apply the fill.
- Click the Fill icon in the Tools panel or the Swatches or Color panel.
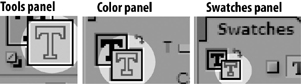
- Click the Text icon in the Tools panel or the Swatches or Color panel
 .
.
 The Text icons (circled) set an effect to be applied to all the text within a frame.
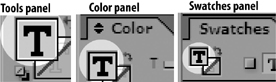
 The T inside the Fill icon (circled) indicates that text is going to be styled.
 - Choose a swatch in the Color, Gradient, or Swatches panel.
You can also apply a gradient to text or objects.
- Click the Fill icon in the Tools panel or the Swatches or Color panel with the container or text icons selected.
- Click the Gradient icon in the Tools panel
 .
.
 The Gradient icon in the Tools panel indicates that a color or gradient will be applied.
or
Click a gradient in the Swatches or Gradient panel. The gradient is displayed in the Fill box
 .
. The gradient in the Fill box indicates that the gradient will be applied as a fill.
Once you have applied a gradient to an object or text, you can modify how it is applied using the Gradient tool.
- Select the object that contains the gradient you want to modify.
- Choose the Gradient tool in the Tools panel
 .
.
 The Gradient tool in the Tools panel lets you modify the appearance of gradients.
 - Drag the Gradient tool along the angle that the linear gradient should follow
 .
.
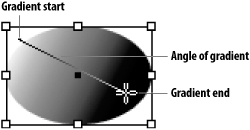 Drag the Gradient tool to set the start and end points and the angle of a linear gradient.
or
Drag the Gradient tool to define the start and end points of a radial gradient
 .
.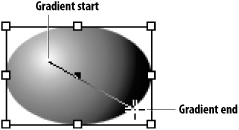 Drag with the Gradient tool to set the start and end points of a radial gradient.
You can also apply a fill of None to an object. This makes the background of the object transparent ![]() .
.
![]() The difference between a text frame with a white fill and a none fill.
The difference between a text frame with a white fill and a none fill.
- Select the object.
- Click the None icon in the Tools panel or the Swatches or Color panel
 .
.
 The None icons (circled) apply no fill to an object.
Another way to style objects is to create a compound path. A compound path allows one path to punch a hole in another. This makes the inside path transparent while the outside path is solid ![]() .
.
![]() An example of how a compound path creates a hole in an object.
An example of how a compound path creates a hole in an object.
- Select two paths that overlap.
- Choose Object > Paths > Make Compound Path.
Tip
If the second object is not completely contained inside the first, the hole appears only where the objects overlap.
You can release a compound path back to separate objects to restore the inside path to a solid color.
- Select the compound path.
- Choose Object > Paths > Release Compound Paths.
Applying Stroke Effects
Strokes are the effects applied to the edge of objects and text, or along lines.
To apply a stroke to an object:
- Select the object.
- Make sure the Container icon is chosen in the Tools panel or the Swatches or Color panel . This indicates that the object will be modified.
- Click the Stroke icon in the Tools panel or the Swatches or Color panel
 .
.
 The Stroke icons (circled) set an effect to be applied to the outside of an object or text.
 - Choose a swatch in the Color, Gradient, or Swatches panel.
You can also apply a stroke color by dragging a swatch onto the edge of any object on the page.
To drag stroke effects onto objects:
- Drag a gradient or color swatch from the Tools panel or the Color, Gradient, or Swatches panel onto the edge of the object.
- Release the mouse button when you see a small line appear next to the mouse cursor
 . This applies the color or gradient to the stroke.
 Drag a swatch onto the edge to apply a stroke effect to an object.
InDesign makes it easy to swap the fill and stroke colors applied to an object.
To swap the fill and stroke settings:
• Click the double-headed arrow in the Tools panel ![]() . This switches the colors of the fill and stroke applied to the object.
. This switches the colors of the fill and stroke applied to the object.

![]() Click the Swap Fill and Stroke icon in the Tools panel to switch the settings.
Click the Swap Fill and Stroke icon in the Tools panel to switch the settings.
You can also add a color or gradient stroke to the outside edges of text with a color or gradient ![]() .
.
![]()
![]() A stroke effect applied to text.
A stroke effect applied to text.
To apply a stroke to selected text:
- Use the Text tool to highlight the text.
- Click the Stroke icon in the Tools panel or Color panel
 .
.
 The outlined T in the Stroke icon (circled) indicates that a stroke has been applied to text.
 - Choose a swatch in the Color, Gradient, or Swatches panel.
To apply a stroke to all the text in a frame:
- Select the text frame that contains the text to which you want to apply the stroke.
- Click the Text button in the Tools panel or Color panel.
- Click the Stroke icon in the Tools panel or Color panel.
- Choose a swatch in the Color, Gradient, or Swatches panel.
You can also apply a gradient as a stroke to text or objects.
- Click the Stroke icon in the Tools panel or the Swatches or Color panel.
- Click the Gradient icon in the Tools panel or the Swatches or Gradient panel.
- Use the Gradient tool to modify the angle or length of the gradient applied to a stroke.

Color is only one aspect of a stroke effect. The Stroke panel controls the rest of the stroke attributes.
To work with the Stroke panel:
• If the Stroke panel is not visible, choose Windo w > Stroke to view it ![]() .
.
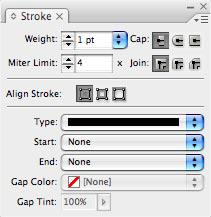
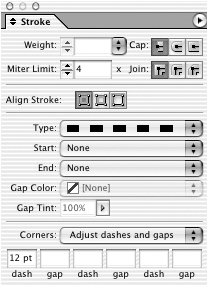
![]() The Stroke panel with all its options displayed.
The Stroke panel with all its options displayed.
or
If the Stroke panel is behind other panels, click the Stroke panel tab.
One of the most important attributes of a stroke is its thickness. This is controlled by changing the stroke weight ![]() .
.
![]() Different stroke weights.
Different stroke weights.
To set the stroke weight (thickness):
- Select the object.
- Use the Weight field controls to set the thickness of the stroke
 .
.
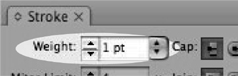 The Weight controls let you change the stroke thickness.
A stroke’s style is also controlled by the end caps and joins, which form points and corners.
- Select an object that has a stroke applied to it.
- In the Stroke panel, use the Cap icons
 to change the way the ends of open paths are treated
  :
:
• Butt ends the stroke in a square. This is the default setting for a plain stroke.
• Round ends the stroke in a semi-circle.
• Projecting ends the stroke in a square that extends out from the end point.
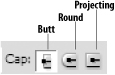 The Cap icons control the end points of strokes.
 The three Cap settings applied to strokes.
 - Use the Join buttons
 to change the way two segments of a path meet at corners
  :
:
• Miter joins the segments at an angle.
• Round joins the segments with a curve.
• Bevel joins the segments with a line between the segments.
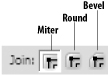 The Join buttons control how the corners of strokes are displayed.
 The three Join settings applied to strokes.
Sometimes a mitered join becomes too long and pointed. Fortunately, you can stop the point from becoming too long by setting the miter limit.
- Select an object with a mitered join.
- In the Stroke panel, increase the amount in the Miter Limit field to control the size of the angle between the segments
 .
.
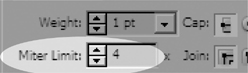 The Miter Limit field controls how long a miter point may extend.
In traditional drawing programs, a stroke is distributed evenly on the outside and inside of its path. InDesign lets you choose the alignment of the stroke on the path ![]() .
.
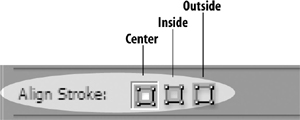
![]() Set the Align Stroke controls to set the position of the stroke along the path.
Set the Align Stroke controls to set the position of the stroke along the path.
To set the alignment of a stroke:
- Apply a stroke to an object.
- Choose one of the three alignment options for the stroke as follows
 :
:
• Center aligns the stroke so that half the stroke weight is inside the path and half is outside the path.
• Inside aligns the stroke so that the entire thickness of the stroke weight is inside the path.
• Outside aligns the stroke so that the entire thickness of the stroke weight is outside the path.
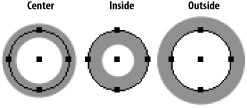 Examples of how the Align Stroke controls change the position of the stroke on the path.
The default setting for strokes is a solid line. However, you can choose one of the specialty strokes such as stripes, dashes, hashes, dots, or diamonds. You can even pick a stroke that curves up and down along the path.
To apply stroke styles to strokes:
- Apply a stroke to an object.
- Choose one of the styles from the Stroke Type menu
 .
.
 The 18 default strokes in the Stroke Type menu in the Stroke panel.
The color of a stroke comes from choosing the Stroke icon and then picking a color. This method only colors the solid portion of a stroke. For strokes such as stripes and dashes, you can also color the gap, or the clear area between the solid colors of the stroke.
Tip
This is the same technique used to set the gap color for the underline and strikethrough effects.
- Choose one of the specialty strokes that have both solid and clear areas.
- Use the Gap Color menu to choose the color for the clear areas of the stroke
 .
.
 Use the Gap Color menu in the Stroke panel to set the color of the clear areas of a stroke.
 - If necessary, use the Gap Tint controls to set a screen for the gap color
 .
.
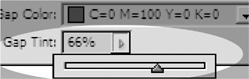 Use the Gap Tint controls to set a tint for the gap color.
The stroke list contains a dashed stroke that you can customize to set the size of the dashes and the gaps between them.
To create custom dashed strokes:
- Apply a stroke to an object.
- Choose Dashed from the Stroke Type pop-up menu. The dashed settings appear at the bottom of the Stroke panel
 .
.
 The Dashed settings at the bottom of the Stroke panel. These only appear when the Dashed stroke type is chosen.
 - Enter an amount in the first dash field for the length of all of the dashes in the line.
- Enter an amount in the first gap field for the size of the space between all of the dashes.
- To create a series of dashes and gaps with irregular lengths, enter other values in the rest of the dash and gap fields.
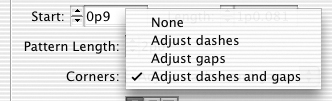
- If necessary, use the Corners list
 to adjust the dashes and gaps
  :
:
• None leaves the dashes and gaps as they are. This can cause unequal dashes at the corners.
• Adjust dashes changes the stroke so that the corner dashes are equal.
• Adjust gaps changes the stroke so that the gap lengths are equal.
• Adjust dashes and gaps changes the stroke to make the best fit so that both the corner dashes and gaps are equal.
• Dash (3 and 2) creates a dash that is 3 times the stroke weight with a gap that is 2 times the stroke weight
 .
.• Dash (4 and 4) creates dashes and gaps that are 4 times the stroke weight
.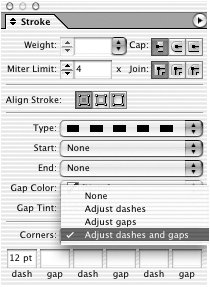 Use the Corners menu to adjust how dashes and gaps are distributed on a stroke.
 Examples of how the Corners settings affect the appearance of a dashed stroke.
 The effects of the two preset dash styles on 3-point strokes.
Creating Custom Stroke Styles
Stroke styles allow you to create custom stripes, dashes, and dots that you can add to your Strokes panel for reuse.
To create custom styles for strokes:
- Choose Stroke Styles from the Stroke panel menu. The Stroke Styles dialog box appears
 .
.
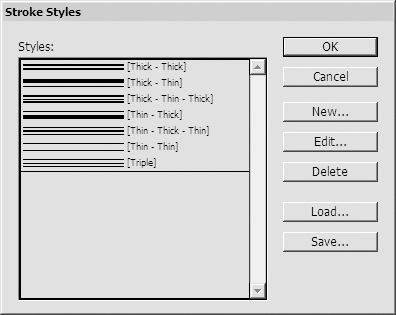 The Stroke Styles dialog box lets you create, edit, and manage custom stroke styles.
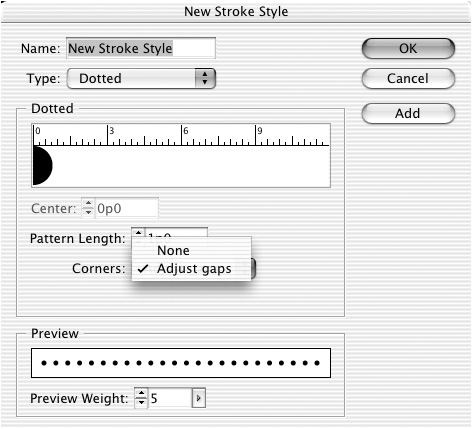
 - Click the New button to open the New Stroke Style dialog box
 .
.
 The New Stroke Style dialog box is where you define the pattern for a custom stroke.
or
Choose one of the default stripes and then click the New button. This opens the New Stroke Style dialog box with the stripe style already set as the starting pattern.
- Use the Name field to enter a name for the custom stroke style.
- Choose the type of stroke style from the Type menu as follows
 :
:
• Stripe allows you to create multiple lines that run parallel to each other along the stroked path.
• Dotted creates a series of dots repeated along the path.
• Dash creates a single line that is broken into a series of individual elements.
 Use the Type menu to choose the type of custom stroke style.
 - The dialog box changes its controls according to the stroke style chosen in the Type menu.
- When you have finished setting the stroke style, Click OK to create the style.
or
Click the Add button to create the style and then define additional styles.
To create a custom stripe stroke style:
- Choose Stripe from the Type menu of the New Stroke Style dialog box. The stripe controls appear
 .
.
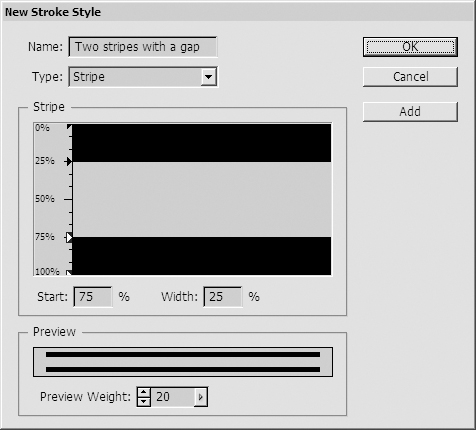
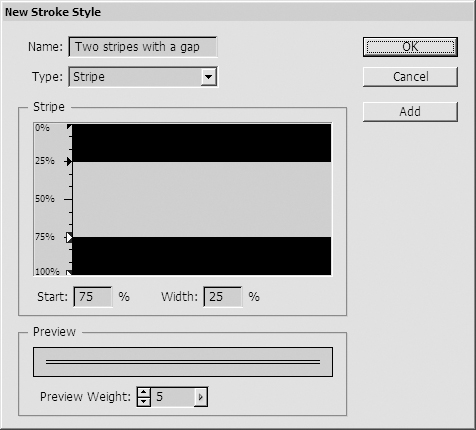 The New Stroke Style dialog box set for the Stripe controls.
 - Click inside the Stripe area to add a stripe to the stroke.
- Drag the Start control triangle on the percentage ruler or enter an amount in the Start field to set the initial position for the stripe on the stroke
 .
.
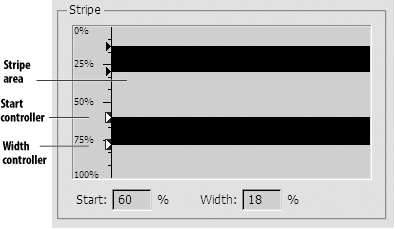 The stripe controls in the New Stroke Style dialog box.
 - Drag the Width control triangle on the percentage ruler or enter an amount in the Width field to set the width of the stripe .
- Drag the stripe itself up or down in the Stripe area to position it without changing its width.
- If you need to delete a stripe, drag it up or down so that it is off the Stripe area.
- Use the Preview control to increase or decrease the size of the preview for the stroke style
 .
.
 Use the Preview display and Preview Weight to see what the stripe style will look like.
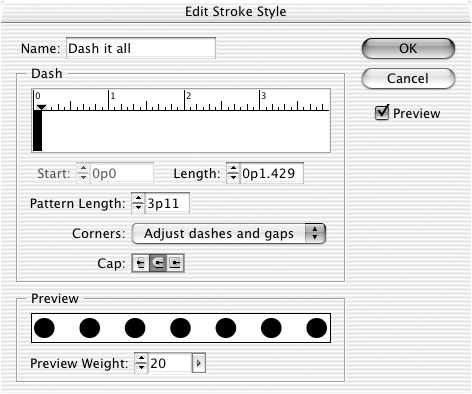
To create a custom dashed stroke style:
- Choose Dash from the Type menu of the New Stroke Style dialog box. The dash controls appear
 .
.
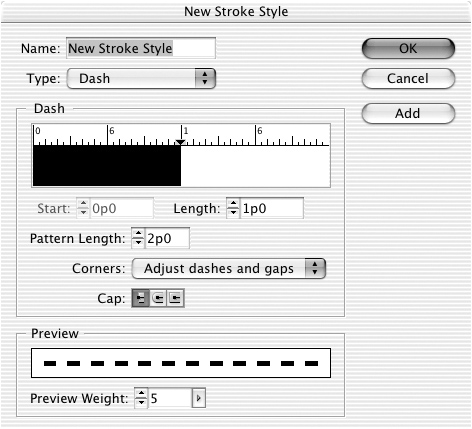
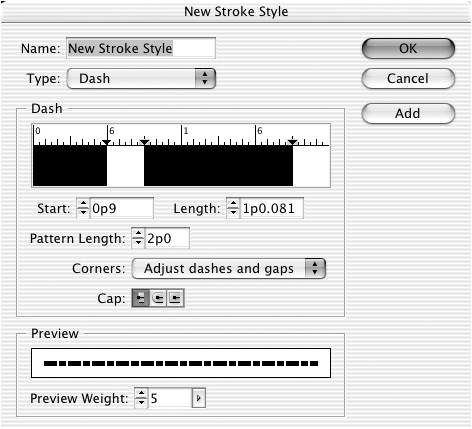 The New Stroke Style dialog box set for the Dash controls.
 - Click inside the Dash area to add a dash to the stroke
 .
.
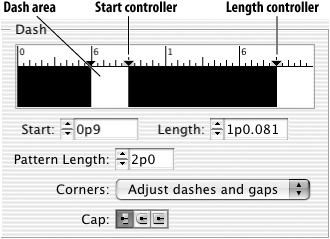 The Dash controls in the New Stroke Style dialog box.
 - Drag the Start control triangle on the percentage ruler or enter an amount in the Start field to set the initial position for the dash .
- Drag the dash itself to move it without changing its width.
- Use the Pattern Length field to increase the length of the space that the dashes repeat within .
- If you need to delete a dash, drag it up or down so that it is off the Dash area.
- Use the Corners list to choose how the dashes should be arranged around corners
 .
.
 Use the Corners list to choose how dashes are distributed along a stroke.
 - Choose a Cap style to set how the dashes appear on the stroke.
- Use the Preview control to increase or decrease the size of the preview for the stroke style.
To create a custom dotted stroke style:
- Choose Dotted from the Type menu of the New Stroke Style dialog box. The dotted controls appear
 .
.
 The New Stroke Style dialog box set for the Dotted controls.
 - Click inside the Dotted area to add a dot to the stroke
 .
.
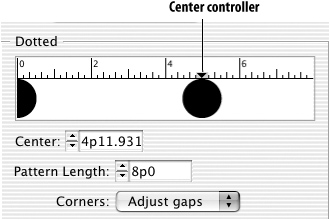 The Dotted controls in the New Stroke Style dialog box.
 - Drag the Center control triangle on the ruler or enter an amount in the Center field to set the initial position for the dot .
- Use the Pattern Length field to increase the length of the space that the dots repeat within .
- If you need to delete a dot, drag it up or down so that it is off the Dotted area.
- Use the Corners list to choose how the dots should be arranged around corners
 .
.
 Use the Corners menu to control how dotted styles are applied to corners.
 - Use the Preview control to increase or decrease the size of the preview for the stroke style
 .
.
- Select the custom stroke style in the Stroke Styles dialog box and choose Edit. The Edit Stroke Style dialog box appears.
- Click OK to apply the changes.
![]() Use the Preview display and Preview Weight to see what a dotted style will look like.
Use the Preview display and Preview Weight to see what a dotted style will look like.
![]() Click the Preview checkbox to see how the stroke edits appear when applied to objects.
Click the Preview checkbox to see how the stroke edits appear when applied to objects.
Once you have defined a stroke style, it appears in the Type menu of the Stroke panel for that document. You may want to transfer strokes from one document to another. You do so using the Stroke Styles dialog box ![]() .
.

![]() The Stroke Styles dialog box lets you create, edit, and manage custom stroke styles.
The Stroke Styles dialog box lets you create, edit, and manage custom stroke styles.
To save strokes for use in another document:
- Choose Stroke Styles from the Stroke panel menu.
- Select the custom strokes that you want to transfer to another document.
- Click the Save button. A dialog box appears where you can save the strokes as an .inst file, which contains the custom stroke definitions.
To transfer strokes from another document:
- Choose Stroke Styles from the Stroke panel menu.
- Click Load from the Stroke Styles dialog box.
- Navigate to find the .inst file that contains the custom stroke definitions.
- Click the Open button to add the strokes to the document.
To delete a stroke from document:
- Choose Stroke Styles from the Stroke panel menu.
- Select the stroke or strokes you want to delete.
- Click the Delete button.
Adding Arrows and Corner Options
You can add arrowheads and other shapes to the open-ended objects that have strokes applied to them ![]() .
.
![]()
![]() The 12 different types of arrowhead styles for paths.
The 12 different types of arrowhead styles for paths.
To add arrowheads and end shapes:
- Select an object with open ends.
- Add a graphic to the beginning of the object by choosing a shape from the Start menu in the Stroke panel
 .
.
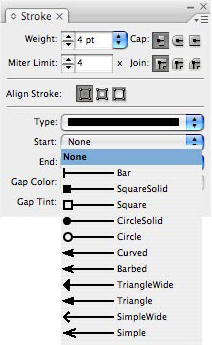 Choose an arrowhead style from the Start or End menu in the Stroke panel.
 - Add a graphic to the end of the object by choosing a shape from the End menu.
InDesign can modify the shape of objects by adding special corner options. You can apply these effects to any object that has corner points—even open-ended objects.
Tip
You can change a star’s points to curves by applying a rounded corner effect. Or you can convert an L-shaped line into a soft curve.
- Select an object with corner points.
- Choose Object > Corner Options. The Corner Options dialog box appears
 .
.
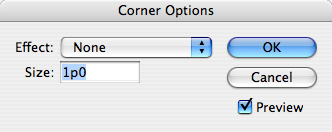 The Corner options dialog box lets you apply different corners to objects.
 - Choose one of the options from the Effect menu.
- Set the size of the effect.
- Click OK to apply the settings
 .
.
 An example of applying the special corner options to rectangles.
Opacity and Blend Mode Effects
What I call transparency (the ability to see through objects, images, or text), InDesign calls opacity.
To apply opacity effect to an object:
- Choose Window > Effects to open the Effects panel
 .
.
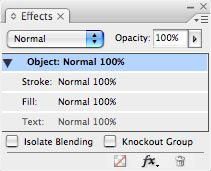 The Effects panel.
or
Click the Opacity slider in the Control panel.
or
Choose Objects > Effects > Transparency to open the Effects dialog box set to the Transparency option
 .
.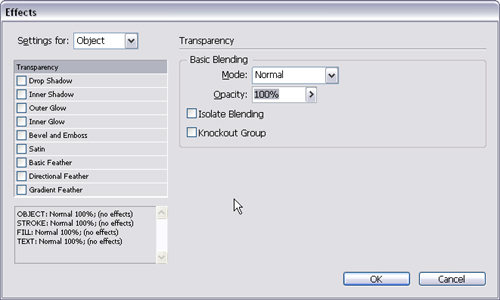 The Transparency controls in the Effects dialog box.
or
Choose Transparency from the Effects panel menu.
- Drag the Opacity slider or enter an amount in the Opacity field
 . The lower the opacity percentage, the more you can see through the object.
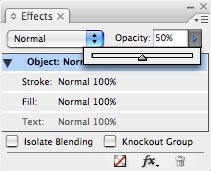 The Opacity slider in the Effects panel lowers the visibility of objects.
Tip
Once you have activated the Opacity field or slider, you can use the up and down arrow keys on the keyboard to increase or decrease the amount of opacity.

Blend mode effects allows the colors and shades in one object to interact with the objects beneath ![]() .
.
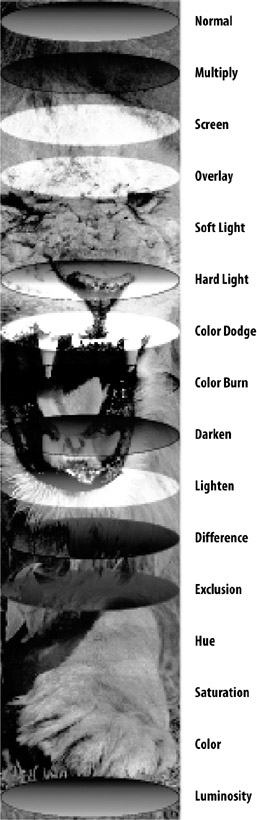
![]() An example of how the 16 blend modes interact when placed over an image.
An example of how the 16 blend modes interact when placed over an image.
- Select the object.
- Choose a blend mode from the list in the Effects panel or from the Transparency controls in the Effects dialog box.
• Normal applies no change to the objects.
• Multiply multiplies the bottom color with the top color.
• Screen is the inverse of Multiply.
• Overlay preserves the highlights and shadows of the base color while mixing in the top color.
• Soft Light is similar to shining a diffused spotlight on the artwork.
• Hard Light is similar to shining a harsh spotlight on the artwork.
• Color Dodge lightens the bottom color to reflect the top color.
• Color Burn darkens the bottom color to reflect the top color.
• Darken displays either the bottom or top color—whichever is darker.
• Lighten selects the bottom or top color—whichever is lighter.
• Difference subtracts one color from another depending on brightness.
• Exclusion is similar to Difference but is lower in contrast.
• Hue replaces the hue of the bottom object with the hue of the top one.
• Saturation replaces the saturation of the bottom object with the top.
• Color colorizes the bottom object with the top color.
• Luminosity changes the bottom object’s luminance with the top.
As you apply a blend mode or an opacity setting, you may need to control how the transparency is applied. One such control is called a knockout group. Objects in a knockout group display their blend modes or opacity settings on other objects, but not with each other ![]() .
.
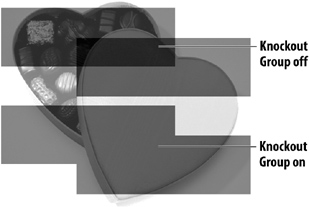
![]() With the Knockout Group turned on, blended objects do not interact with each other.
With the Knockout Group turned on, blended objects do not interact with each other.
- Apply a blend mode or opacity setting to an object.
- Repeat for any additional objects.
- Use the Selection tool to select the objects. These are the objects you don’t want to have interact with each other.
- Choose Object > Group.
- With the group selected, click the Knockout Group checkbox in the Effects panel
 or the Transparency controls in the Effects dialog box.
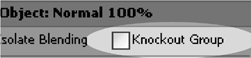 The Knockout Group checkbox in the Effects panel.
The Isolate Blending command creates the opposite effect of a Knockout group. With this command, the objects in the group display their blend modes with each other, but not with objects outside the group ![]() .
.
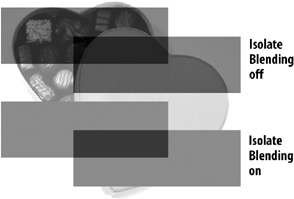
![]() With the Isolate Blending command turned on, blended objects only interact with each other, not the objects below.
With the Isolate Blending command turned on, blended objects only interact with each other, not the objects below.
To isolate the blending in objects:
- Apply a blend mode to as many objects as you want.
- Use the Selection tool to select the objects that have the blend mode.
- Choose Object > Group.
- Keep the group selected, click the Isolate Blending checkbox in the Effects panel
 or the Transparency options in the Effects dialog box.
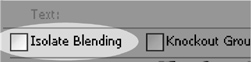 The Isolate Blending checkbox in the Effects panel.
You can also specify where the opacity or blend mode is applied.
To specify to which attributes the effect is applied:
• Use the Settings for menu in the Effects dialog box ![]() to choose one of the following:
to choose one of the following:
• Object sets the effect to the entire object.
• Fill sets the effect to just the fill.
• Stroke sets the effect to just the stroke.
• Text sets the effect to just the text.
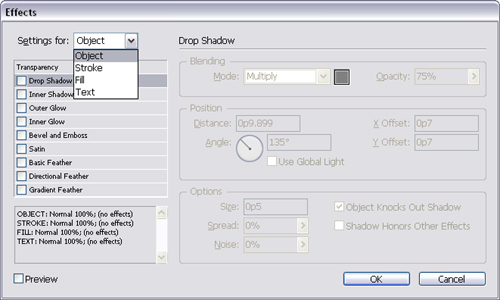
![]() Use the Settings for list to choose to which parts of the object the opacity or blend mode is applied.
Use the Settings for list to choose to which parts of the object the opacity or blend mode is applied.
or
Click to target the object attribute in the Effects panel ![]() .
.
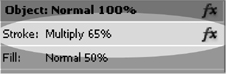
![]() Select the object attribute in the Effects panel to apply the opacity of blend mode to just one part of the object.
Select the object attribute in the Effects panel to apply the opacity of blend mode to just one part of the object.
Tip
Use this technique when working with the other effects such as shadows, glows, bevel and emboss effects, satin, and feathers covered in the next sections.
Working with Effects
In addition to opacity and blend modes, you can also apply special effects such as shadows, glows, and feathers to objects. All these effects are controlled from the Effects dialog box ![]() .
.

![]() The Effects dialog box lets you choose effects as well as change their appearance.
The Effects dialog box lets you choose effects as well as change their appearance.
To open the Effects dialog box:
• Click the fx icon in the Effects panel or the Control panel to choose an effect from the menu ![]() .
.

![]() The fx icon in the Effects panel lets you apply special effects.
The fx icon in the Effects panel lets you apply special effects.
or
Choose Object > Effects and then one of the effects in the submenu.
or
Choose one of the effects in the Effects panel menu.
To remove effects:
• Uncheck the effect in the Effects dialog box.
or
Select the effect in the Effects panel and then click the Delete Effect icon in the Effects panel ![]() .
.
![]()
![]() The Delete Effect icon in the Effects panel removes effects from selections.
The Delete Effect icon in the Effects panel removes effects from selections.
or
Click the Clear All Transparency icon in the Effects panel to remove all effects as well as any opacity and blend mode settings ![]() .
.
![]()
![]() The Clear All Transparency icon in the Effects panel removes all effects and makes the object opaque.
The Clear All Transparency icon in the Effects panel removes all effects and makes the object opaque.
or
Choose Clear Effects from the Effect panel menu or Object > Effects submenu.
or
Choose Clear All Transparency from the Effects panel menu or Object > Effects submenu. This removes all effects as well as any opacity and blend mode settings.
Shadow Effects
One of the most popular effects is a drop shadow set behind objects, text, or images ![]() .
.

![]() A drop shadow applied to text.
A drop shadow applied to text.
- Select the object.
- Open the Effects dialog box
 as described previously.
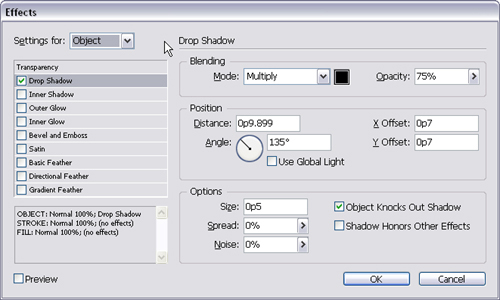 The Drop Shadow controls in the Effects dialog box.
 - Click the Drop Shadow checkbox.
- Set the controls as follows:
• The Blending area controls the color and opacity of the shadow as well as how the shadow interacts with other objects.
• The Position area controls the placement of the shadow in relationship to the object.
• The Options area controls the size and other attributes of the shadow.
- Click OK to apply the shadow.
An inner shadow creates the appearance that the object is cut out of the page it is on ![]() .
.

![]() An inner shadow applied to text.
An inner shadow applied to text.
- Select the object.
- Open the Effects dialog box
 as described previously.
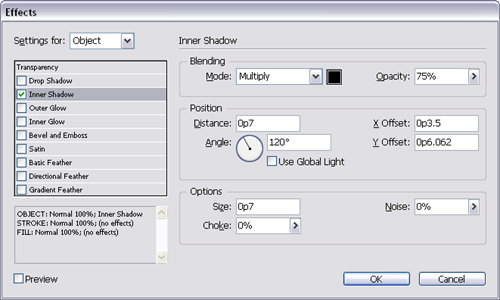 The Inner Shadow controls in the Effects dialog box.
 - Click the Inner Shadow checkbox.
- Set the controls as follows:
• The Blending area controls the color and opacity of the shadow as well as how the shadow interacts with other objects.
• The Position area controls the placement of the shadow in relationship to the object.
• The Options area controls the size and other attributes of the shadow.
- Click OK to apply the shadow.
Glow Effects
You can also add an outer glow around objects or an inner glow inside an object ![]() –
–![]() .
.

![]() An outer glow applied to text.
An outer glow applied to text.
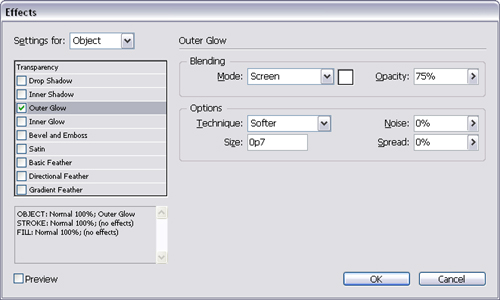
![]() The Outer Glow controls in the Effects dialog box.
The Outer Glow controls in the Effects dialog box.

![]() An inner glow applied to text.
An inner glow applied to text.
![]() The Inner Shadow controls in the Effects dialog box.
The Inner Shadow controls in the Effects dialog box.
- Select the object.
- Open the Effects dialog box
 as described previously.
 - Click the Outer Glow checkbox.
- Set the controls as follows:
• The Blending area controls the color and opacity of the glow as well as how the glow interacts with other objects.
• The Options area controls the size and other attributes of the glow.
- Click OK to apply the glow.
- Select the object.
- Open the Effects dialog box
 as described previously.
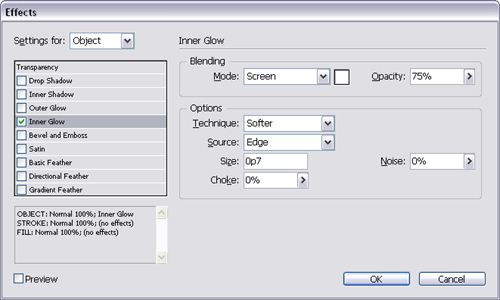
 - Click the Inner Glow checkbox.
- Set the controls as follows:
• The Blending area controls the color and opacity of the shadow as well as how the glow interacts with the inside of the object.
• The Options area controls the size and other attributes of the glow.
- Click OK to apply the glow.
Bevel and Emboss Effects
A great way to add dimension to objects is with the bevel and emboss effects ![]() .
.

![]() A bevel effect applied to text.
A bevel effect applied to text.
- Select the object.
- Open the Effects dialog box
 as described previously.
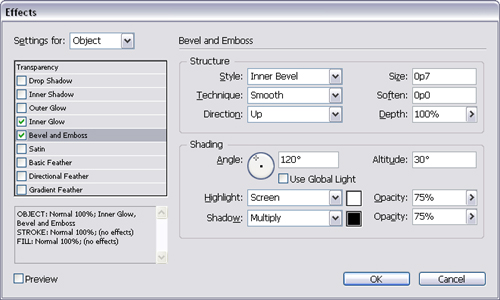 The Bevel and Emboss controls in the Effects dialog box.
 - Click the Bevel and Emboss checkbox.
- Set the controls as follows:
• The Structure area controls the style of the bevel or emboss as well as the size and other attributes.
• The Shading area controls what colors are used for the highlights and shadows of the effect as well as the direction of the light that creates the effects.
- Click OK to apply the bevel or emboss.
Satin Effect
The satin effect gives the appearance of a fabric texture applied to the object ![]() .
.

![]() A satin effect applied to text.
A satin effect applied to text.
- Select the object.
- Open the Effects dialog box
 as described previously.
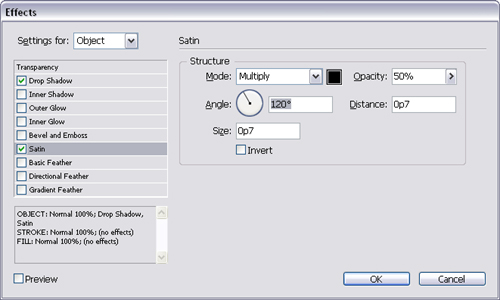 The Satin controls in the Effects dialog box.
 - Click the Satin checkbox.
- Set the controls as follows:
• The Structure area controls how the satin texture is applied as well as the size, angle, and other attributes.
• Choose Invert to reverse the appearance of the satin effect with the object’s color.
- Click OK to apply the satin effect.
Feather Effects
Feather refers to softening the edge of an object so that it fades to transparent. InDesign gives you three different types of feather effects. The Basic Feather creates a soft edge around the outside of objects ![]() .
.

![]() A basic feather applied to text.
A basic feather applied to text.
To add a basic feather effect:
- Select the object.
- Open the Effects dialog box
 as described previously.
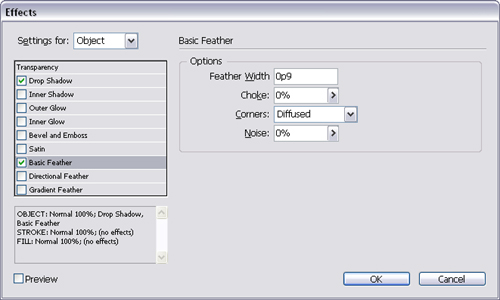 The Basic Feather controls in the Effects dialog box.
 - Click the Basic Feather checkbox.
- Use the Options area to control the size and other attributes of the feather.
- Click OK to apply the feather.
A Directional Feather allows you to specify different amounts of softening for the top, bottom, left, and right sides of the object ![]() .
.

![]() A directional feather applied to text.
A directional feather applied to text.
- Select the object.
- Open the Effects dialog box
 as described previously.
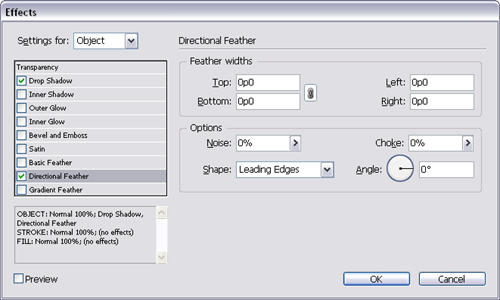 The Directional Feather controls in the Effects dialog box.
 - Click the Directional Feather checkbox.
- Set the controls as follows:
• The Feather widths area controls the size of the feather for the four sides of the object.
• The Options area controls the size and other attributes of the feather.
- Click OK to apply the feather.
The Gradient Feather effect allows you to create a color that fades in and out of opacity. So instead of a gradient that changes color, a gradient feather changes opacity for each of the gradient stops (transition points) ![]() .
.

![]() A gradient feather applied to text.
A gradient feather applied to text.
Tip
The Gradient Feather effect only changes the opacity of the gradient. If you need to change the color of the gradient, you need to create a separate color gradient.
- Select the object.
- Open the Effects dialog box as described previously.
- Click the Gradient Feather checkbox.
- Set the controls as follows
 :
:
• The Gradient Stops area allows you to set the opacity and location for each of the gradient transition points.
• The Options area controls the type of gradient (linear or radial) and the angle of the gradient.
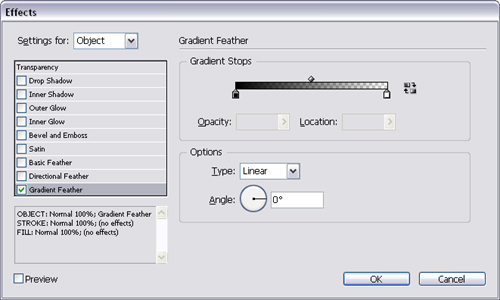 The Gradient Feather controls in the Effects dialog box.
 - Click OK to apply the feather.
Setting the Global Light
The Global Light setting allows you to set an angle and position of the electronic “light” that creates shadows and other dimensional effects. You can use the Global Light controls to coordinate the appearance of the effects.
- Choose Global Light from the Effects panel menu or the Object > Effects submenu.
- Use the Global Light dialog box to set the angle and altitude of the global light
 .
.
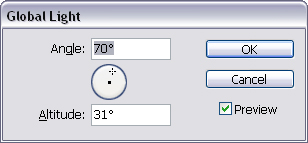 The Global Light dialog box.
Using the Pathfinder Commands
I can’t draw. So rather than struggle to create certain shapes, I use the Pathfinder commands to use multiple objects to create different shapes.
To use the Pathfinder commands:
- Select the objects that you want to have interact with each other. You must select at least two objects.
- Click one of the Pathfinder icons at the top of the Pathfinder panel
 (Window > Object & Layout > Pathfinder).
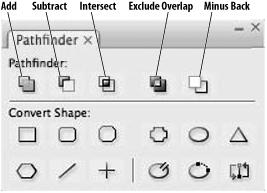 Click the Pathfinder icons in the Pathfinder panel.
or
Choose one of the following from the Object > Pathfinder menu:
• Add combines the outer edges of the objects in a single shape
 . Examples of how the Pathfinder commands change selected objects.
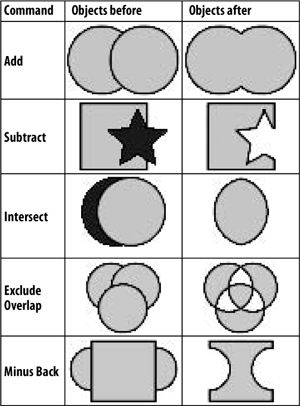
• Subtract uses the frontmost objects as cookie cutters that change the shape of the backmost object
.• Intersect creates a new shape based on the area intersected by the objects
.• Exclude Overlap creates a hole where the objects overlap
.• Minus Back uses the backmost objects as cookie cutters that change the shape of the frontmost object
.
Depending on the command and the position of the objects, you may create a compound path. If you want to separate the objects, you need to release the compound path:
To separate the results of the Pathfinder commands:
- Select the objects created by the Pathfinder command.
- Choose Object > Paths > Release Compound Paths.
- Deselect the objects and then move each one to new positions
 .
.
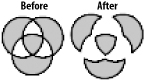 An example of how the Exclude Overlap command creates separate objects when the Compound Path is released.
You can use the Convert Shape commands to change objects from one shape to another.
To change the shape of objects:
- Select the object that you want to convert.
- Click one of the Convert Shape icons in the Pathfinder panel
 and
and  .
.
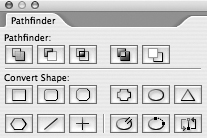 The Convert Shape icons in the Pathfinder panel allow you to change the shape of objects. The Convert Shape icons and their functions.
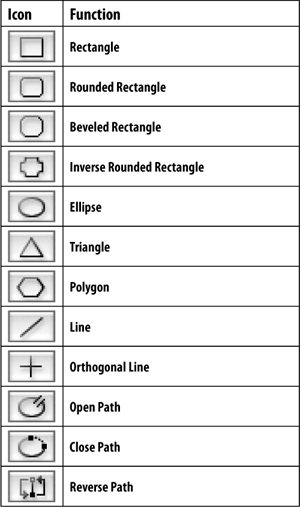
or
Choose one of the following from the Object > Convert Shape menu:
• Rectangle converts to a rectangle.
• Rounded Rectangle converts to a rectangle with rounded corners.
• Beveled Rectangle converts to a rectangle with flat, angled corners.
• Inverse Rounded Rectangle converts to a rectangle with inverted rounded corners.
• Ellipse converts the object to an ellipse.
• Triangle converts to a triangle.
• Polygon converts to a polygon using the current settings for the Polygon tool.
• Line converts the object to a line. The length is the diagonal of the bounding box of the object.
• Orthogonal Line converts the object to a line. The length is the width or height of the bounding box, whichever is greater.
Three of the icons in the Convert Shape area are actually path modification commands.
- Select the object that you want to modify.
- Click one of the Convert Shape icons in the Pathfinder panel and .
or
Choose one of the following from the Object > Paths menu:
• Open Path opens a closed path at a point.
• Close Path creates a segment between the end points of a path.
• Reverse Path changes the direction of a path.
The Pathfinder and Convert Shape commands can be used to create special shapes. Here are a few ideas for working with those commands.
You can use the Pathfinder commands to merge two different shapes into one. For instance, many people want to create a rectangle with only two rounded corners. That shape is easily created by applying the Pathfinder > Add command to merge an ordinary rectangle with a rounded-corner rectangle ![]() .
.
![]() The steps used to create a rectangle with two rounded corners.
The steps used to create a rectangle with two rounded corners.
Using the Eyedropper
Imagine you’ve finished styling an object with exactly the right combination of fill, stroke, and effects. And now you’d like to apply those same settings to a different object. That’s where the Eyedropper tool comes to the rescue.
Tip
As handy as the Eyedropper tool is, it doesn’t come close to the power of object styles (covered in Chapter 15, “Style”).
To set the eyedropper options:
- Double-click the Eyedropper tool in the Tools panel
 This opens the Eyedropper Options dialog box
  .
.
 The Eyedropper tool in the Tools panel lets you sample object attributes.
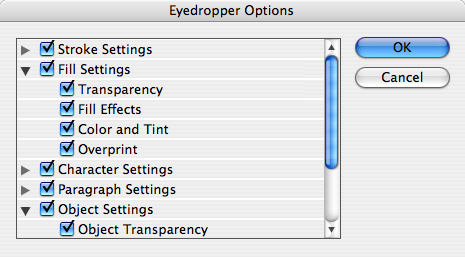 Use the Eyedropper Options dialog box to set which attributes the Eyedropper will sample and apply.
 - Click the triangles to open each of the attribute categories.
- Use the checkboxes to choose which attributes you want the Eyedropper tool to sample.
- Click OK to set the options.
Once you set the eyedropper options, you can sample and apply object attributes.
To sample and apply object attributes:
- Choose the Eyedropper tool.
- Click with the white eyedropper cursor inside the object that you want to sample
 . The cursor changes from white to black.
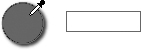 The white eyedropper lets you sample the object attributes.
 - Click the black eyedropper cursor inside the object that you want to change
 . This applies the first object’s attributes to the second.
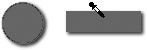 The black eyedropper applies object attributes from one object to another.
 - Click the eyedropper inside any other objects that you want to change.
As you work with the Eyedropper tool, you may change your mind and want to unload one set of attributes to sample new ones.
- Hold the Opt/Alt key. The eyedropper cursor changes to the white sample mode.
- Click the cursor inside a new object that you want to sample.
- Release the Opt/Alt key to apply the new attributes to objects.
You may not want to sample all the attributes in an object—just the fill or stroke. That’s when you can use the Eyedropper tool in its precision mode. The precision mode allows you to sample and apply just the color to either a fill or a stroke.
To use the precision eyedropper:
- Choose the Eyedropper tool. Hold the Shift key. A plus sign appears next to the white eyedropper cursor
 . This indicates that the Eyedropper tool is in the precision mode.
 The white precision eyedropper allows you to sample a specific color.
 - Click the precision white eyedropper cursor on the fill or stroke color you wish to sample. The cursor turns into the precision black eyedropper
 .
.
 The black precision eyedropper lets you apply a specific color to either the fill or a stroke.
 - Click the precision eyedropper on either a fill or a stroke of the object that you want to change. Only the fill or stroke is changed.
Setting Object Defaults
You can make any of the object settings the default for any new objects you create. You can set the object defaults for the current document or globally for all new documents.
To set current document defaults:
- With a document open, deselect any objects.
- Make whatever changes you want in the Stroke panel or other panels. This sets the defaults for the open document.
- Set whatever amounts you want for the Effects or Corner options dialog boxes.
To set global defaults:
• With no document open, make whatever changes you want in the Stroke or other panels. This sets the global defaults for all new documents.
InDesign also has its own default fill and stroke setting of a black stroke and no fill. These are separate from the defaults you set yourself. This can be easily applied to objects.
To apply the InDesign fill and stroke defaults:
• Click the Default Fill and Stroke icon in the Tools panel ![]()

![]() Click the Default Fill and Stroke icon in the Tools panel to set the fill to none and stroke to black.
Click the Default Fill and Stroke icon in the Tools panel to set the fill to none and stroke to black.