
Chapter 10. Pages and Books
Most people who lay out documents work on projects that have more than one page—booklets, brochures, newsletters, menus, annual reports, magazines, books, and so on. Even a lowly business card has two pages if you design a front and back.
When you work with multipage documents, you need to add pages, flow text, apply page numbers, and force text to move to certain pages.
If you are working on very complex documents, you need to make sure all the pages have the same structure.
If you are working on a book, you will want to join individual chapters together. You may also want to automate the process of creating a table of contents or an index.
Here’s where you’ll learn how to automate and organize working with multipage layouts. In addition, you’ll learn how to use InDesign’s Book features to synchronize multiple documents in a large project. You’ll also discover special features for creating a table of contents from text.
Changing the Pages Panel
You may want to change the display of the Pages panel.
To open the Pages panel:
• If the Pages panel is not visible, choose Window > Pages to open the panel ![]() .
.
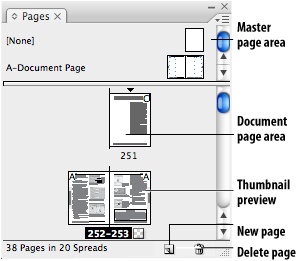
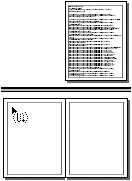
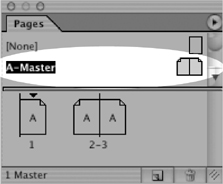
![]() The Pages panel is the command center for multipage documents.
The Pages panel is the command center for multipage documents.
To control the display of the Pages panel:
- Choose Panel options from the Pages panel menu. This opens the Panel Options dialog box
 .
.
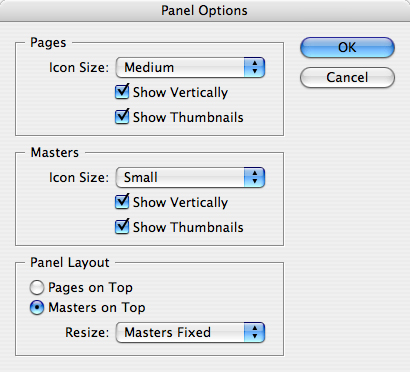 The Panel Options dialog box lets you control the appearance of the Pages panel.
 - Use the Pages Icon Size menu to choose the size of the document pages icons.
- Uncheck Show Vertically to display the pages horizontally in the panel
 .
.
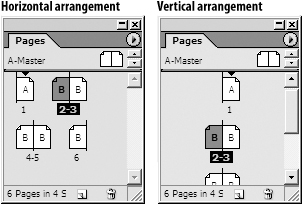 The Pages panel with Show Vertically turned off (left) and turned on (right).
 - Uncheck Show Thumbnails to hide the thumbnail preview of the pages in the Pages panel.
- Use the Masters Icon Size menu to change the size of the master page icons. These choices are the same as the Pages Icon Size menu.
- Choose Pages on Top to position the document pages at the top of the panel.
- Choose Masters on Top to position the master pages at the top of the panel.
- Use the Resize list to control what happens when you resize the panel:
• Proportional maintains the same relative area as you change the size of the panel.
• Pages Fixed adds new space only to the masters area.
• Masters Fixed adds new space only to the pages area.
Adding Blank Pages
Although you probably specified a certain number of pages before you started your document, you might need to add more pages after you’ve started working on it. You can add pages as you work or you can add a particular number of pages at a precise location.
Tip
A checkerboard grid next to the number of the page in the Pages panel indicates that an effect that requires flattening such as a transparency, drop shadow, feather, or Photoshop transparency has been applied on that page ![]() . (See Chapter 19, “Output” for more information on flattening.)
. (See Chapter 19, “Output” for more information on flattening.)
![]() The checkerboard grid next to a page indicates that an effect such as a transparency or a drop shadow has been applied to that page.
The checkerboard grid next to a page indicates that an effect such as a transparency or a drop shadow has been applied to that page.
If you need to add just a few pages, you can add them one by one, manually.
- Click the New Page icon in the Pages panel to add a single page.
or
Drag a master page or a nonmaster page from the master page area to the document area of the panel
 .
. Drag a master page from the master page area of the Pages panel to the document area to add pages to a document.
 - Repeat as many times as necessary until you have added all the pages you need.
If you need to add many pages, rather than dragging pages over and over in the Pages panel, you can add them using the Insert command. This also lets you specify where to add the pages.
To add pages using the Insert command:
- Choose Insert Pages from the Pages panel menu. The Insert Pages dialog box appears
 .
.
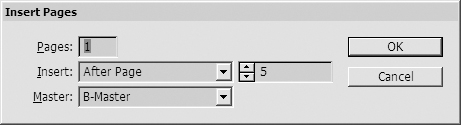 The Insert Pages dialog box lets you add many pages at once to a document.
 - Type the number of pages you want to insert in the Pages field.
- Choose where to add the pages within the document from the Insert menu as follows
 :
:
• After Page lets you insert new pages after a specific page.
• Before Page lets you insert new pages before a specific page.
• At Start of Document inserts new pages at the beginning of the document.
• At End of Document inserts new pages at the end of the document.
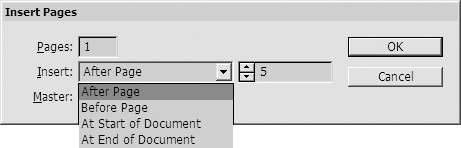 The Insert menu gives you specific choices as to where to insert pages.
 - Use the Master menu to choose the master page that the new pages should be based on.
or
Choose None from the Master menu to have an empty page that does not act as a master applied to the new pages.
- Click OK. The new pages appear in the Pages panel.
Navigating and Moving Pages
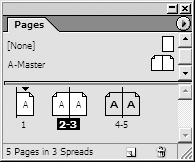
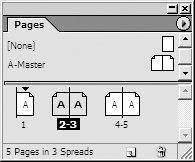
As you work with pages in the Pages panel, you should understand the difference between targeting a page and working on a page. The active page is the page you are currently working on. The targeted page is the page chosen in the Pages panel.
To target a page:
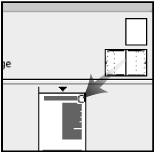
• Click the page in the Pages panel. A highlight appears on the page ![]() .
.
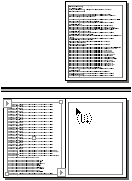
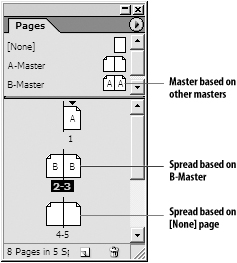
![]() The colored highlight on the targeted pages (pages 4-5) shows they are not the active pages (pages 2-3).
The colored highlight on the targeted pages (pages 4-5) shows they are not the active pages (pages 2-3).
Tip
When a page is targeted, it means you can apply a command in the Pages panel even without working on the page.
To work on a page:
• Double-click the page number or name of the master page spread in the Pages panel. A highlight appears on the number or name of the page ![]() .
.
![]() The highlight on both the page number and the page for the active pages (pages 2-3) shows they are both targeted and active.
The highlight on both the page number and the page for the active pages (pages 2-3) shows they are both targeted and active.
InDesign has several different ways to move from page to page.
To move to a specific page using the Pages panel:
• Double-click the page in the Pages panel that you want to move to. The page is centered within the document window.
or
Double-click the name of the spread to fit both pages in the document window.
You can also use the navigation controls at the bottom of the document window.
To navigate using the window page menu:
• Click a page number in the window page menu to navigate through the document ![]() .
.
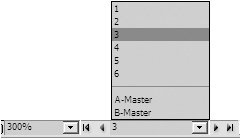
![]() The pop-up page list at the bottom of the document lets you navigate through the document.
The pop-up page list at the bottom of the document lets you navigate through the document.
or
Enter a number in the Page field to move to a specific page.
To use the navigation controls:
• Click each of the navigation arrows to move through the document ![]() .
.
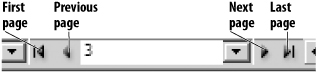
![]() Use the navigation controls at the bottom of the document window to move through the document.
Use the navigation controls at the bottom of the document window to move through the document.
You can also navigate using the commands in the Layout menu in the menu bar at the top of the application.
Tip
The Layout menu commands can be applied using keyboard shortcuts. This lets you move through the document without using the mouse.
To navigate using the Layout menu:
• Choose one of the following:
• Layout > First Page moves to the first page of the document.
• Layout > Previous Page moves to the previous page.
• Layout > Next Page moves to the next page.
• Layout > Last Page moves to the last page of the document.
• Layout > Next Spread moves to display the next spread of pages.
• Layout > Previous Spread moves to display the previous spread of pages.
• Layout > Go Back moves to the page that was previously active.
• Layout > Go Forward moves to the page that was active before the Go Back command was applied.
You can also use the Pages panel to duplicate and delete pages from the document.
- Select the page or spreads you want to duplicate.
- Drag the pages onto the New Page icon.
or
Choose Duplicate Spread from the Pages panel menu.
- Use the Pages panel to select the pages.
- Choose Delete Pages from the Pages panel menu.
or
Click the Delete Page icon at the bottom of the Pages panel
 .
. - When the confirmation dialog box appears, Click OK to confirm your choice.
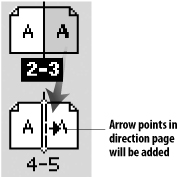
You can use the Pages panel to change how pages are arranged in the document.
To rearrange pages in a document:
• Drag a page next to or between the pages of a spread as follows ![]() :
:
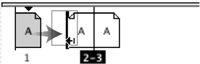
• With Allow Document Pages to Shuffle turned on, the new page forces other pages to a new spread ![]() .
.
• With Allow Selected Spread to Shuffle turned off, the new page is added to the existing spread without moving the other pages ![]() .
.
![]() Pages can be moved by dragging their icons in the Pages panel.
Pages can be moved by dragging their icons in the Pages panel.
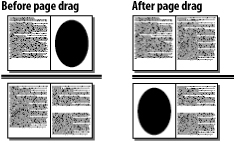
![]() When Allow Document Pages to Shuffle is turned on, a page moved between two other pages forces one of the pages to the next spread.
When Allow Document Pages to Shuffle is turned on, a page moved between two other pages forces one of the pages to the next spread.
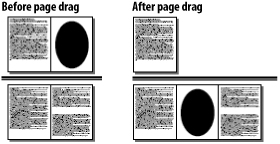
![]() When Allow Document Pages to Shuffle is turned off, a page moved between other pages is added between the two pages in the spread.
When Allow Document Pages to Shuffle is turned off, a page moved between other pages is added between the two pages in the spread.
Tip
You can drag pages between documents. When you do a dialog box appears asking where you would like the pages to appear.
- Choose Move Pages from the Pages panel menu. This opens the Move Pages dialog box
 .
.
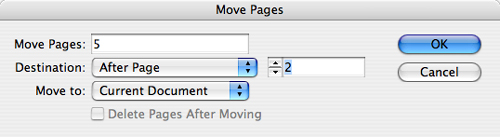 The Move Pages dialog box.
 - Use the Move Pages field to list the pages you want to move.
- Use the Destination list to choose where you want the pages to move.
- If you have chosen After Page or Before Page, enter the page number in the field.
- Use the Move To list to choose the document location. This can be the current document or any open documents.
- If you choose an external open document, you can check Delete Pages after Moving to delete the pages from the original file.
- Click OK to move the pages.
Creating and Separating Spreads
Most documents are either single-page or facing-page documents. However, you can create spreads with more than one or two pages. These are island spreads, like the foldouts found in special issues of magazines ![]() .
.
![]() An example of how three pages can be put together to form an island spread.
An example of how three pages can be put together to form an island spread.
- Deselect Allow Document Pages to Shuffle in the Pages panel menu.
- Drag a page from the pages area, or a master page, next to the spread.
- Release the mouse when the vertical line appears next to the spread
 . This adds the page to the island spread
  .
.
 The thick vertical line indicates that the new page will be added as an island spread.
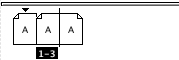 An example of an island spread in the Pages panel.
To dismantle an island spread:
- Drag each page outside the spread.
or
Choose Allow Document Pages to Shuffle from the Pages panel menu. A dialog box asks if you want to maintain the current number of pages in the spread
 .
.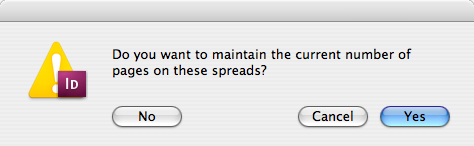 You can dismantle an island spread by changing the number of pages in the spread.
 - Click the No button. This dismantles the island spread into the default number of pages per spread in the document.
You can also control whether or not the pages in a spread are kept together or allowed to separate.
To keep the pages in a spread together:
- Select the spread you want to protect.
- Deselect Allow Selected Spread to Shuffle from the Pages panel menu. Brackets appear around the page numbers
 . This prevents the spread from separating if you add pages.
 The brackets around the numbers indicate that Allow Selected Spread to Shuffle has been turned off for the pages.
Importing Text
If you have a short amount of text, you can easily type it directly in InDesign’s text frames. However, if you are working with long amounts of text, most likely you will want to import the text from a word processing program. You will also want to place the text so that it flows from page to page.
- Choose File > Place. The options for placing text are at the bottom of the Place dialog box
 .
.
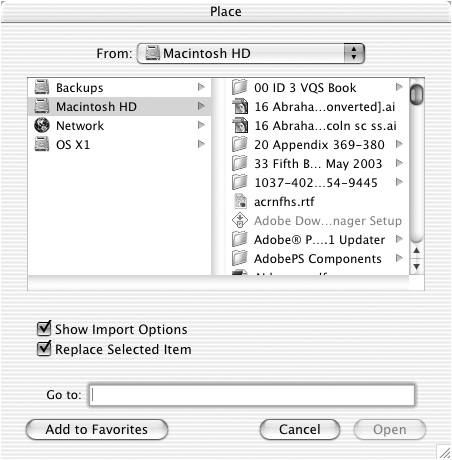 The Import options in the Place dialog box.
 - Navigate to find the file you want to import.
- Click Show Import Options to open the specific import options for that type of text file.
- Click Replace Selected Item to replace the contents of a selected text frame with the new text.
- Click Open to load the text into a text cursor (also called a loaded cursor)
 .
.
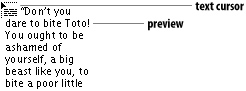 The loaded text cursor indicates that you can place the imported text.
Tip
The text cursor also contains a preview area to show the type of object being placed. For the rest of this book, however, I will show only the text cursor itself to make it easier to see its behavior.
Tip
If you hold the Shift key as you click Choose, you open the Import Options dialog box even if the option is not checked.
The options for importing text change depending on which type of text file you choose to import.
To open the import options for Microsoft Word files:
• Choose Import Options to open the Microsoft Word Import Options dialog box ![]() .
.
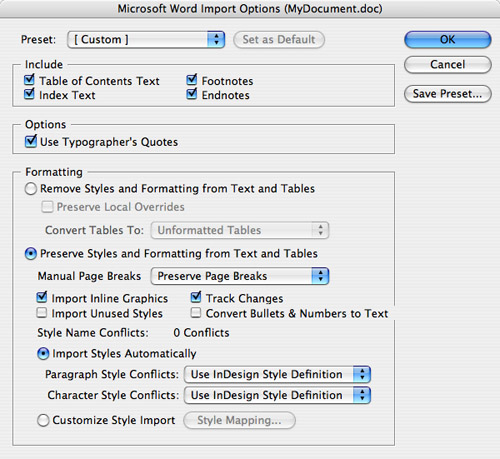
![]() The Microsoft Word Import Options dialog box is used to import Word files.
The Microsoft Word Import Options dialog box is used to import Word files.
To set the Word import options:
- Use the Include area to include Word’s Table of Contents Text, Index Text, Footnotes, or Endnotes.
- Choose whether dumb quotes and apostrophes (such as ' and ") should be converted into proper typographer quotes (such as ‘ and ’ or “ and ”).
To control the formatting in the Word import options:
- Select Remove Styles and Formatting from Text and Tables to remove the formatting that was applied in Word.
- If you choose to remove styles and formatting, you can select Preserve Local Overrides to keep attributes such as italic and bold.
- Use the Manual Page Breaks list to control how Word page break commands are handled
 .
.
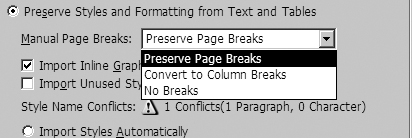 The Manual Page Breaks list controls how Word page breaks are converted.
 - Select Import Inline Graphics to include images inserted into the Word text.
- Select Import Unused Styles to add all styles from the Word document even if some have not been applied to text.
- Select Track Changes to see the edits applied to the text when using InCopy.
- Select Convert Bullets & Numbers to Text to convert Word’s electronic bullets and numbers into actual characters.
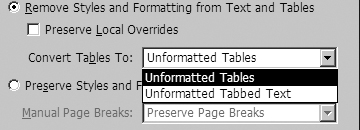
If your Word document contains a table, you can control how those tables are imported.
To control the formatting in the Word import options:
• Use the Convert Table To list to choose one of the following ![]() :
:
• Unformatted Tables creates a table with InDesign’s default settings.
• Unformatted Tabbed Text converts tables into tab-delimited text.
![]() The Convert Tables To list controls how Word tables are converted.
The Convert Tables To list controls how Word tables are converted.
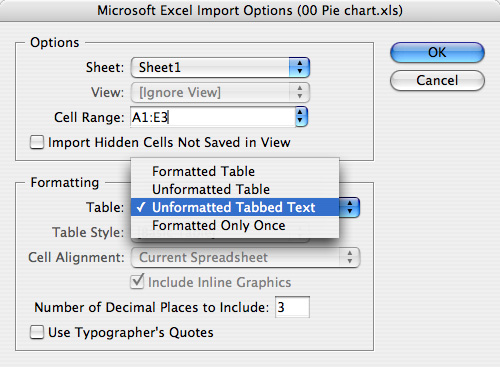
When you import a Microsoft Excel file, you can set the import options for the file. (See Chapter 13, “Tabs and Tables,” for more information on working with the tables imported from Excel files.)
To set the options for Microsoft Excel files:
• Choose Import Options to open the Microsoft Excel Import Options ![]() .
.
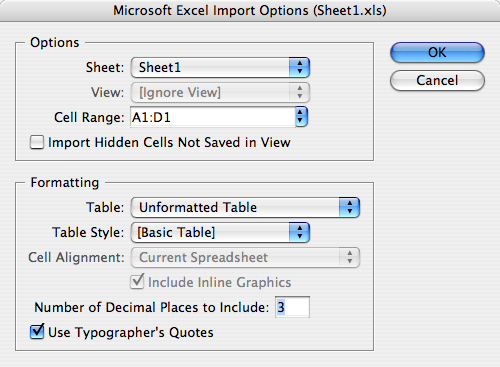
![]() The Microsoft Excel Import Options dialog box is used to import Excel tables.
The Microsoft Excel Import Options dialog box is used to import Excel tables.
To choose which data to import from Excel files:
- Use the Sheet list to control which parts of the spreadsheet you want to import.
- Use the View list to control which view information to import.
- Use the Cell Range list to control which cells to import.
- Check Import Hidden Cells not Saved in View to import that data.
To choose how the Excel data is formatted:
- Use the Formatting Table list to choose how the table should be formatted
 .
.
 The Formatting Table list controls how tables are imported.
 - Use the Formatting Table Style list to apply one of InDesign’s table styles.
- Use the Cell Alignment list to choose the paragraph alignment for the information in the table.
- Check Include Inline Graphics to include placed images along with the text.
You can also control how plain text files, such as ASCII files, are imported into an InDesign document.
To set the options for ASCII files:
- Choose Import Options to open the Text Import Options dialog box
 .
.
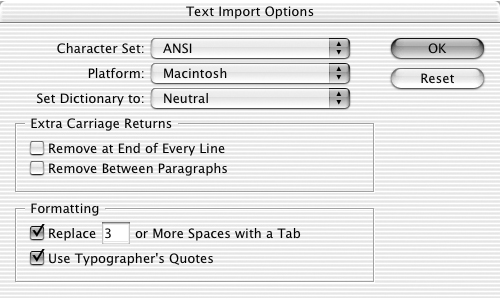 The Text Import Options dialog box is used to import raw ASCII text files.
 - Choose the character set, platform, and dictionary to ensure that special characters are imported correctly.
- Choose how to handle extra carriage (paragraph) returns at the ends of lines and paragraphs.
- Choose how to delete extra spaces inserted into the text.
Flowing Text
Once you have imported the text into the loaded text cursor, you can choose how the text flows into the document.
To import text into a new frame:
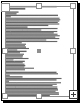
• Drag the loaded text cursor to create a text frame that contains the text ![]() . The straight lines indicate the text will be placed into a new frame.
. The straight lines indicate the text will be placed into a new frame.
![]()
![]() The straight lines around the loaded text cursor indicate that the text will be placed into a new text frame.
The straight lines around the loaded text cursor indicate that the text will be placed into a new text frame.
or
Click the loaded text cursor on the page. InDesign creates a text frame the width of the margins of the page.
You can place text automatically into text frames that are master page items. This makes it easy to flow text from page to page.
To create master text frames:
• Choose Master Text Frame when you first create the document ![]() . This creates a text frame that fits within the margins of the master page.
. This creates a text frame that fits within the margins of the master page.
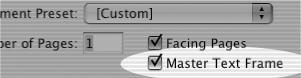
![]() Apply the Master Text Frame option when you create a new document.
Apply the Master Text Frame option when you create a new document.
To import text into an existing or master frame:
- Move the loaded text cursor inside the frame. Curved lines appear
 .
.
 The curved lines around the loaded text cursor indicate that the text will be placed into an existing frame.
 - Click the loaded text cursor inside the frame. The text flows into the frame.
To import text within the margins:
- Move the loaded text cursor near the top-left corner of the margins.
- Click the loaded text cursor. The text flows into the frame.
If you want, you can import many pages of text so they’re linked from one page to another. There are several techniques for flowing the text. The manual method lets you choose exactly where the text should appear. For instance, you can use this method to place text onto noncontiguous pages.
- Import the text so that you have a loaded cursor.
- Move the cursor inside the area where the master text frame is located.
or
Move the cursor inside the top-left corner of the margins.
- Click inside the area where the master text frame is located. The text fills the frame. If there is more text, an overflow symbol appears at the bottom of the frame
 .
.
 If there is more text than can fit on the page, an overflow (plus sign) symbol appears at the bottom of the frame.
 - Click the overflow symbol to load the overflow text into the cursor
 .
.
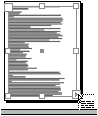 Click the overflow symbol to manually load the overflow text into the cursor.
 - Move to another page. The cursor changes to a link symbol
 . Click to flow the text onto that page
  .
.
 Click the link cursor to flow the text to the next page.
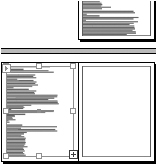 The text flows onto the next page.
 - If there is additional overflow text, repeat steps 3, 4, and 5 until all the text has been manually flowed onto the pages.

Flowing text manually is tedious and cumbersome. Rather than manually load the overflow text onto the cursor, you can use the semi-autoflow command to easily load the cursor with the overflow text.
- Import the text so that you have a loaded cursor.
- Hold the Opt/Alt key to display the semi-autoflow cursor
 .
.
 The semi-autoflow cursors let you flow text page by page.
 - Click the cursor within a frame or the margins.
or
Drag to create a text frame. The semi-autoflow cursor automatically loads any overflow text into a new cursor, which can be placed into a new frame
 .
. After clicking with the semi-autoflow cursor the text is automatically loaded into a new cursor.
 - Hold the Opt/Alt key and click or drag to create another text box linked to the first.
- Repeat step 4 as many times as necessary to place all the text in the story
 .
.
 Each click with the semi-autoflow cursor loads the text onto new pages.
If you have many pages of text, you can automatically flow the text and create new pages at the same time using the autoflow feature.
- Import the text so that you have a loaded cursor.
- Hold the Shift key. This cursor changes to the autoflow text cursor
 .
.
 Use the autoflow cursors to create all the pages necessary to hold the imported text.
 - Move the cursor over the area inside an existing frame or the master frame of the page.
or
Click the cursor at the top-left corner of the margins.
- Click the mouse button. This flows the text onto that page and creates as many additional pages as are necessary to hold all the text
 .
.
 After clicking with the autoflow cursor new pages are created to hold the text.
What if you want to automatically flow text onto the existing pages of a document without adding any new pages?
To flow text onto a fixed number of pages:
- Import the text so that you have a loaded cursor.
- Hold the Shift+Opt/Alt keys. The cursor changes to the fixed-page autoflow cursor
 .
.
 Use the fixed-page autoflow cursors to flow text only onto the existing pages.
 - Click anywhere inside a master text frame or the margins of the page
 . This flows the text automatically onto as many pages as are in the document. If there is more text, an overflow symbol appears on the last page.
 The fixed-page autoflow cursor indicates the text will flow only onto existing pages in the document.
You can fill a frame with dummy text instead of importing real text.
To fill a frame with placeholder text:
- Click inside a frame.
- Choose Type > Fill with Placeholder Text. The dummy text fills the frame
 .
.
 A sample of the placeholder text that is used to fill text frames.
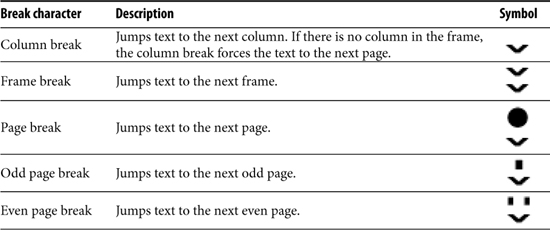
Creating Text Breaks
InDesign has special characters that force the text to break to a new position.
- Place the insertion point where you want to jump to the next location.
- Choose Type > Insert Break Character.
or
Control-click (Mac) or right-click (Win) to choose Insert Break Character from the contextual menu.
- Choose one of the following:
Working with Master Pages
Every new document includes a master page. When you add objects to the master page, they appear on all the document pages based on that master page.
To add objects to a master page:
- In the Pages panel, double-click the name of the master page
 . This opens the master page in the document window.
 Double-click a master page in the Pages panel to view that master page in the document window.
 - Add text boxes, graphics, or any other elements you want on the master page.
- Double-click the name of the document page to make it the active page. Any items placed on the master page now appear on the document page.
You can also add master pages from one document into another.
To import masters from one document into another:
- Choose Load Master Pages from the Pages panel menu.
- Use the dialog box to select the document that contains the masters you want to import.
- If the masters contain the same name, you will be asked how to resolve the conflict.
- An alert will tell you if the masters are not the same page size.
You can have many master pages in a document. This allows you to have different layouts for different parts of your document.
- Choose New Master from the Pages panel menu. This opens the New Master dialog box
 .
.
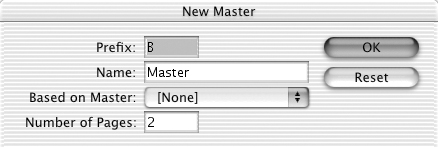 The New Master dialog box allows you to set the attributes for the master page.
 - Choose a letter for the prefix for the master page.
- Enter a name for the master page.
- Use the pop-up menu to set which master page, if any, the new master page should be based on.
- Enter the number of pages for the master. This allows you to create spreads that serve as master pages.
As you work, you might want to convert a document page into a master page. InDesign makes it easy to turn a document page into a master page.
To convert a document page to a master page:
- Select the page or pages.
- Drag the page or pages from the document area to the master page area
 .
.
 Drag a document page into the master page area to convert the document page to a master.
or
Choose Save as Master from the Pages panel menu.
New pages are based on the master page applied to the last existing page of the document. You can easily change the master page that governs pages.
To apply a new master to a page:
- Select the page or pages.
- Choose Apply Master to Pages from the Pages panel. This opens the Apply Master dialog box
 .
.
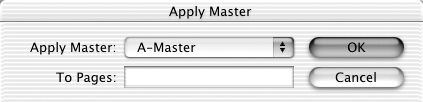 The Apply Master dialog box allows you to change the master that governs pages.
 - Use the Apply Master menu to apply a master to the pages.
- Use the To Pages field to change the selected pages.
To apply masters with the Pages panel:
• Drag the master page onto the document pages as follows:
• To apply to a single page, drag the master page icon onto the page. A rectangle appears around the page ![]() .
.
![]()
![]() The rectangle around the single page indicates that the master will be applied to that page only.
The rectangle around the single page indicates that the master will be applied to that page only.
• To apply to a spread, drag the master page icon onto the spread. A rectangle appears around the spread ![]() .
.
![]()
![]() The rectangle around the spread indicates that the master will be applied to the spread.
The rectangle around the spread indicates that the master will be applied to the spread.
You can also base one master page on another using the Pages panel.
To base masters on existing masters:
- Create a new master or spread.
- Drag one master page onto another.
• To base the spread on the master, drag the master onto the spread.
• To base one page on the master, drag the master onto a single page.
- Release the mouse button. The prefix of the master appears inside the second master page
 . The prefix indicates that the master page governs the other master page.
 The letters inside the page icons indicate what masters are applied to pages or other masters.
Ordinarily you modify the elements of a master page only on the master page itself. The elements on the document pages are protected from being selected or modified. However, you can release that protection and modify the master elements by creating local overrides.
To modify master elements on document pages:
- Hold Cmd/Ctrl-Shift and click the element you want to modify. This releases the protection and selects the element.
- Make any local override changes to the element.
You might want to modify all the master elements on a page. Rather than release each item one by one, InDesign lets you do it with a single command.
To release all master elements on a page:
• Choose Override All Master Page Items from the Pages panel menu. This releases the objects so they can be modified on the document page.
You may want to set master page items, such as page numbers and headers, to never be modified on the document page.
To set a master page item to not be overridden:
- Select the item on the master page.
- Deselect Allow Master Item Overrides on Selection from the Pages panel menu.
You can also set a master page item to apply its text wrap to other master page items, and not any document page items.
To control the text wrap of a master page item:
- Select the item on the master page.
- Apply a text wrap setting.
- Use the Text Wrap panel menu to select or deselect Apply to Master Page Only.
Once you have created a local override on a master page element, it may still have links to the original master page item. You can completely sever all ties between the master page item and the item on the document page.
To separate an item from the master item:
- Select the object that has been released.
- Choose Detach Selection From Master in the Pages panel menu.
Of course you can also separate all the objects on a page from their links to the master page items.
To separate all the master items on a page:
- Use the command Override All Master Page Items to first release all the master page items from the master page.
- Choose Detach All Objects From Master in the Pages panel menu. This severs any remaining link between the item and the master page.
You can also hide master page items on document pages so they do not print.
To change the display of master page items:
• Choose Hide Master Items from the Pages panel menu.
or
Choose Show Master Items from the Pages panel menu.
InDesign also lets you quickly clear all local overrides and reapply the master page items to the document page.
To remove local overrides and reapply the master:
• Choose Remove All Local Overrides in the Pages panel menu. All local override elements will be deleted and the master page items will be reapplied.
Adjusting Layouts
You certainly are not expected to set layouts perfectly the first time, or every time. Fortunately, InDesign has a powerful layout adjustment feature that moves and resizes objects as you change the page size or margins.
Once layout adjustment is turned on, any changes to the layout will alter the position of the elements on both the master pages and the document pages.
To set the layout adjustment options:
- Choose Layout > Layout Adjustment. This opens the Layout Adjustment dialog box
 .
.
 The Layout Adjustment dialog box controls which elements change if you change document attributes such as the page size or margins.
 - Check Enable Layout Adjustment so that elements change position when page size, orientation, margins, or columns are changed
 .
.
 When Enable Layout Adjustment is turned on, the items on the page adjust their size and position when the margins and page size are changed.
 - Set a value for the Snap Zone to specify how close an object must be before it will align and move to a margin or column guide, or page edge.
- Check Allow Graphics and Groups to Resize so that elements change size as well as move during the adjustment.
- Check Allow Ruler Guides to Move to have ruler guides move as part of the layout adjustment.
- Check Ignore Ruler Guide Alignments to keep objects from moving along with ruler guides.
- Check Ignore Object and Layer Locks to move objects that are locked or on locked layers.
- Click OK to set the options. The document will change according to the new settings when the document setup or margins are changed.
Page Numbers and Text Variables
The most common element that is added to a master page is the page-number character.
To add automatic page numbering:
- Draw a text frame on the master page where you want the page number to appear.
- Choose Type > Insert Special Character > Markers > Current Page Number. This inserts a special character in the text frame
 .
.
 The current page number appears as a letter on master pages but as a number on document pages.
 - If the master page is a facing-page master, repeat steps 1 and 2 for the other page in the master.
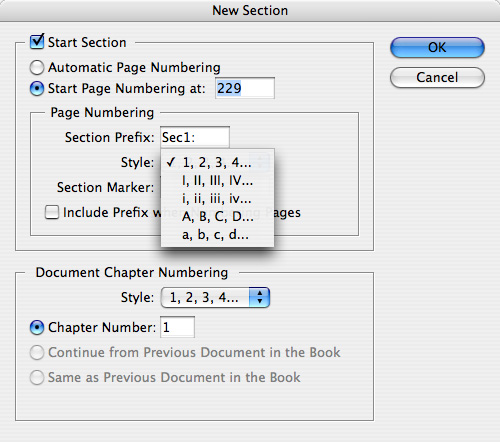
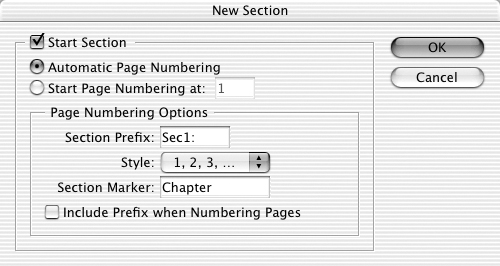
You may want to change the format of page numbers or the number they start from. You do that by creating a new section.
- Move to the page where you want the section to start.
- Choose Layout > Numbering & Section Options. The New Section dialog box appears
 .
.
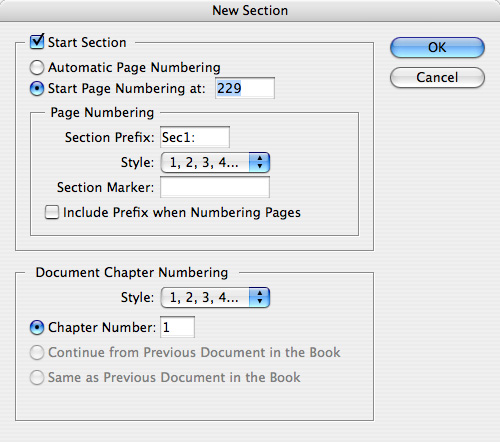 The New Section dialog box lets you change the formatting and numbering of pages.
 - Check Start Section to open the options.
- Choose the Page Numbering options:
• Automatic Page Numbering continues the count from the previous pages.
• Start Page Numbering At lets you enter a specific number to start the section from.
- Use the Style pop-up list to set the format for the automatic page numbering
 .
.
 The Style menu allows you to choose different formats for page numbering of a section.
You can also create a section prefix that appears in front of the current page number.
- Choose Layout > Numbering & Section Options to open the New Section dialog box.
- Type the label (up to five characters) for the section in the Section Prefix field.
- Choose Include Prefix when Numbering Pages to add the section prefix to the page number.
- Enter a label for the Section Marker
 .
.
 The entry in the Section Marker field allows you to create custom labels for pages.
Once you have created an entry for the section marker, you need to insert a section marker character in the text frame to see the entry on document pages.
To add a section marker character:
- Place the insertion point in a text frame where you want the section marker to appear.
- Choose Type > Insert Special Character > Markers and then choose Section Marker from the menu.
Tip
If the text frame that contains the section marker character is on the master page, the word “Section” appears on the master page. If the text frame is on the document page, the label for the section marker appears
 .
.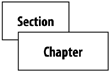 The section marker appears as the word “Section” on master pages but as the label on document pages.
Books have more than just page numbers. They also have chapter numbers. You can specify the chapter number for your document. Then you can insert the chapter number as a text variable in a frame.
- Choose Layout > Numbering & Section Options to open the New Section dialog box.
- Enter a number in the Chapter Number field
 .
.
 The Document Chapter Numbering allows you to set the chapter number for a document.
 - Use the Document Chapter Numbering Style list to choose the style of the characters used for the chapter numbers
 .
.
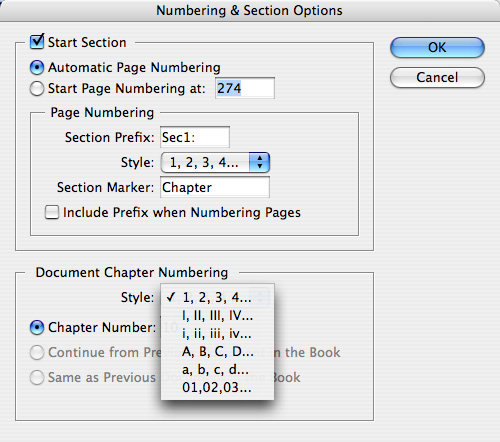 Use the Document Style list to set the elements that are used for chapter numbers.
Chapter numbers are inserted as special characters that can appear anywhere.
- Place the insertion point in a text frame.
- Choose Type > Text Variables > Insert Variable and then choose Chapter Number from the list of preset text variables. The text variable for Chapter Number appears with a line around the display
 .
.
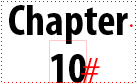 A text variable is displayed with a rectangle around the information.
You can also insert special characters that create jump lines that show the page where the text flow continues to or from.
To create a continued to/from page number:
- Place the insertion point in a text frame that touches the frame that holds the story.
- Choose Type > Insert Special Character and then choose one of the following:
• Next Page Number inserts the number of the page that the text jumps to or continues on
 .
.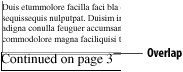 The Next Page Number character shows the page number that the story is continued on. The overlapping area is where the page number frame touches the story frame.
• Previous Page Number inserts the number of the page that the text continued from
 .
.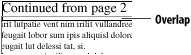 The Previous Page Number character shows the page number that the story comes from. The overlapping area is where the page number frame touches the story frame.
Tip
The continued to/from character needs a separate text frame so that if the text reflows, the continued to/from character doesn’t move along with the text.
Making Books
Most people who create long documents break them up so that each chapter is contained in its own document. They need a way to coordinate the page numbers, colors, and styles. An InDesign book is an electronic file that keeps track of all those documents.
To create an electronic book file:
- Choose File > New > Book.
- Use the dialog box to name the book document and save it in a location
 . The Book panel appears
  .
.
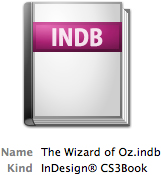 A saved book document appears with its own document icon.
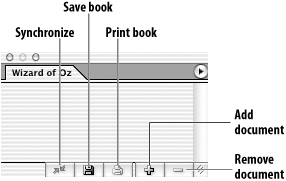 An empty Book panel displays the name of the book on its panel tab.
Once you have created the book file, you can then add documents that make up the book.
Tip
You don’t have to create the book file first. For instance, I created these chapters before I added them to a book document.
- Click the Add Document button at the bottom of the Book panel.
or
Choose Add Document from the Book panel menu.
- Use the dialog box to find the document you want to add to the book. The name of the chapter appears in the Book panel.
- Repeat steps 1 and 2 to add other documents to the book.
To remove documents from a book:
- Select the documents you want to remove.
- Click the Remove Document button at the bottom of the Book panel.
or
Choose Remove Document from the Book panel menu.
You can use the Book panel and Book panel menu to open, rearrange, and control the documents that make up the book.
To open documents in a book:
• Double-click the name of a document in the Book panel. The open book symbol next to the name indicates that the document is open ![]() .
.
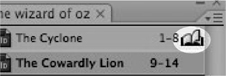
![]() The open book icon indicates that a document of the book is open.
The open book icon indicates that a document of the book is open.
The order that documents are listed in the Book panel determines the page numbers of the book.
To change the order of the documents in a book:
• Drag the name of a document in the Book panel to a new position in the panel ![]() .
.
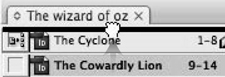
![]() Drag a listing in the Book panel to change the order in which the documents appear in the book.
Drag a listing in the Book panel to change the order in which the documents appear in the book.
One of the benefits of creating a book document is that you can have one file (called the style source) control the style sheets, swatches, and master pages for the other documents in the book. If you make changes to the style source, all the other files in the book synchronize to that file.
To set the style source for a book document:
• Click the Style Source box next to the name of the file that you want to control the rest of the documents in the book ![]() .
.
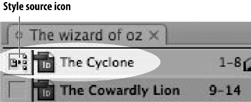
![]() The style source file is used to synchronize the style sheets and colors for other documents in a book.
The style source file is used to synchronize the style sheets and colors for other documents in a book.
To synchronize files to the style source:
• Click the Synchronize button in the Book panel.
or
Choose Synchronize Book in the Book panel menu.
Tip
The menu command says Synchronize Selected Documents if only some of the files in the book are selected.
To set the synchronizing options:
- Choose Synchronize Options from the Book panel menu. The Synchronize Options dialog box opens
 .
.
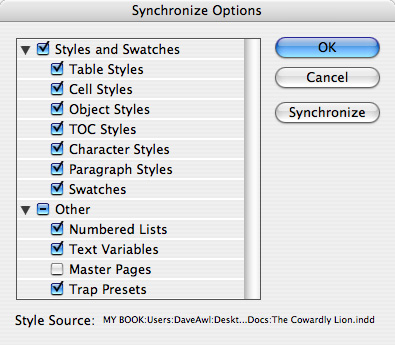 Use the Synchronize Options dialog box to set which attributes of the style source file will be applied to the files in the book.
 - Choose the options that you want to apply from the style source document.
If the book is closed when you modify the files in the book, you need to update them when you do reopen the book document.
- Choose File > Open and then navigate to the book document you want to work on.
- Use the Book panel to open, then modify any files in the book document. An Alert icon appears next to the modified files
 .
.
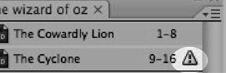 The Alert icon in the Book panel indicates that the file has been modified.
or
Use the Open command in the File menu to open, then modify any files in the book document.
- If necessary, synchronize the files to the style source document.
You can also replace missing files in a book or swap one file for another.
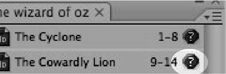
![]() The Missing icon in the Book panel indicates that the file has been moved after it was imported into the book.
The Missing icon in the Book panel indicates that the file has been moved after it was imported into the book.
- Select the file in the Book panel that you want to replace.
- Choose Replace Document from the Book panel menu.
- Navigate to find the file you want to replace or relink.
- If necessary, synchronize the files.
Files in a book automatically run in consecutive numbers. As you add or delete pages in one document, the page numbers in the rest of the book adjust. You can control how the page numbers are adjusted.
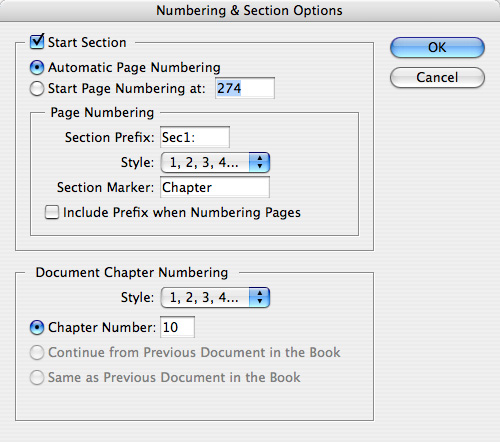
To set how page numbers are adjusted:
- Choose Book Page Numbering Options from the Book panel menu to open the dialog box
 .
.
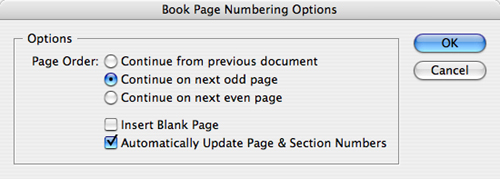 Use the Book Page Numbering Options dialog box to set how pages will be numbered in a book.
 - Choose the Page Order options as follows:
• Continue from previous document starts new pages sequentially from the end of the previous listing.
• Continue on next odd page always starts new pages on an odd number.
• Continue on next even page always starts new pages on an even number.
- If using the odd or even options results in a skipped page, check Insert Blank Page.
- Deselect Automatically Update Page & Section Numbering to stop InDesign from automatically numbering the files in a book.
To set the numbers for each document in a book:
- Choose Document Numbering Options from the Book panel menu to open the dialog box
 .
.
 Use the Document Numbering Options dialog box to set how an individual document is numbered in a book.
 - Choose Automatic Page Numbering to number pages as they appear in the Book panel.
or
Choose Start Page Numbering At to set a specific page number to start that document on
 .
. The Page Numbering options for a document in a book.
 - Set the rest of the options as described on page 273.
To set the chapter numbers for document in a book:
- Choose Document Numbering Options from the Book panel menu to open the dialog box
 .
.
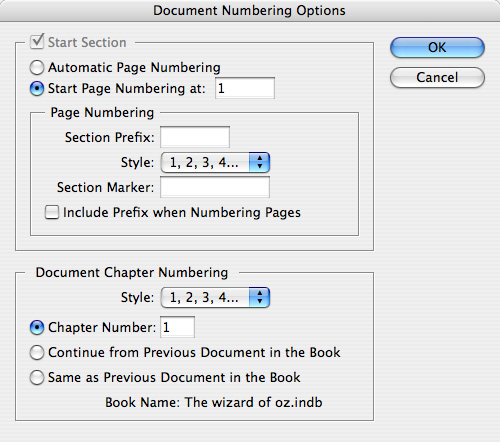 The Document Chapter Numbering options for a document in a book.
 - Choose one of the following to set the number for the chapter:
• Automatic Page Numbering to number pages as they appear in the Book panel.
• Choose Start Page Numbering At to set a specific page number.
- Set the Style options for the chapter number as described on page 273.
To update the numbering in a book:
• Choose one of the following from the Book panel menu’s Update Numbering submenu:
• Update Page & Section Numbers
• Update Chapter & Paragraph Numbers
• Update All Numbers
You can also apply output commands to the files in a book. (See Chapter 19, “Output,” for more information on printing files.)
To set the Output options for a Book:
• Choose one of the following output commands from the Book panel menu:
• Print Book prints the entire book.
• Preflight Book preflights all the documents in the book.
• Package collects the files for output.
• Export Book to PDF creates a PDF of the documents in the book.
Tip
Select just some of the files in the Book to print, preflight, package, or make a PDF of just those files ![]() .
.

![]() With no files selected, the Book panel menu controls all the files in a book (top). However, when you select individual files in the Book, the Book panel menu commands are applied only to those selected files (bottom).
With no files selected, the Book panel menu controls all the files in a book (top). However, when you select individual files in the Book, the Book panel menu commands are applied only to those selected files (bottom).
Creating a Table of Contents
InDesign creates a table of contents (TOC) by looking at the styles applied to paragraphs and then listing the text and page numbers for those paragraphs. The TOC for this book lists the chapters and the section heads ![]() .
.
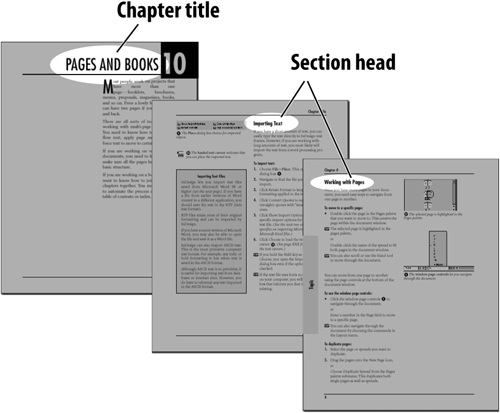
![]() The paragraph styles applied to chapter titles and section heads in this book can be used to create a table of contents.
The paragraph styles applied to chapter titles and section heads in this book can be used to create a table of contents.
To prepare a document for a table of contents:
- Add the page or pages that will hold the TOC.
Tip
Most tables of contents are part of the front matter of a book and are numbered separately without affecting the regular page numbering.
- Apply paragraph styles to the paragraphs that you want to appear in the TOC.
To define the styles for TOC entries:
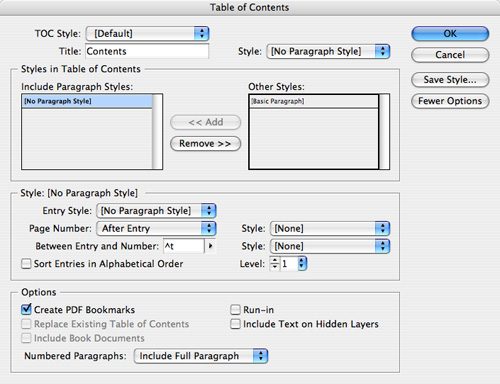
- Choose Layout > Table of Contents to open the Table of Contents dialog box
 .
.
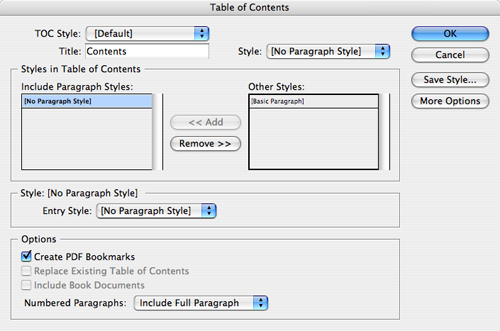 The Table of Contents dialog box lets you select and format listings for a table of contents.
 - Set the Title and Listing controls as described in the exercises that start on the next page.
- Click Save Style. This opens the Save Style dialog box
 .
.
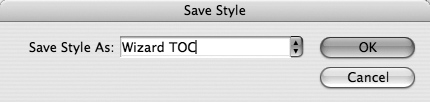 The Save Style dialog box lets you save the settings from the Table of Contents dialog box.
 - Name the style and click Save.
- Choose Layout > Table of Contents to open the Table of Contents dialog box.
- Set each of the controls as described in the following exercises.
- Click OK. This closes the dialog box and creates a loaded text cursor that contains the TOC.
- Click or drag the loaded cursor to apply the TOC text where you want it to appear in the document.
The title is the label that is applied before each entry in the table of contents. You can set the type for the title as well as the paragraph style that formats the title.
To enter the title of the table of contents:
- Type the text for the title in the Title field
 .
.
 Use the Title field in the Table of Contents dialog box to enter the text you want to appear before the listings.
 - Use the Style menu to the right of the Title field to choose which paragraph style is applied to format the title.
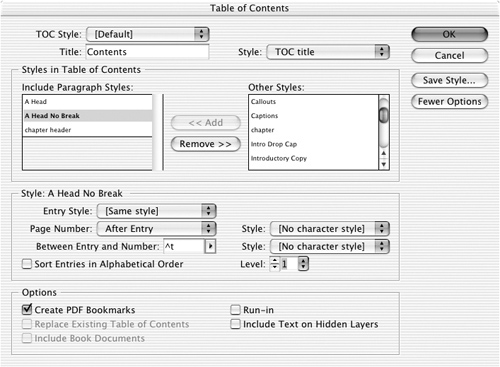
You create the entries for a table of contents by selecting the paragraph styles that are applied to those sections of your documents.
To choose the listings for the table of contents:
- Select a paragraph style listed in the Other Styles area of the Table of Contents dialog box
 .
.
 Move styles from the Other Styles list to the Include Paragraph Styles list to choose which paragraphs are added to the table of contents.
 - Click the Add button. This moves the style to the Include Paragraph Styles list.
- Repeat steps 1 and 2 for any additional styles.
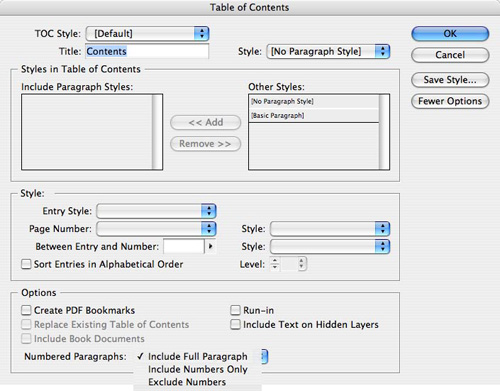
If your TOC uses a style with auto numbers, you can set how the TOC styles those entries.
To set the options for numbered paragraphs:
- Select a paragraph style listed in the Other Styles area of the Table of Contents dialog box
 .
.
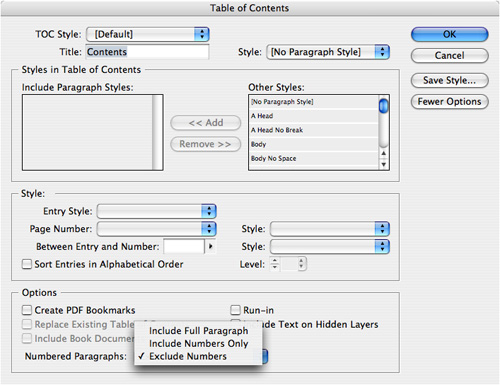 Move styles from the Other Styles list to the Include Paragraph Styles list to choose which paragraphs are added to the table of contents.
 - Choose one of the options from the Numbered Paragraphs list as follows:
• Include Full Paragraph includes the text and the numbers.
• Include Numbers Only includes just the numbers for the paragraph.
• Exclude Numbers includes the text but not the numbers.
Most likely you will want to format the entries in a table of contents with a different style than the one used within the document.
To format the entries in the table of contents:
- Select the entry listing in the Include Paragraph Styles area.
- Choose a paragraph style sheet from the Entry Style menu under the Style: [Name] in the Table of Contents dialog box
 .
.
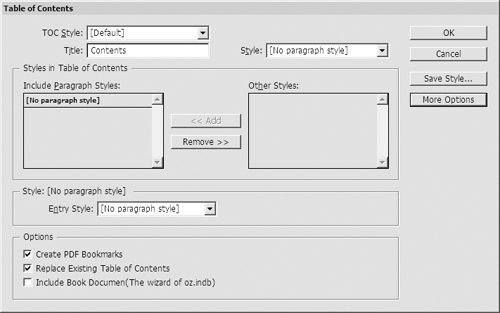 Use the Entry Style menu to choose a style sheet that you have created to format the listing as it should appear in the table of contents.
 - Repeat steps 1 and 2 for any additional styles.
The Table of Contents dialog box has additional controls for more advanced options such as formatting the page numbers for each entry.
To open the additional table of contents controls:
• Click the More Options button in the Table of Contents dialog box ![]() . This opens the advanced options at the bottom of the dialog box
. This opens the advanced options at the bottom of the dialog box ![]() .
.
![]() Click the More Options button to expand the controls in the Table of Contents dialog box.
Click the More Options button to expand the controls in the Table of Contents dialog box.
![]() The Table of Contents dialog box with all the options available.
The Table of Contents dialog box with all the options available.
With the advanced options open, you have additional controls for the style for each entry in the TOC ![]() . This gives you greater control over where the page numbers appear and how they are formatted.
. This gives you greater control over where the page numbers appear and how they are formatted.
![]() The Style options area gives you controls to format how the entries are formatted and arranged in the TOC.
The Style options area gives you controls to format how the entries are formatted and arranged in the TOC.
To set the advanced Style options for each entry:
- Choose one of the styles in the Include Paragraph Styles list. The style name appears in the Style options area.
- If you have not already applied a listing from the Entry Style menu, do so as explained on the previous page.
- Use the Page Number menu to choose a position for the entry’s page number
 .
.
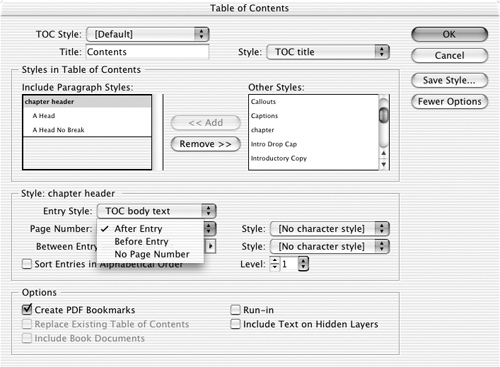 The Page Number menu controls where the page number will appear in the TOC listings.
 - If desired, choose a character style for the page number from the Style list to the right of the Page Number menu.
You can also control how the entry name and the page number are separated.
To control the separator character:
- Select one of the character options from the Between Entry and Number menu
 . The character symbol appears in the field.
 - If you want, type additional text before or after the character symbol. This lets you add a label before the page number.
- If desired, apply a style from the Style menu for the Between Entry and Number character .
A table of contents doesn’t have to be organized in the order that the items appear.
To alphabetize the table of contents:
• Check Sort Entries in Alphabetical order from the advanced options area ![]() .
.
To indent the entries in a table of contents:
• Use the Level controls to indent each table of contents entry ![]() .
.
Tip
Each entry in the Include Paragraph Styles list is automatically indented. This is for display purposes in that dialog box and does not affect the final TOC.
There are additional options you can set for a table of contents ![]() .
.
![]() The Options for creating TOC documents.
The Options for creating TOC documents.
To set the table of contents options:
• Select each of the table of contents options at the bottom of the Table of Contents dialog box as follows:
• Create PDF Bookmarks adds bookmarks to the PDF that is created from the TOC. This is in addition to any hyperlinks within the TOC.
• Replace Existing Table of Contents lets you update or change the table of contents that has already been placed in the document.
• Include Book Documents lets you create a table of contents for all the documents in a book.
• Run-in creates a single paragraph table of contents with each entry divided by a semicolon (;) and a space.
• Include Text on Hidden Layers uses text that is on layers that are not visible.
• Numbered Paragraphs lets you format how paragraphs with auto numbering are formatted in the TOC.