
Temperature and humidity have significant impact on the growth of the crop. Keeping temperature and humidity within certain values also keeps crops healthy. To monitor temperature and humidity, we can use the DHT22 or DHT11 for Arduino and Raspberry Pi. These sensors, DHT22 and DHT11, are famous sensors and have a lot of resources available for development.
The RHT03 (also known as DHT22) is a low-cost humidity and temperature sensor with a single-wire digital interface. You can obtain this module from SparkFun (https://www.sparkfun.com/products/10167) and Adafruit (https://www.adafruit.com/products/393). You may also find it in your local online or electronics store.
You can see the DHT22 module in the following figure:

For further information about the DHT22 module, you can read the DHT22 datasheet at http://cdn.sparkfun.com/datasheets/Sensors/Weather/RHT03.pdf.
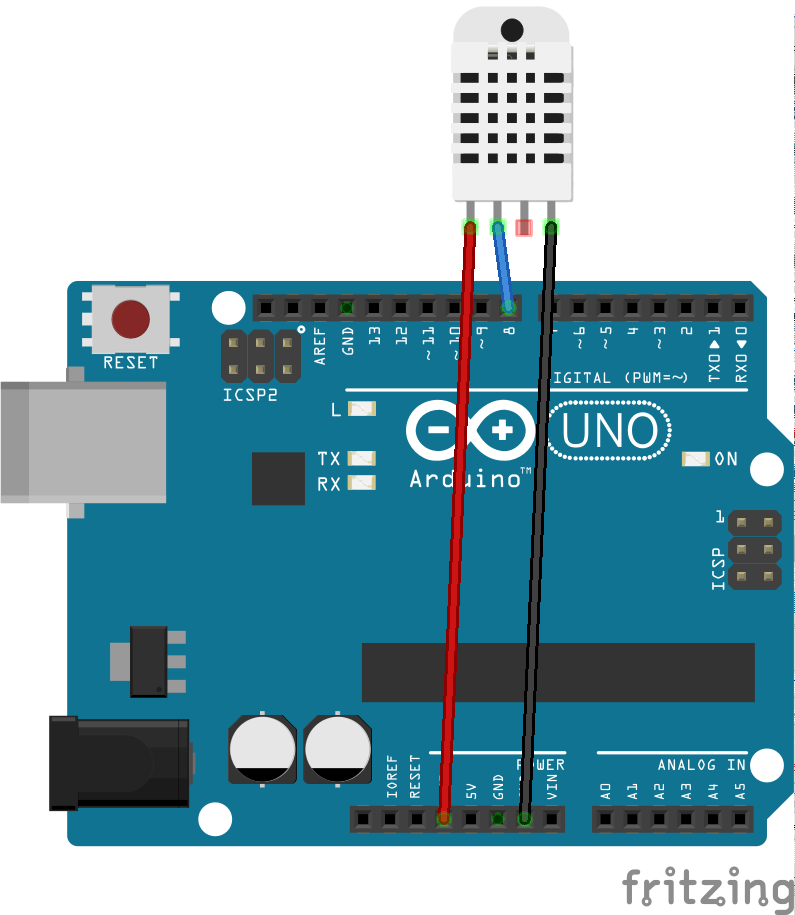
Now we connect the DHT22 module to the Arduino. The following is the wiring:
- VDD (pin 1) is connected to the 3.3V pin on the Arduino
- SIG (pin 2) is connected to digital pin 8 on the Arduino
- GND (pin 4) is connected to GND on the Arduino
You can see the complete wiring in the following figure:
To access the DHT-22 on the Arduino, we can use the DHT sensor library from Adafruit: https://github.com/adafruit/DHT-sensor-library. We can install this library from the Arduino software. Go to Sketch | Include Library | Manage Libraries and you will get a dialog.
Search for dht in Library Manager. You should see the DHT sensor library by Adafruit. Install this library:

Now let's start to write our Sketch program. You can develop a Sketch program to read temperature and humidity using DHT22. You can write this Sketch program in the Arduino software:
#include "DHT.h"

// define DHT22
#define DHTTYPE DHT22
// define pin on DHT22
#define DHTPIN 8

DHT dht(DHTPIN, DHTTYPE);

void setup() {
  Serial.begin(9600);
  dht.begin();
}

void loop() {
  delay(2000);

  // Reading temperature or humidity takes about 250 milliseconds!
  // Sensor readings may also be up to 2 seconds 'old' (its a very slow sensor)
  float h = dht.readHumidity();
  // Read temperature as Celsius (the default)
  float t = dht.readTemperature();


  // Check if any reads failed and exit early (to try again).
  if (isnan(h) || isnan(t)) {
    Serial.println("Failed to read from DHT sensor!");
    return;
  }

  // Compute heat index in Celsius (isFahreheit = false)
  float hic = dht.computeHeatIndex(t, h, false);

  Serial.print("Humidity: ");
  Serial.print(h);
  Serial.print(" %	");
  Serial.print("Temperature: ");
  Serial.print(t);
  Serial.print(" *C	");
  Serial.print("Heat index: ");
  Serial.print(hic);
  Serial.println(" *C ");
}
Save the program. Now you can compile and upload it to the Arduino board. Furthermore, you can open Serial Monitor to see sensor data from the serial port. You can see a sample program output in the following screenshot:

How it works
In the setup() function, we initialize the DHT module by calling dht.begin(). To read temperature and humidity, you can use dht.readTemperature() and dht.readHumidity(). You also can get a heat index using the dht.computeHeatIndex() function.