6
A Tutorial Introduction to IoT Design and Prototyping with Examples
Manuel Meruje,1 Musa Gwani Samaila,1,2 Virginia N. L. Franqueira,3 Mário Marques Freire,1 and Pedro Ricardo Morais Inácio1
1Instituto de Telecomunicações and Department of Computer Science, Universidade da Beira Interior, Covilhã, Portugal
2Centre for Geodesy and Geodynamics, National Space Research and Development Agency, Toro, Bauchi State, Nigeria
3Department of Electronics, Computing & Mathematics, University of Derby, Derby, UK
6.1 Introduction
The evolution of the Internet of Things (IoT) has brought about tremendous digital transformations in many different sectors of human endeavor, including, but not limited to, healthcare, transportation, power grid, manufacturing, and logistics (Haase et al., 2016). This has resulted partly from the fact that communication technologies, sensor technologies, and computer memory and processing power have become readily available and inexpensive (Javed et al., 2016) such that manufacturers of consumer products can afford to put them on a wide range of products (McEwen and Cassimally, 2014). Over the years, the ubiquity of the aforementioned technologies has transformed the semiconductor industry by creating the enabling environments that facilitate chip development and manufacturing. Today, despite the twilight of Moore's law, chipmakers are still racing to develop smaller, smarter, less expensive, and more energy-efficient chips (DeBenedictis, 2017; James, 2016; Lentine and DeRose, 2016), and this has in turn significantly enhanced the development of different IoT hardware development platforms.
IoT hardware development platforms are basically kits or prebuilt development boards that combine microcontrollers and processors with wireless communication chips and other components in a ready-to-build and ready-to-program bundle. They come in different configurations and include a variety of peripherals for connecting sensors and interfacing with other hardware components or devices for designing and prototyping IoT devices. IoT hardware development platforms are generally divided into two categories: microcontroller-based boards (e.g., Arduino boards, Particle Photon, and Adafruit Feather Bluefruit) and Single-Board Computers (SBCs) (e.g., Raspberry Pi, BeagleBone Black, and C.H.I.P).
The emergence of the IoT along with the creation of several innovative consumer-centric applications and services in various domains have led to an explosion of a wide variety of powerful but small IoT hardware development platforms (Musa et al., 2015). A fascinating trend today is the fact that many vendors and companies are competing to make their hardware platforms look a lot more attractive and appealing to IoT designers, developers, and electronics enthusiasts. This quest for competitive advantage is rapidly transforming the IoT hardware development platform landscape. As a result, many new IoT hardware development platforms are now less expensive, require minimal system configurations, have more memory and processing capacity, support a number of programming languages, and come embedded with other functionalities that could include hardware-embedded security and out of the box communication features like wireless connectivity options (Postscapes, 2017; Johnston et al., 2016). Consequently, IoT hardware development platforms are now becoming more user-friendly to the extent that even people with less technical skills can use them. However, lack of fundamental knowledge about proper design and development can potentially lead to poor design and implementation of IoT devices, which could have serious performance and security repercussions.
This chapter seeks to proffer a solution to the problem highlighted above. The aim is to develop a comprehensive design and prototyping guidelines for the IoT that will be easy to understand as well as effective for the learner. Thus, the chapter is presented in a tutorial format that can serve as a guide for beginners who are interested in learning how to develop IoT prototypes. Given the challenges the design and development of embedded systems like IoT devices present, both on the software and hardware parts (Chen et al., 2016; Ruiz-de-Garibay et al., 2014), the chapter could also serve to broaden the experience and knowledge of practicing designers and developers.
6.2 Main Features of IoT Hardware Development Platforms
IoT hardware development platforms have a number of features that make them suitable for designing and prototyping IoT devices. However, this section only considers some of the most important features of these platforms, namely, processing and memory/storage capacity; power consumption, size, and cost; Operating Systems (OSes) and programming languages; connectivity and flexibility/customizability of peripherals of hardware platforms; and onboard sensors and hardware security features. The main focus here is on Arduino boards and Raspberry Pi SBCs.
6.2.1 Key Features of Arduino Hardware Development Platforms
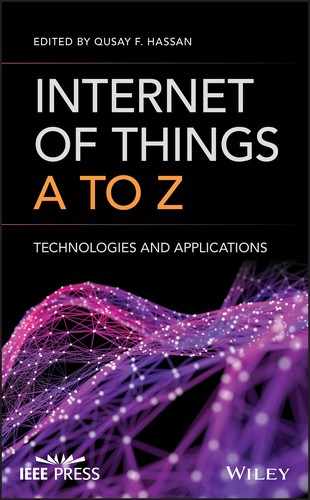
The Arduino is basically an open-source electronics prototyping platform that is made up of two essential parts: the hardware, which is the Arduino board, and the software, the Integrated Development Environment (IDE). While there are different types of Arduino boards, this section does not intend to cover all the Arduino boards that have been created since 2007. It rather provides a comprehensive description of the aforementioned features for a few Arduino boards, namely, the Uno (released in 2010), the Mega 2560 (released in 2010), the Due (released in 2012), the Yún (released in 2013), the Arduino/Genuino 101 (release in 2015), and the Arduino/Genuino MKR1000 (released in 2016). The boards are selected based on their popularity, functionality, newness to the market, and applicability in IoT projects. Figure 6.1a–f shows the pictures of the selected Arduino boards.1
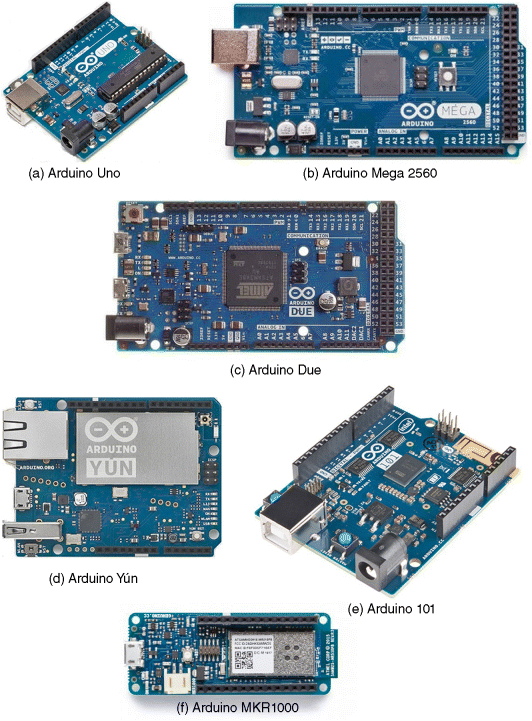
Figure 6.1 The selected Arduino boards. (Images CC-SA-BY from Arduino.cc.)
6.2.1.1 Processing and Memory/Storage Capacity
At the heart of every Arduino board is a Microcontroller Unit (MCU), a type of Integrated Circuit (IC) with a processor, embedded memory, and programmable I/O peripheral devices (Alaraje et al., 2016). Whether 8, 16, or 32-bit MCU, the processor clock rate or clock speed, measured in Megahertz (MHz) or Gigahertz (GHz), determines how many instructions per second the MCU can execute. The 8, 16, or 32-bit refer to the size of the registers, which are high-speed memory areas on the processor that hold instructions and data currently being processed. Larger number of registers enables the processor to simultaneously handle larger memory areas (Aditya et al., 2012). Thus, the bigger the size of the registers, the faster the MCU can process a set of data. The embedded memory on an MCU consists of a Random Access Memory (RAM) for volatile data storage, a flash memory for storing program code and constants, and an Electrically Erasable Programmable Read-Only Memory (EEPROM) for storing persistent data, such as system configurations or other data that ensures normal operations upon reboot.
The Uno is based on the ATmega328, which is a microcontroller chip produced by Atmel. The chip has an 8-bit Central Processing Unit (CPU) with a clock speed of 16 MHz, 2 KB of Static RAM (SRAM), 1 KB of EEPROM, and 32 KB of flash memory (of which 0.5 KB is used by the boot loader). The Mega 2560 is based on the ATmega2560 MCU. The 8-bit CPU on the ATmega2560 chip is clocked at 16 MHz. The Mega 2560 board has an SRAM of 8 KB, 4 KB of EEPROM, and 250 KB of flash memory (of which 8 KB is used by the boot loader). The Due is an Arduino board that is based on the AT91SAM3X8E MCU, and the CPU is a 32-bit SAM3X8E ARM Cortex-M3 that has a clock speed of 84 MHz. It has 96 KB of SRAM that is divided into two banks: 64 KB and 32 KB. The 512 KB flash memory on the board is completely available for the user.
The Yún is a unique Arduino board because it has two different 8-bit processors, the ATmega32U4 MCU and the Atheros AR9331 microprocessor, all clocked at 16 MHz. The ATmega32U4 MCU has 2.5 KB of SRAM, 1 KB of EEPROM, and 32 KB of flash memory (of which 4 KB is used by the boot loader). The Atheros AR9331 processor has 64 MB of Double Data Rate 2 (DDR2) Synchronous Dynamic RAM (SDRAM), 2.5 KB of SRAM, 1 KB of EEPROM, and 16 KB of flash memory. The Yún also has a micro Secure Digital (SD) card reader that is linked to the Atheros AR9331 processor.
The Arduino/Genuino 101 uses an Intel Curie module that is based on Intel Quark SE System on Chip (SoC). The module has two tiny cores, x86 (Intel Quark) and 32-bit ARC EM core architecture that are clocked at 32 MHz. The tiny cores operate simultaneously and share the same memory: 24 KB of SRAM and 196 KB of flash memory. The Arduino/Genuino MKR1000 board is based on the Atmel ATSAMW25 SoC that is made up of three main blocks. While the first block is the SAMD21 Cortex-M0+ 32-bit low-power ARM MCU with a clock speed of 48 MHz, the other two main blocks will be explained subsequently. The board also has an onboard Real-Time Clock (RTC) used for coordinating auto-wakeup from stop/standby mode, which is clocked at 32.768 kHz. The MKR1000 has 32 KB of SRAM and 256 KB of flash memory. Table 6.1 presents the summary of the processing and storage capacity of the Arduino boards.
Table 6.1 Summary of processing and storage capacity of Arduino Boards.
| Microcontroller | Memory/storage | |||||
| Board name |
MCU chip | Processor bit |
Clock speed |
RAM | EEPROM (kb) |
Flash memory (kb) |
| Uno | ATmega328 | 8 | 16 MHz | 2 KB | 1 | 32 |
| Mega 2560 | ATmega2560 | 8 | 16 MHZ | 8 KB | 4 | 250 |
| Due | AT91SAM3X8E | 32 | 84 MHz | 96 KB | – | 512 |
| Yún | ATmega32U4 | 8 | 16 MHz | 2.5 KB | 1 | 32 |
| AR9331 | 8 | 16 MHZ | 64 MB, 2.5 KB | 1 | 16 | |
| 101 | Intel Quark SE SoC | 32 | 32 MHz | 24 KB | – | 196 |
| MKR1000 | ATSAMW25 SoC | 32 | 48 MHz, 32.768 KHz | 32 KB | – | 256 |
6.2.1.2 Power Consumption, Size, and Cost of Arduino Boards
A key requirement for IoT devices is the ability to consume very low power while maintaining an acceptable level of performance, which could enable them to run on batteries for long periods of time. Strategies for achieving ultralow-power operation in IoT devices include, among others, employing low-power communication technologies and implementing low-duty-cycle operations (Maksimović et al., 2014). Nonetheless, power consumption or battery life of IoT devices still remains a challenging research topic (Ghasempour, 2016; Nishimura and Sugita, 2015; Patil et al., 2015). The battery life (in hours) of an IoT device can be calculated by dividing the capacity of the battery (in milliamp-hour (mAh)) by the average current consumption (in milliampere (mA)) of the device. The power consumption or battery life of a hardware development board will largely depend on the operating voltage and operating current of the board as well as on the components that are connected to it. This section covers operating voltage, active current consumption, and power consumption of bare-Arduino boards under consideration. It also discusses size and cost of the hardware development boards. Note that the cost refers to the prices of the boards at the time of writing this chapter.
Coincidentally, the voltage and current specifications of the Uno and the Mega 2560 are the same: Their operating voltage is 5 V, DC current per I/O pin is 20 mA, and DC current for 3.3 V pin is 50 mA. Power consumption can be calculated using Equation 6.1.
where ![]() is the power in Watts,
is the power in Watts, ![]() is the operating current in Amperes, and
is the operating current in Amperes, and ![]() is the operating voltage in Volts. Hence, using 50 mA (0.05 A) and 5 V as the operating current and voltage, respectively, and substituting the values into Equation 6.1 yields
is the operating voltage in Volts. Hence, using 50 mA (0.05 A) and 5 V as the operating current and voltage, respectively, and substituting the values into Equation 6.1 yields
Therefore, the average power consumption of both the Uno and the Mega 2560 is 250 mW. The Due has different specifications, its operating voltage is 3.3 V, DC current for 3.3 V pin is 800 mA, and DC current for 5 V pin is 800 mA, hence its average power consumption is 2.64 W. The voltage and current specifications of the ATmega32U4 MCU on the Yún are 5 V, DC current per I/O pin is 40 mA, and DC current for 3.3 V pin is 50 mA, and the operating voltage on the Atheros AR9331 processor is 3.3 V; since the Yún has built-in Ethernet and Wi-Fi support, the operating current can be more than 200 mA, therefore the average power consumption can be ![]() W.
W.
Although the Arduino/Genuino 101 uses a low-power Intel Curie SoC with a 20 mA DC current per I/O pin, the DC current for 3.3 V pin (i.e., operating current) is not specified. Considering that the board has a Bluetooth LE functionality, the current consumption of the board cannot be 20 mA, hence its average power consumption cannot be estimated correctly from the given specifications. The low-power capability of the Arduino/Genuino MKR1000 MCU makes the DC current per I/O pin to be 7 mA at 3.3 V operating voltage. While the current consumption of the MCU is about 20 mA, the Wi-Fi alone can consume about 100 mA or more when operational.2 Thus, for IoT applications, the total MKR1000 average current consumption can be 120 mA or more, which implies an average power consumption larger than 396 mW.
The length and width of the Uno are, respectively, 68.6 and 53.4 mm, and the price of the Uno-R3 is $22.19. The dimensions of the Mega 2560 in terms of length and width are 101.52 and 53.3 mm, respectively, and Mega 2560-R3 is currently selling for $38.83. The Due has the same dimensions as Mega 2560, but its price is $39.93. The length and width of the Yún are 73 and 53 mm, respectively, and it is selling for $64.90. The length and width of the Arduino/Genuino 101 are 68.6 and 53.4 mm, respectively, and its price is $30.00. The dimensions of the Arduino/Genuino MKR1000 in terms of length, width, and height are, respectively, 65, 25, and 6 mm, and it is selling for $34.38. Table 6.2 summarizes the power consumption, size, and cost of the Arduino boards.
Table 6.2 Summary of power consumption, size, and cost of Arduino boards.
| Board name | Average power consumption | Size (mm) | Cost ($) |
| Uno | 250 mW | 68.8 × 53.4 | 22.19 |
| Mega2560 | 250 mW | 101.5 × 53.3 | 38.83 |
| Due | 2.64 W | 101.5 × 53.3 | 39.93 |
| Yún | ≥1 W | 73 × 53 | 64.90 |
| 101 | – | 68.6 × 53.4 | 30.00 |
| MKR1000 | ≥ 396 mW | 65 × 25 × 6 | 34.38 |
6.2.1.3 Operating Systems and Programming Languages for Arduino Boards
Compared to standard computers, tablets, and smartphones, many IoT devices are resource constrained, especially in terms of memory footprint, and hence they cannot run High-Level Operating System (HLOS) such as Windows and Linux. In addition, the diversity of MCU families and architectures (e.g., there are 8-bit, 16-bit, and 32-bit processors) is one of the greatest bottlenecks to the development of generic OSes for these devices. The abovementioned diversity is also aggravating the restrictions on providing a more generic OS support for IoT heterogeneous hardware (Hahm et al., 2016). In this section, OSes and programming languages for Arduino hardware platforms are discussed.
Owing to stringent resource restrictions, particularly low RAM, the Yún is the only Arduino board under consideration that supports an OS. The onboard Atheros AR9331 processor supports the OpenWrt Linux distribution. Processes/threads in the other models of Arduino are managed in the program. However, a number developers/people in the Arduino community have been exploring possibilities for developing portable OSes for many of the Arduino boards.
The Arduino programming language or Arduino Language (AL) is based on C/C++. AL is composed of a set of C/C++ functions that users can easily call from their code (also known as sketch). While virtually all support libraries are subset of C standard library and not C++ standard library, the Arduino IDE basically uses a simplified version of C++ language. The IDE, which can be downloaded from the Arduino website, is used for writing and uploading the programs to the Arduino board. Another alternative is to use the online IDE (Arduino Web Editor), which allows users to save their sketches in the Cloud. The sketch automatically generates function prototypes after which it is directly passed to a C/C++ compiler (avr-g++).3
Although Arduino boards cannot be programmed directly in JavaScript (JS), it is possible to leverage the web client scripting functionalities of JS using both Firmata and Johnny-Five libraries (Cvjetkovic and Matijevic, 2016). This is particularly important for IoT applications, especially considering how JS is recently gaining more and more popularity among IoT developers and designers as a result of the appearance of Node.JS (Poulter et al., 2015; Singh et al., 2015).
6.2.1.4 Connectivity and Flexibility/Customizability of Peripherals of the Arduino Boards
The ability to communicate with other devices, especially through the Internet is a very essential feature of an IoT hardware development platform. Similarly, the availability and accessibility of both low-level (I/O pins) and high-level (hardware communication interfaces) peripherals are important factors that determine the types of projects that can be built with a particular hardware platform.
Among the Arduino boards being considered, only the Yún and MKR1000 can directly connect to the Internet without using a shield (an Arduino shield is a compatible board that can be plugged on top of an Arduino board for the purpose of extending its capabilities). The Yún has both Ethernet and Wi-Fi support, while the MKR1000 can only connect to the Internet using the WINC1500, a low power 2.4 GHz IEEE 802.11b/g/n Wi-Fi, which is the second block of the ATSAMW25 SoC on the MKR1000. The other boards can connect to the Internet using Ethernet, Wi-Fi, or GSM shields. The Arduino/Genuino 101 has Bluetooth Low Energy (BLE) capabilities.
Despite their versatility and flexibility, Arduino boards cannot be used for general purpose computing. The flexibility of an Arduino board lies in the availability of the peripherals on the MCU as well as their accessibility by users via the program. Virtually all Arduino boards have serial communication interfaces like Universal Serial Bus (USB) port. The USB port can be used to power an Arduino board from a computer; it is also used for uploading programs from the IDE to the board. All the Arduino boards feature a number of digital I/O pins that are used as low-level peripherals, which are also known as General Purpose I/O (GPIO) pins. The analog pins on the Arduino boards also have all the functionality of GPIO pins.
In addition to the digital I/O pins, the Arduino boards support other hardware communication interfaces, such as Serial Peripheral Interface (SPI) communication using the SPI library as well as Universal Asynchronous Receiver/Transmitter (UART) communication. They also support Inter-Integrated Circuit/Two Wire Interface (I2C/TWI) communication using the wire library,4 and apart from the MKR1000, all the other boards have the In-Circuit Serial Programming (ICSP) header.
The Uno features a USB port, 14 GPIO digital pins (of which 6 are Pulse Width Modulation (PWM) output), and 6 analog input pins. The Uno also has the ICSP header, and it supports SPI, UART, and I2C/TWI communications. The Mega 2560 also has a USB port, 54 GPIO digital pins (of which 15 are PWM output), and 16 analog input pins. It also features 4 UART hardware serial ports and an ICSP header, as well as supports SPI and I2C/TWI communications. The Due features 2 USB ports, 54 GPIO digital pins (of which 12 are PWM output), 12 analog input pins, and 2 Digital to Analog Converter (DAC) analog output pins. In addition, the Due has 4 UART ports, 1 ICSP header, 1 SPI header, 1 I2C, and 2 TWI headers. The Yún has 2 USB ports, an Ethernet port, 20 GPIO digital pins (of which 7 are PWM output), and 12 analog input pins. Additionally, it features 1 UART port, 1 ICSP header, and supports SPI and I2C/TWI communications. The Arduino/Genuino 101 features a USB port, 14 GPIO digital pins (of which 4 are PWM output), and 6 analog input pins. It also comes with an ICSP header and supports SPI, UART, and I2C/TWI communications. The MKR1000 has a USB port, 8 GPIO digital pins, 12 PWM output pins, 1 UART, 1 SPI, and 1 I2C peripheral. The other pins include 7 analog input pins (Analog to Digital Converter (ADC) 8/10/12 bit) and 1 analog output pin (DAC 10 bit). A summary of the connectivity and flexibility/customizability of peripherals of the Arduino boards is presented in Table 6.3.
Table 6.3 Summary of connectivity and flexibility/customizability of peripherals of the Arduino boards.
| Board name | Onboard connectivity | GPIO pins | Analog input | USB ports | ICSP header | Other hardware interfaces |
| Uno | – | 14 | 6 | 1 | 1 | SPI, UART, I2C/TWI |
| Mega2560 | – | 54 | 16 | 1 | 1 | SPI, 4 UART, I2C/TWI |
| Due | – | 54 | 12 | 2 | 1 | SPI, 4 UART, I2C, 2 TWI |
| Yún | Ethernet, Wi-Fi | 20 | 12 | 2 | 1 | SPI, UART, I2C/TWI |
| 101 | BLE | 14 | 6 | 1 | 1 | SPI, UART, I2C/TWI |
| MKR1000 | IEEE 802.11b/g/n | 8 | 7 | 1 | – | SPI, UART, I2C |
6.2.1.5 Onboard Sensors and Hardware Security Features of Arduino Boards
While a sensor is meant to perceive and measure some type of input (e.g., temperature, pressure, motion, light, heat, or other environmental phenomena) from the physical environment, an onboard sensor is a device that detects and measures not only what is happening in its surrounding, but also within the board. The Arduino/Genuino 101 is the only board among the Arduino boards under consideration that features some onboard sensors. The board comes with a six-axis accelerometer and a gyroscope. The two sensors can be used together to form an Inertial Monitoring Unit (IMU) that can be employed to identify with accuracy the orientation of the Arduino board.5
The computational and memory limitations of most of the Arduino boards have imposed restrictions on their security capabilities, and hence it will be very difficult for them to run mature technology stacks (Bonetto et al., 2012). The stacks used for securing Hypertext Transfer Protocol (HTTP), Constrained Application Protocol (CoAP), or Message Queuing Telemetry Transport (MQTT) communications are: Internet Protocol Security (IPsec), Secure Sockets Layer/Transport Layer Security (SSL/TLS) or Datagram Transport Layer Security (DTLS). Apart from the Arduino/Genuino MKR1000, all the other Arduino boards covered in this chapter do not have crypto engine or hardware cryptographic module. A hardware crypto engine is a self-contained cryptographic module with a dedicated processor, making it difficult for hackers to access valuable data during cryptographic operations. It is designed to be integrated into devices as an alternative to software-based security implementations. The module performs encryption and decryption computations much faster than the software implementation of the same operations. The MKR1000 has an onboard crypto chip; essentially, the third block in the ATSAMW25 is the ECC508 that provides cryptoauthentication. Additionally, the built-in Wi-Fi module supports SHA-256 certificates for ensuring secure communication. For more details about security, please refer to Chapter 8.
6.2.2 Major Features of the Raspberry Pi Hardware Platforms
The Raspberry Pi is a credit card-sized SBC that provides almost full capabilities of a desktop or a laptop computer while remaining small, lightweight, and inexpensive. The Raspberry Pi minicomputer can also be used for prototyping electronics projects.6 First created in the United Kingdom in February 2012 by the Raspberry Pi Foundation, the SBC was developed for the purpose of promoting the teaching of programming skills and computer hardware in schools and in the developing countries (Lyons, 2015). With reference to the abovementioned features of IoT hardware development platforms, this section describes the following Raspberry Pi models: Raspberry Pi Zero (released in November 2015), Raspberry Pi Zero Wireless (W) (released in February 2017), Raspberry Pi 1 model B+ (released in July 2014), Raspberry Pi 2 model B (released in February 2015), and Raspberry Pi 3 model B (released in February 2016). For the purpose of describing current features of the Raspberry Pi SBCs, only the latest models are selected. Figure 6.2a–e shows the images of the selected models.7
Figure 6.2 The selected Raspberry Pi models. (Source: Raspberrypi.org2017.)
6.2.2.1 Processing and Memory/Storage Capacity
In comparison to the Arduino hardware development platforms, the Raspberry Pi SBCs have faster processors, bigger memory, and larger storage capacity. All Raspberry Pi models are based on the Broadcom SoC that includes ARM CPU and on-chip Graphics Processing Unit (GPU), a VideoCore IV low-power mobile multimedia processor that supports up to 1920 × 1200 resolution. For instance, both the Raspberry Pi Zero and the Pi Zero W feature a Broadcom BCM2835 SoC with a 1 GHz ARM1176JZF-S CPU core, a member of the ARM11 family (which are 40% faster than Raspberry Pi 1) and have a 512 MB Low-Power DDR2 (LPDDR2) SDRAM. The Raspberry Pi 1 B+ is based on the same Broadcom BCM2835 SoC, but with a 700 MHz ARM1176JZF-S Core processor and a 512 MB RAM (Bell, 2014). The Raspberry Pi 2 B uses a Broadcom BCM2836 SoC with a 900 MHz 32-bit quad-core ARM Cortex-A7 CPU and a 1 GB RAM. Similarly, the Raspberry Pi 3 B uses a Broadcom BCM2837 SoC with a 1.2 GHz 64-bit quad-core ARM Cortex-A53 CPU and 1 GB RAM.8 All Raspberry Pi SBCs feature a micro SD card slot. The summary of processing speed and memory/storage capacity of the Raspberry Pi hardware development platforms is presented in Table 6.4.
Table 6.4 Summary of processing speed and memory/storage capacity of Raspberry Pi hardware platforms.
| Broadcom SoC | Memory/storage | |||||
| Raspberry Pi |
SoC | CPU core | Processor architecture |
Clock speed |
RAM | Storage |
| Zero | BCM2835 | ARM1176JZF-S | – | 1 GHz | 512 MB | Micro SD |
| Zero W | BCM2835 | ARM1176JZF-S | – | 1 GHz | 512 MB | Micro SD |
| 1 B+ | BCM2835 | ARM1176JZF-S | – | 700 MHz | 512 MB | Micro SD |
| 2 B | BCM2836 | Quad-core ARM Cortex-A7 | 32 | 900 MHz | 1 GB | Micro SD |
| 3 B | BCM2837 | Quad-core ARM Cortex-A53 | 64 | 1.2 GHz | 1 GB | Micro SD |
6.2.2.2 Power Consumption, Size, and Cost of Raspberry Pi Hardware Platforms
Being a low-power minicomputer, the Raspberry Pi operates on a 5 V DC power supply at 1–2.5 A, powered through a micro-USB port. Note that the cost in this section refers to the price of the Raspberry Pi at the time of writing this chapter.
Although the Raspberry Pi consumes different amounts of power in its four distinct power modes (Maksimović et al., 2014), namely, run, standby, shutdown, and dormant modes, the current draw of each model presented in the official Raspberry Pi magazine are in two modes: idle (standby) and load (run) modes.9 The current consumptions in the two power modes for each model are: 0.1 and 0.25 A for Raspberry Pi Zero; 0.25 and 0.31 A for the Raspberry Pi 1 B+; 0.26 and 0.42 A for the Raspberry Pi 2; and 0.31 and 0.58 A for the Raspberry Pi 3. The conditions under which those measurements were carried out are not explicitly stated in the magazine.
However, other sources, including the Raspberry Pi Foundation and the element14 community show more realistic current consumption. For example, the average current consumption of the Raspberry Pi Zero when running is approximately 160 mA, which shows that the average power consumption is about 0.8 W.10 According to Klosowski (2017) and RasPi.TV (2017), the new Raspberry Pi Zero W requires about 20 mA more than the Pi Zero. This implies that its average current consumption when running is about 180 mA, and therefore, the average power consumption is about 0.9 W. While the Raspberry Pi 1 B+ consumes about 600 mA, implying that average power consumption is about 3.0 W, the average current consumption of the Raspberry Pi 2 B is about 800 mA, and hence the average power consumption is about 4.0 W (Brown, 2015). According to Shabaz (2016), the current draw of Raspberry Pi 3 that runs the Rasbian but doing nothing is 266 mA and the current draw when running cpuburn-a53 (i.e., a stress test that maxes out the CPU of a Pi completely) is 1.45 A. The tests results show that the power consumption of the Raspberry Pi 3 ranges from 1.33 to 7.25 W.
While the power consumption of the Raspberry Pi actually depends on the usage as well as the model of the device, a few best practice techniques that could be applied during operation to reduce power consumption include the following (Bekaroo and Santokhee, 2016):
- Disconnect every peripheral that is not in use
- Switch-off Internet connectivity when not needed
- Shutdown the device or put it in dormant mode when not in use
- When using the device in headless mode (i.e., accessing it via network connections without a keyboard or display), the High-Definition Multimedia Interface (HDMI) could be switched off
- Avoid running several daemons at a time, and run only power efficient applications
The dimensions of the Raspberry Pi Zero and Pi Zero W, which are the smallest of them all, are 65 mm × 30 mm × 5.4 mm. But the Raspberry Pi 1 B+, the Raspberry Pi 2 B, and the Raspberry Pi 3 B have the same dimensions: 85.60 mm × 56 mm × 21 mm. While the price of Raspberry Pi Zero is just $5, the Zero W costs $10. The Raspberry Pi 1 B+ is selling for $25. However, both the Raspberry Pi 2 B and the Raspberry Pi 3 B are selling for $35. Table 6.5 summarizes the power consumption, size, and cost of the Raspberry Pi hardware platforms.
Table 6.5 Summary of power consumption, size, and cost of Raspberry Pi hardware platforms.
| Raspberry Pi | Average power consumption (W) | Size (mm) | Cost ($) |
| Zero | 0.8 | 65 × 30 × 5.4 | 5 |
| Zero W | 0.9 | 65 × 30 × 5.4 | 10 |
| 1 B+ | 3.0 | 85.6 × 56 × 21 | 25 |
| 2 B | 4.0 | 85.6 × 56 × 21 | 35 |
| 3 B | 1.33–7.25 | 85.6 × 56 × 21 | 35 |
6.2.2.3 Operating Systems and Programming Languages for Raspberry Pi
The Raspberry Pi does not come with an OS. Hence, based on their projects, users can choose the type of OS that best suits their needs. This section considers the Raspberry Pi OSes and programming languages.
Raspbian is a Debian-based OS freely provided by the Raspberry Pi Foundation for the Raspberry Pi hardware. Over the years, the Raspbian OS has remarkably gained popularity among Raspberry Pi users for its high performance (Biglesp, 2015). Like a full-fledged OS for traditional computers, it comes with all the basic program utilities and more than 35,000 packages.11 Despite the fact that the Raspbian OS is officially supported by the Raspberry Pi Foundation, the Raspberry Pi SBC is capable of supporting a wide variety of OSes (Keeler and Wolfer, 2016). The Linux-based OSes supported by the Raspberry Pi include Ubuntu MATE, Snappy Ubuntu, Pidora (a Fedora OS for Raspberry Pi), Linutop, SARPi (i.e., Slackware ARM on a Raspberry Pi), Arch Linux ARM, Gentoo Linux, FreeBSD, and Kali Linux. The Raspberry Pi 2 and 3 can also run Windows based OSes like Windows 10 IoT Core (Windows Dev Center, 2017; Klosowski, 2016).
The easiest way to install Raspbian on a Raspberry Pi is to use the New Out Of Box Software (NOOBS), which is an easy-to-use Raspberry Pi operating system installation manager. Users can purchase SD cards with NOOBS preinstalled from Raspberry Pi distributors. An alternative way of obtaining NOOBS is to download the zip file for free from the Raspberry Pi website. An 8 GB SD card is needed to load the latest version, Jessie.12 NOOBS comes with quite a number of OSes that users can choose from.
The two programming languages that normally come with the Raspberry Pi by default are Scratch and Python,13 even though Python is more popular (Astudillo-Salinas et al., 2016; Patil et al., 2016). However, over the course of years, several programming languages have been adapted for the Raspberry Pi. Additionally, skilled individuals in the user community who desired to see their favorite languages on the Raspberry Pi have played a significant role in ensuring that their languages of choice have been adapted for the Raspberry Pi. Some of the programming languages now available for users to program on the Raspberry Pi using different IDEs include Java, C, C++, Objective C, JS, and Ruby (Richards, 2017).
6.2.2.4 Connectivity and Flexibility/Customizability of Peripherals of the Raspberry Pi
Like standard desktop and laptop computers, almost all the Raspberry Pi SBCs under consideration can be connected to the Internet directly. But unlike standard computers, the I/O pins and the hardware communication interfaces on all the Raspberry Pis are accessible to the user. In this section, connectivity, flexibility, customizability of I/O pins, and hardware communication interfaces of the Raspberry Pi will be discussed.
The Raspberry Pi Zero does not have an onboard Ethernet port and Wi-Fi capability. It can nonetheless be connected to the Internet in different ways. For example, it can be connected to the Internet by using USB On The Go (OTG) cable along with RJ45 USB converter, or by using USB OTG and Wi-Fi dongle. On the other end of the spectrum, the Pi Zero W has connectivity functionality that includes IEEE 802.11 b/g/n wireless LAN, Bluetooth 4.1, and BLE.14 Both the Raspberry Pi 1 B+ and Pi 2 B have Ethernet port but no embedded Wi-Fi chip. The Raspberry Pi 3 B, however, is equipped with both Ethernet and Wi-Fi (IEEE 802.11n Wireless LAN) connection capabilities. The Raspberry Pi 3 B also features both Bluetooth 4.1 and BLE.15
The flexibility of the Raspberry Pi allows users to use the device for general purpose computing as well as for electronics projects (Maksimović et al., 2014). All the four Raspberry Pis feature the 40 GPIO pins, Camera Serial Interface (CSI) and HDMI, although the HDMI on the Raspberry Pi Zero and the Zero W is a mini version. Except for the Raspberry Pi Zero and the Pi Zero W, all the other Pis have Display Serial Interface (DSI). The Pi Zero and the Pi Zero W do not have the combined 3.5 mm audio and composite video jack (i.e., the 4-pole socket that carries both audio and video signal), which is on the other Raspberry Pis. Apart from the Pi Zero and Zero W that feature a mini USB OTG port, all the other Pis have 4 USB 2.0 ports. Aside from the 40 GPIO pins, other hardware interfaces that can be found on Raspberry Pi are SPI, UART, and I2C. For example, the BCM2835 ARM (i.e., the SoC on the Pi Zero, Pi Zero W, and Pi 1 B+) has three auxiliary peripherals, a mini UART, two SPI masters, and I2C.16 Similarly, the GPIO pins on the Pi 2 B and the Pi 3 B can be configured as I2C, SPI, and UART.17 Table 6.6 provides a summary of the connectivity and flexibility/customizability of the peripherals of the Raspberry Pi minicomputers.
Table 6.6 Summary of connectivity and flexibility/customizability of the peripherals of the Raspberry Pi.
| Raspberry Pi | Onboard connectivity | GPIO pins | USB ports | Display ports/interfaces | Camera port | Other hardware interfaces |
| Zero | – | 40 | 1 mini | Mini-HDMI | CSI | UART, SPI, I2C |
| Zero W | Wi-Fi, Bluetooth 4.1, BLE | 40 | 1 mini | Mini-HDMI | CSI | UART, SPI, I2C |
| 1 B+ | Ethernet | 40 | 4 | HDMI, DSI, 3.5 mm Video Jack | CSI | UART, SPI, I2C |
| 2 B | Ethernet | 40 | 4 | HDMI, DSI, 3.5 mm Video Jack | CSI | UART, SPI, I2C |
| 3 B | Ethernet, Wi-Fi, Bluetooth 4.1, BLE | 40 | 4 | HDMI, DSI, 3.5 mm Video Jack | CSI | UART, SPI, I2C |
6.2.2.5 Onboard Sensors and Hardware Security Features of Raspberry Pi
Additional features like onboard sensors and hardware security features on IoT hardware development platforms increase user acceptability, especially now that there are serious concerns about the security of IoT device. This section discusses onboard sensors and hardware security features of the Raspberry Pi SBCs.
Essentially, no member of the Raspberry Pi family features any onboard sensors; however, a typical Linux computer would likely come with onboard monitoring sensors (Suehle and Callaway, 2014). Thus, the Broadcom SoC includes on-chip temperature and voltage sensors that can be queried using the vcgencmd utility in the firmware package of the Raspberry Pi. The on-chip temperature sensor can be used to measure the temperature of the CPU and GPU. Similarly, the on-chip voltage sensor can be used to measure different voltages, including the core voltage, the SDRAM I/O voltage, and the SDRAM physical memory voltage.18 The temperature or voltage values can be viewed by typing the appropriate commands in the terminal window of the Raspberry Pi (LDighera, 2015). For instance, the vcgencmd measure_volts command returns the voltage values for some vital components of the Raspberry Pi. To prevent the system from returning the voltage value for the core each time the command is executed, each of the following components must be passed to the vcgencmd measure_volts command as an option (Suehle and Callaway, 2014):
- sdram_c (returns voltage value for the SDRAM controller)
- sdram_i (returns the SDRAM I/O voltage)
- sdram_p (returns the SDRAM physical memory voltage)
- core (returns the GPU processor core voltage)
Despite the fact that Raspberry Pi is a versatile Linux-based hardware development platform that provides unlimited possibilities for different applications, it lacks hardware-based security engines. Additionally, securing private keys for public key cryptography or shared keys for symmetric key cryptography is a very big issue. This is because both data and user code reside on the same SD card, which is usually exposed (Miller, 2017).
6.3 Design and Prototyping of IoT Applications
This section focuses on the design and prototyping of IoT-enabled applications using both Arduino and Raspberry Pi development platforms.
6.3.1 IoT Design and Prototyping Using Arduino Boards
When designing IoT applications for Arduino development boards, the developer usually starts by doing a survey of the necessary components for the project, which may include hardware modules (and respective datasheets), diagrams, Arduino shields, programming libraries, and/or additional software.
Arduino shields, as explained in Section 6.2.1.4, are add-on circuit boards or additional hardware that are attached on top of the Arduino devices to provide enhanced capabilities, or supplementary functionalities for users. Shields are especially intended for beginner designers and developers to overcome the complexity of soldering components and attaching additional hardware resources to their projects.
In case the designer chooses to use alternative electronic modules instead of shields, datasheets from these components enable the designer to understand how they internally work by describing data and technical characteristics, such as power or current specifications. This information also helps the designer to know how the Arduino development platform will respond to the signals received from sensors, or other hardware modules. Additionally, it provides information on whether a voltage regulator is needed or not, given an existing power source.
Usually, in order to ease the work of the designer, hardware companies or third-party programmers develop software libraries for a high-level use of the modules for different programming languages and platforms, such as Adafruit modules and libraries (Earl, 2013). There are several tools that can facilitate the development of IoT projects. Electronic design and prototyping software like Fritzing and Oscad can be used to draw different types of schematic diagrams that can help in the development of IoT projects.
Fritzing (Knörig et al., 2009) is an open-source software application for electronic prototyping that is written in C++ and available for several OSes. It is developed by the Potsdam University of Applied Sciences. The software allows users to design projects in several different views, such as the breadboard view (a graphic representation of the prototyping board and respective circuits), electronic circuit view (a schematic representation of the electronic connections), and printed circuit board schematic view (a schematic representation of the printed circuit). This means designers are able to design a prototype in breadboard view mode and then evolve it into a final project by using the printed circuit board view. Another alternative software application is Oscad (Save et al., 2013), an open-source tool for circuit and Printed Circuit Board (PCB) design, simulation, and analysis. The software helps designers to plan, test, and examine their circuits. It supports Python, KiCad, Ngspice, and Scilab. One of the main features of the Oscad tool is its capability for simulation of circuits developed in the tool.
Arduino IDE (Earl, 2013), as previously mentioned, is the official Arduino open-source software developed in Java language that enables the development and uploading of code to the development board. This software is available on the official Arduino webpage.19 The IDE is bundled with built-in libraries that facilitate I/O operations (Nayyar and Puri, 2016). A typical Arduino program is structured with, at least, two main functions, namely, setup() and loop(). The setup() function is used for setting initialization, which may include initialization of variables, setup of library variables, and serial communications. The loop() function is the main function that will run iteratively until the power is turned off. Data operations and I/O manipulations are usually made within these functions.
IoT devices are typically designed to communicate with other devices within a network using specific messaging protocols, which include CoAP, MQTT, and Extensible Messaging and Presence Protocol (XMPP) (Al-Fuqaha et al., 2015). Although there are several possible protocols that can be used, as previously mentioned in Chapter 3, MQTT will be briefly described here, since it will be employed in the Arduino project presented in Section 6.4.
MQTT is a lightweight messaging protocol designed for devices with constrained hardware, which are usually connected to unreliable or lossy networks with limited and unpredictable bandwidth as well as high latency. At the time of writing, the most recent version of the protocol is 3.1.1 and it was last reviewed in October 2014 (Banks and Gupta, 2014). MQTT is built on top of the Transmission Control Protocol (TCP). The protocol aims to connect embedded devices and networks through applications and middleware using the publish/subscribe pattern, which allows the implementation to be simple. MQTT consists of three components: (1) the broker, (2) the subscriber, and (3) the publisher. Both the subscriber and the publisher are clients to the broker, as explained:
- The Broker. The broker acts as a gateway; it receives messages from a publisher (a client) and delivers the messages to a subscriber (another client). Brokers are sometimes referred to as servers.
- The Subscriber. The subscriber declares its topics of interest to the broker, and the broker sends messages published to those topics.
- The Publisher. The publisher sends messages to the broker using a namespace or a topic name, and the broker forwards the messages to the respective subscribers.
In MQTT, clients can subscribe to multiple topics, and a subscriber can unsubscribe to any topic. Additionally, MQTT has one-to-many message delivery functionality. The protocol also has levels of Quality of Service (QoS), which ensures that the message is delivered or transmitted from the sender to the receiver. There are three QoS levels of delivery in MQTT: at most once, at least once, and exactly once.
An example that illustrates IoT project design and prototyping using the tools and the MQTT protocol described above is the temperature logger, in which the current temperature is published via an MQTT publisher to an MQTT broker. This example, which will be further described in Section 6.4.1, is implemented on an Arduino platform.
6.3.2 IoT Design and Prototyping using Raspberry Pi Platforms
As mentioned in Section 6.2, one of the main differences between the Raspberry Pi and the Arduino board is that the former is a computer based on a System on a Chip processor, while the latter is a programmable microprocessor. This implies that an OS is necessary in order to use the Raspberry Pi for designing and prototyping IoT projects. The choice of OS is usually motivated by its features, the type, and requirements of the application the developer is aiming to design. A list of officially compatible OSes for this type of device is available on the website of the Raspberry Pi Foundation.20
Design and prototyping of IoT projects using both platforms are, in a way, similar. Usually, the designer starts by doing a survey of what hardware and software is necessary for the desired IoT project. This may include the use of hardware datasheets, modules and modules libraries, Raspberry Pi shields, and/or additional software. Sensing and actuating modules can also be connected to the platform by using the GPIO header of the device. Raspbian includes a GPIO controller application that permits users to read and write the state of the GPIO pins. To facilitate the integration of the module in the project that is being designed and prototyped, there are module libraries for different programming languages that are usually written by the community or by the module manufacturer available to the designer. Shields for Raspberry Pi are expansion boards that enable the integration of modules with extra functionalities, such as LCD modules, GPS receiver modules, and Internet connection (GPRS/HSDPA) modules.
The main difference between the development of IoT applications for the Raspberry Pi and for Arduino boards lies in the programming languages. While C/C++ is used for programming the Arduino boards, Python is often used for programming the Raspberry Pi due to its simplicity and readability, which allow beginner designers to catch up fast. One method of designing the hardware part of an IoT project is by using Computer-Aided Design (CAD) software applications. CAD can help in drawing the physical and schematic diagrams of the project, as discussed in the Section 6.3.1. The IoT application prototyping for a Raspberry Pi platform can be developed in the device itself using text editors, such as vi, nano, gedit, and leafpad. Other options include employing IDEs such as NINJA-IDE, Adafruit, and WebIDE, as well as using compilers for the respective programming language being used.
An IoT project usually follows communication protocol for compatibility and compliance purposes. This allows, for example, the project to connect with other devices that operate following the same protocol within a network. Application communication protocols such as MQTT, CoAP, XMPP, and Web Application Programming Interfaces (APIs) are usually implemented when designing and prototyping IoT solutions.
A simple example of the design and prototyping of Raspberry Pi IoT application project that can be used to illustrate prototyping using the tools mentioned above is the web-controlled Light-Emitting Diode (LED) project. In this project, an LED connected to the Internet is switched on and off by accessing a web server. While an LED is used in this example, any actuator like electric motor can be used to replace the LED. This example will be further described in Section 6.4.2.
6.4 Projects on IoT Applications
In order to understand how Arduino and Raspberry Pi platforms can be used, this section describes the basic usage of the Arduino IDE and how to write code in C language that can manipulate digital pins, and explains how to upload the code to the Arduino board. It also covers the basic usage of the Raspberry Pi platform, including how to configure the GPIO pins using Bash Shell scripts and Python programming language.
6.4.1 An Arduino Project for IoT Application
The purpose of this project is to transmit temperature readings collected by a sensor to an MQTT broker. This example makes use of a router with Ethernet and Wi-Fi connection, a 4.7 kΩ resistor, a Maxim Integrated DS18B20 temperature sensor, an ENC28J60 Ethernet module, and two applications: Arduino IDE,21 where the microprocessor program will be developed, and Mosquitto (Eclipse, 2009), an open-source MQTT broker. It is assumed that the computer on which the project is going to be developed is connected to the router via Ethernet or Wi-Fi. For the purpose of demonstration, the computer is assigned the IP address 192.168.1.1.
6.4.1.1 Installing the Arduino IDE and Mosquitto Software
On Linux OS, the Arduino IDE (arduino and arduino-core) and the Mosquitto packages (mosquitto and mosquitto-clients) as well as their respective dependencies can be installed using the Linux terminal. Please note that required packages will only be installed with the following command if one is using the Debian software package manager:
$> sudo apt-get update $> sudo apt-get install arduino arduino-core mosquitto mosquitto-clientsOn Windows OS, both applications can be downloaded from their official websites. After the download is completed, the software can be installed by simply executing the downloaded files. Please note that the Windows version of Mosquitto requires OpenSSL and pthreads library for Windows. Instructions and both download links are given to the user while installing Mosquitto.
6.4.1.2 Using Arduino IDE and Downloading Libraries
Arduino IDE needs to be launched with administrator rights, which can be done by opening the Linux terminal and executing the following command:
$> sudo arduino &After opening the IDE, the steps for both OSes (Linux and Windows) are similar. At this point, the development board needs to be connected to the computer so that the IDE can be configured. This is done by selecting a development board and determining a serial port to be used to upload the code by Board and Port menu in Tools. After opening the Board menu, in which the list of compatible development boards with the IDE will appear, the user can select the desired board, which in this example is Arduino/Genuino Uno, as depicted in Figure 6.3.

Figure 6.3 Choosing the board on the tools menu.
The port that will be used can be configured by accessing the Tools menu, and then selecting the Port menu. In this menu, assuming that there are no more serial devices connected to the computer, the user must select the only available item, e.g.,/dev/ttyUSB* or COM*, where * indicates a number that corresponds to the development board serial port, as shown in Figure 6.4.

Figure 6.4 Choosing the serial port.
The next step is to download the necessary libraries for the development of the Arduino application that will be uploaded to the development board. From version 1.6.2, Arduino IDE includes a functionality that allows the developer to manage libraries without downloading them using a browser. This functionality may be accessed through the Sketch menu, Include Library, and selecting Manage Libraries as illustrated in Figure 6.5. Using the Search bar, the user can download the required libraries which are the following: UIPEthernet, OneWire, DallasTemperature, and PubSubClient.
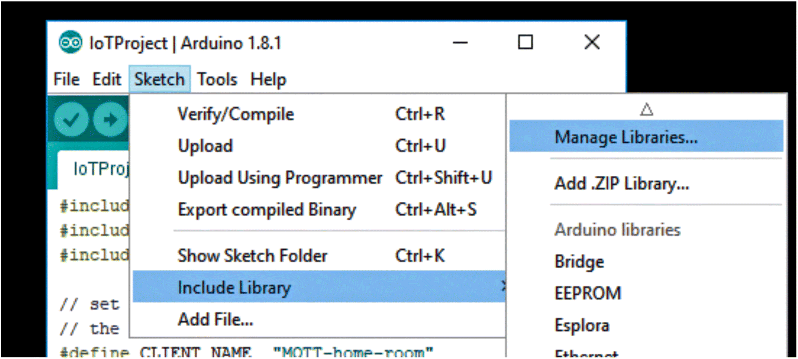
Figure 6.5 Accessing Manage Libraries functionality.
6.4.1.3 Project Source Code and Arduino Wiring Diagram
Listing 1 shows a typical implementation of an application (using C language) that uses MQTT protocol to publish temperature measurements to an MQTT broker (please note the inline comments):
#include <UIPEthernet.h>#include "PubSubClient.h"#include <DallasTemperature.h>// set name, interval between readings,// and the temperature module PIN#define CLIENT_NAME "MQTT-home-room"#define DELAY 5000 #define ONE_WIRE_PIN 7// Set MAC address and IP. Just make sure you don't have// the same MAC / IP addresses set in different devicesuint8_t mac[6] = {0x00, 0x54, 0x45, 0x4d, 0x50, 0x01};IPAddress ip(192, 168, 1, 2);// Declare the modules variablesEthernetClient ecEth;PubSubClient pscMQTTClient;OneWire owOneWire(ONE_WIRE_PIN);DallasTemperature dtSensor(&owOneWire);// Declare variableslong lPrevMillis;float fTemp;void setup(){ // Setup serial connection and modules Serial.begin(9600); dtSensor.begin(); Ethernet.begin(mac, ip); // Set the ethernet module variable to PubSub library // and set the gateway / broker IP and Port. // Assume the broker is running on // ip-address: 192.168.1.1 // port-number: 1883 (this is the default port of the MQTT Broker) pscMQTTClient.setClient(ecEth); pscMQTTClient.setServer("<ip‐address>", <port-number>);}void loop() { // If the defined delay is exceeded. if(millis() - lPrevMillis >= DELAY) { dtSensor.requestTemperatures(); // Request temperature to the module fTemp = dtSensor.getTempCByIndex(0); // and set it to a variable again publishMessage(fTemp); lPrevMillis = millis(); } pscMQTTClient.loop(); // Maintain the connection with the broker}void publishMessage(float fTemp) { char caMsgBuf[10]; if(pscMQTTClient.connect(CLIENT_NAME)) { pscMQTTClient.publish("home/room/temp", dtostrf(fTemp, 6, 2, caMsgBuf));// Note the MQTT topic where the values will be published (home/room/temp) // The topic may describe, with few words, what the code will publish: in this example, we are publishing temperature data from a room within a home. }}Listing 1: Arduino code for the IoT temperature logger project.
After writing the code, it can be compiled and uploaded to the Arduino development board. This can be done by accessing the menu Sketch and selecting the Upload, as illustrated in Figure 6.6. A completion bar will be presented to the user. Since the components are not connected to the board, the code can be executed but nothing will happen.

Figure 6.6 Uploading the code to the device.
At this point, the board can be disconnected from the computer in order to safely connect the components to the Arduino board. Figure 6.7 shows how the different components are connected on the breadboard using jumper wires.

Figure 6.7 A breadboard diagram of the Arduino temperature logger project using the Fritzing software.
With the Arduino board and the other components fully connected as shown in Figure 6.7, the user can connect an Ethernet cable to the ENC28J60 module and to the router. After connecting the Ethernet cable, both MQTT broker and MQTT subscriber can be executed using default settings in order to test the Arduino application.
6.4.1.4 Executing Mosquitto and Testing the Application
For both OSes, it is suggested that an instance of a Mosquitto broker be opened in one window and an instance of the Mosquitto subscriber in another. On Linux, both applications can be executed by opening two different terminal windows. The following commands can be executed in the same order, one in the first window, and the other in the second window:
$> sudo mosquito $> sudo mosquito_sub -h localhost -p 1883 -t “/home/room/temp”For Windows, the user can use the Run functionality of the system by pressing CTRL + R, followed by typing the absolute path to the Mosquitto broker, which in this example will be assumed to be C:/Program Files (x86)/mosquitto/mosquitto.exe. The Mosquitto subscriber application should be installed in the same path as the Mosquitto broker, which can be executed by opening the Run functionality and typing:
“C:/Program Files (x86)/mosquitto/mosquitto_sub.exe” -h localhost -p 1883 -t ”/home/room/temp” The flag -t is used to specify which MQTT topic will be subscribed. Note that both the Mosquitto broker and the Mosquitto subscriber will not present any messages until the Arduino application publishes them to the broker. With the computer prepared to receive data from Arduino, one is able to power it on and see the incoming messages on the Mosquitto subscriber. Figure 6.8 shows the Mosquitto broker running on a Linux computer (accessed via SSH from the Windows OS).
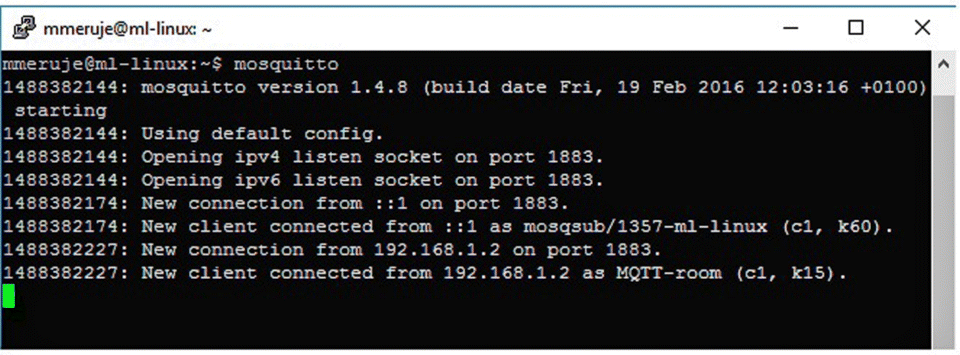
Figure 6.8 Mosquitto broker running on a Linux computer (accessed via SSH on Windows).
The Mosquitto broker presents log messages on which the subscriber and the publisher connections are announced, as seen in Figure 6.8. While the log is presented in the Mosquitto broker, messages are starting to be shown in the Mosquitto subscriber, as can be seen in the screenshot of PuTTY (a free telnet, SSH server, and serial ports terminal software that allows users to remotely access devices over the Internet) in Figure 6.9.
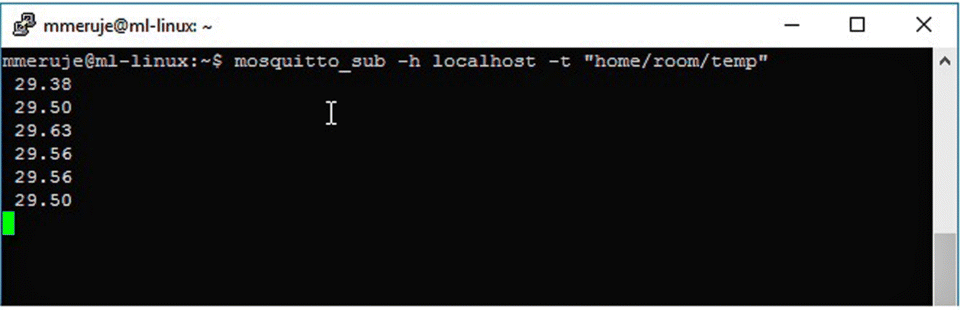
Figure 6.9 Mosquitto subscriber running on a Linux computer (accessed via SSH on Windows).
This is a simple IoT application that works as a temperature publisher within an MQTT environment. Another interesting application that could be developed to complement the one described herein is an MQTT subscriber that can be configured to send an alarm email when the temperature has risen above a certain threshold.
6.4.2 A Raspberry Pi Project for IoT Application
Like the older versions, the newer versions of the Raspberry Pi SBCs also include the 40-pin GPIO headers or a provision to solder them. This means that the project described here can be replicated on all Raspberry Pi versions available in the market. The project is built on the Raspberry Pi Model B Rev. 2, and the Raspbian OS is used (introduced in Section 6.2.2.3). The OS comes preinstalled with some of the necessary software for the project, such as the Python interpreter and the GPIO manipulation tool.
6.4.2.1 Installing the Operating System
For the Linux user, the Raspbian image can be copied to a clean micro SD card by using the dd tool or any appropriate tool. Before writing the image into the memory card, one has to connect it to a computer, and identify the device letter and make sure that it is unmounted. After unmounting the volume, the following command will allow the user to write the OS image into the memory card, where * is the identifier letter of the micro SD card:
$> dd if=∼/2017-01-11-raspbian-jessie.img of=/dev/sd* bs=4M For the Windows user, the Raspbian image can be copied to the micro SD card by using the Win32DiskImager utility that is available on the Sourceforge Project web page. Before writing the image into the memory card, one has to run the utility and choose the image file by using the file selector option. When the file is selected, the user can select the Write option, and the image will be written on the micro SD card.
After writing the image on the micro SD card, the user can insert the card into the micro SD card slot on the Raspberry Pi device. The user can now connect all the peripherals needed to use the device (mouse, keyboard, Ethernet cable, and monitor). Finally, the device can be turned on by plugging the USB cable to the power. In this example, Ethernet will be used for connection purposes. After booting up, Raspberry Pi will run a Bash shell script asking the user to login. The default login of the Raspbian distribution is the username Pi and password raspberry.
6.4.2.2 Downloading and Installing the Required Packages
The first step after login is to make sure that the device is connected to the Internet by pinging a website. The ping command is used to test connectivity between two devices by measuring the time between a request packet and the corresponding response packet. The following command will make the device send exactly four ping packets (-c 4) to one of the Google servers:
$> ping www.google.com -c 4Although some software is preinstalled, some additional Linux packages are needed for the project, such as the wiringPi (wiringpi) package, the Python Package Manager (python-pip), and the header files for Python (python-dev):
$> sudo apt-get install python-dev python-pip wiringpiAfter the Python Package Manager is successfully installed, one will need two Python modules for this project. The first is the wiringPi module, which allows the user to manipulate the GPIO pins through Python. The second one is Flask, a micro web-development framework for Python. Both modules can be installed using the following command:
$> sudo pip install flask wiringPiSince all the dependencies are installed in the system, one should be able to start the project development. Before starting to code, it is suggested to run the command gpio readall. This will give the user an overview of the states of GPIO pins, as well as the pin numbering, which will be displayed in a table on the screen. Different numbering exists due to varying implementations of GPIO libraries. The command is as follows:
pi@raspberrypi:∼ $ gpio readall +-----+-----+---------+------+---+-Model B2-+---+------+---------+-----+-----+| BCM| wPi | Name | Mode | V | Physical | V | Mode | Name | wPi | BCM | +-----+-----+---------+------+---+----++----+---+------+---------+-----+-----+| | | 3.3v | | | 1 || 2 | | | 5v | | || 2 | 8 | SDA.1 | IN | 1 | 3 || 4 | | | 5V | | || 3 | 9 | SCL.1 | IN | 1 | 5 || 6 | | | 0v | | || 4 | 7 | GPIO. 7 | IN | 1 | 7 || 8 | 1 | ALT0 | TxD | 15 | 14 || | | 0v | | | 9 || 10 | 1 | ALT0 | RxD | 16 | 15 || 17 | 0 | GPIO. 0 | IN | 0 | 11 || 12 | 0 | IN | GPIO. 1 | 1 | 18 || 27 | 2 | GPIO. 2 | IN | 0 | 13 || 14 | | | 0v | | || 22 | 3 | GPIO. 3 | IN | 0 | 15 || 16 | 0 | IN | GPIO. 4 | 4 | 23 || | | 3.3v | | | 17 || 18 | 0 | IN | GPIO. 5 | 5 | 24 || 10 | 12 | MOSI | IN | 0 | 19 || 20 | | | 0v | | || 9 | 13 | MISO | IN | 0 | 21 || 22 | 0 | IN | GPIO. 6 | 6 | 25 || 11 | 14 | SCLK | IN | 0 | 23 || 24 | 1 | IN | CE0 | 10 | 8 || | | 0v | | | 25 || 26 | 1 | IN | CE1 | 11 | 7 | +-----+-----+---------+------+---+----++----+---+------+---------+-----+-----+| 28 | 17 | GPIO.17 | IN | 0 | 51 || 52 | 0 | IN | GPIO.18 | 18 | 29 || 30 | 19 | GPIO.19 | IN | 0 | 53 || 54 | 0 | IN | GPIO.20 | 20 | 31 | +-----+-----+---------+------+---+----++----+---+------+---------+-----+-----+| BCM | wPi | Name | Mode | V | Physical | V | Mode | Name | wPi | BCM | +-----+-----+---------+------+---+-Model B2-+---+------+---------+-----+-----+Listing 2: Output of the gpio readall command.
Listing 2 shows the different numbering, including the physical, the Broadcom (BCM), and the wiringPi, as well as the respective modes (e.g., In, Out,…) and states. The gpio command allows users to control the GPIO pins on the device (i.e., setting the mode, changing their values, etc.). The user can now construct the electronic circuit on the breadboard. At this point, it is recommended to shut down the device by typing the following command in the terminal:
$> sudo shutdown now6.4.2.3 Constructing and Testing the Circuit
When the device is turned off, the LED and the 4.7 kΩ resistor can be connected on the breadboard using two jumper wires, as shown in the breadboard diagram of Figure 6.10. The positive pin (pole) of the LED is usually longer than the negative one. Thus, it must be ensured that the positive pin of the LED is connected to the GPIO 15 pin of the GPIO header on the Raspberry Pi, while the negative pin of the LED is connected to any of the resistor pins. The other pin of the resistor should be connected to the GND (Ground) pin of the Raspberry Pi GPIO header.
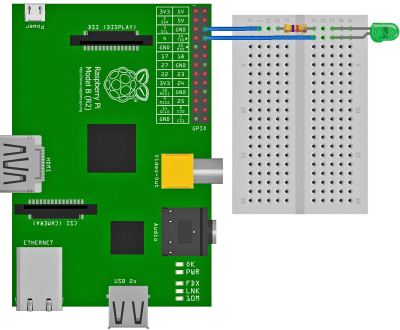
Figure 6.10 A breadboard diagram of the Raspberry Pi web-controlled LED project using the Fritzing software.
After connecting the components as shown in Figure 6.10, the Raspberry Pi can be powered on. When the device asks for the login input, the Raspbian OS default username and password can be entered. Right after the login step, the manipulation of the GPIO pins can be done via gpio command. The pin (GPIO 15) that is being used needs to be configured to output mode before its state can be manipulated, which can be done by using the following command:
$> sudo gpio mode 15 outAfter the pin is correctly configured to output mode, it can have two distinct states, HIGH and LOW, which are represented by 1 and 0, respectively. The GPIO pins will send 3.3 V when they are in HIGH state (with the exception of the Ground and 5 V pins, as can be observed on the Listing 2) and 0 V when the GPIO pins are in LOW state. The following command allows the change of state of a specified GPIO pin to HIGH:
$> sudo gpio write 15 1As soon as this command is executed in the device, one can notice the LED turning on. Alternatively, if the number 1 in the command is switched to 0, the pin will be set to LOW and the LED will turn off. Two Bash script files will be used to turn the LED on and off. The following commands will create two Bash script files named turnOn.sh and turnOff.sh. Each of these files will allow one to turn on and off the LED using the previous tested commands:
$> echo -e '#!\bin\bash sudo gpio mode 15 out sudo gpio write 1' > turnOn.sh$> cp turnOn.sh turnOff.sh && truncate -s-2 turnOff.sh$> echo "0" >> turnOff.sh && chmod +x turn*.sh
These script files will allow the user to manipulate the GPIO pin via Bash shell, and they can be executed by simply typing ./turnOn.sh or ./turnOff.sh. As such, control can only be made when the user has direct access to the Raspberry Pi (considering SSH and Telnet connections are disabled).
6.4.2.4 Development and Testing of a Python Web Application
The next step consists of the development of a small web application that will act as a switch, allowing the user to control the state of the LED through a simple browser. The following command can be used to create the file that will host the web application script and the file permission change:
$> touch ledServer.py && chmod +x ledServer.pyListing 3 includes the code one needs to write in the file, as well as the explanation of each line of code in inline comments. The file can be edited and saved by using the preferred text editor of the user (e.g., nano, vi, or gedit).
#!/usr/bin/pythonimport wiringpi # Import the wiringPi module for Pythonfrom flask import Flask # Import the Flaskapp = Flask(__name__)pin, state = 15, 0@app.route("/switch") # When someone access the http server endpointdef switchLED(): # the switchLED() function is executed. global state # It starts by using the global variable state, if state == 0 : # and if the variable is LOW (0) state = 1 # change it to HIGH (1) else: # otherwise state = 0 # change it to LOW wiringpi.digitalWrite(pin, state) # Write the state to the specified pin return "{'pin':"+str(pin)+", 'state':"+str(state)+"}" # Return a response with the pin and stateif __name__ == "__main__": wiringpi.wiringPiSetup() # Initialization of the module wiringpi.pinMode(pin, 1) # Input = 0; output = 1; app.run(host='0.0.0.0', port=8080) # Run the application on all interfaces using port 8080# Giving the variable host the value 0.0.0.0, will allow to run the application in all interfaces the device has availableListing 3: Python code for a Raspberry Pi IoT application example of an online LED switch.
Before running the server in the device, it is necessary to know the IP address of the Ethernet interface (eth0) of the Raspberry Pi so that when the server is running, one can access it via the browser. The IP address can be known by running the command ipconfig. When the script is prepared, the user can execute it, enabling the control of the LED via the browser by executing the following command:
$> ./ledServer.pyNow, with another device connected to the same network, one may open a browser and go to the server by using the IP address of the Raspberry Pi. Since the server was configured to use the port 8080 of the device, one may go to http://<ip-address>:8080/switch and verify if the LED is turning on or off according to the HIGH or LOW states.
6.5 Conclusion
IoT is fast becoming ubiquitous in everyday life and giving rise to a myriad of applications. Arguably, the advancements and convergence of hardware and software in a single package, also known as development kit, will undoubtedly remain the central backbone providing a major boost and support for IoT deployments.
This chapter has presented a basic, yet comprehensive introduction to IoT design and prototyping. It has described in detail the main features of different IoT hardware development platforms, focusing on a number of Arduino boards and some models of the Raspberry Pi family. The chapter has also discussed design and prototyping in the context of IoT, where some basic examples of IoT design and prototyping that showed step-by-step procedures for IoT project implementations in both software and hardware have been presented. These projects are meant to teach beginners some basic principles of design and prototyping as well as to show how easy it is to get up and running with IoT design and implementation.
Acknowledgments
The authors wish to thank the Centre for Geodesy and Geodynamics, National Space Research and Development Agency, Toro, Bauchi State, Nigeria for supporting this work. This work was supported by National Funding from the FCT—Fundação para a Ciência e a Tecnologia, through the UID/EEA/50008/2013 Project.
Notes
References
- Aditya, A. L. G. N., Chowdary, G. R., and Meenakshi, J. (2012) Delay and power optimized register blocks for the low power microcontrollers. IEEE International Conference on Devices, Circuits and Systems (ICDCS), 408–412. doi: 10.1109/ICDCSyst.2012.6188793.
- Alaraje, N., Sergeyev, A., Reutter, J., Kief, C., Matar, B., and Hata, D. (2016) Technology driven university and community college collaboration: faculty training and ARM microcontrollers. IEEE Portland International Conference on Management of Engineering and Technology (PICMET), 1681–1687. doi: 10.1109/PICMET.2016.7806819.
- Al-Fuqaha, A., Guizani, M., Mohammadi, M., Aledhari, M., and Ayyash, M. (2015) Internet of Things: a survey on enabling technologies, protocols, and applications. IEEE Communications Surveys & Tutorials, 17(4), 2347–2376.
- Astudillo-Salinas, F., Barrera-Salamea, D., Vázquez-Rodas, A., and Solano-Quinde, L. (2016) Minimizing the power consumption in Raspberry Pi to use as a remote WSN gateway. IEEE 8th Latin-American Conference on Communications (LATINCOM), 1–5. doi: 10.1109/LATINCOM.2016.7811590.
- Banks, A. Gupta, R. (eds), (2014) MQTT Version 3.1.1. OASIS Standard. Available at http://docs.oasis-open.org/mqtt/mqtt/v3.1.1/os/mqtt-v3.1.1-os.html. Latest version available at http://docs.oasis-open.org/mqtt/mqtt/v3.1.1/mqtt-v3.1.1.html.
- Bekaroo, G. and Santokhee, A. (2016) Power consumption of the Raspberry Pi: a comparative analysis. IEEE International Conference on Emerging Technologies and Innovative Business Practices for the Transformation of Societies (EmergiTech), 361–366. doi: 10.1109/EmergiTech.2016.7737367.
- Bell, L. (2014) Raspberry Pi Model B+ Review. The Inquirer, Available at http://www.theinquirer.net/inquirer/review/2357623/raspberry-pi-model-b-review (accessed February 17, 2017).
- Biglesp, (2015) Raspberry 2: Which OS is Best? element14 Community. Available at https://www.element14.com/community/polls/2103 (accessed February 19, 2017).
- Bonetto, R., Bui, N., Lakkundi, V., Olivereau, A., Serbanati, A., and Rossi, M. (2012) Secure communication for smart IoT objects: protocol stacks, use cases and practical examples. IEEE International Symposium on a World of Wireless, Mobile and Multimedia Networks (WoWMoM), 1–7. doi: 10.1109/WoWMoM.2012.6263790.
- Brown, E. (2015) Raspberry Pi 2 has quad-core SoC, Keeps $35 Price. LinuxGizmos. Available at http://linuxgizmos.com/raspberry-pi-gets-quad-core-soc-keeps-same-price/ (accessed February 18, 2017).
- Chen, D., Cong, J., Gurumani, S., Hwu, W.-m., Rupnow, K., and Zhang, Z. (2016) Platform choices and design demands for IoT platforms: cost, power, and performance tradeoffs. IET Cyber-Physical Systems: Theory Applications, 1, 70–77. doi: 10.1049/iet-cps.2016.0020.
- Cvjetkovic, V. and Matijevic, M. (2016) Overview of architectures with Arduino boards as building blocks for data acquisition and control systems. 13th IEEE International Conference on Remote Engineering and Virtual Instrumentation (REV), 56–63. doi: 10.1109/REV.2016.7444440.
- DeBenedictis, E.P. (2017) It's time to redefine Moore's law again. IEEE Computer Journal, 50, 72–75. doi: 10.1109/MC.2017.34.
- Earl, B. (2013) Adafruit Arduino Libraries. Adafruit Industries, Available at https://learn.adafruit.com/adafruit-all-about-arduino-libraries-install-use/arduino-libraries (accessed February 28, 2017).
- Eclipse (2009) Mosquitto: an open-source MQTT broker. The Eclipse Foundation. Available at https://mosquitto.org (accessed February 28, 2017).
- Ghasempour, A. (2016) Optimum number of aggregators based on power consumption, cost, and network lifetime in advanced metering infrastructure architecture for smart grid Internet of Things. 13th IEEE Annual Consumer Communications & Networking Conference (CCNC), 295–296. doi: 10.1109/CCNC.2016.7444787.
- Haase, J., Alahmad, M., Nishi, H., Ploennigs, J., and Tsang, K.F. (2016) The IOT mediated built environment: a brief survey. IEEE 14th International Conference on Industrial Informatics (INDIN), 1065–1068. doi: 10.1109/INDIN.2016.7819322.
- Hahm, O., Baccelli, E., Petersen, H., and Tsiftes, N. (2016) Operating systems for low-end devices in the Internet of Things: a survey. IEEE Internet of Things Journal, 3, 720–734. doi: 10.1109/JIOT.2015.2505901.
- James, D. (2016) Moore's Law continues into the 1x-nm era. IEEE 27th Annual SEMI Advanced Semiconductor Manufacturing Conference (ASMC), 324–329, doi: 10.1109/ASMC.2016.7491159.
- Javed, A., Larijani, H., Ahmadinia, A., and Gibson, D. (2016) Smart random neural network controller for HVAC using cloud computing technology. IEEE Transactions on Industrial Informatics, doi: 10.1109/TII.2016.2597746 (accessed February 3, 2017).
- Johnston, S. J., Apetroaie-Cristea, M., Scott, M., and Cox, S. J. (2016) Applicability of commodity, low cost, single board computers for Internet of Things devices. IEEE 3rd World Forum on Internet of Things (WF-IoT), 141–146. doi: 10.1109/WF-IoT.2016.7845414.
- Keeler, W. J. and Wolfer, J. (2016) A Raspberry PI Cluster and Geiger Counter supporting random number acquisition in the CS operating systems class. IEEE 13th International Conference on Remote Engineering and Virtual Instrumentation (REV), 353–354. doi: 10.1109/REV.2016.7444500.
- Klosowski, T. (2016) Best operating systems for your Raspberry Pi projects. lifehacker. Available at http://lifehacker.com/the-best-operating-systems-for-your-raspberry-pi-projec-1774669829 (accessed February 19, 2017).
- Klosowski, T. (2017) How much power the Raspberry Pi Zero W uses compared to other models. lifehacker. Available at http://lifehacker.com/how-much-power-the-raspberry-pi-zero-w-uses-compared-to-1792854782 (accessed March 5, 2017).
- Knörig, A., Wettach, R., and Cohen, J. (2009) Fritzing: a tool for advancing electronic prototyping for designers. Proceedings of the 3rd International Conference on Tangible and Embedded Interaction (TEI '09). ACM, New York, NY, USA, pp. 351–358.
- LDighera, (2015) Shell Script to Display Temperature and Voltage Sensor Output. Raspberry Pi, Available at https://www.raspberrypi.org/forums/viewtopic.php?t=118641&p=805362 (accessed February 22, 2017).
- Lentine, A. L. and DeRose, C. T. (2016) Challenges for optical interconnect for beyond Moore's Law computing. IEEE International Conference on Rebooting Computing (ICRC), 1–5, doi: 10.1109/ICRC.2016.7738696.
- Lyons, C. (2015) A History of the Raspberry Pi Nova, Available at http://novadigitalmedia.com/history-raspberry-pi/ (accessed February 16, 2017).
- Maksimović, M., Vujović, V., Davidović, N., Milošević, V., and Perišić, B. (2014) Raspberry Pi as an Internet of Things hardware: performance and constraints. Proceedings of 1st International Conference on Electrical, Electronic and Computing Engineering IcETRAN, 1–6.
- McEwen, A. and Cassimally, H. (2014) Designing the Internet of Things, John Wiley & Sons, Ltd, Chichester, 1.
- Miller, S. (2017) Enhancing Raspberry Pi security. Zymbit, Available at https://zymbit.com/securing-your-iot-devices-2/ (accessed February 22).
- Musa, A., Minotani, T., Matsunaga, K., Kondo, T., and Morimura, H. (2015) An 8-mode reconfigurable sensor-independent readout circuit for trillion sensors era. IEEE Tenth International Conference on Intelligent Sensors, Sensor Networks and Information Processing (ISSNIP), 1–6. doi: 10.1109/ISSNIP.2015.7106913.
- Nayyar, A. and Puri, V. (2016) A review of Arduino board's, Lilypad's & Arduino shields. 2016 3rd International Conference on Computing for Sustainable Global Development (INDIACom), New Delhi, pp. 1485–1492.
- Nishimura, K. and Sugita, K. (2015) Evaluation of power consumption for smart devices in web applications. 9th IEEE International Conference on Innovative Mobile and Internet Services in Ubiquitous Computing, 47–52. doi: 10.1109/IMIS.2015.12.
- Patil, P. S., Doshi, J., and Ambawade, D. (2015) Reducing power consumption of smart device by proper management of wakelocks. IEEE International Advance Computing Conference (IACC), 883–887. doi: 10.1109/IADCC.2015.7154832.
- Patil, S. S., Katwe, S., Mudengudi, U., Shettar, R. B., and Kumar, P. (2016) Open ended approach to empirical learning of IOT with Raspberry Pi in modeling and simulation lab. IEEE 8th International Conference on Technology for Education, 258–259. doi: 10.1109/T4E.2016.67.
- Postscapes, IoT Development Kits, (2017) Available at http://www.postscapes.com/cellular-internet-of-things-development-kits/ (accessed February 3, 2017).
- Poulter, A. J., Johnston, S. J., and Cox, S. J. (2015) Using the MEAN stack to implement a RESTful service for an Internet of Things application. IEEE 2nd World Forum on Internet of Things (WF-IoT), 280–285. doi: 10.1109/WF-IoT.2015.7389066.
- RasPi.TV, (2017) How much power does Pi Zero W use? Available at http://raspi.tv/2017/how-much-power-does-pi-zero-w-use (accessed March 5, 2017).
- Richards, M. (2017) Young persons guide to BCPL programming on the Raspberry Pi: part 1. Computer Laboratory University of Cambridge. Available at http://www.cl.cam.ac.uk/∼mr10/bcpl4raspi.pdf (accessed February 19, 2017).
- Richardson, M. and Wallace, S. (2012) Getting Started with Raspberry Pi, O'Reilly Media, Sebastopol, pp. 33–57.
- Ruiz-de-Garibay, J., Almeida, A., Kados, S. A., García-Corcuera, A., and López-de-Ipiña, D. (2014) Codesign-oriented platform for agile internet of things prototype development. IEEE Eighth International Conference on Innovative Mobile and Internet Services in Ubiquitous Computing, 387–392. doi: 10.1109/IMIS.2014.52.
- Save, Y. D., Rakhi, R., Shambhulingayya, N. D., Srivastava, A., Das, M. R., Choudhary, S., and Moudgalya, K. M. (2013) Oscad: An open source EDA tool for circuit design, simulation, analysis and PCB design. 2013 IEEE 20th International Conference on Electronics, Circuits, and Systems (ICECS), Abu Dhabi, pp. 851–854.
- Shabaz, (2016) Raspberry Pi 3 dynamic current consumption, power and temperature tests. element14 Community, Available at https://www.element14.com/community/community/raspberry-pi/blog/2016/05/11/raspberry-pi-3-dynamic-current-consumption-power-and-temperature-tests (accessed February 18, 2017).
- Singh, H.V.P., Rizvi, S. R., and Mahmoud, Q. H. (2015) Two architectures for real-time sensor data streaming for cloud applications. IEEE International Symposium on Signal Processing and Information Technology (ISSPIT), 133–138. doi: 10.1109/ISSPIT.2015.7394315.
- Suehle, R. and Callaway, T. (2014) Raspberry Pi Hacks: Tips & Tools for Making Things with Inexpensive Linux Computer. O'Reilly Media, Sebastopol, 8.
- Windows Dev Center. (2017) Windows 10 IoT Core: The operating system built for the Internet of Things. Microsoft. Available at https://developer.microsoft.com/en-us/windows/iot (accessed February 19, 2017).