
Chapter 6
Microsoft Windows XP
This chapter provides an outlook on Microsoft's Window XP. In this hands-on chapter, the reader will learn how to work with Windows XP using its various in-built features. The chapter also covers various tools and features such as Microsoft help and support center, windows explorer, narrator, magnifier, and system restore. The discussion begins with the basics of the Desktop and My Computer. Files and folders are studied next after which the discussion continues with a focus on various system utilities such as on-screen keyboard, disk cleanup, and disk defragmenter.
After reading this chapter, you will be able to understand:
The basic outlook on Microsoft Windows XP and how to boot a computer using XP professional
The Windows XP desktop and its various parts
The Windows XP My Computer and its various parts
How to work with files and folders by creating, deleting, moving, renaming and copying them Windows explorer and how to use it for managing files and folders Windows help and support centre and how to use it to get information on various queries
How to search for files and folders
Some of the basic utilities provided by Windows XP
The control panel and how to view and adjust system settings Some of the basic accessories provided by Windows XP
6.1 INTRODUCTION
Windows XP is an operating system introduced in 2001 by Microsoft and is a part of the Windows family of operating systems. Along with a redesigned look and feel to the user interface, this new operating system uses a more stable and reliable environment than previous versions of Windows. The operating system provides a new interface that uses graphics to simplify navigation and completing common tasks, thus making learning and working easier.
Microsoft released Windows XP in two versions: Windows XP Home and Windows XP Professional. Windows XP Home Edition is designed for home use and small businesses, while Windows XP Professional is specifically designed for advanced home computing, businesses and larger organizations. Windows XP Professional is designed to handle more powerful computing needs by providing more reliability, security and administrative options. We will be discussing the Windows XP Professional version in this chapter.
6.2 FEATURES OF WINDOWS XP
Windows XP provides a new interface to simplify navigation and perform common tasks (like creating and opening of a file) easily, thus making learning and working easier. These are the various features that make Windows XP a powerful, fast, efficient and stable operating system.
- Improved Interface: Windows XP provides a completely redesigned interface Start menu that lets you access programs more quickly. Also, Windows XP keeps a record of programs and files you use more often. In addition, Windows XP displays the most used items in the Start menu while it hides the least used items.
- More Reliable: Windows XP is based on the same technology that is used in Microsoft Windows NT and Windows 2000. This makes Windows XP much more stable than Windows 95, Windows 98 and Windows ME, and greatly reduces the number of system crashes and system restarts.
- Better File and Folder Management: Windows XP makes it easier to view and work with files and folders. For example, Thumbnail view lets you preview photos and images and the new File and Folder tasks pane lets you easily copy, move, rename or delete any file or folder.
- Better Help and Support: Windows XP provides efficient help and support with new features such as Remote Assistance which allows you to contact computer experts and lets them fix a problem on your computer even if they are miles away geographically.
- More Secure: Windows XP provides new security tools that help keep your computer more secure and provide new technologies that run in the background, making your computer run more efficiently. This operating system includes the new Security Centre which allows you to check the status of the important security elements on your computer—Windows Firewall, Automatic Updates and virus protection software—making it convenient for you to understand how to keep your computer better protected against viruses and other security threats.
- Remote Desktop: Windows XP includes a feature known as Remote Desktop which allows you to access your Windows session from another computer just as if you were in front of your computer. For example, you can connect to your office computer from home, have access to all of your files and network resources as though you were in front of your computer at office. You can leave programs running at work and when you get home, you can see your desktop at work displayed on your home computer with the same programs running.
- ClearType: Windows XP provides a special feature called ClearType that makes the words on your computer screen look as smooth as the words on a page. This increases the font resolution of the words written in different programs like Notepad and WordPad.
6.3 STARTING WINDOWS XP PROFESSIONAL
When Windows XP boots up, a log on screen appears. This log on screen depends upon your network identification, membership and system set-up. If you are a member of a domain, the Welcome to Windows screen appears, informing you that you need to use the (Ctrl+Alt+Delete) key combination to begin. If you are not connected to a network, then you can log on to the computer with or without providing any username or password (Figure 6.1). In addition, Windows XP allows you to set up multiple user accounts where each user can use the operating system with his own settings.
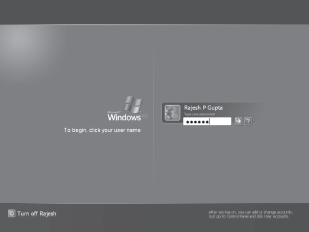
Figure 6.1 Log on Window
6.4 THE DESKTOP
Desktop is the first screen visible after logging in to the Windows XP operating system (Figure 6.2). When Microsoft Windows XP is opened, the desktop appears. The desktop is a full-screen display where all Windows activity takes place. It is part of a graphical user interface, where icons, menus and dialog boxes on the screen represent programs, files and options on your computer.
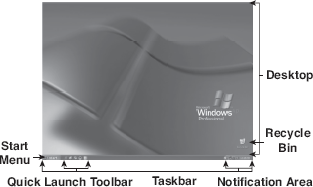
Figure 6.2 Desktop
The desktop is actually an invisible folder called Desktop Folder (you can access this folder by using windows explorer). You can move files and folders to the desktop for easy access. In addition, it allows you to run programs and use a file system without using the command prompt of the operating system. Note that icons are graphic symbols that represent a program or a utility and are one of several different types of objects on the monitor's screen. The desktop has many parts to it, which are discussed in this section.
6.4.1 Taskbar
The taskbar is used as a link to easily open and close programs. It also allows you to switch between the open application programs and files. If you have more than one instance of the same program open at the same time then similar windows are grouped into one button and labelled with the name of the program (Figure 6.3).
Figure 6.3 Taskbar
THINGS TO REMEMBER
Start Menu
Some of the items stored in the Start menu display a submenu, while others directly start an application or program. A submenu appears when the menu item has a right-facing arrow as shown here (▸). Click this arrow to display the submenu and select the applications/program to start it. Some of the Start menu items are Shut Down, Run, Help and Support, Search, Settings, My Recent Documents, and Programs.
By default, the taskbar is placed at the bottom of the Desktop screen. The taskbar can be moved to any of the four sides of the desktop and can be resized to display more window buttons. Note that the number following the program name on the button indicates the number of open windows represented by the button. The taskbar includes Start Menu, Quick Launch Toolbar and System Tray.
Start Menu: The Start menu provides a way to open most of the software applications that are installed on the computer. The Start menu has been Customized to provide quick access methods to all the programs and Windows utilities present on the computer. Click Start menu to display a list of items stored in it (Figure 6.4). Some of the most commonly used Start menu items are listed in Table 6.1.
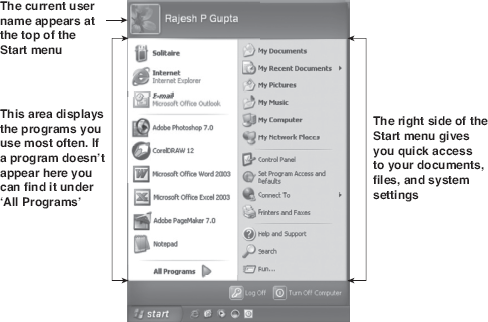
Figure 6.4 Start Menu
Table 6.1 Start Menu Items
| Items | Description |
|---|---|
| Shut Down | This item has several options such as shut down and restart computer, close all programs and log on as a different user, or shut down completely. |
| Run | Starts a program by typing in the program's name and path. There is a browse button to search for the program to be opened in case the path is not known. |
| Help and Support | Gives access to the Help feature for the Windows XP environment. |
| Search | Searches for different types of files and in various locations. Using this feature, you can search for files or even a certain word found in the file. |
| Settings | Provides quick access to the Control Panel, printer options and taskbar properties. |
| My Recent Documents | Reopens one of the last 15 files you have opened by clicking on its name. |
| Programs | Provides access to a list of available programs and submenus of related programs. |
Quick Launch Toolbar: The Taskbar also displays its own set of toolbars; the most frequently used is the Quick Launch toolbar. The Quick launch bar is a Customizable toolbar that displays single-click links to programs and commands. By default, the Quick Launch toolbar displays links to Internet Explorer, Media Player and Show Desktop. If this toolbar is not visible, then follow the steps given below:
- Right-click on the taskbar and select Properties to display the Taskbar and Start Menu Properties dialog box.
- Choose the Taskbar tab and select Show Quick Launch, and click OK.
Additional links can be added to the Quick Launch toolbar by dragging the link to the toolbar. To remove links from this toolbar, right-click it and select Delete from the short cut menu.
Notification Area: The Notification area (also known as system tray in older versions of Windows operating system) is located on the right-hand side of the taskbar, and generally contains icons of various programs that are running in the background. This includes system applications such as the volume control and Anti-Virus programs (if any). In addition, this area also displays icons of clock and other features related to time and date. To change the system date and time, double-click on the displayed time in the taskbar. This displays the Date and Time Properties dialog box (Figure 6.5). You can change the time, date and the time zone using this dialog box.
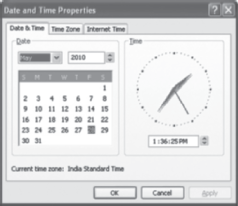
Figure 6.5 Date and Time Properties Dialog Box
6.4.2 Customizing Taskbar
The taskbar can be Customized according to user's preferences. One can Customize the settings such as locking and hiding the taskbar. To modify the taskbar's settings, right-click on an empty area on the taskbar and select Properties from the shortcut menu. This displays the Taskbar and Start Menu Properties dialog box as shown in Figure 6.6. This dialog box contains two tabs: Taskbar and Start Menu.
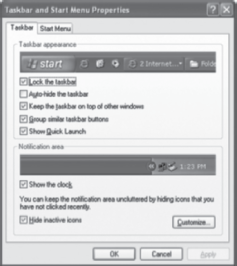
Figure 6.6 Taskbar and Start Menu Properties Dialog Box
The Taskbar tab contains Taskbar appearance and Notification area section. Taskbar appearance section contains a series of options each having an associated check box. These options are listed in Table 6.2. The Notification area section is used to show the clock and hide the inactive icons on the notification area.
Table 6.2 Taskbar Appearance Options
| Options | Description |
|---|---|
| Lock the Taskbar | Locks the taskbar and toolbar on the desktop at its current position so that it cannot be moved to a new location. |
| Auto-hide the Taskbar | Hides the taskbar and displays it only when the mouse pointer is moved over the taskbar's location. |
| Keep the Taskbar on Top of other Windows | Ensures that the taskbar is always visible, even when you run a program in a maximized (full screen) window. |
| Group Similar Ttaskbar Buttons | Displays opened files (more than one) of a similar program as a single button. |
| Show Quick Launch | Displays the quick launch bar on the taskbar. |
6.4.3 Desktop Icons
The desktop includes icons, each having a specific function. Desktop icons can be thought of as symbols that represent a program, shortcut to a program or a folder. When you use Windows XP for the first time, the desktop contains only Recycle Bin. The rest of the icons usually found on other Windows operating systems are not seen on the desktop. To display the required icons follow the steps given below and shown in Figure 6.7.
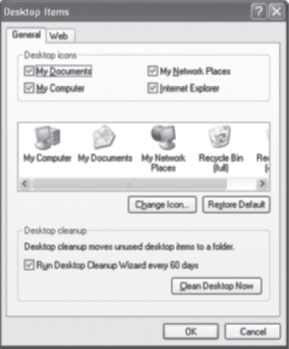
Figure 6.7 Showing Desktop Icons
- Right-click anywhere on the desktop, and select Properties from the shortcut menu. This displays the Display Properties dialog box.
- Select the Desktop tab and click the Customize Desktop button.
- In the Desktop icons pane of the General tab, select the desired icons and click OK twice.
The main icons that appear by default on the desktop are listed in Table 6.3.
Table 6.3 Icons on the Desktop
| Icons | Name | Description |
|---|---|---|
 |
My Computer | Displays documents and files. It also provides access to hard drives and removable drives of the computer (both local and network). |
 |
My Network | Places Enables you to communicate with network resources on the network for file sharing purpose. |
 |
My Documents | It is used to store documents. It also contains data files, which can be easily organized. |
 |
Recycle Bin | It is a temporary storage area used for storing deleted files and recover files accidentally deleted from the hard drive or floppy drive. |
 |
Internet Explorer | Provides access to the Internet. |
In addition, you can create shortcuts of commonly used applications on the desktop. For this, right-click the desired file or folder and select Send To from the shortcut menu as shown in Figure 6.8. This displays another popup menu, from where select Desktop (create shortcut) option.
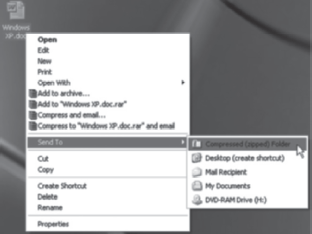
Figure 6.8 Creating Shortcut on Desktop
Organizing Desktop Icons: The above-discussed icons (see Table 6.3) are the basic icons available on the desktop. In addition to these, you can add a number of shortcut icons on the desktop. However, if icons are large in number, the desktop may look untidy and create a problem when working on the desktop. To manage the desktop, Windows XP provides different methods to organize the desktop icons in a number of ways.
The simplest way to organize the icons is to drag them to a new location with the mouse. To use Windows XP's in-built feature for organizing icons, right-click anywhere on the desktop and select the Arrange Icons By and then select the desired option(s) from the pop-up menu to arrange the icons (see Figure 6.9). You may arrange the icons by Name, Size, Type or Modified (date). Another way to arrange icons is to select Auto Arrange. Note that if the Auto Arrange option is checked, then you will not be able to drag the icons until it is unchecked. If Align to Grid is checked, then the icons will be arranged in line.
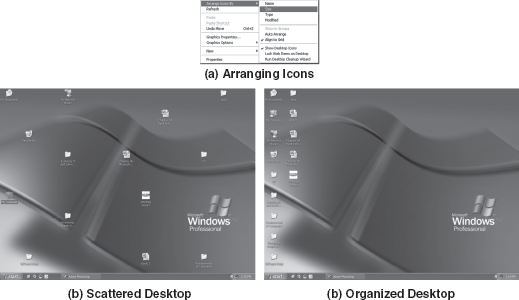
Figure 6.9 Organizing the Desktop
6.4.4 Customizing the Desktop
Windows XP allows you to Customize the desktop according to your preference. The desktop can be changed by modifying the colour scheme of Windows, wallpaper (displayed on the desktop), screensaver and much more. To Customize the desktop, right-click anywhere on the desktop and select Properties from the shortcut menu. This displays Display Properties dialog box as shown in Figure 6.10. This dialog box contains five tabs at the top of the window. These are Themes, Desktop, Screen Saver, Appearance and Settings.
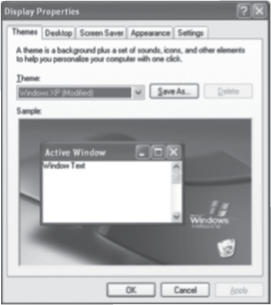
Figure 6.10 Display Properties Dialog Box
Themes: Themes are collections of sounds, icons, fonts, colours and screen savers, which often come with their own background graphics, based on a specific theme. You can select from a range of in-built themes from the Theme drop-down box. The Sample window, displays a preview of the chosen desktop theme.
Desktop: This tab allows you to change the wallpaper (background) of the desktop (see Figure 6.11). Click Customize Desktop to show icons of hidden items on the desktop as well as change icons of the selected desktop item. Note that you can also place the wallpaper on the centre of the screen, stretch it to fill the whole screen or tile it over the full screen by using the Position drop-down box in the Desktop tab.
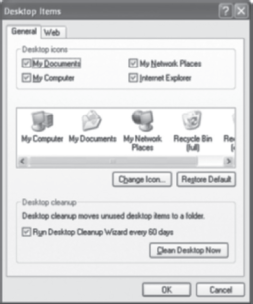
Figure 6.11 Customizing Desktop
Screen Saver: The screen saver is an inbuilt utility that appears on your screen when the mouse or keyboard has not been used for a specified period. The screen saver is primarily used to prevent damage to the phosphor element present in the monitor. The screen saver tab allows you to specify the screen saver and its settings (see Figure 6.12).
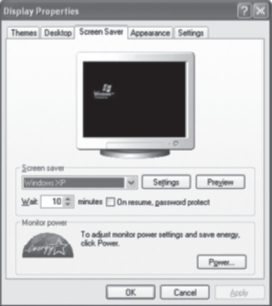
Figure 6.12 Screen Saver Tab
In this tab, you can also use the Power option, which allows you to change the power settings of the monitor. It provides options to save power when the computer is not in use. This is especially useful when the computer is used for a longer duration, for example, the whole day, or when some background operation is going on (like transferring of data between two computers) and the monitor is not required for any operation.
Appearance: This tab allows you to change the windows style, colour scheme and font size. You can choose either the Windows XP style or Windows Classic style from the Windows and buttons drop-down box. Each of these styles has pre-defined colour schemes, which can be selected from the Color scheme dropdown box. These schemes are used to provide colour to all the working objects (like icons, title bar). The Font size dropdown box is used to select the size of the font in the folders, icons, title bar and so on (see Figure 6.13).
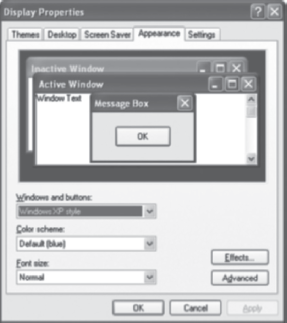
Figure 6.13 Appearance Tab
This tab also includes the Advanced and Effects option. The Advanced option lets you create a colour scheme of your own choice, while the Effects option provides the option to use larger icons, displays shadows under menus, provides fade effects and much more.
Settings: This tab allows you to change the number of colours or display resolution from the Color quality and Screen resolution section, respectively. If you want to increase the screen resolution from 800 × 600 to 1024 × 768 pixels, then drag the bar available in the Screen resolution section (see Figure 6.14). As you increase the pixels, the size of the fonts and icons also increase but the amount of information available on the screen decreases in size. The Color quality section displays the current colour settings for the installed monitor.
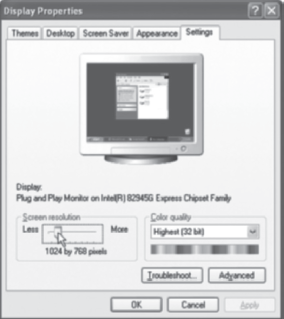
Figure 6.14 Settings Tab
Click the Advanced option to display the Properties dialog box from which you can change the settings for the Video adapter installed on the computer. You can also click on the Troubleshoot option to display the Windows Help and Support Center.
Once you have finished modifying the settings for the desktop under respective tabs, click Apply to implement the new settings and then click OK to close the Display Properties dialog box.
6.5 MY COMPUTER
As stated earlier, My Computer allows users to access disk drives, view and manage files and folders, and access other areas of the operating system such as Control Panel and installed Printers. To open the My Computer window double-click the My Computer icon (![]() ) placed on the desktop. This window has many parts to it as shown in Figure 6.15, which are discussed in this section.
) placed on the desktop. This window has many parts to it as shown in Figure 6.15, which are discussed in this section.
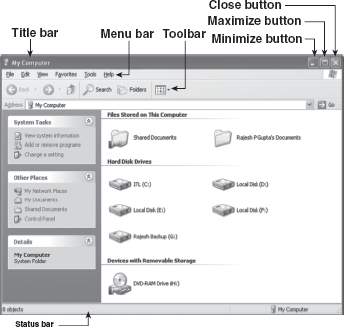
Figure 6.15 My Computer Window
Title Bar: This bar is located at the top of the window and displays the application name. At the extreme upper-left corner of the title bar, there is the Control Menu icon. Click this icon to display a pull-down menu, which contains options to change the size and placement of the window. In addition, like all other Microsoft applications, the title bar also contains the Minimize, Maximize, Restore and Close buttons.
The Minimize button (![]() ) hides a window without closing it, reducing the application as a button on the taskbar. Using the minimizing function, you can run several programs at one time without cluttering the desktop with several open windows. To restore the minimized application at any time, click the application's button placed on the taskbar. The Maximize button (
) hides a window without closing it, reducing the application as a button on the taskbar. Using the minimizing function, you can run several programs at one time without cluttering the desktop with several open windows. To restore the minimized application at any time, click the application's button placed on the taskbar. The Maximize button (![]() ) returns a program to full size (maximized) screen. Note that when the window is maximized, the Maximize button is replaced by the Restore button (
) returns a program to full size (maximized) screen. Note that when the window is maximized, the Maximize button is replaced by the Restore button (![]() ), which returns the window to its original size as it was before the maximized state. The Close button (
), which returns the window to its original size as it was before the maximized state. The Close button (![]() ) is used to close the active application.
) is used to close the active application.
Menu Bar: This bar contains different submenus, which control all options, functions and commands for all applications present in Microsoft Windows operating systems. Each command in the menu bar represents a menu and is activated by pressing Alt+ the underlined letter of the menu from the keyboard. By default, My Computer window contains six menus, which have an associated pull-down menu. For example, the File menu contains commands to open, create and delete a new file/folder.
Toolbar: Toolbar contains shortcut buttons that are used to perform actions found within the menu bar. By default, there are six buttons present on the toolbar each having a specified function. These buttons are listed in Table 6.4.
| Command | Button | Description |
|---|---|---|
| Back | Moves back to the previously viewed folders/items. | |
| Forward | Moves forward to the last viewed folders/items (if the button is active). | |
| Up | Takes you up one level. If you are working in C:My Documents, then the Up button displays the contents of the C drive. | |
| Search | Initiates the search function, which allows you to locate files or folders stored on the computer or network. | |
| Folders | Displays the folders pane on the left side of the window. | |
| Views | Allows you to select the way to view the contents of the window. |
Toolbars can be customized to include frequently used actions. To customize the toolbar, right-click anywhere on the toolbar and select Customize from the shortcut menu. This displays the Customize Toolbar dialog box (see Figure 6.16). In this dialog box, use the Add option to add new buttons on the toolbar or use the Remove option to delete buttons from the toolbar.
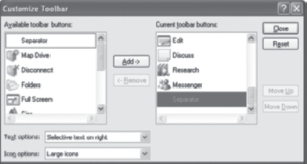
Figure 6.16 Customize Toolbar Dialog Box
Note: To determine the function of each toolbar button, place the cursor over the button. This shows a tag that displays its function which is also the name of the button.
Address Bar and Status Bar: The address bar is located between the toolbar and the window panes. The address bar displays the current disk drive and folder, such as: “C: Documents and SettingsMy Documents”. The status bar is located at the bottom of the window and displays the total number of objects (files and sub-folders) in the folder and the space (bytes) they occupy. If a drive or file is selected, it displays the amount of disk free space on the common tasks area as well as on the status bar.
Windows Pane Area: The Window contains two panes: left and right. The left pane also known as common tasks area is divided into various sections such as System Tasks, Other Places and Details section. System tasks and other places contain links to view information relating to system and access to various system utilities such as the My Documents folder and Control Panel. The right pane area includes some icons, which are listed in Table 6.5.
| Command | Button | Description |
|---|---|---|
| 3½ Floppy Drive | Allows saving of files on an external drive, that is, floppy disk. | |
| Local Disk | Allows access to the local drives placed within the computer. Generally, it is the “C” drive, but sometimes a computer has more than one local drive. | |
| CD Drive | Allows access to the CD drive. It serves as a multi-purpose utility allowing you to install software, take back-ups of data, watch and listen to audio visual CDs. | |
| Network Drive | Allows access to a drive that is stored on a network server. |
Working with Views: Windows XP allows you to view files or folders with some or no details. The main difference between these views is the amount of details you want to know about a file or folder. To select a particular view, click the Views button (![]() ) on the toolbar. An alternate method is to select the desired view from the View menu. There are five views in Windows XP: Thumbnails, Tiles, Icons, List and Details view (see Figure 6.17). Note that all the views show the name of the files/folders. To know more about a file/folder place the mouse pointer on the desired item, this displays information such as the Author, File Type and File Size.
) on the toolbar. An alternate method is to select the desired view from the View menu. There are five views in Windows XP: Thumbnails, Tiles, Icons, List and Details view (see Figure 6.17). Note that all the views show the name of the files/folders. To know more about a file/folder place the mouse pointer on the desired item, this displays information such as the Author, File Type and File Size.

Figure 6.17 Different Views
- Thumbnails View: It displays a small (preview) version of up to four files in the folder.
- Tile View: It displays the items with large icons and provides information such as name and size of the application.
- Icon View: It displays items in a normal view with no additional information.
- List View: It is used to arrange the items in an order.
- Details View: It displays items in a tabular form, providing details such as Type of file and size, which is spread out column wise. You can also sort the item in this view. For example, to sort by type click on the Type (column header), to sort by date click on the Date Modified (column header) and so on.
6.6 WORKING WITH FILES AND FOLDERS
A file is defined as an organized and structured collection of related information stored in secondary storage device. The information can be of different types such as text, data or images. Similar to the way you keep files or documents in file folders for easy reference at office or home, computers also contain folders, which hold different documents or files. Folders provide a very convenient and useful method of storing files and subfolders in an organized way on a computer's hard drive or on a removable drive (see Figure 6.18). For example, a folder could be created on the hard drive to keep all business correspondence with a particular customer. This folder can also contain files other than documents for that customer.
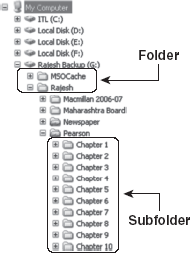
Figure 6.18 Folders and Subfolders
You can also create folders inside a folder. For example, if you have a folder named “Sports” then you can create folders such as cricket, football and hockey for holding various files in these folders. Here cricket, football and hockey are called subfolders.
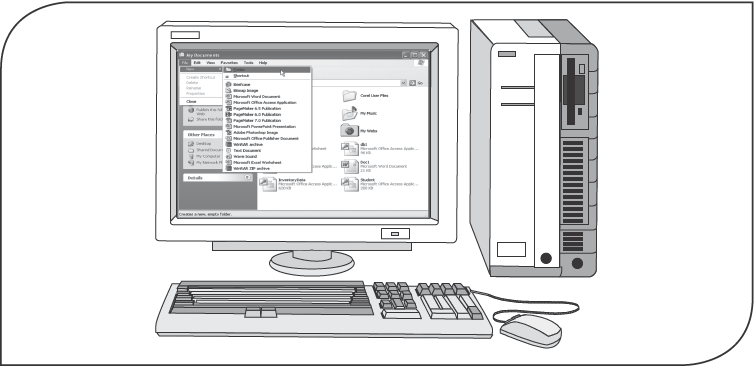
Creating Files and Folders: Since the hard drive can store tens of thousands of files, generally a common practice is to create folders to help in keeping files organized on the hard drive. Folders can be created on Desktop, in the My Documents folder or at any other specified location. To create new folders, say on the desktop, right-click on the desktop and select New from the shortcut menu. This displays another pop-up menu, from where select the Folder option (see Figure 6.19).
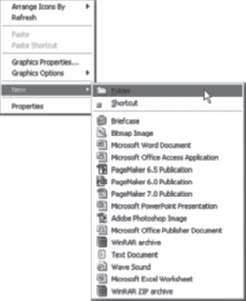
Figure 6.19 Creating a Folder
By default, this creates a new folder named New Folder. Note that the name of the folder is already highlighted, so it can be assigned a new name easily (see Figure 6.20).
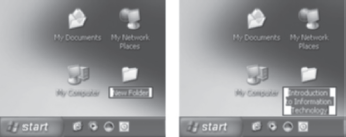
Figure 6.20 Naming a Folder
To create a new folder in the My Documents folder or in any other folder, follow any of the steps given below.
FACT FILE
Naming a File
Filenames can contain up to 255 characters and can contain numbers, letters (upper case or lower case), spaces and some symbols. Most files have an extension in addition to the name. The extension is assigned by the program that creates the file. For example, Microsoft Word creates a file with .doc extension.
- Right-click inside the folder and select New from the shortcut menu. This displays another pop-up menu, select the Folder option from there (see Figure 6.21).
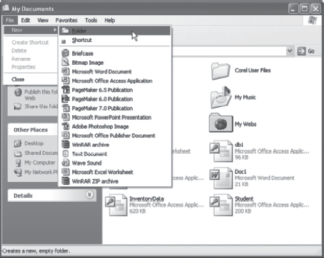
Figure 6.21 Creating a Folder in My Documents Folder
- Select New from the File menu. This displays a pop-up menu, select the Folder option from there.
Moving and Copying Files and Folders: When you are working on a file or folder, sometimes you may decide to move a file or a folder or copy the same file or folder into some other folder or location. Copying a file or folder is similar to the cut operation, except that the copy command retains the file or folder at the original place, but in case of cut, the file or folder is removed from the original location. To move or copy a file or folder, select it and follow any of the steps given below.
- Right-click on the file or folder name and select Cut or Copy from the shortcut menu (see Figure 6.22). Then select the destination folder or location and select Paste from the shortcut menu.
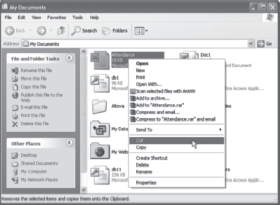
Figure 6.22 Performing Cut or Copy Operation
- Press Ctrl+X to cut or Ctrl+C to copy using the keyboard. Then select the destination folder or location and press Ctrl+V using the keyboard
- Select Cut or Copy from the Edit menu. Then select the destination folder or location and select Paste from the Edit menu.
- Drag the file or folder into another location. Note that this operation accounts only if the file or folder is to be moved from one location to another location of the same hard drive (see Figure 6.23).
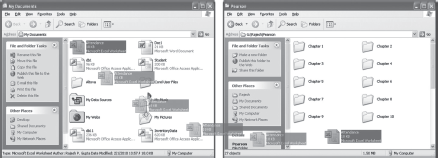
Figure 6.23 Dragging File or Folders
Renaming Files and Folders: Sometimes it may be required that a file or folder should be renamed. To rename a file or a folder select the file or folder and then follow any of the steps given below.
- Right-click on the file or folder name and select Rename from the shortcut menu. Enter the new name and press the Enter key.
- After selecting, click the file or folder a second time (do not double-click) to highlight it, then enter the new name and press the Enter key.
- Select Rename this file or Rename this folder option from the common task area.
Deleting Files and Folders: If you wish to delete a particular file or folder, select the file or folder and follow any of the steps given below.
THINGS TO REMEMBER
Deleting File/Folder Permanently
Files or folders deleted from the hard drive will be moved to the Recycle Bin. Items in the Recycle Bin take up disk space on your hard drive until they are permanently deleted. If you want to permanently delete a file or folder instead of sending it to the recycle bin, select the file or folder and press Shift+Delete key from the keyboard. If you perform this action, file/folders are deleted permanently. Files or folders stored on a floppy disk or network drive are not sent to the Recycle Bin when deleted, instead, they are permanently deleted.
- Right-click on the file or folder and select Delete from the shortcut menu.
- Press the Delete key from the keyboard.
- Select Delete this file or Delete this folder option from the common task area.
- Drag the file or folder into the recycle bin.
When you perform any of the above-mentioned actions, Windows XP displays a message on the screen asking you to confirm deletion of file or folder. Select Yes to delete the file, or No to keep the file.
6.6.1 Recycle Bin
The Recycle Bin is a temporary storage area where you can move any files or folders that you no longer need. To view the contents of the recycle bin, double-click on the Recycle Bin (![]() ) icon placed on the desktop. If the recycle bin has items stored in it, then the recycle bin icon changes to (
) icon placed on the desktop. If the recycle bin has items stored in it, then the recycle bin icon changes to (![]() ). This opens the recycle bin window, which contains a list of deleted items. Items in the recycle bin take up disk space on your hard drive until they are permanently deleted. An item remains in the recycle bin until you decide to permanently delete it or restore it.
). This opens the recycle bin window, which contains a list of deleted items. Items in the recycle bin take up disk space on your hard drive until they are permanently deleted. An item remains in the recycle bin until you decide to permanently delete it or restore it.
Restoring Items: You can restore any accidentally deleted file or folder from the recycle bin. To restore an item, select the item(s) and follow any of the steps given below (Figure 6.24).
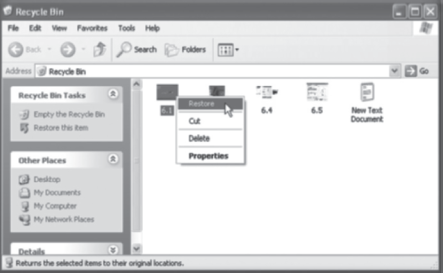
Figure 6.24 Restoring an Item
- Right-click on the item and select Restore option from the shortcut menu.
- Select Restore this item from the common task area.
- Select Restore from the File Menu.
Emptying Recycle Bin: You can permanently delete unnecessary items from the recycle bin. To empty the recycle bin follow any of the steps given below.
- Right-click on the Recycle Bin (
 ) icon on the desktop and select Empty Recycle Bin from the shortcut menu.
 - Select the Empty Recycle Bin option from the common task area.
When you perform any of the above-mentioned actions, Windows XP prompts you to confirm the deletion. Click Yes to empty the recycle bin or No to keep the items in the recycle bin.
To delete the files or folders manually, open the recycle bin window. Now select the item(s) to be deleted and follow any of the steps given below.
- Right-click on the item and select the Delete option from the shortcut menu.
- Select Delete from the File menu.
When you perform any of the above-mentioned actions, Windows XP prompts you to confirm the deletion. Click Yes to permanently delete the item.
Note: Recycle bin contains files deleted from the hard drive only. Files or folders stored on a floppy disk or network drive are not sent to the recycle bin when deleted. Instead, they are permanently deleted.
6.7 WINDOWS EXPLORER
Windows XP provides a very useful feature called Windows Explorer, which helps you to organize files and folders stored on a computer in an efficient manner. It allows you to arrange files according to your own needs, and provides optional views for easy scanning of folder contents. In this window, you can also create new files or folders, open, move or copy, and delete existing file or folders. To open Windows Explorer, follow any of the steps given below.
- Click Start, point to All Programs, and then select Accessories. Now select Windows Explorer from the submenu that appears (see Figure 6.25).

Figure 6.25 Opening Windows Explorer
- Right-click on My Documents folder and select Explore from the shortcut menu.
When you perform any of the above-mentioned actions, Windows XP displays the Windows Explorer window. This window is divided into two panes: Folders pane and Contents pane as shown in Figure 6.26. The folders pane of Windows Explorer displays disk drives, folders and subfolders. These items can be expanded or collapsed by clicking on the plus (+) sign and minus (-) sign symbols that appear to the left of the drive letter, folder or subfolder name. A (+) means there are subfolders that are not visible. Click on the (+) to view the subfolders. Doing this the (+) changes to a (-). The contents of the selected drive or folder are displayed in the contents pane by clicking on the item's name or icon in the folders pane. The toolbar present on the Windows Explorer window provides buttons for common actions associated with the contents present in the window. These buttons have been listed in Table 6.4.
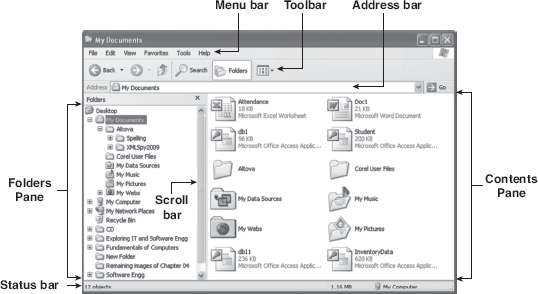
Figure 6.26 Windows Explorer Window
Note: Both panes may contain horizontal or vertical scroll bars, which are used to display contents not visible within the current window.
Changing Sort Order: While searching for a file, it may be easy to locate that file in the contents pane by changing the order in which the files and folders are displayed. You can sort the contents pane by clicking on the desired column heading. For example, in Figure 6.27, the contents pane is sorted by the Type column, in ascending order. Note that a triangle will appear next to the column heading to indicate the sort method. For ascending, the triangle points upward (![]() ) while for descending, the triangle point downward (
) while for descending, the triangle point downward (![]() ).
).
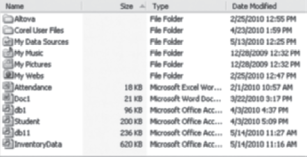
Figure 6.27 Changing Sorting Order I), while for descending, the triangle points
6.8 WINDOWS HELP AND SUPPORT CENTRE
Microsoft Windows XP provides an exhaustive Help and Support Centre, which includes help topics, tutorials, troubleshooting and other support services. Windows help is of great use when you are experiencing difficulty using any application or if you want to know more details about some application. To get help, follow any one of steps given below.
- Press the F1 key.
- Select Help and Support Centre option from the Start menu.
When you perform any of the above actions, Windows XP opens Help and Support Centre. This centre allows you to find support information by selecting from a menu of topics, using Search or Index feature as shown in Figure 6.28. Search allows you to search for a specific item. While, index feature allows you to view the list of help topics in an alphabetical order.
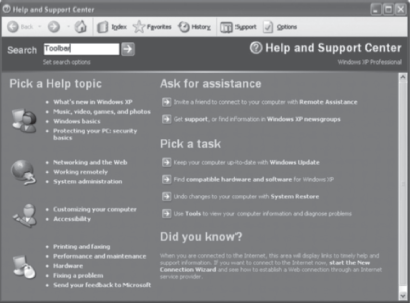
Figure 6.28 Help and Support Centre
To use the search option type the keywords in the Search box and click on (![]() ) or press the Enter key. This opens a new window showing the search results for the help topic. To use the Index feature select Index from the toolbar. Now type the item you want to search for in the Type in the keyword to find box and click Display to show help information.
) or press the Enter key. This opens a new window showing the search results for the help topic. To use the Index feature select Index from the toolbar. Now type the item you want to search for in the Type in the keyword to find box and click Display to show help information.
The window pane area of Help and Support Centre groups tools and topics under four different sections: Pick a Help topic, Ask for assistance, Pick a task and Did you know?
- Pick a Help Topic: This section provides general information about help topics. For example, you can learn about what's new in XP, basic system use, networking, remote system operation, printing and security.
- Ask for Assistance: This section provides a link to Window's XP Remote Assistance feature. This feature lets a Windows XP user to connect to the Internet for assistance by browsing through your computer. You can also access the Microsoft Product Support Services (PSS) Web site and XP-related newsgroups from this section. Note that to perform this, your computer should be connected to the Internet.
- Pick a Task: This section provides a link to the most commonly used items. For example, you can access the Windows Update feature (with which you can update the OS with patches, updates and much more), find Windows XP compatible hardware for the computer, restore the computer back to a previously working state, and run diagnostic tools such as system maintenance and information tools to test your computer.
- Did You Know?: This section contains links to common support topics and Windows XP related FAQs (frequently asked questions). If the Internet connection is available then Windows XP automatically updates this section with data from the PSS website.
6.9 SEARCHING IN WINDOWS XP
It is quite common to forget where you have saved a document or any other file, and it may take a long time to manually search all your folders. The Search command is an invaluable tool in helping you locate a document, file or folder. You can choose to search by various criteria including file name, a specific word present in the file or the last Modified date. Windows XP allows you to search for media files, such as pictures, music and video; documents, such as those created with word processing and spreadsheet programs; or all files and folders.
Carrying out a Basic Search: By default, Windows XP searches all folders and subfolders in the drive selected. If you want to search a particular folder, you can use the Browse option in the Look in list to select the folder. Once the criteria have been entered, you can perform the search. To perform a search, follow the steps given below.
- Click Start and select Search; this displays the Search Results window (see Figure 6.29).
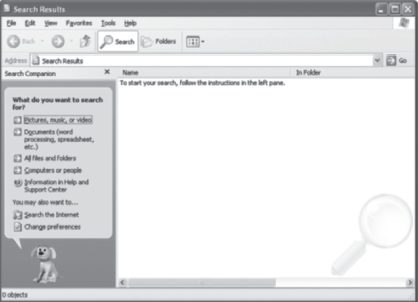
Figure 6.29 Search Results Window
- A search companion appears on the left-hand side of the window, which asks you what type of an item do you want to search for. Search options are context-sensitive. The Search Companion displays different search fields depending upon the type of item you are searching for.
- Click on the desired option. The Search companion now asks you to enter all or part of the file name (see Figure 6.30).
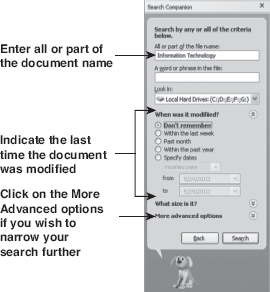
Figure 6.30 Using Basic Search
- Click the Search button to start the search.
Look in the left pane of the main window to see all the search results. To open up any file or folder, simply double-click it (see Figure 6.31).
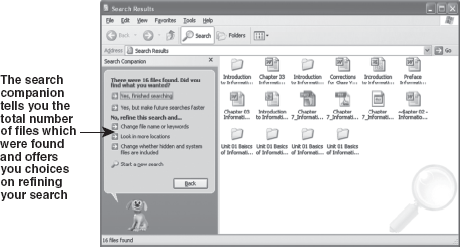
Figure 6.31 Search Results
After the files appear in the Search Results window, you can select any of the following three options.
- If satisfied with the results, select Yes, finished searching. This closes the Search Companion, but leaves the Search Results window open with the found files listed.
- If not satisfied with the results, you can use the links under No, refine this search and to change your search criteria.
- To carry out another search, you can select Start a new search.
Advanced Search with More Criteria Options: If you wish to narrow your search further, you can use the advanced search option. The search companion provides you with many options to consider numerous searching criteria, which helps to narrow down the search, thus making search criteria more accurate and rich. To use advanced search in the Search Results window, follow the steps given below.
- Select the option to be searched for in the left pane (see Figure 6.32).
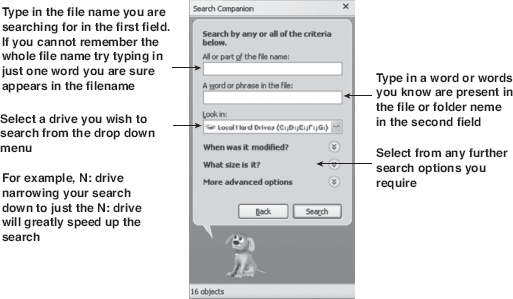
Figure 6.32 Searching Using Advanced Search Option
- The search companion provides you with options, which can be used to carry out advanced search using options such as selecting a specific hard drive or selecting a specific folder.
- Click the Search button to search for files or folders.
With the help of links, you can search by date, file size or other advanced options. These links include “When was it Modified?”, “What size is it?” and More advanced options.
The “When was it Modified?” link allows you to search by the modification date. Date options include searching for files Modified last week, last month, within the past year or you can specify a date range. If you are not sure of the date, you can select Do not remember, which is the default.
You can limit the search to files of a certain size using the “What size is it?” link. You can specify that files be of a maximum or minimum size, or a specific size. Then, only the files that fall within the size parameters you specify will be found.
The More advanced options link includes options for searching system folders, hidden files and folders, subfolders, and tape backups. By default, the Search system folders and Search subfolders options are selected. You can also perform a Case sensitive search. When this option is enabled, the files found must contain the text entered in the A word or phrase in the file box, as well as match the case of the text.
6.10 SYSTEM UTILITIES IN WINDOWS XP
All versions of the Windows operating system include built-in tools that help you maintain your system. With these tools, you can ensure good performance from both the operating system and your hard drive. The basic utilities such as Disk Cleanup, Check Disk and Disk Defragmenter help maintain your hard drive to ensure maximum efficiency. More advanced tools enable you to change to a different file system and compress your hard disk. The main utilities are Narrator, Magnifier, On-Screen keyboard, System Restore, Disk Cleanup, Disk Defragmenter and Backup.
Narrator: The Narrator is a text-to-speech utility for users who are visually impaired. Narrator operates by reading the information available on the screen. This includes contents of the active window, menu options or the text you have typed. The Narrator is designed specifically to work with Notepad, WordPad, Control Panel programs, Internet Explorer and Desktop. To open the Narrator, Click Start, point to All Programs, and then select Accessories. Now choose Accessibility and select Narrator from the shortcut menu that appears as shown in Figure 6.33 (a).
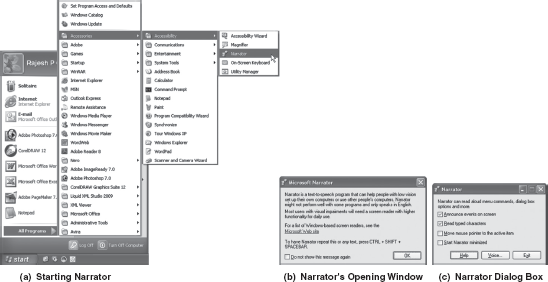
Figure 6.33 Using Narrator
When Narrator is opened, it shows a message, displaying a brief description about Narrator as shown in Figure 6.33 (b). Click OK to proceed to the Narrator dialog box. This dialog box contains a list of options, each having an associated check box as shown in Figure 6.33 (c). Select the appropriate options and then select Voice to adjust the voice settings.
Note: Narrator is not available for all languages and is only supported on the English version of Windows XP.
Magnifier: Magnifier is an accessibility utility that makes the screen more readable for users who have impaired vision. Magnifier operates by creating a separate window that displays a magnified portion of the screen. You can easily change the magnification level, move or resize the Magnifier window, or drag it to the edge of the screen and lock it into place. To open Magnifier click Start, point to All Programs, and then select Accessories. Now choose Accessibility and then select Magnifier from the shortcut menu that appears (see Figure 6.34).
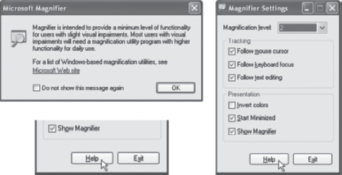
Figure 6.34 Using Magnifier Window
When Magnifier is opened, it displays three overlapped windows. The first window shows a message, displaying brief description about Magnifier. Click OK to display the second window, which displays various settings for the Magnifier. The third window shows magnified view of the screen. Note that in Figure 6.34 Help and Exit buttons appear magnified.
On-screen Keyboard: On-screen keyboard is a utility that displays a virtual keyboard on the screen and allows users with mobility impairments to type data using mouse pointer or a joystick. To open On-Screen Keyboard, click Start, point to All Programs, and then select Accessories. Now choose Accessibility and then select On-Screen Keyboard from the shortcut menu that appears (see Figure 6.35).

Figure 6.35 Using On-screen Keyboard
When On-Screen Keyboard is opened, it shows a message, displaying a brief description about the program. Click OK to access the On-Screen Keyboard. This keyboard includes three typing modes: Click to select, Hover to select, and Joystick or key to select. To access these modes, select Typing mode from the Settings menu to display the Typing Mode dialog box (see Figure 6.36).

Figure 6.36 Typing Mode Dialog Box
- Click to Select: Specifies that you want to type by clicking keyboard characters with a mouse or joystick.
- Hover to Select: Specifies that you want to type by pointing at keyboard characters with a mouse or joystick.
- Joystick or Key to Select: Specifies that you want to type by selecting highlighted keyboard characters with designated keyboard keys, mouse or joystick.
Note: The program in which you want to type characters must be active while you are using On-screen Keyboard.
System Restore: Microsoft Windows XP has included system utilities that help you recover from systems that become unstable or unreliable. System restore is one such system utility whose purpose is to restore computer to a previously known working state in the event of a problem. This is done without loss of personal files or data such as word processing documents, spreadsheets, music files, and images.
System Restore protects your computer by creating backups of vital system configurations and files. These backups are known as restore points and are used to revert the system to a previous state. This utility runs in the background and automatically creates a restore point when a trigger event occurs. Trigger events include application installations, AutoUpdate installations, Microsoft Backup Utility recoveries, unsigned-driver installations, and manual creations of restore points. To open system restore, click Start, point to All Programs, and then select Accessories. Now choose System Tools then select System Restore from the shortcut menu that appears. When System Restore is opened, it displays three options: Restore my computer to an earlier time, Create a restore point, and Undo my last restoration (see Figure 6.37).

Figure 6.37 Using System Restore
Creating a Restore Point: By default, Windows XP is configured to automatically create restore points at scheduled times or before some programs are changed. However, you can also manually create restore points. To do this, follow the steps given below:
- Select Create a restore point option and click Next.
- Select the restore point and click Next.
- Confirm the restore point.
Using a Restore Point: To restore Windows XP to a previously created restore point, follow the steps given below:
- Select Restore my computer to an earlier time option and click Next.
- The window displays in bold a list of dates available. Select the date (restoration point) and then click Next (see Figure 6.38).
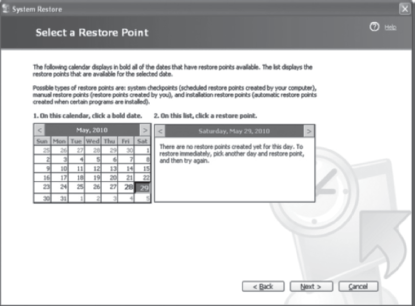
Figure 6.38 Selecting a Date
- Now Click Next to confirm the restoration point.
At this point, you have to confirm, whether you want to continue. Click Next to continue. Now, System restore shuts down all open applications and reboots the computer. After the computer reboots, a message appears on the screen, which confirms that the restoration to the restore point is complete.
Undo the Last Restoration: If the computer fails after reverting to a certain date, you can undo the restoration. Simply select Undo my last restoration option and then follow the instructions on the screen.
Note: If you restore your computer to a point before a program was installed, that program will no longer work after restoration.
Disk Cleanup: Disk Cleanup helps to create free space on your hard drive. Disk Cleanup searches your drive, and then displays temporary files, Internet cache files, and unnecessary program files that you can safely delete. To use Disk Cleanup, follow the steps given below:
- Click Start, point to All Programs, and then select Accessories. Now choose System Tools then select Disk cleanup from the shortcut menu that appears (see Figure 6.39). This displays Select Drive dialog box.
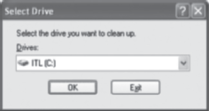
Figure 6.39 Select Drive Dialog Box
- Select the drive from the drop down box and click OK. This displays the Disk Cleanup dialog box (see Figure 6.40).
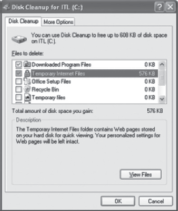
Figure 6.40 Disk Cleanup Dialog Box
- On the Disk Cleanup tab, scroll through the Files to delete list and see which kind of files Windows has selected for removal. Select any additional file types you want to delete, then click OK.
- Windows XP displays a message asking you to confirm deletion. Click Yes to delete.
Disk Defragmenter: The Disk Defragmenter utility searches your hard disk for fragmented files that have been stored in non-contiguous sectors of the disk. It then consolidates fragmented files and folders on your computer's hard disk, so that files and folders are stored in contiguous sectors. As a result, you can access files and folders faster and save new ones more efficiently. To use Disk Defragmenter, follow the steps given below:
- Click Start, point to All Programs, and then select Accessories. Now choose System Tools then select Disk Defragmenter from the shortcut menu that appears (see Figure 6.41). This displays the Disk Defragmenter window.

Figure 6.41 Disk Defragmenter Window
- Select the drive you want to defragment and click Defragment to start defragmenting.
6.11 CONTROL PANEL
Control Panel is an important part of Windows XP as it provides various options to view and adjust system settings such as adding a new hardware, adding and removing programs (software), managing user accounts, changing settings of your mouse and keyboard, and so on. To open the Control Panel, follow any of the steps given below:
- Click Start and then click Control Panel.
- Click Start and then click Run. This displays the Run dialog box. Type control or control panel and click OK or press the Enter key.
As you perform any of the above steps, the Control Panel window appears showing you various shortcut icons for adjusting system settings. Windows XP allows you to view Control Panel in either Classic View or Category View. In the Classic View, all the individual shortcut icons appear with their name while in the Category View icons are grouped into categories which are then displayed. Switching between the views can be performed by clicking on the option (Switch to Classic View or Switch to Category View) from the left side of the Control Panel window. Figure 6.42 displays Control Panel in both views.
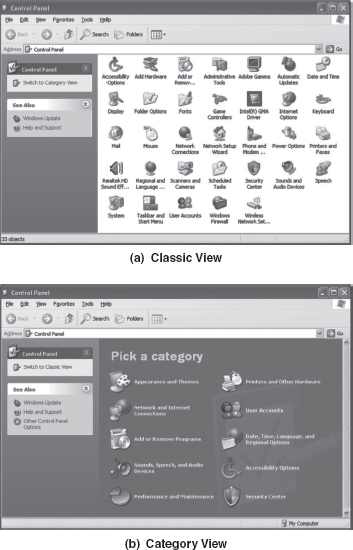
Figure 6.42 Control Panel
The description of most commonly used system settings from Control Panel is listed in (b) Category View Table 6.6.
Table 6.6 Description of Common Settings from Control Panel
| Shortcut Name | Icon | Description |
|---|---|---|
| Accessibility Options | Comprises settings aimed for disabled. | |
| Add Hardware | Allows you to add a new hardware device to the system. | |
| Add Remove Programs | Allows you to add/remove a program or Windows component. It also indicates the size an installed program is occupying and the frequency of its usage. | |
| Date and Time | Allows you to set (change) the system’s date, time, and time zone. | |
| Display | Allows you to change the display characteristics of your computer by changing desktop background, changing or disabling screen saver, specifying color styles of windows elements like menu, adjusting the screen resolution, and so on. | |
| Folder Options | Allows you specifying the settings for files or folders like should folders open in a new window or existing one, should Windows hide system files or folders as well as hidden files, etc. | |
| Fonts | Allows you to view the fonts installed in the computer as well as install new fonts and remove the existing fonts. | |
| Keyboard | Allows you to change the keyboard settings like cursor blink rate. | |
| Mouse | Allows you Customizing the mouse settings like configuring double-click and scroll speed, changing shape of pointer, swapping left and right mouse buttons, adding pointer trail, and many more. | |
| Printers and Faxes | Allows you view the installed printers and faxes. You can remove the existing printer as well as install a new printer from here. | |
| System | Allows you view and specify various settings for system including viewing the version of Windows, amount of RAM, and speed of CPU, changing the name of your computer, enabling or disabling hardware devices installed on your computer, and so on. | |
| User Accounts | Allows you creating, managing, and removing user accounts for persons who share your computer. For instance, you can specify the privileges to a user account, add, change, or remove the password, and so on. |
6.12 WINDOWS ACCESSORIES
Windows XP operating system comes with some basic accessories including Calculator, Notepad, and Paint. Let us discuss them in detail.
6.12.1 Calculator
A built-in calculator is included in the Windows operating system that works just like a hand-held calculator, except you use it on-screen rather than in your hand. The calculator can be used in any one of the two views: Standard and Scientific. In the Standard view of calculator, you perform common mathematical operations such as addition, subtraction, multiplication, division, etc. On the other hand, in the Scientific view of calculator, you perform advanced mathematical operations such as trigonometric and statistical operations, calculate logarithm, exponent, factorial and power. To open the calculator, follow any of the steps given below:
- Click Start, point to All Programs, then point to Accessories, and click Calculator from the submenu that appears.
- Click Start and then click Run. This displays the Run dialog box. Type calc and click OK or press the Enter key.
As you perform any one of the above steps, Calculator appears on screen. Note that it opens in the same view in which it was used (and closed) the last time. You can switch between the two views from the View menu. Figure 6.43 shows both view of calculator.
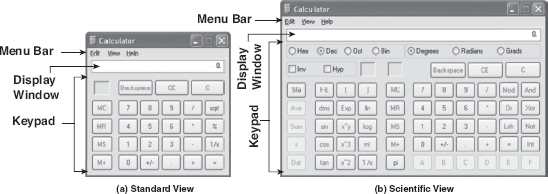
Figure 6.43 Views of Calculator
Note: You can interact with the calculator through mouse as well as keyboard.
6.12.2 Notepad
Windows accessories include a simple built-in text editor, Notepad, that help you create simple text documents as well as web pages. The default extension for the files created in Notepad is .txt. To open Notepad, follow any of the steps given below:
- Click Start, point to All Programs, then point to Accessories, and click Notepad from the submenu that appears.
- Click Start and then click Run. This displays the Run dialog box. Type notepad and click OK or press the Enter key.
As you perform any of the above steps, Notepad window appears on screen, with Untitled – Notepad in the title bar (see Figure 6.44). Notepad contains five menus, namely, File, Edit, Format, View, and Help. Each menu contains commands associated with it. For example, the File menu contains command to create, open, and save a file. Table 6.7 lists all the menus with their associated commands and their description.
Table 6.7 Menus and their associated Commands in Notepad
| Menu | Commands | Description |
|---|---|---|
| File | New | opens a new Notepad Window |
| Open | opens an already saved file | |
| Save | saves the current file | |
| Save As | saves the current file with some other name | |
| Page Setup | sets the size, orientation, and margins of the page and header and footer as well as changes the printer settings | |
| prints the current file | ||
| Exit | closes the Notepad window | |
| Edit | Undo | undoes the last action |
| Cut | cuts the text | |
| Copy | Copies the text | |
| Paste | pastes the cut or copied text | |
| Delete | deletes the selected text | |
| Find | finds the desired word or the phrase | |
| Find Next | finds the next instance of the word or the phrase | |
| Replace | replaces a word or a phrase | |
| Go To | takes the cursor to the specified line number | |
| Select All | selects the entire text in a file | |
| Time/Date | inserts the current time and date | |
| Format | Word Wrap | wraps the text on the line without affecting the way in which text appears on the printed-paper |
| Font | changes the font, font style, font size, and the script | |
| View | Status Bar | displays/hides the status bar |
| Help | Help Topics | provides help on how to use Notepad and its features |
| About Notepad | provides information about Notepad |
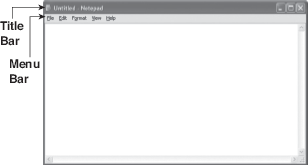
Figure 6.44 Notepad Window
6.12.3 Paint
Windows provides Paint to create and edit graphics. Paint is a simple and easy to use tool and let you work with bitmap (BMP) as well as JPEG and GIF graphics. To open Paint, follow any of the steps given below:
- Click Start, point to All Programs, then point to Accessories, and click Paint from the submenu that appears.
- Click Start and then click Run. This displays the Run dialog box. Type mspaint and click OK or press the Enter key.
As you perform any of the above steps, Paint window appears on screen, with Untitled – Paint in the title bar (see Figure 6.45). The window contains Menu Bar, Tool Box, Vertical and Horizontal Scroll Bars, Color Box, Status Bar, and a white rectangular area (called canvas), where you work with graphics.
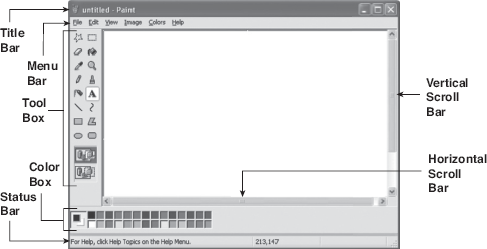
Figure 6.45 Paint Window
Menu Bar: As you can see in Figure 6.45, the Paint contains six menus, namely, File, Edit, View, Image, Colors, and Help. Table 6.8 lists all the menus with their associated commands and their description.
Table 6.8 Menus and their associated Commands in Paint
| Menu | Commands | Description |
|---|---|---|
| File | New | opens a new Paint window |
| Open | opens an already saved file | |
| Save | saves the current file | |
| Save As | saves the current file with some other name | |
| From Scanner or Camera | acquires an image from a scanner or a digital camera–this option is dimmed if a scanner or a digital camera is not installed | |
| Print Preview | displays the graphic as it will appear on the printed paper | |
| Page Setup | sets the size, orientation, and margins of the page as well as changes the printer settings | |
| prints the current file | ||
| Send | sends the graphic as an e-mail | |
| Set As Background (Tiled) | sets the graphic as a wallpaper in a manner that it covers the desktop with many repetitions of the graphic, if required | |
| Set As Background (Centered) | places the graphic in the centre of the desktop | |
| Exit | closes the Paint window | |
| Edit | Undo | undoes the last action–you can go up to three steps back |
| Repeat | re-applies the last change made to the file | |
| Cut | cuts the entire or part of the graphic | |
| Copy | copies the entire or part of the graphic | |
| Paste | pastes the cut or copied graphic | |
| Clear Selection | deselects the selected part | |
| Select All | selects the entire graphic | |
| Copy To | copies the graphic to another graphic file | |
| Paste From | pastes the contents of some other file into your active Paint file | |
| View | Tool Box | displays or hides the Tool Box |
| Color Box | displays or hides the Color Box | |
| Status Bar | displays or hides the Status Bar | |
| Text Toolbar | displays or hides the Text toolbar–this option is available only when the Text tool is selected | |
| Zoom | allows you to zoom the graphic | |
| View Bitmap | displays the graphic without the Tool Box | |
| Image | Flip/Rotate | Flip allows you to flip over the image or a selected portion of it horizontally or vertically while Rotate allows you to rotate the image or a selected portion of it–the three options for rotations are 90°, 180°, 270° |
| Stretch/Skew | Stretch allows you to elongate or shrink the image in a horizontal or vertical direction while skew allows you to change the angle of the image in a horizontal or a vertical direction | |
| Invert Colors | displays the image similar to a photographic negative | |
| Attributes | changes the basic image size, that is, its height and width, which can be measured in pixels, inches, or centimeters | |
| Clear Image | wipes out the entire image leaving a blank area with the same image and dimension as earlier | |
| Draw Opaque | works with the selection–if unchecked, any background color in your selection is treated as transparent, otherwise, the background color remains opaque when the selection is moved in the image | |
| Color | Edit Colors | allows you to edit the colors |
| Help | Help Topics | provides help on how to use Paint and its features |
| About Paint | provides information about Paint |
Tool Box: The Tool Box contains several tools for creating drawings and text, selecting and erasing part of images, filling colors in images, and so on. Table 6.9 lists all the tools available in the Tool Box along with their description.
Table 6.9 Tools available in the Tool Box
| Tool | Buttons | Description |
|---|---|---|
| Free-Form Select | used to select the irregular part of an image for copying or cutting | |
| Select | used to select the rectangular area of an image for copying or cutting | |
| Eraser/Color Eraser | used to erase the parts of an image | |
| Fill with Color | used to fill colors in an image with the currently selected color | |
| Pick Color | used to select the color of any portion of the image you click on | |
| Magnifier | used to magnify the image | |
| Pencil | used to draw anything freehand | |
| Brush | used to draw thick lines of different shapes and widths | |
| Airbrush | used to spray color on the images | |
| Text | used to enter text into the drawing area | |
| Line | used to draw straight lines | |
| Curve | used to draw curved lines | |
| Rectangle | used to draw rectangles and squares | |
| Polygon | used to draw polygons | |
| Ellipse | used to draw circles and ovals | |
| Rounded Rectangle | used to draw squares or rectangles with curved corners |
Color Box: The Color Box contains several colors and lets you select a color for image. In the left-end of the Color Box is a color overlapping another color. The color on the top is the foreground color and the color in the bottom is the background color. To change the foreground color, left-click a color in the Color Box while to change the background color, right-click a color in the Color Box.
Scroll Bar: Paint window has two scroll bars: vertical and horizontal. These scroll bars let you scroll and view the portion of image currently not visible on the screen.
Status Bar: The Status bar displays messages and measurements as you work in paint. For example, it displays the information related to a tool as mouse is moved over it in the Tool Box.
Let Us Summarize
- Windows XP operating system is a product of Microsoft and is a part of Windows family of operating system.
- The new interface of Windows XP provides more stable and reliable environment than the earlier versions of Windows.
- The desktop of Windows XP contains several icons menus, dialog boxes, and shortcuts to various applications on the screen representing programs, files, and options on the computer.
- The taskbar, which is by default placed on the bottom of the taskbar, is a link to open and close various applications and programs present in the computer.
- The taskbar can be customized according to the user's preferences such as locking and hiding the taskbar, showing or hiding the Quick Launch, and so on.
- To organize the desktop icons, right click anywhere on the desktop and select Arrange Icons By option to arrange the icons on the desktop according to name, size, or type.
- Screen Saver is an in-built facility that appears on the computer screen, when mouse or keyboard has not been used for a specified period. This facility is used to prevent the phosphor element present in the monitor.
- My Computer icon is placed on the desktop to allow users to access disk drives, view and manage files and folders and also access Control Panel and installed printers.
- There are five views in Windows XP: Thumbnails, Tiles, Icons, List, and Details. All these views show the name of files and folders.
- A file is an organized and structured collection of related information stored in the computer's memory.
- A folder is a collection of files and subfolders. Any file or folder can be renamed, moved or copied to any other location on the computer.
- Recycle Bin is a temporary storage area where the user moves the files and folders no longer needed. In case, you want to restore the deleted items, right click on the item and click Restore to restore it back to the original location.
- Windows Explorer is a useful feature in Windows XP that allows the users to organize files and folders stored on the computer in an efficient manner.
- Windows XP provides an exhaustive Help and Support Centre. This includes help topics, tutorials, troubleshooting, and other support services.
- To search the saved documents in the computer, Windows XP provides the Basic Search and Advanced Search.
- The main utilities of Windows XP include Narrator, Magnifier, On-screen Keyboard, Disk Cleanup, Disk Defragmenter, and Back up.
- Narrator is a text-to-speech utility for the virtually impaired people.
- Magnifier is an accessibility utility that makes the screen more readable for users who have impaired vision. It operates by creating a separate window that displays a magnified portion of the screen.
- On-screen Keyboard utility displays a virtual keyboard on the screen and allows users with mobility impairment to type data using mouse pointer and joystick.
- System Restore utility includes system utilities that help in recovering from systems that become unstable and unreliable. It protects the computer by creating back-ups of vital system configurations and files.
- Disk Defragmenter utility searches the hard disk for fragmented files that have been stored in non-contiguous sectors of the disk.
- Control Panel is an important part of Windows XP as it provides various options to view and adjust system settings. Windows XP allows you to view Control Panel in either Classic View or Category View.
- Windows XP operating system comes with some basic accessories including Calculator, Notepad, and Paint.
Exercises
Fill in the Blanks
- By default, the taskbar in Windows XP is located at the...............of the desktop.
- Windows XP is available in two versions: ............... and ...............
- The desktop contains icons, which are ............... representing any utility or program.
- You can arrange the icons by name, ............... , ..............., and date.
- Screen Saver is used to prevent damage to ............... element in the monitor.
- Menu Bar contains different ............... to control, options, functions, and commands.
- ............... view is used to arrange the items in an order.
- ............... button returns the window to its original size as it was before the maximized state.
- ............... utility displays a virtual keyboard on the screen.
- For the users having impaired vision, Windows XP provides a utility called ............... to make the screen more readable.
Multiple-choice Questions
- Which of the following is by default displayed in Quick Launch toolbar?
- My Computer
- Show Desktop
- Tools menu
- My Documents
- To permanently delete a file or folder from the computer, which of the following keys must be pressed?
- Ctrl+Delete
- Alt+Delete
- Delete+Enter
- Shift+Delete
- Which of the following is not an option in Taskbar and Start Menu Properties dialog box?
- Lock the Task Bar
- Auto-Hide the Taskbar
- Shut Down
- Show Quick Launch
- Which of the following files and folders does Recycle Bin store?
- Hidden files and folders
- Deleted files and folders
- Files and folders in Floppy Drive
- None of these
- Which of the following options is present in the Display Properties dialog box?
- Desktop
- Appearance
- Themes
- All of these
- The functions of Windows Explorer is to ...............
- Organize files and folders
- Change the settings
- Add new programs
- All of these
- Which of the following tools is used to draw thick lines of different shapes and widths in Paint?
- Brush
- Pencil
- Magnifier
- Airbrush
- Collections of sounds, icons, fonts, colours, and screen saver are known as ...............
- Appearance
- Themes
- Colours
- Settings
- Which of the following utilities is used to search hard disk for fragmented files?
- Disk Cleanup
- System Restore
- Disk Defragmenter
- Back up
- Which of the following is the shortcut key to Windows Help and Support Centre?
- F11
- F1
- Shift+F1
- Shift+F11
State True or False
- The settings of Windows XP once set cannot be changed.
- Title Bar contains the Maximize, Restore, and Close buttons.
- Date and Time Properties dialog box displays the system date and time.
- After a user places a file or folder on desktop, there is no way to arrange the desktop icons.
- The Windows Help and Support Centre provides the option to search a specific topic in it.
- The System Restore utility and the Restore button perform the same task.
- Details view provides the details such as type and size of files and folders in a column wise manner.
- Network Drive allows access to a drive that is stored on the network server.
- Files and folders once deleted by Shift+Delete keys cannot be restored from Recycle Bin.
- User can create shortcut of their files and folders on the desktop.
Descriptive Questions
- What are desktop icons? Describe some of the desktop icons.
- Discuss the features of Windows XP.
- Write short notes on the following.
- Address Bar and Status Bar
- Narrator
- Disk Defragmenter
- Themes
- Windows Explorer
- Calculator
- What are restore points? How can you create and use restore points?
- What are the advantages of On-Screen keyboard over physical keyboard?
- List some of the Start menu items along with their functions.
- What is Disk Cleanup? List the steps to use Disk Cleanup.
- Discuss Control Panel.
ANSWERS
Fill in the Blanks
- Bottom
- Windows XP Home, Windows XP Professional
- Graphic symbols
- Type, size
- Phosphor
- Submenus
- List
- Restore
- On-Screen keyboard
- Magnifier
Multiple-choice Questions
- (b)
- (d)
- (c)
- (b)
- (d)
- (a)
- (a)
- (b)
- (c)
- (b)
State True or False
- False
- True
- True
- False
- True
- False
- True
- True
- True
- True