
Chapter 7
Overview of Microsoft Windows 7
This chapter familiarizes the reader with Windows 7, which is the latest version of Windows operating system released by Microsoft. The chapter begins with discussion on different available editions of Windows 7, which helps the users to select the appropriate edition according to their requirements. Then discussion moves on to the new features introduced in Windows 7 such as Aero interface, gadgets, jump lists and various Aero effects. Finally, some of the new Accessories programs included in Windows 7 such as Sticky Notes, Math Input Panel and Snipping Tool are discussed.
After reading this chapter, you will be able to understand:
Different editions of Windows 7
New features of Windows 7
New Accessories offered by Windows 7
7.1 INTRODUCTION
The latest version of Windows operating system, that is, Windows 7 has been released by Microsoft in 2009 to be used on home and business desktops, laptops, Tablet PCs, netbooks and media Center PCs. Windows 7 provides enhanced user interface making it more user-friendly, improved performance to get the tasks done efficiently, new level of security to protect precious data from unauthorized access, and so on.
Advancements in handwriting and speech recognition, support for virtual hard disk and multi-touch, and redesigned taskbar are some of the new features in Windows 7. One more noticeable change is that some of the applications that have been included with prior releases of Windows including Windows Movie Maker, Windows Mail, Windows Calendar and Windows Photo Gallery are not included in Windows 7. The reason for removal is that these applications demand frequent updates than the operating system itself. These applications are now freely available from the Microsoft website as a separate package called Windows Live Essential.
7.2 DIFFERENT EDITIONS OF WINDOWS 7
Microsoft has released Windows 7 in six different editions, namely, Windows 7 Starter, Windows 7 Home Basic, Windows 7 Home Premium, Windows 7 Professional, Windows 7 Enterprise and Windows 7 Ultimate. Among these editions, only three—Home Premium, Professional and Ultimate—are widely available for sale in most countries; other editions are targeting other markets such as the developing world or are available for enterprise use only.
FACT FILE
Upgrading to Higher Edition of Windows 7
According to Microsoft, installation of Windows 7 stores all the features of every edition on the machine (irrespective of the edition in use). However depending upon the edition, some features may be locked. Users who want to upgrade to a new edition can use Windows Anytime Upgrade (WAU) to purchase an upgrade, which contains product key only, and unlock the features of that edition by just entering the product key. Hence, upgrading to a new edition of Windows 7 does not require re-installation.
- Windows 7 Starter: It is the most basic edition of Windows 7 and contains the fewest features of all the Windows 7 editions. It includes some strange restrictions like the inability to change the default desktop wallpaper. The Starter edition usually comes pre-installed on computers by the computer manufacturers or dealers. It has been specifically designed for notebook computers and netbooks.
- Windows 7 Home Basic: It contains features that make them suitable for home users. This edition is not available in some parts of the world including North America, Australia, and Western and Central Europe.
- Windows 7 Home Premium: Like the Home Basic edition, this edition is also intended for home users; however, it contains some new features such as touch-screen support, Aero effects, etc., that have been excluded from the Home Basic edition.
- Windows 7 Professional: It is suited for small business users as it provides support for being used as a Remote Desktop server, location aware printing, Encrypting File System and so on.
- Windows 7 Enterprise: It targets the enterprise segment with features including Multilingual User Interface, UNIX application support and BitLocker Drive Encryption. This edition is not available through retail market; instead it is sold by Microsoft through volume licensing to the companies that have Software Assurance contract with Microsoft.
- Windows 7 Ultimate: It contains exactly the same features as the Windows 7 Enterprise edition. The only difference is that the Ultimate edition is available on an individual license basis. Hence, individuals can purchase the Windows 7 Ultimate edition.
Note: Each edition of Windows 7 includes features that are available in its previous edition.
7.3 NEW STYLE OF WINDOWS 7
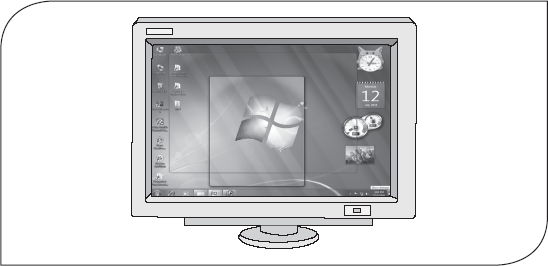
As you start Windows 7, you will be greeted with a new look and style of desktop including Aero themes, gadgets, redesigned taskbar and Start menu, and Jump lists (see Figure 7.1). All the basic elements of Windows like icons, menus, dialog window, etc., have been redesigned to provide better visuals. The new Aero interface of Windows 7 takes advantage of the latest graphics hardware and provides smoother window handling, enhanced animations and glass visual effects (transparencies).
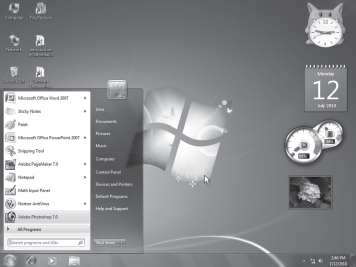
Figure 7.1 Windows 7 Desktop
7.3.1 Aero Themes
An Aero theme is the combination of one or more desktop backgrounds, window colour, sounds and screen saver. Some Aero themes include desktop icons and mouse pointers also. You can apply any of the themes to change the desktop background, window colour, sound and screen saver simultaneously. Moreover, you can make the desktop backgrounds to change automatically after a specified time interval using the desktop slide show feature of Windows 7.
To create a slide show, follow the steps given below:
- Right-click on a blank area of the desktop and select Personalize from the menu that appears. A window similar to the one shown in Figure 7.2 appears.
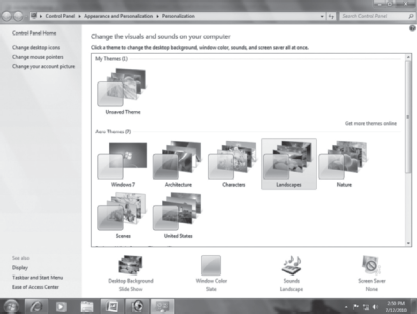
Figure 7.2 Personalization
- Click a theme under the Aero Themes section to apply it to the desktop. Note that all the Aero themes except Windows 7 include slide show.
- Click Desktop Background to change the default slide show pictures or settings of the theme. This displays the Desktop Background window (see Figure 7.3).
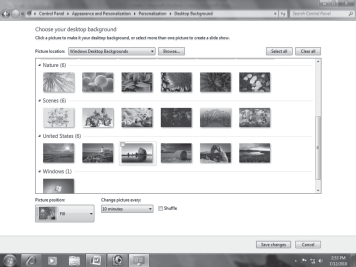
Figure 7.3 Desktop Background Window
- Select the pictures that you want to add to the slide show. For this, follow any of the steps given below:
- To select the pictures provided as a part of Aero themes, place the mouse over the picture that you want to add and select the check box on the top left corner of the picture. Alternatively, click on the desired pictures while holding down the Ctrl key (see Figure 7.4).

Figure 7.4 Selecting Pictures for Slide Show
- To select all the pictures of all the Aero themes at once, click the Select All button.
- To select your own pictures, click the Browse button to locate the folder on the computer from which you want to add the pictures.
Note that you must select more than one picture to create the slide show.
- To select the pictures provided as a part of Aero themes, place the mouse over the picture that you want to add and select the check box on the top left corner of the picture. Alternatively, click on the desired pictures while holding down the Ctrl key (see Figure 7.4).
- Click the down arrow under the Picture position and select an option from the list. For example, select Fill to crop the pictures to fill the screen, Fit to fit the pictures to the screen, Stretch to stretch the pictures to fit to the screen, Tile to tile the pictures, or Centre to place the pictures at the centre of the screen.
- Click the down arrow under the Change picture every option and select the time from the list to specify how quickly the desktop background should change.
- Select the Shuffle check box if you want the pictures to appear in random order.
- Click the Save changes button.
7.3.2 Gadgets
Gadgets are mini programs that provide quick access to information and frequently used tools. For example, you can have a gadget that provides news headlines in order to keep yourself updated. Windows 7 includes many gadgets and you can download more gadgets from Microsoft's web site and install them on the machine.
You can place multiple gadgets or more than one instance of a gadget on the desktop. To add a gadget to the desktop, follow the steps given below:
- Right-click on a blank area of the desktop and select Gadgets from the menu that appears. This displays a window showing all the gadgets installed on the machine (see Figure 7.5).
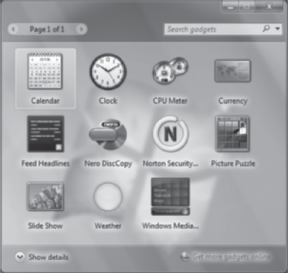
Figure 7.5 Gadgets in Windows 7
- Double-click a gadget to add it to the desktop.
Once a gadget has been added to the desktop, you can move it freely (by dragging) to place it wherever you want. In case you do not want a gadget any more on the desktop, you can remove it from the desktop. For this, right-click the gadget and select Close Gadget from the menu that appears.
Note: Every gadget placed on the desktop has some buttons associated with it that appear only when you place the mouse pointer over the gadget. These buttons can be used to close the gadget, drag it, change its options and resize it.
7.3.3 Taskbar
The taskbar has undergone the major modifications in Windows 7. You may immediately notice that it is taller than the taskbar in the previous versions of Windows. One main reason for making it taller is to enable it to accommodate the touch screen input.
As shown in Figure 7.6, the taskbar has three main sections: the Start button (![]() ), the middle section and the notification area. The Start button, when clicked, opens the Start menu (discussed in Section 7.3.4). The middle section of the taskbar is the one that you use frequently. It shows buttons corresponding to the programs or files that you have currently open. By default, it displays only three buttons corresponding to Internet Explorer 8, Media Player and Windows Explorer program. Afterwards, every time you open a program, file or folder, Windows creates a corresponding button on the taskbar. The taskbar button of the active program is always highlighted. Each taskbar button displays an icon that helps you identify the open program. You can click a button to open the respective program as well as can switch between several open programs using the taskbar.
), the middle section and the notification area. The Start button, when clicked, opens the Start menu (discussed in Section 7.3.4). The middle section of the taskbar is the one that you use frequently. It shows buttons corresponding to the programs or files that you have currently open. By default, it displays only three buttons corresponding to Internet Explorer 8, Media Player and Windows Explorer program. Afterwards, every time you open a program, file or folder, Windows creates a corresponding button on the taskbar. The taskbar button of the active program is always highlighted. Each taskbar button displays an icon that helps you identify the open program. You can click a button to open the respective program as well as can switch between several open programs using the taskbar.

Figure 7.6 Windows 7 Taskbar
At the right side of the taskbar is the notification area (see Figure 7.6). This area contains a clock that tells the system's date and time. In addition, it contains a group of icons that indicate the status of certain programs installed on the computer and certain computer settings. For example, whether anti-virus installed on the machine is enabled, its virus definitions are up to date, and so on. As you move the mouse pointer over an icon in the notification area, the name of the icon or the status of setting appears in a tooltip. Clicking the icon opens the program or associated settings. For example, clicking the volume icon (![]() ) shows the volume controls using which you can set the volume.
) shows the volume controls using which you can set the volume.
Note: Windows 7 hides some icons in the notification area to reduce clutter. These hidden icons can be displayed temporarily by clicking the Show hidden icons button (![]() ) in the notification area.
) in the notification area.
Thumbnails: Recall that every open window has a corresponding button on the taskbar. When you place the mouse pointer over a button on the taskbar, a small preview of the open window(s) associated with that button appears over the taskbar (see Figure 7.7). This preview is called thumbnail.
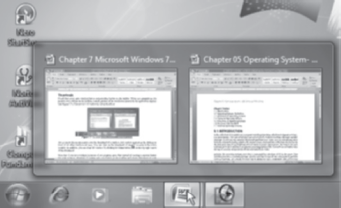
Figure 7.7 Thumbnails
As you move the mouse pointer over the thumbnail of a window, that window appears on the desktop in front of all other windows (if any). You can click on the thumbnail of any window to make it the active window. In addition, you can close the window by clicking the Close button (![]() ) at the top right corner of the thumbnail.
) at the top right corner of the thumbnail.
Note that if you open multiple instances of the same program, then instead of creating a separate button for each instance, Windows 7 creates only one button on the taskbar and shows thumbnail of each instance as you place the mouse pointer over the button.
7.3.4 Start Menu
Start menu provides a common way to perform varied activities such as starting various programs, accessing commonly used folders, searching for files, folders, and programs, getting help for Windows, adjusting the computer settings, etc. You can open the Start menu by clicking the Start button (![]() ) on the taskbar or by pressing the Windows logo key (
) on the taskbar or by pressing the Windows logo key (![]() ) on the keyboard.
) on the keyboard.
As shown in Figure 7.8, Start menu is divided into three basic parts: left pane, right pane and search box. The left pane shows a short list of programs installed on the machine. You can view the complete list of programs by clicking All Programs. The right pane provides quick access to the commonly used folders and files as well as the computer settings. In addition, you can log off, restart or shutdown the system from the right pane. The third part of the Start menu is the search box. The search box lets you search files, folders or whatever you want. As you type in the search box, Windows searches instantly and provides you with the search results. This makes the searching easier and faster. You can also open programs by typing the name of their executable file in the search box. For example, type winword to open Microsoft Word.
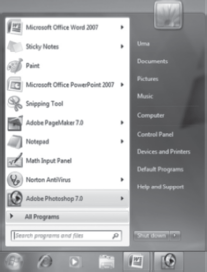
Figure 7.8 Start Menu
7.3.5 Aero Effects
Windows 7 comprises several Aero effects that not only tend to improve the visual experience but also ease the task of managing different windows. These effects include Aero Flip 3D, Aero Peek, Aero Shake and Aero Snap.
Aero Flip 3D: Aero Flip 3D allows you to preview all the open files and folders simultaneously without clicking on the taskbar. For this, press the Windows logo key (![]() )+Tab key. As you press these keys, Windows 7 arranges all the open windows in a three-dimensional stack (see Figure 7.9) that you can easily flip through.
)+Tab key. As you press these keys, Windows 7 arranges all the open windows in a three-dimensional stack (see Figure 7.9) that you can easily flip through.
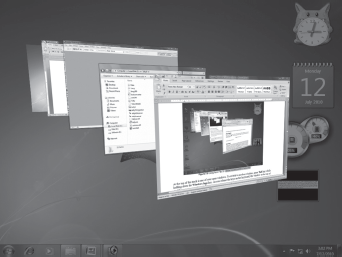
Figure 7.9 Using Aero Flip 3D
At the top of the stack is one of your open windows. To switch to another window, press the Tab key while holding down the Windows logo key. As you release the keys on the keyboard, the window at the top of stack becomes your active window.
Aero Peek: While working, there may be time when you have multiple windows open (and stacked onto one another) simultaneously. To view the desktop by minimizing all the open windows one by one is time-consuming. Alternatively, you can use Windows 7 Aero Peek that allows you to temporarily view the desktop. For this, just place the mouse pointer over the Show desktop button (a semi-transparent rectangular button) at the right-most corner of the taskbar. Doing this fades all the open windows to let you temporarily view the desktop along with its folders and gadgets and Sticky Notes placed on it (see Figure 7.10). As you move the mouse pointer away from the button, all the windows get restored automatically.
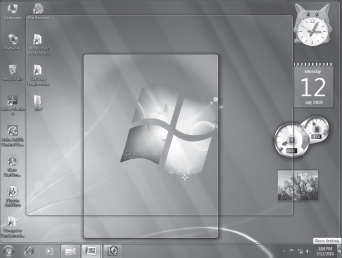
Figure 7.10 Viewing Desktop using Aero Peek
In addition to temporarily view the desktop, you can click the Show desktop button to minimize all the open windows to let you see the desktop. In that case, clicking the Show desktop button again will restore the open windows.
Aero Shake: Aero Shake allows you to minimize all the open windows except the desired one. This saves time when you want to focus on single window and minimize all other open windows. For using this feature, click on the title bar of the window you want to keep open and drag the mouse back and forth quickly. Note that this minimizes all the open windows except the one that you are shaking. In addition, some windows like dialog boxes cannot be minimized. Hence, these remain open on the desktop. To restore all the windows, shake the open window again.
Aero Snap: You can arrange two open windows side by side on the screen using Windows 7 Aero Snap feature. This is helpful while comparing contents of two files or copying files from one folder to another. To arrange two windows side by side on the screen, follow the steps given below:
- Click the title bar of a window and drag it to one side of the screen.
- Release the mouse when you see an outline of the window (see Figure 7.11 (a)). The window will expand to fill the outline.
- Perform step 1 and step 2 for another window. But this time, drag to an opposite side on the screen (see Figure 7.11 (b)).
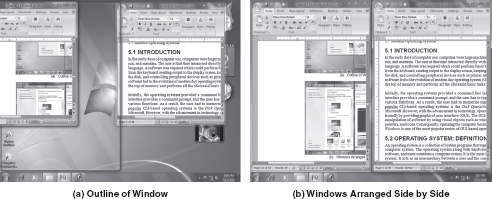
Figure 7.11 Using Aero Snap
7.3.6 Jump Lists
Jump list is a new feature of Windows 7 that provides you quick access to the recently and frequently accessed items (such as files, folders or websites) of some specific program that is used to open those items. You can open any item appearing in the Jump list by just clicking on it.
Jump lists are available for the programs that are pinned to the Start menu or the taskbar. In addition, Windows 7 offers Jump lists on the taskbar for the currently running programs also. To view the Jump list for a program on the Start menu, point to any program in the left pane of the Start menu that contains a right arrow (![]() ) beside it. As you do this, you will see a Jump list corresponding to that program in the right pane. Figure 7.12 (a) shows the Jump list for the Microsoft Office Word 2007 program in the right pane of the Start menu. On the other hand, you can view the Jump list for a program on the taskbar by right-clicking on the program icon. Figure 7.12 (b) shows the Jump list for the Windows Explorer program on the taskbar.
) beside it. As you do this, you will see a Jump list corresponding to that program in the right pane. Figure 7.12 (a) shows the Jump list for the Microsoft Office Word 2007 program in the right pane of the Start menu. On the other hand, you can view the Jump list for a program on the taskbar by right-clicking on the program icon. Figure 7.12 (b) shows the Jump list for the Windows Explorer program on the taskbar.
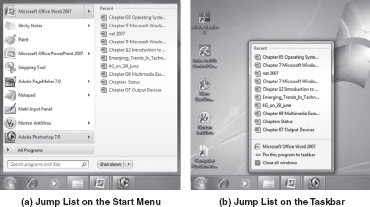
Figure 7.12 Jump Lists
7.4 WINDOWS 7 ACCESSORIES
Windows 7 includes a wide variety of accessories/programs such as Calculator, Command Prompt, Connect to a Network Projector, Math Input Panel, Snipping Tool, Sound Recorder, Sticky Notes, etc. All these programs are grouped under the Accessories folder available in All Programs on the Start menu (see Figure 7.13).
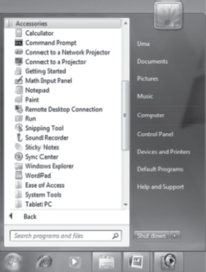
Figure 7.13 Windows 7 Accessories
Some of the Windows 7 accessories are already available in earlier versions of Windows (Windows XP) while others are entirely new. Let us discuss some of the new accessories offered by Windows 7.
Sticky Notes: Sticky Notes are used to write down something like a to-do list, someone's phone number, a note to remind you anything, etc. They are placed on the desktop. Figure 7.14 displays a Sticky Note with some text in it.
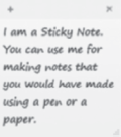
Figure 7.14 A Sticky Note
Creating a Sticky Note is simple. Just follow the steps given below:
- Click Sticky Notes under the Accessories folder on the Start menu. A Sticky Note appears on the screen with the blinking cursor.
- Type the text you want.
Once a Sticky Note has been added, you can add more by clicking the New Note button (![]() ) on its top-left corner. Alternatively, you can press Ctrl+N to add more Sticky Notes. You can also resize a Sticky Note. For this, position the mouse pointer on any side of the Sticky Note and when mouse pointer changes to a double-ended arrow, click and drag.
) on its top-left corner. Alternatively, you can press Ctrl+N to add more Sticky Notes. You can also resize a Sticky Note. For this, position the mouse pointer on any side of the Sticky Note and when mouse pointer changes to a double-ended arrow, click and drag.
Note: To close a Sticky Note, click the Delete Note button (![]() ) on its top-right corner.
) on its top-right corner.
Math Input Panel: Sometimes, you may need to use mathematical equations while working in a document. In earlier versions of Windows, it was quite difficult to specify mathematical expressions. However, Windows 7 makes it easier for you to write mathematical equations in a natural way with the help of Math Input Panel. This program allows you to directly write the simple or complex mathematical expressions just like on a notebook paper. As you write, the in-built math recognizer of Windows 7 recognizes your handwritten expression. You can then transfer the recognized math into your document.
The Math Input Panel basically has been designed to be used with a tablet pen on a tablet PC but you can also use it with other input devices such as mouse, touch screen or external digitizer. To use the Math Input Panel, follow the steps given below:
- Click Math Input Panel under the Accessories folder on the Start menu. Alternatively, type mip in the search box on the Start menu and press Enter. The Math Input Panel program basic window consisting of a menu bar and writing area appears (see Figure 7.15).
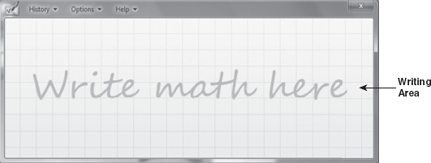
Figure 7.15 Basic Window of Math Input Panel
- Write the mathematical expression in the writing area. As you start writing, the basic window converts to markup window that shows the preview area and editing tools (see Figure 7.16). The preview area shows the recognized math. If some part of the expression has not been recognized correctly, it can be corrected using the editing tools.
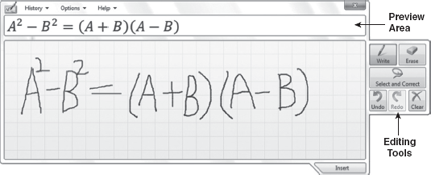
Figure 7.16 Markup Window of Math Input Panel
- Click the Insert button to put the recognized math into your document.
Note: Using the Math Input Panel, you can insert math into only those programs which support Mathematical Markup Language (MathML). Microsoft Office 2007 is an example of such program.
Snipping Tool: Snipping Tool is used to capture a snapshot (called snip) of any object, window or a part of window on your desktop. Once you capture an image, you can annotate it with handwritten comments, save it as an HTML, PNG, GIF or JPEG file, or send it via e-mail from within the Snipping Tool program window.
Snipping Tool enables you to capture the following types of snips.
- Free-form Snip: Enables to capture a free-form-shaped snip by drawing irregular lines around the area you want to capture.
- Rectangular Snip: Enables to capture a rectangle-shaped snip by dragging the mouse pointer to form a rectangle around the area you want to capture.
- Window Snip: Enables to select a window like a dialog box or browser window that you want to capture.
- Full-screen Snip: Enables to capture the entire screen just like the Print Screen key on the keyboard.
To capture a rectangular snip, follow the steps given below:
- Click Snipping Tool under the Accessories folder on the Start menu. The Snipping Tool window appears on the screen (see Figure 7.17).
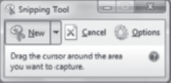
Figure 7.17 Snipping Tool
- Click the down arrow beside the New button and select the Rectangular Snip from the list.
- Click and drag the mouse pointer to select the area on the screen you want to capture. As you start selecting, the Snipping Tool window disappears and after you complete the selection and release the mouse button, the Snipping Tool markup window appears showing the captured image (Figure 7.18).
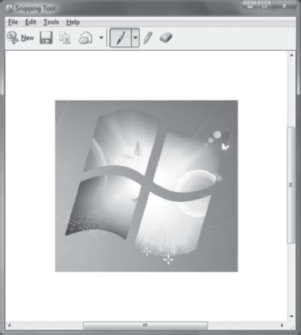
Figure 7.18 Snipping Tool Markup Window with Captured Image
- Perform the desired changes to the captured image such as adding comments, highlighting some specific area, etc.
- Click the Save button present on the toolbar to save the image.
Let Us Summarize
- The latest version of Windows operating system is Windows 7 that has been released by Microsoft in 2009 to be used on home and business desktops, laptops, Tablet PCs, netbooks and media centre PCs.
- Microsoft has released Windows 7 in six different editions, namely, Windows 7 Starter, Windows 7 Home Basic, Windows 7 Home Premium, Windows 7 Professional, Windows 7 Enterprise and Windows 7 Ultimate.
- In Windows 7, all the basic elements of Windows, like icons, menus, dialog window, etc., have been redesigned to provide better visuals. The new Aero interface takes advantage of the latest graphics hardware and provides smoother window handling, enhanced animations and glass visual effects (transparencies).
- An Aero theme is the combination of one or more desktop backgrounds, window colour, sounds, and screen saver. Some Aero themes include desktop icons and mouse pointers also. You can apply any of the themes to change the desktop background, window colour, sound and screen saver simultaneously.
- The desktop slide show feature of Windows 7 allows the desktop backgrounds to change automatically after some specified time interval.
- Gadgets are the mini programs that provide quick access to information and frequently used tools. Windows 7 includes many gadgets and you can download more gadgets from Microsoft's website and install them on the machine.
- Every time you open a program, file or folder, Windows creates a corresponding button on the taskbar. When you place the mouse pointer over a taskbar button, a small preview of the open window(s) associated with that button appears over the taskbar. This preview is called thumbnail.
- Start menu is divided into three basic parts: left pane, right pane and search box. The left pane shows a short list of programs installed on the machine. The right pane provides quick access to the commonly used folders and files as well as the computer's settings. The search box lets you search for files, folders or whatever you want.
- Windows 7 comprises several Aero effects that not only tend to improve the visual experience but also ease the task of managing different windows. These effects include Aero Flip 3D, Aero Peek, Aero Shake and Aero Snap.
- Aero Flip 3D allows you to preview all the open files and folders simultaneously without clicking on the taskbar. Using this feature, you can preview all the open windows arranged in the form of a three-dimensional stack that you can easily flip through.
- Aero Peek allows you to temporarily view the desktop and all its folders as well as gadgets and Sticky Notes placed on it by fading down all the open windows.
- Aero Shake allows you to minimize all the open windows except the desired one. For this, click on the title bar of the window you want to keep open and drag the mouse back and forth quickly.
- Aero Snap allows you to arrange two open windows side by side on the screen. This is helpful while comparing contents of two files or copying files from one folder to another.
- Jump list is a new feature of Windows 7 that provides you quick access to the recently and frequently accessed items (such as files, folders or websites) of some specific program that is used to open those items. You can open any item appearing in the jump list by just clicking on it.
- Sticky Notes are used to write down something like a to-do list, someone's phone number, a note to make you remind of anything, etc. They are placed on the desktop.
- Math Input Panel allows you to directly write the simple or complex mathematical expressions just like on a notebook paper and the in-built math recognizer of Windows 7 recognizes your handwritten expression. You can then transfer the recognized math into your document.
- Snipping Tool is used to capture a snapshot (called snip) of any object, window or a part of a window on your desktop. Once you capture an image, you can annotate it with handwritten comments, save it as an HTML, PNG, GIF or JPEG file, or send it via e-mail from within the Snipping Tool program window.
Exercises
Fill in the Blanks
- .......... edition usually comes pre-installed on computers by the computer manufacturers or dealers.
- The ............ interface of Windows 7 takes advantage of latest graphics hardware and provides smoother window handling, enhanced animations and glass visual effects (transparencies).
- ............ are the mini programs that provide quick access to information and frequently used tools.
- By default, the taskbar displays only three buttons corresponding to ..........., Media Player, and ............ program.
- ........... provides a common way to perform varied activities such as starting various programs, accessing commonly used folders, searching for files, folders and programs, etc.
- ............ contains a group of icons that indicate the status of certain programs installed on the computer.
- ............ feature of Windows 7 lets you temporarily view the desktop along with the folders, gadgets and Sticky Notes placed on it by fading all other open windows.
- You can open the Start menu by clicking the ......... button on the taskbar or by pressing the ........... key on the keyboard.
- You can open Microsoft Word program by typing .......... in the search box on the Start menu.
- ............. provides you quick access to the recently and frequently accessed items (such as files, folders or websites) of some specific program that is used to open those items.
Multiple-choice Questions
- Windows 7 was released in ...........
- 2009
- 2008
- 2010
- None of these
- Which of the following editions of Windows 7 is not available through retail market?
- Ultimate
- Home Professional
- Enterprise
- Starter
- Which feature of Windows 7 allows the desktop backgrounds to change automatically after some specified time interval?
- Desktop slide show
- Gadget
- Aero theme
- Jump list
- Which combination of keys on the keyboard arranges all the open windows in a 3D stack that you can easily flip through?
- Alt+Tab
- Windows logo key+Tab
- Ctrl+Tab
- Shift+Tab
- Which feature allows you to arrange two open windows side by side on the screen?
- Aero Snap
- Aero Shake
- Aero Peek
- None of these
- Using Snipping Tool, you can save your snip as ..........
- PNG file
- GIF file
- JPEG file
- All of these
- The ............ snip enables to select a window like dialog box or browser window that you want to capture.
- Rectangular
- Window
- Free-form
- Full-screen
- How many editions of Windows 7 have been released by the Microsoft?
- Five
- Seven
- Six
- Four
- Which of the following applications is no longer a part of Windows 7?
- Windows Media Player
- WinZip
- Windows Media Centre
- Windows Photo Gallery
- An Aero theme is the combination of one or more desktop backgrounds, ............, ............., and screen savers.
- Window colour, Sounds
- Desktop icons, Gadgets
- Sounds, Gadgets
- Window colour, Gadgets
State True or False
- You can make any open window active by clicking on its thumbnail.
- Using the Aero Shake feature, dialog boxes cannot be minimized.
- The taskbar in Windows 7 is smaller than it was in previous versions of Windows.
- Aero Snap feature allows you to minimize all the open windows to let you view the desktop.
- If you open multiple instances of the same program, Windows 7 creates a separate button for each instance on the taskbar.
- The Math Input Panel basically has been designed to be used with a tablet pen on a tablet PC.
- In Windows 7, the Show desktop button is placed at the left-most corner of the taskbar.
- You can view the Jump list for a program on the taskbar by right-clicking on the program icon.
- The taskbar button of the active program is always highlighted.
- Windows 7 Home Basic edition includes features like touch-screen support, Aero effects, etc.
Descriptive Questions
- Describe the various editions of Windows 7 released by Microsoft.
- List the steps for creating a slide show of the pictures provided by Windows as a part of Aero themes.
- Discuss some changes that you have noticed in the taskbar in Windows 7.
- What is the purpose of the Aero Snap feature? How would you use it?
- Mention the steps for using the Snipping Tool to capture a dialog box window.
- Write short notes on:
- Gadgets
- Aero Shake
- Jump lists
- Thumbnails
- What do you mean by Sticky Notes? Write down the steps for creating a Sticky Note.
- What is Math Input Panel? How can we use it?
ANSWERS
Fill in the Blanks
- Windows 7 Starter
- Aero
- Gadgets
- Internet Explorer 8, Windows Explorer
- Start menu
- Notification area
- Aero Peek
- Start, Windows logo
- Winword
- Jump list
Multiple-choice Questions
- (a)
- (c)
- (a)
- (b)
- (a)
- (d)
- (b)
- (c)
- (d)
- (a)
State True or False
- True
- True
- False
- False
- False
- True
- False
- True
- True
- False