
In JIRA, you can see that user details are formatted with the full name and a link to the user's profile within the application. For example, when the issues are displayed in the issue navigator, the assignee and reporter are displayed as follows:
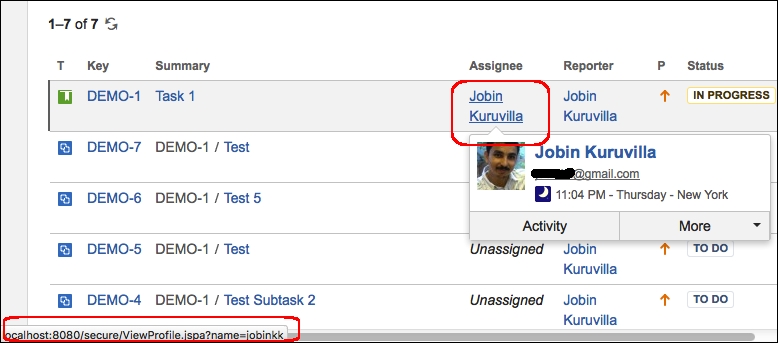
You can see that the link points to the profile page.
But what if we want to change how user details are displayed? Say, we want to display the user's avatar alongside their name, or that we want to display their usernames with an external link, such as a link to the user's Twitter profile.
JIRA provides the User Format plugin module to serve this purpose. Using this module, we can define different formats in which the user will be displayed, and we can use them within the existing JIRA display or within our custom plugins.
In this recipe, let us try to create a new user profile that will display the username (instead of the full name) with a link to their Twitter profile to add some spice! The following are the steps to do it:
- Add the
user-profilemodule to theatlassian-plugin.xmlfile:<user-format key="twitter-format" name="Twitter User Format" class="com.jtricks.jira.user.TwitterUserFormat" system="true"> <description>User name linking to twitter</description> <type>twitterLink</type> <resource type="velocity" name="view" location="templates/user/twitterLink.vm"/> </user-format>As with other plugin modules, the user profile module also has a unique key. It then points to the class that will be used by the user formatter,
TwitterUserFormatin this case.Note
The type element holds the unique profile type name that will be used while formatting the user. The following types exist in JIRA by default with effect from version 7.1: profileLink,profileLinkWithAvatar, avatarWithHover, fullName, fullNameHover, avatarFullNameHover, userName, profileLinkSearcher, profileLinkExternal, profileLinkActionHeader, and fullProfile.
The resource element points to the velocity template to be used for rendering the view,
twitterLink.vmin this case. - Create the formatter class in the previous step. The class should implement the
UserFormatinterface:@Named("TwitterUserFormat") public class TwitterUserFormat implements UserFormat { private final VelocityTemplatingEngine templatingEngine; @Inject public TwitterUserFormat(@ComponentImport VelocityTemplatingEngine templatingEngine) { this.templatingEngine = templatingEngine; } ........ }Here, we inject
VelocityTemplatingEngineinto the class to render the velocity template, as shown in the next step. - Implement the required methods. We will have to implement the two overridden format methods.
a. The first method takes a username and id, where the username is the name of the user, which can also be null, and the id is an extra argument that can be used to pass extra context to the renderer. Ideally, an implementation might include this id in the rendered output such that it can be used for test assertions. An example of how the id is used can be found by displaying the assignee in the column view (
/WEB-INF/classes/templates/jira/issue/field/assignee-columnview.vm) where the id is assignee.We are not going to use id in the example, and the method is implemented as follows:
            public String format(String username, String id) {
                final Map<String, Object>
                params = getInitialParams(username, id);
                return templatingEngine.render(file
                  ("templates/user/twitterLink.vm"))
                  .applying(params).asHtml();
            }
Where
getInitialParamsjust populates theparamsmap with the username as shown:private Map<String, Object> getInitialParams(final String username, final String id) { final Map<String, Object> params = MapBuilder.<String, Object> newBuilder().add("username", username).toMutableMap(); return params; }We can populate the map with as many things as needed if we want to render the user details in some other way!
b. The second method takes username, id, and a map pre-populated with extra values to add more to the context! The method is implemented as follows:
           public String format(String username, String id,
           Map<String, Object> params) {
             final Map<String, Object>
             velocityParams = getInitialParams(username, id);
             velocityParams.putAll(params);
             return templatingEngine.render(file
            ("templates/user/twitterLink.vm"))
            .applying(velocityParams).asHtml();
          }
The only difference is that the extra context is also populated into the
paramsmap.In both cases, the
VelocityTemplatingEnginerenders the velocity template defined in theviewtemplate. - Write the velocity template that uses the context populated in
paramsmap in the previous step to display the user information:#disable_html_escaping() #if ($username) #set ($quote = '"') #set($author = "<a id=${quote}assignee_$username)${quote} class=${quote}user-hover${quote} rel=${quote}$username${quote} href=${quote}https://twitter.com /${username}${quote}>$username</a>") #else #set($author = $i18n.getText('common.words.anonymous')) #end ${author}In our example, we just display the username as it is with a link,
https://twitter.com/${username},that will point to the twitter account with that username. Note that thequotevariable is assigned a double quotation mark inside a single quotation mark. Here, single quotation marks are the velocity syntax and double quotation marks are the value. It is used to construct the URL where name, class, href value, and so on are placed between quotes!Don't forget to handle a scenario where the user is null. In our case, we just display the name as Anonymous when the user is null.
- Package the plugin and deploy it.
Once the plugin is deployed, the new user profile, twitterLink in this case, can be used in various places in JIRA where appropriate. For example, the /WEB-INF/classes/templates/jira/issue/field/assignee-columnview.vm file can be modified to include a twitterLink profile instead of the default profileLink as follows:
#disable_html_escaping()
#if ($assigneeUserkey)
#if ($displayParams && $displayParams.nolink)
$userformat.formatUserkey($assigneeUserkey, 'fullName',
'assignee')
#else <span class="tinylink">
$userformat.formatUserkey($assigneeUserkey,'twitterLink',
'assignee')
</span>
#end
#else
<em>$i18n.getText('common.concepts.unassigned')</em>
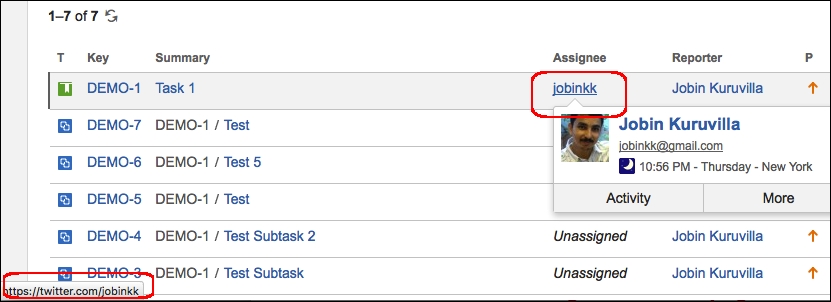
#endWhen you do that, the assignee column in issue navigator will appear as follows with a link to the user's Twitter account:
We can also use the new profile in the plugins to render user details just by invoking formatUser, as follows:
$userformat.formatUser($username, 'twitterLink', 'some_id')
Or:
$userformat.formatUser($username, 'twitterLink', 'some_id', $someMapWithExtraContext)