
What are workflow conditions? They determine whether a workflow action is available or not. Considering the importance of a workflow in business processes and how there is a need to restrict the actions, either to a set of people (groups, roles, and so on) or based on some criteria (for example, the field is not empty), writing workflow conditions is almost inevitable.
Workflow conditions are created with the help of the workflow-condition module. The following are the key attributes and elements supported. Visit https://developer.atlassian.com/jiradev/jira-platform/building-jira-add-ons/jira-plugins2-overview/jira-plugin-module-types/workflow-plugin-modules#WorkflowPluginModules-Conditions for more details:
Attributes:
|
Name |
Description |
|
|
This should be unique within the plugin. |
|
|
Class to provide contexts for rendered velocity templates. It must implement the |
|
|
The localization key for the human-readable name of the plugin module. |
|
|
Human-readable name of the workflow condition. |
Elements:
|
Name |
Description |
|---|---|
|
|
Description of the workflow condition. |
|
|
Class to determine whether the user can see the workflow transition. It must implement |
|
|
Velocity templates for the workflow condition views. |
As usual, create a skeleton plugin. Then create an eclipse project using the skeleton plugin and we are good to go!
In this recipe, let's assume we are going to develop a workflow condition that limits a transition only to the users belonging to a specific project role. The following are the steps to write our condition:
- Define the inputs needed to configure the workflow condition.
We need to implement the
WorkflowPluginFactoryinterface, which mainly exists to provide velocity parameters to the templates. It will be used to extract the input parameters that are used in defining the condition.To make it clear, the inputs here are not the inputs used while performing the workflow action, but the inputs used in defining the condition.The condition factory class,
RoleConditionFactoryin this case, extends theAbstractWorkflowPluginFactory, which implements theWorkflowPluginFactoryinterface. There are three abstract methods that we should implement, namely,getVelocityParamsForInput,getVelocityParamsForEdit, andgetVelocityParamsForView. All of them, as the name suggests, are used for populating the velocity parameters for the different scenarios.In our example, we need to limit the workflow action to a certain project role, and so we need to select the project role while defining the condition. The three methods will be implemented as follows:
        private static final String ROLE =
          "role"; private static final String ROLES = "roles";
            ...
        @Override
        protected void getVelocityParamsForEdit
        (Map<String, Object> velocityParams,
         AbstractDescriptor descriptor) {
            velocityParams.put(ROLE, getRole(descriptor));
            velocityParams.put(ROLES, getProjectRoles());
        }
        @Override
        protected void getVelocityParamsForInput
        (Map<String, Object> velocityParams){
            velocityParams.put(ROLES, getProjectRoles());
        }
        @Override
        protected void getVelocityParamsForView(Map<String,
        Object> velocityParams, AbstractDescriptor descriptor) {
           velocityParams.put(ROLE, getRole(descriptor));
        }
Let's look at the methods in detail:
a.
getVelocityParamsForInput: This method defines the velocity parameters for the input scenario, that is, when the user initially configures the workflow. In our example, we need to display all the project roles, so that the user can select one to define the condition. The methodgetProjectRolesmerely returns all the project roles and the collection of roles is then put into the velocity parameters with the keyROLES.b.
getVelocityParamsForView: This method defines the velocity parameters for the view scenario, that is, how the user sees the condition after it is configured. In our example, we have defined a role, and so we should display it to the user after retrieving it from the workflow descriptor. If you have noticed, the descriptor, which is an instance ofAbstractDescriptor, is available as an argument in the method. All we need is to extract the role from the descriptor, which can be done as follows:private ProjectRole getRole(AbstractDescriptor descriptor) { if (!(descriptor instanceof ConditionDescriptor)){ throw new IllegalArgumentException ("Descriptor must be a ConditionDescriptor."); } ConditionDescriptor functionDescriptor = (ConditionDescriptor) descriptor; String role = (String) functionDescriptor.getArgs().get(ROLE); if (role != null && role.trim().length() > 0) return getProjectRole(role); else return null; }Just check if the descriptor is a condition descriptor or not, and then extract the role as shown in the preceding snippet.
c.
getVelocityParamsForEdit: This method defines the velocity parameters for the edit scenario, that is, when the user modifies the existing condition. Here we need both the options and the selected value. So, we put both the project roles collection and the selected role on to the velocity parameters. - The second step is to define the velocity templates for each of the three aforementioned scenarios: input, view, and edit. We can use the same template here for input and edit with a simple check to keep the old role selected for the edit scenario. Let us look at the templates:
a.
role-condition-input.vm: Displays all project roles and highlights the already-selected one in the edit mode. In the input mode, the same template is reused, but the selected role will be null and so a null check is done:<tr> <td class="fieldLabelArea">Project Role: </td> <td nowrap> <select name="role" id="role"> #foreach ($field in $roles) <option value="${field.id}" #if ($role && (${field.id}==${role.id})) SELECTED #end >$field.name</option> #end </select> <br><font size="1"> Select the role in which the user should be present! </font> </td> </tr>b.
role-condition.vm: Displays the selected role:#if ($role) User should have ${role.name} Role! #else Role Not Defined #end - The third step is to write the actual condition. The condition class should extend the
AbstractJiraConditionclass. Here, we need to implement thepassesConditionmethod. In our case, we retrieve the project from the issue, check if the user has the appropriate project role, and return true if the user does:public boolean passesCondition(Map transientVars, Map args, PropertySet ps) { Issue issue = getIssue(transientVars); ApplicationUser user = getCallerUser(transientVars, args); Project project = issue.getProjectObject(); String role = (String)args.get(ROLE); Long roleId = new Long(role); return projectRoleManager.isUserInProjectRole(user, projectRoleManager.getProjectRole(roleId), project); }The issue on which the condition is checked can be retrieved using the
getIssuemethod implemented in theAbstractJiraConditionclass. Similarly, the user can be retrieved using thegetCallerUsermethod. In the preceding method,projectRoleManageris injected in the constructor, as we have seen before.Tip
Make sure you are using the appropriate scanner annotations for constructor injection, if the Atlassian Spring Scanner is defined in the pom.xml. See https://bitbucket.org/atlassian/atlassian-spring-scanner for more details.
- We can see that the
ROLEkey is used to retrieve the project role ID from theargsparameter in thepassesConditionmethod. In order for theROLEkey to be available in theargsmap, we need to override thegetDescriptorParamsmethod in the condition factory class,RoleConditionFactoryin this case. ThegetDescriptorParamsmethod returns a map of sanitized parameters, which will be passed into workflow plugin instances from the values in an array form submitted by velocity, given a set ofname:valueparameters from the plugin configuration page (that is, theinput-parametersvelocity template). In our case, the method is overridden as follows:public Map<String, String> getDescriptorParams(Map<String, Object> conditionParams) { if (conditionParams != null && conditionParams.containsKey(ROLE)) { return MapBuilder.build(ROLE, extractSingleParam(conditionParams, ROLE)); } // Create a 'hard coded' parameter return MapBuilder.emptyMap(); }The method here builds a map of the
key:valuepair, where key isROLEand the value is the role value entered in the input configuration page. TheextractSingleParammethod is implemented in theAbstractWorkflowPluginFactoryclass. TheextractMultipleParamsmethod can be used if there is more than one parameter to be extracted! - All that is left now is to populate the
atlassian-plugin.xmlfile with the aforementioned components. We will use theworkflow-conditionmodule and it looks like the following block of code:<workflow-condition key="role-condition" name="Role Based Condition" i18n-name-key="role-condition.name" class="com.jtricks.jira.workflow.RoleConditionFactory"> <description key="role-condition.description"> Role Based Workflow Condition </description> <condition-class> com.jtricks.jira.workflow.RoleCondition </condition-class> <resource type="velocity" name="view" location="templates/conditions/role-condition.vm"/> <resource type="velocity" name="input-parameters" location="templates/conditions /role-condition-input.vm"/> <resource type="velocity" name="edit-parameters" location="templates/conditions /role-condition-input.vm"/> </workflow-condition> - Package the plugin and deploy it!
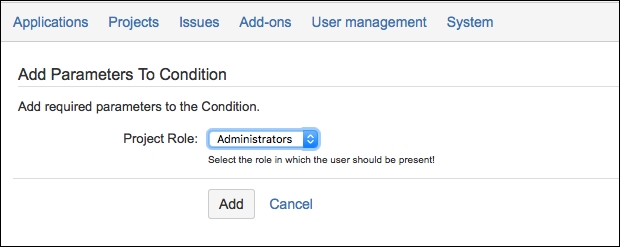
After the plugin is deployed, we need to modify the workflow to include the condition. The following screenshot is how the condition looks when it is added initially. This, as you now know, is rendered using the input template:
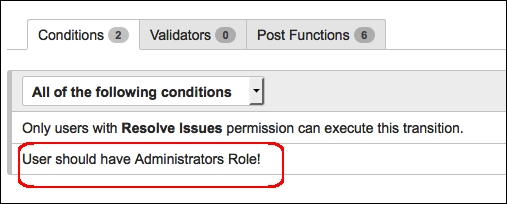
After the condition is added (that is, after selecting the Administrators role), the view is rendered using the view template and looks as shown in the following screenshot:
If you try to edit it, the screen will be rendered using the same input template and the Administrators role, or whichever role was selected earlier, will be preselected.
After the workflow is configured, when the user goes to an issue, they will be presented with the transition only if they are a member of the project role where the issue belongs. It is while viewing the issue that the passesCondition method in the condition class is executed.