
We have seen how to write JIRA reports and we also had a brief look at how JIRA lets us configure the input parameters. The example we have chosen in the previous recipe, on creating JIRA reports, explained the usage of the select type. In this recipe, we will see the various property types supported and some examples on how to configure them.
There are a number of property types supported in JIRA. The full list supported by your JIRA version can be found in the com.atlassian.configurable.ObjectConfigurationTypes class. For JIRA 7.1.*, the following are the types supported for reports:
|
Type |
Input HTML type |
|
|
Textbox |
|
|
Textbox |
|
|
NA. Hidden to the user |
|
|
Textbox with calendar popup |
|
|
Textbox with user picker |
|
|
Text area |
|
|
Select list |
|
|
Multiselect list |
|
|
Checkbox |
|
|
Filter picker |
|
|
Filter or project picker |
|
|
Cascading select list dependent on a parent select list |
Let us quickly look at each property and how it is used:
- string: The
stringproperty is used to create a Text Box. The Java data type is string. All you need here is to add thepropertytag with the type asstring:<property> <key>testString</key> <name>Test String</name> <description>Example String property</description> <type>string</type> <default>test val</default> </property>Each of the property types, including the
stringproperty, can have a default value populated using thedefaulttag, as shown. - long: The
longproperty is used to create a Text Box. The Java data type is again string:<property> <key>testLong</key> <name>Test Long</name> <description>Example Long property</description> <type>long</type> </property> - select: The select property is used to create a Select List. The Java data type is string. We have seen an example of this in the previous recipe. There are two ways you can populate the values of a select property:
Usinga value generator class: The class should implement the
ValuesGeneratorinterface and return a map of key/value pairs. The key will be the value returned to the report class, whereas the value is the display value to the user. Let us use the same example from the previous recipe here:<property> <key>projectId</key> <name>Project</name> <description>report.allissues.project.description</description> <type>select</type> <values class= " com.jtricks.jira.reports.ProjectValuesGenerator "/> </property>ProjectValuesGeneratorimplements thegetValues()method as follows:public class ProjectValuesGenerator implements ValuesGenerator{ public Map<String, String> getValues(Map userParams) { Map<String, String> projectMap = new HashMap<String, String>(); List<Project> allProjects = ComponentAccessor.getProjectManager().getProjectObjects(); for (Project project : allProjects) { projectMap.put(project.getId().toString(), project.getName()); } return projectMap; } }Using pre-defined key/value pairs in the property: The following is an example:
<property> <key>testSelect</key> <name>Test Select</name> <description>Example Select Property</description> <type>select</type> <values> <value> <key>key1</key> <value>Key 1</value> </value> <value> <key>key2</key> <value>Key 2</value> </value> <value> <key>key3</key> <value>Key 3</value> </value> </values> </property> - multiselect: The
multiselectproperty is used to create a Multi Select List. It is the same as the select property. The only difference is that the type name ismultiselect. Here the Java type will be a string if only one value is selected, and it will be an array of stringsString[]if more than one value is selected. - hidden: The
hiddenproperty is used to pass a hidden value. The Java data type isstring:<property> <key>testHidden</key> <name>Test Hidden</name> <description>Example Hidden property</description> <type>hidden</type> <default>test hidden val</default> </property>We must provide a value using the
defaulttag, as the user won't be able to enter a value. - date: The
dateproperty is used to create a date picker. The Java data type is string. We should then parse it to theDateobject in the report:<property> <key>testDate</key> <name>Test Date</name> <description>Example Date property</description> <type>date</type> </property> - user: The
userproperty is used to create a user picker. The Java data type is string and it will be the username:<property> <key>testUser</key> <name>Test User</name> <description>Example User property</description> <type>user</type> </property> - text: The
textproperty is used to create a text area. The Java data type is string:<property> <key>testText</key> <name>Test Text Area</name> <description>Example Text property</description> <type>text</type> </property> - checkbox: The
checkboxproperty is used to create a checkbox. The Java data type is string and the value will betrueif selected. If the checkbox is unchecked, the value will benull:<property> <key>testCheckbox</key> <name>Test Check Box</name> <description>Example Checkbox property</description> <type>checkbox</type> </property> - filterpicker: The
filterpickerproperty is used to create a filter picker. The Java data type is string and it will hold the ID of the selected filter:<property> <key>testFilterPicker</key> <name>Test Filter Picker</name> <description>Example Filter Picker property</description> <type>filterpicker</type> </property> - filterprojectpicker: Used to create a filter or project picker. The Java data type is string, and it will be the ID preceded by the filter (if a filter is selected) and project (if a project is selected):
<property> <key>testFilterProjectPicker</key> <name>Test Filter or Project Picker</name> <description> Example Filter or Project Picker property </description> <type>filterprojectpicker</type> </property> - cascadingselect: Used to create a cascading select, based on another select box:
         <property>
           <key>testCascadingSelect</key>
           <name>Test Cascading Select</name>
           <description>Example Cascading Select</description>
           <type>cascadingselect</type>
           <values class="com.jtricks.CascadingValuesGenerator"/>
           <cascade-from>testSelect</cascade-from>
         </property>
Here, the cascading select testCascadingSelect depends on the select property named testSelect. We have seen the testSelect property with the key/value pairs. The next important thing is the value generator class. As with the other value generator classes, this one also generates a map of key/value pairs.
Here, the key in the key/value pair should be the value that will be returned to the user. The value should be an instance of a ValueClassHolder class, which is a static class. The ValueClassHolder class will look like the following:
private static class ValueClassHolder {
    private String value;
    private String className;

    public ValueClassHolder(String value, String className) {
      this.value = value;
      this.className = className;
    }

    public String getValue() {
      return value;
    }

    public String getClassName() {
      return className;
    }

    public String toString() {
      return value;
    }
}
The value in the ValueClassHolder will be the display value of the cascading select options to the user. The className attribute will be the key of the parent select option.
In our example, the parent select property is testSelect. It has three keys - key1, key2, and key3. The getValues() method will, therefore, look as follows:
public Map getValues(Map arg0) {
    Map allValues = new LinkedHashMap();

    allValues.put("One1", new ValueClassHolder("First Val1", "key1"));
    allValues.put("Two1", new ValueClassHolder("Second Val1", "key1"));
    allValues.put("Three1", new ValueClassHolder("Third Val1", "key1"));
    allValues.put("One2", new ValueClassHolder("First Val2", "key2"));
    allValues.put("Two2", new ValueClassHolder("Second Val2", "key2"));
    allValues.put("One3", new ValueClassHolder("First Val3", "key3"));

    return allValues;
}
If you take a single line, for example, allValues.put("One1", new ValueClassHolder("First Val1", "key1")), it will have the key/value pair One1/First Val1 when the select list has the key key1 selected!
After selecting the appropriate values, they can be retrieved in the report class, as shown in the following lines of code:
final String testString = (String) reqParams.get("testString");
final String testLong = (String) reqParams.get("testLong");
final String testHidden = (String) reqParams.get("testHidden");
final String testDate = (String) reqParams.get("testDate");
final String testUser = (String) reqParams.get("testUser");
final String testText = (String) reqParams.get("testText");
final String[] testMultiSelect = (String[]) reqParams.get("testMultiSelect");
final String testCheckBox = (String) reqParams.get("testCheckBox");
final String testFilterPicker = (String) reqParams.get("testFilterPicker");
final String testFilterProjectPicker = (String) reqParams.get("testFilterProjectPicker");
final String testSelect = (String) reqParams.get("testSelect");
final String testCascadingSelect = (String) reqParams.get("testCascadingSelect");
Special mention should be given to the filterprojectpicker. The value will be filter-10000 if a filter with the ID 10000 is selected. The value will be project-10000 if a project with ID 10000 is selected.
When the report input screen is presented to the user, the properties mentioned in the plugin descriptor are converted into the appropriate HTML elements, as discussed. We can then retrieve their values in the report class and process them to generate the report.
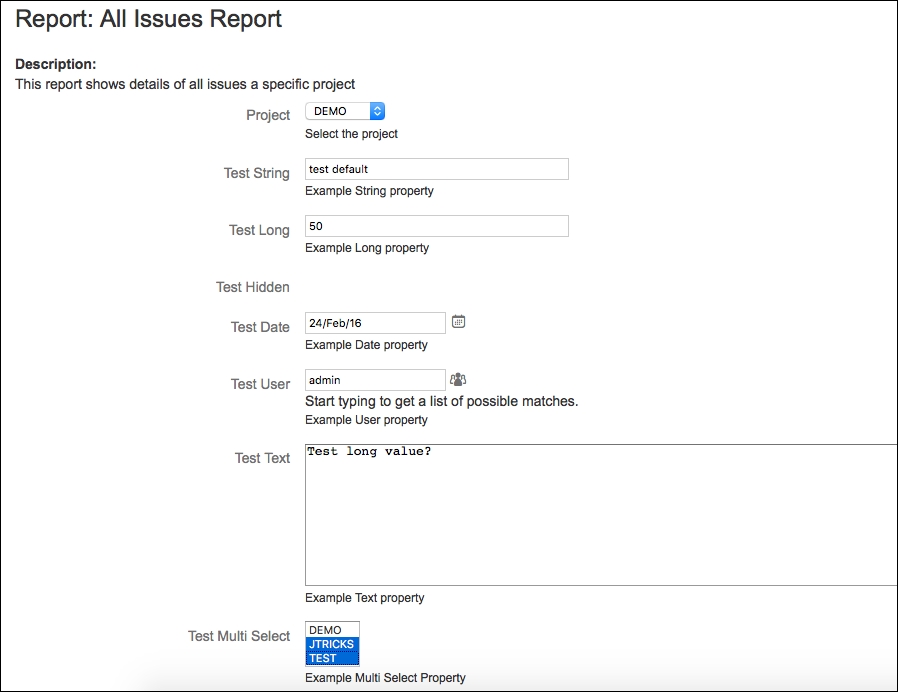
The following screenshot shows how properties such as String, Long, Hidden, Date, User, Text and Multi Select fields appear on the input screen:
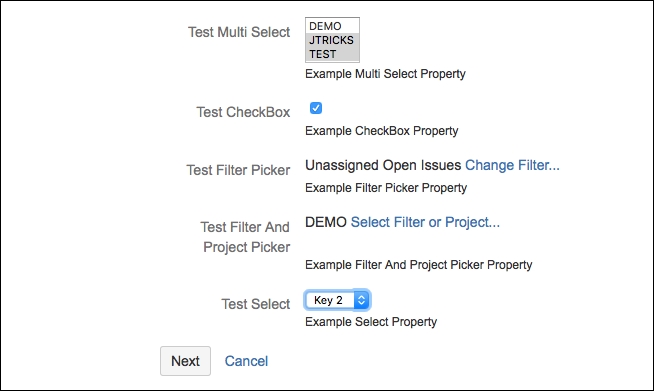
The following screenshot shows properties such as CheckBox, Filter Picker, Filter and Project Picker, and Select fields on the input screen:
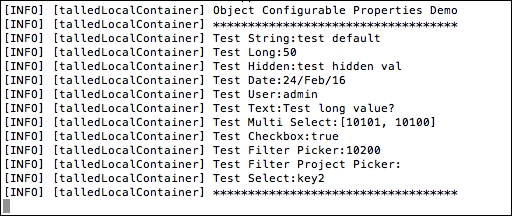
If you print the extracted values into the console in the report class, it will appear as follows:
Hopefully, that gives you a fair idea of how to use object configurable parameters in JIRA reports.
Note
As of JIRA 7.0.x, there is a bug that is preventing cascading selects from rendering properly. The bug was originally reported for Firefox and IE but is reproducible in other browsers as well. See https://jira.atlassian.com/browse/JRA-22613 for the latest status.