
The plugin architecture is built around plugin modules, and JIRA exposes a number of plugin module types, each with a specific purpose. A plugin can have any number of plugin modules, either of the same type or of different types, as long as they all have a unique key. Throughout this book, we will see how we can use different plugin module types to solve different requirements.
In this recipe we will look at adding plugin modules to an existing plugin project.
Make sure the plugin project already exists or create a new skeleton project as explained, in the previous recipe.
- Open a command window and go to the plugin project folder, where
pom.xmlresides.Type
atlas-create-jira-plugin-moduleand press Enter. This will show all the available plugin modules as a numbered list, as shown here: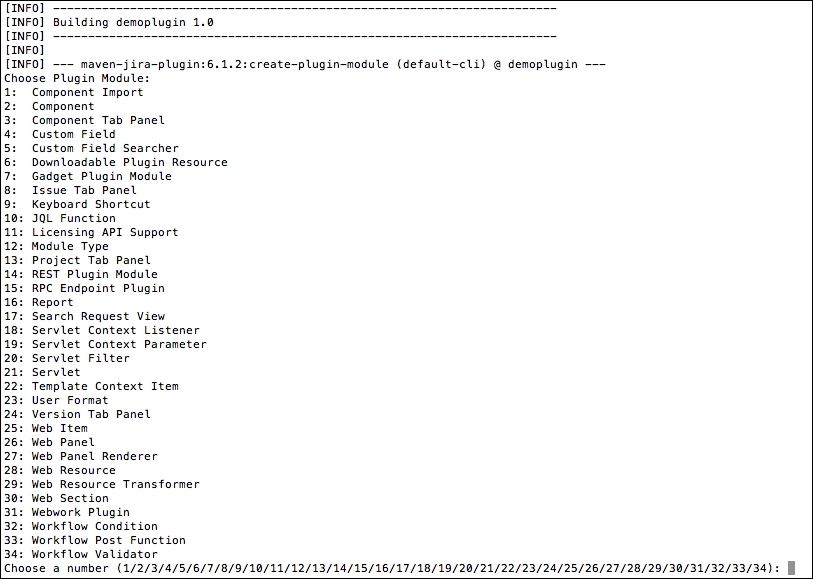
- Select the number against the module that you are planning to add. For example, type
25and press Enter if you want to add a simpleweb-itemmodule to the plugin. - Follow the instructions to provide the details required for the selected module. Some of the options may have default values. Some modules might also have an advanced setup. Type
Yand press Enter when prompted, if you want to go toAdvanced Setup. If not, typeNand press Enter. - Once the module is completed, type
YorNand press Enter when prompted to add another plugin module, depending on whether you want to add another module or not. - Repeat the steps for every module you want to add.
- Wait for the
BUILD SUCCESSFULmessage when no more modules are to be added.
Similar to the skeleton plugin creation, a set of directories and subdirectories are created during this process, along with a number of Java files or velocity templates required for the selected plugin module.
It also adds the plugin module definition in the atlassian-plugin.xml based on our inputs in step 4. A sample plugin descriptor, after adding the web-item module, looks like this:
<?xml version="1.0" encoding="UTF-8"?>
<atlassian-plugin key="${atlassian.plugin.key}" name="${project.name}" plugins-version="2">
    <plugin-info>
        <description>${project.description}</description>
        <version>${project.version}</version>
        <vendor name="${project.organization.name}"
          url="${project.organization.url}"/>
        <param name="plugin-icon">images/pluginIcon.png</param>
        <param name="plugin-logo">images/pluginLogo.png</param>
    </plugin-info>
    <!-- add our i18n resource -->
    <resource type="i18n" name="i18n" location="demoplugin"/>
    <!-- add our web resources -->
    <web-resource key="demoplugin-resources"
     name="demoplugin Web Resources">
        <dependency>com.atlassian.auiplugin:ajs</dependency>
        <resource type="download" name="demoplugin.css" location="/css
          /demoplugin.css"/>
        <resource type="download" name="demoplugin.js" location="/js
          /demoplugin.js"/>
        <resource type="download" name="images/" location="/images"/>
        <context>demoplugin</context>
    </web-resource>
    <web-item name="My Web Item" i18n-name-key="my-web-item.name"
      key="my-web-item" section="system.user.options/personal"
      weight="1000">
        <description key="my-web-item.description">The My Web Item Plugin
        </description>
        <label key="my-web-item.label"></label>
        <link linkId="my-web-item-link">http://www.j-tricks.com</link>
    </web-item>
</atlassian-plugin>
As you can see, a web-item module is added. We will see more about the web-item module, and other modules mentioned here, in the upcoming chapters.
You can also see a resource module and a web-resource module, which are added automatically the first time a plugin module is created.
The resource module defines the i18n resource file for the plugin, and more key-value pairs will be added in to this file when more modules are added. The file has the name {plugin-artifact-name}.properties and is created under the src/main/resources{plugin-group-folder} folder. In our example, the demo.properties file is created under the src/main/resources/com/jtricks/demo folder.
A sample property file is as follows:
#put any key/value pairs here
my.plugin.name=MyPlugin
my-web-item.label=My Web Item
my-web-item.name=My Web Item
my-web-item.description=The My Web Item Plugin
The web-resource module defines the plugin web resources, which includes a JS file, a CSS file, and an images folder that has the default plugin icon and logo images. We will learn more about these modules later in this book.