
Chapter 14. Server-side Java testing with Cactus
Good design at good times. Make it run, make it run right.
Kent Beck, Test Driven Development: By Example
This chapter covers
- Drawbacks of mock objects
- Testing inside the container with Cactus
- How Cactus works
- Integrating Cactus with other projects, including Ant and Maven
In the second part of the book we explained what mock objects are and how to benefit from using them. We also described different techniques for unit testing your server-side code, and we even compared these techniques against each other. The one thing that you should be aware of now is that there is no absolute truth—the best techniques to use depend on the situation you’re currently in. For example, in most cases you might find server-side testing with mocks and stubs sufficient, but as you saw, this technique suffers some significant drawbacks. That’s why we cover the in-container testing approach deeper in the book. Furthermore, this chapter focuses on the in-container testing methodologies by means of one of the most popular in-container testing frameworks: Cactus. We start by introducing the Cactus framework and then show you some real-world examples of how to use Cactus.
We begin by explaining what’s so special about Cactus and the order of execution of Cactus tests. We then build a sample application that uses some components from the Java EE spec, and we write the tests for those components with the help of Cactus. The next step is to execute those tests; we show a sample integration between Cactus and some of the most popular build tools (Ant and Maven). But we go a bit further than that: we demonstrate the tight integration between Cactus and other projects, such as Cargo and Jetty. So let’s start!
14.1. What is Cactus?
Cactus is an open source framework (http://jakarta.apache.org/cactus/) for in-container testing server-side Java code (mostly Java EE components in the current version of Cactus). It’s an extension of JUnit that was created by Vincent Massol in 1998.
Before we go any further, I’d like to clarify the definitions just mentioned. When we say Cactus is a framework, we mean that it provides an API that you have to extend in order to use it.
Also, in-container means that (as you’ll see later in the chapter) the tests get executed inside the virtual machine of the container. And finally, Cactus is an extension of JUnit for two reasons: First, it extends JUnit by empowering it with new functionality (Cactus makes JUnit tests get executed inside the container, something which otherwise wouldn’t be possible). And second, Cactus’s API extends JUnit’s API; in low-level software engineering terms, it extends some of JUnit’s classes and overrides some of JUnit’s methods.
Let’s see Cactus in action. In later sections, we explain in more detail how it works.
14.2. Testing with Cactus
This section is somewhat theoretical. You need this knowledge before you experiment with a sample application, because Cactus is different from the normal unit testing frameworks. Cactus executes the tests inside the container, which on its own raises a lot of questions, so we try to answer all of them here.
14.2.1. Java components that you can test with Cactus
As we mentioned in the previous section, the Cactus project is used for testing the core Java EE components (JSPs, tag libraries, servlets, filters, and EJBs). What’s worth mentioning is that this is the only focus of the Cactus project. It doesn’t test any specific framework (look at the next chapter if your application is framework specific), because it isn’t intended to do so. A lot of the emails that come from the Cactus mailing list ask if people can use Cactus for testing an application based on a specific framework (like Struts, JSF, or Spring). There are quite a few tools dedicated to such testing, and we cover some of them later in the book. Most of those tools are based on Cactus and require Cactus in their classpath, but again Cactus is designed for in-container testing of the components from the Java EE spec.
14.2.2. General principles
Because Cactus is an extension of JUnit, every Cactus test is a JUnit test by itself. The reverse isn’t true; most of the JUnit tests are Cactus tests. So what distinguishes the Cactus tests from the JUnit tests? You need to stick to a couple of rules in order to use Cactus.
We already discussed in chapter 8 what in-container testing means. Back then, we had a web application that uses servlets. We want to unit test the isAuthenticated method in listing 14.1 from a SampleServlet servlet.
Listing 14.1. Sample of a servlet method to unit test
[...]
import javax.servlet.http.HttpServlet;
import javax.servlet.http.HttpServletRequest;
import javax.servlet.http.HttpSession;

public class SampleServlet extends HttpServlet {
public boolean isAuthenticated(HttpServletRequest request) {
      HttpSession session = request.getSession(false);
if (session == null) {
return false;
      }
      String authenticationAttribute =
               (String) session.getAttribute("authenticated");

return Boolean.valueOf(authenticationAttribute).booleanValue();
   }
}
In order to be able to test this method, we need to get hold of a valid HttpServletRequest object. Unfortunately, it isn’t possible to call new HttpServletRequest to create a usable request. The lifecycle of HttpServletRequest is managed by the container. JUnit alone isn’t enough to write a test for the isAuthenticated method.
So what must we do in order to obtain a valid HttpServletRequest? Wouldn’t it be perfect if we had an HttpServletRequest object already instantiated in our test cases? And how can we achieve this? What if we always had to extend a certain class that takes care of providing us the server-side objects that are otherwise managed by the container (such as HttpServletRequest)? Listing 14.2 shows a corresponding Cactus test that tests the given servlet.
Listing 14.2. Using Cactus to unit test SampleServlet
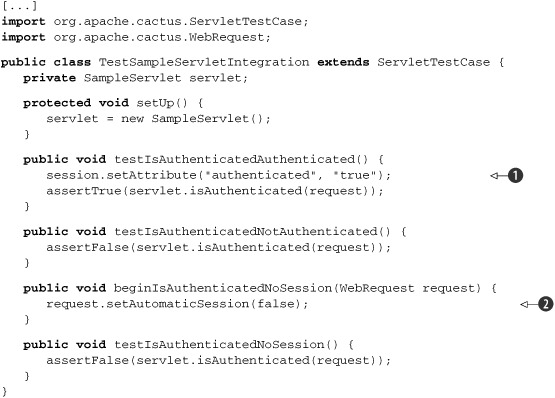
Now you’re probably asking, “At what place do the session ![]() and request
and request ![]() objects get declared and initialized?” The answer is straightforward—they come from the base class, ServletTestCase, which is part of the Cactus API.
objects get declared and initialized?” The answer is straightforward—they come from the base class, ServletTestCase, which is part of the Cactus API.
As you can see, the Cactus test case meets all of our requirements. It gives us access to the container objects, inside our JUnit test cases. As you can see from the previous listing, writing a Cactus test case involves several key points:
- The Cactus test case must extend one of the following, depending on what type of component you’re testing: ServletTestCase, JSPTestCase, or FilterTestCase. This is a rule: because Cactus extends the 3.8.x version of JUnit, your test cases always have to extend one of the latter classes.
- The Cactus framework exposes the container objects (in this case the HttpServletRequest and HttpSession objects) to your tests, making it easy and quick to write unit tests.
- You get a chance to implement two new methods: beginXXX and endXXX. These two new methods are executed on the client side, and you can use them to place certain values in the request object or to get certain values from the response object.
- In order for Cactus to expose the container objects, Cactus needs to get them from the JVM they live in, and because the container is the only one managing the lifecycle of these objects, Cactus tests need to interact directly with the container. This leads us to the conclusion that Cactus tests must be deployed inside the container.
The last of these points tells us that Cactus tests live in the container JVM. This brings us to the next issue: if Cactus tests live in the container JVM, how are they executed? Also, how do we see the result from their execution?
14.2.3. How Cactus works
Before we rush into the details, you need to understand a bit more about how Cactus works. The lifecycle of a Cactus test is shown in figure 14.1.
Figure 14.1. Lifecycle of a Cactus test
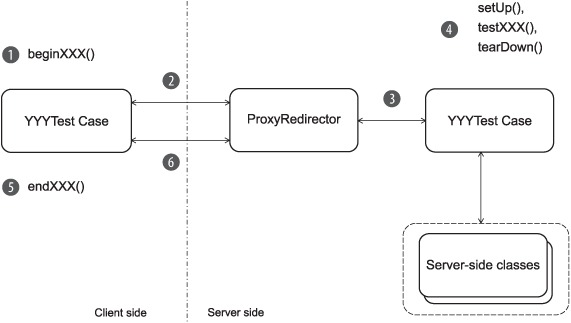
Let’s look at the steps in using the TestSampleServletIntegration Cactus test from listing 14.2. Say, now we have a sample servlet that we want to test and also a test written for that particular servlet. What we need to do now is package the servlet and the test, along with the necessary Cactus libraries, and deploy the package in the server. Once we start the server, we have the test and the servlet in both: deployed in the container and in our workspace on the client side. You can submit the client-side Cactus test to a JUnit test runner, and the runner starts the tests.
Executing client-side and server-side steps
The lifecycle comprises steps that are executed on the client side and others that are executed on the server side (inside the container JVM). Client side refers to the JVM in which you started the JUnit test runner.
On the client side, the Cactus logic is implemented in the YYYTestCase classes that your tests extend (where YYY can be Servlet, Jsp, or Filter). More specifically, YYYTestCase overrides JUnit TestCase.runBare, which is the method called by the JUnit test runner to execute one test. By overriding runBare, Cactus can implement its own test logic, as described later.
On the server side, the Cactus logic is implemented in a proxy redirector (or redirector for short).
Stepping through a test
For each test (testXXX methods in the YYYTestCase classes), the six steps shown in figure 14.2 take place. Let’s step through them.
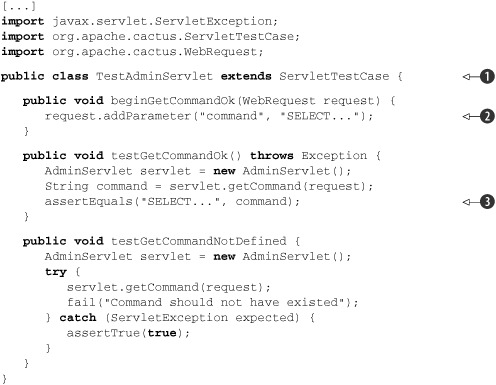
Figure 14.2. The sample Administration application. We use it as a base sample in this chapter to see how to unit test servlets, filters, JSPs, taglibs, and database applications.

- Execute beginXXX. If there is a beginXXX method, Cactus executes it. The beginXXX method lets you pass information to the redirector. The TestSampleServletIntegration example extends ServletTestCase and connects to the Cactus servlet redirector. The servlet redirector is implemented as a servlet; this is the entry point
in the container. The Cactus client side calls the servlet redirector by opening an HTTP connection to it. The beginXXX method sets up HTTP-related parameters that are set in the HTTP request received by the servlet redirector. This method can
be used to define HTTP POST/GET parameters, HTTP cookies, HTTP headers, and so forth.
Here’s an example:
public void beginXXX(WebRequest request) {
request.addParameter("param1", "value1");
request.addCookie("cookie1", "value1");
[...]
} In the TestSampleServletIntegration class, we’ve used the beginXXX method to tell the redirector not to create an HTTP session (the default behavior creates one):
public void beginIsAuthenticatedNoSession(WebRequest request) {
request.setAutomaticSession(false);
} - Open the redirector connection. The YYYTestCase opens a connection to its redirector. In this case, the ServletTestCase code opens an HTTP connection to the servlet redirector (which is a servlet).
- Create the server-side TestCase instance. The redirector creates an instance of the YYYTestCase class. Note that this is the second instance created by Cactus; the first one was created on the client side (by the JUnit TestRunner). Then the redirector retrieves container objects and assigns them in the YYYTestCase instance by setting class variables. In the servlet example, the servlet redirector creates an instance of TestSampleServletIntegration and sets the following objects as class variables in it: HttpServletRequest, HttpServletResponse, HttpSession, and others. The servlet redirector is able to do this because it’s a servlet. When it’s called by the Cactus client side, it has received a valid HttpServletRequest, HttpServletResponse, HttpSession, and other objects from the container and is passing them to the YYYTestCase instance. It acts as a proxy/redirector (hence its name). The redirector then starts the test (see step 4). Upon returning from the test, it stores the test result in the ServletConfig servlet object along with any exception that might have been raised during the test, so the test result can later be retrieved. The redirector needs a place to temporarily store the test result because the full Cactus test is complete only when the endXXX method has finished executing (see step 5).
- Call setUp, testXXX, and tearDown on the server. The redirector calls the JUnit setUp method of YYYTestCase, if there is one. Then it calls the testXXX method. The testXXX method calls the class/methods under test, and finally the redirector calls the JUnit tearDown method of the TestCase, if there is one.
- Execute endXXX on the client. Once the client side has received the response from its connection to the redirector, it calls an endXXX method (if it exists). This method is used so that your tests can assert additional results from the code under test. For
example, if you’re using a ServletTestCase, FilterTestCase, or JspTestCase class, you can assert HTTP cookies, HTTP headers, or the content of the HTTP response:
public void endXXX(WebResponse response) {
assertEquals("value", response.getCookie("cookiename").getValue());
assertEquals("...", response.getText());
[...]
} - Gather the test result. In step 3, the redirector saves the test result in a variable stored with the ServletConfig object. The Cactus client side now needs to retrieve the test result and tell the JUnit test runner whether the test was successful, so the result can be displayed in the test runner GUI or console. To do this, the YYYTestCase opens a second connection to the redirector and asks it for the test result.
This process may look complex at first glance, but this is what it takes to be able to get inside the container and execute the test from there. Fortunately, as users, we’re shielded from this complexity by the Cactus framework. You can use the provided Cactus frontends to start and set up the tests.
Now that you’ve seen what Cactus tests are and how they work, let’s take a closer look at more component-specific tests.
14.3. Testing servlets and filters
As you already saw, Cactus is designed for testing the core components from the Java EE spec. This testing, however, has some component-specific characteristics. In this section we explore these characteristics.
When you unit test servlet and filter code, you must test not only these objects but also any Java class calling the Servlet/Filter API, the JNDI API, or any backend services. Starting from this section, we build a real-life sample application that will help demonstrate how to unit test each of the different kinds of components that make up a full-blown web application. This section focuses on unit testing the servlet and filter parts of that application. Later subsections test the other common components (JSPs and EJBs).
14.3.1. Presenting the Administration application
The goal of this sample Administration application is to let administrators perform database queries on a relational database. Suppose the application it administers already exists. Administrators can perform queries such as listing all the transactions that took place during a given time interval, listing the transactions that were out of service level agreement (SLA), and so forth. We set up a typical web application architecture (see figure 14.2) to demonstrate how to unit test each type of component (filter, servlet, JSP, and EJB).
The application first receives from the user an HTTP request containing the SQL query to execute. The request is caught by a security filter that checks whether the SQL query is a SELECT query (to prevent modifying the database). If not, the user is redirected to an error page. If the query is a SELECT, the AdminServlet servlet is called. The servlet performs the requested database query and forwards the results to a JSP page, which displays the results. The page uses JSP tags to iterate over the returned results and to display them in HTML tables. JSP tags are used for all the presentation logic code. The JSPs contain only layout/style tags (no Java code in scriptlets). We start by unit testing the AdminServlet servlet. Then, in the following subsections, we test the other components of the Administration application.
14.3.2. Writing servlet tests with Cactus
In this section, we focus on using Cactus to unit test the AdminServlet servlet (see figure 14.2) from the Administration application.
Let’s test AdminServlet by writing the tests before we write the servlet code. This strategy is called test-driven development, or test first, and it’s efficient for designing extensible and flexible code and making sure the unit test suite is as complete as possible. (See chapter 4 for an introduction to TDD.)
Before we begin coding the test, let’s review the requirement for AdminServlet. The servlet should extract the needed parameter containing the command to execute from the HTTP request (in this case, the SQL command to run). Then it should fetch the data using the extracted command. Finally, it should pass the control to the JSP page for display, passing the fetched data. Let’s call the methods corresponding to these actions getCommand, executeCommand, and callView, respectively.
Designing the first test
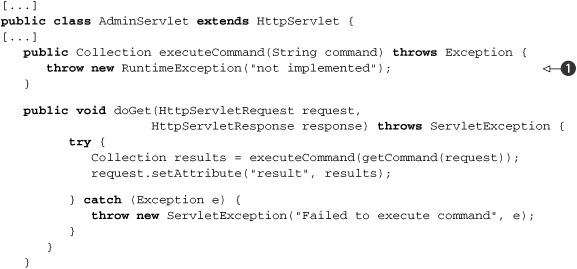
Listing 14.3 shows the unit tests for the getCommand method. Remember that we haven’t yet written the code under test. The AdminServlet class doesn’t exist, and our code doesn’t compile (yet).
Listing 14.3. Designing and testing the getCommand method
This is a typical Cactus test case. We extended the ServletTestCase ![]() , because the component that we want to test is a servlet. We also set a request parameter in the beginXXX method
, because the component that we want to test is a servlet. We also set a request parameter in the beginXXX method ![]() that we assert to be present in the testXXX method
that we assert to be present in the testXXX method ![]() .
.
Once we’ve written the test case, we can go on and implement the bare minimum of code that will allow us to compile the project. We need to implement a sample servlet with a getCommand method. Listing 14.4 shows the code.
Listing 14.4. Minimum code to make the TestAdminServlet compile
[...]
public class AdminServlet extends HttpServlet {

public String getCommand(HttpServletRequest request)
throws ServletException {
return null;
   }
}
This is the minimum code that allows the TestAdminServlet to compile successfully.
The code compiles okay, but there’s one more thing that we have to think about. What you probably notice at this point is that if this test gets executed it will fail, because of the null object that we return. Tests are used to prevent us from making mistakes. That said, we always have to ensure that tests fail if we provide corrupt data, as in the previous example. At this point, we need to ensure that the error is reported successfully. And after that, when we implement the code under test, the tests should succeed, and we’ll know we’ve accomplished something. It’s a good practice to ensure that the tests fail when the code fails.
It’s a good practice to always verify that the tests you’re writing work. Be sure a test fails when you expect it to fail. If you’re using the test-driven development methodology, this failure happens as a matter of course. After you write the test, write a skeleton for the class under test (a class with methods that return null or throw runtime exceptions). If you try to run your test against a skeleton class, it should fail. If it doesn’t, fix the test (ironically enough) so that it does fail! Even after the case is fleshed out, you can vet a test by changing an assertion to look for an invalid value that should cause it to fail.
But let’s get back to the test. Listing 14.5 shows the code for getCommand. It’s a minimal implementation that passes the tests.
Listing 14.5. Implementation of getCommand that makes the tests pass
[...]
public String getCommand(HttpServletRequest request)
throws ServletException {

   String command = request.getParameter(COMMAND_PARAM);

if (command == null) {
throw new ServletException("Missing parameter ["
                  + COMMAND_PARAM + "]");
   }
return command;
}
[...]
The code in this listing is a simple implementation, but it’s enough for our needs. We want our code not only to compile but also to pass the tests.
The Simplest Thing That Could Possibly Work is an Extreme Programming (XP) principle that says overdesign should be avoided, because you never know what will be used effectively. XP recommends designing and implementing the minimal working solution and then refactoring mercilessly. This is in contrast to the monumental methodologies, which advocate fully designing the solution before starting development. When you’re developing using the TDD approach, the tests are written first—you only have to implement the bare minimum to make the test pass in order to achieve a fully functional piece of code. The requirements have been fully expressed as test cases, and you can let yourself be led by the tests when you’re writing the functional code.
Finishing the Cactus servlet tests
At the beginning of the previous subsection, we mentioned that we need to write three methods: getCommand, executeCommand, and callView. We implemented getCommand in listing 14.5. The executeCommand method is responsible for obtaining data from the database. We defer this implementation until section 14.5, “Testing EJBs.”
That leaves the callView method, along with the servlet’s doGet method, which ties everything together by calling our different methods. One way of designing the application is to store the result of the executeCommand method in the HTTP servlet request. The request is passed to the JSP by the callView method (via servlet forward). The JSP can then access the data to display by getting it from the request (possibly using a useBean tag). This is a typical MVC Model 2 pattern used by many applications and frameworks.
We still need to define what objects executeCommand will return. The BeanUtils package in the Apache Commons (http://commons.apache.org/beanutils/) includes a DynaBean class that can expose public properties, like a regular JavaBean, but we don’t need to hardcode getters and setters. In a Java class, we access one of the dyna properties using a map-like accessor:
DynaBean employee = ...
String firstName = (String) employee.get("firstName");
employee.set("firstName", "Petar");
The BeanUtils framework is nice for the current use case because we retrieve arbitrary data from the database. We can construct dynamic JavaBeans (or DynaBeans) that we use to hold database data. The mapping of a database to DynaBeans is covered in the last section.
Testing the callView method
We have enough in place now that we can write the tests for callView, as shown in listing 14.6.
To make the test easier to read, we create a createCommandResult private method. This utility method creates arbitrary DynaBean objects, like those that will be returned by executeCommand. In testCallView, we place the DynaBeans in the HTTP request where the JSP can find them.
Listing 14.6. Unit tests for callView
[...]
public class TestAdminServlet extends ServletTestCase {
[...]
private Collection createCommandResult() throws  Exception {
      List results = new ArrayList();

      DynaProperty[] props = new DynaProperty[] {
new DynaProperty("id", String.class),
new DynaProperty("responsetime", Long.class)
      };
      BasicDynaClass dynaClass = new BasicDynaClass("requesttime",
null, props);

      DynaBean request1 = dynaClass.newInstance();
      request1.set("id", "12345");
      request1.set("responsetime", new  Long(500));
      results.add(request1);
      DynaBean request2 = dynaClass.newInstance();
      request1.set("id", "56789");
      request1.set("responsetime", new  Long(430));
      results.add(request2);

return results;
    }

public void testCallView() throws  Exception {
      AdminServlet servlet = new  AdminServlet();
      // Set the result of the execution of the command in the
      // HTTP request so that the JSP page can get the data to
      // display
      request.setAttribute("result", createCommandResult());
      servlet.callView(request);
    }
}
There’s nothing we can verify in testCallView, so we don’t perform any asserts there. The call to callView forwards to a JSP. But Cactus supports asserting the result of the execution of a JSP page. We can use Cactus to verify that the JSP will be able to display the data that we created in createCommandResult. Because this would be JSP testing, we show how it works in section 14.4 (“Testing JSPs”).
Listing 14.7 shows the callView method that we use to forward the execution to the JSP in order to display the results.
Listing 14.7. Implementation of callView that makes the test pass
[...]
public class AdminServlet extends HttpServlet {
[...]
public void callView(HttpServletRequest request) {
      request.getRequestDispatcher("/results.jsp")
                                          .forward(request, response);
   }
}
We don’t have a test yet for the returned result, so not returning anything is enough. That will change once we test the JSP.
Testing the doGet method
Let’s design the unit test for the AdminServlet doGet method. To begin, we need to verify that the test results are put in the servlet request as an attribute. Here’s how to do that:
Collection results = (Collection) request.getAttribute("result");
assertNotNull("Failed to get execution results from the request",
results);
assertEquals(2, results.size());
This code leads to storing the command execution result in doGet. But where do we get the result? Ultimately, from the execution of executeCommand—but it isn’t implemented yet. The typical solution to this kind of deadlock is to have an executeCommand that does nothing in AdminServlet. Then, in our test, we can implement executeCommand to return whatever we want:
AdminServlet servlet = new AdminServlet() {
   public Collection executeCommand(String command) throws Exception {
      return createCommandResult();
   }
};
We can now store the result of the test execution in doGet:
public void doGet(HttpServletRequest request,
                  HttpServletResponse response) throws ServletException {
   try {
      Collection results = executeCommand(getCommand(request));
      request.setAttribute("result", results);
   } catch (Exception e) {
      throw new ServletException("Failed to execute command", e);
   }
}
Notice that we need the catch block because the servlet specification says doGet must throw a ServletException. Because executeCommand can throw an exception, we need to wrap it into a ServletException.
If you run this code, you’ll find that you’ve forgotten to set the command to execute in the HTTP request as a parameter. You need a beginDoGet method to do that, such as this:
public void beginDoGet(WebRequest request) {
   request.addParameter("command", "SELECT...");
}
With this method we’re ready to complete the test.
The doGet code is shown in listing 14.8.
Listing 14.8. Implementation of doGet that makes the tests pass
There are two points to note. First, the call to callView isn’t present in doGet; the tests don’t yet mandate it. (They will, but not until we write the unit tests for our JSP.)
Second, we throw a RuntimeException object if executeCommand is called ![]() . We could return null, but throwing an exception is a better practice. An exception clearly states that we haven’t implemented the method. If the
method is called by mistake, there won’t be any surprises.
. We could return null, but throwing an exception is a better practice. An exception clearly states that we haven’t implemented the method. If the
method is called by mistake, there won’t be any surprises.
When you’re writing code, there are often times when you want to execute the code without having finished implementing all the methods. For example, if you’re writing a mock object for an interface and the code you’re testing uses only one method, you don’t need to mock all methods. A good practice is to throw an exception instead of returning null values (or not returning anything for methods with no return value). There are two good reasons: doing this states clearly to anyone reading the code that the method isn’t implemented, and it ensures that if the method is called, it will behave in such a way that you can’t mistake skeletal behavior for real behavior.
So far, we’ve discussed the Administrator application and shown how to test one part of it, the servlet part. Now it’s time to move on and concentrate on probably the most difficult-to-test part of the application, the frontend.
14.4. Testing JSPs
In this section, we continue with the Administration application we introduced in the previous section. Here, we concentrate on testing the view components—namely the JavaServer Pages (JSPs).
14.4.1. Revisiting the Administration application
We call the application by sending an HTTP request (from our browser) to the AdminServlet (figure 14.2). We pass a SQL query to run as an HTTP parameter, which is retrieved by the AdminServlet. The security filter intercepts the HTTP request and verifies that the SQL query is harmless (it’s a SELECT query). Then, the servlet executes the query on the database, stores the resulting objects in the HTTP Request object, and calls the Results View page. The JSP takes the results from the Request and displays them, nicely formatted, using custom JSP tags from our tag library.
14.4.2. What is JSP unit testing?
First, let’s remove any doubt: what we call unit testing a JSP isn’t about unit testing the servlet that’s generated by the compilation of the JSP. We also assume that the JSP is well designed, which means there’s no Java code in it. If the page must handle any presentation logic, the logic is encapsulated in a JavaBean or in a taglib. We can perform two kinds of tests to unit test a JSP: test the JSP page itself in isolation and/or test the JSP’s taglibs.
We can isolate the JSP from the backend by simulating the JavaBeans it uses and then verifying that the returned page contains the expected data. We use Cactus to demonstrate this type of test. Because mock objects (see chapter 7) operate only on Java code, we can’t use a pure mock objects solution to unit test our JSP in isolation. We could also write functional tests for the JSP using a framework such as HttpUnit. But doing so means going all the way to the backend of the application, possibly to the database. With a combination of Cactus and mock objects, we can prevent calling the backend and keep our focus on unit testing the JSPs themselves. We can also unit test the custom tags used in the JSP.
14.4.3. Unit testing a JSP in isolation with Cactus
The strategy for unit testing JSPs in isolation with Cactus is defined in figure 14.3.
Figure 14.3. Strategy to unit test JSPs with Cactus

Here’s what happens. The Cactus test case class must extend ServletTestCase (or JspTestCase):
- In the testXXX method (called by Cactus from inside the container), we create the mock objects that will be used by the JSP. The JSP gets its dynamic information either from the container-implicit object (HttpServletRequest, HttpServletResponse, or ServletConfig) or from a taglib.
- Still in testXXX, we perform a forward to call the JSP under test. The JSP then executes, getting the mock data set up in step 1.
- Cactus calls endXXX, passing to it the output from the JSP. This allows us to assert the content of the output and verify that the data we set up found its way to the JSP output, in the correct location on the page.
14.4.4. Executing a JSP with SQL results data
Let’s see some action on the Administration application. In the servlet section (“Testing servlets and filters”), we defined that the results of executing the SQL query would be passed to the JSP by storing them as a collection of DynaBean objects in the HttpServletRequest object. Thanks to the dynamic nature of DynaBeans, we can easily write a generic JSP that will display any data contained in the DynaBeans. DynaBeans provide metadata about the data they contain. We can create a generic table with columns corresponding to the fields of the DynaBeans, as shown in listing 14.9.
Listing 14.9. Results View JSP (results.jsp)
<%@ page contentType="text/html;charset=UTF-8" language="java" %>
<%@ taglib prefix="c" uri="http://jakarta.apache.org/taglibs/core" %>
<%@ taglib prefix="d" uri="/dynabeans" %>

<html>
   <head>
      <title>Results Page</title>
   </head>
   <body bgcolor="white">
      <table border="1">
         <d:properties var="properties"
            item="${requestScope.results[0]}"/>

         <tr>
            <c:forEach var="property" items="${properties}">
               <th><c:out value="${property.name}"/></th>
            </c:forEach>
         </tr>

         <c:forEach var="result" items="${requestScope.results}">
            <tr>
              <c:forEach var="property" items="${properties}">
                 <td><d:getProperty name="${property.name}"
                                         item="${result}"/></td>
              </c:forEach>
            </tr>
         </c:forEach>
      </table>
   </body>
</html>
We use both JSTL tags and custom taglibs to write the JSP. The JSTL tag library is a standard set of useful and generic tags. It’s divided into several categories (core, XML, formatting, and SQL). The category used here is the core, which provides output, management of variables, conditional logic, loops, text imports, and URL manipulation.
We also write two custom tags, <d:properties> and <d:getProperty>, which are used to extract information from the DynaBeans. <d:properties> extracts the name of all properties of a DynaBean, and <d:getProperty> extracts the value of a given DynaBean property.
There are two reasons for writing these custom tags. The primary reason is that it isn’t possible to extract DynaBean information without (ouch!) embedding Java code in the JSP (at least not with the current implementation of the JSTL tags and the DynaBean package). The second reason is that it gives us a chance to write and unit test custom taglibs of our own.
Writing the Cactus test
Now let’s write a Cactus ServletTestCase for the JSP. The callView method from the AdminServlet forwards control to the Results View JSP, as shown in listing 14.10.
Listing 14.10 shows a unit test for callView that sets up the DynaBean objects in the Request, calls callView, and then verifies that the JSP output is what we expect.
Listing 14.10. TestAdminServlet.java: unit tests for results.jsp
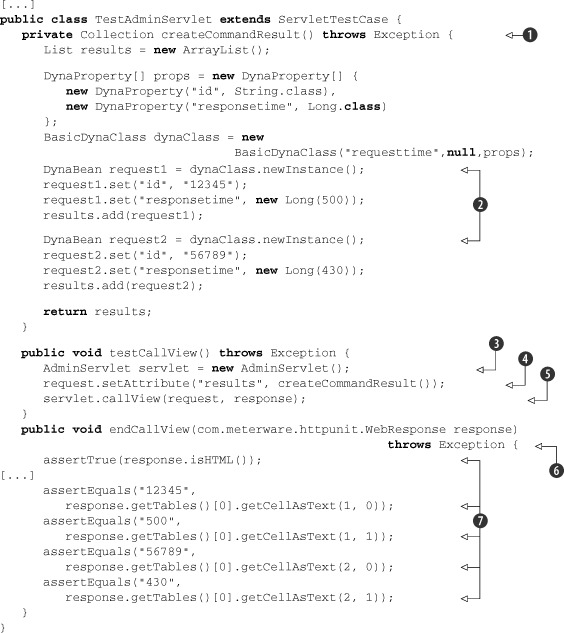
We start by defining the createCommand method ![]() , which puts several DynaBeans in the request
, which puts several DynaBeans in the request ![]() . Then in the testCallView
. Then in the testCallView ![]() method (remember that it’s executed on the server side) we instantiate the servlet to test
method (remember that it’s executed on the server side) we instantiate the servlet to test ![]() , set the DynaBeans in the request E, and call the JSP
, set the DynaBeans in the request E, and call the JSP ![]() to display the result. The endCallView
to display the result. The endCallView ![]() , which is executed on the client side, has a com.meterware.httpunit.WebResponse parameter, holding the response from the server. In
, which is executed on the client side, has a com.meterware.httpunit.WebResponse parameter, holding the response from the server. In ![]() we assert different statements against the response of the server, in order to verify that the JSP displays the results properly.
we assert different statements against the response of the server, in order to verify that the JSP displays the results properly.
We use the Cactus HttpUnit integration in the endCallView method to assert the returned HTML page. When Cactus needs to execute the endXXX method, first it looks for an endXXX (org.apache.cactus.WebResponse) signature. If this signature is found, Cactus calls it; if it isn’t, Cactus looks for an endXXX (com.meterware. httpunit.WebResponse) signature, and if it’s available, calls it. Using the org.apache. cactus.WebResponse object, we can perform asserts on the content of the HTTP response, such as verifying the returned cookies, the returned HTTP headers, or the content. The Cactus org.apache.cactus.WebResponse object supports a simple API. The HttpUnit web response API (com.meterware.httpunit.WebResponse) is much more comprehensive. With HttpUnit, we can view the returned XML or HTML pages as DOM objects. In listing 14.10, we use the provided HTML DOM to verify that the returned web page contains the expected HTML table.
In this section we described how to test the frontend of the Administrator application. What we’re still missing is a few pages that will reveal to us how to unit test the AdministratorBean EJB, which executes our queries on the database. The secrets of EJB testing are covered in the next section.
14.5. Testing EJBs
Testing EJBs has a reputation of being a difficult task. One of the main reasons is that EJBs are components that run inside a container. You need to either abstract out the container services used by your code or perform in-container unit testing. In this section, we demonstrate different techniques that can help you write EJB unit tests. We also continue developing our Administrator application, showing you the module that executes the SQL queries.
The architecture of the Administrator application goes like this: The command to be executed gets through the filter, which determines whether it’s a SELECT query. After that, the AdminServlet eventually receives the command/query.
The execution flow starts in the AdminServlet doGet method. It receives the HTTP requests and calls the getCommand method to extract the SQL query from it. It then calls executeCommand to execute the database call (using the extracted SQL query) and return the results as a Collection. The results are then put in the HTTP request (as a request attribute) and, at last, doGet calls callView to invoke the JSP page that presents the results to the user. So far, we’ve given no implementation of the executeCommand method. The idea behind it would be to call a given EJB, which would execute the query on a given database. One simple implementation of the executeCommand method would be as follows:
public Collection executeCommand(String command) throws Exception {
   Context context = new InitialContext();
   IAdministratorLocal administrator = (IAdministratorLocal)
                                       context.lookup("AdministratorBean");
   return administrator.execute(command);
}
The EJB itself is shown in listing 14.11.
Listing 14.11. AdministratorEJB
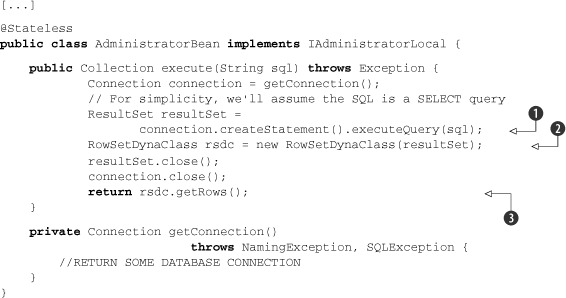
We call the execute method from the servlet with the given query; there we try to obtain a valid connection and execute the query ![]() . After that we create a RowSetDynaClass object from the ResultSet
. After that we create a RowSetDynaClass object from the ResultSet ![]() , and we return its rows
, and we return its rows ![]() .
.
In order to test the EJB with Cactus, we have to instantiate it and then assert against the result of the execution. We can use, again, mock objects to simulate the JNDI lookup, but this approach is unnecessarily complicated, so we won’t list it here. Let’s look at the test case for the EJB in listing 14.12, and then we’ll go through it and discuss it.
Listing 14.12. Test case for AdministratorEJB
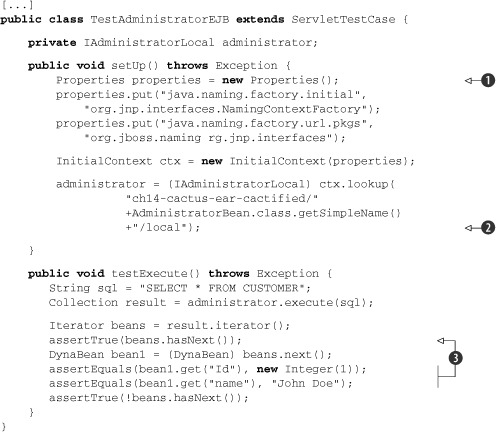
At ![]() we start by initializing the context in the setUp method (remember that this method is called before each test method), and we get hold of a valid IAdministratorBeanLocal instance from the JNDI
we start by initializing the context in the setUp method (remember that this method is called before each test method), and we get hold of a valid IAdministratorBeanLocal instance from the JNDI ![]() . Then in each test method we invoke the methods on the EJB with different parameters and assert the validity of the result
. Then in each test method we invoke the methods on the EJB with different parameters and assert the validity of the result
![]() .
.
So far, we’ve covered what you need in order to write Cactus test cases. Before we rush into the section that deals with execution of our Cactus tests, it’s essential that you get familiar with a project called Cargo. The tight integration between Cargo and Cactus is one of the new features that facilitate running your tests.
14.6. What is Cargo?
What we’ve seen so far is pretty much the bulk of how to write Cactus tests cases. At the beginning of the chapter, we mentioned that Cactus test cases are executed inside the container. In this section and in the ones that follow we focus on how to integrate execution of Cactus tests in your build lifecycle. In order to keep the Extreme Programming principles, you need to execute the tests every time you make a build. This requires a tight integration between Cactus and the build system—Ant or Maven. But before we jump into that integration, you need to become familiar with a project they both rely on: Cargo.
Cargo (http://cargo.codehaus.org/) is an open source project started, again, by Vincent Massol in 2004. The aim of the project is to automate container management in a generic way so that we could use the same mechanism to start and deploy a WAR file with Tomcat as we could with WebLogic or almost any other application server. It provides an API around most of the existent Java EE containers for managing those containers (starting, stopping, and deploying). But Cargo is a bit more than just an API, and that’s where its strength comes from; it provides Ant tasks and Maven (1.x and 2.x) plug-ins for facilitating the management of those containers.
After this brief introduction to the secrets of Cargo you’re probably asking yourself, what’s the connection between Cargo and Cactus? The Cactus team realizes that the idea behind the project is great, but it seems as though there’s too much of a burden regarding the process of executing the tests. Once written, the tests need to be packaged in a WAR or EAR archive; then the application descriptors need to be patched with the appropriate redirectors. After that, before the execution gets started, the archive needs to be deployed in a container that’s already started. You’ve probably already noticed the three italicized words in the previous sentence. And you’ve probably already guessed that the main idea of the Cactus development team was to hide all the complexity regarding the management of the container by means of Cargo.
This gives us full automation. If we use Cargo’s Ant tasks (or Maven plug-ins) to start the container, then deploy the WAR/EAR in it, and then stop the container we have achieved the Extreme Programming principles of continuous integration. Our build is fully automated, isn’t it? That’s all true, but deploying the archive with the tests by itself doesn’t do anything magical—we still need to figure out a way to trigger the execution of the tests when the archive is deployed. We also need a way to prepare the archive for deployment. This is all part of the tight integration between Cactus and the various build systems. We deal with this integration in subsequent chapters.
14.7. Executing Cactus tests with Ant
The first way to fire up Cactus tests that we’re going to show seems to be the most common one. Using Ant is easy and straightforward. If you’re new to Ant, we’d like to recommend to you Ant in Action, by Steve Loughran and Erik Hatcher—a marvelous book. Also, before you read this section, please make sure you’ve already read chapter 8.
14.7.1. Cactus tasks to prepare the archive
Cactus comes bundled with two kinds of Ant tasks: the first one will facilitate you in preparing the archive (WAR or EAR) to hold the test cases, and the second will invoke the tests. We go through these tasks one after the other and show you how to use them.
The process of preparing the archive for executing the tests is called cactification. This term was introduced by the Cactus team. Imagine you have at some point an archive (a WAR or EAR file), which is the application that you want to deploy. The cactification process includes adding the required JARs into the lib folder of the archive and also patching the web.xml to include desired Cactus redirectors.
According to the type of archive that you want to cactify, there are two different tasks that you may want to use: cactifywar and cactifyear. Before we rush into describing these tasks, let’s first take a minute to focus on the build.xml skeleton that we use for our presentation purposes (see listing 14.13).
Listing 14.13. Build.xml skeleton to execute the Cactus tests
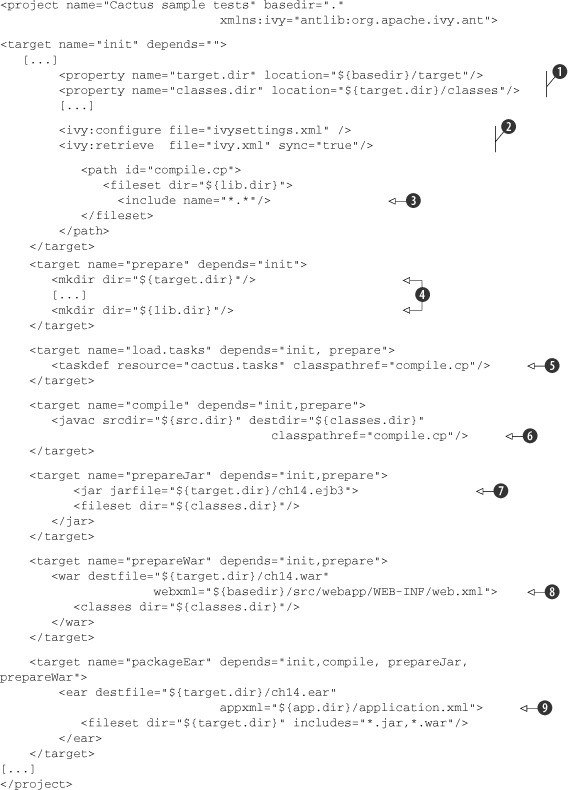
This Ant descriptor is pretty simple. As you can see, one of the first things to do is declare some properties in the init target ![]() . We use these properties later in the script. In this target we also resolve the additional dependencies with Ivy
. We use these properties later in the script. In this target we also resolve the additional dependencies with Ivy ![]() and construct a classpath refid
and construct a classpath refid ![]() . The prepare target prepares the folder structure for the build
. The prepare target prepares the folder structure for the build ![]() , and after that we use the taskdef task
, and after that we use the taskdef task ![]() to define the external tasks (remember that cactifyXXX and cargo tasks are external tasks that come with Cactus/Cargo; they aren’t part of the official Ant tasks). Then we compile our code
to define the external tasks (remember that cactifyXXX and cargo tasks are external tasks that come with Cactus/Cargo; they aren’t part of the official Ant tasks). Then we compile our code
![]() and produce either a JAR file containing the EJBs
and produce either a JAR file containing the EJBs ![]() or a WAR file
or a WAR file ![]() containing the servlets (depending on what part of the code we test). We might use also a separate target to produce the
EAR file
containing the servlets (depending on what part of the code we test). We might use also a separate target to produce the
EAR file ![]() that we will need.
that we will need.
Now that you’re familiar with the structure of the build.xml, it’s time to focus on the first set of tasks that Cactus provides.
The cactifywar task
This task is used when your application is a WAR file and you want to cactify it. The cactifywar task extends the built-in war Ant task so it also supports all attributes and nested elements that the war task supports. Nothing explains better than an example, so let’s start the test cases from this chapter using Ant. We walk through the build.xml in listing 14.14 and then discuss it.
Listing 14.14. Build.xml to present cactifywar task
<target name="cactifywar" depends="init,load.tasks, prepareWar">
    <cactifywar srcfile="${target.dir}/ch14.war"
                 destfile="${target.dir}/ch14-cactified.war"/>
</target>
In the cactifywar target we call the cactifywar task, which we imported in the first steps (in the load.tasks target). As you can see, the cactifywar task takes the following parameters: srcfile, destfile, and a list of redirectors we want to define. There’s a bunch of other, nonrequired parameters, all of which are perfectly documented on the Cactus website (http://jakarta.apache.org/cactus), where you can find additional help. Also, once again, because the cactifywar task extends the war task, you can pass all the parameters for the war task to it—they’re all valid.
In the srcfile attribute you specify the archive file of the application that you want to cactify. The important thing to notice here is that you may need to specify not only the name of the file but also the destination path to it. In the destfile parameter, you specify the name of the cactified file to produce.
You also may want to describe a list of redirectors in the cactifywar task. This list of redirectors describes URL patterns to map the Cactus test redirectors to the nested elements filterredirector, jspredirector, and servletredirector. If you don’t specify those elements, the test redirectors will be mapped to the default URL pattern.
After executing the target with
ant cactifywar
we should get the desired cactified archive, which we can examine.
The cactifyear task
The cactifyear task is the analogue of the cactifywar task, but instead it’s used to cactify EAR applications. It’s a bit different from cactifywar, because in most cases EAR applications contain a WAR archive that needs to be cactified. The cactifyear task is, again, an external task that comes from the Cactus team and extends the Ant ear task. This way it accepts all of the parameters that are valid for the ear task.
Let’s now execute our tests from an EAR archive (listing 14.15), and then we’ll walk through the example application and discuss the different aspects.
Listing 14.15. Build.xml to present cactifyear task
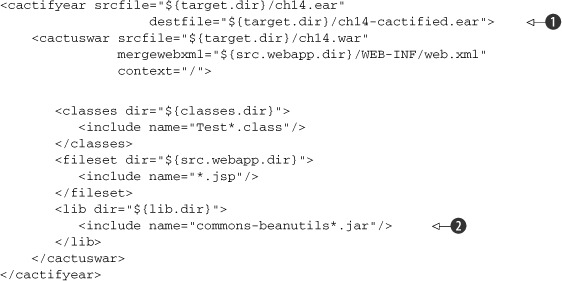
Once again, we use the build.xml skeleton from listing 14.13, and here we list the target that’s responsible for the cactification of the already packaged EAR file.
As you can see, the cactifyear task accepts the srcfile and destfile parameters again ![]() . Their meaning here is exactly the same as for the cactifywar task. The new component here is a cactuswar nested element. This element has all the parameters of the cactifywar task except the destfile parameter. The web application will always be named cactus.war and placed in the root of the EAR. We also add the commons-beanutils.jar
file to the web application
. Their meaning here is exactly the same as for the cactifywar task. The new component here is a cactuswar nested element. This element has all the parameters of the cactifywar task except the destfile parameter. The web application will always be named cactus.war and placed in the root of the EAR. We also add the commons-beanutils.jar
file to the web application ![]() , because our servlet and filter test cases need it.
, because our servlet and filter test cases need it.
Once we execute with
ant cactifyear
we get the cactified archive, which we can examine.
The cactus task
Because the other Cactus-related tasks are external Ant tasks that extend some of the internal Ant tasks, this concept is also valid for the cactus task. The cactus task is used to execute the Cactus tests, and because every Cactus test is a pure JUnit test, you’ve probably already figured out what task the cactus task extends. That’s right—the cactus task extends the junit task. This way, all the parameters that the junit task accepts are also valid for the cactus task.
Listing 14.16 extends listing 14.13 with the cactus task that executes the tests from the EAR archive.
Listing 14.16. The test target to demonstrate the cactus task
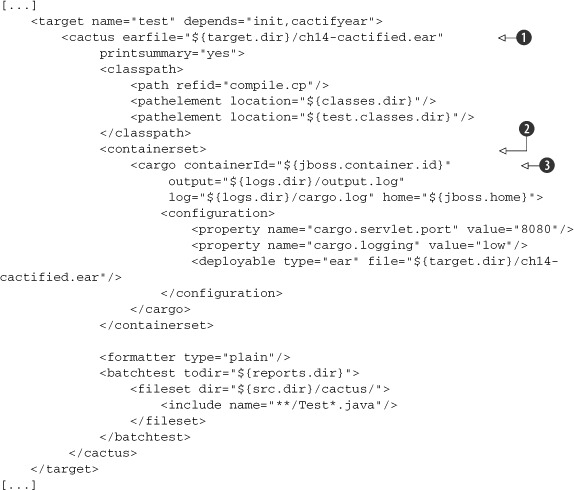
As you can see, the cactus task is used in connection with the cargo tasks (this is why we introduced Cargo a while ago). With the one declaration in the listing, we’ve defined all the necessary information to start and execute tests and stop the container.
The warfile/earfile parameter ![]() is used to specify the name of an archive file that we’re going to deploy. This has to be the name of our cactified WAR/EAR
file that holds our test cases as well as the classes that we want to test (it’s the result of the corresponding cactify task). It’s also obligatory to add a containerset nested element
is used to specify the name of an archive file that we’re going to deploy. This has to be the name of our cactified WAR/EAR
file that holds our test cases as well as the classes that we want to test (it’s the result of the corresponding cactify task). It’s also obligatory to add a containerset nested element ![]() . In this nested element we specify a number of cargo tasks
. In this nested element we specify a number of cargo tasks ![]() , which will define the containers in which to execute our tests. When we say that we specify cargo tasks, we mean it—these are pure cargo tasks, and they can take any parameter that a normal cargo task can take: proxy, timeout, server port, and so on.
, which will define the containers in which to execute our tests. When we say that we specify cargo tasks, we mean it—these are pure cargo tasks, and they can take any parameter that a normal cargo task can take: proxy, timeout, server port, and so on.
In the given cargo tasks we have to specify the ID of the containers, the configuration of the containers, and the deployable (the cactified archive that contains our test cases). Cargo tasks can work with installed local or remote instances of a container; you need only specify the home directory of that container. But there’s more; these tasks also let you specify the so-called ZipURLInstaller. In this installer you specify a URL to a given container archive, and Cargo will download the given container from there, extract the container from the archive, start the container, and deploy the given deployable. Then Cactus will execute the tests inside the container, and Cargo will stop the container. That’s a fully automated cycle, and the Cactus project comes with several sample applications that use this automation.
Our application is done; not only this, but it’s also well tested using Cactus. You already saw how to execute your tests with Ant, so it’s time to show one final way to execute the given tests, this time using another build tool: Maven.
14.8. Executing Cactus tests with Maven2x
Another common approach for executing your Cactus tests is including them in your Maven[1] build.
1 From now on, whenever we discuss the term Maven, we mean the Maven2 project, because the authors of this book consider Maven1 a dead technology.
Many people use Maven as their build system, and until version 1.8.1 of Cactus, the only way of executing Cactus tests with Maven was calling the Ant plug-in for Maven and executing the tests via Ant. The latest version of Cactus, however, contains a cactus-maven2 plug-in that significantly facilitates the cactification process. The Cactus Maven plug-in consists of two MOJOs (Maven POJOs, or plain old Java objects) you can use for cactification of a WAR or EAR.
Let’s walk through the examples and see how to use them.
14.8.1. Maven2 cactifywar MOJO
Listing 14.17 shows a common pom.xml file that we enhance later.
Listing 14.17. Sample pom.xml for running the Cactus tests
<project>
    <modelVersion>4.0.0</modelVersion>
    <groupId>com.manning.junitbook2</groupId>
    <artifactId>ch14-cactus</artifactId>
    <packaging>jar</packaging>
    <version>2.0-SNAPSHOT</version>
</project>
This is a basic pom.xml, and we can use it for all our purposes: compile our source code and package our application in a WAR archive. There’s nothing fancy here; we’re just using the corresponding plug-ins of Maven. After executing the build with
mvn package
we should see the resulting archive and can examine its accuracy. Now we can add the Cactus plug-ins to prepare the archive for deployment.
The Cactus plug-in is nothing more than a declaration of several other plug-ins, in the correct order. We now show how to declare these plug-ins. The next three listings (14.18, 14.19, and 14.20) should be considered one big listing, but for the sake of readability, we’ve split them into three.
Listing 14.18. Build section of the pom.xml to enable Cactus tests execution
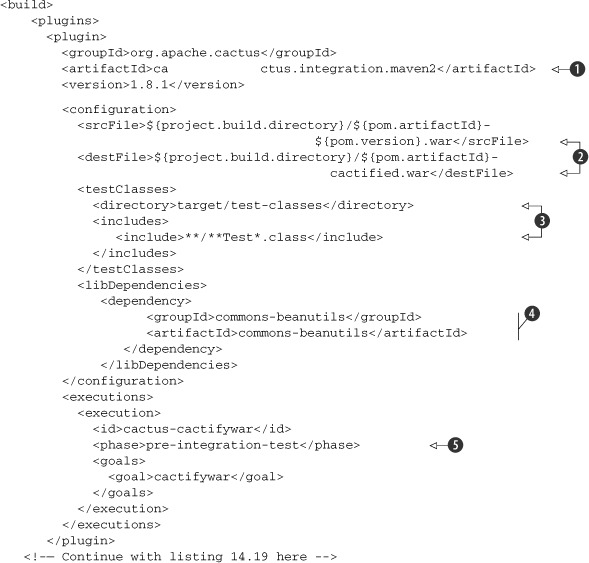
As we mentioned already, all we do is define three plug-ins, one after another in the correct order. The first one is the
cactus.integration.maven2 plug-in ![]() . We use it for cactification of the WAR file we got from the previous listing. Again, as in the cactifywar task, we specify srcfile and destfile parameters
. We use it for cactification of the WAR file we got from the previous listing. Again, as in the cactifywar task, we specify srcfile and destfile parameters ![]() . We also specify which test classes to include
. We also specify which test classes to include ![]() and which libraries to include in the WEB-INF/ lib folder
and which libraries to include in the WEB-INF/ lib folder ![]() . In this case, we want only the commons-beanutils, because our tests use it.
. In this case, we want only the commons-beanutils, because our tests use it.
It’s important to specify the execution order of the plug-ins. In Maven we specify the execution order by attaching every
plug-in goal to a single phase. For instance, in the listing we attached our plug-in’s cactifywar goal to the pre-integration-test phase ![]() . This phase, as its name implies, is executed by Maven just before the integration-test phase (in which we’re going to execute
our tests). This is perfect, because we want our package cactified before we execute our tests.
. This phase, as its name implies, is executed by Maven just before the integration-test phase (in which we’re going to execute
our tests). This is perfect, because we want our package cactified before we execute our tests.
Listing 14.19 displays the second plug-in.
Listing 14.19. Continuation of the plug-in declarations from listing 14.18
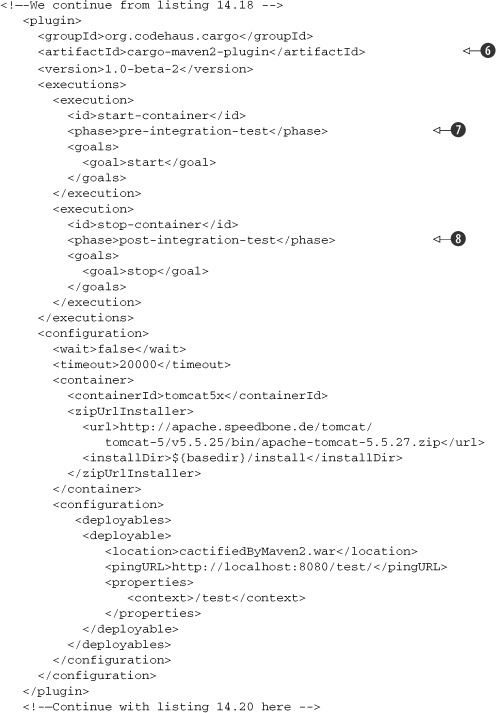
The next plug-in declaration is for the cargo-maven2-plugin, which we use to declare the containers to execute our tests in ![]() . As you can see, we attach its start goal to the pre-integration-test phase to start the container before we execute the tests
. As you can see, we attach its start goal to the pre-integration-test phase to start the container before we execute the tests ![]() . But wait a second; didn’t we attach the cactifywar goal to the same phase? What will be the execution order here? In this case, we need two different goals attached to the
same phase, because we have more than one thing to do before the integration phase of Maven. In this situation, the cactus plug-in will execute first, because it’s declared right before the cargo plug-in. And here you can see why we insisted that the order of declaration of the plug-ins in the <build> section is so important. This way we first prepare the cactified archive for deployment, and then we start the container
with this archive as a deployable. We also attach this plug-in’s stop goal with the post-integration-test phase
. But wait a second; didn’t we attach the cactifywar goal to the same phase? What will be the execution order here? In this case, we need two different goals attached to the
same phase, because we have more than one thing to do before the integration phase of Maven. In this situation, the cactus plug-in will execute first, because it’s declared right before the cargo plug-in. And here you can see why we insisted that the order of declaration of the plug-ins in the <build> section is so important. This way we first prepare the cactified archive for deployment, and then we start the container
with this archive as a deployable. We also attach this plug-in’s stop goal with the post-integration-test phase ![]() . This is normal; we need to stop the container once the tests are executed.
. This is normal; we need to stop the container once the tests are executed.
Listing 14.20 displays the third plug-in: the maven-surefire-plugin.
Listing 14.20. Continuation of the plug-in declarations from listing 14.19
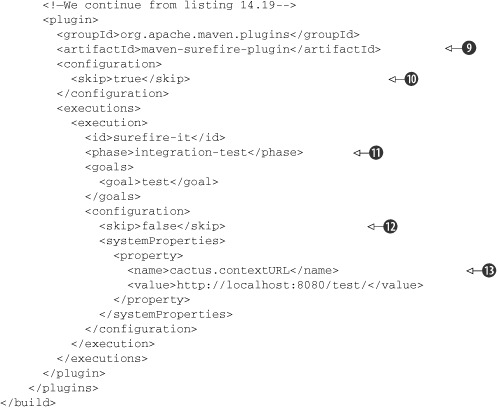
The last plug-in declaration is for the maven-surefire-plugin ![]() . As you already saw in chapter 10, this Maven plug-in is responsible for executing JUnit tests. Because every Cactus test is also a JUnit test, we can use
this plug-in to execute our Cactus tests. There are a couple of things to notice in its declaration. As you can see, we declare
the skip parameter with true
. As you already saw in chapter 10, this Maven plug-in is responsible for executing JUnit tests. Because every Cactus test is also a JUnit test, we can use
this plug-in to execute our Cactus tests. There are a couple of things to notice in its declaration. As you can see, we declare
the skip parameter with true ![]() . That’s because the Surefire plug-in is by default attached to the test phase. We surely don’t want it attached to this phase,
so we declare the skip parameter to true, which will cause the plug-in to skip the execution. Further in the declaration we attach the test goal with the integration-test
phase
. That’s because the Surefire plug-in is by default attached to the test phase. We surely don’t want it attached to this phase,
so we declare the skip parameter to true, which will cause the plug-in to skip the execution. Further in the declaration we attach the test goal with the integration-test
phase ![]() (where we want it to be), and we declare the skip parameter with false
(where we want it to be), and we declare the skip parameter with false ![]() . This will cause the plug-in to execute the tests in the integration-test phase, just as we want it to happen. There’s also
one thing to remember: whenever you execute Cactus tests, you always have to specify cactus.contextURL
. This will cause the plug-in to execute the tests in the integration-test phase, just as we want it to happen. There’s also
one thing to remember: whenever you execute Cactus tests, you always have to specify cactus.contextURL ![]() . The Cactus Ant task does it for you, but the Surefire plug-in doesn’t, so that’s what we do in the last part.
. The Cactus Ant task does it for you, but the Surefire plug-in doesn’t, so that’s what we do in the last part.
14.8.2. Maven2 cactifyear MOJO
To execute Cactus tests from an EAR file, we have to follow the same procedure as for the WAR file, except for the cactification of the archive. That’s why we cover the cactifyear Cactus plug-in in this section. Listing 14.21 cactifies our example EAR package.
Listing 14.21. cactifyear Cactus plug-in declaration
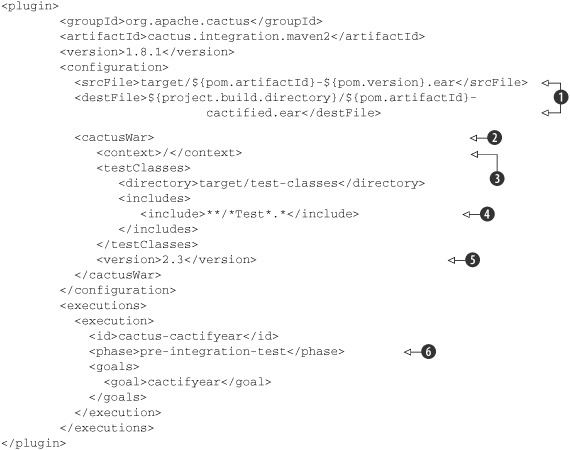
This declaration seems simple enough. All we have to do here is provide the srcfile and destfile parameters ![]() . In the <cactusWar> section
. In the <cactusWar> section ![]() , we describe parameters related to the WAR application inside our EAR file, such as the context of the application
, we describe parameters related to the WAR application inside our EAR file, such as the context of the application ![]() , which test classes to include
, which test classes to include ![]() , and which version of the web.xml will be used
, and which version of the web.xml will be used ![]() . In
. In ![]() we attach the plug-in to the pre-integration phase of Maven. The rest of the pom.xml is the same as the one in the previous
section, so we won’t discuss it further.
we attach the plug-in to the pre-integration phase of Maven. The rest of the pom.xml is the same as the one in the previous
section, so we won’t discuss it further.
Now we move on and show you one other way of executing your Cactus tests. This time we use Jetty as an embedded container. Jetty is not only a servlet container, but it also provides you with an API for manipulating the container. This API is used by Cactus to fire up the container for you, execute the tests, and then stop the container—all with a single command.
14.9. Executing Cactus tests from the browser
We know several different ways to execute JUnit tests. We looked at executions through JUnit’s own test runner, with the Ant and Maven test runners, and also through Jetty. As you already know, Cactus tests are also JUnit tests, so the question, “What is the analogue of the JUnit text test runner for Cactus?” seems valid and reasonable. JUnit’s test runner communicates directly with the JVM in which the execution takes place and gets the result from there. Cactus tests are executed in the server JVM, so we need to find a way to communicate with the server (tell it to invoke the tests and get the results).
The easiest way to communicate with the server is via a browser. In order to do this, we need to take care of a couple of things.
First, we need to declare the ServletTestRunner servlet in the application’s web.xml. The declaration is shown in listing 14.22.
Listing 14.22. ServletTestRunner declaration
[...]
<servlet>
    <servlet-name>ServletTestRunner</servlet-name>
    <servlet-class>
        org.apache.cactus.server.runner.ServletTestRunner
    </servlet-class>
</servlet>
[...]
<servlet-mapping>
    <servlet-name>ServletTestRunner</servlet-name>
    <url-pattern>/ServletTestRunner</url-pattern>
</servlet-mapping>
[...]
Once it’s declared, we’re going to use this servlet in our URL in the browser to tell the server to invoke the tests. We need to call the server with the following request in the browser:
http://server:port/mywebapp/ServletTestRunner?suite=mytestcase
Here you need to replace server, port, mywebapp, and mytestcase with the correct values of your server address, port number, context, and the fully qualified name (that is, with packages) of your TestCase class containing a suite() method.
After executing the given URL in the browser, the server should respond with the result shown in figure 14.4.
Figure 14.4. XML result in the browser from Cactus tests
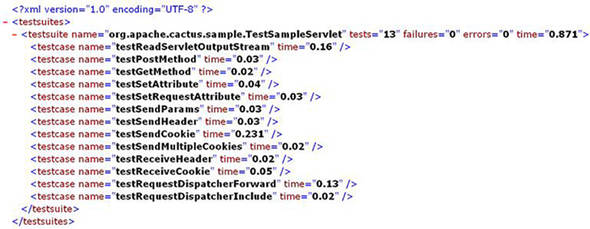
If you see a blank page, click the View Source option of your browser. It means your browser doesn’t know how to display XML data. Okay, that’s nice, but what if you want HTML instead of XML? Don’t worry; there’s a solution. Grab the XSLT stylesheet that comes with Cactus (cactus-report.xsl, based on the stylesheet used by the <junitreport> Ant task), and drop it in your web app (in the root directory, for example). Then, open a browser and type
http://server:port/mywebapp/ServletTestRunner?suite=mytestcase&xsl=cactus-report.xsl.
The .xsl stylesheet will generate the HTML report you’re familiar with, so you can view it from within your browser.
14.10. Summary
When it comes to unit testing container applications, pure JUnit unit tests come up short. A mock objects approach (see chapter 7) works fine and should be used. But it misses a certain number of tests—specifically integration tests, which verify that components can talk to each other, that the components work when run inside the container, and that the components interact properly with the container. In order to perform these tests, an in-container testing strategy is required.
In the realm of Java EE components, the de facto standard framework for in-container unit testing is Jakarta Cactus. In this chapter, we ran through some simple tests using Cactus, in order to get a feel for how it’s done. We also discussed how Cactus works, so we’re now ready to in-container test our Java EE applications.
Testing the components from the Java EE spec is nice, but it isn’t the whole picture. Most of our applications are heavily framework based. In the next chapters, we explore one of the most widely used MVC frameworks, JSF. We also introduce the JSFUnit project, which will let you test your JSF application inside the container.