
10. Objects and the DOM
Writing Code with Object Literals 257
Node manipulation is the W3C-recommended way for standards-compliant browsers to support Web pages that act more like applications than the standard, static pages that you’re used to. For instance, you can have pages that change based on entries the user makes, without hitting the server, and you can update pages under script control. Although you can use techniques like innerHTML, as we’ve done elsewhere in this book, here we show the officially supported approach. While this can also be done on the server side, it’s only with JavaScript that you can provide this functionality without the user having to go from page to page to page.
In this chapter, you’ll learn a bit more about nodes and the DOM; add, delete, and work with specific nodes; and insert and replace nodes on your pages.
About Node Manipulation
This chapter is about the deepest that this book goes into JavaScript and the DOM, so we’ll first need to cover a little bit of history and terminology.
DOM 2 and the W3C
The W3C (as mentioned in Chapter 1) has released specifications for how browsers should handle the Document Object Model (also known as the DOM). The DOM Level 2 specification, which became an official recommendation in November 2000, goes into more depth as to how browsers should be able to refer to and manage the content on their pages. You can find more details about the specification at
www.w3.org/TR/DOM-Level-2-Core/.
Although this specification has been around for years, there are still plenty of browsers in use that have incomplete or partial DOM 2 support. Before using any of these scripts, make sure that your intended audience is able to run them, or that you offer another way for older browsers to achieve the same results. Thankfully, the majority of surfers today use Internet Explorer 8+, Firefox, Chrome, or Safari, which should all work just fine with these scripts.
DOM 2 terminology
At the beginning of this book, we referred to JavaScript as “the snap-together language,” because of the way that you can put objects, properties, and methods together to build JavaScript applications. There’s a different way to look at HTML pages that we’ve only briefly mentioned before: as a tree structure with nodes. For example, this simple Web page
<html>
<head>
<title>My page</title>
</head>
<body>
<p>This is text on my page</p>
</body>
</html>
can be displayed as seen in ![]() .
.
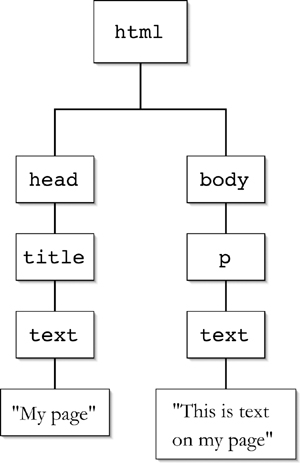
![]() The tree structure, showing nodes, is just another way of looking at how an HTML page is organized.
The tree structure, showing nodes, is just another way of looking at how an HTML page is organized.
We can use JavaScript to modify any aspect of this tree, including the ability to add, access, change, and delete nodes on the tree. Each box on the tree is a node. If the node contains an HTML tag, it’s referred to as an element node. Otherwise, it’s referred to as a text node. Of course, element nodes can contain text nodes.
DOM 3
Level 3 of the DOM standard became an official recommendation in April 2004. That specification is at www.w3.org/TR/DOM-Level-3-Core/. As with so many other parts of the W3C process, we’re still a long ways off from true support in shipping browsers, so this chapter sticks to discussing DOM 2. However, if you’re interested in learning more about DOM 3, the best place to look is at ECMAScript bindings, which can be found at www.w3.org/TR/DOM-Level-3-Core/ecma-script-binding.html.
Adding Nodes
The easiest way to learn about nodes is to start off by simply appending an element node (one which will contain a text node) to the end of your document. Listings 10.1 (the HTML) and 10.2 allow the user to enter some data and click a button, and voila! a new paragraph is added to your page ![]() .
.
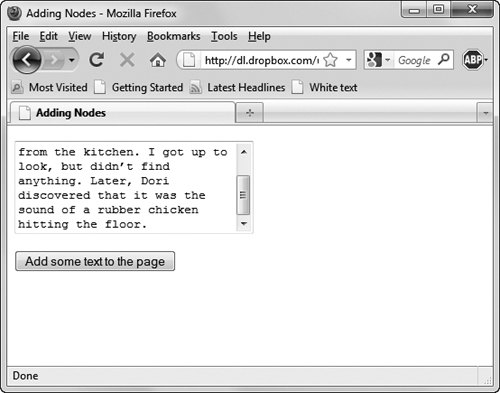
![]() To add a node, enter the text in the field (top) and then click the button. The text appears on the page (bottom).
To add a node, enter the text in the field (top) and then click the button. The text appears on the page (bottom).
To add nodes
1. var newText = document.createTextNode(inText);
We start by creating a new text node (called newText) using the createTextNode() method, which will contain whatever text was found in textArea.
2. var newGraf = document.createElement("p");
Next, we create a new element node using the createElement() method. While the node we’re creating here is a paragraph tag, it could be any HTML container (div, span, etc.). The name of the new element is newGraf.
3. newGraf.appendChild(newText);
In order to put the new text into the new paragraph, we have to call appendChild(). That’s a method of newGraf, which, when passed newText, puts the text node into the paragraph.
Listing 10.1. This HTML creates the text area and submit button that allow the user to add a text node.
<!DOCTYPE html>
<html>
<head>
<title>Adding Nodes</title>
<script src="script01.js"></script>
</head>
<body>
<form action="#">
<p><textarea id="textArea" rows="5" cols="30"></textarea></p>
<input type="submit" value="Add some text to the page">
</form>
</body>
</html>
Listing 10.2. With this script, the user can add any text they want to the page.
window.onload = initAll;
function initAll() {
document.getElementsByTagName("form")[0].onsubmit = addNode;
}
function addNode() {
var inText = document.getElementById("textArea").value;
var newText = document.createTextNode(inText);
var newGraf = document.createElement("p");
newGraf.appendChild(newText);
var docBody = document.getElementsByTagName("body")[0];
docBody.appendChild(newGraf);
return false;
}
4. var docBody = document.getElementsByTagName("body")[0];
In order to add a new node into the body of our document, we need to figure out where the body is. The getElementsByTagName() method gives us every body tag on our page. If our page is standards-compliant, there should only be one. The [0] property is that first body tag, and we store that in docBody.
5. docBody.appendChild(newGraf);
And finally, appending newGraf onto docBody (using appendChild() again) puts the user’s new text onto the page.
Wondering why you’d bother to go through all the hassle of creating a text node, creating an element node, and appending a child to each just to do what you could have done with a simple assignment to innerHTML? Here’s one reason: with this approach, you cannot make your page invalid. For example, every <p> or <div> tag that’s added is automatically closed. With innerHTML, on the other hand, it’s very easy (almost too easy) to create tag soup—and once you do, your page’s DOM becomes difficult to work with. You can’t read the contents of an element if it has a beginning but no ending tag, for instance.
In case you’re wondering: no, paragraphs cannot themselves contain other paragraphs. If you try pasting in multiple sentences broken up with blank lines, this code will turn them into a single giant paragraph. Instead, paste each paragraph separately.
Deleting Nodes
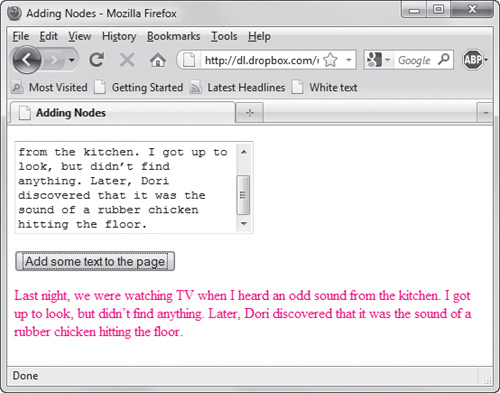
If you want to add content to your page, you’re also likely to want to delete content from your page. Listings 10.3 (HTML) and 10.4 delete the last paragraph on the page, as shown in ![]() .
.
![]() The last paragraph on this page needed a little revision (left), so it’s good that it can be deleted using the “Delete last paragraph” link (right).
The last paragraph on this page needed a little revision (left), so it’s good that it can be deleted using the “Delete last paragraph” link (right).
Listing 10.3. This script adds a link, rather than a button, to delete a text node.
<!DOCTYPE html>
<html>
<head>
<title>Deleting Nodes</title>
<script src="script02.js"></script>
</head>
<body>
<form action="#">
<p><textarea id="textArea" rows="5" cols="30"></textarea></p>
<input type="submit" value="Add some text to the page">
</form>
<a id="deleteNode" href="#">Delete last paragraph</a>
</body>
</html>
To delete nodes
1. var allGrafs = document.getElementsByTagName("p");
This line uses the getElementsByTagName method to collect all the paragraph tags in our page and store them in the allGrafs array.
2. if (allGrafs.length > 1) {
Before doing anything we regret, we have to check first that the allGrafs array has a length greater than one. We don’t want to try to delete something that doesn’t exist, and the length will always be at least one (as Listing 10.3’s textarea form field is inside a <p> tag).
Listing 10.4. Now the user can both add and delete text.
window.onload = initAll;
function initAll() {
document.getElementsByTagName("form")[0].onsubmit = addNode;
document.getElementById("deleteNode").onclick = delNode;
}
function addNode() {
var inText = document.getElementById("textArea").value;
var newText = document.createTextNode(inText);
var newGraf = document.createElement("p");
newGraf.appendChild(newText);
var docBody = document.getElementsByTagName("body")[0];
docBody.appendChild(newGraf);
return false;
}
function delNode() {
var allGrafs = document.getElementsByTagName("p");
if (allGrafs.length > 1) {
var lastGraf = allGrafs.item(allGrafs.length-1);
var docBody = document.getElementsByTagName("body")[0];
docBody.removeChild(lastGraf);
}
else {
alert("Nothing to remove!");
}
return false;
}
3. var lastGraf = allGrafs.item(allGrafs.length-1);
If there are paragraphs, get the last one on the page by subtracting one from length and using that as our index array. Remember that length is one-relative while arrays are zero-relative, so subtracting one from the length gives us the last paragraph on the page.
4. var docBody = document.getElementsByTagName("body")[0];
docBody.removeChild(lastGraf);
Just like the last task, in order to modify the document we need to get the contents of the body. Once we’ve got that, it’s simply a matter of calling the docBody.removeChild() method and passing it lastGraf, which tells JavaScript which paragraph we want to delete. Our page should immediately show one less paragraph.
Once again, remember that you can use JavaScript to delete element nodes other than paragraphs. To do this, you need to change the script so that getElementsByTagName() is passed something other than a p.
Deleting Specific Nodes
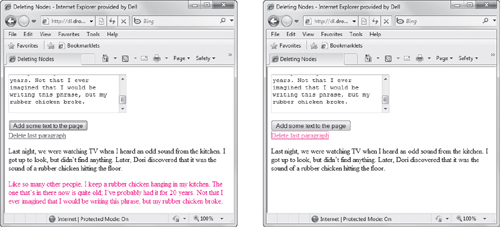
While always deleting the last paragraph might be interesting, you’ll sometimes want to delete something that’s not at the end of the page. Listings 10.5 (HTML) and 10.6 make our code considerably more flexible, allowing the user to decide which paragraph is history, as shown in ![]() and
and ![]() .
.
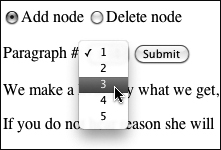
![]() After adding nodes, the Paragraph # pop-up menu contains a list of paragraph numbers.
After adding nodes, the Paragraph # pop-up menu contains a list of paragraph numbers.
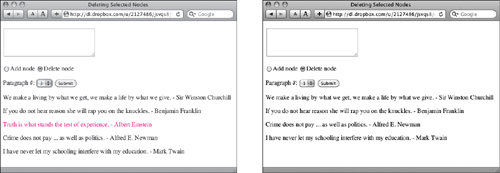
![]() First, you click the “Delete node” radio button, and then you choose a paragraph to delete from the pop-up menu (left). Clicking the Submit button wipes out the selected paragraph (the Albert Einstein quote) and moves up the following paragraph (right).
First, you click the “Delete node” radio button, and then you choose a paragraph to delete from the pop-up menu (left). Clicking the Submit button wipes out the selected paragraph (the Albert Einstein quote) and moves up the following paragraph (right).
Listing 10.5. We added radio buttons to this page to let you offer your visitors the choice of adding or deleting text.
<!DOCTYPE html>
<html>
<head>
<title>Deleting Selected Nodes</title>
<script src="script03.js"></script>
</head>
<body>
<form action="#">
<p><textarea id="textArea" rows="5" cols="30"></textarea></p>
<p><label><input type="radio" name="nodeAction">Add node</label>
<label><input type="radio" name="nodeAction">Delete node</label></p>
Paragraph #: <select id="grafCount"></select>
<input type="submit" value="Submit">
</form>
<div id="modifiable"> </div>
</body>
</html>
To delete a particular node
1. nodeChgArea = document.getElementById("modifiable");
As our page now has multiple paragraphs, it could be confusing to keep track of which can and can’t be deleted. Instead, we now set up an entirely new area: a div with the id of modifiable. Here, we set the global variable nodeChgArea to that element node.
Listing 10.6. This script allows users to choose which paragraph they want to delete.
window.onload = initAll;
var nodeChgArea;
function initAll() {
document.getElementsByTagName("form")[0].onsubmit = nodeChanger;
nodeChgArea = document.getElementById("modifiable");
}
function addNode() {
var inText = document.getElementById("textArea").value;
var newText = document.createTextNode(inText);
var newGraf = document.createElement("p");
newGraf.appendChild(newText);
nodeChgArea.appendChild(newGraf);
}
function delNode() {
var grafChoice = document.getElementById("grafCount").selectedIndex;
var allGrafs = nodeChgArea.getElementsByTagName("p");
var oldGraf = allGrafs.item(grafChoice);
nodeChgArea.removeChild(oldGraf);
}
function nodeChanger() {
var actionType = -1;
var pGrafCt = nodeChgArea.getElementsByTagName("p").length;
var radioButtonSet = document.getElementsByTagName("form")[0].nodeAction;
for (var i=0; i<radioButtonSet.length; i++) {
if (radioButtonSet[i].checked) {
actionType = i;
}
}
switch(actionType) {
case 0:
addNode();
break;
case 1:
if (pGrafCt > 0) {
delNode();
break;
}
default:
alert("No valid action was chosen");
}
document.getElementById("grafCount").options.length = 0;
for (i=0; i<nodeChgArea.getElementsByTagName("p").length; i++) {
document.getElementById("grafCount").options[i] = new Option(i+1);
}
return false;
}
2. var grafChoice = document.getElementById("grafCount").selectedIndex;
var allGrafs = nodeChgArea.getElementsByTagName("p");
var oldGraf = allGrafs.item(grafChoice);
When the user chose to delete a paragraph, they also had to pick which paragraph to delete. We read that number from the grafCount field and store it in grafChoice. The allGrafs variable is then set to be all the paragraphs within nodeChangingArea, and the paragraph to be deleted is then stored in oldGraf.
3. nodeChgArea.removeChild(oldGraf);
This step is just like that in the previous task, except that when it’s run we’ll see paragraphs disappear from the middle of our page.
Having trouble figuring out some of the other code? The nodeChanger() function combines (in order of appearance) functionality from Listings 2.15, 6.5, and 6.13. It’s very common in programming to have a library of simple routines, which, when put together, can create a single, much more complex whole.
Note that in the code above we’re using nodeChgArea where we previously used docBody—when you’re working with nodes, it’s straightforward to swap out code that works with one element node for another. Here, we’re looking at just one part of the page instead of the whole, but the overall way to accomplish our task is identical.
Instead of declaring nodeChgArea as a global variable and initializing it in initAll(), we could have created and initialized it locally inside every function in which it’s used. Each choice has its pros and cons; here, we went with the global so that we didn’t have to initialize it over and over again.
Listing 10.7. Another radio button and some script changes allow a third option—inserting text before another paragraph.
<!DOCTYPE html>
<html>
<head>
<title>Inserting Nodes</title>
<script src="script04.js"></script>
</head>
<body>
<form action="#">
<p><textarea id="textArea" rows="5" cols="30"></textarea></p>
<p><label><input type="radio" name="nodeAction">Add node</label>
<label><input type="radio" name="nodeAction">Delete node</label>
<label><input type="radio" name="nodeAction">Insert before node</label></p>
Paragraph #: <select id="grafCount"></select>
<input type="submit" value="Submit">
</form>
<div id="modifiable"> </div>
</body>
</html>
Inserting Nodes
Along with wanting to delete nodes other than at the end of the document, you’re likely to want to add nodes somewhere other than the end. With Listings 10.7 (the HTML) and 10.8, you’ll be able to choose where you want your new nodes to appear. In ![]() , you can see how the new node gets inserted.
, you can see how the new node gets inserted.
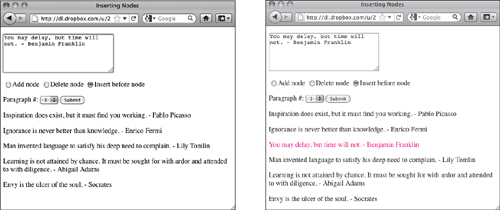
![]() To insert a paragraph, click the “Insert before node” radio button, select the desired paragraph you want for the insertion point (left), enter your text, and then click Submit (right).
To insert a paragraph, click the “Insert before node” radio button, select the desired paragraph you want for the insertion point (left), enter your text, and then click Submit (right).
To insert a node
1. var grafChoice = document.getElementById("grafCount").selectedIndex;
var inText = document.getElementById("textArea").value;
In order to insert a paragraph, we need to know two things: the place where the user wants it inserted (grafChoice) and the text they want inserted (inText).
Listing 10.8. The user can now add text anywhere on the page.
window.onload = initAll;
var nodeChgArea;
function initAll() {
document.getElementsByTagName("form")[0].onsubmit = nodeChanger;
nodeChgArea = document.getElementById("modifiable");
}
function addNode() {
var inText = document.getElementById("textArea").value;
var newText = document.createTextNode(inText);
var newGraf = document.createElement("p");
newGraf.appendChild(newText);
nodeChgArea.appendChild(newGraf);
}
function delNode() {
var grafChoice = document.getElementById("grafCount").selectedIndex;
var allGrafs = nodeChgArea.getElementsByTagName("p");
var oldGraf = allGrafs.item(grafChoice);
nodeChgArea.removeChild(oldGraf);
}
function insertNode() {
var grafChoice = document.getElementById("grafCount").selectedIndex;
var inText = document.getElementById("textArea").value;
var newText = document.createTextNode(inText);
var newGraf = document.createElement("p");
newGraf.appendChild(newText);
var allGrafs = nodeChgArea.getElementsByTagName("p");
var oldGraf = allGrafs.item(grafChoice);
nodeChgArea.insertBefore(newGraf,oldGraf);
}
function nodeChanger() {
var actionType = -1;
var pGrafCt = nodeChgArea.getElementsByTagName("p").length;
var radioButtonSet = document.getElementsByTagName("form")[0].nodeAction;
for (var i=0; i<radioButtonSet.length; i++) {
if (radioButtonSet[i].checked) {
actionType = i;
}
}
switch(actionType) {
case 0:
addNode();
break;
case 1:
if (pGrafCt > 0) {
delNode();
break;
}
case 2:
if (pGrafCt > 0) {
insertNode();
break;
}
default:
alert("No valid action was chosen");
}
document.getElementById("grafCount").options.length = 0;
for (i=0; i<nodeChgArea.getElementsByTagName("p").length; i++) {
document.getElementById("grafCount").options[i] = new Option(i+1);
}
return false;
}
2. var newText = document.createTextNode(inText);
var newGraf = document.createElement("p");
newGraf.appendChild(newText);
Here’s our by-now-standard way of creating a new paragraph node and filling it with the user’s text.
3. var allGrafs = nodeChgArea.getElementsByTagName("p");
var oldGraf = allGrafs.item(grafChoice);
Once again, we get all the p tags in our region, and then we store the target paragraph (the one we’ll be inserting our new paragraph in front of) in oldGraf.
4. nodeChgArea.insertBefore(newGraf,oldGraf);
The new paragraph is inserted by calling the insertBefore() method and passing it two parameters: the new node and the existing node that we want the new node to be inserted before (hence the name).
You might think that if there’s an insertBefore() there ought to be an insertAfter(), but that’s not the case. If you want to add something to the end of the page, you need to use appendChild().
Replacing Nodes
While you can always delete existing nodes and insert new nodes, it’s simpler to just replace nodes if that’s what you want. Listings 10.9 (the HTML) and 10.10 show how you can replace one node with another. ![]() shows the replacement process.
shows the replacement process.
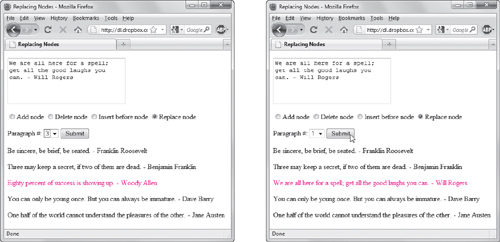
![]() Here, we’ve replaced the third paragraph (left) with new text (right).
Here, we’ve replaced the third paragraph (left) with new text (right).
Listing 10.9. Adding the “Replace node” radio button to the HTML rounds out our node manipulation examples.
<!DOCTYPE html>
<html>
<head>
<title>Replacing Nodes</title>
<script src="script05.js"></script>
</head>
<body>
<form action="#">
<p><textarea id="textArea" rows="5" cols="30"></textarea></p>
<p><label><input type="radio" name="nodeAction">Add node</label>
<label><input type="radio" name="nodeAction">Delete node</label>
<label><input type="radio" name="nodeAction">Insert before node</label>
<label><input type="radio" name="nodeAction">Replace node</label></p>
Paragraph #: <select id="grafCount"></select>
<input type="submit" value="Submit">
</form>
<div id="modifiable"> </div>
</body>
</html>
To replace nodes
• nodeChgArea.replaceChild(newGraf,oldGraf);
The only line in this script that should be new to you is this one (see the rest of this chapter for explanations about the rest of the script). And in a similar fashion to the last task, all we need to do is call replaceChild() with two parameters: the paragraph we want to swap in and the paragraph we want to swap out.
Listing 10.10. And now, the user can add, delete, and replace any text on the page.
window.onload = initAll;
var nodeChgArea;
function initAll() {
document.getElementsByTagName("form")[0].onsubmit = nodeChanger;
nodeChgArea = document.getElementById("modifiable");
}
function addNode() {
var inText = document.getElementById("textArea").value;
var newText = document.createTextNode(inText);
var newGraf = document.createElement("p");
newGraf.appendChild(newText);
nodeChgArea.appendChild(newGraf);
}
function delNode() {
var grafChoice = document.getElementById("grafCount").selectedIndex;
var allGrafs = nodeChgArea.getElementsByTagName("p");
var oldGraf = allGrafs.item(grafChoice);
nodeChgArea.removeChild(oldGraf);
}
function insertNode() {
var grafChoice = document.getElementById("grafCount").selectedIndex;
var inText = document.getElementById("textArea").value;
var newText = document.createTextNode(inText);
var newGraf = document.createElement("p");
newGraf.appendChild(newText);
var allGrafs = nodeChgArea.getElementsByTagName("p");
var oldGraf = allGrafs.item(grafChoice);
nodeChgArea.insertBefore(newGraf,oldGraf);
}
function replaceNode() {
var grafChoice = document.getElementById("grafCount").selectedIndex;
var inText = document.getElementById("textArea").value;
var newText = document.createTextNode(inText);
var newGraf = document.createElement("p");
newGraf.appendChild(newText);
var allGrafs = nodeChgArea.getElementsByTagName("p");
var oldGraf = allGrafs.item(grafChoice);
nodeChgArea.replaceChild(newGraf,oldGraf);
}
function nodeChanger() {
var actionType = -1;
var pGrafCt = nodeChgArea.getElementsByTagName("p").length;
var radioButtonSet = document.getElementsByTagName("form")[0].nodeAction;
for (var i=0; i<radioButtonSet.length; i++) {
if (radioButtonSet[i].checked) {
actionType = i;
}
}
switch(actionType) {
case 0:
addNode();
break;
case 1:
if (pGrafCt > 0) {
delNode();
break;
}
case 2:
if (pGrafCt > 0) {
insertNode();
break;
}
case 3:
if (pGrafCt > 0) {
replaceNode();
break
}
default:
alert("No valid action was chosen");
}
document.getElementById("grafCount").options.length = 0;
for (i=0; i<nodeChgArea.getElementsByTagName("p").length; i++) {
document.getElementById("grafCount").options[i] = new Option(i+1);
}
return false;
}
Writing Code with Object Literals
As covered in the sidebar “About Object Literals,” there’s more than one way to write any given JavaScript. Listing 10.11 is an example of how Listing 10.10 can be rewritten to use object literals.
To use an object literal
1. document.getElementsByTagName ("form")[0].onsubmit =nodeChanger;
chgNodes.init();
Just as with code you’ve seen before, we have to start off by doing our initializations. The first line is the same as what you’ve seen previously, but the second is a little different: it calls the init() function that’s inside the chgNodes object.
2. function nodeChanger() {
return chgNodes.doAction();
}
The nodeChanger() function here doesn’t do much at all—all it does is call chgNodes.doAction(). Why that function couldn’t have been called directly will be covered shortly.
3. var chgNodes = {
Here’s the beginning of the chgNodes object. All we had to do to create it is start the line off as if we’re setting a simple variable, but then end with a set of statements between braces.
4. actionType: function() {
var radioButtonSet =
document.getElementsByTagName("form")[0].nodeAction;
for (var i=0; i<radioButtonSet.length; i++) {
if (radioButtonSet[i].checked) {
return i;
}
}
return -1;
},
Listing 10.11. This brief script shows many of the useful features of the object literal.
window.onload = initAll;
function initAll() {
document.getElementsByTagName("form")[0].onsubmit = nodeChanger;
chgNodes.init();
}
function nodeChanger() {
  return chgNodes.doAction();
}
var chgNodes = {
actionType: function() {
  var radioButtonSet =
  document.getElementsByTagName("form")[0].nodeAction;
  for (var i=0; i<radioButtonSet.length; i++) {
    if (radioButtonSet[i].checked) {
       return i;
    }
  }
  return -1;
},
allGrafs: function() {
  return this.nodeChgArea.getElementsByTagName("p");
},

pGrafCt: function() {
  return this.allGrafs().length;
},
inText: function() {
return document.getElementById("textArea").value;
},
newText: function() {
return document.createTextNode(this.inText());
},
grafChoice: function() {
return document.getElementById("grafCount").selectedIndex;
},
newGraf: function() {
var myNewGraf = document.createElement("p");
myNewGraf.appendChild(this.newText());
return myNewGraf;
},
oldGraf: function () {
return this.allGrafs().item(this.grafChoice());
},
doAction: function() {
switch(this.actionType()) {
case 0:
this.nodeChgArea.appendChild(this.newGraf());
break;
case 1:
if (this.pGrafCt() > 0) {
this.nodeChgArea.removeChild(this.oldGraf());
break;
}
case 2:
if (this.pGrafCt() > 0) {
this.nodeChgArea.insertBefore(this.newGraf(),this.oldGraf());
break;
}
case 3:
if (this.pGrafCt() > 0) {
this.nodeChgArea.replaceChild(this.newGraf(),this.oldGraf());
break;
}
default:
alert("No valid action was chosen");
}
document.getElementById("grafCount").options.length = 0;
for (var i=0; i<this.pGrafCt(); i++) {
document.getElementById("grafCount").options[i] = new Option(i+1);
}
return false;
},
init: function() {
  this.nodeChgArea = document.getElementById("modifiable");
}
}
In the previous version of the script, the first part of the nodeChanger() function was spent setting the actionType variable. Here, actionType() is a method of chgNodes. While the style of the code is different, the end result should be identical.
5. allGrafs: function() {
return this.nodeChgArea.getElementsByTagName("p");
},
pGrafCt: function() {
return this.allGrafs().length;
},
Here’s an example of two simple functions inside chgNodes: allGrafs() and pGrafCt(). Because they return values, they can be used anywhere they’re needed for adding, replacing, or deleting nodes.
6. doAction: function() {
switch(this.actionType()) {
case 0:
this.nodeChgArea.append Child(this.newGraf());
break;
The doAction() function handles most of the heavy lifting needed in chgNodes—this small bit is just the start. Just as with the prior version, we look at the radio button to see which action we want to do, and that action is done by means of a switch statement.
7. init: function() {
this.nodeChgArea = document.getElementById("modifiable");
}
And finally, we end up with our init() function, and all it does is initialize nodeChgArea for later use. What’s most important is that we do not have a comma at the end of this routine—every statement except the last should end with a comma (and yes, a function is basically an extended statement).
In steps 1 and 2, you may have been wondering why we couldn’t just write:
document.getElementsByTagName("form") [0].onsubmit = chgNodes.doAction();
Or maybe you’re wondering why we’ve used this so often in the code? Here’s the trick: it’s the same answer for both.
Inside an object literal, you can reference every other property and method of the object just by referring to this. If we use a var command, as in the case of myNewGraf or radioButtonSet, it’s a normal variable that can’t be accessed outside the parent object. By not using var, and instead always referring to it as this.whatever, those properties become part of the object itself.
However, this for object literals has to abide by the same rules that this does everywhere in JavaScript—what it evaluates to depends on from where it was called. If chgNodes.doAction() is called directly from the form, then this refers to the form object—which isn’t what we want. Calling chgNodes.doAction() from nodeChanger() lets us work around this.
If you’re considering switching from procedural JavaScript, but haven’t made a firm decision, here’s one more reason to think about using object literals instead: note that Listing 10.11 does the exact same thing as Listing 10.10—but it’s about 20 percent shorter.