Up until now, everything that we created was only available locally, and was subject to mechanical failure, accidental deletion, and other forces. We did not add any versions to scripts and functions, and had no history.
This is about to change, with a version control system. While we will be focusing on Git, similar principles will apply to other systems, such as Mercurial, subversion, or TFVC.
Be sure to check this out if you want to learn about Git more in more detail.
A version control system allows you to keep track of changes that occur in your code, roll back changes, and collaborate. Moreover, it is an integral part of a release pipeline, which we will set up in Chapter 10, Creating Your Own PowerShell Repository.
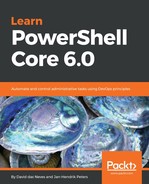
To get the ball rolling, VSCode already has everything that you might need to work with systems such as Git or svn:

In the preceding screenshot, you can see the Git provider for VSCode in action. The book's repository is connected, and it shows three modified files, denoted by an M, and six untracked files, marked by a U. Untracked files are files that are not yet in source control. At the bottom, you can see the branch name and all incoming and outgoing changes, or commits.
But, let's start at the beginning and create a new repository such as the next code sample illustrates:
# Everything starts with an empty repo
mkdir MyNewRepository
cd MyNewRepository
git init

# Use git status to find out more
git status
Everything starts with an empty repository that we initialized with git init. You should learn the necessary Git commands, even though VSCode does everything for you. In the following code sample, we will use other git commands to query the current status of our repository, prepare files to be added to the repository and commit changes into our repository.
# Add a new file
New-Item NewScript.ps1

# Confirm that it is an untracked change
git status

# Add this file to the next commit (staging)
git add NewScript.ps1

# Commit your files to source control.
# Until now, nothing was tracked. once committed, changes will be tracked
git commit -m 'Added new script to do stuff'

# Verify with git status that the working copy is clean
git status
After you have added your first file, it is time to track it in source control. To do this, the file needs to be added to the current commit, or staged. All staged files are part of a commit. Once committed to source control, all changes to the files that you added will be tracked:
# Add a gitignore file that ignores all tmp files
New-Item .gitignore -Value '*.tmp'

# Stage and commit
git add .gitignore
git commit -m 'Added .gitignore file'

# Test the file. file.tmp should not appear when looking
# at the output of git status
New-Item file.tmp
git status
If you don't want to track certain items (for example, temporary files created during a build process, staging directories, and other files), you can use a file called .gitignore. This hidden file instructs Git to look the other way when it encounters certain files.
In order to make the most of your new source control system, try not to stuff everything into one huge commit. Try to keep the commits small and incremental; this allows you to roll changes back more granularly. Remember to add a useful commit message. It should relate to what you did, so that anyone looking at the change log can see what the commit changed, and why you did it.