
For our first hardware project, we're going to wire an LED to the Arduino. An LED, or a Light Emitting Diode, is a component that lights up when electric current is passed through it. They come in many colors and sizes and are one of the most easy-to-use and versatile components in hobbyist robotics.
First, take an LED. We'll determine the positive and negative leads of the LED—for this component, it's straightforward: the positive lead is longer than the negative lead.
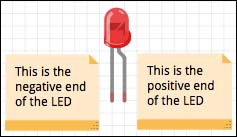
Determining the positive and negative ends of an LED
To wire the LED to an Arduino, place the positive lead on pin 11 and the negative lead on the pin marked GND, just like in the following diagram:

Wiring up our LED
You can also use a breadboard if you wish to—it will look like the following:

Wiring an LED with a breadboard
Now that we've wired up the LED, we're going to make it blink as we did in the last chapter. The script looks very familiar:
var five = require("johnny-five");

var board = new five.Board();

board.on("ready", function() {
  var led = new five.Led(11);
  led.blink(500);
});
This is because it's nearly the same script as in the previous chapter—we just changed the pin number to reflect the new LED we have installed.
Save and run the script. You should see a blinking LED on your board, as shown in the following screenshot:
[TODO: Add Photo]
When you run the script, you'll notice a prompt—you can even type into it! This is the REPL, and we're going to use it to play with our LED in real time!