
Let's take a look at using some basic input devices first. We'll start with a button and a potentiometer—two of the easiest input devices to use with Johnny-Five, and a good way to get acquainted with both specialized input objects, such as buttons, and general Sensor objects, which we'll use for the potentiometer.
First, we're going to wire up a button and write some code to measure whether it is pressed or not, using an LED as our indicator. The wiring of the project will look like this:
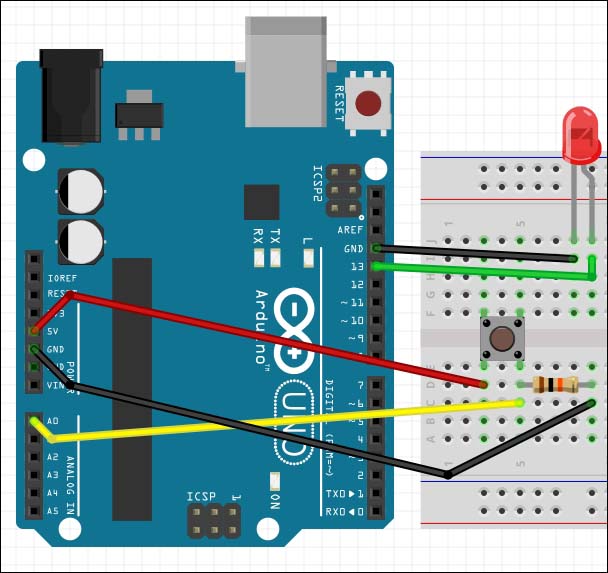
Wiring diagram for a button and an LED
Make sure that if you're using the four-prong button, it crosses over the center trough of your breadboard as shown in the diagram. If it does not, the button will not work properly. If you are using a two-prong button, the wiring is very similar, and it does not have to cross over.
Now, let's take a look at the Button object in Johnny-Five to see what we'll need to use for our code. First, we want to see whether or not there's an event to tap into when the button is pressed. Sure enough, there is such an event: the press event is logged when the button is pressed. Right below this, we see the release event that is logged when the button is released.
Using these and our previous knowledge of the Led object, we can write the following in button-led.js:
var five = require('johnny-five'),

var board = new five.Board();

board.on('ready', function(){
  var button = new five.Button('A0'),
  var led = new five.Led(13);

  button.on('press', function(){
    console.log('button pressed!'),
    led.on();
  });

  button.on('release', function(){
    console.log('button released!'),
    led.off();
  })
});
This code will light the LED when the button is pressed and turn it off again when the button is released. Go ahead and run it with the following command:
> node button-led.js
Try this out. You should see an output in your console like the following:

The output from led-button.js
The LED should be lit when the button is pressed, and it should be turned off when the button is released.
Now that we've got a button working, let's set up our potentiometer and discover some other events related to input and sensor devices. Our project will set the brightness of the LED to correlate to the input from the potentiometer—we're building a dimmer switch, essentially.
Grab your potentiometer and follow the wiring in the following diagram:

Wiring diagram for a dimmer switch
As we write our code, you'll notice that there is no potentiometer object in Johnny-Five. That's fine. As the potentiometer is a very basic sensor, we'll be using the Sensor object instead.
Next, let's take a look at the events that we'll be using. The change event fires when the input from the potentiometer changes, so we'll use this event to trigger our LED change. In order to get the reading, we'll use this.value, as explained in the documentation.
Now, let's think about how LEDs work and about the input from the potentiometer. The LED can be set from 0 to 255, and the potentiometer can take an input from 0 to 1023. We can do the math to scale these inputs ourselves, but luckily, Johnny-Five has a function to help us out. This is called the scale(min, max) function. It will scale our input to the number that we give it; in our case, 0 and 255. We will still use this.value to reference the scaled value. If you want to see the unscaled value in the event handler, you can use this.raw.
We can use the scale function before the event listener call to scale our potentiometer's output to the range our LED can understand.
With this in mind, we can write the code for our dimmer switch. Go ahead and place the following code in dimmer-switch.js:
var five = require('johnny-five'),

var board = new five.Board();

board.on('ready', function(){
  var pot = new five.Sensor('A0'),
  var led = new five.Led(11);

  pot.scale(0, 255).on('change', function(){
    console.log('The scaled potentiometer value is: ' + this.value);
    console.log('The raw potentiometer value is: ' + this.raw);
    led.brightness(this.value);
  });
});
Start the script using the following:
> node dimmer-switch.js
Try this out by twisting the potentiometer. Data should log in to your terminal as follows:

The output from dimmer-switch.js
The brightness of the LED should change accordingly. Now that we have a good grasp on input devices, we'll take a look at sensors, using a photocell and a temperature sensor.