
For the next project, we're going to look at the
Led object API and test several different methods. This is one of the benefits of Johnny-Five—abstraction. If you can understand the concept of an LED, you can use the Johnny-Five LED object without thinking about the underlying pins or timings. Let's go over the methods that we'll use for our project:
on()andoff(): These turn an LED on and off. Under abstraction, this sets the pin that is wired to the LED toHIGHandLOW, respectively. We'll be using these in the REPL.blink(time): This turns an LED on and off at a given interval.strobe()andblink()are aliases of each other and do the same thing.pulse(time): This will cause an LED to pulse on and off in an eased manner. This requires an LED wired to a PWM pin. Thetimeargument sets the length of each side of the pulse—500will mean the LED will fade in for 500 ms and fade out for 500 ms, meaning a 1-second pulse.fade(brightness,ms): This will cause an LED to fade on or off from its current brightness to the given brightness overmsmilliseconds.stop(): This stops any recurring action happening on an LED. Note that this won't necessarily turn off the LED. It will stop the action in its tracks—if this means the LED is on, so be it.
Remember that most Johnny-Five object functions are chainable—you can use one right after the other.
myLed1.stop().off()
The preceding code will stop any recurring event on the LED and then turn it off.
Now that we know what functions we'll be working with, let's wire up our next project.
Grab your materials and look at the following diagram:
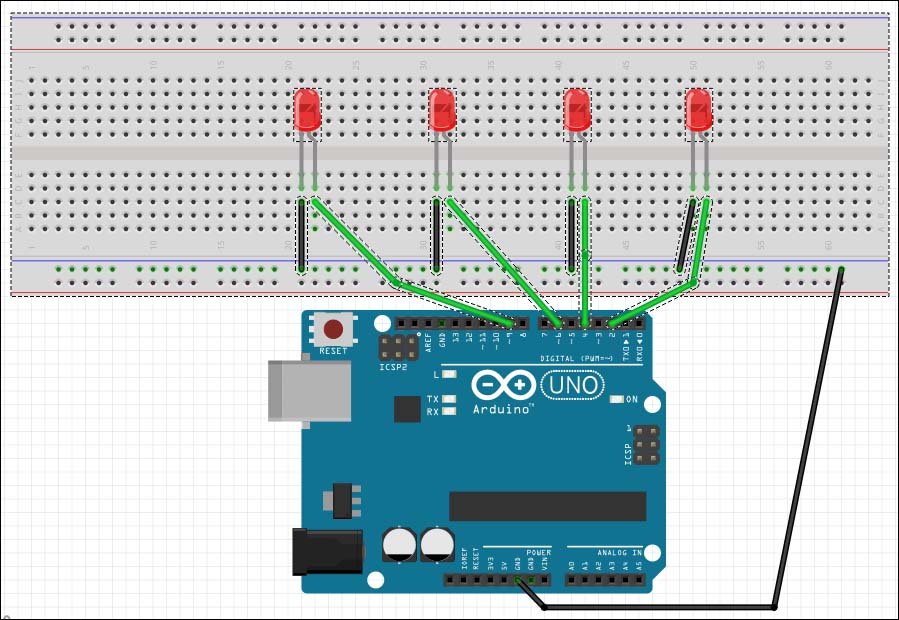
The wiring for our multiple LEDs project
Note that the LEDs are wired to pins 2, 4, 6, and 9—two on Digital pins and two on PWM pins. We will perform an experiment to check whether they are Digital or PWM pins.
Let's write our script, called leds-gpio.js, with the following objectives in mind:
- Establish the
Boardobject and add a handler to the board'sreadyevent. - Create
Ledobjects for each of our LEDs. - Make the LEDs on pins 2 and 9 accessible to the REPL as
myLed2andmyLed9respectively. - Set the LED on pin 4 to blink every 500 ms.
- Set the LED on pin 6 to pulse every 500 ms.
Your code should look like this:
var five = require("johnny-five");

var board = new five.Board();

board.on("ready", function() {
  var myLed2 = new five.Led(2);
  var myLed4 = new five.Led(4);
  var myLed6 = new five.Led(6);
  var myLed9 = new five.Led(9);

  this.repl.inject({
    myLed2: myLed2,
    myLed9: myLed9
  });

  myLed4.blink(500);
  myLed6.pulse(500);
});
Now, let's run the script and play around with our new Led objects.
When you run the script, the LEDs on pins 4 and 6 should start blinking and pulsing, respectively. First, let's see what happens when we run pulse(), a method that requires a PWM pin, on our LED wired to pin 2, which is a digital pin. In the REPL, run the following:
myLed2.pulse(500);
You should be promptly kicked out of the REPL as your program crashes.
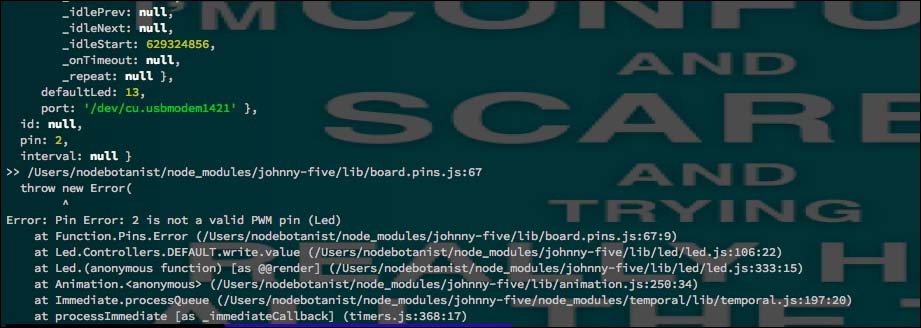
An error when using a PWM method on a digital pin
This is because Johnny-Five watches your program and makes sure that you don't try to use PWM methods on digital pins. This also shows one of the other benefits of Johnny-Five—the maintainers have taken great pains to make sure that many error messages are clear, which can be an issue while dealing with robotics code.
Restart your code, and run the following:
myLed2.on().isOn
This will return the value as true in your REPL:
The isOn attribute
This points to an attribute of the Led object. isOn tells you whether the LED is on (any value other than 0) or off (a 0 value). There are other attributes of your LED:

The other LED attributes
Go ahead and explore these attributes and the function with myLed2 and myLed9.
Now that we've learned how to use one of the less complicated Johnny-Five components, the LED, let's take a look at a component with a more interesting API and make some music with the Piezo object.