
The Animation API has its own vocabulary—it may be familiar to the readers who have done some animation work. It also has a few different ways to interact with it, and we'll explore these ways before diving in and writing our own projects.
There are two parts that make up any servo animation in Johnny-Five: a target and one or more segments. The target is either a servo or an array of servos. We'll go into the programmatic differences between a servo and a servo array in our first project; the basic point is that a ServoArray object in Johnny-Five allows a logical grouping and the manipulation of multiple servos—a leg, for instance, would be a logical use of a ServoArray object.
A segment is the programmatic description of a piece of animation. It is comprised of a few pieces of information: a duration, cue points, and keyframes.
A keyframe is a description of the position of the target at a given point. A keyframe has no concept of time; it is an instantaneous description of state. Keyframes are combined with cue points in a segment to add the concept of time.
Cue points are the points at which each keyframe is placed in a segment. This is not a discrete point in time either; cue points are described relative to the segment, usually as a decimal between 0 and 1 where 0 is the beginning of the segment and 1 is the end.
The duration outlines exactly how long the segment will take. The rest of the information uses the duration to calculate the speeds necessary to make it between keyframes at the cue points given. Duration adds the concept of discrete time to a segment.
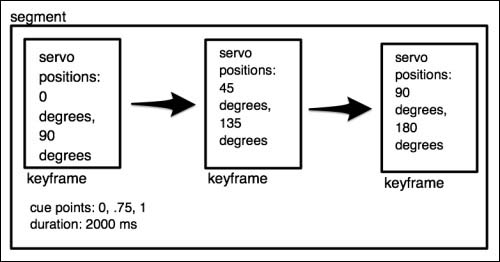
In order to better understand how these work together, let's walk through a segment description: we have a segment with a duration of 2000 ms (2 seconds). It has cue points at 0, .75, and 1. There are two servos in our target: keyframe 1 has servo 1 at 0 degrees, and servo 2 at 90 degrees. Keyframe 2 has servo one at 45 degrees, and servo 2 at 135 degrees. Keyframe 3 has servo one at 90 degrees, and servo 2 at 180 degrees. So in all, we have a servo starting at 0 degrees and moving to 90 degrees over 2 seconds, and a second servo moving from 90 to 180 degrees in that same 2 seconds.
A graphical representation of this can be seen in the following figure:
A graphical representation of an animation segment
So, now that we have our segment information, let's use the duration and cue points to see when each keyframe should be reached: the 0 cue point will be reached at 0 ms, the .75 cue point will be reached at 1,500 ms, and the 1 cue point will be reached at 2,000 ms. But how do we determine this? We can use the following formula to determine when a cue point will be reached in a segment:

The formula for a cue point time
So, for the .75 cue point, 2000 ms * .75 = 1500 ms.
Now, we match these cue points to our keyframes: at 0 ms, servo one will be at 0 and servo two at 90 degrees. At 1500 ms, servo one will be at 45 degrees and servo two will be at 135 degrees, and at 2000 ms, servo one will be at 90 degrees and servo two at 180 degrees. A graphical representation of this is shown in figure 3:

The pictures of the servo movement from the segment
So, in summary, an animation consists of segments applied to a target. Segments consist of keyframes, set to cue points whose timings are determined by the segment's duration.
You get a glimpse of the power the Animation API gives you via this example; trying to calculate the speed needed to move one servo from one degree point to another over x milliseconds is a difficult task—to get a lot of servos that represent an arm or leg to do so would be chaotic. The Animation API does this for you by allowing you to set keyframes and cue points in a segment to achieve the movement you want.
It may look like the extra options in the .to() method for servos allow the creation of animations implicitly. This is not the case!
The duration parameter, while allowing servos to move at nonmax speeds, does not necessarily serve the same purpose as an animation. The rate parameter does not create keyframes; the rate parameter creates a number of discrete movements, and they are moved to at the maximum speed.
So, while using .to() with durations and rates may seem like creating animations, you should know that they are not a full substitute to write your own animations and segments using the Animation API.
We've discussed the concept of ServoArray, but let's look at it in a little more detail, as we'll be using it in this chapter's projects.
Constructing the ServoArray object looks remarkably similar to constructing a single servo; however, the object is called Servos instead of Servo, and you pass in an array of pins representing the pins your group of servos is on:
var myServos = five.Servos([3, 5, 6]);
This creates an array of servos that are on pins 3, 5, and 6.
Performing actions on a servo array is also remarkably similar to moving a single servo; using .to() will move all the servos using the parameters given. For instance, consider the following:
myServos.to(120, 500);
This will move all the servos in the array to 120 degrees over 500 ms. If you'd like to move one servo independently, all you need is its key in the servo array—you can then reference it and move it as a standard Servo object:
myServos[0].to(90, 200);
This moves the first servo in the array to 90 degrees over 200 ms.
ServoArrays are also very useful in creating animations; you can address an entire array of servos with a single keyframe, allowing you to write keyframes and segments for several servos at once, instead of writing them out separately for each servo.
Now that we've explored the terminology and concepts behind the Animation API, let's build our first project; we're going to build our three servos into a servo array that we can manipulate.
First, you'll have to wire up your three servos as shown in the following figure:

Taking our knowledge of Johnny-Five and the code we went over in the last section, let's write a code to create a servo array of the servos we just wired up and inject them into the REPL so that we can run some code in real time. Place the following into servo-array.js:
var five = require('johnny-five')

var board = new five.Board({
  port: '/dev/cu.usbmodem14131'
})

board.on('ready', function(){
  var myServos = new five.Servos([3,5,6])
  this.repl.inject({
    servos: myServos
  })
})
Now we run it with the following:
> node servo-array.js
Let it start up. Eventually, the REPL will start and your servos should move to their starting position (the default is 90).
Let's explore moving these servos as a group. Let's sweep them all:
>servos.sweep()
Tip
If, while sweeping all the servos in your array, they seem choppy, don't fret; we're using three servos now, which takes more electric current than usual. The choppiness is due to a lack of electric current. While this is OK for our present example, you should definitely take a look at the powering servos section in Chapter 6, Moving Your Bot, if you want to make a project with multiple servos run smoothly.
We can stop the servos with the following:
>servos.stop()
Now, let's explore how to use .to(), and not only look at how it works with each servo, but also how duration and rate don't substitute the writing of an animation.
We can move all of the servos to the same angle using .to(), as follows:
>servos.to(0)
We can use the same parameters, duration, and rate that we used with a single servo, as shown here:
>servos.to(90, 500, 10)
That ran pretty smoothly, right? Like an animation would? That's true! But let's slow .to() and see what's actually happening here:
>servos.to(0)
>servos.to(180, 10000, 20)
That's a full 180-degree movement over 10 seconds with 20 discrete steps. Did you notice the choppiness? That's because this writes to servoWrite() instead of writing an animation segment.
You can also control one servo at a time as we explored in the last section. For instance, run the following:
>servos[0].to(0);
This will move the first servo (on pin 3) to 0 degrees, while leaving the other two pins alone.
There are some really great options available in the Animation API that will make these movements smoother and allow you to create complex movements. Let's explore how to declare and run animation segments with Johnny-Five.