SPI, I2C, and some other protocols get really complex, but there's a whole other world of devices we can also use with our Johnny-Five projects. These technically fall outside the scope of the Johnny-Five library, but works well with the library due to their use of Node.JS. Let's take a look at the "why" and the "how" of external devices with Johnny-Five.
Microcontrollers are amazing! They can do a litany of things—input, output, and so on - but sometimes you see a new device that doesn't plug in to a microcontroller. Perhaps it contains a microcontroller of its own—such as a quadcopter or a drone! This section covers the use of these devices with Node and integrating them into your Johnny-Five projects.
Some really cool examples that have been integrated into Johnny-Five projects are as follows: video game controllers; the LeapMotion controller, a gesture sensor that tracks hand position and movement; and Wi-Fi-enabled quadcopters, such as the Parrot AR drones.
But how do we communicate with devices without using Johnny-Five? The answer actually lies within Johnny-Five itself: node-serialport, a library that handles serial connections via Node.JS. Let's take a look at how this library enables us to build the amazing world of NodeBots.
As early as five years ago, NodeBots didn't exist. As early as ten years ago, they weren't even a thought—JavaScript was a browser language, after all. However, with the advent of Node, all sorts of new technologies were available to Node.
Serial connections are the communications channel between all sorts of devices—such as printers, webcams—and many of the peripherals that we use on a daily basis. In 2009, Chris Williams (often cited as the Godfather of NodeBots!) created node-serialport. The node-serialport library allows you to communicate with serial devices using Node.JS.
At first, this didn't create the explosion of NodeBots you'd expect by reading a book like this—it was still a very specialized thing to get a serial connection working. However, shortly after the creation of node-serialport, Rick Waldron wrote Johnny-Five on top of it. That's right; under its hood, Johnny-Five uses node-serialport to speak to the Arduino boards we've been using in our examples.
However, there are other devices that have made their way to Node using libraries outside node-serialport; these include gamepads meant for playing games on the PC. Many devices that you can add to your computer via USB can now be used with Node, thanks to another library called node-hid.
The node-hid library is for using Human Interface Device (HID) devices, such as gamepads. HID is a part of the USB specification and allows many peripherals to speak to a computer in a way that is easily understood and emulated.
Some of the most popular HID devices used are gamepads, computer games, and retro system emulators. In our next build, we'll explore how to use these external devices with Johnny-Five, using a library called node-gamepad.
What we're going to build is a hybrid project; we'll be using Johnny-Five along with other Node plugins in order to expand the reach of things we can do. We're going to show the x and y coordinates from the joystick on the N64RetroLink controller (or left on the PS3 controller) on our LCD display.
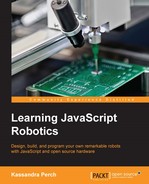
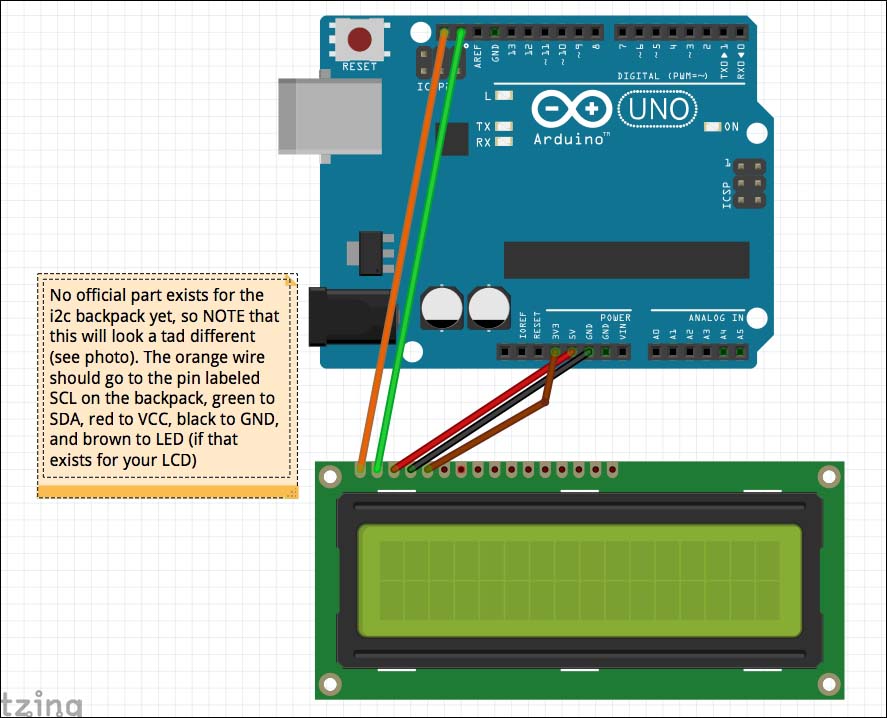
First, let's wire our LCD to our Arduino to show data on. Remember to use the first diagram for I2C displays and the second for regular LCD displays:
Wiring diagram—I2C LCD
Wiring diagram—regular LCD
Once you've wired up your LCD, connect your gamepad to your computer. If you're using the RetroLinkN64 controller, plug it in via USB. If you're using the PS3 controller, you can pair it with Bluetooth or connect it via USB.
Let's take a look at the node-gamepad library before writing our code. First, let's install the library:
npm install node-gamepad
This will install the library and rebuild the native bindings for node-hid. Then, let's take a look at the gamepad constructor:
var GamePad = require('node-gamepad'),
var gamepad = new GamePad('n64/retrolink'), //using PS3? use 'ps3/dualshock3' instead
The constructor just takes a path to a keymap provided by the library; use n64/retrolink for the retrolink controller and ps3/dualshock3 for the PS3 controller.
For the joystick data, we'll need to put an event handler on the joystick so that we get a response when it moves:
gamepad.on('center:move', function(data){ … }); //Using PS3? use 'left:move'The data object will have an x and a y property, representing the x and y coordinates of the joystick.
Now that you know what to look for from the gamepad, you can wire this code together with your existing Johnny-Five knowledge!
Create a controller.js file and add the following lines of code:
var five = require("johnny-five");
var GamePad = require( 'node-gamepad' );
var board = new five.Board();

var controller = new GamePad( 'ps3/dualshock3' );
controller.connect();

board.on("ready", function() {
  // Controller: PCF8574A (Generic I2C)
  // Locate the controller chip model number on the chip itself.
  var l = new five.LCD({
    controller: "PCF8574A",
  });

  //If you're using a regular LCD, comment the previous three
  // lines and uncomment these lines:
  // var l = new five.LCD({
  //   pins: [8, 9, 10, 11, 12, 13]
  // });

  var x, y;

  // if you're using a PS3 controller, change center:move to
  //  left: move!
  controller.on( 'center:move', function(data) {
    x = data.x;
    y = data.y;
  });

  // Updates on an interval to not overwhelm the LCD!
  setInterval(function(){
    l.clear();
    l.cursor(0, 0).print('X: ' + x);
    l.cursor(1, 0).print('Y: ' + y);
  }, 250)
});
Start the file using the following command line:
node controller.js
You should see the LCD update when you move the joystick!
Now here's a challenge; add a listener for one of the controller buttons to show on the LCD as well!