
Chapter 7. Wireless Security Testing
To paraphrase Irwin M. Fletcher, it’s all wireless today, fellas. It really is. Nearly all of my computers don’t have a way to connect a physical cable anymore. The 8-wire RJ45 jacks used for wired Ethernet are gone because the form factor of the jack was just too large to be accommodated in today’s narrow laptop designs. In the old, old days when we relied on PCMCIA cards for extending the capabilities of our laptops, cards had click-out connectors that could accept the Ethernet cables. The problem was that they were typically thin and easy to snap off. Desktop computers, of course, should you still have one, will generally have the RJ45 jack for your Ethernet cable, but increasingly even those have the ability to do Wireless Fidelity (WiFi) directly on the motherboard.
All of this is to say the future is in wireless in one form or another. Your car and your phone talk wirelessly. Your car may even talk to your home network wirelessly. Thermostats, door locks, televisions, light bulbs, toasters, refrigerators, Crock-Pots, you name it—versions of all of these products probably have wireless capability of some sort. This is why wireless testing is so important and why a fair number of tools will cover a range of wireless protocols. Over the course of this chapter, we will cover the wireless protocols that Kali Linux supports with testing tools.
The Scope of Wireless
The problem with the term wireless is that it covers too much ground. Not all wireless is created equal, as it were. Numerous protocols are wireless by nature. Even within the spectrum of cellular telephones, several protocols exist. This is why phones sometimes can’t be migrated between carrier networks. It’s less about some sort of signature associated with the phone than it is about one phone communicating on one set of frequencies using one protocol, when the network uses a different set of frequencies and a different protocol. This is just the start of our problems. Let’s take a look at the various protocols that are commonly used with computing devices for communication. We’re going to skip Code Division Multiple Access (CDMA) and Global System for Mobiles (GSM). While your smartphones and tablets use them to communicate with carrier networks, they are really carrier protocols, and not protocols used for direct system-to-system communication.
802.11
The most common protocol you’ll run across is really a set of protocols. You probably know it as WiFi or maybe even just wireless. In reality, it’s a set of protocols managed by the Institute of Electrical and Electronics Engineers (IEEE, commonly called I Triple E). The IEEE manages standards, though they are not the only organization to do so. It happens, however, that IEEE created and maintains the standards related to wireless local area networks (WLANs). This standard is referred to collectively as 802.11.
802.11 has specifications that cover different frequency spectra and, along with them, different throughput capabilities. These are commonly named with letters after 802.11. One of the first was 802.11a, which was followed by 802.11b. Currently, the release specification is 802.11ac, though specifications through 802.11ay are in development. Ultimately, the throughput is restricted by the frequency ranges in use, though later versions of 802.11 have used multiple communications channels simultaneously to increase throughput.
Note
802.11 is commonly referred to as WiFi, though WiFi is a trademark of the WiFi Alliance, a group of companies involved in wireless networking. WiFi is just another way of referring to the IEEE wireless networking standards and is not separate from them.
802.11 is a set of specifications for the physical layer, to include MAC. We still need a data link protocol. Ethernet, a common data link protocol that also specifies physical and MAC elements, is layered over the top of 802.11 to provide system-to-system communications over a local area network.
One of the early challenges with 802.11 is that wireless signals are not bounded physically. Think about listening to radio stations, since that’s really what we are talking about here—radio waves, just at a different set of frequencies. When you listen to radio stations, it doesn’t matter whether you are inside or outside; the signal passes through walls, ceilings, and floors so you can pick up the signal with your receiver. We have the same challenge with the radio signals that are used for wireless LANs. They will pass through walls, floors, windows, and ceilings. Since our LANs carry sensitive information, this is a problem.
In the wired world, we were able to control the flow of information with physical restrictions. To gain access to a LAN, someone had to be plugged in, in the building and near an Ethernet jack. This was no longer the case with a wireless LAN. All someone needed to do was be within range of the signal. You might be surprised at just how far a wireless signal carries, in spite of feeling like you need to be in the right room in your house to get it just right sometimes. As an example, my car is joined to my wireless network in my house so the car can download updates as needed. The car notifies me when I leave the range of the signal. I can get to the end of my block and around the corner before I get the notice that my signal is gone. That’s more than half a dozen homes away from mine.
Along comes Wired Equivalent Privacy (WEP), meant to address the concerns over sensitive business data leaving the control of the enterprise. As it turns out, the first pass at protecting data transmitted over wireless using encryption was a bad one. There have since been other attempts, and the current one is Wireless Protected Access (WPA) version 2, though that will shortly be replaced by version 3 because of issues with version 2. It’s these issues, along with various misconfigurations, that require us to test wireless LANs.
Bluetooth
Not all communication is meant to connect multiple systems together. In fact, the majority of your communications is probably between your system and your peripherals, whether it’s your keyboard, trackpad, mouse, or monitor. None of these are meant to be networked; all of them started as wired devices and all are constantly in communication. To get wires out of the way as much as possible, considering networks were wireless, relieving us of the need to have one other cable tethering us into place, a wireless protocol was developed in the early 1990s. This protocol used a similar set of bandwidth to that later used by 802.11 developed by the mobile device manufacturer Ericsson.
Today, we know this as Bluetooth, and it is used to connect a variety of peripherals. It does this using profiles that define the functionality being offered by the device. Bluetooth is used for short-range transmissions, typically on the order of about 30 feet. However, considering what devices use Bluetooth and their need for proximity (you wouldn’t expect to use a keyboard from a different room, for instance), this isn’t exactly a limitation. The challenge comes with the power applied to the wireless transmitter. The more power applied, the farther we can get the signal, so 30 feet isn’t the maximum; it’s just a common distance.
One issue with Bluetooth is that devices that use it may be easily discoverable by anyone interested in probing for them. Devices typically need to pair, meaning they exchange initial information just to prevent any two devices from connecting randomly. However, pairing can sometimes be a simple process achieved by asking a device to pair. This is done to support devices like earbuds that have no ability to accept input from the user to enter a pairing key. All of this is to say that there may be Bluetooth devices around that attackers can connect to and pair with to extract information.
We perform Bluetooth testing to discover devices that are not appropriately locked down to prevent unauthorized connections, which may result in the leakage of sensitive information. These unauthorized connections may also provide an attacker a way of controlling other devices, leading to a foothold inside the network.
Zigbee
Zigbee is a protocol that has been around in concept for more than a couple of decades, though the protocol itself was ratified in 2004. Recently, Zigbee has seen a sharp increase in implementations. This is because Zigbee was developed as a personal area network protocol, and the whole smart-home movement has used this simple, low-power and low-cost protocol to allow communication throughout the house, between devices. The point of Zigbee is to offer a way for devices that don’t have a lot of power, perhaps because they are battery operated, and don’t send a lot of data to communicate.
As more devices using Zigbee become available, they will increasingly become targets of attacks. This is perhaps more true for residential users, as more smart-home devices are introduced to the market. It is still a concern for businesses, however, because building automation is a thing. Zigbee is not the only protocol in this space, of course. Z-Wave is a related protocol, though there are no tools in Kali that will test Z-Wave. This will likely change over time as more and more devices using Z-Wave are introduced.
WiFi Attacks and Testing Tools
It’s hard to overstate this, so I’ll say it again: everything is wireless. Your computer, your tablet, your smartphone, your television, your gaming consoles, various home appliances, and even garage door openers are all wireless. In this context, I mean they are wireless in the sense that they support 802.11 in one of its incarnations. Everything is connected to your network. This makes the systems themselves vulnerable, and the prevalence of WiFi makes the underlying protocols exposed to attack as well; as the radio signal of your wireless network passes beyond the walls of your organization, attackers may be able to get access to your information. The only way they can do that is to compromise the protocol in some way.
Ultimately, the goal of attacking WiFi networks isn’t just to attack the network; it’s to gain access to information or systems. Or both. The attack against the protocol gets them access to the information being transmitted across the network. This either gets them the information, which may in itself be valuable, or gets them access to a system on the network. It’s so important to keep in mind the goal of the attacker. When we’re testing, we need to make sure we’re not testing just for the sake of testing, though that could be entertaining; we’re making sure that our testing targets aren’t exposed to potential attack. The objective of your testing is to improve the security posture, remember, and not just to knock things over.
802.11 Terminology and Functioning
Before we start in on various attacks, we should probably review the terminology and functioning of 802.11. First, there are two types of 802.11 networks: ad hoc networks and infrastructure networks. In an ad hoc network, clients connect directly to one another. There can be multiple systems within an ad hoc network, but there is no central device through which the communication happens. If there is an access point (AP) or base station, the network is considered an infrastructure network. Devices that connect through the AP are clients. APs will send out messages over the air indicating their presence. This message is called a beacon.
The process clients use to get connected to a WiFi network is to send out a message probing for wireless networks. Whereas wired systems use electrical signals to communicate, wireless systems use radio communications, meaning they have transmitters and receivers. The probe frame is sent out using the radio transmitter in the device. Access points in the vicinity, receiving the probes, respond with their identifying information. The client, if told to by the user, will attempt to associate with the AP. This may include some form of authentication. The authentication does not necessarily imply encryption, though WiFi networks are commonly encrypted in some manner. This may or may not be true when it comes to public networks, such as those in restaurants, airports, and other open spaces.
Note
An enterprise environment may have several access points, all sharing the same service set identifier (SSID). Attacks against the wireless network will be targeted at individual AP devices/radios, but the end result, if successful, will land you on the enterprise network, regardless of which AP you are targeting.
Once the client has been authenticated and associated, it will then begin communicating with the AP. Even if devices are communicating with others on the same wireless network, all communication will still go through the AP rather than directly from peer to peer. Certainly, there are far more technical details to 802.11 networks, but this suffices for our purposes, to set the stage for later discussions.
When we do testing over the network, often the network interface needs to be put into promiscuous mode in order to ensure that all traffic is passed up through the network interface and to the operating system. When it comes to WiFi, we need to be concerned with another feature: monitor mode. This tells the WiFi interface to send up the radio traffic in addition to the messages that you’d normally see. This means you could see beacon messages as well as the messages associating and authenticating the clients to the AP. These are all the 802.11 protocol messages that typically happen at the radio and aren’t otherwise seen. To enable monitor mode, should the tool you are using not do it for you, you can use airmon_ng start wlan0, assuming your interface name is wlan0. Some tools will handle the monitor mode setting for you.
Identifying Networks
One of the challenges with WiFi is that in order for systems to easily attach to the network, the SSID is commonly broadcast. This keeps people from having to manually add the wireless network by providing the SSID, even before having to enter the passcode or their username and password. However, broadcasting the SSID also helps attackers identify the wireless networks that are nearby. This is generally easy to do. All you have to do is ask to connect to a wireless network and you’ll be presented with a list of the available networks. Figure 7-1 shows a list of wireless networks available while I was at a conference in downtown Denver a few years ago. It’s a particularly good list, so I have retained the screenshot.
War Driving
Attackers may go mobile to identify wireless networks within an area. This process is commonly called war driving.
However, this list doesn’t present us with much other than the SSID. To get really useful information that we’ll need for some of the tools, we need to look at something like Kismet. You may be wondering what other details we need. One of them is the base station set identifier (BSSID). This is different from the SSID, and it looks like a MAX address. One reason the BSSID is necessary is that an SSID can be used across multiple access points so the SSID alone is insufficient to indicate who a client is communicating with.

Figure 7-1. List of wireless networks
Before we start using specific WiFi tools to investigate wireless networks, let’s look at using Wireshark. Specifically, we’ll take a look at the radio headers that are sent. You wouldn’t see any of this when you are capturing traffic normally unless you enable monitor mode on your wireless interface, which you can do by enabling that setting in the interface in Wireshark. Once you do that, you’ll see all the radio traffic your interface sees. Using Wireshark, we can look at the headers indicating where the SSID has been announced. This is called a beacon frame, and Wireshark will call it that in the info column. You can see the relevant headers in Figure 7-2. This shows the name of the SSID as TP-Link_862C_5G. Above that, you will see that the BSSID is different and is presented as a MAC address, including the translation of the organizationally unique identifier (OUI) into a vendor ID.
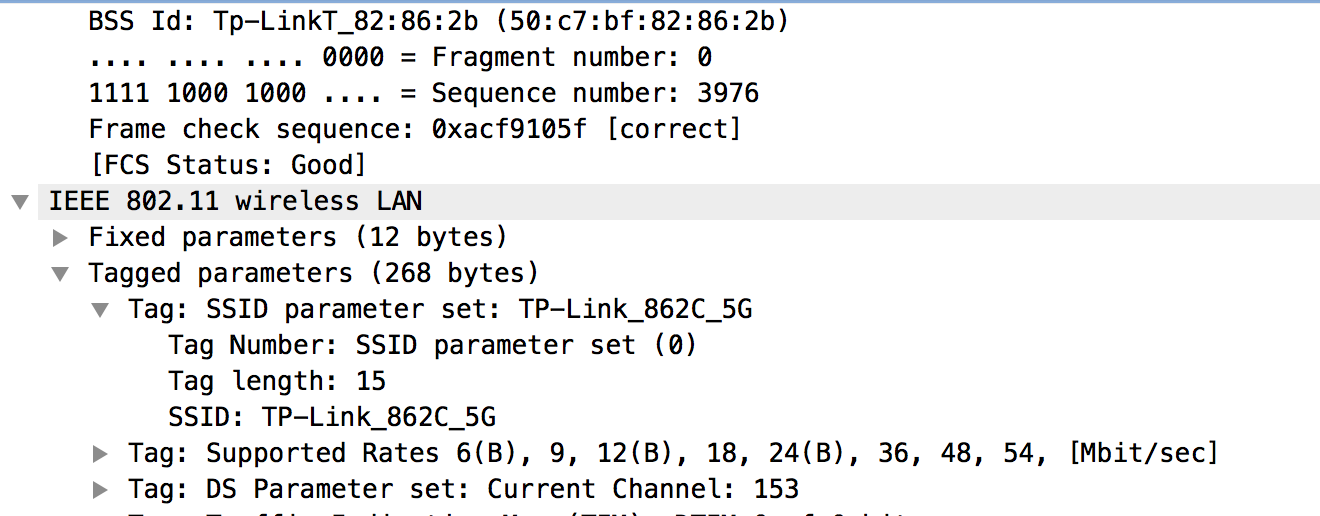
Figure 7-2. Radio headers in Wireshark
The program kismet can be used to not only get the BSSID of a wireless network but also enumerate networks that are broadcasting. This information also includes SSIDs that are not named. You will see in Figure 7-3 that a couple of SSIDs aren’t explicitly named. The first is <Hidden SSID>, indicating that the SSID broadcasting has been disabled. When a probe is sent looking for wireless networks, the AP won’t respond with an SSID name. You will, however, get the BSSID. Using the BSSID, we’ll be able to communicate with the device because we know the identification of the AP. The second one that isn’t explicitly named is <Any>, which is an indication that a probe is being sent out.
You will also notice an SSID that has two separate BSSIDs associated with it. In this case, two meshed Google WiFi devices are handling that SSID, and as a result, the SSID is being announced by both of those devices. kismet also shows you the channel that is associated with that SSID. Our two APs advertising CasaChien are on two different channels. Two APs trying to communicate over the same channel, meaning they are using the same frequency range, will end up clobbering one another. In the wired world, this would be called a collision. Although there are different addresses, this is still radio. If you ever listen to an AM or FM radio station and you end up hearing a second one at the same time, you’ll get the idea.
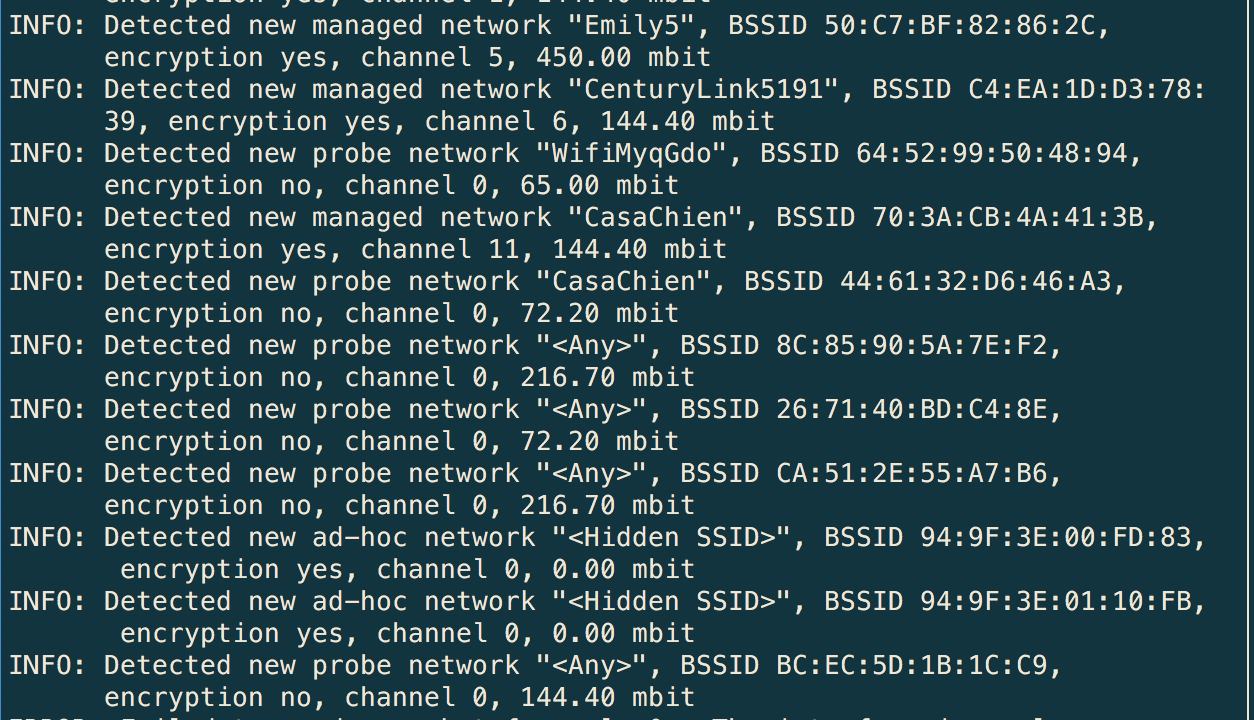
Figure 7-3. Kismet detecting wireless networks
All of this information is useful for further attack strategies. We will need to know things like the BSSID in order to perform attacks, since that’s how we know we are talking to the right device.
WPS Attacks
One way of gaining access to a WiFi network, especially for those who don’t want to deal with the fuss of configuring the operating system by entering passwords or passphrases, is to use WiFi-Protected Setup (WPS). WPS can use various mechanisms to associate a client with an AP. This might include providing a personal identification number (PIN), using a USB stick, or pushing a button on the AP. However, vulnerabilities are associated with WPS, which may allow an attacker to gain access to networks they shouldn’t get access to. As a result, it’s useful to scan for networks that may support WPS, since this is something that can be disabled.
The tool we are going to start looking at is wash. This tool lets us know whether WPS is enabled on an AP. It’s a simple tool to use. You run it by specifying an interface to scan on or by providing a capture file to look for. Example 7-1 shows a run of wash looking for networks in my vicinity that have WPS enabled. This is a simple run, though we could select specific channels.
Example 7-1. Running wash to identify WPS-enabled APs
yazpistachio:root~# wash -i wlan0 Wash v1.6.4 WiFi Protected Setup Scan Tool Copyright(c)2011, Tactical Network Solutions, Craig Heffner BSSID Ch dBm WPS Lck Vendor ESSID ------------------------------------------------------------------------------- 50:C7:BF:82:86:2C5-43 2.0 No AtherosC TP-Link_862C C4:EA:1D:D3:78:396-43 2.0 No Broadcom CenturyLink5191
Now we know that we have two devices in close proximity that support WPS for authentication. Fortunately, both of these devices are mine, which means I am free to perform testing against them. I have the BSSID, which I need in order to run additional attacks. We’re going to take a look at using the tool reaver to attempt to gain access to the AP. This Kali system is not associated to this network and AP. No authentication credentials have been passed between Kali and this AP. So, we’re going to try to use reaver to use WPS to get access. This is essentially a brute-force attack, and it’s easy to start. We need to provide the interface to use and also the BSSID. You can see the start of a run in Example 7-2.
Example 7-2. Using reaver to attempt authentication
yazpistachio:root~# reaver -i wlan0 -b 50:C7:BF:82:86:2C Reaver v1.6.4 WiFi Protected Setup Attack Tool Copyright(c)2011, Tactical Network Solutions, Craig Heffner <[email protected]>[+]Waitingforbeacon from 50:C7:BF:82:86:2C[+]Received beacon from 50:C7:BF:82:86:2C[+]Vendor: AtherosC[+]Associated with 50:C7:BF:82:86:2C(ESSID: TP-Link_862C)[+]Associated with 50:C7:BF:82:86:2C(ESSID: TP-Link_862C)[+]Associated with 50:C7:BF:82:86:2C(ESSID: TP-Link_862C)[+]Associated with 50:C7:BF:82:86:2C(ESSID: TP-Link_862C)[+]Associated with 50:C7:BF:82:86:2C(ESSID: TP-Link_862C)[+]Associated with 50:C7:BF:82:86:2C(ESSID: TP-Link_862C)[+]0.00%complete@ 2018-02-20 17:33:39(0seconds/pin)
Using reaver to get the WPS PIN can take several hours, depending on the characteristics of the hardware and the network you are attempting to communicate with. reaver is not the only attack tool that can be used against WPS-enabled devices. reaver is used online, but if you need to get the PIN offline, you could use the Pixie Dust attack. This attack takes advantage of a lack of randomness in the values used to set up the encryption that passes between the AP and the client. To acquire the PIN using the Pixie Dust attack, you would need to have access to a successful connection.
Once you have this, you collect the public key from both the AP (registrar) and the client (enrollee). Additionally, you need the two hash values used by the client: the authentication session key and the nonce used by the enrollee. Once you have those, there are a couple of programs you can use. One of them is reaver. Another is pixiewps. Using pixiewps is straightforward. To run it with the relevant information, you use pixiewps -e <enrolleekey> -r <registrarkey> -s <hash1> -z <hash2> -a <sessionkey> -n <nonce>.
Automating Multiple Tests
Unsurprisingly, you can attack WiFi networks in multiple ways. The problem is that saying WiFi networks suggests that there are only a couple of types of WiFi networks. The reality is there are many ways that WiFi networks may be deployed, even before we get into topology—meaning the positioning of the devices, whether it’s a mesh network, and various other similar concerns. We haven’t talked at all about encryption to date, though we’ve referred to keys.
To address concerns about privacy, Wired Equivalent Privacy (WEP) was developed to ensure transmission was encrypted. Without encryption, anyone with a WiFi radio could listen in on the transmissions. All they needed was to be in proximity to the signal, which could be in the parking lot. WEP, though, had vulnerabilities. Because of the weakness in its initialization vector, the encryption key could be determined, allowing traffic to be decrypted. As a result, WPA was developed as a successor to WEP. It, too, had issues, leading to WPA2.
The problem is that some people are still using the older encryption mechanisms. In part, this is because of legacy requirements. There may be hardware that can’t be replaced that supports only the older mechanisms. If you have a working network setup, why change it, after all? Therefore, it’s worth performing testing against some of these mechanisms.
Kali includes one program that can be used to test WiFi networks automatically using various techniques. wifite can test WPA, WEP, and WPS-enabled APs. While you can test each of those specifically, you can also run wifite without any parameters and have it test all of these mechanisms. Figure 7-4 shows wifite running. In order to run, it places the interface in monitor mode. This is necessary to be able to get the radio traffic it needs to perform the testing. What’s interesting about this run, aside from one of the SSIDs, is that all of the BSSIDs indicate that WPS is not enabled, which is not true for at least two of them.
Note
An ESSID is an extended service set identifier. In some cases, the BSSID will equal the ESSID. However, in larger networks where there may be multiple APs, the ESSID will be different from the BSSID.

Figure 7-4. Using wifite to gather BSSIDs
Figure 7-4 shows the list of APs that have been identified. Once you have that list, you need to select the APs you want to test. Once you have the SSID you want to test against showing in the list, you press Ctrl-C to have wifite stop looking for networks. You then select a device from the list or you can select all. Example 7-3 shows wifite starting testing against all the APs.
Example 7-3. wifite running tests
[+]selecttarget numbers(1-5)separated by commas, or'all': all[+]5targets selected.[0:08:20]starting wpa handshake capture on"CasaChien"[0:08:09]sending5deauth to *broadcast*...
As mentioned, wifite uses various strategies by default. In addition to trying to capture the handshake required by WPA, as you can see in Example 7-3, wifite will also take a pass at running the Pixie Dust attack. You can see attempts to run that attack against the APs that have WPS enabled in Figure 7-5. You will also note there that wifite was able to capture the WPA handshake, which it saved as a pcap file for later analysis.
This will run for a while, attempting to trigger the vulnerabilities that exist against the encryption and authentication mechanisms supported. Because all five targets were selected, it will take quite a bit longer than if I were just testing one of the devices. To run these tests, wifite needs to send frames that wouldn’t be part of the normal process. Other tools do similar things by injecting traffic into the network in order to watch the responses from the network devices. This may be essential in trying to gather enough traffic for analysis.

Figure 7-5. wifite attempting Pixie Dust attacks
Injection Attacks
A common approach to attacking WiFi networks is to inject frames into the network. This can be in order to elicit a response from the AP. One of the tools available in Kali to enable injection is wifitap. This program creates a tunnel interface that can be used to inject traffic through to the wireless network. Example 7-4 shows the use of wifitap to create a tunnel interface. The BSSID is provided for the AP associated with the SSID. You’ll also see that the interface for inbound and outbound are specified. Once wifitap is run, you will see that there is a new interface. You will then need to configure the new interface, wj0, in order to use it.
Example 7-4. Using wifitap to create a tunnel
yazpistachio:root~# wifitap -b 50:C7:BF:82:86:2C -i wlan0 -o wlan0
Psyco optimizer not installed, running anyway...
IN_IFACE:   wlan0
OUT_IFACE:  wlan0
BSSID:      50:c7:bf:82:86:2c
Interface wj0 created. Configure it and use it
Once you have the interface up, you will be able to set an IP address for the target network on the interface and then set routes for the target network through your new interface. This program will allow you to inject packets into the network without using any other library. Any application can use this new interface without needing to know anything about interacting with wireless networks. Along with wifitap comes a few other tools that can be used to answer protocols like ARP and DNS. The tools wifiarp and wifidns can be used to listen for and respond to those protocols on the network.
Not all wireless interfaces support packet injection. Packet injection is something that will be important not only for dumping traffic onto the wireless network but also for trying to crack passwords that will allow us to get authentication credentials for that wireless network. Example 7-5 shows the use of the tool aireplay-ng to determine whether injection works on your system with your interface. You can see from the result that injection is successful.
Example 7-5. Using aireplay-ng to test packet injection
yazpistachio:root~# aireplay-ng -9 -e TP-Link_862C -a 50:C7:BF:82:86:2C wlan0 21:07:37 Waitingforbeacon frame(BSSID: 50:C7:BF:82:86:2C)on channel 5 21:07:37 Trying broadcast probe requests... 21:07:38 Injection is working! 21:07:39 Found1AP 21:07:39 Trying directed probe requests... 21:07:39 50:C7:BF:82:86:2C - channel:5-'TP-Link_862C'21:07:40 Ping(min/avg/max): 1.290ms/14.872ms/48.013ms Power: -44.97 21:07:40 29/30: 96%
aireplay-ng comes with the aircrack-ng package and is also capable of running other attacks, such as fake authentication, ARP replay, and other attacks against authentication. All of these attacks are performed using packet injection techniques on the wireless network. This is a key element of running password attacks.
Password Cracking on WiFi
The purpose of performing password cracking on a WiFi network is to get the passphrase used to authenticate against the AP. Once we have the passphrase, we can get access to the network, which we shouldn’t have access to. From the standpoint of working with an employer or client, if you are capable of cracking the password, a malicious attacker will be able to as well. This could mean vulnerabilities in the encryption mechanism used or it could mean a weak passphrase. Either way, this is something that the business should resolve to prevent unauthorized access to the network.
A few tools can be used to perform password attacks against WiFi networks. Keep in mind that you could be working against two encryption mechanisms: WEP and WPA. It’s less likely you will run across a WEP network, but you may still see them. If you do, you should strongly encourage your client or employer to do what they can to replace the AP and network. You may find they are stuck with it for legacy reasons, so it’s worth keeping that in mind. The other encryption mechanism that you will run across is some form of WPA. Again, you shouldn’t see WPA, but instead you should see WPA2. If you run across WPA, you should strongly encourage that it be replaced with WPA2.
besside-ng
The first tool we will take a look at is besside-ng. Before we do that, though, we’re going to scan for BSSIDs again, though we’ll do it in a different way. We’re going to use another tool from the aircrack-ng package. This tool puts your wireless interface into monitor mode and in the process creates another interface that can be used to dump traffic on. To enable monitor mode, we use airmon-ng start wlan0 when the wireless interface is wlan0. Once airmon-ng is started, the interface wlan0mon is created. airmon-ng will tell you the name of the interface that’s created, since yours may be different. Once we have monitor mode enabled, we can use airodump-ng wlan0mon to monitor the traffic with the radio headers, which is enabled by airmon-ng. Example 7-6 shows the output from airodump-ng.
Example 7-6. Using airodump-ng
CH10][Elapsed:6mins][2018-02-25 19:41 BSSID PWR Beacons#Data, #/s CH MB ENC CIPHER AUTH ESSID78:28:CA:09:8E:41 -101601-1 WPA <leng 70:3A:CB:52:AB:FC -101802590154e. WPA2 CCMP PSK CasaC 18:D6:C7:7D:EE:11 -291981210154e. WPA2 CCMP PSK CasaC 70:3A:CB:4A:41:3B -441629201154e. WPA2 CCMP PSK CasaC C4:EA:1D:D3:78:39 -4618300654e WPA2 CCMP PSK Centu 50:C7:BF:82:86:2C -4611800554e. WPA2 CCMP PSK TP-Liq C4:EA:1D:D3:80:19 -4957390654e WPA2 CCMP PSK Centuq q BSSID STATION PWR Rate Lost Frames Probe(not associated)1A:BD:33:9B:D4:59 -200-106(not associated)26:D6:B6:BE:08:7A -420-106(not associated)44:61:32:D6:46:A3 -460-1090CasaChien(not associated)64:52:99:50:48:94 -480-1012WifiMyqGdo(not associated)F4:F5:D8:A2:EA:AA -460-103CasaChien 78:28:CA:09:8E:41 94:9F:3E:01:10:FB -28 0e-07953Sonos_lHe9q 70:3A:CB:52:AB:FC 94:9F:3E:01:10:FA -2636-240101 70:3A:CB:52:AB:FC C8:DB:26:02:89:62 -1 0e-003 70:3A:CB:52:AB:FC 94:9F:3E:00:FD:82 -360-24027 18:D6:C7:7D:EE:11 44:61:32:8C:02:9A -460- 1e240117CasaChien
This gives us the list of BSSIDs as well as the encryption details. We know that most of them are using WPA2 with the Counter Mode Cipher Block Chaining Message Authentication Code Protocol, Counter Mode CBC-MAC Protocol, or CCM mode protocol (CCMP). Unfortunately, the one that is using WPA and not WPA2 is not one of my networks, so I can’t do any testing on it. Instead, we’re going to be using an AP I own that isn’t being used for anything other than testing. We’ll use besside-ng to attempt to crack the authentication for that BSSID. You need to use -b with the BSSID, as you can see in Example 7-7. You also need to specify the interface used. You’ll see wlan0mon is used, but in order to use it, I stopped airmon-ng.
Example 7-7. Using besside-ng to automatically crack passwords
yazpistachio:root~# besside-ng -b 50:C7:BF:82:86:2C wlan0mon[19:55:52]Let's ride[19:55:52]Resuming from besside.log[19:55:52]Appending to wpa.cap[19:55:52]Appending to wep.cap[19:55:52]Logging to besside.log UNHANDLED MGMT 10cking[TP-Link_862C]WPA - PING UNHANDLED MGMT 10cking[TP-Link_862C]WPA - PING UNHANDLED MGMT 10cking[TP-Link_862C]WPA - PING UNHANDLED MGMT 10cking[TP-Link_862C]WPA - PING UNHANDLED MGMT 10cking[TP-Link_862C]WPA - PING UNHANDLED MGMT 10cking[TP-Link_862C]WPA - PING UNHANDLED MGMT 10cking[TP-Link_862C]WPA - PING[19:55:59]Attacking[TP-Link_862C]WPA - DEAUTH
You’ll see from the example that besside-ng is sending a DEAUTH. This is a deauthentication message. It’s used to force clients to reauthenticate in order to collect the authentication message. Once the authentication message has been collected, the program can perform a brute-force attack in order to determine the passphrase or authentication credentials used. We are attacking a WPA2-encrypted network, but if we had found a WEP-encrypted network, we could have used wesside-ng.
Note
A deauthentication attack can also be used as a denial of service. By injecting deauthentication messages to the network, an attacker can force a client off the network. By continually repeating the deauthentication message, the client may be stuck in an authentication/deauthentication cycle and never be able to get on the network.
coWPAtty
Another program we can use to try to crack passwords is cowpatty. This is styled coWPAtty, to make it clear it’s an attack against WPA passwords. What cowpatty needs in order to crack the password is a packet capture that contains the four-way handshake used to set up the encryption key for encrypting the transmission between the AP and the station. You can get a packet capture including the relevant frames by using airodump-ng or kismet. Either will generate a packet capture file (.cap or .pcap) that would include the relevant radio headers, though you would need to tell airodump-ng that you wanted to write out the files. Otherwise, you would just get output to the screen. You would pass -w and a prefix to the command. The prefix is used to create the files, including a .cap file.
Once you have your .cap file, you also need a password file. Fortunately, Kali has several of them in /usr/share/wordlists. You can also download others from online sources. These are dictionaries that would have to include the password or passphrase used by the wireless network. Just as with any password attack, you won’t be successful unless the actual password is in the dictionary you are using. This is because the brute-force attack will compare what was captured against what was generated from the password. Once you have those elements, you could take a run at cracking the passwords with something like the following command: cowpatty -r test-03.cap -f /usr/share/wordlists/nmap.lst -s TP-Link_862C.
Aircrack-ng
We’ve been using tools from the Aircrack-ng suite but we haven’t talked about using aircrack-ng to crack passwords. It’s a powerful tool that can crack WEP and WPA passwords. What aircrack-ng needs is a large collection of packets that can be used to crack against. What aircrack-ng does is a statistical analysis from the packets captured by using a password file to compare against. The short version of what could be a much longer description (and if you are interested in a longer version, you can read the documentation) is that it’s all math and not just hashing and comparing. The program does a byte-by-byte analysis to obtain the passphrase used.
Weak Initialization Vectors
Encryption mechanisms, like those used by WEP and WPA, can use something called an initialization vector. This is a random numerical value, sometimes called a nonce, that is used to help create the encryption key. If the initialization vector algorithm is weak, it can lead to predictable values. This can essentially leak the passphrase used by the wireless network.
Because the program is doing a statistical analysis, it requires many packets to increase the chance of getting the passphrase right. This is, after all, a statistical analysis, and the more data you have, the more you can compare. Think of it as a frequency analysis when you are trying to decode an encrypted message. A small collection may yield an even distribution across all or most letters. This doesn’t help us at all. As a result, the more data we can collect, the better chance we have of being able to determine one-to-one mappings because everything starts to display a normal frequency distribution. The same goes for coin flips. You could flip five heads in a row, for example, or four heads and a tail. Based on the probability of each event, we will get an equal number of heads as tails, but it may take a large number to fully get to 50%.
Frequency Analysis
A frequency analysis is a count of the number of times characters show up in text. This is sometimes used when trying to crack ciphertext, because a frequency analysis of ciphertext will reveal letters that are used regularly. This allows us to compare that to a table of letters most commonly used in the language the message is written in. This can start to break down some of the ciphertext back to plain text, or at least provide some good guesses as to which ciphertext letters correspond with which plain-text letters.
To use aircrack-ng, we need a packet capture. This can be done using airodump-ng, as we’ve used before. In addition to just the capture from airodump-ng, we need the capture to include at least one handshake. Without this, aircrack-ng can’t make an attempt at cracking a WPA password. You will also need a password file. You will find a collection of such dictionaries to be useful, and you may spend some disk space accumulating them. You will find that different files will suit you well because password cracking can have different requirements depending on the circumstances. Not all passwords are created equal, after all. WiFi passwords may be more likely to be passphrases, meaning they would be longer than a user’s password.
Fortunately, Kali can help us out here, although what Kali has to offer isn’t specifically directed at WPA passphrases but instead at common passwords. One file that is useful because of its size and varied collection of passwords is rockyou.txt, which is a word list provided with Kali in the /usr/share/wordlists directory. We will use this file to check against the packet capture. You can see a run of aircrack-ng with rockyou.txt as the wordlist/dictionary and then localnet-01.cap as the packet capture from airodump-ng in Example 7-8.
Example 7-8. Running aircrack-ng to crack WPA passwords
root@savagewood:~# aircrack-ng -w rockyou.txt localnet-01.cap Opening localnet-01.cap Read10299packets.# BSSID ESSID Encryption170:3A:CB:4A:41:3B CasaChien WPA(0handshake)270:3A:CB:52:AB:FC CasaChien WPA(0handshake)318:D6:C7:7D:EE:11 CasaChien WPA(1handshake)450:C7:BF:82:86:2C TP-Link_862C No data - WEP or WPA570:8B:CD:CD:92:30 Hide_Yo_Kids_Hide_Yo_WiFi WPA(0handshake)6C4:EA:1D:D3:78:39 CenturyLink5191 No data - WEP or WPA70C:51:01:E4:6A:5C PJ NETWORK No data - WEP or WPA8C4:EA:1D:D3:80:19 WPA(0handshake)978:28:CA:09:8E:41 WPA(0handshake)1094:9F:3E:0F:1D:81 WPA(0handshake)1100:25:00:FF:94:73 None(0.0.0.0)1270:3A:CB:4A:41:37 Unknown13EC:AA:A0:4D:31:A8 Unknown Index number of target network ?
Note
While three of the SSIDs that were caught belong to me, others do not. Since they belong to my neighbors, it would be impolite, not to mention unethical and illegal, to attempt to crack those networks. Always make sure you are working against either your own systems or systems that you have clear permission to test.
Once we run aircrack-ng, we’ll be asked which target network we want to crack. You will see from Example 7-8 that only one network has a handshake that was captured. This is one of the BSSIDs associated with the SSID CasaChien. As such, this is the only network we can select to be able to run a crack against. Selecting the network we want will start up the cracking attempt, as seen in Example 7-9.
Example 7-9. aircrack-ng cracking WPA password
                                 Aircrack-ng 1.2 rc4

      [00:00:06] 11852/9822768 keys tested (1926.91 k/s)

      Time left: 1 hour, 24 minutes, 53 seconds                  0.12%

                       Current passphrase: redflame


      Master Key     : BD E9 D4 29 6F 15 D1 F9 76 52 F4 C2 FD 36 96 96
                       A4 74 83 42 CF 58 B6 C9 E3 FA 33 21 D6 7F 35 0E

      Transient Key  : 0B 04 D6 CA FF EE 7A B9 6E 6D 90 0F 9E 4F E5 64
                       5B AA C0 53 18 32 F7 54 DE 46 74 D1 4D D0 31 CF
                       BC 57 D7 8A 5C B4 30 DB FA A9 BD F8 20 0C C9 19
                       35 F7 89 F6 2F 8A 25 74 3A 83 FD 50 F7 E5 C3 9B

      EAPOL HMAC     : 50 66 38 C1 84 A1 DD BC 7C 2F 52 70 FD 48 04 9A
Using Kali in a VM, you can see that it will take about an hour and a half to run through fewer than 10 million passwords. Faster machines that may be dedicated to this task may be able to do the cracking faster. Larger lists will take longer to crack.
Fern
Fear not if you are reluctant to take multiple steps using the command line to go after WiFi networks. You can use Fern, a GUI-based application that can be used to attack different encryption mechanisms. Figure 7-6 shows the interface that Fern presents. You can see from the screen capture that Fern supports cracking WEP and WPA networks.

Figure 7-6. Fern GUI
Once you have Fern running, you need to select the wireless interface you plan to use and then you need to scan for networks. The selection of the interface is in the leftmost box in the top row. Next to that is a Refresh button if you have made changes outside the GUI in order to get them picked up in the interface. “Scan for Access points” is the next button down. That populates a list that Fern will provide to you. When you select the type of network you want to crack, either WEP or WPA, you will be presented with the box shown in Figure 7-7. This gives you a list of the networks that were found. This list is basically the same list we’ve been dealing with up to now.
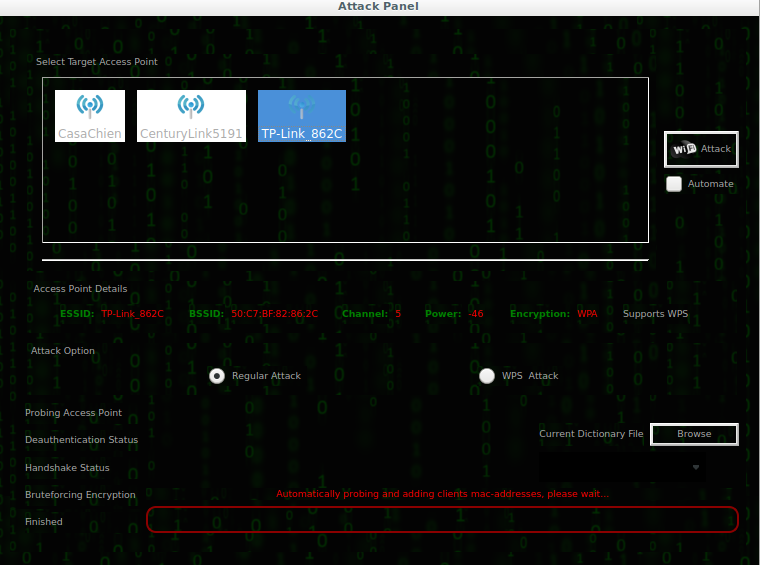
Figure 7-7. Fern network selection
You may also notice that at the bottom right of the dialog box is a selection button to provide Fern with a dictionary to use. Just like aircrack-ng, Fern uses a dictionary to run cracks with, and just as with aircrack_ng, you won’t be able to crack the password if it is not provided in the dictionary that Fern is given. To get Fern started, you select one of the networks provided, provide it with a dictionary file, and then click the Attack button.
Going Rogue
Rogue APs come in two, possibly three, flavors. First, you may get an AP that just tries to lure you in. It may be named FreeWiFi, or it may be a variation on a legitimate AP. There is no attempt to do anything other than get people to connect. In the second kind, an attacker attempts to take over a legitimate SSID. The attacker masquerades as the real network, possibly jamming the legitimate signal. The third one is less relevant here, though still of some concern. This may be less of an issue now, but there was a time when employees would install their own APs at their companies because the company didn’t offer WiFi. A potentially insecure AP was then bridged to the corporate network, which might have allowed an attacker access to the corporate network.
Rogue APs are a common problem because it’s so easy to create a wireless network with an AP advertising an SSID. This may be a well-known AP. Because there is nothing that necessarily makes one clearer than another, it’s easy to stand up a rogue AP to attack clients. This isn’t useful in and of itself, necessarily, from the standpoint of security testing. It’s easy enough to determine that people, given the right location for your rogue AP, will mistakenly attach to your network. Once they have done that, you can collect information from them. This may provide you a way to gain access to the legitimate network by collecting credentials that you can then use against the legitimate network.
Hosting an Access Point
Before we get into more traditional attacks, we should look at just using Linux—specifically, Kali—to host an AP. This requires a couple of things. The first is a wireless interface. Fortunately, we have one of those. We’ll also need the ability to feed network addresses to our clients and then route the traffic that’s coming in. We can do all of this with Kali Linux. First, we need to set up a configuration for hostapd. Kali doesn’t include one by default, but there is an extensively documented sample in /usr/share/docs/hostapd. To get an AP up and running, we’ll use a simple configuration, which you can see in Example 7-10. We’ll be putting this into /etc/hostapd, but it doesn’t much matter where it is because you tell hostapd where the configuration file is.
Example 7-10. hostapd.conf
# hostapd.conf for demonstration purposesinterface=wlan0bridge=br0driver=nl80211logger_syslog=1logger_syslog_level=2ssid=FreeWiFichannel=2ignore_broadcast_ssid=0wep_default_key=0wep_key0=abcdef0123wep_key1=01010101010101010101010101
This configuration allows us to start the hostapd service. We provide the SSID as well as the radio channel to be used. We are also telling hostapd to broadcast the SSID and not expect that the client specifically ask for it. You also need to provide the encryption and authentication parameters, depending on your needs. We’ll be using WEP for this. You can see a start-up of hostapd in Example 7-11. What you’ll see is a -B parameter, which tells hostapd to run in the background as a daemon. The final parameter is the configuration file. Since we are providing it, there is no default, and so it doesn’t much matter where the configuration file is stored.
Example 7-11. Starting hostapd
root@savagewood:/# hostapd -B /etc/hostapd/hostapd.conf
Configuration file: /etc/hostapd/hostapd.conf
Using interface wlan0 with hwaddr 9c:ef:d5:fd:24:c5 and ssid "FreeWiFi"
wlan0: interface state UNINITIALIZED->ENABLED
wlan0: AP-ENABLED
From the configuration and the start-up messages, you will see that the name of the SSID was FreeWiFi, which you can see being advertised in Figure 7-8. This means that our Kali Linux systems is successfully advertising the SSID as expected. This will allow users only to connect to our wireless AP. It doesn’t let users do anything after they have connected. To do that, we need a second interface to send the traffic out to. There are a few ways to do that. You could bounce through a cellular connection, a second wireless network, or just run out to a wired interface.
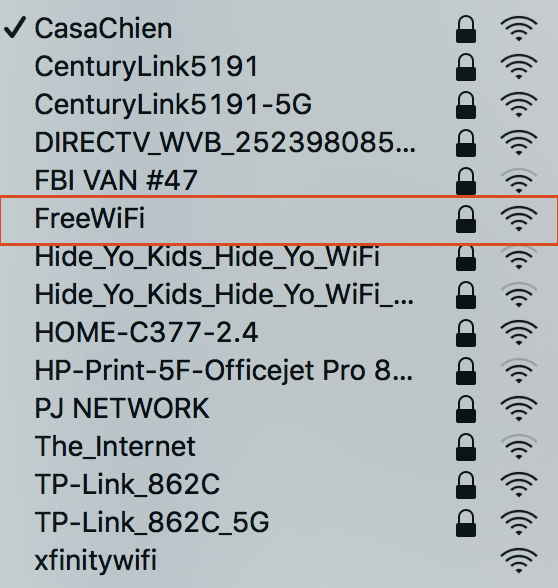
Figure 7-8. List of SSIDs including FreeWiFi
Even if we have a second network interface, though, we need to do a couple of other things. To start, we need to tell the Linux kernel that it’s okay to pass traffic from one interface to another. Unless we set that kernel parameter, the operating system will not allow the traffic to go anywhere after it has entered the system. We can do that by running sysctl -w net.ipv4.ip_forward. To make this change permanent, the file /etc/sysctl.conf needs to be edited to set that parameter. That will allow Linux to accept the packets in and forward them out another interface, based on the routing table the operating system has.
With all this in place, you can have your very own AP for whatever purpose you would like. This can include just keeping track of the clients that attempt to connect to you. This may give you a sense of potentially malicious users. To do more complicated and potentially malicious things of our own, we should get a little extra help.
Phishing Users
You can use hostapd to create a rogue AP. It’s just an AP, though. Another tool we can use, which you’d need to install, is wifiphisher. This will allow us to compromise clients. This may work best if you are masquerading as a legitimate SSID in an area where the legitimate SSID would be available. wifiphisher will jam the legitimate signal while simultaneously advertising the SSID itself. To do this, however, you need to have two WiFi interfaces. One will take care of jamming clients on the legitimate SSID, while the other one will advertise that same SSID.
This ends up working by using the same injection strategies we’ve talked about before. wifiphisher sends deauthentication messages to get the client off the legitimate network. This would force the client to attempt to reassociate. While you can run your attacks using this approach, you can also go single-legged and just advertise an SSID. The attack styles will be the same, no matter what. By running wifiphisher --nojamming -e FreeWiFi, we create an AP advertising the SSID FreeWiFi. Once wifiphisher is started, you’ll be asked which phishing scenario you want to use. You can see the scenarios provided in Example 7-12.
Example 7-12. wifiphisher phishing scenarios
Available Phishing Scenarios:1- Browser Connection Reset A browser error message askingforrouter credentials. Customized accordingly based on victim's browser.2- Firmware Upgrade Page A router configuration page without logos or brands askingforWPA/WPA2 password due to a firmware upgrade. Mobile-friendly.3- Browser Plugin Update A generic browser plugin update page that can be used to serve payloads to the victims.[+]Choose the[num]of the scenario you wish to use:
If you do choose to go the two-legged route with two WiFi interfaces, you just drop off the parameters used in the preceding example and run wifiphisher on its own. When you do that, or if you even leave off the name of the SSID, you will be presented with a list of available networks that you can mimic. Example 7-13 shows the list of networks available locally when I ran wifiphisher. Once you select the network, you will be presented with the same list as seen previously in Example 7-12.
Example 7-13. Selecting wireless network to mimic
[+]Ctrl-C at anytimeto copy an access point from below num ch ESSID BSSID vendor -------------------------------------------------------------------1-1- CasaChien - 70:3a:cb:52:ab:fc None2-5- TP-Link_862C - 50:c7:bf:82:86:2c Tp-link Technologies3-6- CenturyLink5191 - c4:ea:1d:d3:78:39 Technicolor4-11- Hide_Yo_Kids_Hide_Yo_WiFi - 70:8b:cd:cd:92:30 None5-6- PJ NETWORK - 0c:51:01:e4:6a:5c None
After selecting your scenario, wifiphisher will start up a DHCP server to provide the client with an IP address in order to have an address that can be used to communicate with. This is necessary for the different attack vectors, since the scenarios rely on IP connectivity to the client. For our purposes, I selected the firmware upgrade page. wifiphisher will be required to capture web connections in order to present the page we want to the client. When a client connects to the malicious AP, they get presented with a captive login page, which is common for networks that want you to either authenticate with provided credentials or acknowledge some terms of use. You can see the page that is presented in Figure 7-9.

Figure 7-9. Captive login page from wifiphisher
You’ll see that it looks respectable. It even has terms and conditions that you have to agree to. Once you have agreed to them, you are expected to provide your preshared key, otherwise known as the WiFi password, that is expected to authenticate you against the network. Meanwhile, the attacker running wifiphisher is collecting the password, as you can see in Example 7-14.
Example 7-14. wifiphisher output while attacking
Jamming devices: DHCP Leases:1520243113f4:0f:24:0b:5b:f1 10.0.0.43 lolagranola 01:f4:0f:24:0b:5b:f1 HTTP requests:[*]GET 10.0.0.43[*]GET 10.0.0.43[*]GET 10.0.0.43[*]GET 10.0.0.43[*]GET 10.0.0.43[*]GET 10.0.0.43[*]POST 10.0.0.43 wfphshr-wpa-password=mypassword[*]GET 10.0.0.43[*]GET 10.0.0.43
At the bottom of the output from wifiphisher, you will see that a password has been entered. While this is just a bogus password that I entered to get through the page, any user thinking they were connecting to a legitimate network would presumably enter what they believed the password to that network to be. In this way, the attacker would get the password to the network. Additionally, since the 802.11 messages are passing at least to the rogue AP, the attacker gets any network communication being sent from the client. This may include attempts to log in to websites or mail servers. This can happen automatically without the client even knowing, depending on whether the clients or browser are running or if there are background processes set up. Once the password is sent through to the attacker, the client is presented with the page in Figure 7-10.
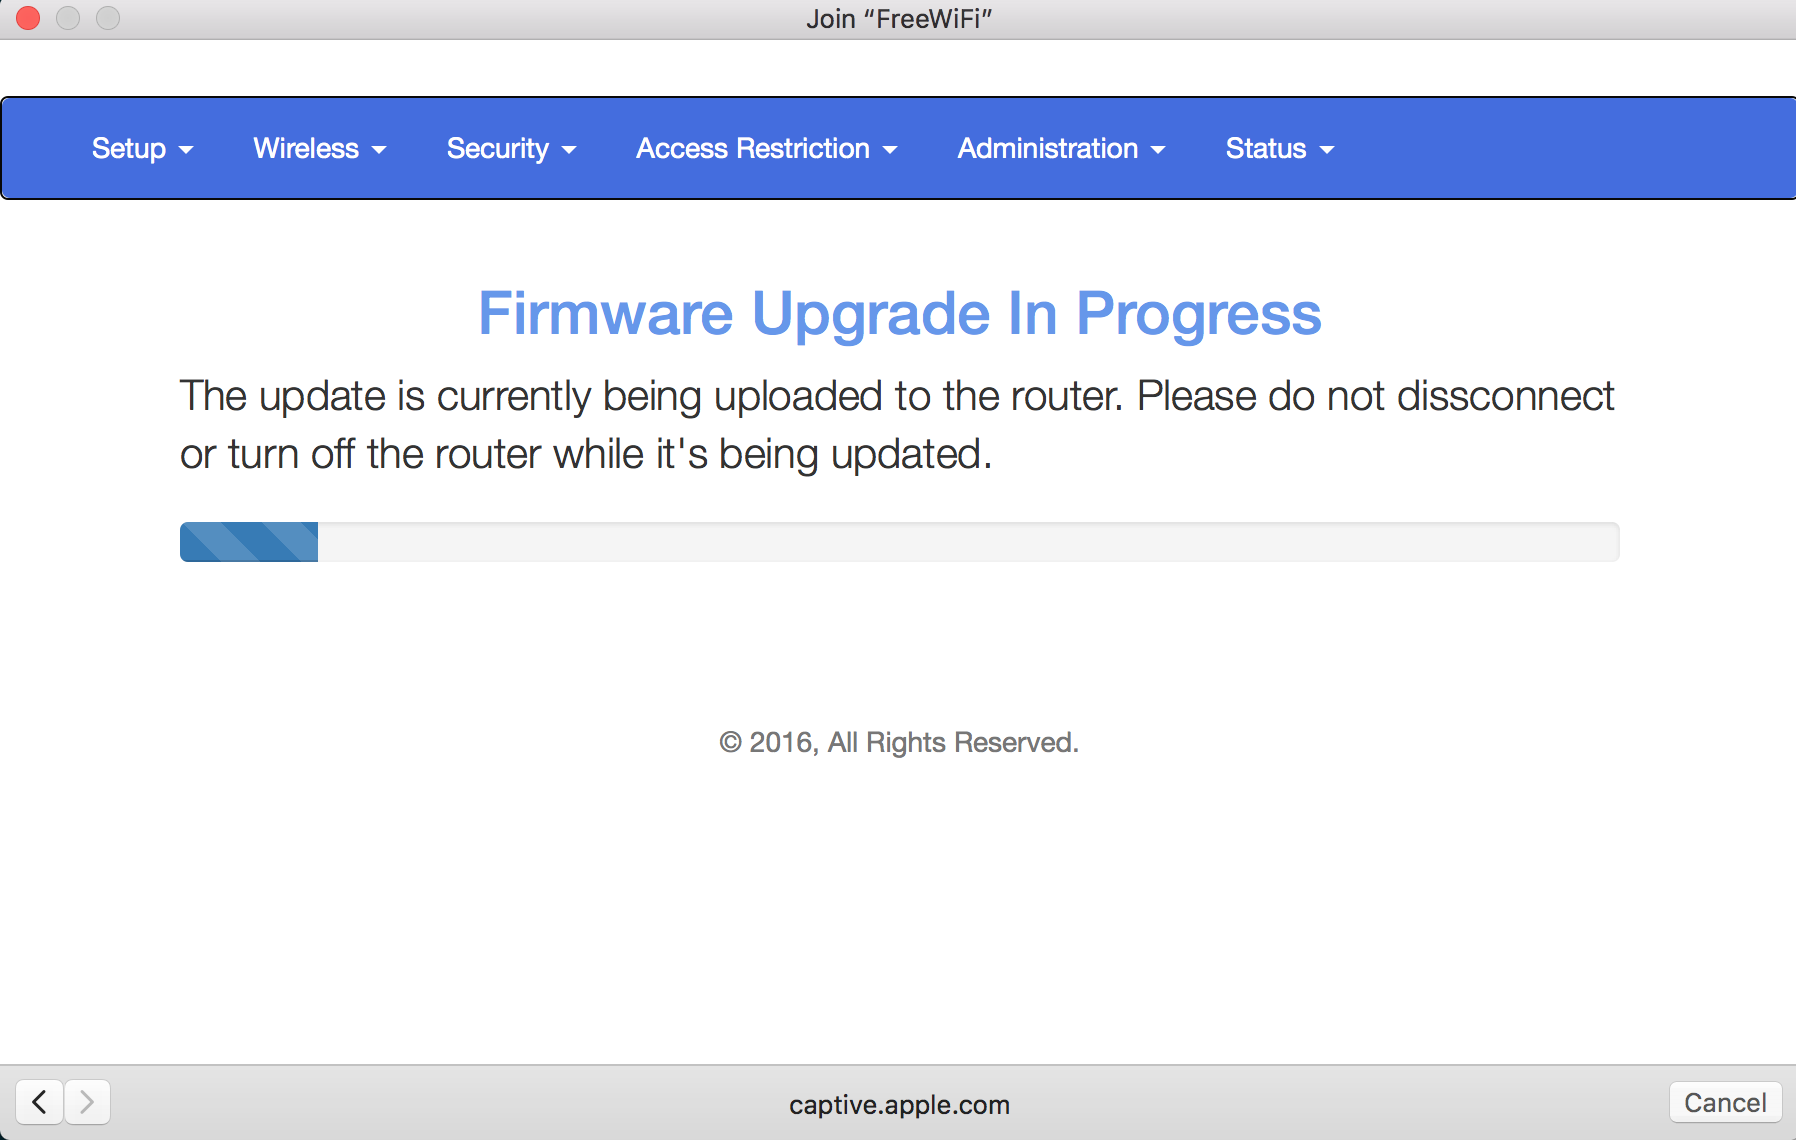
Figure 7-10. Firmware update page
You will notice that the word disconnect is misspelled on the page. There is also no copyright holder at the bottom, though there is a copyright date. It looks legitimate, though if you look closely, you will see that it’s entirely bogus. A typical user would likely not notice any of these issues. The entire point is to look legitimate enough to get users to believe they should be entering their passwords so the attacker can collect them.
Wireless Honeypot
Honeypots are generally used to sit and collect information. Honeypots on a network have commonly been used to collect attack traffic. This can help to gather information about previously unknown attacks. This is one way new malware can be collected. When it comes to WiFi networks, though, we can use a honeypot to collect information from the client. This can be tricky if clients are expecting to use different encryption mechanisms. Fortunately, Kali can help us with that.
wifi-honey starts up four monitor threads to take care of the possibilities for encryption: none, WEP, WPA1 and WPA2. It also starts up an additional thread to run airodump-ng. This can be used to capture the initial stages of a four-way handshake that can be used later with a tool like coWPAtty to crack the preshared key. To run wifi-honey, you have to provide the SSID you want to use, the channel to be active on, and the wireless interface you want to use. You can see an example of running wifi-honey in Example 7-15.
Example 7-15. Running wifi-honey
root@savagewood:/# wifi-honey FreeWiFi6wlan0 Found3processes that could cause trouble. If airodump-ng, aireplay-ng or airtun-ng stops working after a short period oftime, you may want to run'airmon-ng check kill'PID Name426NetworkManager584wpa_supplicant586dhclient PHY Interface Driver Chipset phy0 wlan0 rt2800usb Ralink Technology, Corp. RT5372(mac80211 monitor mode vif enabledfor[phy0]wlan0 on[phy0]wlan0mon)(mac80211 station mode vif disabledfor[phy0]wlan0)
Because multiple processes get started up with wifi-honey, the script uses the program screen to provide virtual terminals. Each of the processes will be available in a different screen session. This saves having to have multiple terminal windows up to manage the different processes.
Bluetooth Testing
Bluetooth is a common protocol that is used to connect peripherals and other I/O devices to a system. This system can be a desktop computer, a laptop, or even a smartphone. Peripherals have a wide variety of capabilities that are defined by profiles. Bluetooth uses radio transmission to communicate, with a frequency range that is close to one of the ranges used by WiFi. Bluetooth is a relatively low-power transmission medium; commonly, you have a range of up to about 30 feet. Bluetooth devices are required to pair with one another before any information can be passed from one device to another. Depending on the complexity of the device, the pairing may be as simple as identifying the peripheral after putting it into pairing mode or it may require confirming a PIN on either side.
If you have a Bluetooth radio in your computer, you can use it to perform testing with the tools provided by Kali. You may wonder why Bluetooth is strictly relevant when it comes to security testing. With so many devices, offering so many services, including file transmission, sensitive company information could be available to attackers if the Bluetooth device isn’t appropriately locked down. Because of the potential sensitivity of what a Bluetooth device can provide access to as well as the potential for acquiring information (imagine an attacker getting remote access to a keyboard, for instance, as a user starts to type a username and password imagining the keyboard is still connected to their system), Bluetooth devices will commonly be undiscoverable unless specifically put into a state where they are discoverable.
Note
The industrial, scientific, and medical (ISM) radio band is a set of frequencies that have been allocated for use by a range of devices. This includes microwave ovens, which is the appliance that triggered the allocation to begin with, in 1947. The 2.4GHz–2.5GHz range is used by microwaves, WiFi, Bluetooth, and other applications.
Scanning
While you may not get much in the way of devices available, a few tools can be used to scan for local Bluetooth devices. Keep in mind that this is something you need to be in close proximity to do. If the building you are working in is large, you will need to do a lot of scans from numerous locations in the building. Don’t assume that picking even a central location will give you meaningful results.
The first tool is provided by the bluez-tools package. It isn’t specifically related to security testing but instead is a utility that is used to manage Bluetooth devices. The program hciutil uses the human-computer interaction interface in your system. In my case, it’s a Bluetooth dongle that is connected via USB. To identify Bluetooth devices with range, we use hciutil to scan. You can see an example of running this scan in Example 7-16.
Example 7-16. Using hciutil to identify Bluetooth devices
root@savagewood:/# hcitool scan
Scanning ...
        00:9E:C8:93:48:C9       MIBOX3
In spite of the many Bluetooth devices in my house and the reasonably close proximity of neighbors, all that was found was a single device. This is because all the other devices are previously paired or not in pairing mode to be discovered. We can use hciutil to query Bluetooth devices, and we’ll use it for that later. As we are still scanning for Bluetooth devices, we’re going to move onto another program: btscanner. This has an ncurses-based interface, which is a very rudimentary GUI. It provides the program more than a line-by-line interface. You can see an example of using it in Figure 7-11.

Figure 7-11. btscanner showing Bluetooth devices
You’ll note that we get the same results from btscanner as we did from using hcitool, which you’d expect since they are both using the same Bluetooth device and sending out the standard Bluetooth protocol commands. We get two ways of performing the scan using btscanner. The first is the inquiry scanner, which sends out probes looking for devices. The second is a brute-force scan, which sends out specific requests to addresses. In other words, you provide a range of addresses for btscanner to probe. It will then send out requests to those addresses, which are MAC addresses, so they should look familiar. Communicating with a Bluetooth device is done over layer 2, and as such, we use layer 2 addresses, MAC addresses, to communicate with the devices.
If we want to go about brute-forcing Bluetooth devices, there is one last tool that we are going to take a look at. This is a program called RedFang, which was developed as a proof of concept to identify nondiscoverable Bluetooth devices. Just because an inquiry scan doesn’t return much of anything doesn’t mean that there aren’t Bluetooth devices around. RedFang helps us to identify all of those devices. Once we’ve identified them, we may be able to use them down the road a little. Using RedFang, we can let it scan all possible addresses or we can specify a range. In Example 7-17, we’ve selected a range of addresses to look for devices in.
Example 7-17. Brute-force Bluetooth scanning with RedFang
root@savagewood:/# fang -r 007500000000-0075ffffffff -s redfang - the bluetooth hunter ver 2.5(c)2003@stake Inc author: Ollie Whitehouse <[email protected]> enhanced: threads by Simon Halsall <[email protected]> enhanced: device info discovery by Stephen Kapp <[email protected]> Scanning4294967296address(es)Address range 00:75:00:00:00:00 -> 00:75:ff:ff:ff:ff Performing Bluetooth Discovery...
Even just scanning the range 00:75:00:00:00:00 through 00:75:ff:ff:ff:ff, selecting a range entirely at random, gives us 4,294,967,296 addresses to scan. I’ll save you from counting the positions. That’s more than 4 billion potential devices. And we’re just scanning a small slice of the possible number of devices. Scanning the entire range would be looking through 281,474,976,710,656 device addresses.
Service Identification
Once we have identified devices, we can query those devices for additional information, including information about the profiles that are supported. Bluetooth defines about three dozen profiles describing the functionality that the device supports. Understanding these profiles will tell us what we may be able to do with the device. First, we’ll go back to using hcitool because we can use it to send several queries. We’re going to use it now to get information about the device we had previously identified. Remember that this was previously identified as a MiBox, which is a device running Android to provide TV services. In Example 7-18, you can see a run of hcitool asking for info about the MAC address identified earlier. What we are going to get back from this query is the features, rather than the profiles, that are supported.
Example 7-18. Using hcitool to get features
root@savagewood:/# hcitool info 00:9E:C8:93:48:C9
Requesting information ...
        BD Address:  00:9E:C8:93:48:C9
        OUI Company: Xiaomi Communications Co Ltd (00-9E-C8)
        Device Name: MIBOX3
        LMP Version: 4.1 (0x7) LMP Subversion: 0x6119
        Manufacturer: Broadcom Corporation (15)
        Features page 0: 0xbf 0xfe 0xcf 0xfe 0xdb 0xff 0x7b 0x87
                <3-slot packets> <5-slot packets> <encryption> <slot offset>
                <timing accuracy> <role switch> <sniff mode> <RSSI>
                <channel quality> <SCO link> <HV2 packets> <HV3 packets>
                <u-law log> <A-law log> <CVSD> <paging scheme> <power control>
                <transparent SCO> <broadcast encrypt> <EDR ACL 2 Mbps>
                <EDR ACL 3 Mbps> <enhanced iscan> <interlaced iscan>
                <interlaced pscan> <inquiry with RSSI> <extended SCO>
                <EV4 packets> <EV5 packets> <AFH cap. slave>
                <AFH class. slave> <LE support> <3-slot EDR ACL>
                <5-slot EDR ACL> <sniff subrating> <pause encryption>
                <AFH cap. master> <AFH class. master> <EDR eSCO 2 Mbps>
                <EDR eSCO 3 Mbps> <3-slot EDR eSCO> <extended inquiry>
                <LE and BR/EDR> <simple pairing> <encapsulated PDU>
                <err. data report> <non-flush flag> <LSTO> <inquiry TX power>
                <EPC> <extended features>
        Features page 1: 0x0f 0x00 0x00 0x00 0x00 0x00 0x00 0x00
        Features page 2: 0x7f 0x0b 0x00 0x00 0x00 0x00 0x00 0x00
What we know from this output is that the MiBox supports synchronous connection-oriented (SCO) communication. Included in this is the ability to use one, two, and three slots for communication (HV1, HV2, and HV3). We also know that it supports Enhanced Data Rate (EDR) for faster transmission speeds. This would be necessary for any audio streaming that would need more bandwidth than transmitting something like a single scan code maybe a few times a second, as would be the case for keyboards. We can use the information we’ve acquired here to make inferences, but it’s still helpful to know what profiles the device supports.
To get the profiles, we’re going to turn to using the service discovery protocol (SDP). We’ll use sdptool to get the list of profiles that are supported. With a device as complex as a MiBox, we’re likely to get several profiles back. Keep in mind that three dozen profiles are defined at the moment by Bluetooth. Example 7-19 shows the use of sdptool to browse the MAC address we acquired earlier. You’ll see only a subset of the entire output here, just to give you a sense of what is available.
Example 7-19. sdptool providing a list of profiles
root@savagewood:/# sdptool browse 00:9E:C8:93:48:C9 Browsing 00:9E:C8:93:48:C9 ... Service RecHandle: 0x10000 Service Class ID List:"Generic Attribute"(0x1801)Protocol Descriptor List:"L2CAP"(0x0100)PSM: 31"ATT"(0x0007)uint16: 0x0001 uint16: 0x0005 Service RecHandle: 0x10001 Service Class ID List:"Generic Access"(0x1800)Protocol Descriptor List:"L2CAP"(0x0100)PSM: 31"ATT"(0x0007)uint16: 0x0014 uint16: 0x001c Service Name: Headset Gateway Service RecHandle: 0x10003 Service Class ID List:"Headset Audio Gateway"(0x1112)"Generic Audio"(0x1203)Protocol Descriptor List:"L2CAP"(0x0100)"RFCOMM"(0x0003)Channel: 2 Profile Descriptor List:"Headset"(0x1108)Version: 0x0102 Service Name: Handsfree Gateway Service RecHandle: 0x10004 Service Class ID List:"Handsfree Audio Gateway"(0x111f)"Generic Audio"(0x1203)Protocol Descriptor List:"L2CAP"(0x0100)"RFCOMM"(0x0003)Channel: 3 Profile Descriptor List:"Handsfree"(0x111e)Version: 0x0106 Service Name: AV Remote Control Target Service RecHandle: 0x10005 Service Class ID List:"AV Remote Target"(0x110c)Protocol Descriptor List:"L2CAP"(0x0100)PSM: 23"AVCTP"(0x0017)uint16: 0x0104 Profile Descriptor List:"AV Remote"(0x110e)Version: 0x0103 Service Name: Advanced Audio Service RecHandle: 0x10006 Service Class ID List:"Audio Source"(0x110a)Protocol Descriptor List:"L2CAP"(0x0100)PSM: 25"AVDTP"(0x0019)uint16: 0x0102 Profile Descriptor List:"Advanced Audio"(0x110d)Version: 0x0102
Unsurprisingly, we can see that the MiBox supports the AV Remote Control Target. It also supports Advanced Audio, as you might expect. Each of these profiles has a set of parameters that are necessary for any program to know about. This includes the protocol descriptor list.
Other Bluetooth Testing
While you can scan for Bluetooth devices, you may not know where they are located. The tool blueranger.sh can be used to determine how close a device is. This is a bash script that sends L2CAP messages to the target address. The theory of this script is that a higher link quality indicates that the device is closer than one with a lower link quality. Various factors may affect link quality aside from the distance between the radio sending the messages and the one responding. To run blueranger.sh, you specify the device being used, probably hci0, and the address of the device you are connecting to. Example 7-20 shows the results of pinging the MiBox we’ve been using as a target so far.
Example 7-20. blueranger.sh output
(((B(l(u(e(R)a)n)g)e)r)))By JP Dunning(.ronin)www.hackfromacave.com Locating: MIBOX3(00:9E:C8:93:48:C9)Ping Count: 14 Proximity Change Link Quality ---------------- ------------ NEUTRAL 214/255 Range ------------------------------------|* ------------------------------------
Note
If you go to the Kali website and look at the tools available in the distribution, some of those tools aren’t available. Because of the nature of open source, projects come and go from distributions because they may not work with the latest distribution’s libraries or kernel. The software may have stopped being developed at some point and may not be relevant any longer. This may be especially true with the protocols we are looking at here. It’s worth checking in on the website from time to time to see whether new tools have been released and are available.
One last Bluetooth tool we’re going to look at is bluelog. This tool can be used as a scanner, much like tools we’ve looked at before. However, the point of this tool is that it generates a log file with what it finds. Example 7-21 shows the run of bluelog. What you see is the address of the device used to initiate the scan, meaning the address of the Bluetooth interface in this system. You can keep running this to potentially see Bluetooth devices come and go.
Example 7-21. Running a bluelog scan
root@savagewood:/# bluelog Bluelog(v1.1.2)by MS3FGX --------------------------- Autodetecting device...OK Opening output file: bluelog-2018-03-05-1839.log...OK Writing PID file: /tmp/bluelog.pid...OK Scan started at[03/05/18 18:39:44]on 00:1A:7D:DA:71:15. Hit Ctrl+C to end scan.
Once bluelog is done, you will have the list of addresses in the file indicated. The one listed in Example 7-21 is bluelog-2018-03-05-1839.log. The output from this scan shows the same address repeated because it’s the only device that is responding close by.
Zigbee Testing
Zigbee testing requires special equipment. Whereas many systems will have WiFi and Bluetooth radios in them, it’s uncommon to find either Zigbee or Z-Wave. That doesn’t mean, however, that you can’t do testing of Zigbee devices. Kali does include the KillerBee package that can be used to scan for Zigbee devices and capture Zigbee traffic. The challenge with this, though, is that you have to have specific interfaces. According to the KillerBee website, the only devices that are supported are River Loop ApiMote, Atmel RZ RAVEN USB Stick, MoteIV Tmote Sky, TelosB mote, and Sewino Sniffer.
The project page does indicate an intention to continue adding support for additional hardware devices. However, the majority of the source code hasn’t been touched in three years as of this point in time. If you have the right devices, you can use the KillerBee package to scan for Zigbee devices. This may provide you some insight into building automation that may be used.
Summary
Wireless takes multiple forms, especially as more and more people and businesses are using home automation. More and more, the wires are going away from our world. Because of that, you will likely have to do some wireless testing somewhere. Some key ideas to take away from this chapter are as follows:
-
802.11, Bluetooth, and Zigbee are types of wireless networks.
-
802.11 clients and access points interact by using associations.
-
Kismet can be used to scan for 802.11/WiFi networks to identify both the SSID and BSSID.
-
Security issues with WEP, WPS, WPA, and WPA2 can lead to decryption of messages.
-
You need to enable monitor mode on wireless network interfaces in order to capture radio headers.
-
aircrack-ng and its associated tools can be used to scan and assess WiFi networks.
-
Kali includes tools to scan for Bluetooth devices and identify services being offered on devices that were found.
-
Kali includes tools that can be used to scan Zigbee devices.
Useful Resources
-
Ric Messier’s “Professional Guide to Wireless Network Hacking and Penetration Testing” video (Infinite Skills, 2015)
-
United States Computer Emergency Readiness Team, “Using Wireless Technology Securely” (US-CERT, 2008)