
Chapter 3. Reconnaissance
When you are performing any penetration testing, ethical hacking, or security assessment work, that work typically has parameters. These may include a complete scope of targets, but often, they don’t. You will need to determine what your targets are—including systems and human targets. To do that, you will need to perform something called reconnaissance. Using tools provided by Kali Linux, you can gather a lot of information about a company and its employees.
Attacks can target not only systems and the applications that run on them, but also people. You may not necessarily be asked to perform social engineering attacks, but it’s a possibility. After all, social engineering attacks are the most common forms of compromise and infiltration these days—by far. Some estimates, including Verizon and FireEye, suggest that 80–90% or maybe more of the data breaches that happen in companies today are happening because of social engineering.
In this chapter, we’ll start looking for company information at a distance to keep your activities quiet. At some point, though, you need to engage with the company, so we’ll start moving closer and closer to the systems owned by the business. We’ll wrap up with a pretty substantial concept: port scanning. While this will give you a lot of details, the information you can gather from the other tools and techniques can really help you determine who your port scan targets are and help to narrow what you are looking at.
What Is Reconnaissance?
Perhaps it’s better to start with a definition of reconnaissance just so we’re all on the same page, so to speak. According to Merriam-Webster, reconnaissance is a “preliminary survey to gather information” and the definition goes on to suggest a connection to the military. The military suggestion isn’t entirely out of bounds here, considering the way we talk about information security. We talk about arms races, attacking, defending, and of course, reconnaissance. What we are doing here is trying to gather information to make our lives as testers (attackers or adversaries) easier. Although you can go blindly at your testing and just throw as much at the wall as you can think of, generally speaking, testing is not an unlimited activity. We have to be careful and conscious with our time. It’s best to spend a little time up front to see what we are facing rather than spending a lot of time later shooting into the dark.
When you start gathering information about your target, it’s usually best to not make a lot of noise. You want to start making your inquiries at a distance without engaging your target directly. Obviously, this will vary from engagement to engagement. If you work at a company, you may not need to be quiet, because everyone knows what you are doing. However, you may need to use the same tactics we’ll talk about to determine the sort of footprint your company is leaving. You may find that your company is leaking a lot of information to public outlets that it doesn’t mean to leak. You can use the open source intelligence tools and tactics to help protect your company against attack.
If we were thinking just of network attacks, we might be satisfied here with port scanning and service scanning. However, a complete security test may cover more than just the hard, technical, “can you break into a system from open ports” style of attack. It may include operational responses, human interfaces, social engineering, and much more. Ultimately, the security posture of a business is impacted by far more than just which services are exposed to the outside world. As a result, there is far more to performing reconnaissance in preparation for security testing than just performing a port scan.
One of the great things about the internet is that there is just so much information. The longer you are connected and interact with the internet, the more breadcrumbs there are about you. This is true of people and businesses. Think about social networking sites just as a starting point. What sort of presence do you have? How much information have you scattered around about you? What about as an employee for the company you are working for? In addition to all of this, the internet stores information just to keep itself running and allow us to get around. This is information about domain names, contact information, company details, addressing, and other useful data for you as you are working through a security test.
Over time, the importance of locating this information has generated many tools to make that information easier to extract from the places it’s stored. This includes command-line tools that have been around for a while, but also websites, browser plug-ins, and other programs. There are so many places to mine for information, especially as more and more people are online and there are more places gathering information. We won’t go over all the ways to gather information through different websites, though there are a lot of sites you can use. We will focus on tools that are available in Kali, with a little discussion over extensions you can add into Firefox, which is the browser used as the default in Kali.
Open Source Intelligence
Not so long ago, it was harder to find someone with a significant online presence than it was to find someone who had no idea what the internet was. That has reversed itself in a short amount of time. Even people who have shunned social networking sites like Facebook, Twitter, Foursquare, MySpace, and many others still have an internet presence. This comes from public records being online, to start with. Additionally, anyone who has had a home phone can be located online. This is just people who otherwise don’t have much use for the internet. For people who have been around online for a while, there is a much longer trail. My own trail is now decades long.
What is open source intelligence? Anything you find from a public source, no matter whether it’s government records that may be considered public, such as real estate transactions, or other public sources like mailing list archives that are considered open sources of information. When you hear open source, you may think of software, but it’s just as applicable to other information. Open source just means it is coming from a place where it is freely available. This does not include various sites that will provide details about people for a fee.
The question you may be wondering is, why would you use this open source intelligence? It’s not about stalking people. When you are performing security tests, there may be multiple reasons to use open source intelligence. The first is that you can gather details about IP addresses and hostnames. If you are expected to test a company in full red team mode, meaning you are outside the organization and haven’t been provided any details about your target, you need to know what you are attacking. This means finding systems to go after. It can also mean identifying people who work at the company. This is important, because social engineering can be an easy and effective means of getting access to systems or at least additional information.
If you are working for a company as a security professional, you may be asked to identify the external footprint of the company and high-ranking staff. Companies can limit the potential for attack by reducing the amount of information leakage to the outside world. This can’t be reduced completely, of course. At a minimum, information exists about domain names and IP addresses that may be assigned to the company as well as DNS entries. Without this information being public, consumers and other companies, like vendors and partners, wouldn’t be able to get to them.
Search engines can provide us with a lot of information, and they are a great place to start. But with so many websites on the internet, you can quickly become overwhelmed with the number of results you may get. There are ways to narrow your search terms. While this isn’t strictly related to Kali, and a lot of people know about it, it is an important topic and worth going over quickly. When you are doing security testing, you’ll end up doing a lot of searches for information. Using these search techniques will save you a lot of time trying to read through irrelevant pages of information.
When it comes to social engineering attacks, identifying people who work at the company can be an important avenue. There are various ways of doing that, especially when it comes to social networks. LinkedIn can be a big data mine for identifying companies and their employees. Job sites can also provide a lot of information about the company. If you see a company looking for staff with Cisco and Microsoft Active Directory experience, you can tell the type of infrastructure in place. Other social networks like Twitter and Facebook can provide some insight about companies and people.
This is a lot of information to be looking for. Fortunately, Kali provides tools to go hunting for that information. Programs can automatically pull a lot of information from search engines and other web locations. Tools like theHarvester can save you a lot of time and are easy to use. A program like Maltego will not only automatically pull a lot of information, but also display it in a way that can make connections easier to see.
Google Hacking
Search engines existed well before Google started. However, Google changed the way search engines worked, and as a result overtook the existing popular search sites like Altavista, InfoSeek, and Inktomi, all of which have since been acquired or been put out of business. Many other search engines have become defunct. Google was not only able to create a search engine that was useful but also find a unique way to monetize that search engine, allowing the company to remain profitable and stay in business.
One feature that Google introduced is a set of keywords that users can use to modify their search requests, resulting in a tighter set of pages to look at. Searches that use these keywords are sometimes called Google Dorks, and the entire process of using keywords to identify highly specific pages is called Google Hacking. This can be an especially powerful set of knowledge to have when you are trying to gather information about your target.
One of the most important keywords when it comes to isolating information related to a specific target is the site: keyword. When you use this, you are telling Google that you want only results that match a specific site or domain. If I were to use site:oreilly.com, I would be indicating that I want to only look for pages that belonged to any site that ended in oreilly.com. This could include sites like blogs.oreilly.com or www.oreilly.com. This allows you to essentially act as though every organization has a Google search engine embedded in their own site architecture, except that you can use Google to search across multiple sites that belong to a domain.
Note
Although you can act as though an organization has its own search engine, it’s important to note that when using this sort of technique, you will find only pages and sites that have reachability from the internet. You also won’t get sites that have internet reachability but are not referenced anywhere else on the internet: you won’t get any intranet sites or pages. Typically, you would have to be inside an organization to be able to reach those sites.
You may want to limit yourself to specific file types. You may be looking for a spreadsheet or a PDF document. You can use the filetype: keyword to limit your results to only those that are that file type. As an example, we could use two keywords together to get detailed results. You can see in Figure 3-1 that the search is for site:oreilly.com filetype:pdf. This will get us PDF documents that Google has identified on all sites that end in oreilly.com, and you can see two websites listed in the first two results.

Figure 3-1. Google results for filetype and site search
There are two other keywords that you might consider paired: inurl: and intext:. The first looks just in the URL for your search terms. The second looks just in the text for your search terms. Normally, Google would find matches across different elements related to the page. What you are telling Google here is that you want it to limit where it is looking for your search terms. This can be useful if you are looking for pages that have something like /cgi_bin/ in the URL. You can also specify that you want to see Google looking only for matches in the text of the page by using intext: followed by your search terms. Normally, Google may present results where not all of your search terms are located. If you want to make sure you find everything, you can use the analog keywords allinurl: and allintext:.
There are other keywords and they do change from time to time—for instance, Google has dropped the link: keyword. The preceding keywords are some of the primary ones that you may use. Keep in mind that generally you can use several of these keywords together. You can also use basic search manipulation, including using Boolean operators. You could use AND or OR, for instance, to tell Google that you want to include both terms you are looking for (AND) or either term (OR). You can also use quotes to make sure that you get word patterns in the correct order. If I wanted to search for references to the Statue of Liberty, for instance, I would use the term “Statue of Liberty,” or else I would get pages that had the words statue and liberty in them. This will likely get you a lot of pages you just don’t want.
Google Hacking Database
Another aspect of Google searching to note is that there is a database of useful search queries. This is the Google Hacking Database that was started in 2004 by Johnny Long, who began collecting useful or interesting search terms in 2002. Currently, the Google Hacking Database is hosted at exploit-db.com. The dorks are maintained by categories, and there are a lot of interesting keywords that you may be able to use as you are doing security testing for a company. You can take any search term you find in the database and add site: followed by the domain name. You will then turn up potentially vulnerable pages and sensitive information using Google hacking.
One final keyword that you can use, though you may be limited in when you might use it, is cache:. You can pull a page out of Google’s search cache to see what the page looked like the last time Google cached it. Because you can’t control the date you are looking for, this keyword may not be as useful as the Wayback Machine in terms of the cache results you can get. However, if a site is down for whatever reason, you can pull the pages down from Google. Keep in mind, though, that if you are referring to the Google cache because the site is down, you can’t click links in the page because they will still refer to the site that is down. You would need to use the cache: keyword again to get that page back.
Automating Information Grabbing
All of this searching can be time-consuming, especially if you have to go through many queries in order to get as many results as possible. Fortunately, we can use tools in Kali to get results quickly. The first tool we are going to look at is called theHarvester. This is a program that can use multiple sources for looking for details. This includes not only Google or Bing, two popular search providers, but also LinkedIn, a social networking site for business opportunities where you post your resume online and make connections with people for business purposes, including hiring searches. theHarvester will also search through Twitter and Pretty Good Privacy (PGP). When the Harvester looks through PGP, it is looking through an online database of people who use PGP to encrypt or sign their emails. Using the online PGP database, theHarvester will be able to turn up numerous email addresses if the people have ever registered a PGP key.
In Example 3-1, we take a look for PGP keys that have been registered using the domain name oreilly.com. This will provide us with a list of email addresses, as you can see, though the email addresses have been obscured here just for the sake of propriety. The list of email addresses has been truncated as well. Several more results were returned. Interestingly, even though I created my first PGP key in the 90s and have had to regenerate keys a few times for my personal email address because I haven’t stored the private key, my email address didn’t come up when I went looking for it.
Example 3-1. theHarvester PGP results
root@rosebud:~# theharvester -d oreilly.com -b pgp ******************************************************************* * * *||_||__ ___ //\__ _ _ ____ _____ ___||_ ___ _ __ * *|__|'_ / _ / /_/ / _` | '__/ / _/__|__/ _'__|* *||_||||__/ / __ /(_|||V / __/\__||__/|* *\__|_||_|\___|//_/\__,_|_|\_/\___||___/\__\___|_|* * * * TheHarvester Ver. 2.7 * * Coded by Christian Martorella * * Edge-Security Research * * [email protected] * *******************************************************************[-]Searching in PGP key server..[+]Emails found: ------------------ [email protected] [email protected] [email protected] [email protected] [email protected] [email protected] [email protected]
We are not limited to using just PGP, of course. We can also search through LinkedIn to identify people. In Example 3-2, the search is for a different domain name. In this case, we are looking for anyone who has used a gmail.com email address. Added to the command line for this search, as you will see, is a flag for indicating the limit on the results to work with. This particular search didn’t end up yielding anything. This is why it may be useful to try multiple providers to look for people. You will get different results from the different providers, so you may want to try all the providers that theHarvester supports.
Example 3-2. theHarvester LinkedIn results
root@rosebud:~# theharvester -d gmail.com -l1000-b linkedin ******************************************************************* * * *||_||__ ___ //\__ _ _ ____ _____ ___||_ ___ _ __ * *|__|'_ / _ / /_/ / _` | '__/ / _/__|__/ _'__|* *||_||||__/ / __ /(_|||V / __/\__||__/|* *\__|_||_|\___|//_/\__,_|_|\_/\___||___/\__\___|_|* * * * TheHarvester Ver. 2.7 * * Coded by Christian Martorella * * Edge-Security Research * * [email protected] * *******************************************************************[-]Searching in Linkedin.. Searching100results.. Searching200results.. Searching300results.. Searching400results.. Searching500results.. Searching600results.. Searching700results.. Searching800results.. Searching900results.. Searching1000results.. Users from Linkedin:====================
This is another case that may require multiple searches. Fortunately, in this case you can write a little script to make your life easier. In Example 3-3, you can see a simple Python script that will run through a few providers, given a domain name provided on the command line. This script could be beefed up substantially if it was intended to be used across multiple users who didn’t necessarily understand how it worked. For my own personal use, though, this works perfectly. What you should end up with is a number of files, both XML and HTML, for each of the providers that returned results.
Example 3-3. Script for searching using theHarvester
#!/usr/bin/pythonimport sys import osiflen(sys.argv)< 2: sys.exit(-1)providers=['google','bing','linkedin','pgp','google-profiles']fora in providers:cmd='theharvester -d {0} -b {1} -f {2}.html'.format(sys.argv[1], a, a)os.system(cmd)
The for loop is a way to keep calling theHarvester with different providers each time. Because theHarvester can generate output, we don’t have to collect the output from this script. Instead, we just name each output file based on the provider. If you want to add providers or just change providers out, you can modify the list. You may not want to check with google-profiles, for instance. You may want to add Twitter. Just modifying the providers line will get you additional results, depending on your needs.
Because it can be such a useful source of information, we’re going to take a look at another program that mines LinkedIn. This program uses word lists to help identify matches on LinkedIn. We are essentially doing two levels of data searching. First, we are focusing on companies, but additionally, we can look for specific data. In Example 3-4, we are searching LinkedIn for people who have titles that are included in the word list provided using the program InSpy.
Example 3-4. Using InSpy to search LinkedIn
root@rosebud:~# inspy --empspy /usr/share/inspy/wordlists/title-list-large.txt oreilly InSpy 2.0.3 2017-12-18 17:51:2524Employees identified 2017-12-18 17:51:25 Shannon Sisk QA Developer OReilly Automotive, HP Tuners Enthusi 2017-12-18 17:51:25 gerry costello financial controller at oreilly transport 2017-12-18 17:51:25 Amber Evans HR Assistant LOAforOreilly Corporate Office 2017-12-18 17:51:25 Mary Treseler Vice President, Content Strategy, OReilly Media 2017-12-18 17:51:25 Donna O'Reilly President of Eurow & OReilly Corporation2017-12-18 17:51:25 Ruben Garcia District Manager at Oreilly Auto Parts2017-12-18 17:51:25 Lexus Johnson Program Coordinator at OReilly Auto Parts2017-12-18 17:51:25 John O'Reilly Chairman at Oreilly Birtwistle SL 2017-12-18 17:51:25 Destiny Wallace HR Social Media Specialist at OReilly Auto Parts
The word lists provided with InSpy are just text files. The one we are using is a list of titles. The following is a subset of one of the word lists. If a title is not included in either of the title word lists (the difference is the length), you can just add them to the file.
chairman
president
executive
deputy
manager
staff
chief
director
partner
owner
treasurer
secretary
associate
supervisor
foreman
counsel
As mentioned before, you can search things like job listings for technology used by a company. The same is true for LinkedIn listings. Because the profiles are essentially resumes that people will sometimes use to submit for job applications, details are often included about the responsibilities of a particular person in any given position. Because of that, we can potentially get a list of technology in use at a company. This can also be done using InSpy. Whereas before we were using the empspy module, we will use the techspy module this time. The command syntax is the same. All we need to do is switch out the module and the word list. You can see this in Example 3-5.
Example 3-5. InSpy using the TechSpy module
root@rosebud:~# inspy --techspy /usr/share/inspy/wordlists/tech-list-large.txt oreilly

InSpy 2.0.3
What InSpy is doing is searching for the company name and then looking for references in the profiles to the different technologies listed in the word list. One thing to note about InSpy is that it isn’t currently installed by default in Kali. To be able to use it, I needed to install it.
Recon-NG
Although Recon-NG is also about automating data gathering, it’s deep enough to get its own section. Recon-NG is a framework and uses modules to function. It was developed as a way to perform reconnaissance against targets and companies by searching through sources. Some of these sources will require that you get programmatic access to the site being searched. This is true of Twitter, Instagram, Google, Bing, and others. Once you have acquired the key, you can use the modules that require access to the APIs. Until then, programs are blocked from querying those sources. This allows these sites to ensure that they know who is trying to query. When you get an API key, you have to have a login with the site and provide some sort of confirmation that you are who you are. When you get an API key from Twitter, for example, you are required to have a mobile phone number associated with your account, and that mobile number is validated.
Most of the modules that you would use to do your reconnaissance for you will require API keys. Although some modules don’t require any authentication, such as for searching PGP keys and also for looking up whois information, a substantial number will need API keys. In Example 3-6 you can see a list of services that require API keys. In some cases, you will see an API key listed where I added a key. I should probably make clear that I have altered the key provided here.
Example 3-6. List of API keys in Recon-NG
[recon-ng][default][twitter_mentions]> keys list +---------------------------------------------------------------------+|Name|Value|+---------------------------------------------------------------------+|bing_api|||builtwith_api|||censysio_id|||censysio_secret|||flickr_api|||fullcontact_api|||github_api|||google_api|AIzaSyRMSt3OtA42uoRUpPx7KMGXTV_-CONkE0w||google_cse|||hashes_api|||instagram_api|||instagram_secret|||ipinfodb_api|||jigsaw_api|||jigsaw_password|||jigsaw_username|||linkedin_api|||linkedin_secret|||pwnedlist_api|||pwnedlist_iv|||pwnedlist_secret|||shodan_api|||twitter_api|zIb6v3RR5AIltsv2gzM5DO5d42||twitter_secret|l73gkqojWpQBTrk243dMncY4C4goQIJxpjAEIf6Xr6R8Bn6H|+------------------ -------------------------------------------------+
Using Recon-NG is fairly easy. When you want to search for information, you use module_name. For instance, in Example 3-7, you can see the use of a twitter_mentions module. When you use the module, you have to make sure that you have filled in all of the required options. Each module may have a different set of options; even if the options are the same across modules, such as the SOURCE option, the values may be different. For the twitter_mentions module, we are using a domain name to look for Twitter mentions.
Example 3-7. Using Recon-NG to search Twitter
[recon-ng][default][pgp_search]> use recon/profiles-profiles/twitter_mentions[recon-ng][default][twitter_mentions]>setSOURCE oreilly.comSOURCE=> oreilly.com[recon-ng][default][twitter_mentions]> run ----------- OREILLY.COM -----------[*][profile]homeAIinfo - Twitter(https://twitter.com/homeAIinfo)[*][profile]homeAIinfo - Twitter(https://twitter.com/homeAIinfo)[*][profile]OReillySecurity - Twitter(https://twitter.com/OReillySecurity)[*][profile]OReillySecurity - Twitter(https://twitter.com/OReillySecurity)[*][profile]OReillySecurity - Twitter(https://twitter.com/OReillySecurity)------- SUMMARY -------[*]5total(2new)profiles found.
When you run modules, you are populating a database that Recon-NG maintains. For instance, in the process of running through a PGP module, I acquired names and email addresses. Those were added to the contacts database within Recon-NG. You can use the show command to list all the results you were able to get. You could also use reporting modules. With a reporting module, you can take the contents of your databases with whatever is in them and can export all of the results into a file. This file may be XML, HTML, CSV, JSON, or a couple of other formats. It depends entirely on which reporting module you choose. In Example 3-8, you can see that the JavaScript Object Notation (JSON) reporting module was chosen. The options allow you to select the tables from the database to export. You can also choose where you want to put the file. Once the options are set, though the ones shown are defaults, you can just run the module and the data will be exported.
Example 3-8. Recon-NG reporting module
[recon-ng][default][xml]> use reporting/json[recon-ng][default][json]> show options Name Current Value Required Description -------- ------------- -------- ----------- FILENAME /root/.recon-ng/workspaces/default/results.json yes path and filenameforreport output TABLES hosts, contacts, credentials yes comma delineated list of tables[recon-ng][default][json]> run[*]27records added to'/root/.recon-ng/workspaces/default/results.json'.
While Recon-NG doesn’t support workspaces, you can export your data if you are working with multiple clients and then clean out the database to make sure you don’t have any cross-contamination. In the preceding example with 27 records in the contacts database, I cleared it by running delete contacts 1-27, which deleted rows 1–27. This required that I run a query against the database to see all the rows and know what the row numbers are. Running the query was as simple as just using show contacts. Using Recon-NG, you have a lot of capabilities, which will continue to change over time. As more resources become available and developers find ways of mining data from them, you might expect new modules to become available.
Maltego
Because I go back so many years to the days when GUIs weren’t a thing, I’m a command-line guy. Certainly, a lot of command-line tools can be used in Kali. Some people are GUI kinds of people, though. We’ve taken a look at a lot of tools so far that are capable of getting a lot of data from open sources. One thing we don’t get from the tools we have used so far is easy insight into how the different pieces of information relate to one another. We also don’t get a quick and easy way to pivot to get additional information from a piece of data we have. We can take the output of our list of contacts from theHarvester or Recon-NG and then feed that output into either another module or another tool, but it may be easier to just select a piece of information and then run that other module against that data.
This is where we come to Maltego. Maltego is a GUI-based program that does some of the same things we have done already. The difference with Maltego is we can look at it in a graph-based format, so all of the relationships between the entities are shown clearly. Once we have a selection of entities, we can acquire additional details from those entities. This can then lead us to more details, which we can use to get more details, and so on.
Before we get too far into looking at Maltego, we need to get the terminology down so you know what you are looking at. Maltego uses transforms to perform work. A transform is a piece of code, written in the Maltego Scripting Language (MSL), that uses a data source to create one entity from another. Let’s say, for instance, that you have a hostname entity. You might apply a transform to create a new entity that contains the IP address linked to the hostname entity. As noted earlier, Maltego presents its information in a graph form. Each entity would be a node in the graph.
We are going to be using the community edition of Maltego because it’s included in Kali, though Paterva does supply a commercial version of Maltego. As we are using the community edition, we are limited by the transforms that we can install into Maltego. The commercial version has many more transforms from different sources. Having said that, there are still several transforms that we can install with the community edition. You can see the list of transform bundles in Figure 3-2.

Figure 3-2. Transforms available in Maltego community edition
The engine of Maltego is the transforms that are installed. However, you don’t have to do all the work yourself by applying one transform after another. This is done using something called a machine. A machine can be created to apply transforms from a starting point. As one example, we can get the footprint of a company. The machine that will do the work for us includes transforms doing DNS lookups and finding connections between systems. The Footprint L3 machine performs transforms getting the mail exchanger and name server records based on a provided domain. From there, it gets IP addresses from hostnames and does additional branching out from there, looking for related and associated hostnames and IP addresses. To start a machine, you would just click the Run Machine button, select the machine you want to run, and then provide the information required by the machine. In Figure 3-3, you can see the dialog box starting up a machine, and above that the Machines tab with the Run Machine button.
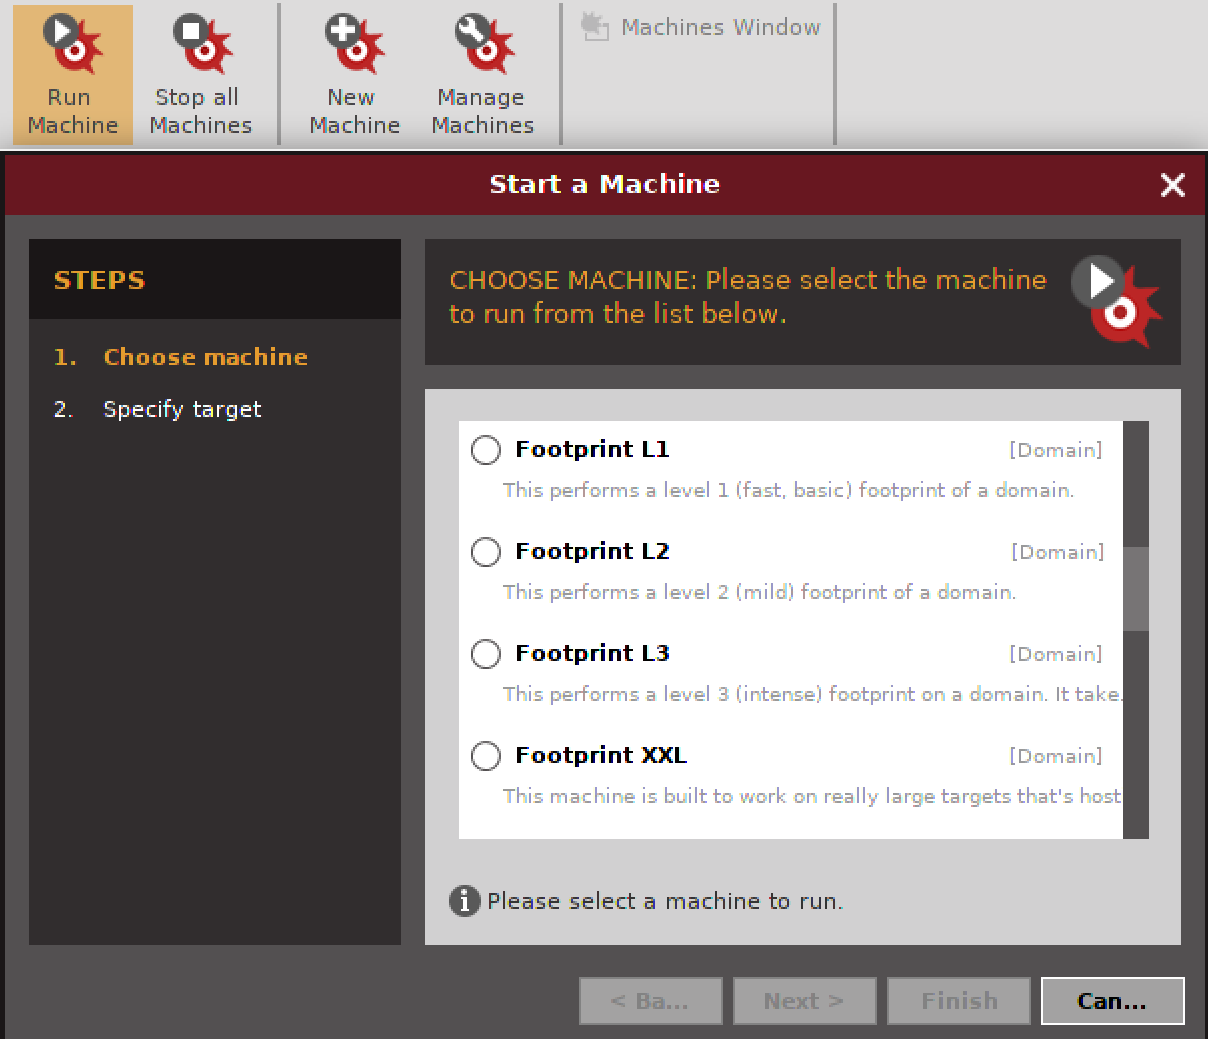
Figure 3-3. Running a machine from Maltego
During this process, the machine will ask for guidance about what entities to include and what entities to exclude; when the machine is done, you will have a graph. This isn’t a graph that you may be used to. It is a directed graph showing relationships between entities. In the center of the graph resulting from the machine we ran, we can see the domain name we started with. Radiating out from there are a variety of entities. The icon for each entity indicates its type. For example, an icon that looks like a network interface card is an IP address entity. Other entities that may look like stacks of systems belong to DNS and MX records, depending on their color. You can see an example of a Maltego graph in Figure 3-4.
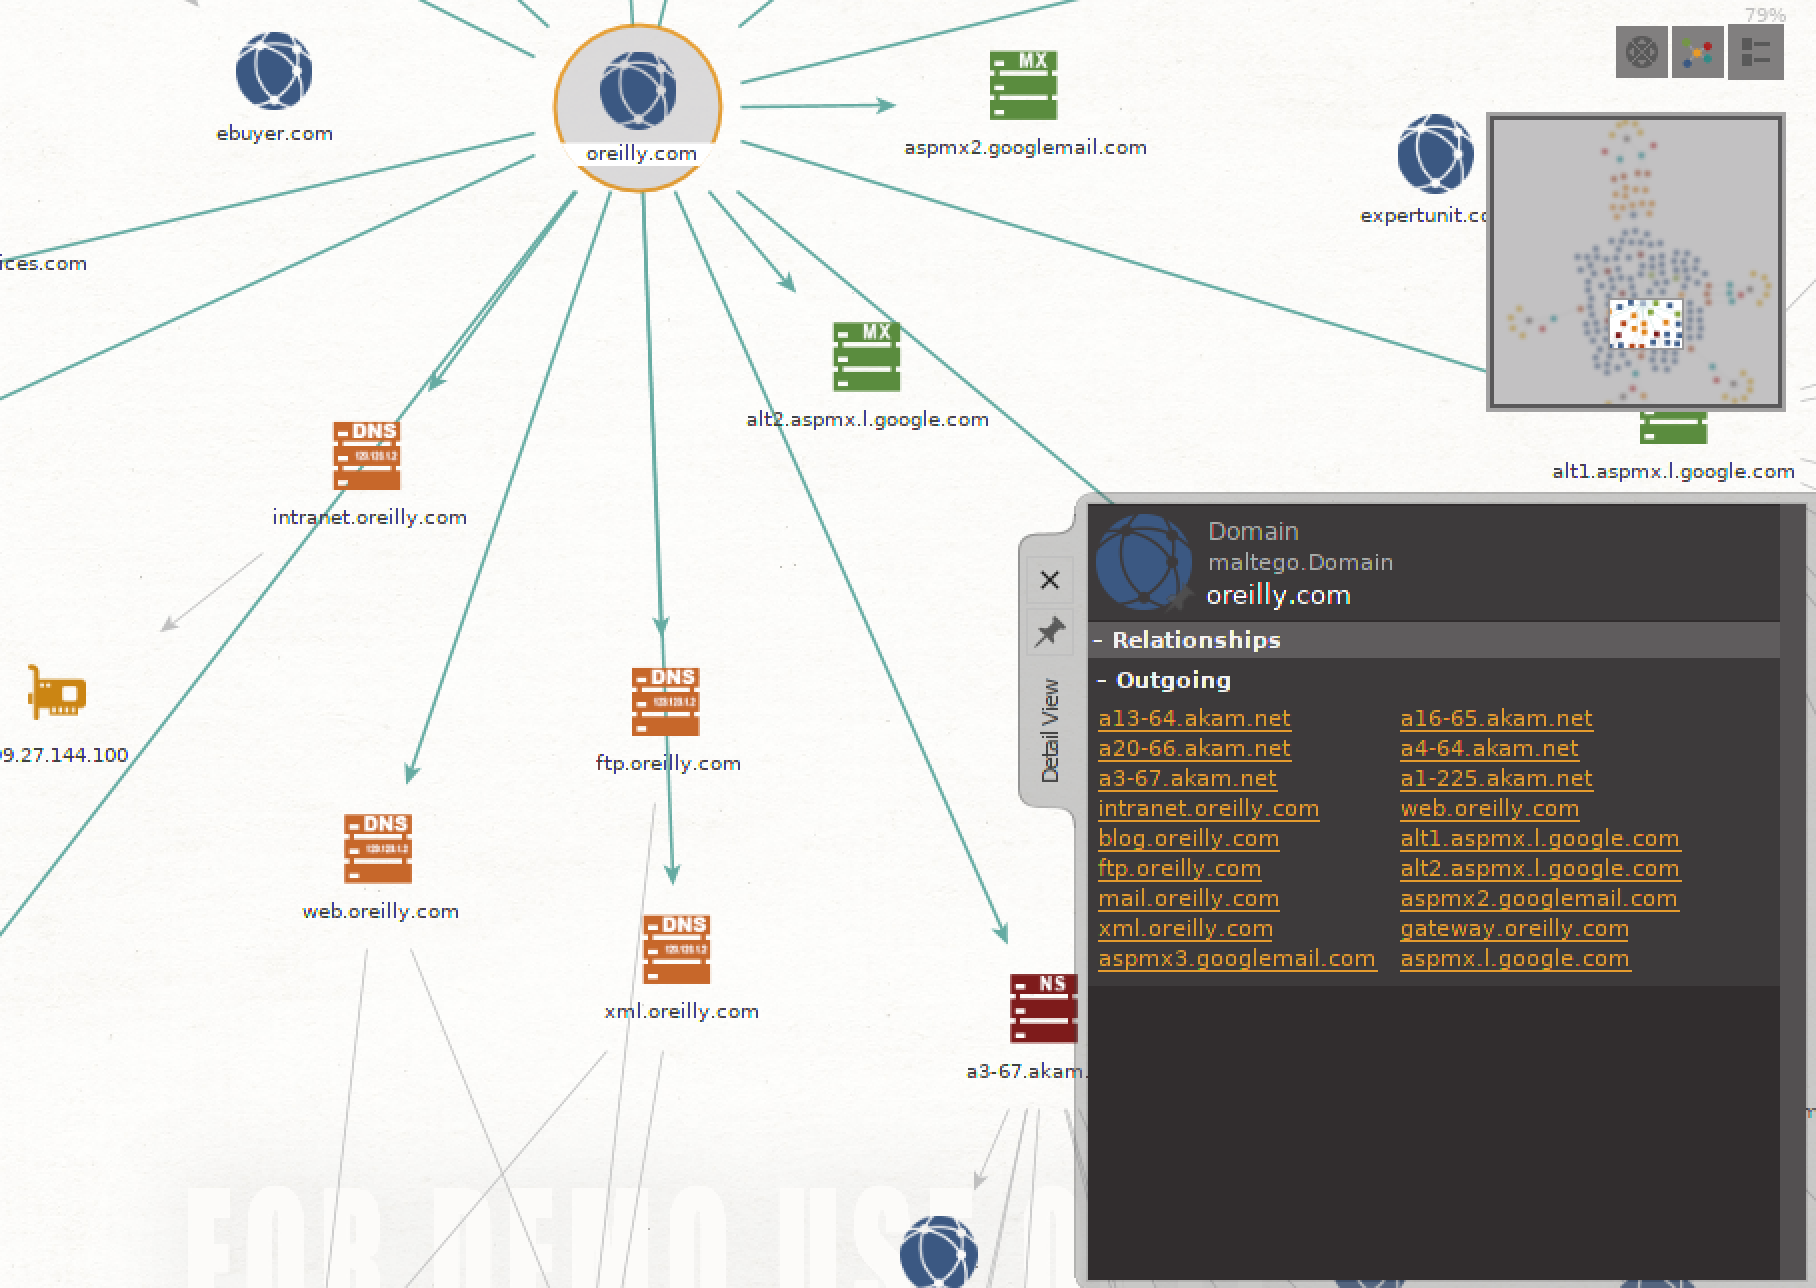
Figure 3-4. A directed graph in Maltego
From each entity, you can get a context menu by right-clicking. You will be able to view transforms that you can then apply to the entity. If you have a hostname but you don’t have the IP address for it, you can look up the IP by using a transform. You could also, as you can see in Figure 3-5, get information from a regional internet registry associated with the entity. This would be the whois transform provided by ThreatMiner.
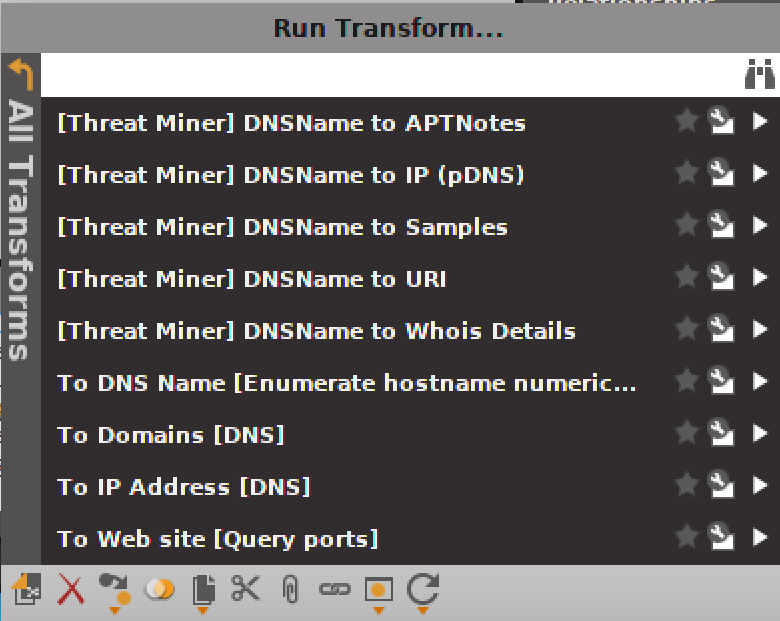
Figure 3-5. Transforms to apply to entities
Anytime you apply a transform, you make the graph larger. The more transforms you have, the more data you can acquire. If you start with a single entity, it doesn’t take long before you can have a lot of information. It will be presented in a directed graph so you can see the relationships, and you can easily click any entity to get additional details, including the associated entities, both incoming and outgoing. This can make it easy to clearly see how the entities are related to one another and where the data came from.
If you are the kind of person who prefers to visualize relationships in order to get the bigger picture, you may enjoy using Maltego. Of course, you have other ways to get the same information that Maltego provides. It’s just a little more laborious and certainly a lot more typing.
DNS Reconnaissance and whois
The internet world really does revolve around DNS. This is why vulnerabilities in DNS have been taken so seriously. Without DNS, we’d all have to keep enormous host tables in our heads because we’d be forced to remember all the IP addresses we use, including those that are constantly changing. This was, after all, how DNS came to be in the first place. Before DNS, a single hosts file stored the mappings between IP addresses and hostnames. Any time a new host was added to the network—and keep in mind that this was when hosts on the network were large, multiuser systems—the hosts file had to be updated and then sent out to everyone. That’s not sustainable. Thus was born the DNS.
DNS ultimately comes down to IP addresses. Those IP addresses are assigned to the companies or organizations that own the domains. Because of this, we need to talk about regional internet registries (RIRs). When you are trying to get an understanding of the scope of your target, using your DNS recon will go hand in hand with using tools like whois to query the RIRs. Although they are helpful together, for the purposes of doing recon, we will take a look at DNS reconnaissance first because we will use some of the output to feed into the queries of RIRs.
DNS Reconnaissance
DNS is a hierarchical system. When you perform a DNS lookup, you send out a request to a server that is probably close to you. This would be a caching server, so-called because the server caches responses it gets. This makes responses to subsequent requests for the same information much faster. When the DNS server you ask gets your query, assuming the hostname you are looking for isn’t in the cache, it starts looking for where to get your information. It does this using hints. A DNS server that does any lookups on behalf of clients will be seeded with starting points for queries.
When you are reading a fully qualified domain name (FQDN), which is a name that includes the domain name (e.g., www.oreilly.com, which includes the hostname www as well as the domain name oreilly.com), you start from the tail end. The rightmost part of an FQDN is the top-level domain (TLD). The information related to the TLDs is stored in root servers. If our DNS server wanted to look up www.oreilly.com, it would start with the root server for the .com TLD. What it needs to do is to get the server for oreilly.com. This process of iterative queries is called a recursive querying.
Note
FQDNs can be hard to understand because the concept of a domain name is sometimes difficult for people to grasp. A domain name is sometimes used as a hostname itself, meaning it maps to an IP address. Sometimes a name like oreilly.com may map to the same IP address as the web server (e.g., www.oreilly.com) but that doesn’t mean they are always the same. oreilly.com is the domain name. It can sometimes carry an IP address. A name like www or mail is a hostname and can be used all by itself with the right configuration. To be specific about which domain we are referring to the hostname in, we use the FQDN including both the name of the individual system (or IP address) as well as the domain that host belongs to.
Once the DNS server has the root server for .com, it asks that server for information related to oreilly.com. Once it has that name server, it issues another query to the name server asking for information about www.oreilly.com. The server it is asking for this information is the authoritative name server for the domain we are looking for. When you ask for information from your server, what you will get back is a non-authoritative answer. Although it originally came from an authoritative server, by the time it gets to you, it’s passed through your local server so it is no longer considered authoritative.
Using nslookup and dig
One tool we can use to query DNS servers is nslookup. nslookup will issue queries against the DNS server you have configured, if you don’t otherwise tell it to use a different server. In Example 3-9, you can see an example of using nslookup to query my local DNS server. In the response, you will see that what we got back was a non-authoritative answer. You can see the name server that was used for the lookup.
Example 3-9. Using nslookup
root@rosebud:~# nslookup www.oreilly.com Server: 192.168.86.1 Address: 192.168.86.1#53 Non-authoritative answer: www.oreilly.com canonicalname=www.oreilly.com.edgekey.net. www.oreilly.com.edgekey.net canonicalname=e4619.g.akamaiedge.net. Name: e4619.g.akamaiedge.net Address: 23.79.209.167
In that request, the local server has provided an answer to us, but it’s telling us that it’s a nonauthoritative answer. What we got back for this FQDN is a series of aliases culminating in the IP address, after all the aliases have been unwound. To get an authoritative response, we need to ask the authoritative name server for the domain. To do that, we can use another utility that will do DNS lookups. We’ll use the program dig and ask it for the name server record. You can see that in Example 3-10.
Example 3-10. Using dig
root@rosebud:~# dig ns oreilly.com;<<>> DiG 9.10.6-Debian <<>> ns oreilly.com;;global options: +cmd;;Got answer:;;->>HEADER<<- opcode: QUERY, status: NOERROR, id: 56163;;flags: qr rd ra;QUERY: 1, ANSWER: 6, AUTHORITY: 0, ADDITIONAL: 1;;OPT PSEUDOSECTION:;EDNS: version: 0, flags:;udp: 512;;QUESTION SECTION:;oreilly.com. IN NS;;ANSWER SECTION: oreilly.com. 3599 IN NS a20-66.akam.net. oreilly.com. 3599 IN NS a13-64.akam.net. oreilly.com. 3599 IN NS a3-67.akam.net. oreilly.com. 3599 IN NS a1-225.akam.net. oreilly.com. 3599 IN NS a4-64.akam.net. oreilly.com. 3599 IN NS a16-65.akam.net.
At this point, we could continue to use dig, but we’ll go back to using nslookup just to see clearly the differences in the results. When we run nslookup again, we specify the server we are going to query. In this case, we’re going to use one of the name servers listed in Example 3-10. We do that by appending the name server we want to ask to the end of the line we were using before. You can see how this works in Example 3-11.
Example 3-11. Using nslookup and specifying the DNS server
root@rosebud:~# nslookup www.oreilly.com a20-66.akam.net Server: a20-66.akam.net Address: 95.100.175.66#53 www.oreilly.com canonicalname=www.oreilly.com.edgekey.net.
When we have one IP address, we may be able to use that IP address to acquire additional IP addresses that belong to the target of our testing. To do this, though, we will need to move a level up from DNS. From here, we’ll take a look at using the whois program to get more details about our target.
Automating DNS recon
Using tools like host and nslookup will give us a lot of details, but getting those details a piece at a time can be time-consuming. Instead of using manual tools one at a time, we can use other programs that can get us blocks of information. One of the challenges with using any of these tools is they often rely on the ability to do zone transfers. A zone transfer in DNS terms is just a download of all the records associated with a zone. A zone in the context of a name server is a collection of related information. In the case of the domain oreilly.com, it would probably be configured as a zone itself. In that zone would be all of the records that belonged to oreilly.com, such as the web server address, the email server, and other records.
Because initiating zone transfers can be effective ways to perform recon against a company, they are not commonly allowed. One reason they exist is for backup servers to request a zone transfer from the primary server in order to keep them synchronized. As a result, in most cases you won’t be able to get a zone transfer unless your system has specifically been allowed to initiate a zone transfer and obtain that data.
Never fear, however. Although there are tools that expect to be able to do zone transfers, we can use other tools to get details about hosts. One of these is dnsrecon, which will not only try zone transfers but will also test hosts from word lists. To use word lists with dnsrecon, you provide a file filled with hostnames that would be prepended to the domain name specified. There are easy ones like www, mail, smtp, ftp, and others that may be specific to services. However, the word list provided with dnsrecon has over 1,900 names. Using this word list, dnsrecon can potentially turn up hosts that you might not think would exist.
This all assumes that your target has these hosts in their externally available DNS server. The great thing about DNS is it’s hierarchical but also essentially disconnected. Therefore, organizations can use something called split DNS. This means systems internal to the organization can be pointed at DNS servers that are authoritative for the domain. This would include hosts that the company doesn’t want external parties to know about. Because the root servers don’t know anything about these name servers, there is no way for external users to look up these hosts without going directly to the internal name servers, which would commonly not be reachable from outside the organization.
Having said all of that, you should not be deterred from using dnsrecon. There is still plenty of information to get. In Example 3-12, you can see partial results of running dnsrecon against a domain that I own that uses Google Apps for Business. In the output, you can see the TXT record that was required to indicate to Google that I was the registrant for the domain and had control of the DNS entries. You can also see who the name servers for the domain are in this. This is partial output because a substantial amount of output results from using this tool. To get this output, I used the command dnsrecon -d cloudroy.com -D /usr/share/dnsrecon/namelist.txt.
Example 3-12. Using dnsrecon to gather DNS information
[*]SOA dns078.a.register.com 216.21.231.78[*]NS dns249.d.register.com 216.21.236.249[*]Bind Versionfor216.21.236.249 Register.com D DNS[*]NS dns151.b.register.com 216.21.232.151[*]Bind Versionfor216.21.232.151 Register.com B DNS[*]NS dns078.a.register.com 216.21.231.78[*]Bind Versionfor216.21.231.78 Register.com A DNS[*]NS dns118.c.register.com 216.21.235.118[*]Bind Versionfor216.21.235.118 Register.com C DNS[*]MX aspmx3.googlemail.com 74.125.141.27[*]MX aspmx.l.google.com 108.177.112.27[*]MX alt2.aspmx.l.google.com 74.125.141.27[*]MX alt1.aspmx.l.google.com 173.194.175.27[*]MX aspmx2.googlemail.com 173.194.175.27[*]MX aspmx3.googlemail.com 2607:f8b0:400c:c06::1b[*]MX aspmx.l.google.com 2607:f8b0:4001:c02::1a[*]MX alt2.aspmx.l.google.com 2607:f8b0:400c:c06::1b[*]MX alt1.aspmx.l.google.com 2607:f8b0:400d:c0b::1b[*]MX aspmx2.googlemail.com 2607:f8b0:400d:c0b::1b[*]A cloudroy.com 208.91.197.39[*]TXT cloudroy.com google-site-verification=rq3wZzkl6pdKp1wnWX_BItql6r1qKt34QmMcqE8jqCg[*]TXT cloudroy.comv=spf1 include:_spf.google.com ~all
Although it was fairly obvious from the MX records, the TXT record makes it clear that this domain is using Google for hosting services. This is not to say that finding just the TXT record tells that story. In some cases, an organization may change hosting providers or no longer be using the service that required the TXT record without removing the TXT record. Since there is no harm in leaving that record in the DNS zone, organizations may leave this detritus around even after it’s not needed anymore. Even knowing that they once used those services may tell you a few things, so using a tool like dnsrecon to extract as much DNS information as you can might be useful as you are working through your testing.
Regional Internet Registries
The internet is hierarchical in nature. All of the numbers that get assigned—whether they’re registered port numbers, IP address blocks, or autonomous system (AS) numbers—are handed out by the Internet Corporation for Assigned Names and Numbers (ICANN). ICANN, in turn, provides some of these assignments to the RIRs, which are responsible for different regions in the world. The following are the RIRs that exist in the world today:
-
African Network Information Center (AfriNIC) is responsible for Africa.
-
American Registry for Internet Numbers (ARIN) is responsible for North America, Antarctica, and parts of the Caribbean.
-
Asia Pacific Network Information Centre (APNIC) is responsible for Asia, Australia, New Zealand, and other neighboring countries.
-
Latin America and Caribbean Network Information Centre (LACNIC) is responsible for Central and South America as well as parts of the Caribbean.
-
Réseaux IP Européens Network Coordination Centre (RIPE NCC) is responsible for Europe, Russian, the Middle East, and central Asia.
The RIRs manage IP addresses for these regions as well as AS numbers. The AS numbers are needed by companies for their routing. Each AS number is assigned to a network large enough to be sharing routing information with internet service providers and other organizations. AS numbers are used by the Border Gateway Protocol (BGP), which is the routing protocol used across the internet. Within organizations, other routing protocols including Open Shortest Path First (OSPF) are typically used, but BGP is the protocol used to share routing tables from one AS to another.
Using whois
To get information from any of the RIRs, we can use the whois utility. This command-line program comes with any distribution of Linux. Using whois, we can identify owners of network blocks. Example 3-13 shows a whois query looking for the owner of the network 8.9.10.0. The response shows us who was provided the entire block. What you see in this example is a large address block. Blocks this large either belong to companies that have had them since the first addresses were handed out or may belong to service providers.
Example 3-13. whois query of a network block
root@rosebud:~# whois 8.9.10.0## ARIN WHOIS data and services are subject to the Terms of Use# available at: https://www.arin.net/whois_tou.html## If you see inaccuracies in the results, please report at# https://www.arin.net/public/whoisinaccuracy/index.xhtml### The following results may also be obtained via:# https://whois.arin.net/rest/nets;q=8.9.10.0?showDetails=true&showARIN=# false&showNonArinTopLevelNet=false&ext=netref2#NetRange: 8.0.0.0 - 8.255.255.255 CIDR: 8.0.0.0/8 NetName: LVLT-ORG-8-8 NetHandle: NET-8-0-0-0-1 Parent:()NetType: Direct Allocation OriginAS: Organization: Level3Communications, Inc.(LVLT)RegDate: 1992-12-01 Updated: 2012-02-24 Ref: https://whois.arin.net/rest/net/NET-8-0-0-0-1
When larger blocks are broken up, a whois lookup will tell you not only who owns the block you are looking up but also what the parent block is and who it came from. Let’s take another chunk out of the 8.0.0.0–8.255.255.255 range. In Example 3-14, you can see a subset of that block. This one belongs to Google, as you can see. However, before the output you see here, you would see the same block as you saw in the earlier example, where Level 3 Communications owns the complete 8. block.
Example 3-14. whois query showing a child block
# startNetRange: 8.8.8.0 - 8.8.8.255 CIDR: 8.8.8.0/24 NetName: LVLT-GOGL-8-8-8 NetHandle: NET-8-8-8-0-1 Parent: LVLT-ORG-8-8(NET-8-0-0-0-1)NetType: Reallocated OriginAS: Organization: Google LLC(GOGL)RegDate: 2014-03-14 Updated: 2014-03-14 Ref: https://whois.arin.net/rest/net/NET-8-8-8-0-1 OrgName: Google LLC OrgId: GOGL Address:1600Amphitheatre Parkway City: Mountain View StateProv: CA PostalCode: 94043 Country: US RegDate: 2000-03-30 Updated: 2017-10-16 Ref: https://whois.arin.net/rest/org/GOGL OrgTechHandle: ZG39-ARIN OrgTechName: Google LLC OrgTechPhone: +1-650-253-0000 OrgTechEmail: [email protected] OrgTechRef: https://whois.arin.net/rest/poc/ZG39-ARIN
The way we can use this is to take an IP address we have located, such as a web server or an email server, and determine who owns the whole block. In some cases, such as the O’Reilly web server, the block belongs to a service provider, so we won’t be able to get other targets from that block. However, when you find a block that belongs to a specific company, you have several target IP addresses. These IP blocks will be useful later, when we start doing some more active reconnaissance. In the meantime, you can also use dig or nslookup to find the hostnames that belong to the IP addresses.
Finding the hostname from the IP requires the organization to have a reverse zone configured. To look up the hostname from the IP address, there needs to be pointer records (PTRs) for each IP address in the block that has a hostname associated with it. Keep in mind, however, that a relationship doesn’t necessarily exist between the reverse lookup and the forward lookup. If www.foo.com resolves to 1.2.3.42, that doesn’t mean that 1.2.3.42 necessarily resolves back to www.foo.com. IP addresses may point to systems that have many purposes and potentially multiple names to match those purposes.
Passive Reconnaissance
Often, reconnaissance work can involve poking around at infrastructure that belongs to the target. However, that doesn’t mean that you necessarily have to actively probe the target network. Activities like port scans, which we will cover later, can be noisy and attract attention to your actions. You may not want this attention until you are ready to really launch attacks. You can continue to gather information in a passive manner by simply interacting with exposed systems in a normal way. For instance, you could just browse the organization’s web pages and gather information. One way we can do this is to use the program p0f.
p0f works by watching traffic and extracting data that may be interesting from the packets as they go by. This may include relevant information from the headers, especially source and destination addresses and ports. You can also see where p0f has extracted details about web servers and operating systems in Example 3-15. In the first block, you can see an HTTP request that shows the client details as well as the host and user agent data. In the second block of data extracted, p0f has identified that the operating system is Linux 3.11 or newer. Just below that, it was able to identify that the server is nginx. It is able to determine this from looking at the HTTP headers.
Example 3-15. Output from p0f
.-[192.168.2.149/48244 -> 104.197.85.63/80(http request)]-||client=192.168.2.149/48244|app=???|lang=English|params=none|raw_sig=1:Host,User-Agent,Accept=[*/*],Accept-Language=[en-US,en;q=0.5], Accept-Encoding=[gzip,deflate],?Referer,?Cookie,Connection=[keep-alive]:Accept-Charset,Keep-Alive:Mozilla/5.0(X11;Linux x86_64;rv:52.0)Gecko/20100101 Firefox/52.0|`---- .-[192.168.2.149/48254 -> 104.197.85.63/80(syn)]-||client=192.168.2.149/48254|os=Linux 3.11 and newer|dist=0|params=none|raw_sig=4:64+0:0:1460:mss*20,7:mss,sok,ts,nop,ws:df,id+:0|`---- .-[192.168.2.149/48254 -> 104.197.85.63/80(http response)]-||server=104.197.85.63/80|app=nginx 1.x|lang=none|params=dishonest|raw_sig=1:Server,Date,Content-Type,?Content-Length,?Last-Modified,Connection=[keep-alive],Keep-Alive=[timeout=20],?ETag,X-Type=[static/known], ?Cache-Control,?Vary,Access-Control-Allow-Origin=[*],Accept-Ranges=[bytes]::nginx|
One of the challenges of using p0f is that it relies on observing traffic that is going by the system. You need to interact with the systems on which you want to perform passive reconnaissance. Since you are interacting with publicly available services, it’s unlikely you will be noticed, and the remote system will have no idea that you are using p0f against it. There is no active engagement with the remote services in order to prompt for more details. You will get only what the services that you engage with are willing to provide.
The side you are most apt to get information on is the local end. This is because it can look up information from the MAC address, providing vendor details so you can see the type of device that is communicating. As with other packet capture programs, there are ways to get traffic to your system that isn’t specifically destined there by using a hub or a port span on a switch or even doing spoofing. The MAC address comes from the layer 2 header, which gets pulled off when a packet crosses a layer 3 boundary (router).
Although the information you can get from passive reconnaissance using a tool like p0f is limited to what the service and system is going to give up anyway, using p0f alleviates the manual work that may otherwise be required to pull out this level of detail. The biggest advantage to using p0f is you can quickly extract details without doing the work yourself, but you are also not actively probing the target systems. This helps to keep you off the radar of any monitoring systems or teams at your target.
Port Scanning
Once you are done gathering as much information as you can without actively and noisily probing the target networks, you can move on to the making noise stage with port scans. This is commonly done using port scanners, though port scanning doesn’t necessarily mean that the scans have to be high traffic and noisy. Port scanning uses the networking protocols to extract information from remote systems to determine what ports are open. We use port scanning to determine what applications are running on the remote system. The ports that are open can tell us a lot about those applications. Ultimately, what we are looking for are ways into the system. The open ports are our gateways.
An open port means that an application is listening on that port. If no application is listening, the port won’t be open. Ports are the way we address at the transport layer, which means that you will see applications using TCP or UDP commonly for their transport needs, depending on the requirements of the application. The one thing in common across both transport protocols is the number of ports that are available. There are 65,536 possible port values (0–65,535).
As you are scanning ports, you won’t see any port that is being used on the client side. As an example, I can’t scan your desktop computer and determine what connections you have open to websites, email servers, and other services. We can only detect ports that have listeners on them. When you have opened a connection to another system, you don’t have a port in a listening state. Instead, your operating system will take in an incoming packet from the server you are communicating with and determine that an application is waiting for that packet, based on a four-tuple of information (source and destination IP addresses and ports).
Because differences exist between the two transport protocols, the scans work differently. In the end, you’re looking for open ports, but the means to determine that information is different. Kali Linux comes with port scanning tools. The de facto standard for port scanning is nmap, so we’ll start by using that and then look at other tools for high-speed scanning, used for scanning really large networks in a time-efficient manner.
TCP Scanning
TCP is a connection-oriented protocol. Because it is connection oriented, which means the two ends of the conversation keep track of what is happening, the communication can be considered to be guaranteed. It’s only guaranteed, though, under the control of the two endpoints. If something were to happen in the middle of the network between those two systems, the communication isn’t guaranteed to get there, but you are guaranteed to know when the transmission fails. Also, if an endpoint doesn’t receive a transmission, the sending party will know that.
Because TCP is connection-oriented, it uses a three-way handshake to establish that connection. TCP port scans generally take advantage of that handshake to determine whether ports are open. If a SYN message, the start of the three-way handshake, gets sent to a server and the port is open, the server will respond with a SYN/ACK message. If the port is not open, the server will respond by sending a RST (reset) message indicating that the sending system should stand down and not send any more messages. This clearly tells the sending system that the port is not available.
The challenge with any port scanning, and potentially TCP most of all, is firewalls or other port-blocking mechanisms. When a message is sent, firewalls or access control lists can prevent the message from getting through. This can leave the sending host in an uncertain state. Having no response doesn’t indicate that the port is open or closed, because there may simply be no response at all if the firewall or access control list just drops the inbound message.
Another aspect to port scanning with TCP is that the protocol specifies header flags aside from the SYN and ACK flags. This opens the door to sending other types of messages to remote systems to see how they respond. Systems will respond in different ways, based on the different flags that are configured.
UDP Scanning
UDP is a simple protocol. There are no connections and no guarantee of delivery or notification. Therefore, UDP scanning can be more challenging. This may seem counterintuitive, considering UDP is simple.
With TCP, the protocol defines interactions. A client is expected to send a message with the SYN flag set in the TCP header. When it’s received on an open port, the server responds with a SYN and an ACK. The client responds with an ACK. This guarantees that both parties in the communication know that the other end is there. The client knows the server is responsive because of the SYN/ACK, and the server knows the client isn’t being spoofed because of the ACK response.
UDP has no specified interactions. The protocol doesn’t have any header fields to provide any state or connection management information. UDP is all about providing a transport layer protocol that just gets out of the way of the application. When a client sends a message to a server, it is entirely up to the application how or whether to respond. Lacking a SYN/ACK message to indicate that the server has received the communication, the client may have no way of knowing whether a port is open or closed. A lack of response may merely mean that the client sent a message that wasn’t understood. It could also mean an application failure. When performing UDP port scans, the scanner can’t determine whether a lack of response means a closed port. Therefore, the scanner would typically have to resend the message. Since UDP might be deprioritized in networks, it could take a while for messages to get to the target and back. This means the scanner will typically wait for a short period of time before sending again. This will happen a few times, since the objective is to ensure that the port is thoroughly ruled out.
This is the same scanning behavior that would happen if there was no response to a TCP message. This could be a result of a firewall just dropping messages. Instead of a RST message or even an ICMP response, the scanner has to assume that the outbound message was lost. That means retries. Retries can be time-consuming, especially if you are scanning more the 65,000 ports. Each one may need to be retried multiple times. The complexity of scanning UDP ports comes from the uncertainty from the lack of response.
Port Scanning with Nmap
The de facto port scanner today, and the first one that became mainstream, is nmap. At this point, nmap has been around for more than 20 years and has made its way into major motion pictures, like The Matrix. It has become such an important security tool that the command-line switches used by nmap have been replicated by other port scanners. While you may have an idea about what a port scanner is, nmap introduces far more capabilities than just probing ports.
Starting off with port scanning, though, we can look at how nmap does with a TCP scan. Before we get there, it’s important to realize that there are various types of TCP scans. Even in the context of doing a scan involving the SYN message, there are a couple of different ways of doing it. The first is just a simple SYN scan: nmap sends out a SYN message and records whether there is an open port or a closed port. If the port is closed, nmap receives a RST message and moves on. If nmap gets a SYN/ACK, it then responds with a RST message in order to have the receiving end just close down the connection and not hold it open. This is sometimes called a half-open scan.
In a full-connect scan, nmap completes the three-way handshake before closing the connection. One advantage to this type of scan is that applications aren’t getting half-open connections across the server. There is a slim chance that this may be less suspicious to a monitoring system or team than the half-open connections. There would be no differences in the results between a full-connect and a half-open scan. It comes down to which is more polite and potentially less likely to be noticed. In Example 3-16, you can see partial results from a full-connect scan. In this example, I’m using nmap to scan the entire network. The /24 designation tells nmap to scan all hosts from 192.168.86.0-255. This is one way of denoting that. You can also provide ranges or lists of addresses if that’s what you need to do.
Example 3-16. Full connect nmap scan
root@rosebud:~# nmap -sT -T5192.168.86.0/24 Nmap scan reportfortestwifi.here(192.168.86.1)Host is up(0.00092s latency). Not shown:995closed ports PORT STATE SERVICE 53/tcp open domain 80/tcp open http 5000/tcp open upnp 8080/tcp open http-proxy 8081/tcp open blackice-icecap MAC Address: 18:D6:C7:7D:F4:8A(Tp-link Technologies)Nmap scan reportformyq-d9f.lan(192.168.86.20)Host is up(0.0064s latency). Not shown:999closed ports PORT STATE SERVICE 80/tcp open http MAC Address: 64:52:99:54:7F:C5(The Chamberlain Group)
In the output, nmap provides not only the port number but also the service. This service name comes from a list of service identifiers that nmap knows and has nothing to do with what may be running on that port. nmap can determine which service is running on the port by getting application responses. nmap also helpfully provides a lookup of the vendor ID from the MAC address. This vendor ID can help you identify the device you are looking at. The first one, for instance, is from Tp-Link Technologies. Tp-Link makes network hardware like wireless access point/router devices.
You may have noticed that I didn’t specify ports I wanted to scan. By default, nmap will scan the 1,000 most commonly used ports. This makes the scan faster than scanning all 65,536 ports, since you won’t see the vast majority of those ports in use. If you want to specify ports, you can use ranges or lists. If you want to scan all the ports, you can use the command-line switch -p-. This tells nmap to scan everything; nmap also has a default speed at which it scans. This is the delay between messages that are sent. To set a different throttle rate, you can use -T and a value from 0–5. The default value is -T 3. You might go lower than that if you want to be polite by limiting bandwidth used, or if you are trying to be sneaky and limit the possibility of being caught. If you don’t care about being caught and you want your scan to go faster, you can increase the throttle rate.
Although there are other types of TCP scans, these ones will get you good results the majority of the time. Other scans are meant for evasion or firewall testing, though they have been well-known for many years at this point. We can move on to doing UDP scanning using nmap. You can use the same throttle rates as with the TCP scan. You will still have the retransmission issue, even if you are going faster. It will be faster than a normal scan if you increase the throttle rate, but it will be slower than, say, a TCP scan. You can see the output from a UDP scan in Example 3-17.
Example 3-17. UDP scan from nmap
root@rosebud:~# nmap -sU -T4192.168.86.0/24 Starting Nmap 7.60(https://nmap.org)at 2017-12-30 20:31 MST Nmap scan reportfortestwifi.here(192.168.86.1)Host is up(0.0010s latency). Not shown:971closed ports,27open|filtered ports PORT STATE SERVICE 53/udp open domain 5351/udp open nat-pmp MAC Address: 18:D6:C7:7D:F4:8A(Tp-link Technologies)
Note
The TCP scan of all the systems on my network took 86 seconds, just less than a minute and a half. The UDP scan took well over half an hour, and this was on a local network.
Although nmap can do port scanning, it has other capabilities. For instance, you can have it perform an operating system detection. It does this based on fingerprints that have been collected from known operating systems. Additionally, nmap can run scripts. These scripts are called based on ports that have been identified as being open and are written in the Lua programming language. Although scripts that come with nmap provide a lot of capabilities, it’s possible to add your own scripts as needed. To run scripts, you tell nmap the name of the script you want to run. You can also run a collection of scripts, as you can see in Example 3-18. In this case, nmap will run any script that has http as the start of its name. If nmap detects that a common web port is open, it will call the different scripts against that port. This scan request will catch all the web-based scripts that are available. At the time of this run, that is 129 scripts.
Example 3-18. Scripts with nmap
root@rosebud:~# nmap -sS -T3-p80-oN http.txt --script http* 192.168.86.35 Nmap scan reportforrosebud.lan(192.168.86.35)Host is up(0.000075s latency). PORT STATE SERVICE 80/tcp open http|http-apache-server-status:|Heading: Apache Server Statusforrosebud.lan(via 192.168.86.35)|Server Version: Apache/2.4.29(Debian)OpenSSL/1.1.0g|Server Built: 2017-10-23T14:46:55|Server Uptime:36days47minutes32seconds|Server Load: 0.00 0.00 0.00|VHosts:|_ rosebud.washere.com:80|http-brute:|_ Path"/"does not require authentication|_http-chrono: Requesttimesfor/;avg: 11.60ms;min: 2.61ms;max: 29.73ms|http-comments-displayer:|Spidering limited to:maxdepth=3;maxpagecount=20;withinhost=rosebud.lan
You can see from the example that the scan was limited to a single host on a single port. If I’m going to be running HTTP-based scripts, I may as well restrict my searches to just the HTTP ports. You certainly can run scripts like that with a normal scan of 1,000 ports. The difference is going to be in parsing the output. You’ll have to look through all the other results to find the script output for the web servers.
In addition to running scripts and the basic port scanning, nmap will provide information about the target and the services that are running. If you specify -A on the command line for nmap, it will run an operating system detection and a version detection. It will also run scripts based on the ports found to be open. Finally, nmap will run a traceroute to give you the network path between you and the target host.
High-Speed Scanning
nmap may be the de facto port scanner, but it is not the only scanner that’s available. In some cases, you may find you have large networks to scan. nmap is efficient, but it isn’t optimized for scanning very large networks. One scanner that is designed for scanning large networks is masscan. A major difference between masscan and nmap is that masscan uses asynchronous communication: the program will send a message, and rather than waiting for the response to come back, it will keep sending. It uses another part of the program to wait for the responses and record them. Its ability to transmit at high rates of speed allows it to scan the entire internet in a matter of minutes. Compare this with the speed of scanning just a local /24 network with a maximum of 254 hosts using nmap.
masscan can take different parameters, but it accepts the ones that nmap also accepts. If you know how to operate nmap, you can pick up masscan quickly. One difference between masscan and nmap, which you can see in Example 3-19, is the need to specify ports. nmap will assume a set of ports to use. masscan doesn’t assume any ports. If you try to run it without telling it which ports to scan, it will prompt you to specify the ports you want to scan. In Example 3-19, you will see I set to scan the first 1,501 ports. If you were looking for all systems listening on port 443, meaning that system was likely operating a TLS-based web server, you would specify that you wanted to scan only port 443. Not scanning ports you don’t care about will save you a lot of time.
Example 3-19. High-speed scanning with masscan
root@rosebud:~# masscan -sS --ports 0-1500 192.168.86.0/24 Starting masscan 1.0.3(http://bit.ly/14GZzcT)at 2017-12-31 20:27:57 GMT -- forced options: -sS -Pn -n --randomize-hosts -v --send-eth Initiating SYN Stealth Scan Scanning256hosts[1501ports/host]Discovered open port 445/tcp on 192.168.86.170 Discovered open port 22/tcp on 192.168.86.30 Discovered open port 1410/tcp on 192.168.86.37 Discovered open port 512/tcp on 192.168.86.239 Discovered open port 445/tcp on 192.168.86.239 Discovered open port 22/tcp on 192.168.86.46 Discovered open port 143/tcp on 192.168.86.238 Discovered open port 1410/tcp on 192.168.86.36 Discovered open port 53/tcp on 192.168.86.1 Discovered open port 1400/tcp on 192.168.86.36 Discovered open port 80/tcp on 192.168.86.38 Discovered open port 80/tcp on 192.168.86.1
You can use a multipurpose utility for port scanning that will also give you some control over the time interval between messages being sent. Whereas masscan uses an asynchronous approach to speed things up, hping3 gives you the ability to specify the gap between packets. This doesn’t give it the capacity to do really high-speed scanning, but hping3 does have a lot of power to perform many other tasks. hping3 allows you to craft a packet with command-line switches. The challenge with using hping3 as a scanner is that it is really a hyperactive ping program and not a utility trying to re-create what nmap and other scanners do.
However, if you want to perform scanning and probing against single hosts to determine characteristics, hping3 is an outstanding tool. Example 3-20 is a SYN scan against 10 ports. The -S parameter tells hping3 to set the SYN flag. We use the -p flag to indicate the port we are going to scan. By adding the ++ to the -p flag, we’re telling hping3 that we want it to increment the port number. We can control the number of ports by setting the count with the -c flag. In this case, hping3 is going to scan 10 ports and stop. Finally, we can set the source port with the -s flag and a port number. For this scan, the source port doesn’t really matter, but in some cases, it will.
Example 3-20. Using hping3 for port scanning
root@rosebud:~# hping3 -S -p ++80 -s1657-c10192.168.86.1 HPING 192.168.86.1(eth0 192.168.86.1): Sset,40headers +0data byteslen=46ip=192.168.86.1ttl=64DFid=0sport=80flags=SAseq=0win=29200rtt=7.8 mslen=46ip=192.168.86.1ttl=64DFid=15522sport=81flags=RAseq=1win=0rtt=7.6 mslen=46ip=192.168.86.1ttl=64DFid=15523sport=82flags=RAseq=2win=0rtt=7.3 mslen=46ip=192.168.86.1ttl=64DFid=15524sport=83flags=RAseq=3win=0rtt=7.0 mslen=46ip=192.168.86.1ttl=64DFid=15525sport=84flags=RAseq=4win=0rtt=6.7 mslen=46ip=192.168.86.1ttl=64DFid=15526sport=85flags=RAseq=5win=0rtt=6.5 mslen=46ip=192.168.86.1ttl=64DFid=15527sport=86flags=RAseq=6win=0rtt=6.2 mslen=46ip=192.168.86.1ttl=64DFid=15528sport=87flags=RAseq=7win=0rtt=5.9 mslen=46ip=192.168.86.1ttl=64DFid=15529sport=88flags=RAseq=8win=0rtt=5.6 mslen=46ip=192.168.86.1ttl=64DFid=15530sport=89flags=RAseq=9win=0rtt=5.3 ms --- 192.168.86.1 hping statistic ---10packets transmitted,10packets received, 0% packet loss round-trip min/avg/max=5.3/6.6/7.8 ms
Unlike a port scanner, which will tell you what ports are open, with hping3 you have to interpret the results to determine whether you’ve found an open port. As you look over each line of the responses, you can see the flags field. The first message returned has the SYN and ACK flags set. This indicates that the port is open. If you look at the sport field, you will see that the port that’s open is 80. This may seem backward in that it’s giving a source port, but keep in mind that what you are looking at is a response message. In the message going out, 80 would be the destination port, but in the response, it would become the source port.
The other response messages show that the RST and ACK flags are set. Because the RST flag is set on the response, we know that the port is closed. Using hping3, you can set any collection of flags you would like. For example, you could do an Xmas scan in which the FIN, PSH, and URG flags are set. It’s called an Xmas scan because with all those flags set, the packet is said to look like a Christmas tree with lights on it. You have to imagine that enabling a flag turns on a light in order to make sense of this name. To do an Xmas scan, we could just set all those flags on the command line, as in hping3 -F -P -U. When we send those messages to the same target as before, the target responds with the RST and ACK flags on ports 81–89. There is no response at all on port 80. This is because port 80 is open, but RFC 793 suggests that packets looking like this fall into a category that should be discarded, meaning no response.
As noted above, hping3 can also be used to send high-speed messages. There are two ways to do this. The first is by using the -i flag and a value. A simple numeric value will be the wait time in seconds. If you want it to go faster, you can use -i u1, for example, to just wait one microsecond. The u prefix to the value indicates that it is being provided in microseconds. The second way to do high-speed message sending with hping3 is to use the --flood switch on the command line. This tells hping3 to send messages as fast as it is possible to send them without bothering to wait for a response.
Service Scanning
Ultimately, what you want to get is the service that’s running on the open ports. The ports themselves will likely tell you a lot, but they may not. Sometimes services are run on nonstandard ports, although less commonly. For example, you would normally expect to see SSH on TCP port 22. If nmap found port 22 to be open, it would indicate that SSH had been found. If nmap found port 2222 open, it wouldn’t know what to think unless you had specified that you wanted to do a version scan in order to get the application version by grabbing banners from the protocols.
amap doesn’t make assumptions about the service behind the port. Instead, it includes a database of how protocols are supposed to respond, and so in order to determine the actual application listening on the port, it sends triggers to the port and then looks up the responses in the database.
In Example 3-21, you can see two runs of amap. The first is a run of amap against a web server using the default port. Unsurprisingly, amap tells us that the protocol matches HTTP. In the second run, we’re probing port 2222. This port number doesn’t have a single well-known protocol that it’s used for. As a result, we need to do a little more work to determine which protocol is actually listening there. amap tells us that the protocol is ssh or ssh-openssh.
Example 3-21. Getting application information from amap
root@rosebud:~# amap 192.168.86.1 80 amap v5.4(www.thc.org/thc-amap)started at 2017-12-31 20:11:31 - APPLICATION MAPPING mode Protocol on 192.168.86.1:80/tcp matches http Unidentified ports: none. amap v5.4 finished at 2017-12-31 20:11:37 root@rosebud:~# amap 192.168.86.238 2222 amap v5.4(www.thc.org/thc-amap)started at 2017-12-31 20:13:28 - APPLICATION MAPPING mode Protocol on 192.168.86.238:2222/tcp matches ssh Protocol on 192.168.86.238:2222/tcp matches ssh-openssh Unidentified ports: none. amap v5.4 finished at 2017-12-31 20:13:34
Some protocols can be used to gather information about target hosts. One of those is the Server Message Block (SMB) protocol. This is a protocol used for file sharing on Windows networks. It can also be used for remote management of Windows systems. A couple of tools can be used to scan systems that use SMB for file sharing. One of them is smbmap, which can be used to list all of the shares being offered up on a system. Example 3-22 shows a run of smbmap against a macOS system that is using SMB to share files over the network. Commonly, shares are not offered without any authentication. As a result, you have to provide login information in order to get the shares back. This does have the downside of requiring usernames and passwords to get the information. If you already have the username and password, you may not need to use a tool like smbmap.
Example 3-22. Listing file shares using smbmap
root@rosebud:~# smbmap -u kilroy -p obscurePW -H billthecat[+]Finding open SMB ports....[+]User SMB session established on billthecat...[+]IP: billthecat:445 Name: billthecat.lan Disk Permissions ---- ----------- IPC$NO ACCESS Macintosh HD READ ONLY Ric Messier's Public Folder-1 READ, WRITE Seagate Backup Plus Drive READ, WRITE kilroy READ, WRITE
Another tool that will look for these SMB shares and other information shared using that protocol is enum4linux. enum4linux is a script that wraps the programs that come with the Samba package, which implements the SMB protocol on Linux. You can also use those programs directly. As an example, you can use smbclient to interact with remote systems. This could include getting a list of the shares just as smbmap does in Example 3-22.
Manual Interaction
Although the automated tools to gather information are great, sometimes you need to get down in the dirt and play with the protocol directly. This means opening up a connection to the service port and issuing protocol commands. One program you can use is the telnet client. This is different from either the Telnet protocol or Telnet server. Although the telnet client is used to interact with a Telnet server, it is really just a program that can open a TCP connection to a remote server. All you need to do is provide a port number to telnet. In Example 3-23, I’ve used telnet to open a connection to a Simple Mail Transfer Protocol (SMTP) server.
Example 3-23. Using telnet to interact with a mail server
root@rosebud:~# telnet 192.168.86.35 25 Trying 192.168.86.35... Connected to 192.168.86.35. Escape character is'^]'.220rosebud.washere.com ESMTP Postfix(Debian/GNU)EHLO blah.com 250-rosebud.washere.com 250-PIPELINING 250-SIZE 10240000 250-VRFY 250-ETRN 250-STARTTLS 250-ENHANCEDSTATUSCODES 250-8BITMIME 250-DSN250SMTPUTF8 MAIL FROM: [email protected]2502.1.0 Ok RCPT To: root@localhost2502.1.5 Ok
If using the telnet client, it would default to port 23, which is the standard Telnet port. However, if we provide a port number, in this case 25, we can get telnet to open a TCP connection to that port. Once we have the connection open, which is clearly indicated, you can start typing protocol statements. Since it’s an SMTP server, what you are seeing is a conversation in Extended SMTP (ESMTP). We can gather information using this approach, including the type of SMTP server (Postfix) as well as protocol commands that are available. While these are all SMTP commands, servers are not required to implement them. The VRFY command, for example, is used to verify addresses. This could be used to enumerate users on a mail server. That’s not something organizations will want remote users to be able to do, because it can expose information that might be useful to an attacker. Instead, they may just disable that command.
The first message we get back from the server is the service banner. Some protocols use a service banner to announce details about the application. When a tool like nmap gathers version information, it is looking for these service banners. Not all protocols or servers will send out a service banner with protocol or server information.
telnet is not the only command that can be used to interact with servers. You can also use netcat, which is commonly done via the command nc. We can use nc in the same way that we use telnet. In Example 3-24, I’ve opened a connection to a web server at 192.168.86.1. Unlike telnet, nc doesn’t indicate that the connection is open. If the port is closed, you will get a message saying, “Connection refused.” If you don’t get that message, you can assume the connection is open and you can start typing commands. You’ll see an HTTP/1.1 request being sent to the remote server. Once the request has been sent, a blank line tells the remote server that the headers are done, at which point it starts sending the response.
Example 3-24. Using nc to interact with a web server
root@rosebud:~# nc 192.168.86.1 80 GET / HTTP/1.1 Host: 192.168.86.1 HTTP/1.1200OK Connection: Keep-Alive Content-Length: 7597 Content-Type: text/html Date: Mon,01Jan201803:55:36 GMT
The output here shows just the headers, though they were followed by the HTML for the page that was requested. One advantage to using nc over telnet is that netcat can be used to set up a listener. This means you can create a sink to send network traffic to. You could use it to just collect data from anyone who makes a connection to whatever port you have it set to listen on. Additionally, telnet uses TCP. By default, nc also uses TCP, but you can have nc use UDP. This can allow you to interact with any services that use UDP as the transport layer.
Summary
Information gathering will help your later work. It can also be used to turn up potential vulnerabilities in the sense of information leakage. Spending time information gathering can pay off, even if you really just want to get to the exploitation. The following are some important ideas to take away from this chapter:
-
You can use openly available sources to acquire information about targets.
-
You can use Maltego to automatically gather openly available information.
-
Tools like theHarvester can be used to automatically gather details about email addresses and people.
-
The Domain Name System (DNS) can contain a lot of details about a target organization.
-
Regional Internet Registries (RIRs) can be a source of a lot of details about IP addresses and who owns them.
-
The nmap program can be used for port scanning as well as for gathering details about operating systems and application versions.
-
Port scans are ultimately a way to find applications listening on those ports.
Useful Resources
-
Cameron Colquhoun’s blog post, “A Brief History of Open Source Intelligence”
-
Sudhanshu Chauhan’s blog post, “Tools For Open Source Intelligence”
-
Automating Open Source Intelligence, by Robert Layton and Paul Watters (Elsevier, 2015)
-
Hacking Web Intelligence, by Sudhanshu Chauhan and Nutan Kumar Panda (Elsevier, 2015)