
Chapter 8. Web Application Testing
Think about the applications that you use by way of a web interface. Your banking. Your credit cards. Social networking sites like Facebook, Twitter, LinkedIn, and so many others. Job search sites. Your information is stored by a lot of companies with accessible portals available on the open internet. Because of the amount of data that is available and the potentially exposed pathways to that data, web attacks are common vectors. As a result, web application testing is a common request from companies. At times, you will find that web application testing may be all that you are asked to do.
Kali, not surprisingly, is loaded with web application testing tools. To make effective use of them, though, it’s helpful to understand what you are up against. This includes understanding what the potential targets are in order to better identify the risk. It also includes knowing the potential architecture you may be looking at—the systems you may need to pass through and the way they may be arranged, including the security mechanisms that may be in place to protect the elements.
Web Architecture
A web application is a way of delivering programmatic functionality using common web-based technologies between a server and a client, where the client is a web browser. A simpler way of saying this, perhaps, is that programs that may otherwise have run natively on your computer are, instead, running in your browser, with communication to a remote server. The remote server you are interacting with likely has other systems it communicates with in order to provide the functionality or data you are trying to get to. You are likely familiar with web applications and probably even use them on a daily basis.
Note
Even mobile applications are often web applications in the sense that the mobile application you are interacting with is communicating with a web server remotely using web-based protocols and technologies.
When we talk about web-based technologies, we are talking about protocols and languages like HTTP, HTML, XML, and SQL. This also suggests that we are communicating with a web server, meaning a server that communicates using HTTP, which may be secured using TLS for encryption. Much of this is what happens between the server and the client, but doesn’t necessarily describe what may be happening with other systems within the network design. To help you fully understand, we’ll talk about the systems you may run into within a web application architecture. We will start at the customer-facing end and then work our way inward to the most sensitive components. Figure 8-1 will be a reference point for us going forward. To simplify it a little, some of the connection lines are missing. In reality, the load balancers would cross-connect with all of the web servers, for example. However, at some point all of the cross-connections start to clutter the image.

Figure 8-1. Sample web architecture
This is just a sample, but it contains the elements you may run across and gives us something to talk about. Starting at the top left is the person with the browser. The cloud suggests the open internet, which will pass you through whatever route will get you to the application.
Firewall
A firewall is a common component of most network architectures. The word firewall, though, is ambiguous at best. It could mean anything from a set of access controls on a router all the way up to what are called next-generation firewalls, which can not only perform static blocking based on rules configured on the firewall but also perform dynamic blocking based on any intrusions that may have been detected. A next-generation firewall may also watch for malicious software (malware) in any communication passing through it.
This point will also be noted again, but it’s worth mentioning a few times. What is being described here is a set of functionality rather than a specific device. A firewall may be a single device that incorporates one or several security functions, but it may also be a set of functions that could live on another device. As an example, the firewall functions may be incorporated into the load balancer, which is the next device in our architecture.
Load Balancer
On the front end of a larger network design, you may find a load balancer. The load balancer is intended to take a lot of traffic in order to pass it through to the web servers behind. The point of a load balancer is that it is a simple device that doesn’t do anything but keep track of usage of the servers behind the scenes. Requests coming in will be redirected to those servers, based on an algorithm the load balancer knows. It may be simply round-robin, meaning request 1 goes to server 1, request 2 goes to server 2, request 3 goes to server 3, before starting all over again at server 1. There is no sense of the complexity of the request in this scheme or the time it may take to fulfill the request.
Load-Balancing Algorithms
Several potential algorithms can be used to drive the way load balancers work, with the ultimate objective always being spreading the load across multiple resources. In addition to round-robin, there is also weighted round-robin, which assigns weights to different systems behind the load balancers. Higher-weighted systems will take more load. There are also algorithms that make decisions based on response time from the server behind. The algorithm used may be entirely dependent on the load balancer vendor used.
The load balancer may fulfill a security function in addition to making sure the overall application has good performance. A load balancer may function like a reverse proxy, meaning it handles requests as though it were the actual web server. This means the client never knows the real web server. No data is stored on this system because its only purpose is to pass through the request. This is the reverse of a proxy an enterprise might use, where the clients are hidden behind the proxy. In this case, the web server is hidden by the proxy.
If you were using a reverse proxy, you may be able to have it function as a web application firewall. Requests passing through the web server are evaluated to see whether the requests appear to be legitimate or malicious. Malicious requests may be blocked or logged, depending on their severity. This spreads out the burden of validation and is especially useful if the web application being used has not been developed by the enterprise where it is run. If the internal functioning of the application isn’t known, it can be helpful to have something watching out for requests that look bad.
Web Server
The web server takes in HTTP requests and feeds HTTP back. In a real application architecture, this server could fulfill several functions. There could be code running on the server, or it could simply be a place to determine whether the response is static (in which case it would be served up by the web server), or dynamic (in which case it would be passed to servers behind the web server). Validation code may be run here to ensure nothing bad is fed into the backend systems. In some cases, such as really small implementations, there may be little more than this server.
Web servers that run some form of code may have that code written in web-based programming languages like PHP or several other languages. Several other languages can be used to perform simple server-side code. Programs that perform validation or generate pieces of dynamic pages will run on this server, rather than on the client. This is not to say that no code runs on the client. However, it is important to keep in mind all of the places where program code can execute. Anywhere code can execute is a potential point of attack. If code is run on the web server, the web server is vulnerable to attack.
If the web server were to be compromised, any data stored on the server would be exposed to theft or modification. Any credentials stored on the web server to get access to any additional systems could be used, and the web server itself could become a launching point for additional attacks against other systems.
Application Server
The heart of the web application is the application server. In smaller application implementations, with fewer resource requirements, this may actually be the web server or it may be on the web server. The same may be true of some of the other functions described here, where each individual server may carry multiple functions rather than a single function. The application server may coexist with the web server, for instance. The implementation will be dependent on the needs of the application.
Application servers also take in HTTP and will generate HTML to be sent back out. There may also be communication using XML between the client and the application server. XML is a way of bundling up data to either be sent to the application server or for data to be presented to the application. The application server will commonly be language dependent. It may be based in Java, .NET (C# or Visual Basic), or even scripting languages like Go, Ruby, or Python. In addition to the programming language used to perform the business functions and generate the presentation code, the application server would also need to speak whatever language the data is stored in (SQL, XML, etc.).
The application server implements the business logic, which means it handles the critical functioning of the application, determining what to present to the user. These decisions are commonly based on information provided by the user or stored on behalf of the user. The data stored may be stored locally or, perhaps more commonly, using some sort of backend storage mechanism like a database server. The application server would be responsible for maintaining any state information since HTTP is a stateless protocol, meaning every request from a client is made in isolation without other mechanisms helping out.
An application server will commonly have the application in a prebuilt state rather than in source code form. This would be different, of course, if the application server were based on a scripting language. While those languages may be compiled, they are often left in their text-based form. If an application server were to be compromised, the functionality of the server could be manipulated if the source code were in place.
Worse than that, however, the application server is the gateway to sensitive information. This would be entirely dependent on the application, but the application server would be responsible for retrieving and manipulating any data for the application. The application then needs to be able to get access to the data, wherever it’s stored. This means it knows where files may be or it would need credentials to any database server that is used. Those credentials could be grabbed and used to gain direct access to the data if the application server were to be compromised.
Database Server
The database server is where the crown jewels are stored. This, again, is entirely dependent on the application. The crown jewels may be inventory for a business, where a user could determine whether a business sells a particular product, or they may be credit card information or user credentials. It would depend entirely on the purpose of the application and what the business determined was important to be stored. This is persistent storage, though a server that sat in the middle of the information flow between the database and the client could get temporary access to the data as it passes through. The easiest place to get access to the data, though, is at the database.
One of the challenges with databases is that if an attacker can either pass requests through to them or can get access to the database server itself, the data could be compromised. Even if the data were encrypted in transmission or encrypted on disk, the data could be stolen. If an attacker can access credentials that the application server needs to access the data, the attacker could similarly access data in the database by querying it. Once a user has been authenticated to the database server, it’s irrelevant that the data is encrypted anywhere because it has to be decrypted by the database server in order to be presented to the requestor.
Because of the possible sensitivity of the information in the database and the potential for it to be compromised, this server is probably high on the list of key systems, if not at the very top. Because of that, other mechanisms may be in place to better protect this system. Any of the elements within the architecture can expose the data that’s stored on this system, so ideally mechanisms are in place on all of them to ensure that the data is not compromised. The data stored here is a common target of the different web-based attacks, but it is not the only target.
Web-Based Attacks
Because so many websites today have programmatic elements and the service is often exposed to the open internet, they become nice targets for attackers. Of course, attacks don’t have to come in the shape of sending malicious data into the application, though those are common. There are other ways of getting what the attacker is looking for. Keep in mind that the motivation is not always the same. Not every attacker is looking to get complete access to the database. They may not be looking to get a shell on the target system. Instead, there may be other motivations for what they are doing. As the canvas for developing web applications expands with more frameworks, more languages and more helper protocols and technologies, the threat increases.
Note
One of the most impactful breaches to date—the Equifax data breach—was caused as a result of a framework used to develop the website. A vulnerability in that framework, left unpatched long after the issue had been fixed and announced, allowed the attackers in where they were able to make off with the records of about 148 million people.
Often, attacks are a result of some sort of injection attack: the attacker sends malicious input to the application, which treats it as though it were legitimate. This is a result of a problem with data validation; the input wasn’t checked before it was acted on. Not all attacks, though, are injection attacks. Other attacks use headers or are a result of a form of social engineering, where the expectation is the user won’t notice something is wrong while it’s happening. Following are explanations of some of the common web attacks, so you will have a better idea of what is being tested when we start looking at tools a little later.
As you are looking through these attack types, keep the target of the attack in mind. Each attack may target a different element of the entire application architecture, which means the attacker gets access to different components with different sets of data to achieve different results. Not all attacks are created equal.
SQL Injection
It’s hard to count the number of web applications that use a database for storage, but as a proportion, it’s likely large. Even if there is no need for persistent storage of user information, a database could help to guide the application in what is presented. This may be a way of populating changing information without having to rewrite code pages. Just dump content into the database, and that content is rendered when a user comes calling. This means that if you are looking to attack a web application, especially one where there is significant interaction with the user, there is probably a database behind it all, making this a significant concern when testing the application.
Structured Query Language (SQL) is a standard way of issuing queries to relational databases. It has existed in one form or another for decades and is a common language used to communicate with the databases behind the web application. A common query to a database, looking to extract information, would look something like "SELECT * FROM mydb.mytable WHERE userid = 567". This tells the SQL server to retrieve all records from the mytable in the mydb database where the value in the column named userid is equal to 567. The query will run through all of the rows in the database looking for matching results. The results will be returned in a table that the application will have to do something with.
If you are working with a web application, though, you are probably not using constant values like 567. Instead, the application is probably using a variable as part of the query. The value inside the variable is inserted into the query just before the query is sent off to the database server. So, you might have something like "SELECT * FROM mydb.mytable WHERE username = '", username, "';". Notice the single quotes inside the double quotes. Those are necessary to tell the database server that you are providing a string value. The value of the variable username would be inserted into the query. Let’s say, though, that the attacker were to input something like ' OR '1' = '1. This means the query being passed into the server would look like this: "SELECT * FROM mydb.mytable WHERE username = '' OR '1' = '1';".
Since 1 is always equal to 1 and the attacker has used the Boolean operator OR, every row is going to return a true. The Boolean OR says that if either side of the OR is true, the entire statement is true. This means that every row is going to be evaluated against that query, and the 1 = 1 is always going to return a true so the entire statement will evaluate to true and the row will be returned.
This is a simplistic example. Often mitigations are in place for simple attacks like this, but the concept remains the same. The attacker submits SQL into a form field somewhere, expecting that what is entered will make it all the way to the database to be executed there. That’s a SQL injection attack—injecting SQL statements that are syntactically correct and accurate into the input stream, hoping to have that SQL executed by the database server to accomplish some result. Using a SQL injection attack, the attacker could insert data, delete data, gain access to the application by forcing a bogus login to return true, or perhaps even get a backdoor installed on the target machine.
XML Entity Injection
At their core, all injection attacks are the same. The attacker is sending something into the input stream, hoping that the application will process it in the way the attacker wants. In this case, the attacker is using the fact that applications will often use XML to transmit data from the client to the server. Applications do this because it allows for structured, complex data to be sent in a single bundle rather than as a parameterized list. The problem comes with how the XML is processed on the server side.
Note
Asynchronous JavaScript and XML (Ajax) is how web applications get around the fact that HTTP and HTML alone, as web servers were originally intended to work, require the user to initiate a request. This happens by going directly to a URL or clicking a link or a button. Application developers needed a way for the server to be able to send data to the user without the user initiating the request. Ajax handles this problem by placing JavaScript in the page that then runs inside the browser. The script handles making the requests in order to keep refreshing the page if the data on it is prone to constant change.
These injection attacks end up working because of something called an XML external entity (XXE). In the XML being sent to the server, there is a reference to something within the operating system. If the XML parser is improperly configured and allows these external references, an attacker can get access to files or other systems inside the network. Example 8-1 shows a sample of XML that could be used to return a file on the system that’s handling the XML.
Example 8-1. XML external entity sample
<?xmlversion="1.0"encoding="ISO-8859-1"?> <!DOCTYPE wubble[<!ELEMENT wubble ANY > <!ENTITY xxe SYSTEM"file:///etc/passwd">]> <foo>&xxe;</wubble>
The external entity is referenced as xxe, and in this case, it’s a call to the SYSTEM looking for a file. Of course, the /etc/passwd file will give you only a list of users. You won’t get password hashes from it, though the web server user probably doesn’t have access to the /etc/shadow file. This isn’t the only thing you can do with an XML injection attack, though. Instead of a reference to a file, you could open a remote URL. This could allow an outside-facing server to provide content from a server that is only on the inside of the network. The XML would look similar except for the !ENTITY line. Example 8-2 shows the !ENTITY line referring to a web server with a private address that would not be routable over the internet.
Example 8-2. XML external entity for internal URL
<!ENTITY xxe SYSTEM"https://192.168.1.1/private">]>
One other attack that could be used with this is to refer to a file that would never close. On a Unix-like operating system, you could refer to something like /dev/urandom, which would never have an end-of-file marker because it just keeps sending random values. There are other, similar, pseudodevices on Linux and other Unix-like operating systems. If this type of attack were used, the web server or the application may stop functioning properly, causing a denial of service.
Command Injection
Command injection attacks target the operating system of the web server. With this type of attack, someone could take advantage of a form field that is used to pass something to the operating system. If you have a web page that has some sort of control of the underlying device or offers up some sort of service (for example, doing a whois lookup), you may be able to send in an operating system command. Theoretically, if you had a page that used the whois command from the operating system, the language the application was written in would do something like a system() call, passing in whois followed by what should be a domain name or IP address.
With this sort of attack, it’s helpful to know the underlying operating system so you can pass in appropriate commands and use the right command delimiter. Let’s assume that it’s a Linux system. Linux uses ; (semicolon) as a command delimiter. So, we could do something like passing in “wubble.com; cat /etc/passwd” to the form field. This would complete the whois command being run with the domain name wubble.com. The delimiter then says, “wait a second, I have another command to run after the first one is finished.” So, the operating system will also run the next command. All of the output from both would be fed back to the page being presented to the user. This would show the whois output but also the contents of the /etc/passwd file.
This attack targets the server that processes whatever system command is meant to be run. Any command that can be executed by the user that owns the process can be passed in. This means an attacker can gain control of the system. This is probably the web server, but it could be the application server as well.
Cross-Site Scripting
So far, the attacks have been focused on the server side. Not all attacks, though, are focused on the servers or the web infrastructure that houses the application. In some cases, the target is the user or something that the user has. This is the case with cross-site scripting. Cross-site scripting is another injection attack, but in this case, the injection is a scripting language that will be run within the context of the user’s browser. Commonly, the language used is JavaScript since it’s reasonably universal. Other scripting languages that can be run inside a browser, like Visual Basic Script (VBScript), may also be used, though they may be platform dependent.
There are two types of cross-site scripting attack. One is persistent. A persistent cross-site scripting attack stores the script on the web server. Don’t be confused by this, however. Just because the script is stored on the web server doesn’t mean that the web server is the target. The script is no more run on the server than HTML is. In each case, the browser processes the language. With HTML, the language tells the browser how to render the page. With something like JavaScript, the script can get the browser to do anything that the language and the browser context allows. Some browsers implement something like a sandbox in order to contain any activity.
With persistent cross-site scripting, the attacker finds a website that allows for the storage and subsequent retrieval and display of data provided by the user. When that happens, the attacker can load a script into the server that will be displayed to users who later visit the page. This is a good way to easily attack several systems. Anyone visiting the page will run the script, performing whatever function the attacker wants. A simple way to test for a cross-site scripting vulnerability is to load something like <script>alert(wubble);</script> into a field that leads to persistent storage. An early avenue of attack was discussion forums. The attacker could load up a forum with an attack and wait for people to come visit.
The thing about this, though, is that you may think an easy mitigation is to just block the characters < and >. That keeps the tags from being stored and interpreted later as an actual script to be run by the browser. However, there are ways around those sorts of limited input checks.
Persistent Cross-Site Scripting
Persistent cross-site scripting is also sometimes known as stored cross-site scripting. Similarly, reflected cross-site scripting is sometimes known as nonpersistent cross-site scripting.
The other type of cross-site scripting attack is called reflected cross-site scripting. Instead of being stored on a server for someone to come visit later, this type requires that the script be part of a URL that is then sent to users. This sort of attack looks the same, in essence, as persistent in the sense that you would still need to generate a script that can be run in the browser. The reflected attack requires a couple of other things, though. First, certain characters aren’t allowed as part of a URL. This requires that some of the characters be URL encoded.
The process of URL encoding is simple. Any character can be rendered this way, but some are required to be encoded. The space, for example, can’t be part of a URL because the browser would consider the URL complete when it hit the space and wouldn’t consider anything beyond that. To URL encode, you need to look up the ASCII value for the character and convert the decimal value to hexadecimal, as necessary. Once you have done that, you add a % (percent) to the beginning of the value and you have a character that has been URL encoded. A space, for example, is rendered as %20. The hexadecimal value 20 is 32 in decimal (16 × 2), and that is the ASCII value for the space character. Any character in the ASCII table can be converted in this way.
The second thing that should probably happen is that the URL should be hidden or obscured in some way. This could be done by anchoring text to the link in an e-mail. After all, if you were to receive an email with this in it, you probably wouldn’t click it: http://www.rogue.com/somescript.php?%3Cscript%3Ealert(%22hi%20there!%22)%3B%3C%2Fscript%3E.
The target, as noted earlier, is the client that is connecting to the website. The script could do any number of things, including retrieving data from the client and sending it off to an attacker. Anything that the browser can access could be handled or manipulated. This creates a threat to the user, rather than a threat to the organization or its infrastructure. The website at the organization is just the delivery mechanism because of an application or script that does a poor job of input validation.
Cross-Site Request Forgery
A cross-site request forgery (CSRF) attack creates a request that appears to be associated with one site when, in fact, it’s going to another site. Or, put another way, a user visits one page that either is on site X or appears to be on site X when in fact a request on that page is being requested against site Y. To understand this attack, it helps to know how HTTP works and how websites work. In order to understand this, let’s take a look at some simple HTML source in Example 8-3.
Example 8-3. Sample HTML source code
<html><head><title>This is a title</title></head><linkrel="stylesheet"type="text/css"href="pagestyle.css"><body><h1>This is a header</h1><p>Bacon ipsum dolor amet burgdoggen shankle ground round meatball bresaola pork loin. Brisket swine meatloaf picanha cow. Picanha fatback ham pastrami, pig tongue sausage spare ribs ham hock turkey capicola frankfurter kevin doner ribeye. Alcatra chuck short ribs frankfurter pork chop chicken cow filet mignon kielbasa. Beef ribs picanha bacon capicola bresaola buffalo cupim boudin. Short loin hamburger t-bone fatback porchetta, flank picanha burgdoggen.</p><imgsrc="<a href="/anotherpage.html">This is a link</a><imgsrc="/images/picture.png"></body></html>
When a user visits this particular page, the browser issues a GET request to the web server. As the browser parses through the HTML to render it, it runs across the reference to pagestyle.css and issues another GET request for that document. Later, it sees there is an image and in order to render it, another GET request is sent off to the server. For this particular image, it exists on the same server where the page is since the page reference is relative rather than absolute. However, any reference found in the source here could point to another website altogether, and this is where we run into an issue.
Keep in mind that when an img tag is found, the browser sends a GET request. Since that’s the case, there is no particular reason the img tag has to include an actual image. Let’s say that instead of an image, you had <img src="http://www.bank.com/transfer.php?fromacct=5788675&toacct=875791&amount=5000">. This would issue a GET request to that URL with those parameters. Ideally, a request that expected to make a change would issue a POST request, but some applications accept GET requests in place of the preferred POST.
The target here is the user. Ideally, the user has cached credentials for the referred site and page. This would allow the request to happen under the hood, so to speak. The user probably wouldn’t ever see anything happening if the negotiation with the server is clean, meaning the credentials are cached (there is a cookie that is current) and it’s passed between the client and the server with no intervention. In some cases, perhaps the user is asked to log into the server. The user may not understand what is happening, but if they aren’t very sophisticated, they may enter their credentials, allowing the request to happen.
This is another case where the target is the user, or potentially the user’s system, but the attack is helped along because of what may be considered poor practices on the part of the web development team. It’s the script that is being called that allows the attack to happen.
Session Hijacking
One of the downsides of HTTP as it was designed is that it is entirely stateless. The server, according to the protocol specification, has no awareness of clients or where they are in a transaction to acquire files and data. The server has no awareness of the contents of the file to know whether clients should be expected to send additional requests. As noted previously, all of the intelligence with respect to requests that are made is on the browser side, and the requests exist in complete isolation from the standpoint of the server.
There are a lot of reasons that it may be helpful for the server to have some awareness of the client and whether they have visited previously. This is especially true when it comes to selling anything online. There is no shopping cart keeping track of items you want to buy without an awareness of state. There is no way to authenticate a user and maintain the user in a “logged-in” state. There has to be a way to retain information across requests. This is why cookies exist. A cookie is a way of storing small amounts of data that get passed back and forth between the server and the client.
However, we’re talking about session hijacking. One type of cookie is a session identifier. This is a string that is generated by the application and sent to the client after the client has authenticated. The session identifier lets the server know, when it’s been passed back from the client, that the client has passed authentication. The server then validates the session identifier and allows the client to continue. Session identifiers will look different based on the application that generated them, but ideally they are created using pieces of information from the client. This prevents them from being stolen and reused. You can see an example of a session token in Example 8-4.
Example 8-4. HTTP headers including session identification
Host: www.amazon.com User-Agent: Mozilla/5.0(Macintosh;Intel Mac OS X 10.13;rv:58.0)Gecko/20100101 Firefox/58.0 Accept: */* Accept-Language: en-US,en;q=0.5 Accept-Encoding: gzip, deflate, br Referer: https://www.amazon.com/?ref_=nav_ya_signin&X-Requested-With: XMLHttpRequest Cookie:skin=noskin;session-id=137-0068639-1319433;session-id-time=2081786201l;csm-hit=tb:s-PJB1RYKVT0R6BDGMN821|1520569461535&adb:adblk_no;x-wl-uid=1HWKHMqcArB0rSj86npAwn3rqkjxiK9PBt7W0IX+kSMfH9x/WzEskKefEx8NDD K0PfVQWcZMpwJzrdfxlTLg+75m3m4kERfshgmVwHv1vHIwOf5pysSE/9YFY5wendK+hg39/KV6DC0w=;ubid-main=132-7325828-9417912;session-token="xUEP3yKlbl+lmdw7N2esvuSp61vlnPAG+9QABfpEAfJ7rawYMDdBDSTijFkcrsx6HkP1I7JGbWFcHzyXLEBHohy392qYLmnKOrYp0fOAEOrNYKFqRGeCZkCOuk812i2RdG1ySv/8mQ/2tc+rmkZa/3EYmMu7D4dS3A+p6MR55jTHLKZ55JA8sDk+MVfOatv31w4sg82yt8SKx+JS/vsK9P/SB2xHvf8TYZGnLv2bIKQhxsoveHDfrEgiHBLjXKSs0WhqHOY5nuapg/fuU1I3u/g==";a-ogbcbff=1;x-main=iJbCUgzFdsGJcU4N3cIRpWs9zily9XsA;at-main=Atza|IwFBIC8tMgMtxKF7x70caK7RB7Jd57ufok4bsiKZVjyaHSTBYHjM0H9ZEK zBfBALvcPqhxSjBThdCEPRzUpdZ4hteLtvLmRd3-6KlpF9lk32aNsTClxwn5LqV-W3sMWT8 YZUKPMgnFgWf8nCkxfZX296BIrlueXNkvw8vF85I-iipda0qZxTQ7C_Qi8UBV2YfZ3gH3F3 HHV-KWkioyS9k82HOJavEaZbUOsx8ZTF-UPkRUDhHl8Dfm5rVZ1i0NWq9eAVJIs9tSQC4pJ PE3gNdULvtqPpqqyGcWLAxP6Bd3RXiMB3--OfGPUFZ6yZRda1nXe-KcXwsKsYD2jwZS1V8L 0d0Oqsaoc0ljWs7HszK-NgdegyoG8Ah_Y-hK5ryhG3sf-DXcMOOKfs5dzNwl8MS1Wq6vKd;sess-at-main="iNsdlmsZIQ7KqKU1kh4hFY1+B/ZpGYRRefz+zPA9sA4=";sst-main=Sst1|PQFuhjuv6xsU9zTfH344VUfbC4v2qN7MVwra_0hYRzz6f53LiJO0RLgrX WT33Alz4jljZV6WqKm5oRtlP9sxDEf3w4-WbKA87X7JFduwMw7ICWlhhJJRLjNSVh5wVdaH vBbrD6EXQN9u7l3iR3Y7WuFeJqN3t_dyBLA-61tk9oW1QbdfhrTXI6_xvfyCNGklXW6A2Pn CNBiFTI_5gZ12cIy4KpHTMyEFeLW6XBfv1Q8QFn2y-yAqZzVdNpjoMcvSJFF6txQXlKhvsL Q6H-1OYPvWAqmTNQ7ao6tSrpIBeJtB7kcaaeZ5Wpu1A7myEXpnlfnw7NyIUhsOGq1UvaCZa hceUQ;lc-main=en_US Connection: keep-alive
Before you get too excited, this set of tokens has been altered. The session identifier here has been time bound, which also helps to prevent against session hijack attempts. You can see the header that indicates the time that the session identifier was created. This suggests there is a time limit on it that is checked by the server. If an attacker were to get my session identification information, they would have a limited amount of time to use it. Additionally, with a session identifier like this, it should be bound to my device, which means it can’t be copied and used somewhere else.
A session hijacking attack targets the user in order to get the user’s privileges. The attack requires that the session identifier get intercepted. This can happen with a man-in-the-middle attack, where the traffic is intercepted. This could mean the attacker intercepts the web traffic through its regular stream or reroutes the traffic. This could be done with a snooping attack, for instance.
You can see from the example that commerce sites use session identifiers. Even average users have to be concerned about session hijacking since it’s not always, and perhaps not even regularly, about attacking an enterprise to gain access to systems. Sometimes it’s simply about theft. If session identifiers could be hijacked, your Amazon account could be used to order goods that could be resold later. Your bank account could be hijacked to transfer money. This is not to suggest, at all, that either of those are open to this attack today, especially since companies like Amazon require information to be revalidated before any changes in shipping information are made.
Using Proxies
A proxy server is used to pass requests through so the request appears to be made on behalf of the proxy server rather than coming from the user’s system. These systems are often used to filter requests so users aren’t drawn to malicious sites or, sometimes, using sites that are not specifically business-related. They can be used to capture messages from a client to a server or vice versa in order to ensure no malware gets through to the enterprise network.
We can use the same idea to perform security testing. Since proxy servers are sent requests, which can then be altered or dropped, they are valuable for testing. We can intercept normal requests being made in order to modify values outside expected parameters. This allows us to get by any filtering that is being done by scripting within the page. The proxy server is always after any script has done any sanitization. If the web application relies almost entirely on the filtering in the browser, any alterations made after the fact can cause the application to crash.
Proxy-based testing allows us to programmatically attack the server in different ways. We can see all of the pages that are accessed as a user works through a website to understand the flow of the application. This can help when it comes to testing, since changing the flow of the application may cause failures in it.
Another thing proxy-based testing can do is allow us to authenticate manually, since sometimes programmatic authentication is challenging, if the application is written well. If we authenticate manually, the proxy carries the session identifier that indicates to the application that it is authenticated. If we can’t authenticate to web applications, we miss the majority of pages in sites that rely on being accessible only to the right users.
Spidering Pages
One of the first things any web testing application will do, including proxy-based applications, is get a list of all of the pages. This helps to identify the scope. The process is commonly called spidering. Getting the list of pages ahead of time allows the tester to include or exclude pages from the test.
Burp Suite
Burp Suite is a proxy-based testing program that provides a lot of capabilities and is multiplatform so it will run under Windows, Linux, and macOS—anywhere that Java can run. Personally, I’m a big fan of Burp Suite. The challenge is that the version of Burp Suite that is included with Kali is limited, because Burp Suite has a commercial version that unlocks all of the capabilities. The good news is that if you want to use the commercial version, it’s comparatively inexpensive, especially when you look at some of the more well-known testing programs or suites.
Note
To use any proxy-based tester, you need to configure your browser to use the proxy for any web requests. In Firefox, which is the default browser in Kali, you go to Preferences → Advanced → Network → Connection Settings. Configure localhost and port 8080 for the address under Manual configuration. You should also select the checkbox to use this proxy for all protocols.
The interface for Burp Suite can take some getting used to. Every function is a different tab, and each tab may then have additional subtabs. Some of the UI options in Burp Suite may be counterintuitive. For example, when you go to the Proxy tab, you will see an “Intercept is on” button that appears to be pushed in. To turn off the intercept feature, you click the button that says the intercept is on and essentially unpush that button. You can see this in Figure 8-2, as well as the rest of the interface and all of the tabs showing all of the features, at a high level, of Burp Suite.
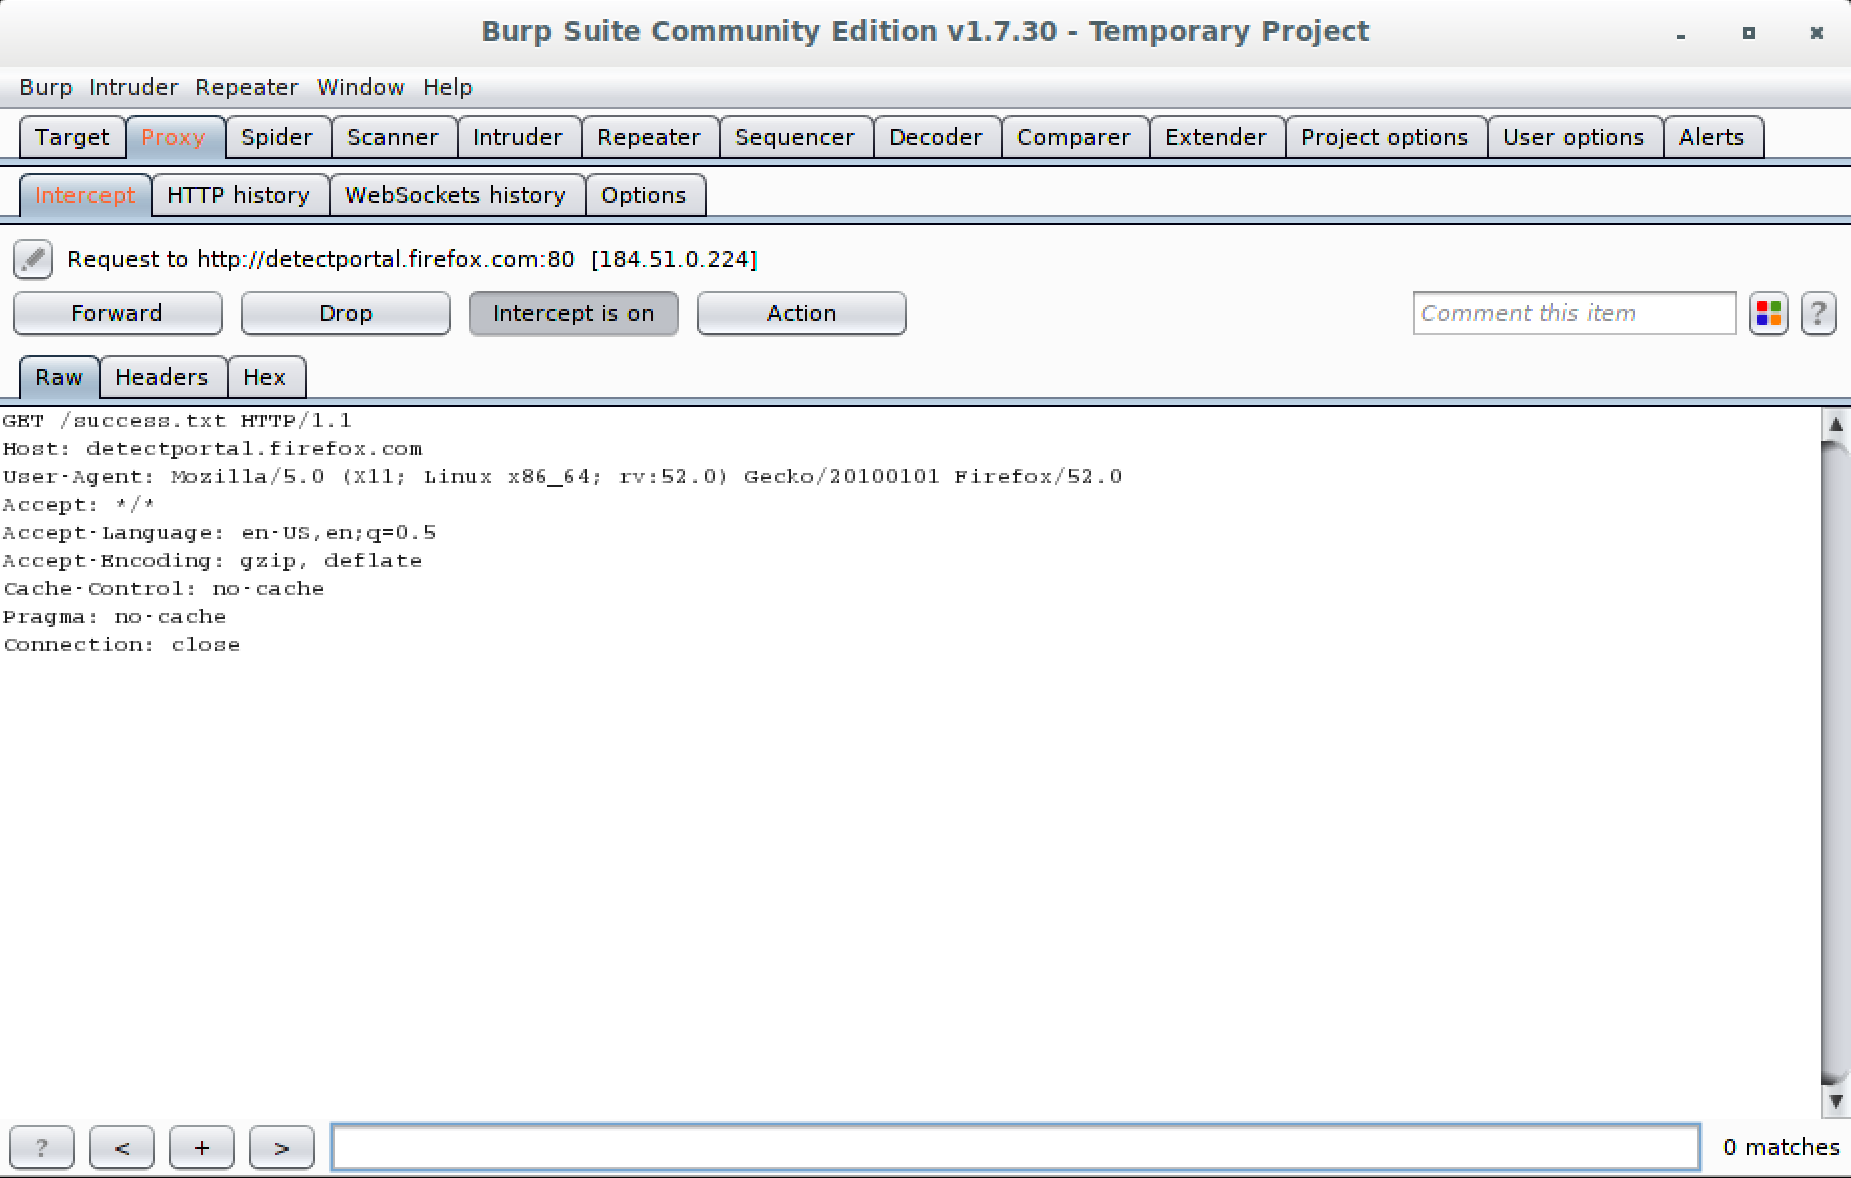
Figure 8-2. Burp Suite windows
Locating Burp Suite
You will find Burp Suite in the Kali menu under Web Application Testing.
The Intercept tab is highlighted with the text in red because Burp has intercepted a request. This requires user intervention. You can Forward, Drop, or make changes and then Forward. The request is in plain text, because HTTP is a plain-text protocol, so no special tools are required to change the request. You just edit the text in front of you in whatever way makes the most sense to you, based on your testing requirements. This is not to say that you have to do all of the testing manually. It may be easier to get started if you just disable the Intercept for a while. That will log the starting URL and from there, we can spider the host.
One of the challenges with spidering is that each site may have links to pages on other sites. A spider may follow every link it finds, which may mean you soon have half of all the available pages on the internet logged in your Burp Suite. Burp Suite sets a scope that limits what pages will be spidered and tested later. When you start a spider, Burp Suite will ask you about modifying the scope. Figure 8-3 shows the Target tab in Burp Suite with the context menu up, which gives us access to the spider feature.

Figure 8-3. Burp Suite Target tab with spider
With the commercial version, you can also perform an active scan, which means it will run through a large number of attacks against the pages within the scope. Unfortunately, this feature is disabled in the community edition, which is what comes with Kali. However, we do have access to one of the coolest features of Burp Suite: the Intruder. Essentially, the Intruder is a fuzzing attack tool. When you send a page to the Intruder, which you can do from the context menu, you can select parameters in the request and tell Burp Suite how you want to fill in those parameters over the course of testing.
With the commercial version, you get canned lists. Sadly, the community edition requires that you populate the lists of values yourself. Of course, you can use the word lists available in Kali in Burp Suite. Figure 8-4 shows the Intruder tab, looking at Positions. The positions allow you to select the parameters you want to manipulate. You’ll also see a pull-down for “Attack type.” The attack type tells Burp Suite how many parameters you are manipulating and how you want to manipulate them. If it’s just a single parameter, you have a single set of payloads. If you have multiple parameters, do you use a single set of payloads or do you use multiple payloads? How do you iterate through the multiple payloads? That’s what the “Attack type” selection will tell Burp Suite.
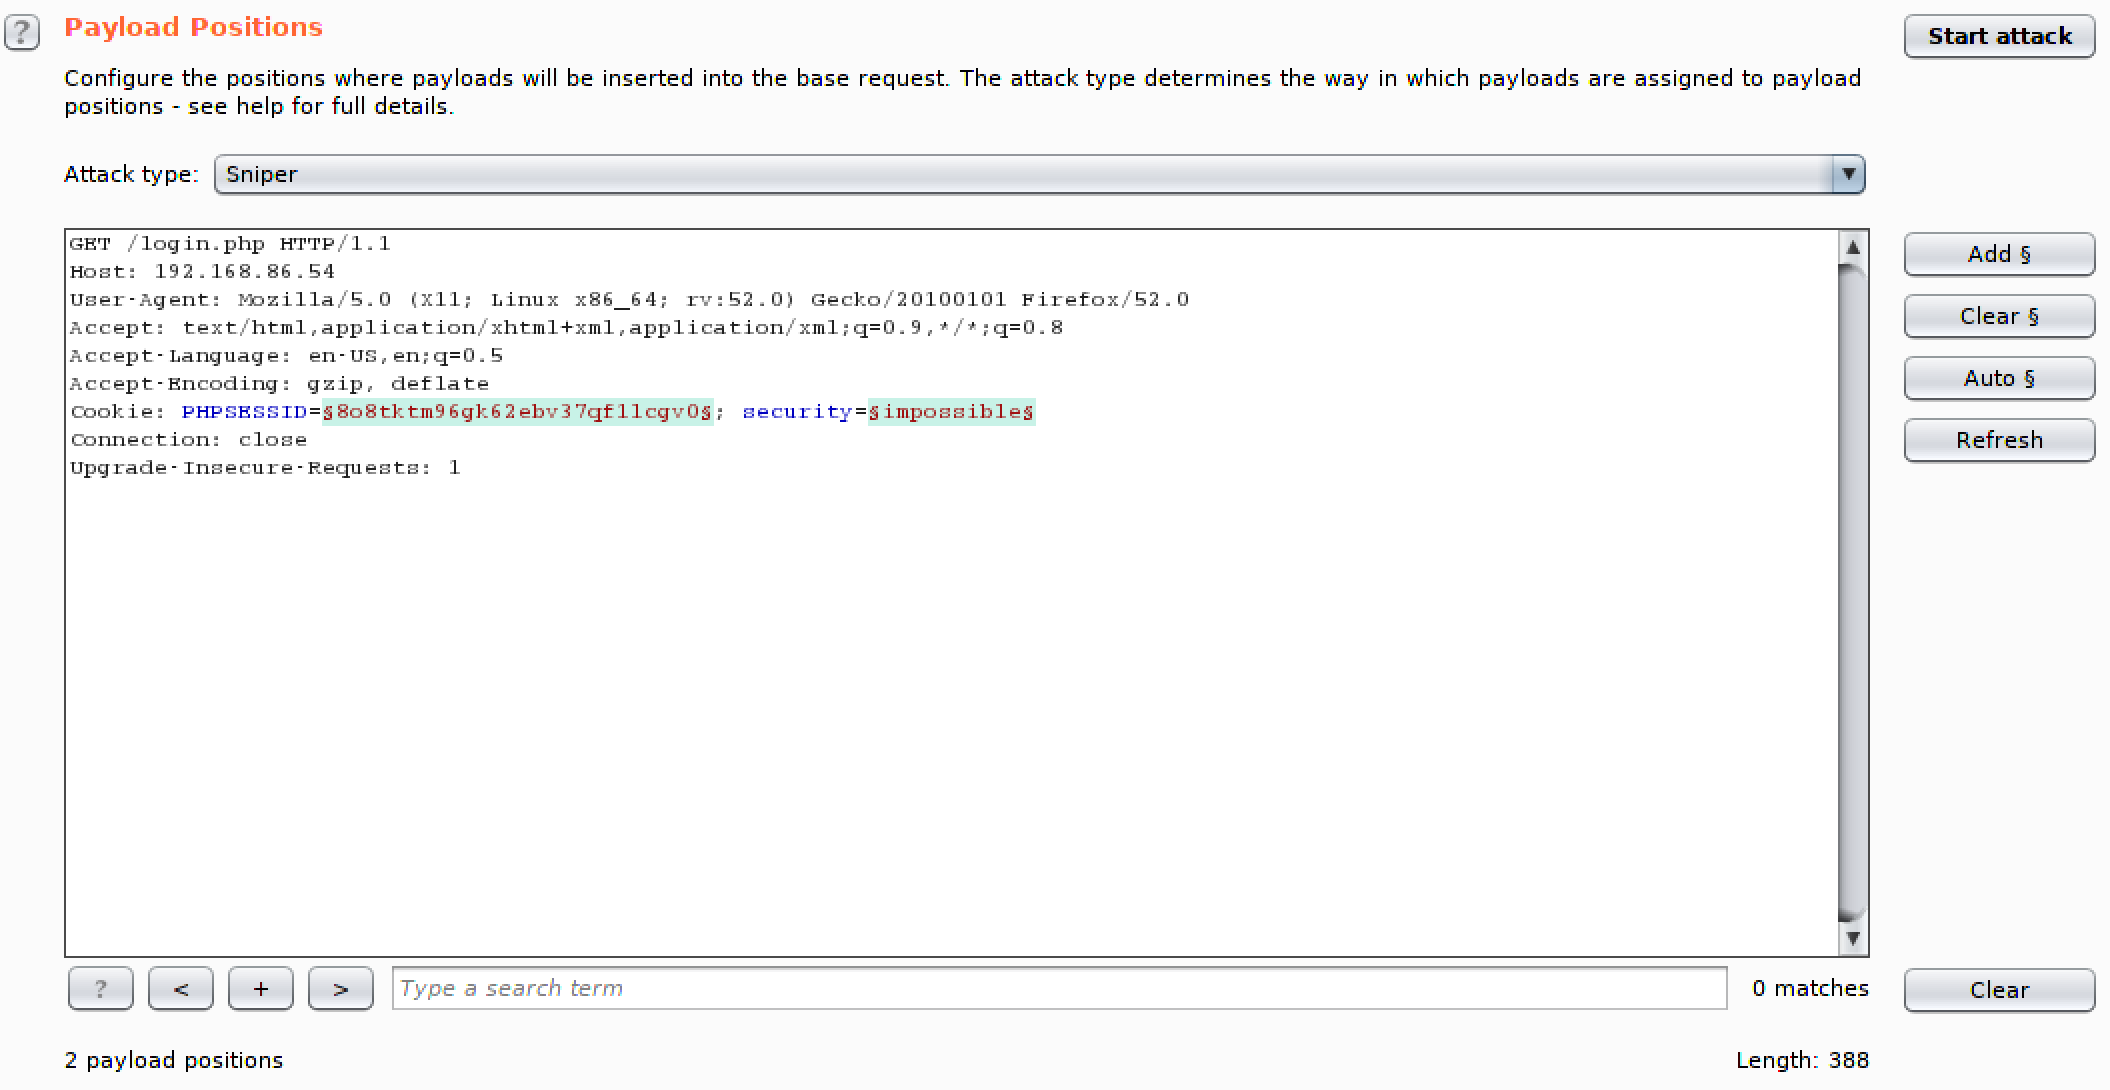
Figure 8-4. Burp Suite Intruder
Once you have selected the parameters you want to manipulate, you move to the Payloads tab. This allows you to load payloads and, perhaps more importantly, set up your payload processing. Using a simple word list like rockyou.txt may not be sufficient. People will take simple payloads and alter them in specific ways. They may switch out letters for numbers that look like them, for instance (3 for e, 4 for a, and so on). The Payload Processing feature allows you to configure rules that will alter your basic list of payloads as it works through the different payloads.
Earlier we talked about session hijacking. Burp Suite may be able to help with identifying authentication tokens, performing an analysis on them to determine if they are predictable. You would use the Sequencer tab for this. If tokens can be predicted, this may allow an attacker to either determine what a token is or make one up. You can send requests to the Sequencer from other Burp Suite tools or you can just use a packet capture that you can send to this tool.
While it can take some getting used to, especially with all of the options that are available to configure, Burp Suite performs extensive testing, even with just the limited number of capabilities in the community edition in Kali. This is an excellent starting point for someone who wants to learn how the exchanges between a server and a client work and how changing those requests may impact how the application functions.
Zed Attack Proxy
The Open Web Applications Security Project (OWASP) maintains a list of common vulnerability categories. This is meant to educate developers and security people on how to protect their applications and their environments from attacks by minimizing the number of mistakes leading to these vulnerabilities. In addition to the list of vulnerabilities, OWASP has also created a web application tester. This is also a proxy-based tester, like Burp Suite. However, Zed Attack Proxy (ZAP) also has some additional features aside from just doing proxy-based testing.
Locating Zed Attack Proxy
You will find Zed Attack Proxy in the Kali menu under Web Application Testing with the name OWASP-Zap.
The first, and perhaps most important difference between Burp Suite and ZAP, is the Quick Start feature. You can see this in Figure 8-5. When you use Quick Start, which is the tab presented to you when you launch ZAP, all you need to do is provide a URL where ZAP should start testing. This will spider the site and then perform tests on all the pages that have been found. This feature assumes that everything you want to test can be found by just links on pages. If you have additional URLs or pages within the site but they can’t be reached by links that follow from spidering at the top of the site, they won’t be tested with this approach. Also, Quick Start won’t accommodate logins. It’s meant to be for quick testing on easy sites that don’t require configurations.
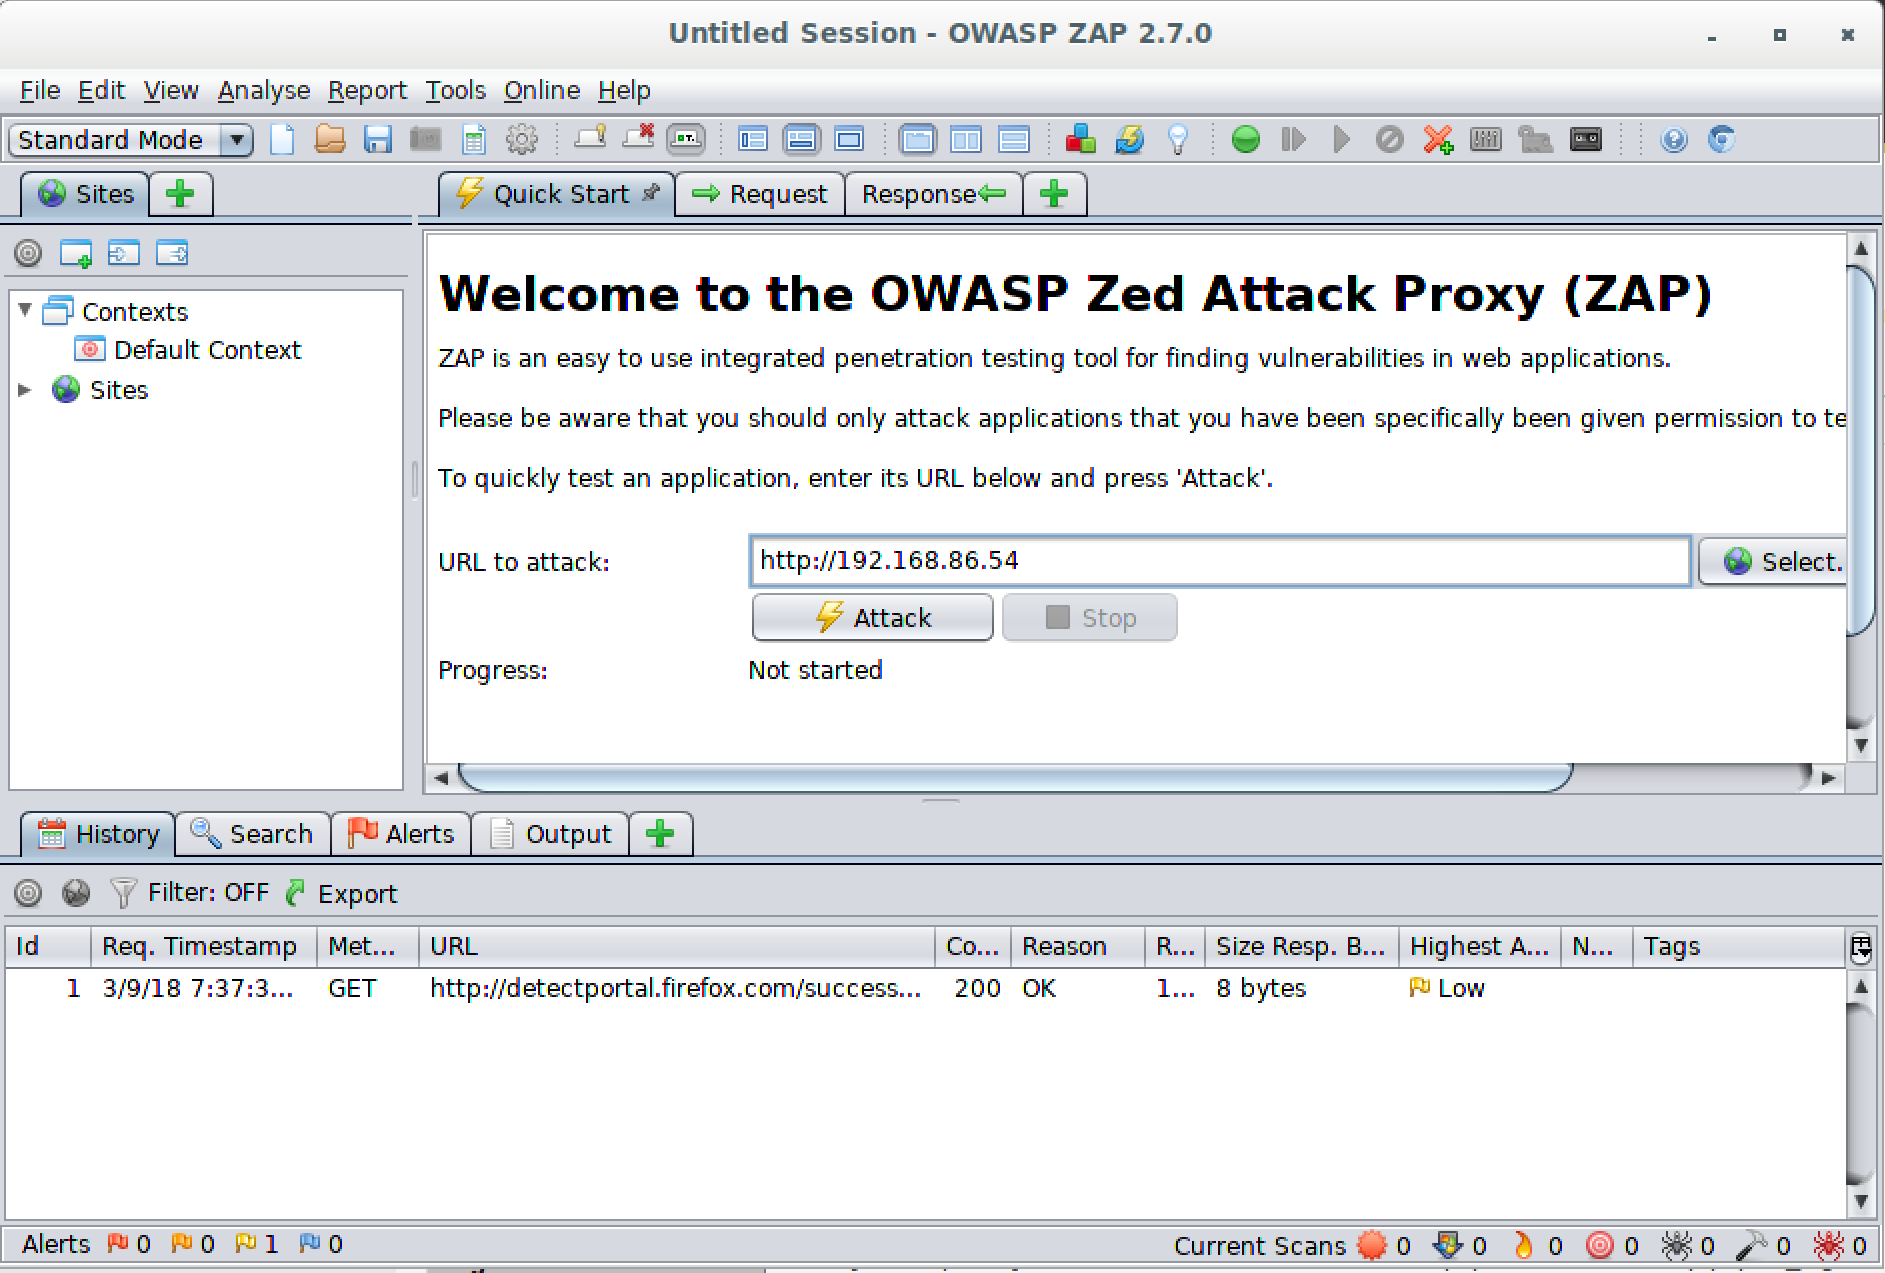
Figure 8-5. Zed Attack Proxy quick start
Just like Burp Suite, you can configure your browser to use ZAP as a proxy. This will allow ZAP to intercept requests for manipulation as well as populate the Sites list on the left. From there, you can select what to do with each URL by using the context menu. You can see the selection in Figure 8-6. One thing we probably want to do first is to spider the site. However, before that, we need to make sure we have logged into the application. The site in question here is Damn Vulnerable Web Application (DVWA), which is freely downloadable and can be used to better understand web-based attacks. It does have a login page to get access to all of the exercises.
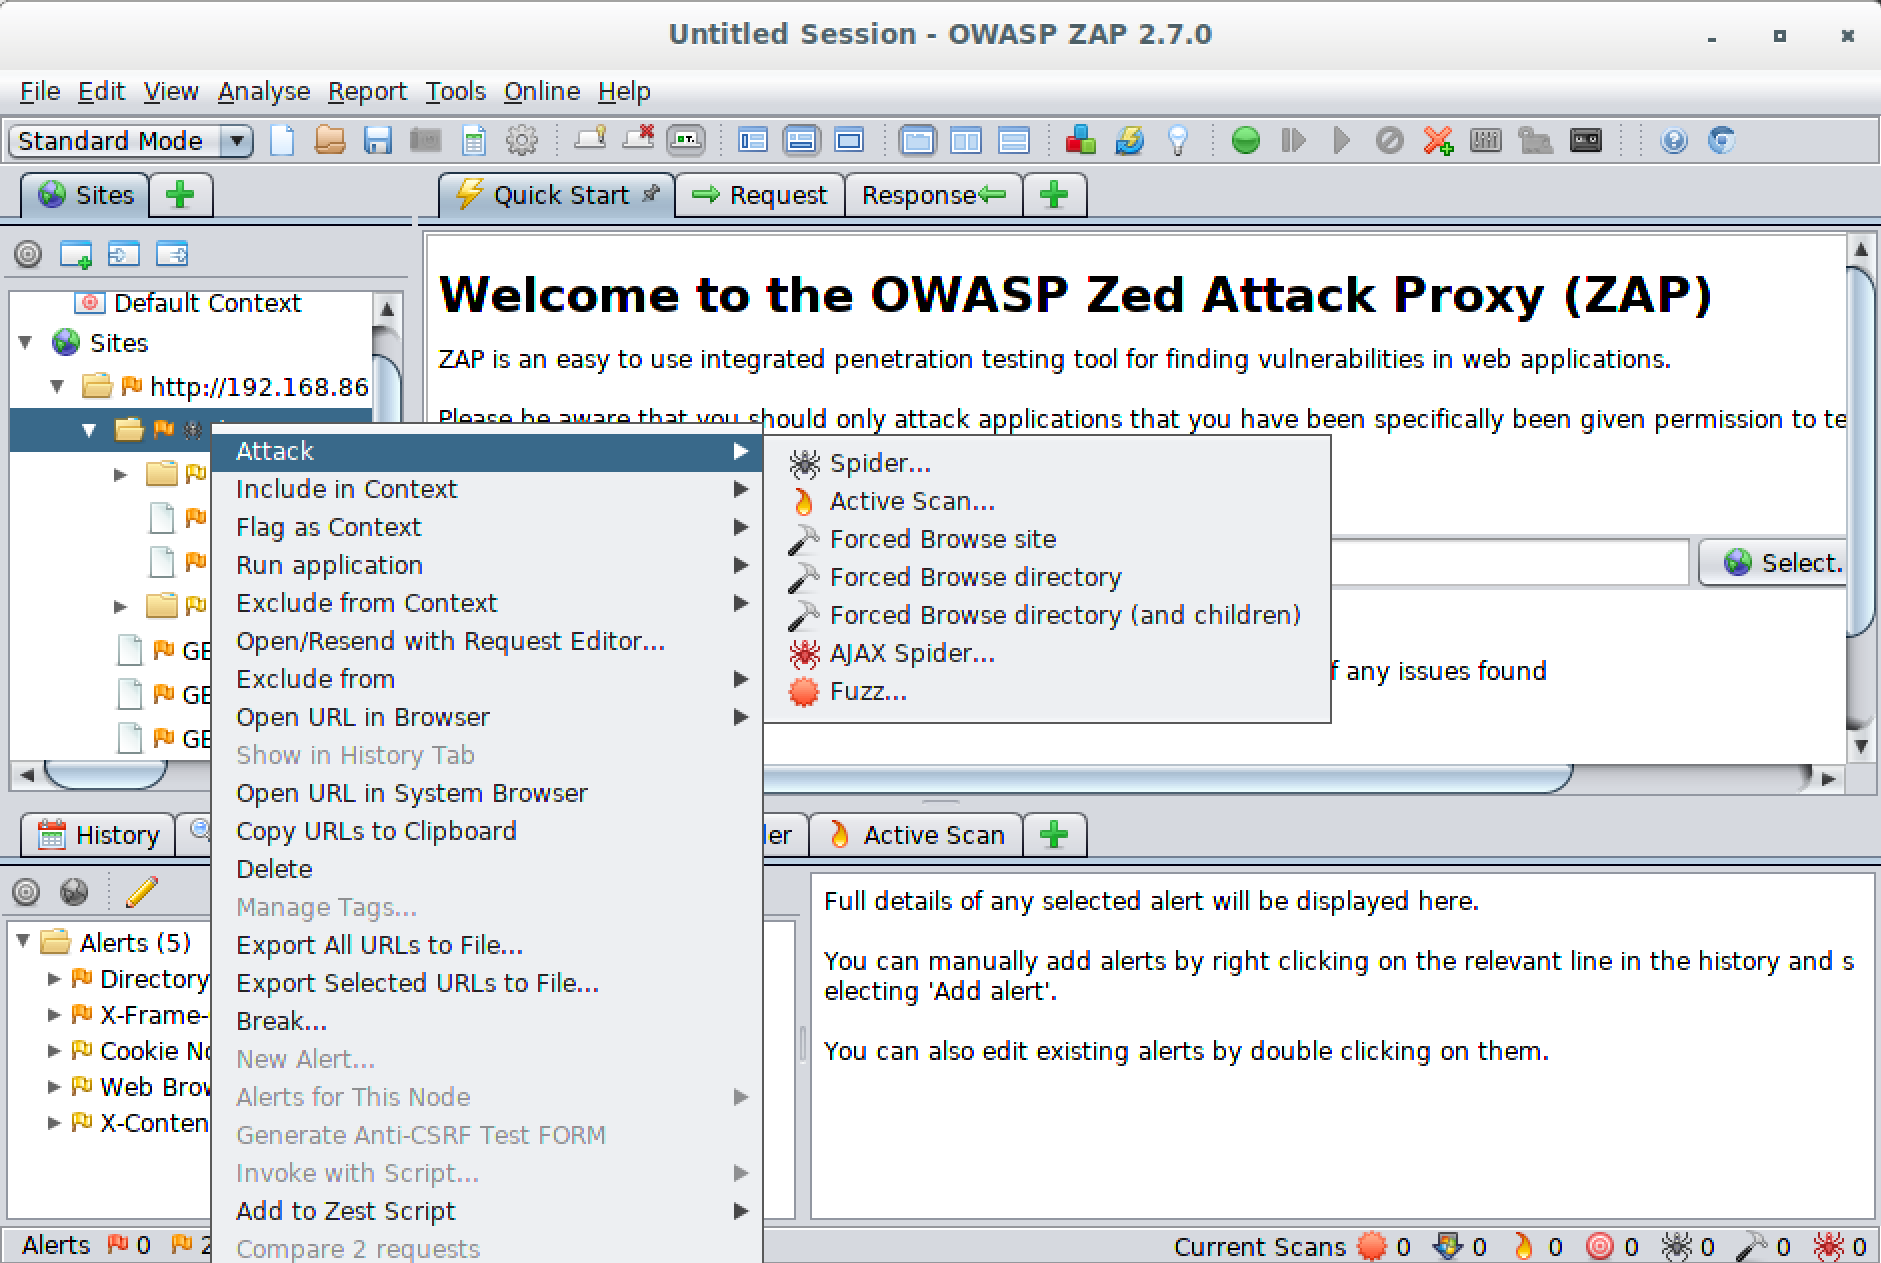
Figure 8-6. Selection of attacks available in ZAP
Once the site is spidered, we can see what we are up against. We can do this by not only seeing all of the pages and the technology we may be up against, but also all of the requests and responses. When you select one of the pages on the left side from the Sites list, you will be presented with information at the top. This includes the Request tab, which shows you the HTTP headers that were sent to the server. You will also see the Response tab, which shows not only the HTTP headers but also the HTML that was sent from the server to the client.
Note
While spidering may seem as though it is low-impact because all ZAP is doing is requesting pages just as you would by browsing the site, it could have negative consequences. A few years ago, I managed to spike the CPU on a server where I was testing an application written in Java. The application was apparently leaking memory objects (not destroying them effectively), and the high-speed requests meant a lot of them were collecting quickly, forcing the garbage collection process to step in to try to clean up. All of this is to say that you have to be careful even when you are doing what seems to be something simple. Some businesses don’t like their applications crashed while testing, unless that was agreed to up front.
In the Response tab, you will see the headers in the top pane and the HTML in the bottom pane. If you look at the Request tab, you will see the HTTP headers at the top with the parameters that were sent at the bottom. In Figure 8-7, you will see a Request with parameters. If you select one of these parameters, you can do the same sort of thing that we were able to do earlier with Burp Suite’s Intruder. Instead of being called Intruder, this is called Fuzzer, and you can see the context menu showing the list of functions that can be performed against the selected parameter. The one we are looking for is, not surprisingly, listed as Fuzz.
Note
Fuzzing is taking an input parameter and submitting anomalous data to the application. This could be trying to send strings where integers are expected or it could be long strings or anything that the application may not expect. The intention, often, is to crash an application. In this case, fuzzing is used to vary data being sent to the application. This could be used for brute-force attacks.

Figure 8-7. Selecting parameters to Fuzz
Once we have selected the parameter and indicated that we are intending to fuzz it, we will get another dialog box that lets us indicate the terms we wish to replace the original parameter with. The dialog box allows us to provide a set of strings, open a file and use the contents, use a script, and submit numbers or other sets of data. Figure 8-8 shows the selection of a file to replace the parameter contents with. Once we run the fuzzer, it will run through all the contents of the file, replacing the original parameter with each item in the file. The fuzzer will allow us to select multiple parameters to fuzz.
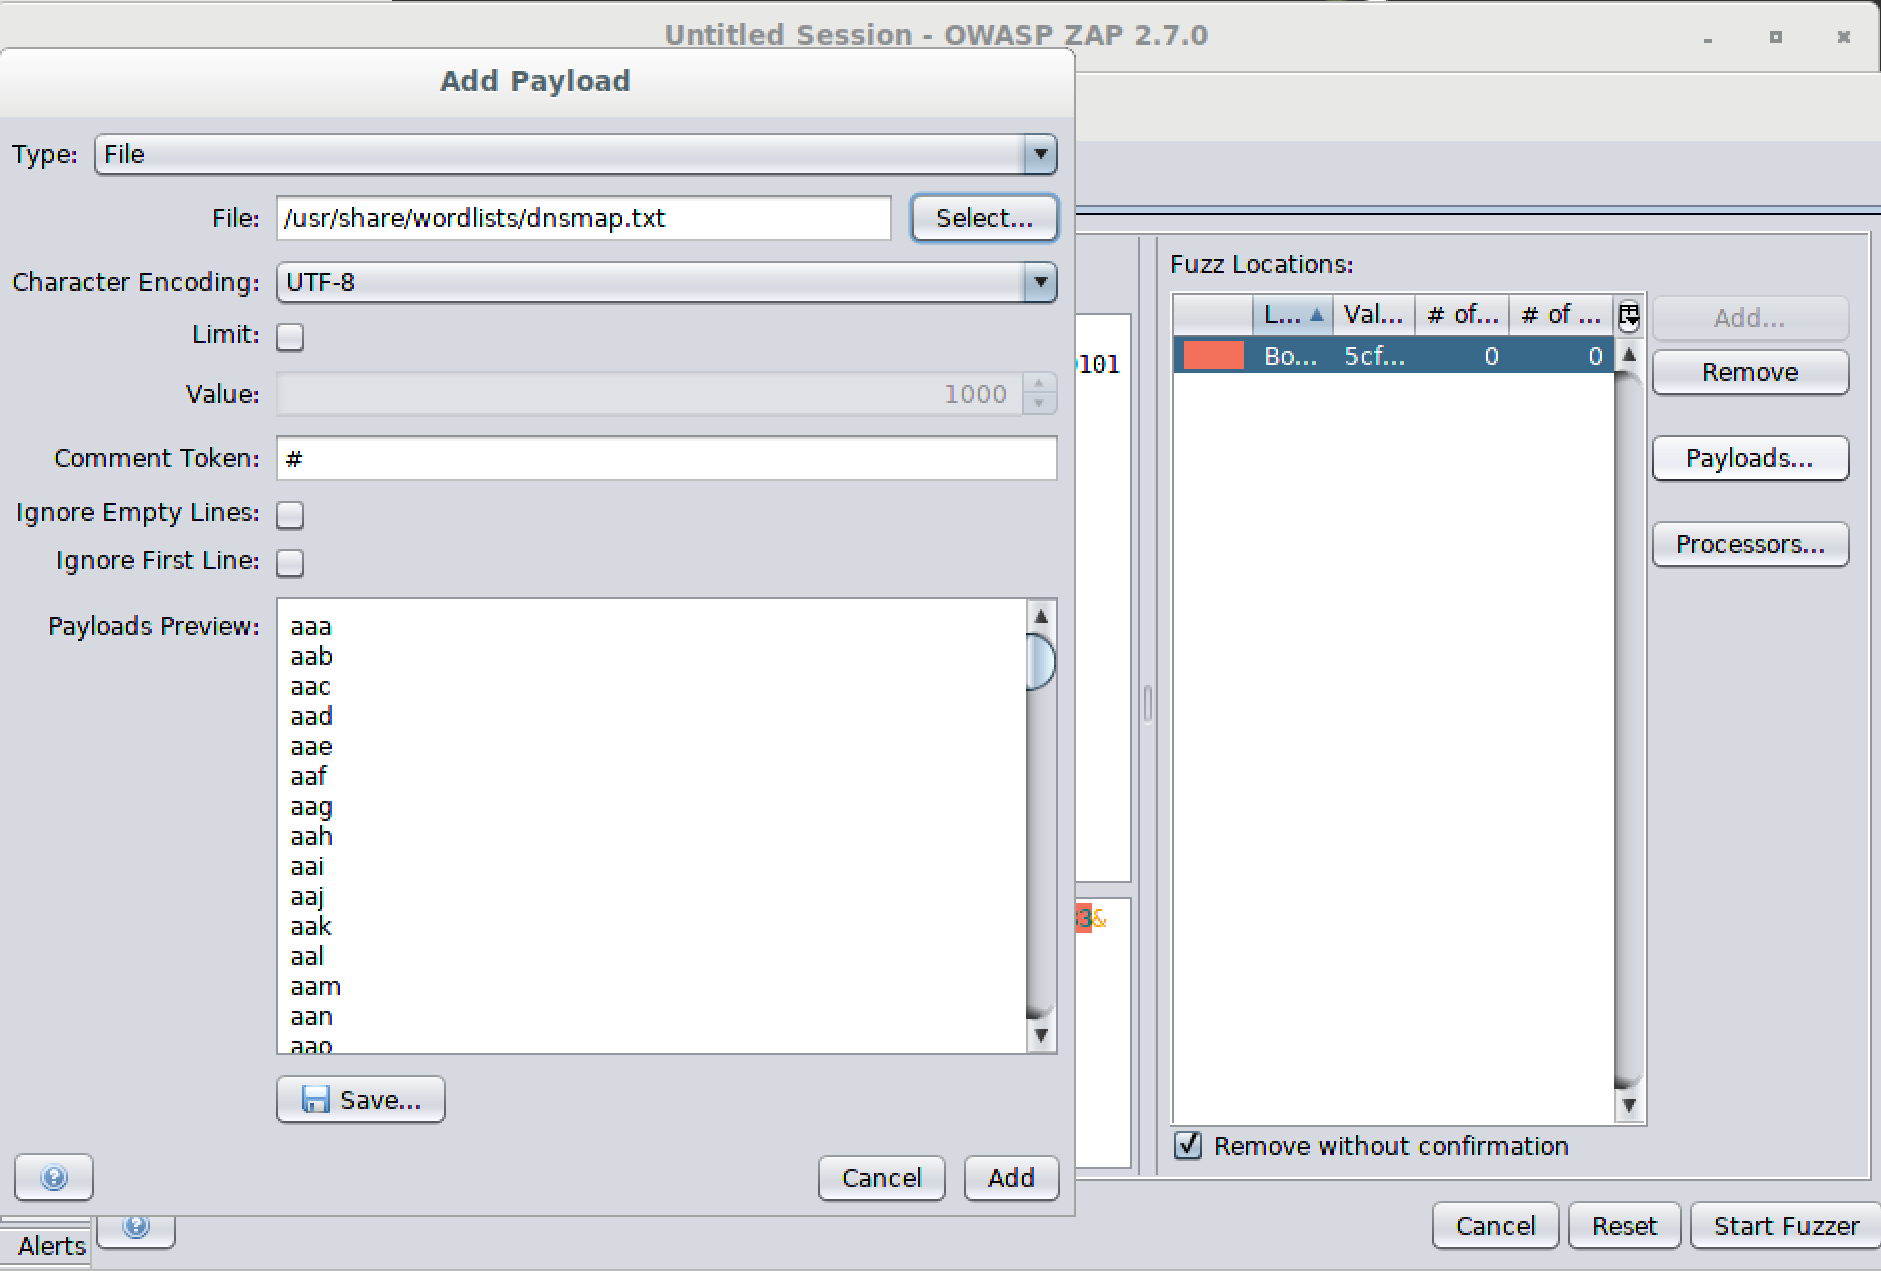
Figure 8-8. Determining parameter contents
Using this sort of technique, you can perform brute-force attacks on usernames and passwords on login fields. You could fuzz session identifiers to see if you could get one that would validate. You could send input to the application that could crash it. The fuzzer in ZAP is powerful and provides a lot of capabilities for a security tester. It comes down to the imagination and skill of the tester as well as the potential openings in the application. Using the fuzzer, you can change not only parameters sent to the application, but also header fields. This has the potential to impact the web server itself.
ZAP can do passive scanning, which means it will detect potential vulnerabilities while browsing the site. Additionally, you can perform an active scan. The passive scan will make determinations based on just what it sees, without performing any testing. It observes without getting into the middle. An active scan will send requests to the server in order to identify vulnerabilities. ZAP knows common attacks and how to trigger them, so it sends requests intended to determine whether the application may be vulnerable. As it finds issues, you will find them in the Alerts tab at the bottom.
The alerts are categorized by severity. Under each severity, you will find a list of issues. Each issue found will have a list of URLs that are susceptible to that issue. As with other vulnerability scanners, ZAP provides details about the vulnerability found, references related to it, and ways to mitigate the vulnerability. Figure 8-9 shows the details related to one of the vulnerabilities ZAP found in DVWA. This particular issue was classified as low risk but medium confidence. You can see from the details provided that ZAP has provided a description as well as a way to remediate or fix the vulnerability.
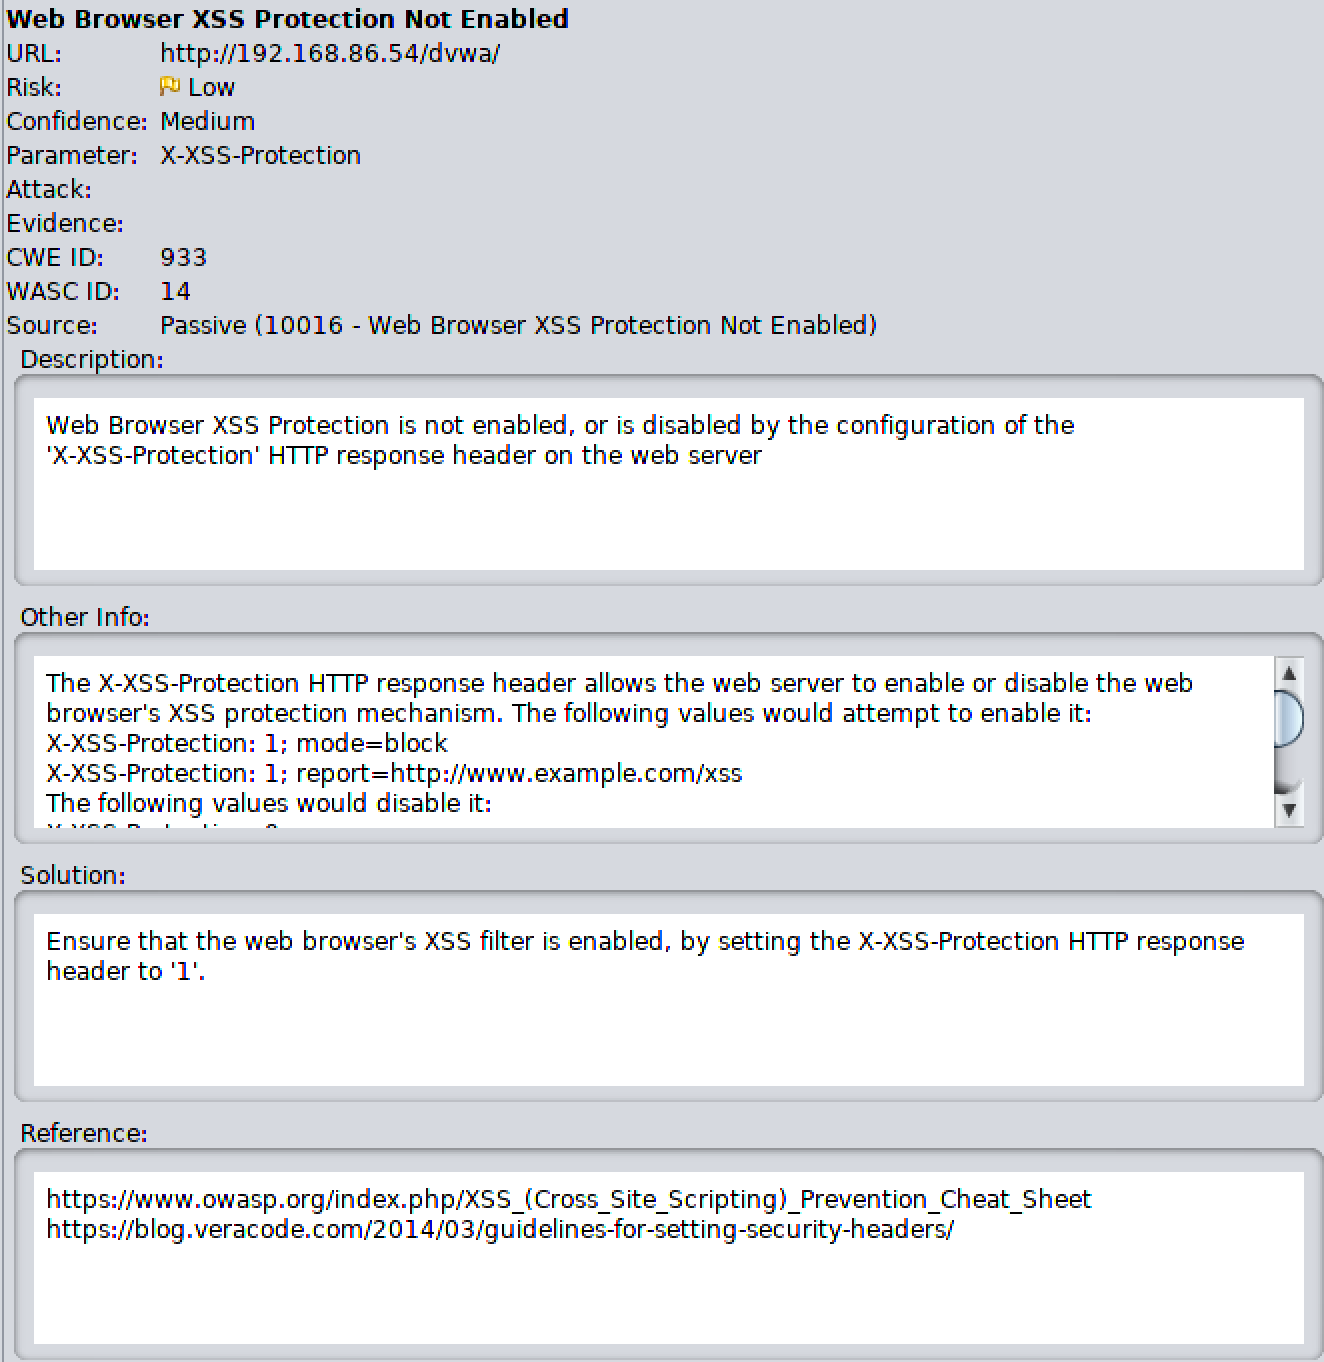
Figure 8-9. Details related to a ZAP finding
ZAP is a comprehensive web application testing program. Between the scanners, the fuzzer, and other capabilities in ZAP, you can poke a lot of holes in web applications you have been asked to test. As with so many other testing or scanning programs, though, you can’t take everything for granted with ZAP. This is one reason it provides you with a confidence rating. When the confidence is only medium, as mentioned previously, you have no guarantee that it really is a vulnerability. In this case, the remediation suggested is just good practice. It’s important to check the confidence and to validate any finding before passing it on to the business you are doing work for.
WebScarab
There are a lot of proxy-based testing tools, and some of them take different approaches. Some may be focused in particular areas. Some may follow a more traditional vulnerability analysis approach. Others, like WebScarab, are more about providing you with the tools you may need to analyze a web application and pull it apart. It acts as a proxy, meaning you are browsing sites through it in order to provide a way to capture and assess the messages going to the server. It does offer some of the same capabilities as other proxy-based testing tools.
Locating WebScarab
You can find WebScarab in the Kali menu under the Web Application Analysis folder.
A couple of quick differences are obvious when you first look at the interface, as you can see in Figure 8-10. One is a focus on authentication. You can see tabs for SAML, OpenID, WS-Federation, and Identity. This breaks out different ways of authenticating to web applications so you can analyze them. It also gives you ways of attacking the different authentication schemes. Under each of the tabs you see are additional tabs, giving you access to more functionality related to each category. WebScarab will also give you the ability to craft your own messages completely from scratch. You can see how to build the message in Figure 8-10 since that tab is up front.

Figure 8-10. WebScarab
Similar to what Burp Suite can do, WebScarab will perform an analysis on the session identifier. Attacking session identifiers is a big thing, as you may have guessed. Getting session identifiers that are truly random and tied to the system that the session belongs to is a big deal. This is true, especially as computers become more powerful and can perform far more computations in a short period of time for analysis and brute-force attacks. WebScarab may not be as comprehensive as some of the other tools we’ve looked at, but it does provide some capabilities in a different way than others. It is, after all, as much about giving developers ways to test as it is about providing security folks with more capabilities.
Paros Proxy
Paros is actually an older tool. As such, it doesn’t have the capabilities that some of the others do. It is mostly focused on some of the attacks that were serious over a decade ago. The good news, if you can call it that, is that those same attacks are still serious issues, though one of them is perhaps less prevalent than it once was. SQL injection continues to be a serious concern, though cross-site scripting has moved to the side a little for some more recent attack strategies. However, Paros is a proxy-based testing tool, written in Java, that performs testing based on configured policies. Figure 8-11 shows the policy configuration available for Paros.
Locating Paros
Paros can be launched from the Kali menu under Web Application Analysis. It can also be launched from the command line with the command paros.
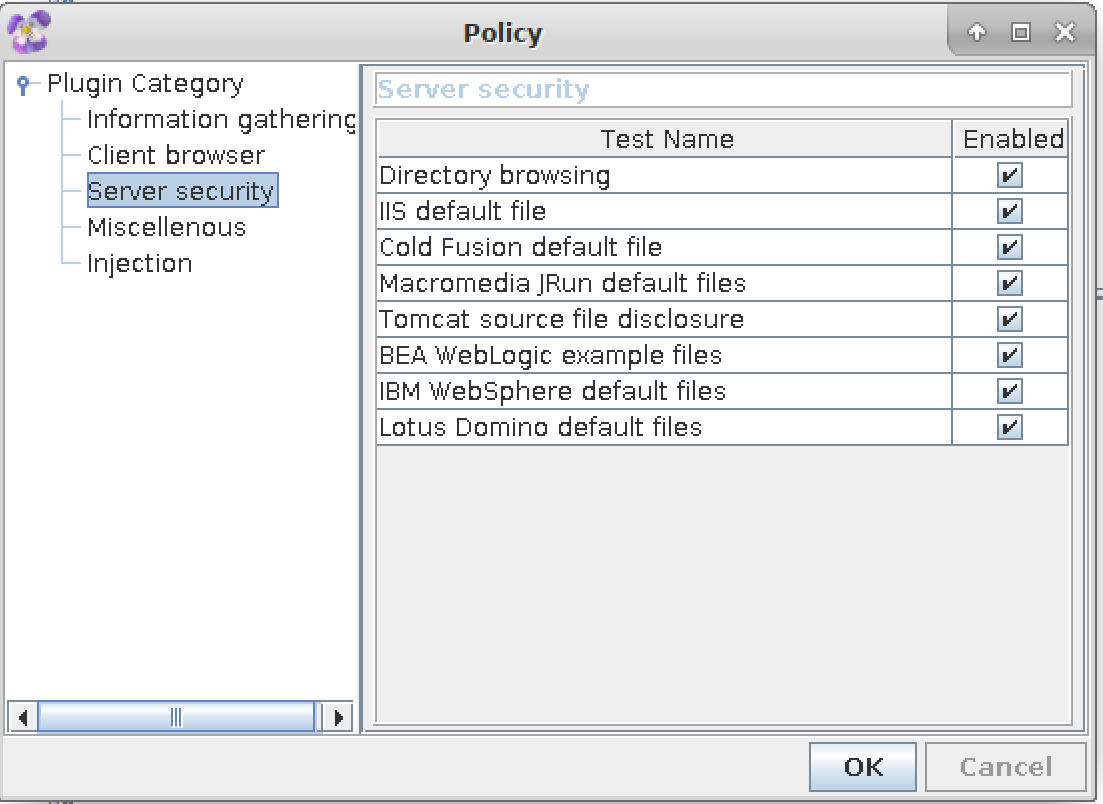
Figure 8-11. Paros policy configuration
Paros is a much simpler interface than some of the other tools we’ve looked at, which shouldn’t be much of a surprise considering that it doesn’t do quite as much. However, don’t sell Paros short. It still has a lot of capabilities. One of them is that it generates a report that some of the other tools you’ll look at won’t do. It also allows you to search through your results and do encoding/hashing from inside the application. It’s not a bad testing tool to spend a little time with as long as you are aware of what it will and won’t do.
Proxystrike
Let’s look at one last graphical proxy before we move on: ProxyStrike. This is a program developed to perform testing while you browse a website. This program doesn’t have the same features as the proxies we have looked at so far. There is no spidering. It relies on you to maneuver through the site to look at the pages you want tested. There is no active scanning. ProxyStrike focuses on testing for cross-site scripting (XSS) and SQL injection. You can configure ProxyStrike to test either of those or both. The layout of ProxyStrike is shown in Figure 8-12.
Figure 8-12. ProxyStrike UI
Much like the other proxy servers we have looked at, you can configure the port ProxyStrike listens on. By default, it listens on port 8008. You may notice that the ports we have seen proxy servers listen on are in the 8000 range. You may notice from the screen capture that you can view requests and responses, just as you were able to with the previous proxy servers. You can also intercept requests so you can make alterations to them. While this is limited in its scope, it is another tool that can be used against web applications.
Finding ProxyStrike
You can find ProxyStrike in the Kali menu under Web Application Analysis. You can also launch it from the command line using the command proxystrike.
This brings up a good point. Even when tools overlap functionality, they will generally perform their functions in different ways. It doesn’t hurt to run multiple, similar tests against any application since you may get different results. Testing tools are no more infallible than any other software. They may focus on different tactics and techniques. Verifying with other tools is generally a good idea.
Automated Web Attacks
Much of what we have looked at has been automated or at least capable of being told to run automated tests. Other tools are focused on web-based testing, though, which may be more specific and possibly less configurable. These tools are a mix of console-based and GUI-based. To be honest, a lot of console-based tools are available in Kali that do this automated testing that may be focused on a particular subsection of tasks rather than being a full-service web vulnerability test tool.
Recon
We’ve talked about the importance of getting a complete map of the application. You may find it useful to get the complete list of pages that would be available from a spider of the site. skipfish is a program that can perform reconnaissance of a website. There are a lot of parameters you can pass to the program to determine what gets scanned and how it gets scanned, but a simple run of the program is something like skipfish -A admin:password -o skipdir http://192.168.86.54, which is what was run to get the output shown in Example 8-5. The -A parameter tells skipfish how to log into the web application, and -o indicates what directory the output of the program should be stored in.
Example 8-5. Using skipfish for recon
skipfish version 2.10b by [email protected] - 192.168.86.54 - Scan statistics: Scantime: 0:02:11.013 HTTP requests :30502(232.8/s),121601kB in,9810kB out(1003.0 kB/s)Compression :0kB in,0kB out(0.0% gain)HTTP faults :0net errors,0proto errors,0retried,0drops TCP handshakes :618total(49.4 req/conn)TCP faults :0failures,0timeouts,5purged External links :164skipped Reqs pending : 0 Database statistics: Pivots :291total,283done(97.25%)In progress :0pending,0init,0attacks,8dict Missing nodes :4spotted Node types :1serv,14dir,252file,3pinfo,1unkn,20par,0vall Issues found :48info,0warn,0low,0medium,0high impact Dict size :148words(148new),6extensions,256candidates Signatures :77total[+]Copying static resources...[+]Sorting and annotating crawl nodes: 291[+]Lookingforduplicate entries: 291[+]Counting unique nodes: 91[+]Saving pivot dataforthird-party tools...[+]Writing scan description...[+]Writing crawl tree: 291[+]Generating summary views...[+]Report saved to'skipdir/index.html'[0x048d5a7e].[+]This was a great dayforscience!
You will notice that at the end of the output is a reference to an HTML page. The page was created by skipfish and is a way of looking at the results that the program found. More than just a list of pages, skipfish generates an interactive list of pages. You can see in Figure 8-13 what the output page looks like. You get a list of categories of content that the program found. When you click the category, you get the list of pages that fall under that category. For example, clicking XHTML+XML gets a list of 10 pages that you can see in Figure 8-13. You will see the only actual page that came back is the page login.php. If you want to see more details, you can click show trace to get the HTTP request, the HTTP response, and the HTML output for the page.

Figure 8-13. skipfish interactive page listing
In addition to providing a list of pages that are categorized by type and the complete transcript of the interaction, skipfish will provide you with a list of potential issues that were found. You can see this list in Figure 8-14. If you click an issue from the list, you will see a list of pages that were potentially vulnerable to that issue.
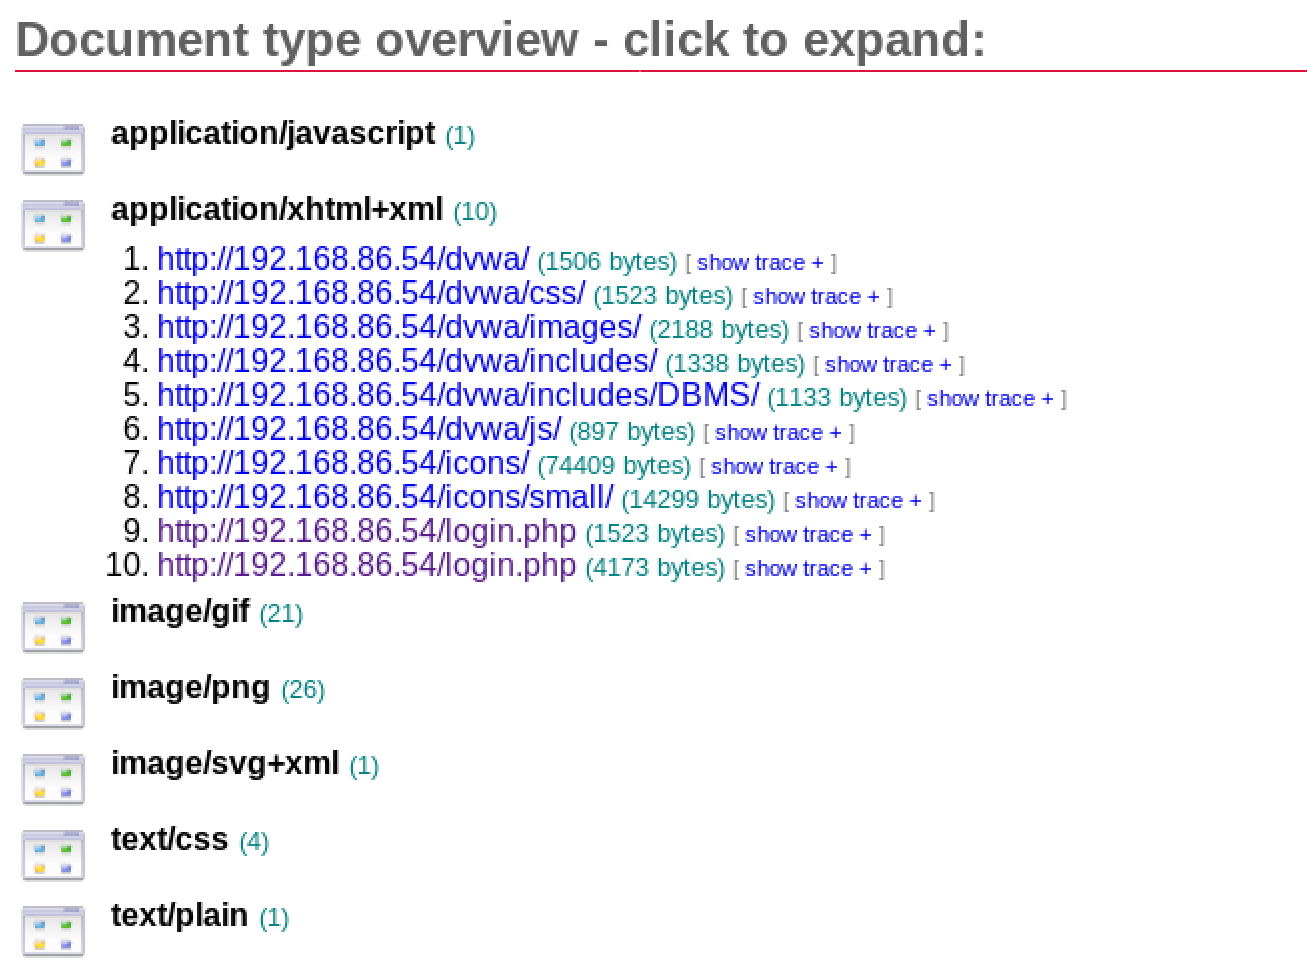
Figure 8-14. skipfish list of issues
skipfish was written by Michal Zalewski, the same developer who wrote p0f, which does passive reconnaissance. He also wrote a proxy-based web application testing program called Rat Proxy, which was formerly available in Kali Linux. Some of the same capabilities that were in Rat Proxy are available in skipfish. One interesting thing about this program is you will get some findings that you wouldn’t get using other tools. Whether you find them concerning is up to you and your assessment of the application, but it does provide another point of reference.
Vega
The program Vega does have some proxy capabilities, but it will also do a strictly automated scan of a website. When you launch a scan using Vega, it will allow you to select plug-ins. This is different from some of the other programs we’ve looked at. When you start an active scan with ZAP, for instance, you have just started a scan. You don’t select the plug-ins you want to use or how you want it to do the scan. Vega gives you a little more control over what you are doing against the site. This can speed up your scan because you can rule out plug-ins that search for vulnerabilities that you don’t believe are in the site, or you may want to target just a specific vulnerability. Figure 8-15 shows a partial list of plug-ins that you can select from when you start a scan.
Installing Vega
To get access to Vega, you need to install it with apt. Once you have installed it, you can find it in the Kali menu under Web Application Analysis. You can also launch it by running vega on the command line.

Figure 8-15. Vega plug-ins to select from
One of the things that’s interesting about Vega is that there are two contexts to work in. One of them is the Scanner, and the other is the Proxy. The UI changes slightly depending on the context you are in. Specifically, the toolbar changes, which changes what you can do. In the top right of Figure 8-16, you can see the two tabs to select the context you are working in. You will also see that a scan is running. When you set up the scan, you can select an identity to use as well as provide cookie details. This helps to do authenticated scans.

Figure 8-16. Vega scan details
The middle of the screen shows the scan running and a summary of the findings. In the lower left of the screen, you can see the details of the scan. You will see a breakdown of the different severities. Opening those up, you will see a list of the vulnerabilities discovered followed by the pages that are potentially vulnerable. Vega provides a description of the vulnerability, the impact, and how you can remediate the vulnerability. This is similar to other vulnerability scanners.
nikto
Time to go back to the console. The scanner nikto is one of the earliest web vulnerability scanners, though it has continued to be updated, which means it is still relevant in spite of having been around for a while. nikto can be updated with the latest plug-ins and database by running it with -update as the parameter. nikto uses a configuration file at /etc/nikto.conf that indicates where the plug-ins and databases are located. Additionally, you can configure proxy servers and which SSL libraries to use. The default settings work fine, and you can see a run of nikto using the default configuration in Example 8-6.
Example 8-6. Testing with nikto
overbeek:root~# nikto -id admin:password -host 192.168.86.54 - Nikto v2.1.6 --------------------------------------------------------------------------- + Target IP: 192.168.86.54 + Target Hostname: 192.168.86.54 + Target Port: 80 + Start Time: 2018-03-12 19:31:35(GMT-6)--------------------------------------------------------------------------- + Server: Apache/2.4.6(CentOS)PHP/5.4.16 + Retrieved x-powered-by header: PHP/5.4.16 + The anti-clickjacking X-Frame-Options header is not present. + The X-XSS-Protection header is not defined. This header can hint to the user agent to protect against some forms of XSS + The X-Content-Type-Options header is not set. This could allow the user agent to render the content of the site in a different fashion to the MIMEtype+ Cookie PHPSESSID created without the httponly flag + Root page / redirects to: login.php + Server leaks inodes via ETags, header found with file /robots.txt, fields: 0x1a 0x5650b5acd4180 + PHP/5.4.16 appears to be outdated(current is at least 5.6.9). PHP 5.5.25 and 5.4.41 are also current. + Apache/2.4.6 appears to be outdated(current is at least Apache/2.4.12). Apache 2.0.65(final release)and 2.2.29 are also current. + OSVDB-877: HTTP TRACE method is active, suggesting the host is vulnerable to XST + OSVDB-3268: /config/: Directory indexing found. + /config/: Configuration information may be available remotely. + OSVDB-12184: /?=PHPB8B5F2A0-3C92-11d3-A3A9-4C7B08C10000: PHP reveals potentially sensitive information via certain HTTP requests that contain specific QUERY strings. + OSVDB-12184: /?=PHPE9568F34-D428-11d2-A769-00AA001ACF42: PHP reveals potentially sensitive information via certain HTTP requests that contain specific QUERY strings. + OSVDB-12184: /?=PHPE9568F35-D428-11d2-A769-00AA001ACF42: PHP reveals potentially sensitive information via certain HTTP requests that contain specific QUERY strings.
To run against the implementation of DVWA, we had to specify the login information. This is done using the -id parameter and then providing the username and password. For DVWA, we’re using the default login settings of admin for the username and password for the password. The output provides references to the Open Source Vulnerability Database (OSVDB). If you need more details related to the vulnerabilities identified, you can look up the reference listed. A Google search will turn up pages that have details about the vulnerability. After the OSVDB number is the relative path to the page that is vulnerable so you can verify it manually.
dirbuster and gobuster
As you work with websites, you will discover that often the directories and pages in the site aren’t accessible by just spidering. Remember that spidering assumes that everything in the site is available by starting with a URL and traversing every link on every page discovered. This isn’t always the case. One way of discovering additional directories is to use a brute-force attack. This works by making requests to directories that are generally provided by a word list. Some of the tools we have looked at so far are capable of doing this sort of brute-force attack on web servers in order to identify directories that may not have turned up in a spider.
Note
When a web server receives a request for a directory path without any specific file (page), it returns the identified index page that exists in that directory. Index pages are identified by name in the web server configuration and are commonly something like index.html, index.htm, index.php, or something similar. If there is no index page in that directory, the web server should return an error. If directory listing is allowed by the server, the list of all the files in the directory will be presented. It is considered a security vulnerability to have a web server configured in this way because files that remote users shouldn’t be aware of, including files that may have authentication information in them, may be presented in this way.
The program dirbuster is a GUI-based program that will perform this sort of testing. It is written in Java, which should mean it is cross-platform. Figure 8-17 shows dirbuster running through testing against a word list that was provided against a website that was also provided. To make it easier, the dirbuster package provides a set of word lists to work from. You can, of course, provide your own word list or use another one that you may find somewhere. The word lists provided by dirbuster cover some common directories that may be found and may actually be hidden. These word lists are just text files so they should be easy to create, should you wish to use your own.
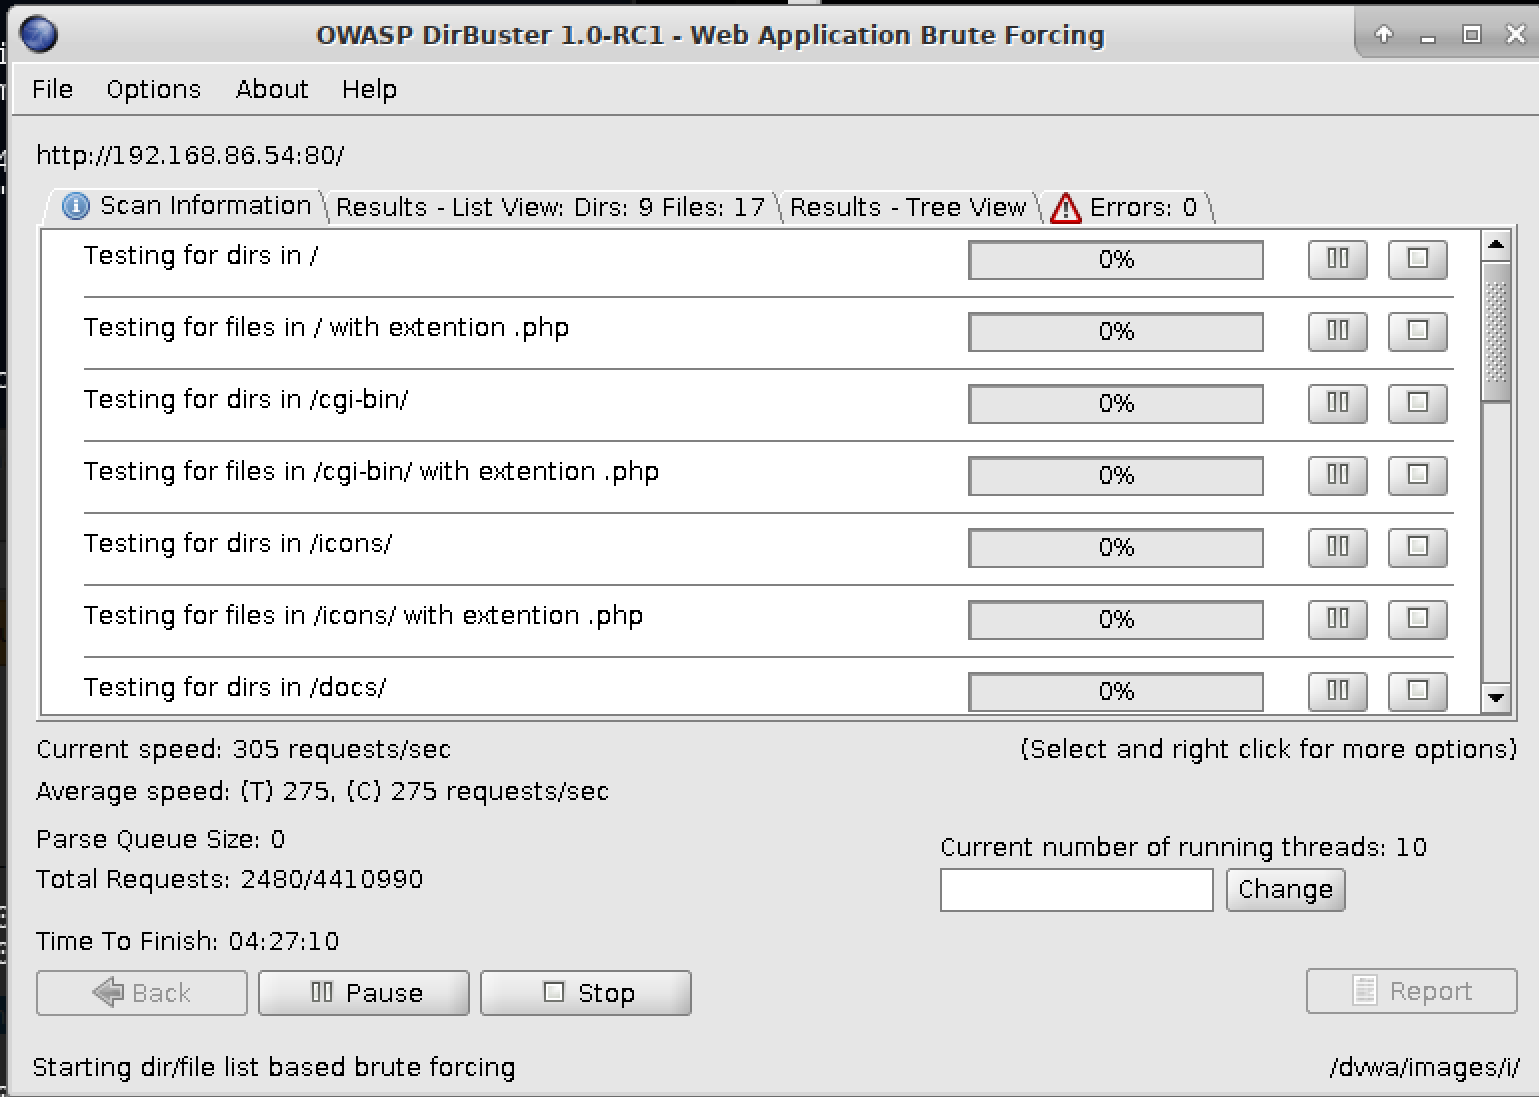
Figure 8-17. Dirbuster testing a website
Another program that performs a similar function is gobuster. One major difference between this and dirbuster is that gobuster is a console-based program. This is important if you have only SSH access to your Kali system. As I have some of my systems running on a VM server that I access remotely, it’s often easier for me to use SSH. It’s a bit faster and it’s easier to capture output using an SSH session. I can SSH to one of my Kali systems with gobuster. With dirbuster, I could access it remotely, but I would need an X server running on the system I am physically at and then I’d need to forward X back from Kali. It’s a bit easier to SSH sometimes, unless you can dedicate hardware to your Kali installation.
gobuster requires simple parameters in order to run. The output is also straightforward. You can see a run of gobuster in Example 8-7. A downside to gobuster is the package doesn’t come with its own word lists. Fortunately, other word lists are available. The dirbuster package includes word lists you can use. You might also use the word lists in /usr/share/wordlists/dirb, as they have been curated to include common possibilities for web-based directory names.
Example 8-7. Testing for directories with gobuster
overbeek:root~# gobuster -w /usr/share/wordlists/dirbuster/directory-list-1.0.txt -u http://192.168.86.54 Gobuster v1.2 OJ Reeves(@TheColonial)=====================================================[+]Mode : dir[+]Url/Domain : http://192.168.86.54/[+]Threads : 10[+]Wordlist : /usr/share/wordlists/dirbuster/directory-list-1.0.txt[+]Status codes : 200,204,301,302,307=====================================================/docs(Status: 301)/config(Status: 301)/external(Status: 301)/vulnerabilities(Status: 301)
One of the nice things about gobuster is that you get status codes indicating the response from the server. Of course, you get status codes back from dirbuster as well. One difference is that a run of dirbuster provides an extensive list, including what you’d get from a spider. It’s harder to pull apart what was determined from the word list and what was grabbed by running some sort of spider against the server.
Java-Based Application Servers
Java-based application servers are common. You may run across Tomcat or JBoss, and those are just the open source application servers available for Java. Many commercial ones exist as well. Tools can be used to test the open source Java application servers. One reason for this is that multiple vulnerabilities have been associated with these servers, including well-known default credentials. Any easy way to compromise a Java application server like Tomcat is sometimes just to give known default credentials. While these vulnerabilities have commonly been cleaned up quickly, it doesn’t change the fact that many legacy systems may not have cleaned up their act, so to speak.
JBoss is an application server supporting Java that is currently maintained by RedHat. JBoss, as with many complex pieces of software, requires expertise to install and configure well in a production environment. When it comes to testing, you may need to move beyond the application and take a look at the infrastructure that hosts the application. JBoss is not, itself, the web application. It hosts the application and executes it. The client connects to JBoss, which passes the messages in to the application to process.
The program JBoss-Autopwn was developed as a way to automatically test JBoss servers. There are two separate applications, depending on the target operating system. While JBoss is developed by RedHat, a company that’s in the Linux business with multiple Linux distributions, the application server runs on Linux and Windows. This is where reconnaissance comes in. To determine which program you run, you need to know the underlying operating system. Of course, it’s not the end of the world if you run it once, find nothing because it’s the wrong platform, and then run the other one. However, picking the wrong one, getting no results, and assuming you’re done is a bad move. It leads to a false sense of security on the part of the organization you are doing testing on.
To run either, the process is simple. The program does all the work. The only parameters the program requires are the hostname and the port number that you are testing.
Because of the prevalence of these application servers, it’s not surprising that there are other ways of testing the underlying infrastructure. No standalone programs are available for Kali. However, modules are available in Metasploit.
SQL-Based Attacks
SQL injection attacks are a serious problem, considering they target the database of the web application. Tools are provided in Kali to test for SQL injection vulnerabilities in the application. Considering the importance of the resource, this is not surprising. Additionally, there are easy libraries to use with the various database types you would likely run across. This makes writing programs to launch the attacks much easier. The tools run a range of being able to attack Microsoft’s SQL Server, MySQL, and Oracle’s database servers.
The first one we want to take a look at is sqlmap. This program is intended to automate the process of looking for SQL-based vulnerabilities in web pages. It supports testing against the databases you would expect to see in these sorts of installations—MySQL, Microsoft SQL Server, PostgreSQL, and Oracle. The first thing you need to do in order to run sqlmap is locate a page that would have data being sent to the database. I’m using a Wordpress installation I have locally for testing, only because Wordpress is simple to set up and there are easy pages to locate that will go to the database. For this, we’re going to use a search query. You can see an example of running sqlmap in Example 8-8. Because it’s the latest version of Wordpress and the developers have access to this tool as well, I wouldn’t expect sqlmap to be successful here, but you can at least see how it runs and a sample of the output as it runs through testing.
Example 8-8. sqlmap testing of local Wordpress site
overbeek:root~# sqlmap -u http://192.168.86.50/wordpress/?s=___ __H__ ___ ___[,]_____ ___ ___{1.2.3#stable}|_ -|.[)]|.'| . ||___|_ [)]_|_|_|__,| _||_|V |_| http://sqlmap.org[!] legal disclaimer: Usage of sqlmap for attacking targets withoutprior mutual consent is illegal. It is the end user's responsibility to obey all applicablelocal, state and federal laws. Developers assume no liability and are not responsibleforany misuse or damage caused by this program[*]starting at 17:57:39[17:57:39][WARNING]provided valueforparameter's'is empty. Please, always use only valid parameter values so sqlmap could be able to run properly[17:57:39][INFO]testing connection to the target URL[17:57:39][INFO]checkingifthe target is protected by some kind of WAF/IPS/IDS[17:57:40][INFO]testingifthe target URL content is stable[17:57:40][WARNING]target URL content is not stable. sqlmap will base the page comparison on a sequence matcher. If no dynamic nor injectable parameters are detected, or incaseof junk results, refer to user's manual paragraph'Page comparison'how do you want to proceed? [(C)ontinue/(s)tring/(r)egex/(q)uit] C[17:57:49] [INFO] testing if GET parameter 's' is dynamic[17:57:49] [WARNING] GET parameter 's' does not appear to be dynamic[17:57:50] [WARNING] heuristic (basic) test shows that GET parameter 's'might not be injectable[17:57:50] [INFO] testing for SQL injection on GET parameter 's'[17:57:50] [INFO] testing 'AND boolean-based blind - WHERE or HAVING clause'[17:57:50] [WARNING] reflective value(s) found and filtering out[17:57:56] [INFO] testing 'MySQL >=5.0 boolean-based blind - Parameter replace'[17:57:57] [INFO] testing 'MySQL >=5.0 AND error-based - WHERE, HAVING, ORDER BY or GROUP BY clause(FLOOR)'[17:57:59] [INFO] testing 'PostgreSQL AND error-based - WHERE or HAVING clause'[17:58:01] [INFO] testing 'Microsoft SQL Server/Sybase AND error-based - WHERE or HAVING clause(IN)'[17:58:03] [INFO] testing 'Oracle AND error-based - WHERE or HAVING clause(XMLType)'[17:58:06] [INFO] testing 'MySQL >=5.0 error-based - Parameter replace(FLOOR)'[17:58:06] [INFO] testing 'MySQL inline queries'[17:58:06] [INFO] testing 'PostgreSQL inline queries'[17:58:07] [INFO] testing 'Microsoft SQL Server/Sybase inline queries'[17:58:07] [INFO] testing 'PostgreSQL > 8.1 stacked queries(comment)'[17:58:08] [INFO] testing 'Microsoft SQL Server/Sybase stacked queries(comment)'[17:58:10] [INFO] testing 'Oracle stacked queries(DBMS_PIPE.RECEIVE_MESSAGE - comment)'
Note
Running some of these automated tools doesn’t require you to know SQL, though if you want to replicate the findings in order to validate them before handing them over to the people paying you, you should learn a little SQL.
Running sqlmap like this will take the safest route for what is tested. If you like, you can amp up the testing by adding --risk with a value of 2 or 3 (the default is 1, and 3 is the highest). This will add in the potential for unsafe tests that may have an impact on the database. You can also add in --level with a value between 1 and 5, though 1 is the default and is the least intrusive testing sqlmap will perform. sqlmap gives you the opportunity to use any vulnerability found to give you an out-of-band connection to run shell commands, upload files, download files, execute arbitrary code, or perform a privilege escalation.
There are a couple of ways to see what is happening with the testing so you can learn from the requests. The first is to perform a packet capture on the Kali Linux system. You can then open the packet capture in Wireshark and follow the conversation that’s happening, assuming you aren’t testing an encrypted server. The other way, assuming you have access to the server, is to watch the logs on the remote web server you are testing. Example 8-9 shows a few of the messages that were captured in the log. While you won’t catch parameters that are sent this way, you will get anything in the URL.
Example 8-9. Apache logs showing SQL injection testing
192.168.86.62 - -[16/Mar/2018:00:29:45 +0000]"GET /wordpress/?s=foo%22%20OR%20%28SELECT%202%2A%28IF%28%28SELECT%20%2A%20FROM%20%28SELECT%20CONCAT%280x71716b7671%2C%28SELECT%20%28ELT%289881%3D9881%2C1%29%29%29%2C0x717a767071%2C0x78%29%29s%29%2C%208446744073709551610%2C%208446744073709551610%29%29%29%20AND%20%22CApQ%22%20LIKE%20%22CApQ HTTP/1.1"20054525"http://192.168.86.50:80/wordpress/""sqlmap/1.2.3#stable(http://sqlmap.org)"192.168.86.62 - -[16/Mar/2018:00:29:46 +0000]"GET /wordpress/?s=foo%25%27%29%20OR%20%28SELECT%202%2A%28IF%28%28SELECT%20%2A%20FROM%20%28SELECT%20CONCAT%280x71716b7671%2C%28SELECT%20%28ELT%289881%3D9881%2C1%29%29%29%2C0x717a767071%2C0x78%29%29s%29%2C%208446744073709551610%2C%208446744073709551610%29%29%29%20AND%20%28%27%25%27%3D%27 HTTP/1.1"20054490"http://192.168.86.50:80/wordpress/""sqlmap/1.2.3#stable(http://sqlmap.org)"192.168.86.62 - -[16/Mar/2018:00:29:46 +0000]"GET /wordpress/?s=foo%25%27%29%29%20OR%20%28SELECT%202%2A%28IF%28%28SELECT%20%2A%20FROM%20%28SELECT%20CONCAT%280x71716b7671%2C%28SELECT%20%28ELT%289881%3D9881%2C1%29%29%29%2C0x717a767071%2C0x78%29%29s%29%2C%208446744073709551610%2C%208446744073709551610%29%29%29%20AND%20%28%28%27%25%27%3D%27 HTTP/1.1"20054504"http://192.168.86.50:80/wordpress/""sqlmap/1.2.3#stable(http://sqlmap.org)"
If you plan on doing extensive testing by increasing the depth, expect it to take a lot of time. The preceding testing ran well over half an hour and, not surprisingly, turned up nothing. One reason it took so long is that it was running through tests against all of the different database servers sqlninja knows about. If you want to reduce the time it takes to test, you can specify a backend, if you happen to know it. In this case, I did know the server that was being used. If you are doing black-box testing, you may not have turned up anything that lets you know what the database server is, so settle in for a bit while this runs.
Another tool that can be used for SQL-based testing is sqlninja. This tool requires a configuration file in order to run. Configuring this program to run is not for the faint of heart, however. To test with sqlninja, you need to capture the request. You can do this with a proxy server like Burp Suite or ZAP. Once you have the request, you need to configure the sqlninja.conf file to include the HTTP request parameter. You would do something like what you see in Example 8-10.
Example 8-10. Configuration file for sqlninja
–httprequest_start– GET /wordpress/?s=SQL2INJECT HTTP/1.1 Host: 192.168.86.50 User-Agent: Mozilla/5.0(X11;Linux x86_64;rv:49.0)Gecko/20100101 Firefox/49.0 Accept: text/html,application/xhtml+xml,application/xml Accept-Language: en-US,en;q=0.5 Accept-Encoding: gzip, deflate -httprequest_end-
Once you have the configuration file in place, you can start up sqlninja by specifying the mode. Example 8-11 shows the modes that are available to run. This comes from the help output.
Example 8-11. Testing modes available
-m <mode> : Required. Available modes are: t/test -testwhether the injection is working f/fingerprint - fingerprint user, xp_cmdshell and more b/bruteforce - bruteforce sa account e/escalation - add user to sysadmin server role x/resurrectxp - try to recreate xp_cmdshell u/upload - upload a .scr file s/dirshell - start a direct shell k/backscan - lookforan open outbound port r/revshell - start a reverse shell d/dnstunnel - attempt a dns tunneled shell i/icmpshell - start a reverse ICMP shell c/sqlcmd - issue a'blind'OScommandm/metasploit - wrapper to Metasploit stagers
We have a couple of things to note about sqlninja. First, its design is more flexible than some other testing tools. Second, the samples you will find for the configuration file are likely outdated. There are some git repositories that have configuration files with all the parameters documented. They are for an older version of the software that used a different configuration file. The newer configuration file is not well documented. When you are doing security testing, though, you shouldn’t expect everything to be point-and-shoot. Doing a good job takes work and time to get experience.
Assorted Tasks
Kali also includes tools for web testing that fill some niche cases. As an example, WebDAV is an extension of HTTP to allow for authoring and publishing remotely. As mentioned earlier, HTTP was a simple protocol when it was developed, so there has been a need to create supporting protocols and application interfaces. The program davtest will determine whether a target server can be exploited to upload files. WebDAV servers that allow for open uploading of files may be vulnerable to attack. Commonly, you will find that WebDAV is on Windows systems running Internet Information Systems (IIS), though extensions for WebDAV are available for other web servers. If you find a web server on a Windows system, you may try out davtest, which just requires a URL to run.
Apache servers can be configured to allow everyone to have their own section of the website. Users would place their content into a special directory in their home, perhaps called public_html. Anything in that directory can be viewed remotely through the web server. When any user on the system can publish their own content without any oversight, there is a possibility of information leaking. As a result, it may be useful to determine whether there are any user directories. You can use apache-users to test for user directories. This program requires a word list, since this is essentially a brute-force attack where all of the users provided in the word list are checked. An example of a run of apache-users may look like apache-users -h 192.168.86.50 -l /usr/share/wordlists/metasploit/unix_users.txt -p 80 -s 0 -e 403 -t 10.
The command line may be reasonably straightforward, but let’s walk through it. First, we provide a host, which is an IP address in this case. We also have to provide a word list for the program to read. For this run, we are using a list of common Unix usernames that come with the Metasploit package. We also tell apache-users which port it needs to connect to. This would commonly be port 80, unless you are using TLS/SSL, in which case it would typically be port 443. The -s 0 parameter tells apache-users not to use TLS/SSL. Finally, the error code to look for is 403, and the program should start up 10 threads, which will help it run faster.
It’s common for web servers to be spidered by search engines so they can index the pages that the server provides. This makes content on the server searchable, which may allow consumers to get to the site. In some cases, however, the site owner may not want sections of the site to be searchable because they would rather have users not visit them. The way to fix that is to include a robots.txt file that includes Disallow: settings to tell the spiders not to search or index those sections of the website. This assumes that the search spider is well-behaved, since it is by convention rather than anything else that would keep the content from being indexed. The program parsero will grab the robots.txt file to determine the status of what is referenced in that file. You can see a run of parsero in Example 8-12.
Example 8-12. Running parsero
parsero -u 192.168.86.50 ____|___ _ _ __ ___ ___ _ __ ___||_)/ _`|'__/ __|/ _ '__/ _|__/(_|||\____/||(_)||_|\__,_|_||___/\___|_|\___/ Starting Parsero v0.75(https://github.com/behindthefirewalls/Parsero)at 03/15/18 21:10:15 Parsero scan reportfor192.168.86.50 http://192.168.86.50/components/200OK http://192.168.86.50/modules/200OK http://192.168.86.50/cache/200OK http://192.168.86.50/bin/200OK http://192.168.86.50/language/200OK http://192.168.86.50/layouts/200OK http://192.168.86.50/plugins/200OK http://192.168.86.50/administrator/500Internal Server Error http://192.168.86.50/installation/404Not Found http://192.168.86.50/libraries/200OK http://192.168.86.50/logs/404Not Found http://192.168.86.50/includes/200OK http://192.168.86.50/tmp/200OK http://192.168.86.50/cli/200OK[+]14links have been analyzed and11of them are available!!! Finished in 0.2005910873413086 seconds
The advantage to running parsero is that a business may not want these locations indexed because they may have sensitive or fragile components. If you grab the robots.txt file, you can get a list of specific places in the site that you may want to look more closely at. You can grab the robots.txt file yourself and read it, but parsero will also do testing on each of the URLs, which can let you know where you should do more testing. As you can see, some of the entries received a 404. This means those listings don’t exist on the server. As a result, you can save yourself some time by not bothering with them.
Summary
Kali Linux includes several tools available for web application testing. This is good, considering the number of services that are now consumed through web applications. We have taken a good swipe at the tools and how you can use them as you are working on testing. However, we didn’t cover everything available. You can find other tools in the Kali menu, but only those that have been installed by default. You may want to keep an eye on the tools page on Kali’s website.
Some important ideas to take away from this chapter are as follows:
-
A common web application architecture may include a load balancer, web server, application server, and database server.
-
The types of web application attacks you may commonly see are cross-site scripting, cross-site request forgery, SQL injection, and XML entity injection.
-
Proxy-based tools like Burp Suite and Zed Attack Proxy can be used for web application testing and scanning.
-
Specific tools like skipfish, nikto, and Vega can be used to automate testing without using proxy-based testers.
-
sqlmap is a good tool to test for SQL injection testing.
-
Tools like davtest and parsero can be used for gathering information and testing.
Useful Resources
-
OWASP, “OWASP Top Ten Project”
-
Kali Tools, “Kali Linux Tools Listing”
-
Microsoft, “Common Web Application Architectures”