
As you learned in the previous chapter, manipulating a huge chunk of data is more easily done by running a periodic job rather than user data entry. So the data that is being inserted or updated must come from somewhere, right? Let's say you have a semicolon-separated file, or maybe even an XML file, that contains data that you would like to read into AX. Or perhaps you need to generate such a file from AX so that it can be read by another system?
In this chapter, you will learn how to:
- Read/write data from/to a character-separated file
- Read/write data from/to a binary file
- Read/write data from/to an XML file
- Read/write data from/to a database using ODBC
- Use DictTable and DictField to create generic code for data manipulation
- Create a simple module to export and import data to/from AX
, What is the need to create import/export routines in code when I can use the standard data import and export functionality in AX, you might ask. Well, you will notice after a while that the standard data import/export functionality in AX is fairly limited. It treats each table as its own entity while you might have the need to include data from several tables.
This chapter focuses on how to generate the different file formats and not on the transport of the data. We will only generate files that are stored on the disk. When integrating data between two systems, you will have to take the data transport into account as well. If the system that integrates with AX exists in the same domain, storing the files in a shared folder might be sufficient. If the system exists in a different domain, perhaps at a customer or vendor site, you will have to establish a transport link between these two systems. This can be done using FTP, web services, and message queuing, to mention a few.
While setting up such a transport, you should also consider creating a subsystem that logs data that is being communicated over the transport in order to pick up data that causes errors or unwanted situations.
One way of doing this can be to use the EventWriter that is shown in Chapter 10, Working with .NET and AX.
The Application Integration Framework (AIF) can be used as a middle layer between AX and the transport links mentioned earlier. The AIF is most commonly used in business-to-business (B2B) integration scenarios where there is a need to exchange electronic business documents.
The AIF is not covered in detail in this book, but you can read more about it in the SDK here at http://msdn.microsoft.com/en-us/library/bb496535(lightweight).aspx.
The most common way of integrating data is by reading/writing some sort of text files where the records are separated with a new line and the fields are separated by a certain character. This is typically achieved using the TextIo or CommaIo class.
As you can see in the following figure, these classes belong to a class hierarchy where the Io class is the main class.
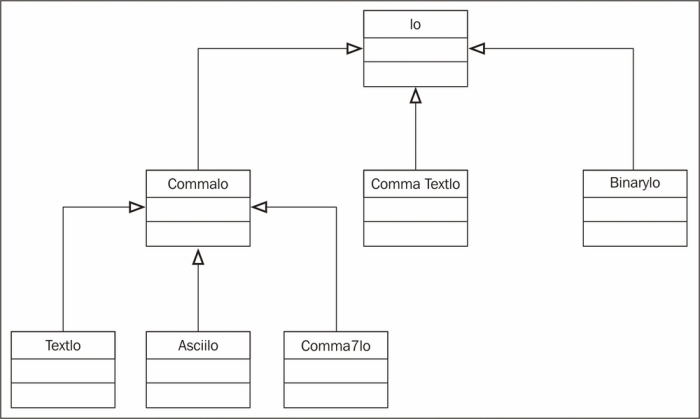
The data in AX are stored using Unicode fields in the SQL database. When these data are exported from AX, you need to make sure that the files generated will also be in Unicode. To achieve this, always use the TextIo or CommaTextIo class.
The AsciiIo and CommaIo classes should only be used if there is an absolute demand for files using the ASCII encoding.
The difference between the TextIo and the CommaTextIo is that by using the CommaTextIo class, the files will by default set the field delimiter to comma and the record delimiter to carriage return plus the line feed. It will also wrap all of the string fields between the quotation marks (" and "); the numbers will not be wrapped.
Let's look at how we can write data from AX to a text file in a very easy way using a job.
First, we will put all the code in the method into a try/catch statement to make sure we can pick up any errors that are thrown.
We also need to set a filename for the file. We will use this filename when creating a new Io object, but before we do so, we have to ask the system for permission to write the file to the file path specified. This is achieved by using the FileIoPermission class that extends the CodeAccessPermission class. The second parameter in new() specifies whether we want to read, write, or append a file. When using the TextIo class as shown in the example, we also have the option of setting a third parameter in new() that specifies the code page that we would like to use in the file. This is necessary when writing language-specific characters. You can find a list of these code pages at http://msdn.microsoft.com/en-us/goglobal/bb964653.aspx.
The following table shows how to use the three different options. The macros used are taken from the #File macro library.
If the specified filepath doesn't exist, or if we do not have permission to write to this folder, a new object will not be created. We should therefore check to see if a new object of the TextIo was created and throw an exception if the variable is null.
In order to write fields from a table to a file, we use a container and put all the field data into the container first. Then we simply write the container to the file. It is important to remember to empty the container each time it is looped through the records by using the connull() method.
The last thing we do is revert the code access permission by calling the static method revertAssert() which is defined in the CodeAccessPermission class.
Here is an example:
static server void WriteTextFile(Args _args)
{
  TextIo              file;
  // Using the @ before the filename
  // enables us to use single path
  // delimiters. If you don't use it
  // you will have to write the path like this:
  // "c:\temp\cars.txt"
  FileName            filename = @"c:	empcars.txt";
  CarTable            carTable;
  container           con;
  FileIoPermission    permission;
  #File
  try
  {
    // Create the permission class
    permission = new FileIoPermission(filename, #io_write);
    // Add a request for permission before new TextIo()
    permission.assert();
    // Create the TextIo object
    file = new TextIo(filename, #io_write);
    if (!file)
    throw Exception::Error;
    // Specify the delimiters
    file.outRecordDelimiter(#delimiterCRLF);
    file.outFieldDelimiter(";");
    // Loop through the data source
    while select carTable
    {
      // Empty the container
      con = connull();
      // Set the data into the container
      con = conins(con, 1, carTable.CarId);
      con = conins(con, 2, carTable.CarBrand);
      con = conins(con, 3, carTable.Mileage);
      con = conins(con, 4, carTable.Model);
      con = conins(con, 5, carTable.ModelYear);
      // Write the container to the file
      file.writeExp(con);
    }
  }
  catch(Exception::Error)
  {
    error("You do not have access to write the file to the selected folder");
  }
  // Revert the access privileges
  CodeAccessPermission::revertAssert();
}
This is how the exported file looks:
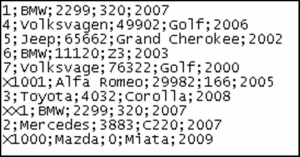
You can now play around by changing the class used from TextIo to CommaIo or TextIo to CommaTextIo and see the difference in the result, as stated earlier in this chapter.
In the preceding example, we used a container to out the data into before writing the content of the container to the file. You can also write the data directly to the file by using the write() method instead of the writeExp() method. The while loop would then look as follows:
    while select carTable
    {
      // Write the data to the file
      file.write(carTable.CarId,
      carTable.CarBrand,
      carTable.Mileage,
      carTable.Model,
      carTable.ModelYear);
    }
Reading from a file is very similar to writing to the file, but you now have to change the direction of the data by changing the filemode to #io_read instead of #io_write. The methods that set the delimiters also have to change from outDelimiters to inDelimiters.
The while loop will now loop through the file content instead of the AX table. In my example, we simply print the information from the file to the Infolog. You can, however, play around and find out how to insert and update the data in the carTable.
static void ReadTextFile(Args _args)
{
  TextIo              file;
  FileName            filename = @"c:	empcars.txt";
  CarTable            carTable;
  container           con;
  FileIoPermission    permission;
  #File
  try
  {
    // Create the permission class
    permission = new FileIoPermission(filename, #io_read);
    // Ask for permission to write the file
    permission.assert();
    // Create the TextIo object
    file = new TextIo(filename, #io_read);
    if (!file)
    throw Exception::Error;
    // Note that we now use inDelimiters
    // instead of outDelimiters as in the
    // previous example
    file.inRecordDelimiter(#delimiterCRLF);
    file.inFieldDelimiter(";");
    // Write the header info
    info("CarId - CarBrand - Mileage - Model - ModelYear");
    // Read the first record from the file
    con = file.read();
    // Loop as long as the file status is ok
    while (file.status() == IO_Status::Ok)
    {
      // Write the content to the infolog
      info(strfmt("%1 - %2 - %3 - %4 - %5",
      conpeek(con,1),
      conpeek(con,2),
      conpeek(con,3),
      conpeek(con,4),
      conpeek(con,5)));
      // Read the next record from the file
      con = file.read();
    }
  }
  catch(Exception::Error)
  {
    error("You do not have access to write the file to theselected folder");
  }
  // Revert the access privileges
  CodeAccessPermission::revertAssert();
}